ECO mode DODGE GRAND CARAVAN 2015 5.G Owner's Manual
[x] Cancel search | Manufacturer: DODGE, Model Year: 2015, Model line: GRAND CARAVAN, Model: DODGE GRAND CARAVAN 2015 5.GPages: 164, PDF Size: 22.27 MB
Page 84 of 164
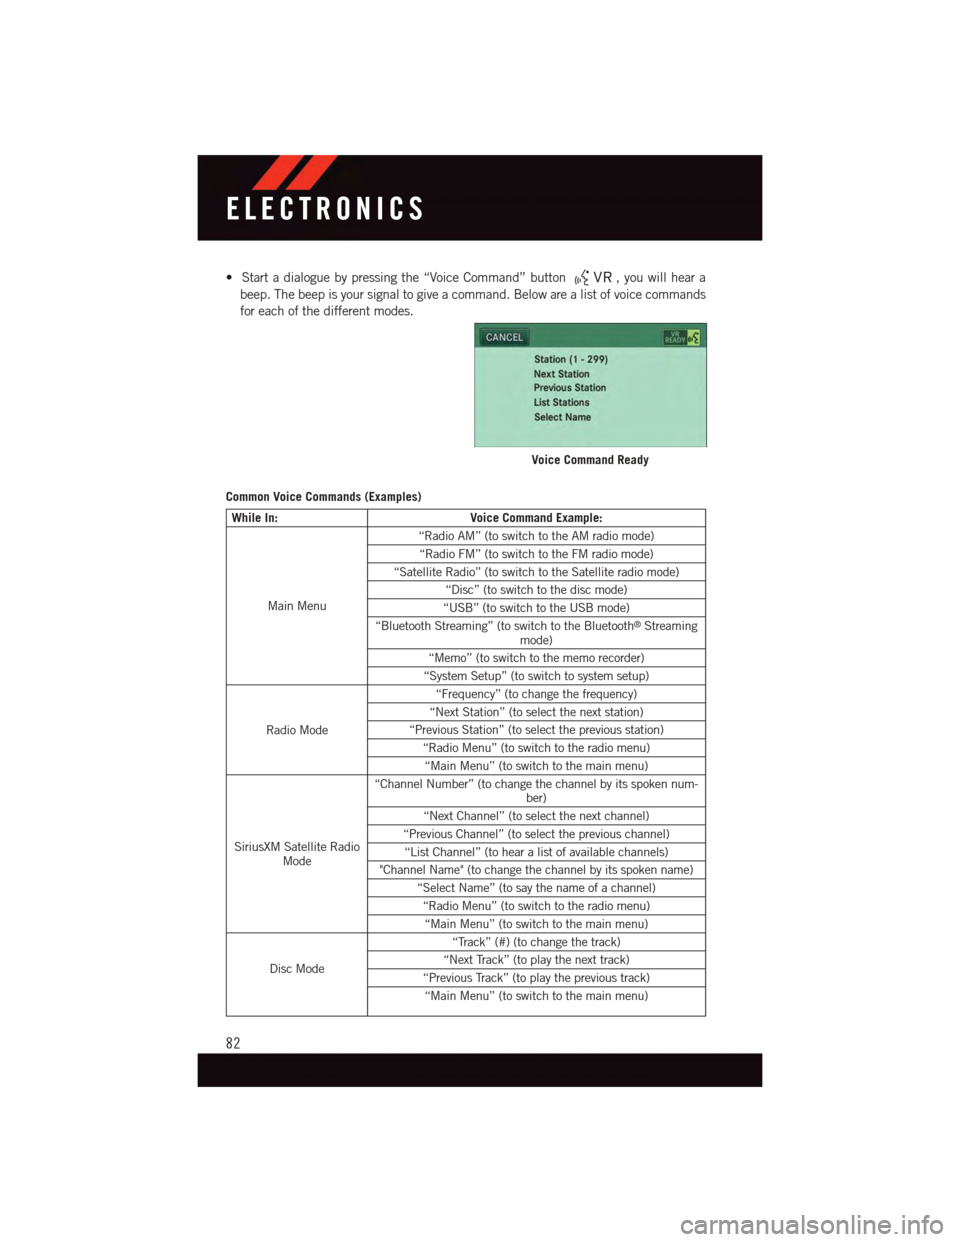
•Startadialoguebypressingthe“VoiceCommand”button,youwillheara
beep. The beep is your signal to give a command. Below are a list of voice commands
for each of the different modes.
Common Voice Commands (Examples)
While In:Voice Command Example:
Main Menu
“Radio AM” (to switch to the AM radio mode)
“Radio FM” (to switch to the FM radio mode)
“Satellite Radio” (to switch to the Satellite radio mode)
“Disc” (to switch to the disc mode)
“USB” (to switch to the USB mode)
“Bluetooth Streaming” (to switch to the Bluetooth®Streamingmode)
“Memo” (to switch to the memo recorder)
“System Setup” (to switch to system setup)
Radio Mode
“Frequency” (to change the frequency)
“Next Station” (to select the next station)
“Previous Station” (to select the previous station)
“Radio Menu” (to switch to the radio menu)
“Main Menu” (to switch to the main menu)
SiriusXM Satellite RadioMode
“Channel Number” (to change the channel by its spoken num-ber)
“Next Channel” (to select the next channel)
“Previous Channel” (to select the previous channel)
“List Channel” (to hear a list of available channels)
"Channel Name" (to change the channel by its spoken name)
“Select Name” (to say the name of a channel)
“Radio Menu” (to switch to the radio menu)
“Main Menu” (to switch to the main menu)
Disc Mode
“Track” (#) (to change the track)
“Next Track” (to play the next track)
“Previous Track” (to play the previous track)
“Main Menu” (to switch to the main menu)
Voice Command Ready
ELECTRONICS
82
Page 85 of 164
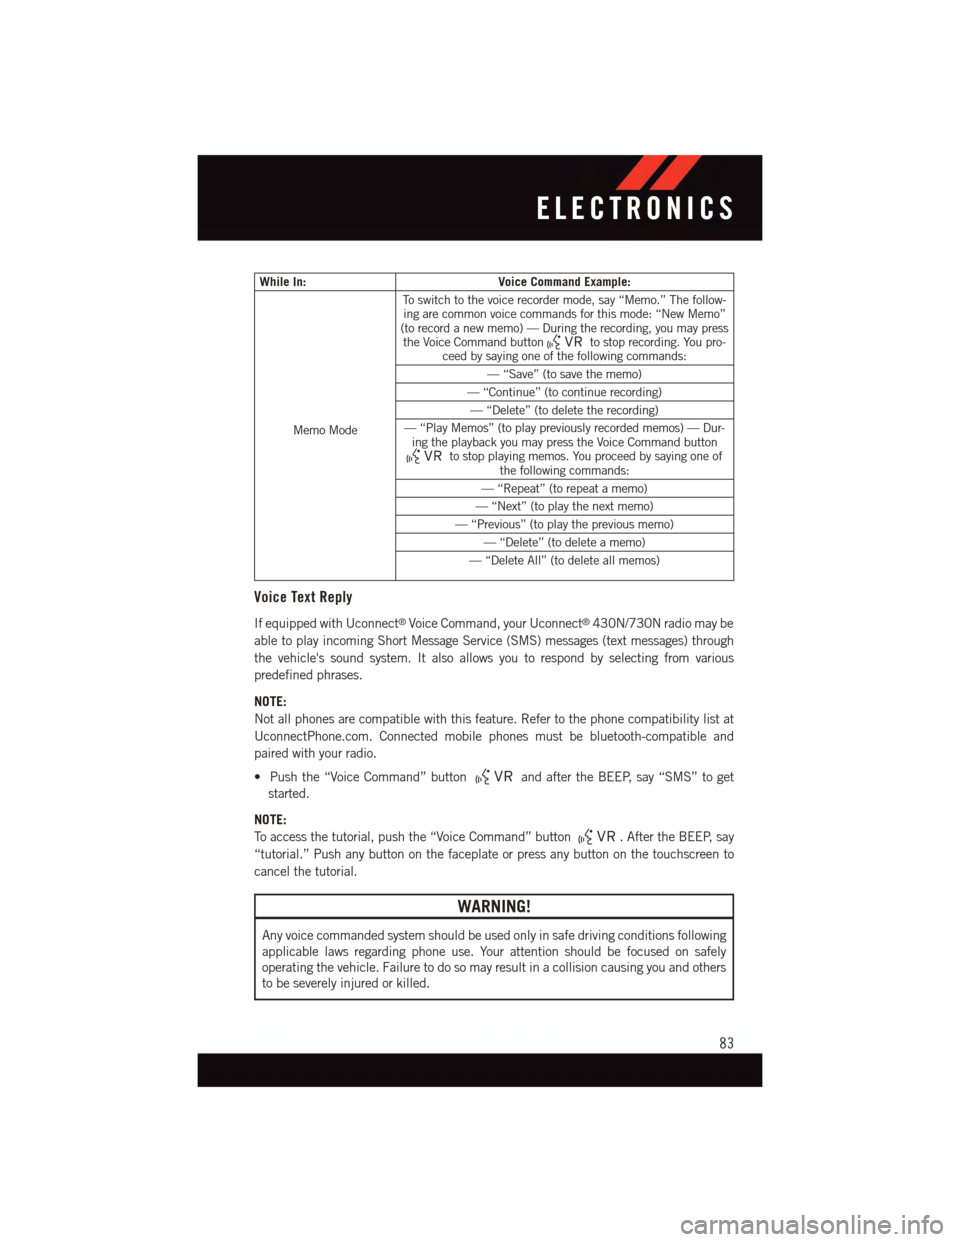
While In:Voice Command Example:
Memo Mode
To s w i t c h t o t h e v o i c e r e c o r d e r m o d e , s a y “ M e m o . ” T h e f o l l o w -ing are common voice commands for this mode: “New Memo”(to record a new memo) — During the recording, you may pressthe Voice Command buttonto stop recording. You pro-ceed by saying one of the following commands:
—“Save”(tosavethememo)
—“Continue”(tocontinuerecording)
—“Delete”(todeletetherecording)
—“PlayMemos”(toplaypreviouslyrecordedmemos)—Dur-ing the playback you may press the Voice Command buttonto stop playing memos. You proceed by saying one ofthe following commands:
—“Repeat”(torepeatamemo)
—“Next”(toplaythenextmemo)
—“Previous”(toplaythepreviousmemo)
—“Delete”(todeleteamemo)
—“DeleteAll”(todeleteallmemos)
Voice Text Reply
If equipped with Uconnect®Voice Command, your Uconnect®430N/730N radio may be
able to play incoming Short Message Service (SMS) messages (text messages) through
the vehicle's sound system. It also allows you to respond by selecting from various
predefined phrases.
NOTE:
Not all phones are compatible with this feature. Refer to the phone compatibility list at
UconnectPhone.com. Connected mobile phones must be bluetooth-compatible and
paired with your radio.
•Pushthe“VoiceCommand”buttonand after the BEEP, say “SMS” to get
started.
NOTE:
To a c c e s s t h e t u t o r i a l , p u s h t h e “ V o i c e C o m m a n d ” b u t t o n.AftertheBEEP,say
“tutorial.” Push any button on the faceplate or press any button on the touchscreen to
cancel the tutorial.
WARNING!
Any voice commanded system should be used only in safe driving conditions following
applicable laws regarding phone use. Your attention should be focused on safely
operating the vehicle. Failure to do so may result in a collision causing you and others
to be severely injured or killed.
ELECTRONICS
83
Page 87 of 164
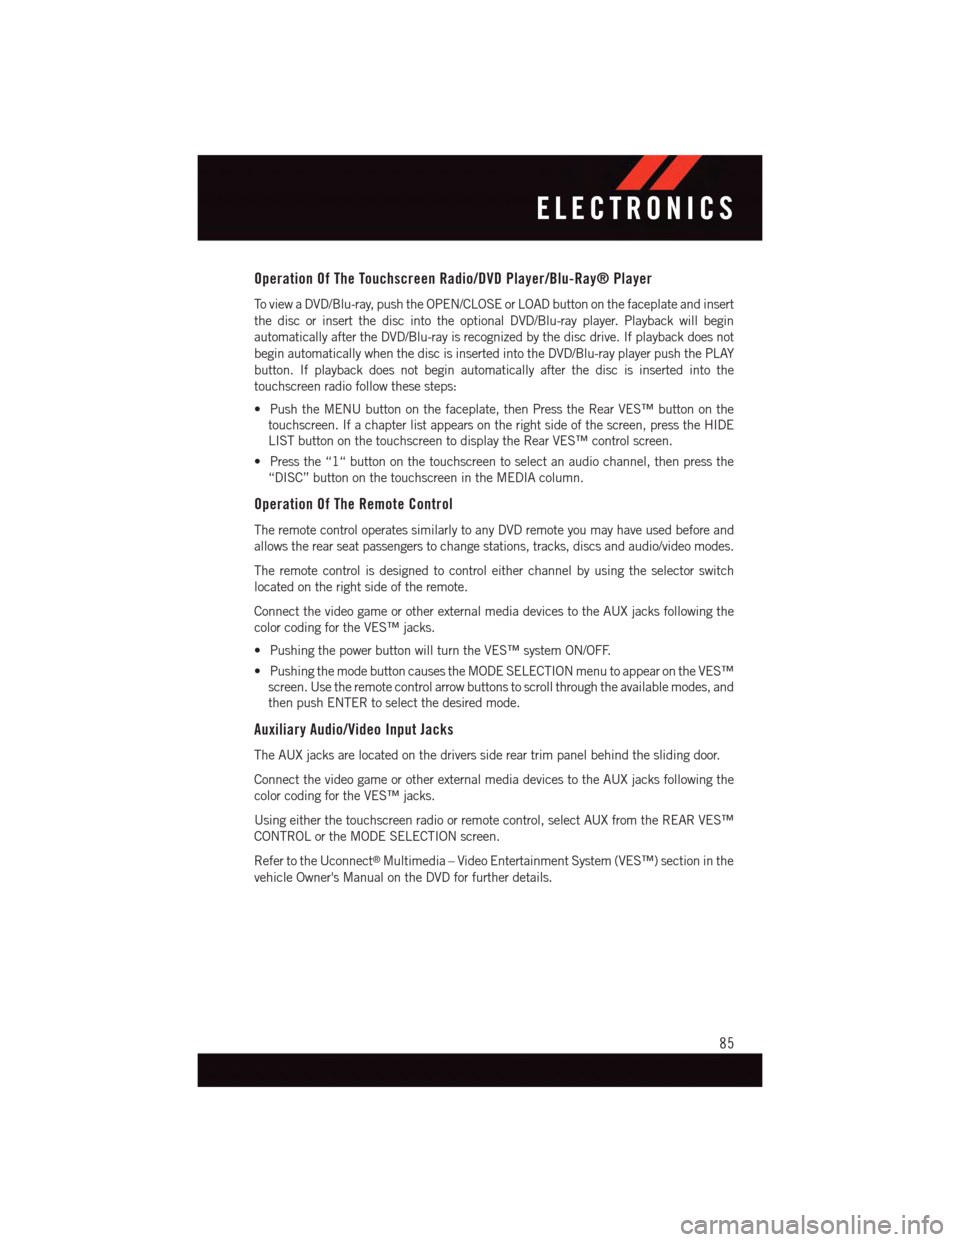
Operation Of The Touchscreen Radio/DVD Player/Blu-Ray® Player
To v i e w a D V D / B l u - r a y, p u s h t h e O P E N / C L O S E o r L O A D b u t t o n o n t h e f a c e p l a t e a n d i n s e r t
the disc or insert the disc into the optional DVD/Blu-ray player. Playback will begin
automatically after the DVD/Blu-ray is recognized by the disc drive. If playback does not
begin automatically when the disc is inserted into the DVD/Blu-ray player push the PLAY
button. If playback does not begin automatically after the disc is inserted into the
touchscreen radio follow these steps:
•PushtheMENUbuttononthefaceplate,thenPresstheRearVES™buttononthe
touchscreen. If a chapter list appears on the right side of the screen, press the HIDE
LIST button on the touchscreen to display the Rear VES™ control screen.
•Pressthe“1“buttononthetouchscreentoselectanaudiochannel,thenpressthe
“DISC” button on the touchscreen in the MEDIA column.
Operation Of The Remote Control
The remote control operates similarly to any DVD remote you may have used before and
allows the rear seat passengers to change stations, tracks, discs and audio/video modes.
The remote control is designed to control either channel by using the selector switch
located on the right side of the remote.
Connect the video game or other external media devices to the AUX jacks following the
color coding for the VES™ jacks.
•PushingthepowerbuttonwillturntheVES™systemON/OFF.
•PushingthemodebuttoncausestheMODESELECTIONmenutoappearontheVES™
screen. Use the remote control arrow buttons to scroll through the available modes, and
then push ENTER to select the desired mode.
Auxiliary Audio/Video Input Jacks
The AUX jacks are located on the drivers side rear trim panel behind the sliding door.
Connect the video game or other external media devices to the AUX jacks following the
color coding for the VES™ jacks.
Using either the touchscreen radio or remote control, select AUX from the REAR VES™
CONTROL or the MODE SELECTION screen.
Refer to the Uconnect®Multimedia – Video Entertainment System (VES™) section in the
vehicle Owner's Manual on the DVD for further details.
ELECTRONICS
85
Page 105 of 164
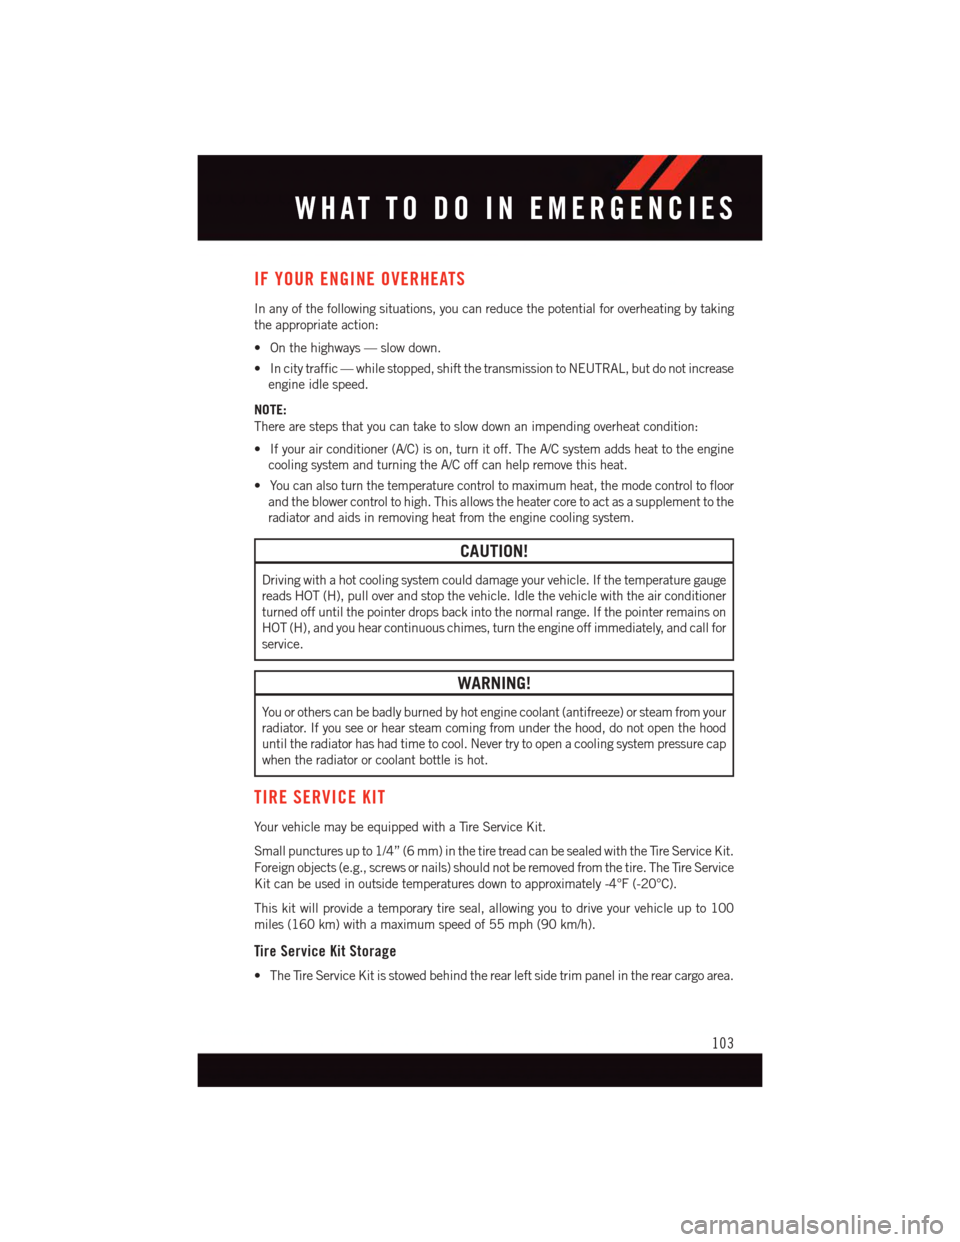
IF YOUR ENGINE OVERHEATS
In any of the following situations, you can reduce the potential for overheating by taking
the appropriate action:
•Onthehighways—slowdown.
•Incitytraffic—whilestopped,shiftthetransmissiontoNEUTRAL,butdonotincrease
engine idle speed.
NOTE:
There are steps that you can take to slow down an impending overheat condition:
•Ifyourairconditioner(A/C)ison,turnitoff.TheA/Csystemaddsheattotheengine
cooling system and turning the A/C off can help remove this heat.
•Youcanalsoturnthetemperaturecontroltomaximumheat,themodecontroltofloor
and the blower control to high. This allows the heater core to act as a supplement to the
radiator and aids in removing heat from the engine cooling system.
CAUTION!
Driving with a hot cooling system could damage your vehicle. If the temperature gauge
reads HOT (H), pull over and stop the vehicle. Idle the vehicle with the air conditioner
turned off until the pointer drops back into the normal range. If the pointer remains on
HOT (H), and you hear continuous chimes, turn the engine off immediately, and call for
service.
WARNING!
Yo u o r o t h e r s c a n b e b a d l y b u r n e d b y h o t e n g i n e c o o l a n t ( a n t i f r e e z e ) o r s t e a m f r o m y o u r
radiator. If you see or hear steam coming from under the hood, do not open the hood
until the radiator has had time to cool. Never try to open a cooling system pressure cap
when the radiator or coolant bottle is hot.
TIRE SERVICE KIT
Yo u r v e h i c l e m a y b e e q u i p p e d w i t h a Ti r e S e r v i c e K i t .
Small punctures up to 1/4” (6 mm) in the tire tread can be sealed with the Tire Service Kit.
Foreign objects (e.g., screws or nails) should not be removed from the tire. The Tire Service
Kit can be used in outside temperatures down to approximately -4°F (-20°C).
This kit will provide a temporary tire seal, allowing you to drive your vehicle up to 100
miles (160 km) with a maximum speed of 55 mph (90 km/h).
Tire Service Kit Storage
•TheTireServiceKitisstowedbehindtherearleftsidetrimpanelintherearcargoarea.
WHAT TO DO IN EMERGENCIES
103
Page 106 of 164
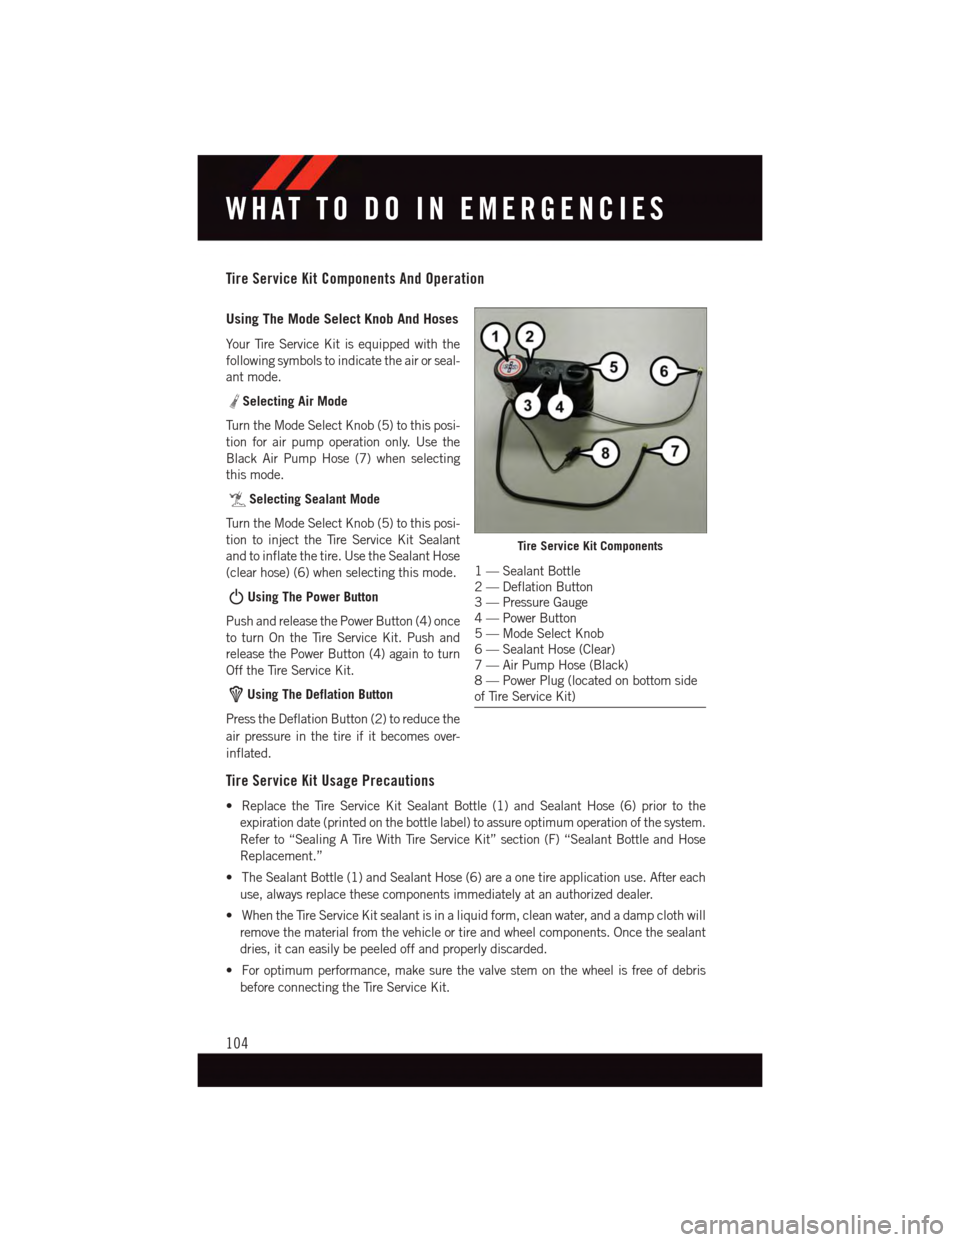
Tire Service Kit Components And Operation
Using The Mode Select Knob And Hoses
Yo u r Ti r e S e r v i c e K i t i s e q u i p p e d w i t h t h e
following symbols to indicate the air or seal-
ant mode.
Selecting Air Mode
Tu r n t h e M o d e S e l e c t K n o b ( 5 ) t o t h i s p o s i -
tion for air pump operation only. Use the
Black Air Pump Hose (7) when selecting
this mode.
Selecting Sealant Mode
Tu r n t h e M o d e S e l e c t K n o b ( 5 ) t o t h i s p o s i -
tion to inject the Tire Service Kit Sealant
and to inflate the tire. Use the Sealant Hose
(clear hose) (6) when selecting this mode.
Using The Power Button
Push and release the Power Button (4) once
to turn On the Tire Service Kit. Push and
release the Power Button (4) again to turn
Off the Tire Service Kit.
Using The Deflation Button
Press the Deflation Button (2) to reduce the
air pressure in the tire if it becomes over-
inflated.
Tire Service Kit Usage Precautions
•ReplacetheTireServiceKitSealantBottle(1)andSealantHose(6)priortothe
expiration date (printed on the bottle label) to assure optimum operation of the system.
Refer to “Sealing A Tire With Tire Service Kit” section (F) “Sealant Bottle and Hose
Replacement.”
•TheSealantBottle(1)andSealantHose(6)areaonetireapplicationuse.Aftereach
use, always replace these components immediately at an authorized dealer.
•WhentheTireServiceKitsealantisinaliquidform,cleanwater,andadampclothwill
remove the material from the vehicle or tire and wheel components. Once the sealant
dries, it can easily be peeled off and properly discarded.
•Foroptimumperformance,makesurethevalvestemonthewheelisfreeofdebris
before connecting the Tire Service Kit.
Tire Service Kit Components
1—SealantBottle2—DeflationButton3—PressureGauge4—PowerButton5—ModeSelectKnob6—SealantHose(Clear)7—AirPumpHose(Black)8—PowerPlug(locatedonbottomsideof Tire Service Kit)
WHAT TO DO IN EMERGENCIES
104
Page 108 of 164
If the sealant (white fluid) does not flow within0–10seconds through the Sealant Hose (6):
1. Press the Power Button (4) to turn Off the Tire Service Kit. Disconnect the Sealant
Hose (6) from the valve stem. Make sure the valve stem is free of debris. Reconnect the
Sealant Hose (6) to the valve stem. Check that the Mode Select Knob (5) is in the
Sealant Mode position and not Air Mode. Press the Power Button (4) to turn On the Tire
Service Kit.
2. Connect the Power Plug (8) to a different 12 Volt power outlet in your vehicle or
another vehicle, if available. Make sure the engine is running before turning ON the
Ti r e S e r v i c e K i t .
3. The Sealant Bottle (1) may be empty due to previous use. Call for assistance.
NOTE:
If the Mode Select Knob (5) is on Air Mode and the pump is operating, air will dispense
from the Air Pump Hose (7) only, not the Sealant Hose (6).
If the sealant (white fluid) does flow through the Sealant Hose (6):
1. Continue to operate the pump until sealant is no longer flowing through the hose
(typically takes 30 - 70 seconds). As the sealant flows through the Sealant Hose (6),
the Pressure Gauge (3) can read as high as 70 psi (4.8 Bar). The Pressure Gauge (3)
will decrease quickly from approximately 70 psi (4.8 Bar) to the actual tire pressure
when the Sealant Bottle (1) is empty.
2. The pump will start to inject air into the tire immediately after the Sealant Bottle (1)
is empty. Continue to operate the pump and inflate the tire to the pressure indicated
on the tire pressure label on the driver-side latch pillar (recommended pressure).
Check the tire pressure by looking at the Pressure Gauge (3).
If the tire does not inflate to at least 26 psi (1.8 Bar) pressure within 15 minutes:
The tire is too badly damaged. Do not attempt to drive the vehicle further. Call for
assistance.
NOTE:
If the tire becomes over-inflated, press the Deflation Button to reduce the tire pressure to
the recommended inflation pressure before continuing.
If the tire inflates to the recommended pressure or is at least 26 psi (1.8 Bar) pressure
within 15 minutes:
1. Press the Power Button (4) to turn off the Tire Service Kit.
2. Remove the Speed Limit sticker from the top of the Sealant Bottle (1) and place the
sticker on the instrument panel.
3. Immediately disconnect the Sealant Hose (6) from the valve stem, reinstall the cap on
the fitting at the end of the hose, and place the Tire Service Kit in the vehicle storage
location. Quickly proceed to (D) “Drive Vehicle.”
WHAT TO DO IN EMERGENCIES
106
Page 109 of 164
(D) Drive Vehicle:
Immediately after injecting sealant and inflating the tire, drive the vehicle 5 miles (8 km)
or 10 minutes to ensure distribution of the Tire Service Kit Sealant within the tire. Do not
exceed 55 mph (88 km/h).
(E) After Driving:
Pull over to a safe location. Refer to “Whenever You Stop to Use Tire Service Kit” before
continuing.
1. Turn the Mode Select Knob (5) to the Air Mode position.
2. Uncoil the Air Pump Hose (7) (black in color) and screw the fitting at the end of hose
(7) onto the valve stem.
3. Uncoil the power plug and insert the plug into the vehicles 12 Volt power outlet.
4. Check the pressure in the tire by reading the Pressure Gauge (3).
If tire pressure is less than 19 psi (1.3 Bar), the tire is too badly damaged. Do not attempt
to drive the vehicle further. Call for assistance.
If the tire pressure is 19 psi (1.3 Bar) or higher:
1. Press the Power Button (4) to turn on Tire Service Kit and inflate the tire to the pressure
indicated on the tire and loading information label on the driver-side door opening.
2. Disconnect the Tire Service Kit from the valve stem, reinstall the cap on the valve stem
and unplug from 12 Volt outlet.
3. Place the Tire Service Kit in its proper storage area in the vehicle.
4. Have the tire inspected and repaired or replaced at the earliest opportunity at an
authorized dealer or tire service center.
5. Remove the Speed Limit sticker from the instrument panel after the tire has been
repaired.
6. Replace the Sealant Bottle (1) and Sealant Hose (6) assembly at your authorized
dealer as soon as possible. Refer to “(F) Sealant Bottle and Hose Replacement.”
NOTE:
•Ifthetirebecomesover-inflated,presstheDeflationButtontoreducethetirepressure
to the recommended inflation pressure before continuing.
•Whenhavingthetireserviced,advisetheauthorizeddealerorservicecenterthatthe
tire has been sealed using the Tire Service Kit.
WHAT TO DO IN EMERGENCIES
107
Page 127 of 164
FREEING A STUCK VEHICLE
If your vehicle becomes stuck in mud, sand or snow, it can often be moved using a rocking
motion. Turn your steering wheel right and left to clear the area around the front wheels.
Then shift back and forth between DRIVE and REVERSE while gently pressing the
accelerator. Use the least amount of accelerator pedal pressure that will maintain the
rocking motion, without spinning the wheels or racing the engine.
NOTE:
Press the "ESC Off" switch, to place the Electronic Stability Control (ESC) system in
"Partial Off" mode before rocking the vehicle. Once the vehicle has been freed, press the
"ESC Off" switch again to restore "ESC On" mode.
CAUTION!
•When“rocking”astuckvehiclebyshiftingbetweenREVERSEandDRIVE,donot
spin the wheels faster than 15 mph (24 km/h), or drivetrain damage may result.
•Revvingtheengineorspinningthewheelstoofastmayleadtotransmission
overheating and failure. It can also damage the tires. Do not spin the wheels above
30 mph (48 km/h) while in gear (no transmission shifting occurring).
WARNING!
Fast spinning tires can be dangerous. Forces generated by excessive wheel speeds may
cause tire damage or failure. A tire could explode and injure someone. Do not spin your
vehicle's wheels faster than 30 mph (48 km/h) when you are stuck. Do not let anyone
near a spinning wheel, no matter what the speed.
WHAT TO DO IN EMERGENCIES
125
Page 134 of 164
MAINTENANCE PROCEDURES
For information on the maintenance procedures for your vehicle, please refer to “Main-
tenance Procedures” in “Maintaining Your Vehicle” in your Owner’s Manual or applicable
supplement on the DVD for further details.
MAINTENANCE SCHEDULE
Yo u r v e h i c l e i s e q u i p p e d w i t h a n a u t o m a t i c o i l c h a n g e i n d i c a t o r s y s t e m . T h e o i l c h a n g e
indicator system will remind you that it is time to take your vehicle in for scheduled
maintenance.
Based on engine operation conditions, the oil change indicator message will illuminate.
This means that service is required for your vehicle. Operating conditions such as frequent
short-trips, trailer tow, extremely hot or cold ambient temperatures, and E85 fuel usage
will influence when the “Oil Change Required” message is displayed. Severe Operating
Conditions can cause the change oil message to illuminate as early as 3,500 miles
(5,600 km) since last reset. Have your vehicle serviced as soon as possible, within the
next 500 miles (805 km).
Yo u r a u t h o r i z e d d e a l e r w i l l r e s e t t h e o i l c h a n g e i n d i c a t o r m e s s a g e a f t e r c o m p l e t i n g t h e
scheduled oil change. If a scheduled oil change is performed by someone other than your
authorized dealer, the message can be reset by referring to the steps described under
“Instrument Cluster Warning Lights” in “What To Do In Emergencies” in this guide or
“Electronic Vehicle Information Center (EVIC)” in “Understanding Your Instrument
Panel” in your Owners Manual on the DVD for further information.
NOTE:
Under no circumstances should oil change intervals exceed 10,000 miles (16,000 km)
or twelve months, whichever comes first.
Severe Duty All Models
Change Engine Oil at 4000 miles (6,500 km) if the vehicle is operated in a dusty and off
road environment. This type of vehicle use is considered Severe Duty.
Once A Month Or Before A Long Trip:
•Checkengineoillevel.
•Checkwindshieldwasherfluidlevel.
•Checktirepressureandlookforunusualwearordamage.Rotatetiresatthefirstsign
of irregular wear, even if it occurs before the oil indicator system turns on.
•Checkthefluidlevelsofthecoolantreservoir,brakemastercylinder,andpower
steering and fill as needed.
•Checkfunctionofallinteriorandexteriorlights.
MAINTAINING YOUR VEHICLE
132
Page 149 of 164
CHRYSLER GROUP LLC CUSTOMER CENTER
P. O . B o x 2 1 – 8 0 0 4 A u b u r n H i l l s , M I 4 8 3 2 1 – 8 0 0 4 P h o n e : 1 – 8 0 0 – 4 2 3 – 6 3 4 3
CHRYSLER CANADA INC. CUSTOMER CENTER
P. O . B o x 1 6 2 1 W i n d s o r , O n t a r i o N 9 A 4 H 6 P h o n e : 1 – 8 0 0 – 4 6 5 – 2 0 0 1 ( E n g l i s h ) P h o n e :
1–800–387–9983 (French)
PUBLICATIONS ORDERING
•If you are the first registered retail owner of your vehicle, you may obtain a complimentary
printed copy of the Owner's Manual, Navigation/Uconnect®Manuals or Warranty Booklet.
United States customers may visit the Dodge Contact Us page atwww.dodge.com scroll
to the bottom of the page and select the “Contact Us” link, then select the “Owner’s
Manual and Glove Box Material” from the left menu. You may also obtain a compli-
mentary copy by calling 1–800–423–6343 (U.S.) or 1–800–387–1143 (Canada).
•ReplacementUserGuidekitsorDVDsor,ifyouprefer,additionalprintedcopiesofthe
Owner's Manual, Warranty Booklet or Radio Manuals may be purchased by visiting
www.techauthority.com or by calling 1–800–890–4038 (U.S.) or 1–800–387–1143
(Canada). Visa, Master Card, American Express and Discover orders are accepted. If
you prefer mailing your order, please call the above numbers for an order form.
NOTE:
•Astreetaddressisrequiredwhenorderingmanuals(noP.O.Boxes).
•TheOwner'sManualandUserGuideelectronicfilesarealsoavailableontheChrysler,
Jeep, Ram Truck, Dodge and SRT websites.
•Clickonthe“ForOwners”tab,select“Owner/ServiceManuals”,thenselectyour
desired model year and vehicle from the drop down lists.
ASSISTANCE FOR THE HEARING IMPAIRED
To a s s i s t c u s t o m e r s w h o h a v e h e a r i n g d i f f i c u l t i e s , t h e m a n u f a c t u r e r h a s i n s t a l l e d s p e c i a l
TDD (Telecommunication Devices for the Deaf) equipment at its customer center. Any
hearing or speech impaired customer, who has access to a TDD or a conventional
teletypewriter (TTY) in the United States, can communicate with the manufacturer by
dialing 1–800–380–CHRY. Canadian residents with hearing difficulties that require
assistance can use the special needs relay service offered by Bell Canada. For TTY
teletypewriter users, dial 711 and for Voice callers, dial 1–800–855–0511 to connect
with a Bell Relay Service operator.
CONSUMER ASSISTANCE
147