park assist DODGE GRAND CARAVAN 2017 5.G User Guide
[x] Cancel search | Manufacturer: DODGE, Model Year: 2017, Model line: GRAND CARAVAN, Model: DODGE GRAND CARAVAN 2017 5.GPages: 530, PDF Size: 5.01 MB
Page 272 of 530
next to the feature showing the system has been acti-
vated or the check-mark is removed showing the system
has been deactivated. Refer to “Rear Park Assist Sys-
tem” in “Understanding The Features Of Your Vehicle”
for system function and operating information.
Auto Lock Doors
When selected, all doors will lock automatically when the
vehicle reaches a speed of 15 mph (24 km/h). To make your
selection, push and release theRIGHT
arrow button
until a check-mark appears.
Auto Unlock Doors
When this feature is selected, all doors will unlock when
the vehicle is stopped and the transmission is in the PARK
or NEUTRAL position and the driver’s door is opened. To
make your selection, push and release the RIGHT
ar-
row button until a check-mark appears next to the
feature showing the system has been activated, or the
check-mark is removed showing the system has been
deactivated.
Remote Unlock Sequence
When Unlock Driver Door Only On 1st Press is selected,
only the driver ’s door will unlock on the first push of the
key fob UNLOCK button. When Unlock Driver Door OnlyOn 1st Press, you must push the key fob UNLOCK button
twice to unlock the passenger ’s doors. When
Unlock All
Doors On 1st Press is selected, all of the doors will unlock
on the first push of the key fob UNLOCK button. To make
your selection, push and release the RIGHT
arrow
button until a check-mark appears next to the feature
showing the system has been activated or the check-
mark is removed showing the system has been deacti-
vated.
Linked To Memory- If Equipped
When this feature is selected, the memory seat, mirror, and
radio settings will return to the memory set position when
the key fob UNLOCK button is pushed. If this feature is not
selected, then the memory seat, mirror, and radio settings
can only return to the memory set position using the door
mounted switch. To make your selection, push and release
the RIGHT
arrow button until a check-mark appears
next to the feature showing the system has been acti-
vated or the check-mark is removed showing the system
has been deactivated.
Remote Start Comfort Sys.
When this feature is selected and the remote start is
activated, the heated steering wheel and driver heated seat
features will automatically turn on in cold weather. These
270 UNDERSTANDING YOUR INSTRUMENT PANEL
Page 358 of 530

POWER STEERING
The standard power steering system will give you good
vehicle response and increased ease of maneuverability in
tight spaces. The system will provide mechanical steering
capability if power assist is lost.
If for some reason the power assist is interrupted, it will
still be possible to steer your vehicle. Under these condi-
tions, you will observe a substantial increase in steering
effort, especially at very low vehicle speeds and during
parking maneuvers.
NOTE:
•Increased noise levels at the end of the steering wheel
travel are considered normal and do not indicate that
there is a problem with the power steering system.
• Upon initial start-up in cold weather, the power steering
pump may make noise for a short amount of time. This
is due to the cold, thick fluid in the steering system. This
noise should be considered normal, and it does not in
any way damage the steering system.
CAUTION!
Prolonged operation of the steering system at the end
of the steering wheel travel will increase the steering
fluid temperature and it should be avoided when
possible. Damage to the power steering pump may
occur.
Power Steering Fluid Check
Checking the power steering fluid level at a defined service
interval is not required. The fluid should only be checked
if a leak is suspected, abnormal noises are apparent,
and/or the system is not functioning as anticipated. Coor-
dinate inspection efforts through an authorized dealer.
CAUTION!
Do not use chemical flushes in your power steering
system as the chemicals can damage your power steer-
ing components. Such damage is not covered by the
New Vehicle Limited Warranty.
356 STARTING AND OPERATING
Page 364 of 530

WARNING!(Continued)
exploited in a reckless or dangerous manner, which
could jeopardize the user’s safety or the safety of
others.
Hill Start Assist (HSA)
The HSA system is designed to mitigate roll back from a
complete stop while on an incline. If the driver releases the
brake while stopped on an incline, HSA will continue to
hold the brake pressure for a short period. If the driver
does not apply the throttle before this time expires, the
system will release brake pressure and the vehicle will roll
down the hill as normal.
The following conditions must be met in order for HSA to
activate:
•The feature must be enabled.
• The vehicle must be stopped.
• Park brake must be off.
• Driver door must be closed.
• The vehicle must be on a sufficient grade. •
The gear selection must match vehicle uphill direction
(i.e., vehicle facing uphill is in forward gear; vehicle
backing uphill is in REVERSE gear).
• HSA will work in REVERSE gear and all forward gears.
The system will not activate if the transmission is in
PARK or NEUTRAL. For vehicles equipped with a
manual transmission, if the clutch is pressed, HSA will
remain active.
WARNING!
There may be situations where the Hill Start Assist
(HSA) will not activate and slight rolling may occur,
such as on minor hills or with a loaded vehicle, or
while pulling a trailer. HSA is not a substitute for
active driving involvement. It is always the driver ’s
responsibility to be attentive to distance to other ve-
hicles, people, and objects, and most importantly brake
operation to ensure safe operation of the vehicle under
all road conditions. Your complete attention is always
required while driving to maintain safe control of your
vehicle. Failure to follow these warnings can result in
a collision or serious personal injury.
362 STARTING AND OPERATING
Page 365 of 530

Towing With HSA
HSA will also provide assistance to mitigate roll back while
towing a trailer.
WARNING!
•If you use a trailer brake controller with your trailer,
the trailer brakes may be activated and deactivated
with the brake switch. If so, there may not be enough
brake pressure to hold both the vehicle and the
trailer on a hill when the brake pedal is released. In
order to avoid rolling down an incline while resum-
ing acceleration, manually activate the trailer brake
or apply more vehicle brake pressure prior to releas-
ing the brake pedal.
• HSA is not a parking brake. Always apply the
parking brake fully when leaving your vehicle. Also,
be certain to leave the transmission in PARK.
• Failure to follow these warnings may cause the
vehicle to roll down the incline and could collide
with another vehicle, object or person, and cause
serious or fatal injury. Always remember to use the
parking brake while parking on a hill and that the
driver is responsible for braking the vehicle.
Disabling And Enabling HSA
This feature can be turned on or turned off. To change the
current setting, proceed as follows:
• For vehicles equipped with the instrument cluster dis-
play, refer to “Instrument Cluster Display” in “Under-
standing Your Instrument Panel” for further informa-
tion.
• If disabling HSA using Uconnect Settings, refer to
“Uconnect Settings” in “Understanding Your Instrument
Panel” for further information.
For vehicles not equipped with the instrument cluster
display, perform the following steps:
1. Center the steering wheel (front wheels pointing straight forward).
2. Shift the transmission into PARK.
3. Apply the parking brake.
4. Start the engine.
5. Rotate the steering wheel slightly more than one-half turn to the left.
5
STARTING AND OPERATING 363
Page 430 of 530
5. Uncoil the Power Plug (8) and insert the plug into thevehicle’s 12 Volt power outlet.
NOTE: Do not remove foreign objects (e.g., screws or nails)
from the tire.
(C) Injecting Tire Service Kit Sealant Into The
Deflated Tire:
• Always start the engine before turning ON the Tire
Service Kit.
NOTE: Manual transmission vehicles must have the park-
ing brake engaged and the gear selector in NEUTRAL.
• After pushing the Power Button (4), the sealant (white
fluid) will flow from the Sealant Bottle (1) through the
Sealant Hose (6) and into the tire.
NOTE: Sealant may leak out through the puncture in the
tire.
If the sealant (white fluid) does not flow within0–10
seconds through the Sealant Hose (6):
1. Push the Power Button (4) to turn Off the Tire Service Kit. Disconnect the Sealant Hose (6) from the valve stem.
Make sure the valve stem is free of debris. Reconnect the
Sealant Hose (6) to the valve stem. Check that the Mode Select Knob (5) is in the Sealant Mode position and not
Air Mode. Push the Power Button (4) to turn On the Tire
Service Kit.
2. Connect the Power Plug (8) to a different 12 Volt power outlet in your vehicle or another vehicle, if available.
Make sure the engine is running before turning ON the
Tire Service Kit.
3. The Sealant Bottle (1) may be empty due to previous use. Call for assistance.
NOTE: If the Mode Select Knob (5) is on Air Mode and the
pump is operating, air will dispense from the Air Pump
Hose (7) only, not the Sealant Hose (6).
If the sealant (white fluid) does flow through the Sealant
Hose (6):
1. Continue to operate the pump until sealant is no longer flowing through hose (typically takes 30 - 70 seconds).
As the sealant flows through the Sealant Hose (6), the
Pressure Gauge (3) can read as high as 70 psi (4.8 Bar).
The Pressure Gauge (3) will decrease quickly from
approximately 70 psi (4.8 Bar) to the actual tire pressure
when the Sealant Bottle (1) is empty.
428 WHAT TO DO IN EMERGENCIES
Page 491 of 530
Cavity Cartridge FuseMini-FuseDescription
M23 –10 Amp Red Horn
M24 –25 Amp Clear Rear Wiper
M25 –20 Amp Yellow Fuel Pump
M26 –10 Amp Red Power Mirror Switch, Driver Window Switch
M27 –10 Amp Red Wireless Control Module, Keyless Entry Module
M28 –10 Amp Red Powertrain, Transmission Control Module
M29 –10 Amp Red Occupant Classification Module
M30 –15 Amp Blue Diagnostic Feed
M31 –20 Amp Yellow Back-Up Lamps
M32 –10 Amp Red Airbag Module, THATCHUM – If Equipped
M33 –10 Amp Red Powertrain
M34 –10 Amp Red Park Assist, Heater Climate Control Module,
Headlamp Wash, Compass, Rear Camera, DoorLamps, Flashlight, Relay Diesel Cabin Heater
M35 –10 Amp Red Heated Mirrors
M36 –20 Amp Yellow Power Outlet #3 (Instrument Panel or with Con-
sole Center)
7
MAINTAINING YOUR VEHICLE 489
Page 515 of 530
Fluid And Filter Changes...................479
Fluid Change .......................... .479
Fluid Level Check ........................479
Fluid Type ..........................478, 498
Gear Ranges ............................348
Special Additives ........................ .478
Torque Converter ........................353
Auto Up Power Windows .....................31
Battery ...............................244, 468
Charging System Light ....................244
Jump Starting .......................... .448
Keyless Key Fob Replacement ................21
Saving Feature (Protection) ..................177
Belts, Seat .................................93
Body Mechanism Lubrication ..................470
B-Pillar Location .......................... .374
Brake Assist System ........................ .361
Brake Control System, Electronic ................359
Brake Fluid ...............................498
Brake System ..........................359, 476
Anti-Lock (ABS) ........................ .359
Fluid Check ............................477
Parking ...............................357
Warning Light .......................... .243Brake/Transmission Interlock
..................346
Bulb Replacement ..........................492
Bulbs, Light ............................95, 491
Calibration, Compass ........................267
Camera, Rear ............................ .192
Capacities, Fluid .......................... .495
Caps, Filler Fuel ................................. .404
Power Steering ..........................356
Radiator (Coolant Pressure) .................475
Carbon Monoxide Warning .................93, 402
Cargo Compartment Luggage Carrier ........................ .225
Car go
(Vehicle Loading) ..................... .219
Car Washes ...............................480
Center High Mounted Stop Light ...............494
Certification Label ..........................406
Chains, Tire ............................. .388
Changing A Flat Tire ........................433
Chart, Tire Sizing .......................... .370
Check Engine Light (Malfunction Indicator Light). . . .461
Checking Your Vehicle For Safety ................92
Checks, Safety .............................92
Child Restraint .............................71
10
INDEX 513
Page 521 of 530
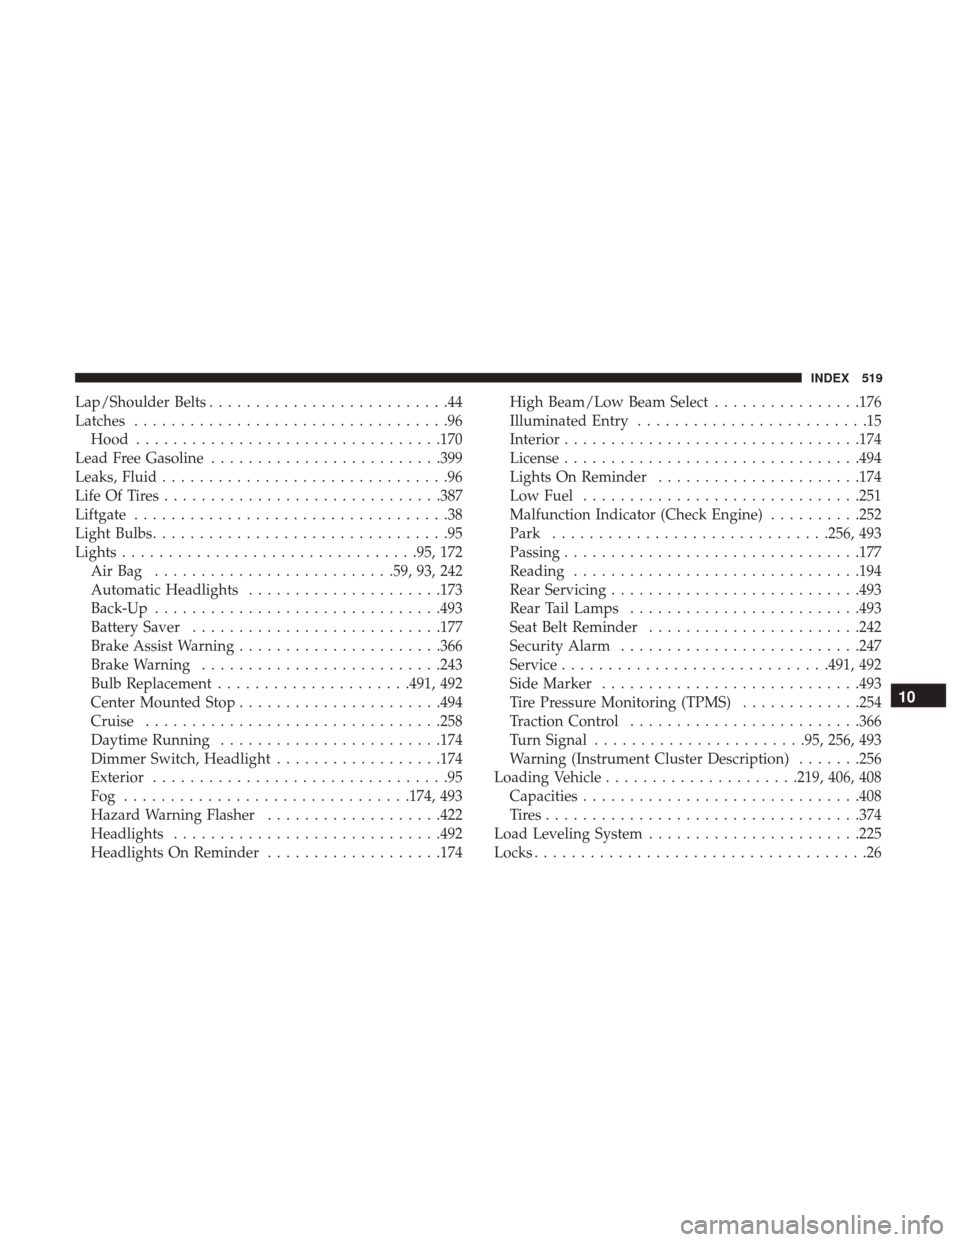
Lap/Shoulder Belts..........................44
Latches ..................................96
Hood .................................170
Lead Free Gasoline ........................ .399
Leaks, Fluid ...............................96
Life Of Tires ............................. .387
Liftgate ..................................38
Light Bulbs ................................95
Lights ............................... .95, 172
AirBag ......................... .59, 93, 242
Automatic Headlights .....................173
Back-Up ...............................493
Battery Saver .......................... .177
Brake Assist Warning ..................... .366
Brake Warning ..........................243
Bulb Replacement .....................491, 492
Center Mounted Stop ..................... .494
Cruise ............................... .258
Daytime Running ........................174
Dimmer Switch, Headlight ..................174
Exterior ................................95
Fog ...............................174, 493
Hazard Warning Flasher ...................422
Headlights ............................ .492
Headlights On Reminder ...................174 High Beam/Low Beam Select
................176
Illuminated Entry .........................15
Interior ............................... .174
License ............................... .494
Lights On Reminder ..................... .174
Low Fuel ............................. .251
Malfunction Indicator (Check Engine) ..........252
Park ............................. .256, 493
Passing ............................... .177
Reading ...............................194
Rear Servicing .......................... .493
Rear Tail Lamps ........................ .493
Seat Belt
Reminder .......................242
Security Alarm ..........................247
Service ............................ .491, 492
Side Marker ............................493
Tire Pressure Monitoring (TPMS) .............254
Traction Control ........................ .366
Turn Signal .......................95, 256, 493
Warning (Instrument Cluster Description) .......256
Loading Vehicle .....................219, 406, 408
Capacities ............................. .408
Tires................................. .374
Load Leveling System .......................225
Locks ....................................26
10
INDEX 519
Page 525 of 530

Seat Belts............................. .43, 93
Adjustable Shoulder Belt ....................48
Adjustable Upper Shoulder Anchorage ..........48
Child Restraint ...........................71
Extender ...............................53
Front Seat ........................ .43, 44, 46
Inspection ..............................93
Operating Instructions ......................46
Pregnant Women .........................54
Pretensioners ............................54
Rear Seat ...............................44
Reminder ............................. .242
Untwisting Procedure ......................48
Seats ............................... .141, 142
Adjustment ..................... .141, 142, 146
Fold in Floor (Stow nGo) ..................151
Memory ...............................167
Power ............................... .141
Reclining ............................. .147
Stow N Go (Fold in Floor) ..................151
Security Alarm ..........................13, 247
Selection Of Coolant (Antifreeze) ...............496
SENTRY KEY Key Programming .........................13
Sentry Key (Immobilizer) ......................11 Sentry Key Replacement
......................12
Service Assistance ..........................506
Service Contract .......................... .508
Service Manuals .......................... .510
Settings, Personal ..........................269
Setting The Clock .......................276, 284
Shift Lever Override ........................452
Shoulder Belts .............................44
Signals, Turn .....................95, 176, 256, 493
Sliding Door ...............................33
Snow Chains (Tire Chains) ....................388
Snow Tires ...............................382
Spare Tire ..................... .383, 384, 385, 434
Spark Plugs ............................. .496
Speed Contr
ol
Accel/Decel ............................184
Cancel ............................... .183
Resume ...............................183
Speed Control (Cruise Control) .................182
Starting .................................342
Automatic Transmission ....................342
Cold Weather .......................... .343
Engine Fails To Start ..................... .343
Remote ................................23
Starting And Operating ..................... .342
10
INDEX 523