stop start DODGE GRAND CARAVAN 2020 Owner's Manual
[x] Cancel search | Manufacturer: DODGE, Model Year: 2020, Model line: GRAND CARAVAN, Model: DODGE GRAND CARAVAN 2020Pages: 380, PDF Size: 14.92 MB
Page 191 of 380
STARTING AND OPERATING189
Towing Requirements — Trailer Lights And
Wiring
Whenever you pull a trailer, regardless of the
trailer size, stoplights and turn signals on the
trailer are required for motoring safety.
The Trailer Tow Package may include a four- and
seven-pin wiring harness. Use a factory
approved trailer harness and connector.
NOTE:
Do not cut or splice wiring into the vehicle’s
wiring harness.
The electrical connections are all complete to
the vehicle but you must mate the harness to a
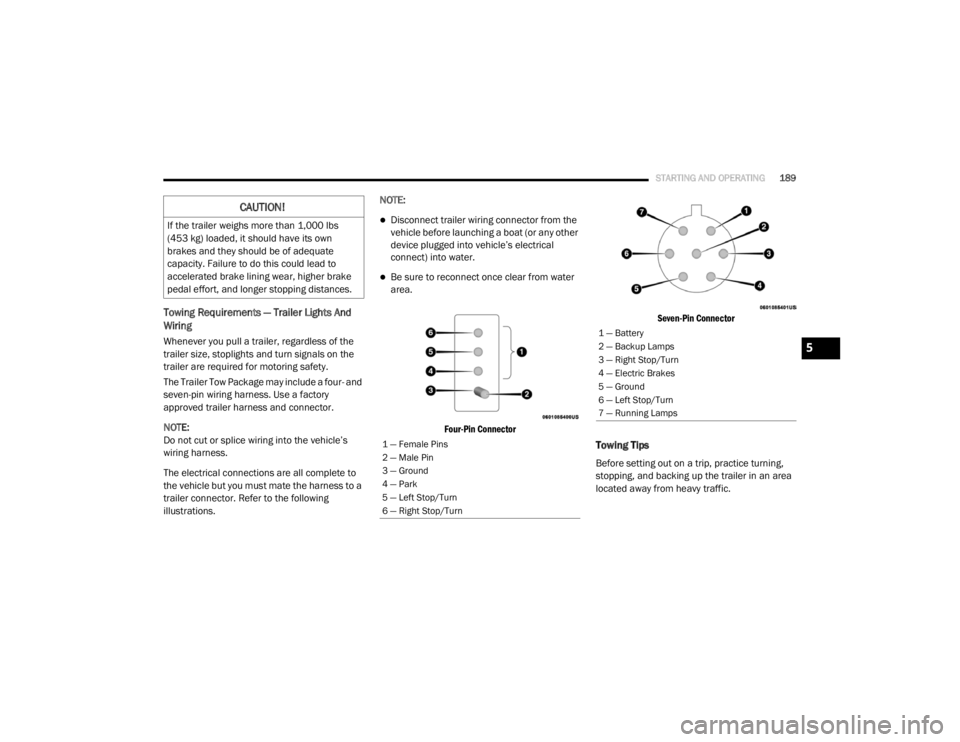
trailer connector. Refer to the following
illustrations. NOTE:
Disconnect trailer wiring connector from the
vehicle before launching a boat (or any other
device plugged into vehicle’s electrical
connect) into water.
Be sure to reconnect once clear from water
area.
Four-Pin Connector Seven-Pin Connector
Towing Tips
Before setting out on a trip, practice turning,
stopping, and backing up the trailer in an area
located away from heavy traffic.
CAUTION!
If the trailer weighs more than 1,000 lbs
(453 kg) loaded, it should have its own
brakes and they should be of adequate
capacity. Failure to do this could lead to
accelerated brake lining wear, higher brake
pedal effort, and longer stopping distances.
1 — Female Pins
2 — Male Pin
3 — Ground
4 — Park
5 — Left Stop/Turn
6 — Right Stop/Turn
1 — Battery
2 — Backup Lamps
3 — Right Stop/Turn
4 — Electric Brakes
5 — Ground
6 — Left Stop/Turn
7 — Running Lamps
5
20_RT_OM_EN_USC_t.book Page 189
Page 192 of 380

190STARTING AND OPERATING
Automatic Transmission
The DRIVE range can be selected when towing.
However, if frequent shifting occurs while in
DRIVE, use the Electronic Range Select (ERS)
shift control to manually select a lower gear
range.
NOTE:
Using a lower gear range while operating the
vehicle under heavy loading conditions, will
improve performance and extend transmission
life by reducing excessive shifting and heat
buildup. This action will also provide better
engine braking.
If you REGULARLY tow a trailer for more than
45 minutes of continuous operation, then
change the transmission fluid and filter as
specified for "police, taxi, fleet, or frequent
trailer towing." Refer to the “Maintenance Plan”
for the proper maintenance intervals. Electronic Range Select (ERS)When using the ERS shift control, select the
highest gear that allows for adequate perfor
-
mance and avoids frequent downshifts. For
example, choose “4” if the desired speed can
be maintained. Choose “3” or “2” if needed
to maintain the desired speed.
To prevent excess heat generation, avoid
continuous driving at high RPM. Reduce
vehicle speed as necessary to avoid
extended driving at high RPM. Return to a
higher gear range or vehicle speed when
grade and road conditions allow.
Speed Control — If Equipped
Do not use on hilly terrain or with heavy
loads.
When using the Speed Control, if you experi -
ence speed drops greater than 10 mph
(16 km/h), disengage until you can get back
to cruising speed.
Use Speed Control in flat terrain and with
light loads to maximize fuel efficiency.
Cooling System
To reduce potential for engine and transmission
overheating, take the following actions:
City Driving
In city traffic — while stopped, place the trans -
mission in NEUTRAL, but do not increase
engine idle speed.
Highway Driving
Reduce speed.
Temporarily turn off air conditioning.
20_RT_OM_EN_USC_t.book Page 190
Page 194 of 380
192STARTING AND OPERATING
DRIVING TIPS
Driving On Slippery Surfaces
Information in this section will aid in safe
controlled launches in adverse conditions.
Acceleration
Rapid acceleration on snow covered, wet, or
other slippery surfaces may cause the driving
wheels to pull erratically to the right or left. This
phenomenon occurs when there is a difference
in the surface traction under the front (driving)
wheels.
Traction
When driving on wet or slushy roads, it is
possible for a wedge of water to build up
between the tire and road surface. This is
hydroplaning and may cause partial or
complete loss of vehicle control and stopping
ability. To reduce this possibility, the following
precautions should be observed:
Slow down during rainstorms or when the
roads are slushy.
Slow down if the road has standing water or
puddles.
Replace the tires when tread wear indicators
first become visible.
Keep tires properly inflated.
Maintain sufficient distance between your
vehicle and the vehicle in front of you to avoid
a collision in a sudden stop.
Driving Through Water
Driving through water more than a few
inches/centimeters deep will require extra
caution to ensure safety and prevent damage to
your vehicle.
Flowing/Rising Water
Towing this vehicle in violation of the above
requirements can cause severe transmis -
sion damage. Damage from improper
towing is not covered under the New
Vehicle Limited Warranty.
Do not use a bumper mounted clamp-on
tow bar on your vehicle. The bumper face
bar will be damaged.
CAUTION! (Continued)WARNING!
Rapid acceleration on slippery surfaces is
dangerous. Unequal traction can cause
sudden pulling of the front wheels. You could
lose control of the vehicle and possibly have a
collision. Accelerate slowly and carefully
whenever there is likely to be poor traction
(ice, snow, wet, mud, loose sand, etc.).
WARNING!
Do not drive on or across a road or path
where water is flowing and/or rising (as in
storm run-off). Flowing water can wear away
the road or path's surface and cause your
vehicle to sink into deeper water.
Furthermore, flowing and/or rising water can
carry your vehicle away swiftly. Failure to
follow this warning may result in injuries that
are serious or fatal to you, your passengers,
and others around you.
20_RT_OM_EN_USC_t.book Page 192
Page 195 of 380
STARTING AND OPERATING193
(Continued)
Shallow Standing Water
Although your vehicle is capable of driving
through shallow standing water, consider the
following Warnings and Cautions before doing so.
WARNING!
Driving through standing water limits your
vehicle’s traction capabilities. Do not
exceed 5 mph (8 km/h) when driving
through standing water.
Driving through standing water limits your
vehicle’s braking capabilities, which
increases stopping distances. Therefore,
after driving through standing water, drive
slowly and lightly press on the brake pedal
several times to dry the brakes.
Failure to follow these warnings may result
in injuries that are serious or fatal to you,
your passengers, and others around you.
CAUTION!
Always check the depth of the standing
water before driving through it. Never drive
through standing water that is deeper than
the bottom of the tire rims mounted on the
vehicle.
Determine the condition of the road or the
path that is under water and if there are any
obstacles in the way before driving through
the standing water.
Do not exceed 5 mph (8 km/h) when
driving through standing water. This will
minimize wave effects.
Driving through standing water may cause
damage to your vehicle’s drivetrain compo -
nents. Always inspect your vehicle’s fluids
(i.e., engine oil, transmission, axle, etc.) for
signs of contamination (i.e., fluid that is
milky or foamy in appearance) after driving
through standing water. Do not continue to
operate the vehicle if any fluid appears
contaminated, as this may result in further
damage. Such damage is not covered by
the New Vehicle Limited Warranty.
Getting water inside your vehicle’s engine
can cause it to lock up and stall out, and
cause serious internal damage to the
engine. Such damage is not covered by the
New Vehicle Limited Warranty.
CAUTION! (Continued)
5
20_RT_OM_EN_USC_t.book Page 193
Page 204 of 380
202IN CASE OF EMERGENCY
(Continued)
(Continued)
The power windows are fused by a 25 Amp circuit breaker located in the Totally Integrated Power Module.
JACKING AND TIRE CHANGING
M34
–10 Amp RedPark Assist, Heater Climate Control Module, Headlamp
Wash, Compass, Rear Camera, Door Lamps, Flashlight,
Relay Diesel Cabin Heater
M35 –10 Amp Red Heated Mirrors
M36 –20 Amp Yellow Power Outlet #3 (Instrument Panel Or With Console
Center)
M37 –10 Amp Red Antilock Brakes, Stability Control, Stop Lamp, Fuel Pump
M38 –25 Amp Clear Door Lock/Unlock Motors, Liftgate Lock/Unlock Motors
CavityCartridge Fuse Mini-Fuse Description
WARNING!
Do not attempt to change a tire on the side
of the vehicle close to moving traffic. Pull
far enough off the road to avoid the danger
of being hit when operating the jack or
changing the wheel.
Being under a jacked-up vehicle is
dangerous. The vehicle could slip off the
jack and fall on you. You could be crushed.
Never put any part of your body under a
vehicle that is on a jack. If you need to get
under a raised vehicle, take it to a service
center where it can be raised on a lift.
Never start or run the engine while the
vehicle is on a jack.
WARNING! (Continued)
The jack is designed to be used as a tool for
changing tires only. The jack should not be
used to lift the vehicle for service purposes.
The vehicle should be jacked on a firm level
surface only. Avoid ice or slippery areas.
WARNING! (Continued)
20_RT_OM_EN_USC_t.book Page 202
Page 217 of 380

IN CASE OF EMERGENCY215
Sealing A Tire With Tire Service Kit
Whenever You Stop To Use Tire Service Kit:
1. Pull over to a safe location and turn on the
vehicle’s Hazard Warning Flashers.
2. Verify that the valve stem (on the wheel with
the deflated tire) is in a position that is near
to the ground. This will allow the Tire Service
Kit Hose to reach the valve stem and keep
the Tire Service Kit flat on the ground. This
will provide the best positioning of the kit
when injecting the sealant into the deflated
tire and running the air pump. Move the
vehicle as necessary to place the valve
stem in this position before proceeding.
3. Place the transmission in PARK and cycle the ignition in the OFF position.
4. Apply the parking brake.
Setting Up To Use Tire Service Kit:
1. Uncoil the Sealant Hose and then remove the cap from the fitting at the end of the
hose.
2. Place the Tire Service Kit flat on the ground next to the deflated tire.
3. Remove the cap from the valve
stem and then screw the fitting at
the end of the Sealant Hose onto
the valve stem. 4. Uncoil the Power Plug and
insert the plug into the vehicle’s
12 Volt power outlet.
NOTE:
Do not remove foreign objects (e.g., screws or
nails) from the tire.
Injecting Tire Service Kit Sealant Into The
Deflated Tire:
1. Always start the vehicle before
turning ON the Tire Service Kit.
2. Ensure the Mode Select Knob
is to the Sealant Mode position.
3. After pushing the Power Button,
the sealant (white fluid) will flow
from the Sealant Bottle through
the Sealant Hose and into the tire.
NOTE:
Sealant may leak out through the puncture in
the tire.
Take care not to allow the contents of Tire
Service Kit to come in contact with hair,
eyes, or clothing. Tire Service Kit sealant is
harmful if inhaled, swallowed, or absorbed
through the skin. It causes skin, eye, and
respiratory irritation. Flush immediately
with plenty of water if there is any contact
with eyes or skin. Change clothing as soon
as possible, if there is any contact with
clothing.
Tire Service Kit Sealant solution contains
latex. In case of an allergic reaction or rash,
consult a physician immediately. Keep Tire
Service Kit out of reach of children. If swal -
lowed, rinse mouth immediately with plenty
of water and drink plenty of water. Do not
induce vomiting! Consult a physician imme -
diately.
WARNING! (Continued)
6
20_RT_OM_EN_USC_t.book Page 215
Page 223 of 380
IN CASE OF EMERGENCY221
IF YOUR ENGINE OVERHEATS
In any of the following situations, you can
reduce the potential for overheating your
engine by taking the appropriate action.
On the highways — slow down.
In city traffic — while stopped, place the trans -
mission in NEUTRAL, but do not increase
engine idle speed. NOTE:
There are steps that you can take to slow down
an impending overheat condition:
If your Air Conditioner (A/C) is on, turn it off.
The A/C system adds heat to the engine
cooling system and turning the A/C off can
help remove this heat.
You can also turn the temperature control to
maximum heat, the mode control to floor and
the blower control to high. This allows the
heater core to act as a supplement to the
radiator and aids in removing heat from the
engine cooling system.CAUTION!
Accessories plugged into the vehicle power
outlets draw power from the vehicle’s battery,
even when not in use (i.e., cellular devices,
etc.). Eventually, if plugged in long enough
without engine operation, the vehicle’s
battery will discharge sufficiently to degrade
battery life and/or prevent the engine from
starting.
CAUTION!
Driving with a hot cooling system could
damage your vehicle. If the temperature
gauge reads “H,” pull over and stop the
vehicle. Idle the vehicle with the air
conditioner turned off until the pointer drops
back into the normal range. If the pointer
remains on the “H” and you hear continuous
chimes, turn the engine off immediately and
call for service.
WARNING!
You or others can be badly burned by hot
engine coolant (antifreeze) or steam from
your radiator. If you see or hear steam coming
from under the hood, do not open the hood
until the radiator has had time to cool. Never
try to open a cooling system pressure cap
when the radiator or coolant bottle is hot.
6
20_RT_OM_EN_USC_t.book Page 221
Page 234 of 380
232SERVICING AND MAINTENANCE
Checking Oil Level
To ensure proper engine lubrication, the engine
oil must be maintained at the correct level.
Check the oil level at regular intervals, such as
every fuel stop. The best time to check the
engine oil level is about five minutes after a fully
warmed engine is shut off.
Checking the oil while the vehicle is on level
ground will improve the accuracy of the oil level
readings. Maintain the oil level within the SAFE
crosshatch marking on the dipstick. Adding one
quart of oil when the reading is at the bottom of
the mark will result in reading the top of the
mark on these engines.
Adding Washer Fluid
The fluid reservoir for the windshield washers
and the rear window washer is shared. It is
located in the engine compartment and should
be checked at regular intervals. Fill the reservoir with windshield washer solvent
(not radiator antifreeze) and operate the system
for a few seconds to flush out any residual
water.
The washer fluid reservoir will hold a full gallon
of fluid when the Low Washer Fluid Light
illuminates.
After the engine has warmed, operate the
defroster for a few minutes to reduce the
possibility of smearing or freezing the fluid on
the cold windshield. Mopar All Weather
Windshield Washer Solution or equivalent, used
with water as directed on the container, aids
cleaning action, reduces the freezing point to
avoid line clogging, and is not harmful to paint
or trim.
Maintenance-Free Battery
Your vehicle is equipped with a
maintenance-free battery. You will never have
to add water, nor is periodic maintenance
required.
CAUTION!
Overfilling or underfilling will cause oil
aeration, or loss of oil pressure. This could
damage your engine.
WARNING!
Commercially available windshield washer
solvents are flammable. They could ignite and
burn you. Care must be exercised when filling
or working around the washer solution.
WARNING!
Battery fluid is a corrosive acid solution and
can burn or even blind you. Do not allow
battery fluid to contact your eyes, skin, or
clothing. Do not lean over a battery when
attaching clamps. If acid splashes in eyes
or on skin, flush the area immediately with
large amounts of water. Refer to “Jump
Starting Procedure” in “In Case Of Emer
-
gency” for further information.
Battery gas is flammable and explosive.
Keep flame or sparks away from the
battery. Do not use a booster battery or any
other booster source with an output greater
than 12 Volts. Do not allow cable clamps to
touch each other.
Battery posts, terminals, and related acces -
sories contain lead and lead compounds.
Wash hands after handling.
20_RT_OM_EN_USC_t.book Page 232
Page 241 of 380
SERVICING AND MAINTENANCE239
Under normal operating conditions, the
catalytic converter will not require
maintenance. However, it is important to keep
the engine properly tuned to ensure proper
catalyst operation and prevent possible catalyst
damage.
NOTE:
Intentional tampering with emissions control
systems can result in civil penalties being
assessed against you. In unusual situations involving grossly malfunc
-
tioning engine operation, a scorching odor may
suggest severe and abnormal catalyst
overheating. If this occurs, stop the vehicle, turn
off the engine and allow it to cool. Service,
including a tune-up to manufacturer's specifi -
cations, should be obtained immediately.
To minimize the possibility of catalytic converter
damage:
Do not interrupt the ignition when the trans -
mission is in gear and the vehicle is in
motion.
Do not try to start the vehicle by pushing or
towing the vehicle.
Do not idle the engine with any ignition
components disconnected or removed, such
as when diagnostic testing, or for prolonged
periods during very rough idle or malfunc -
tioning operating conditions.
Cooling System
Damage to the catalytic converter can
result if your vehicle is not kept in proper
operating condition. In the event of engine
malfunction, particularly involving engine
misfire or other apparent loss of perfor -
mance, have your vehicle serviced
promptly. Continued operation of your
vehicle with a severe malfunction could
cause the converter to overheat, resulting
in possible damage to the converter and
vehicle.
CAUTION! (Continued)
WARNING!
You or others can be badly burned by hot
engine coolant (antifreeze) or steam from
your radiator. If you see or hear steam
coming from under the hood, do not open
the hood until the radiator has had time to
cool. Never open a cooling system pressure
cap when the radiator or coolant bottle is
hot.
Keep hands, tools, clothing, and jewelry
away from the radiator cooling fan when
the hood is raised. The fan starts automati -
cally and may start at any time, whether the
engine is running or not.
When working near the radiator cooling fan,
disconnect the fan motor lead or turn the
ignition to the OFF mode. The fan is
temperature controlled and can start at any
time the ignition is in the ON mode.7
20_RT_OM_EN_USC_t.book Page 239
Page 289 of 380

MULTIMEDIA287
Your radio will play the following formats:
MP3, WMA, AAC, M4A, CD Audio, DVD Audio,
and DVD Video.
Do not insert anything other than the supported
CD/DVD formats.
SACD (SACD layer), VCD DualDisc, SVCD, VCD
format on DVD MPEG-4 are not supported.
A complete list of supported CD/DVD formats is
available at DriveUconnect.com (US Residents)
or DriveUconnect.ca (Canadian Residents).
Inserting A Disc
1. Push the Load button once.
2. After the screen opens, with the printed side upward, insert the disc into the disc slot of
the radio. The radio pulls the disc automat-
ically and closes the flip screen. The radio
selects the appropriate mode after the disc
is recognized and starts playing the first
track. The display shows “Reading...” during
this process. NOTE:
A faulty CD is NOT automatically ejected. Use
only standard size discs. Discs that have
been modified with an adhesive label should
not be used in the CD/DVD player.
On Data CDs with a large number of songs it
may take several seconds to read, play and
display information for all songs on the disc.
Recording your own CD on a home computer
at a lower write speed will result in a more
consistent quality.
High definition content and media
(e.g, HD-DVD, Blu-Ray™) is not supported.
If the user does not remove an ejected CD
within approximately 10 seconds the CD will
reload.
Removing A Disc
1. Push the Load button.
2. After the display opens the disc is ejected and can be removed. NOTE:
If the disc is not removed within approximately
10 seconds, the unit pulls it back into the slot
(park position). The disc may be ejected when
the ignition is OFF.
3. Push the Load button to close the display. If
you do not push the Load button or insert a
new disc, the display will close 30 seconds
after the display was opened.
Selecting Disc Mode
Activate Disc Mode by pushing the Media
button located on the faceplate. The disc mode
can be selected by pressing the Disc button on
the touchscreen.
NOTE:
When a disc is inserted, the appropriate mode
is automatically selected once the disc is
recognized.
Scan Search
Press the Scan button.
The first few seconds of each individual track
will be played in succession.
Press the Stop Scan button to stop the scan
function.
9
20_RT_OM_EN_USC_t.book Page 287