belt DODGE GRAND CARAVAN 2020 Owners Manual
[x] Cancel search | Manufacturer: DODGE, Model Year: 2020, Model line: GRAND CARAVAN, Model: DODGE GRAND CARAVAN 2020Pages: 380, PDF Size: 14.92 MB
Page 5 of 380

3
WINDOWS ............................................................59 Power Vent Windows — If Equipped .......... 59
Power Windows ............................................ 59
HOOD......................................................................61
Opening The Hood ....................................... 61
Closing The Hood ......................................... 61
LIFTGATE ................................................................62
Opening ........................................................ 62
Closing .......................................................... 62
Power Liftgate — If Equipped ...................... 62
Cargo Area Features ................................... 63
LOAD LEVELING SYSTEM — IF EQUIPPED .........63
GARAGE DOOR OPENER — IF EQUIPPED ..........63
Before You Begin Programming
HomeLink® .................................................. 64 Programming A Rolling Code ...................... 64
Programming A Non-Rolling Code............... 65
Canadian/Gate Operator Programming ..... 66
Using HomeLink® ........................................ 67
Security......................................................... 67
Troubleshooting Tips ................................... 67
General Information .................................... 68
INTERNAL EQUIPMENT ........................................68
Storage ......................................................... 68
Cupholders .................................................. 73
Sun Screens — If Equipped ......................... 75
Electrical Power Outlets — If Equipped....... 75
Power Inverter — If Equipped ...................... 77
Smoker's Package Kit — If Equipped ......... 78
Sunglass Storage Bin — If Equipped........... 78 ROOF LUGGAGE RACK — IF EQUIPPED ............. 79
Deploying The Crossbars............................. 79
Stowing The Crossbars................................ 80
GETTING TO KNOW YOUR INSTRUMENT PANEL
INSTRUMENT CLUSTER ...................................... 82 Instrument Cluster Descriptions ................ 84
INSTRUMENT CLUSTER DISPLAY ..................... 85
Instrument Cluster Display Location And
Controls ....................................................... 85 Oil Life Reset ................................................ 87
Instrument Cluster Display Menu Items .... 87
TRIP COMPUTER ................................................. 93
WARNING LIGHTS AND MESSAGES .................. 94 Red Warning Lights ..................................... 94
Yellow Warning Lights ................................. 97
White Indicator Lights ............................... 100Green Indicator Lights ............................... 100Blue Indicator Lights.................................. 100
ONBOARD DIAGNOSTIC SYSTEM — OBD II..... 101
Onboard Diagnostic System (OBD II)
Cybersecurity ............................................. 101
EMISSIONS INSPECTION AND
MAINTENANCE PROGRAMS .............................102
SAFETY
SAFETY FEATURES .............................................103
Anti-Lock Brake System (ABS) ................. 103
Electronic Brake Control (EBC) System ... 104 AUXILIARY DRIVING SYSTEMS ........................ 110
Blind Spot Monitoring (BSM)
— If Equipped ............................................. 110 Tire Pressure Monitoring System
(TPMS) ........................................................ 115
OCCUPANT RESTRAINT SYSTEMS ................. 119
Occupant Restraint Systems Features .... 119
Important Safety Precautions ................... 119
Seat Belt Systems .................................... 120Supplemental Restraint Systems (SRS)... 131
Child Restraints ......................................... 141Transporting Pets ..................................... 159
SAFETY TIPS ...................................................... 159
Transporting Passengers .......................... 159
Exhaust Gas ............................................... 159
Safety Checks You Should Make
Inside The Vehicle .................................... 160 Periodic Safety Checks You Should
Make Outside The Vehicle ........................ 161
STARTING AND OPERATING
STARTING THE ENGINE .................................... 162
Normal Starting ......................................... 162Cold Weather Operation
(Below –22°F Or −30°C) ......................... 163 After Starting — Warming Up The
Engine ........................................................ 163 If Engine Fails To Start ............................. 163
ENGINE BLOCK HEATER — IF EQUIPPED ........ 163
20_RT_OM_EN_USC_t.book Page 3
Page 7 of 380

5
SERVICING AND MAINTENANCE
SCHEDULED SERVICING .................................. 226Maintenance Plan......................................227
ENGINE COMPARTMENT .................................. 231
Engine Compartment — 3.6L ....................231
Checking Oil Level......................................232
Adding Washer Fluid .................................232
Maintenance-Free Battery .......................232
Pressure Washing ......................................233
DEALER SERVICE .............................................. 233
Engine Oil .................................................. 233Engine Oil Filter ..........................................234Engine Air Cleaner Filter ...........................235
Air Conditioner Maintenance ...................235Accessory Drive Belt Inspection................236Body Lubrication ........................................237
Windshield Wiper Blades ..........................238
Exhaust System ........................................238
Cooling System ..........................................239Brake System ............................................242
Automatic Transmission ............................243
RAISING THE VEHICLE ...................................... 244
TIRES ................................................................... 245
Tire Safety Information .............................245Tires — General Information .....................252Tire Types ...................................................256
Spare Tires — If Equipped .........................257
Wheel And Wheel Trim Care ....................259
Tire Chains and Traction Devices ............260
Tire Rotation Recommendations .............261 DEPARTMENT OF TRANSPORTATION
UNIFORM TIRE QUALITY GRADES .................. 261
Treadwear .................................................. 261
Traction Grades ......................................... 261
Temperature Grades ................................. 262
VEHICLE STORAGE .............................................262
BODYWORK ........................................................ 262
Protection From Atmospheric Agents....... 262
Body And Underbody Maintenance .......... 263Preserving The Bodywork .......................... 263
INTERIORS ......................................................... 264
Seats And Fabric Parts .............................. 264
Plastic And Coated Parts ........................... 264
Glass Surfaces .......................................... 265Cleaning The Instrument Panel
Cupholders ................................................. 265
TECHNICAL SPECIFICATIONS
IDENTIFICATION DATA .......................................266
Vehicle Identification Number .................. 266
BRAKE SYSTEM .................................................. 266
WHEEL AND TIRE TORQUE
SPECIFICATIONS ................................................ 266
Torque Specifications ................................ 266
FUEL REQUIREMENTS ......................................267
3.6L Engine ................................................ 267
Reformulated Gasoline ............................ 268
Materials Added To Fuel ........................... 268
Gasoline/Oxygenate Blends ..................... 268 Do Not Use E-85 In Non-Flex Fuel
Vehicles ...................................................... 269 CNG And LP Fuel System
Modifications ............................................. 269 MMT In Gasoline........................................ 269
Fuel System Cautions................................ 270
Carbon Monoxide Warnings...................... 270
FLUID CAPACITIES ............................................ 271
FLUIDS AND LUBRICANTS ................................ 272
Engine ........................................................ 272
Chassis ....................................................... 274
MULTIMEDIA
CYBERSECURITY ............................................... 275
SAFETY AND GENERAL INFORMATION .......... 276Safety Guidelines....................................... 276
RADIO 430/430 NAV........................................ 277
General Handling....................................... 277
Getting Started .......................................... 279
Radio Mode ................................................ 281
Media Mode ............................................... 286
Remote Devices......................................... 299Uconnect Phone— If Equipped ................. 304
Navigation — If Equipped .......................... 317
STEERING WHEEL AUDIO CONTROLS — IF
EQUIPPED .......................................................... 340
Radio Operation......................................... 340CD Player.................................................... 340
20_RT_OM_EN_USC_t.book Page 5
Page 22 of 380
20GETTING TO KNOW YOUR VEHICLE
(Continued)
SEATS
Seats are a part of the Occupant Restraint
System of the vehicle.
Manual Adjustment (Front Seats) — If
Equipped
Manual Front/Second Row Seat Adjuster
Both front seats are adjustable forward or
rearward. The manual seat adjustment handle
is located under the seat cushion at the front
edge of each seat.
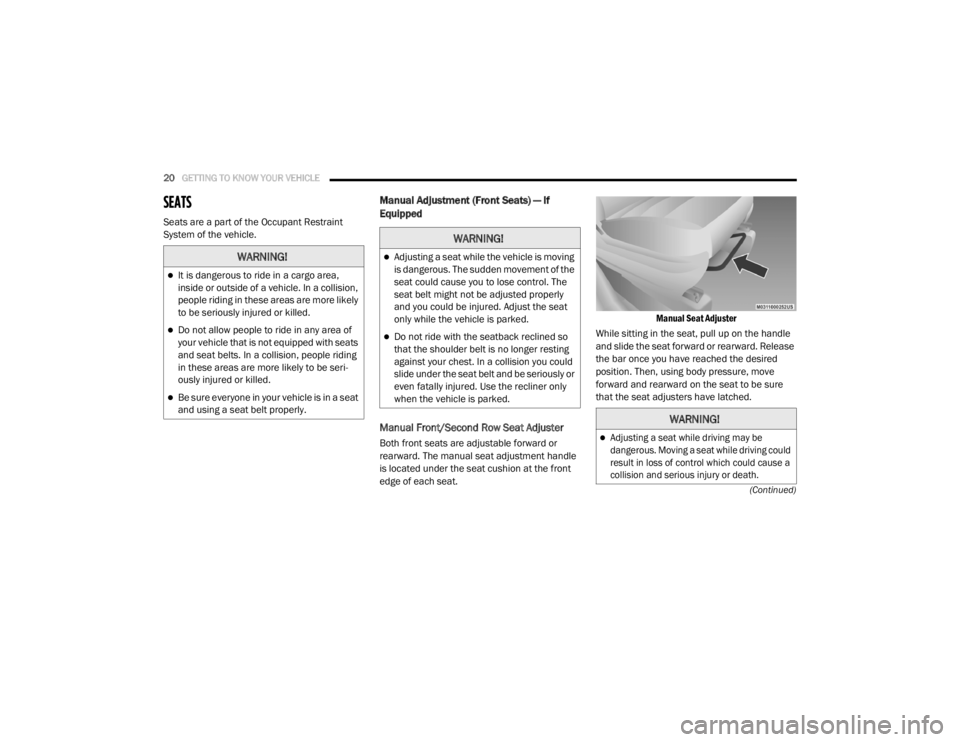
Manual Seat Adjuster
While sitting in the seat, pull up on the handle
and slide the seat forward or rearward. Release
the bar once you have reached the desired
position. Then, using body pressure, move
forward and rearward on the seat to be sure
that the seat adjusters have latched.
WARNING!
It is dangerous to ride in a cargo area,
inside or outside of a vehicle. In a collision,
people riding in these areas are more likely
to be seriously injured or killed.
Do not allow people to ride in any area of
your vehicle that is not equipped with seats
and seat belts. In a collision, people riding
in these areas are more likely to be seri -
ously injured or killed.
Be sure everyone in your vehicle is in a seat
and using a seat belt properly.
WARNING!
Adjusting a seat while the vehicle is moving
is dangerous. The sudden movement of the
seat could cause you to lose control. The
seat belt might not be adjusted properly
and you could be injured. Adjust the seat
only while the vehicle is parked.
Do not ride with the seatback reclined so
that the shoulder belt is no longer resting
against your chest. In a collision you could
slide under the seat belt and be seriously or
even fatally injured. Use the recliner only
when the vehicle is parked.
WARNING!
Adjusting a seat while driving may be
dangerous. Moving a seat while driving could
result in loss of control which could cause a
collision and serious injury or death.
20_RT_OM_EN_USC_t.book Page 20
Page 23 of 380
GETTING TO KNOW YOUR VEHICLE21
Manual Reclining Seats — If Equipped
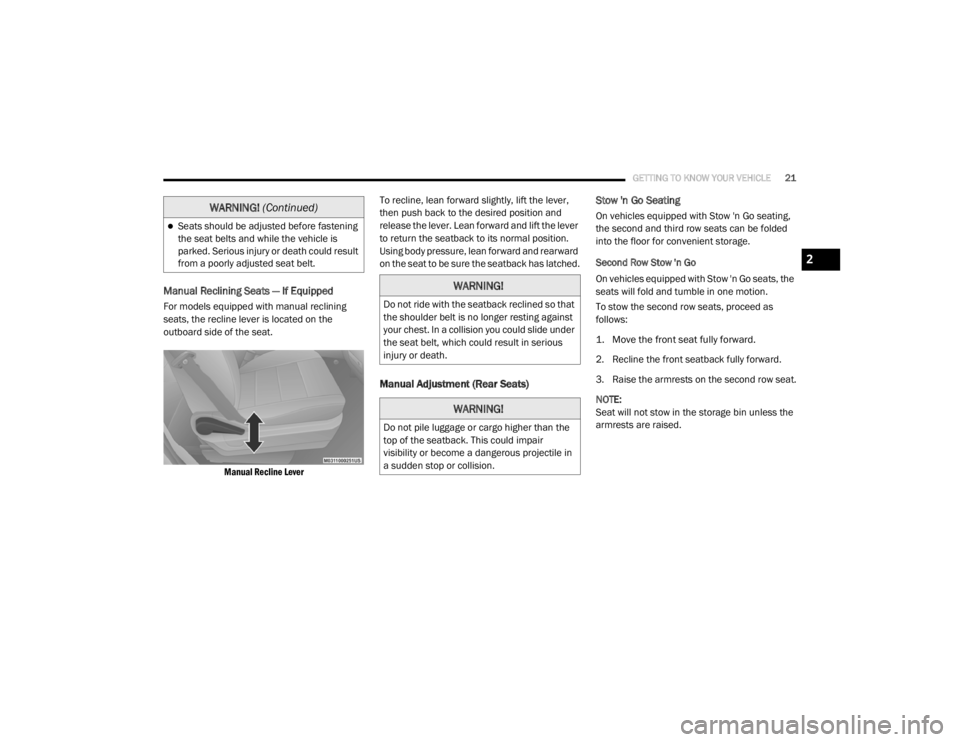
For models equipped with manual reclining
seats, the recline lever is located on the
outboard side of the seat.
Manual Recline Lever
To recline, lean forward slightly, lift the lever,
then push back to the desired position and
release the lever. Lean forward and lift the lever
to return the seatback to its normal position.
Using body pressure, lean forward and rearward
on the seat to be sure the seatback has latched.
Manual Adjustment (Rear Seats)
Stow 'n Go Seating
On vehicles equipped with Stow 'n Go seating,
the second and third row seats can be folded
into the floor for convenient storage.
Second Row Stow 'n Go
On vehicles equipped with Stow 'n Go seats, the
seats will fold and tumble in one motion.
To stow the second row seats, proceed as
follows:
1. Move the front seat fully forward.
2. Recline the front seatback fully forward.
3. Raise the armrests on the second row seat.
NOTE:
Seat will not stow in the storage bin unless the
armrests are raised.Seats should be adjusted before fastening
the seat belts and while the vehicle is
parked. Serious injury or death could result
from a poorly adjusted seat belt.
WARNING!
(Continued)
WARNING!
Do not ride with the seatback reclined so that
the shoulder belt is no longer resting against
your chest. In a collision you could slide under
the seat belt, which could result in serious
injury or death.
WARNING!
Do not pile luggage or cargo higher than the
top of the seatback. This could impair
visibility or become a dangerous projectile in
a sudden stop or collision.
2
20_RT_OM_EN_USC_t.book Page 21
Page 24 of 380
22GETTING TO KNOW YOUR VEHICLE
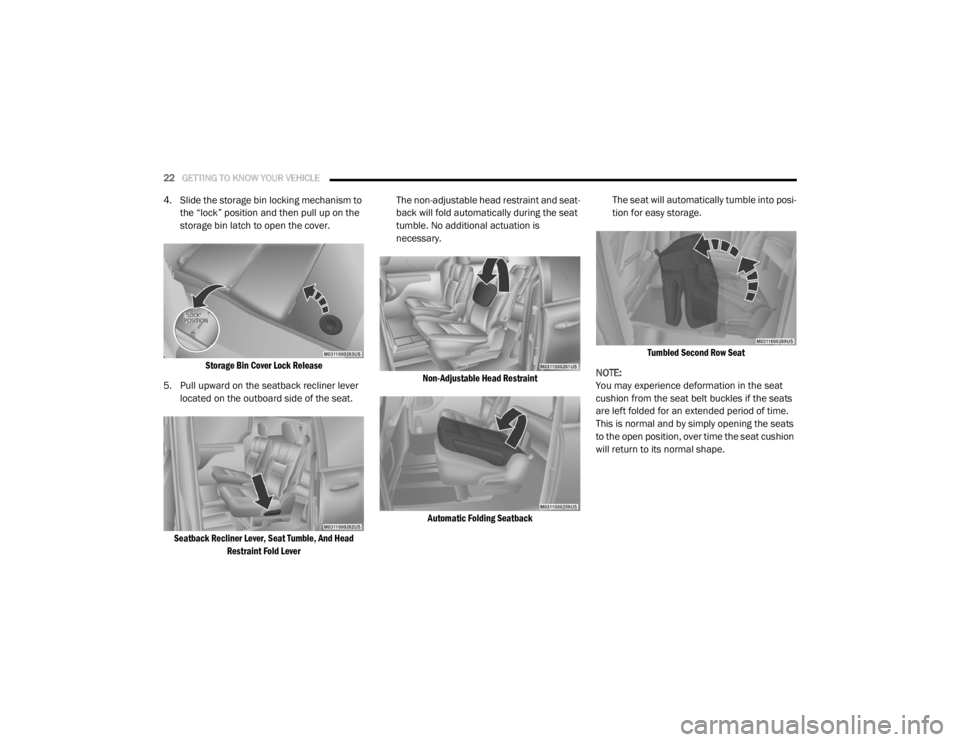
4. Slide the storage bin locking mechanism to
the “lock” position and then pull up on the
storage bin latch to open the cover.
Storage Bin Cover Lock Release
5. Pull upward on the seatback recliner lever located on the outboard side of the seat.
Seatback Recliner Lever, Seat Tumble, And Head Restraint Fold Lever
The non-adjustable head restraint and seat
-
back will fold automatically during the seat
tumble. No additional actuation is
necessary.
Non-Adjustable Head RestraintAutomatic Folding Seatback
The seat will automatically tumble into posi
-
tion for easy storage.
Tumbled Second Row Seat
NOTE:
You may experience deformation in the seat
cushion from the seat belt buckles if the seats
are left folded for an extended period of time.
This is normal and by simply opening the seats
to the open position, over time the seat cushion
will return to its normal shape.
20_RT_OM_EN_USC_t.book Page 22
Page 28 of 380
26GETTING TO KNOW YOUR VEHICLE
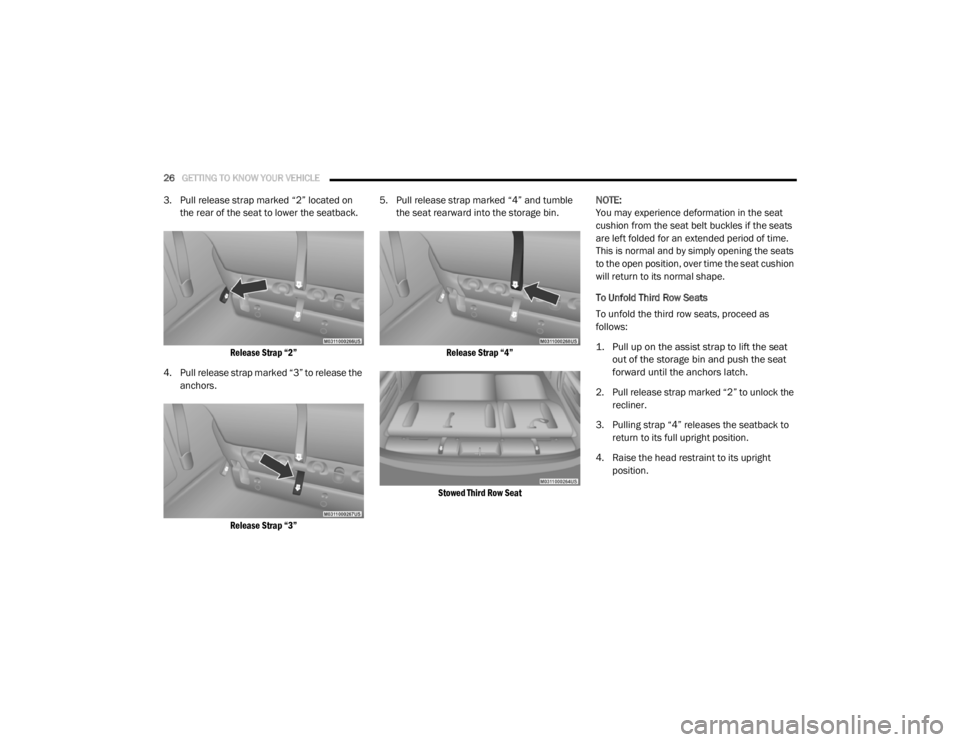
3. Pull release strap marked “2” located on
the rear of the seat to lower the seatback.
Release Strap “2”
4. Pull release strap marked “3” to release the anchors.
Release Strap “3”
5. Pull release strap marked “4” and tumble
the seat rearward into the storage bin.
Release Strap “4”
Stowed Third Row Seat
NOTE:
You may experience deformation in the seat
cushion from the seat belt buckles if the seats
are left folded for an extended period of time.
This is normal and by simply opening the seats
to the open position, over time the seat cushion
will return to its normal shape.
To Unfold Third Row Seats
To unfold the third row seats, proceed as
follows:
1. Pull up on the assist strap to lift the seat
out of the storage bin and push the seat
forward until the anchors latch.
2. Pull release strap marked “2” to unlock the recliner.
3. Pulling strap “4” releases the seatback to return to its full upright position.
4. Raise the head restraint to its upright position.
20_RT_OM_EN_USC_t.book Page 26
Page 29 of 380
GETTING TO KNOW YOUR VEHICLE27
Tailgate Mode
To fold the third row seats into Tailgate Mode,
proceed as follows:
1. Pull release strap “3”, then pull release
strap “4” to rotate the entire seat
rearward.
2. To restore the seat to its upright position, lift up on the seatback and push forward until
the anchors latch.
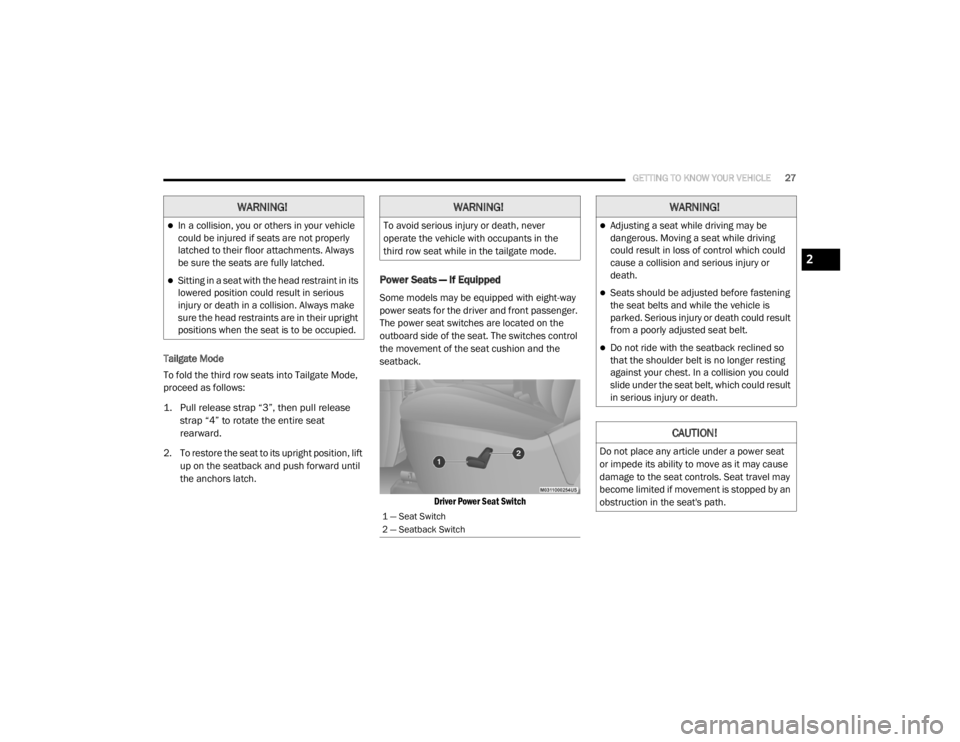
Power Seats — If Equipped
Some models may be equipped with eight-way
power seats for the driver and front passenger.
The power seat switches are located on the
outboard side of the seat. The switches control
the movement of the seat cushion and the
seatback.
Driver Power Seat Switch
WARNING!
In a collision, you or others in your vehicle
could be injured if seats are not properly
latched to their floor attachments. Always
be sure the seats are fully latched.
Sitting in a seat with the head restraint in its
lowered position could result in serious
injury or death in a collision. Always make
sure the head restraints are in their upright
positions when the seat is to be occupied.
WARNING!
To avoid serious injury or death, never
operate the vehicle with occupants in the
third row seat while in the tailgate mode.
1 — Seat Switch
2 — Seatback Switch
WARNING!
Adjusting a seat while driving may be
dangerous. Moving a seat while driving
could result in loss of control which could
cause a collision and serious injury or
death.
Seats should be adjusted before fastening
the seat belts and while the vehicle is
parked. Serious injury or death could result
from a poorly adjusted seat belt.
Do not ride with the seatback reclined so
that the shoulder belt is no longer resting
against your chest. In a collision you could
slide under the seat belt, which could result
in serious injury or death.
CAUTION!
Do not place any article under a power seat
or impede its ability to move as it may cause
damage to the seat controls. Seat travel may
become limited if movement is stopped by an
obstruction in the seat's path.
2
20_RT_OM_EN_USC_t.book Page 27
Page 30 of 380
28GETTING TO KNOW YOUR VEHICLE
Adjusting The Seat Forward Or Rearward
The seat can be adjusted both forward and
rearward. Push the seat switch forward or
rearward. The seat will move in the direction of
the switch. Release the switch when the desired
position has been reached.
Adjusting The Seat Up Or Down
The height of the seats can be adjusted up or
down. Pull upward or push downward on the
rear of seat switch, the seat will move in the
direction of the switch. Release the switch when
the desired position has been reached.
Tilting The Seat Up Or Down
The angle of the seat cushion can be adjusted
in two directions. Pull upward or push
downward on the front of the seat switch, the
front of the seat cushion will move in the
direction of the switch. Release the switch when
the desired position has been reached.
Reclining The Seatback
The angle of the seatback can be adjusted
forward or rearward. Push the seatback switch
forward or rearward, the seat will move in the
direction of the switch. Release the switch when
the desired position is reached.
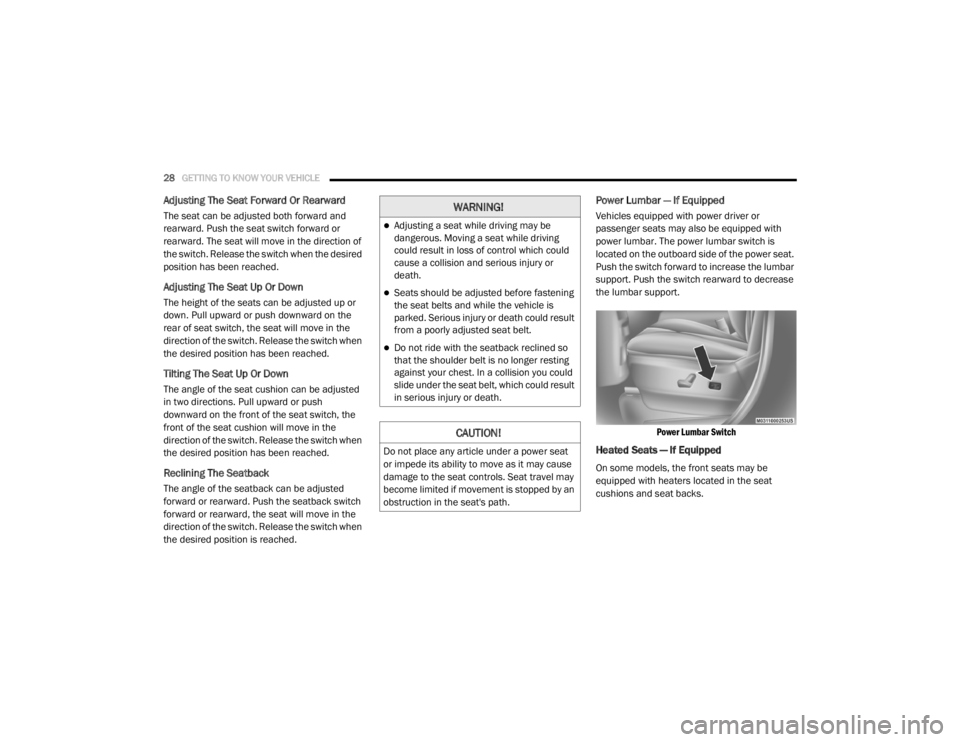
Power Lumbar — If Equipped
Vehicles equipped with power driver or
passenger seats may also be equipped with
power lumbar. The power lumbar switch is
located on the outboard side of the power seat.
Push the switch forward to increase the lumbar
support. Push the switch rearward to decrease
the lumbar support.
Power Lumbar Switch
Heated Seats — If Equipped
On some models, the front seats may be
equipped with heaters located in the seat
cushions and seat backs.
WARNING!
Adjusting a seat while driving may be
dangerous. Moving a seat while driving
could result in loss of control which could
cause a collision and serious injury or
death.
Seats should be adjusted before fastening
the seat belts and while the vehicle is
parked. Serious injury or death could result
from a poorly adjusted seat belt.
Do not ride with the seatback reclined so
that the shoulder belt is no longer resting
against your chest. In a collision you could
slide under the seat belt, which could result
in serious injury or death.
CAUTION!
Do not place any article under a power seat
or impede its ability to move as it may cause
damage to the seat controls. Seat travel may
become limited if movement is stopped by an
obstruction in the seat's path.
20_RT_OM_EN_USC_t.book Page 28
Page 98 of 380
96GETTING TO KNOW YOUR INSTRUMENT PANEL
Engine Coolant Temperature Warning Light
This warning light warns of an
overheated engine condition. If the
engine coolant temperature is too
high, this indicator will illuminate and
a single chime will sound. If the temperature
reaches the upper limit, a continuous chime will
sound for four minutes or until the engine is
able to cool, whichever comes first.
If the light turns on while driving, safely pull over
and stop the vehicle. If the Air Conditioning
(A/C) system is on, turn it off. Also, shift the
transmission into NEUTRAL and idle the vehicle.
If the temperature reading does not return to
normal, turn the engine off immediately and call
for service.
Refer to “If Your Engine Overheats” in
“In Case Of Emergency” for further information.
Liftgate Open Warning Light
This indicator will turn when the
liftgate is open.
NOTE:
If the vehicle is moving, there will also be a
single chime.
Oil Pressure Warning Light
This warning light will illuminate to
indicate low engine oil pressure. If the
light turns on while driving, stop the
vehicle, shut off the engine as soon as
possible, and contact an authorized dealer. A
chime will sound when this light turns on.
Do not operate the vehicle until the cause is
corrected. This light does not indicate how
much oil is in the engine. The engine oil level
must be checked under the hood.
Seat Belt Reminder Warning Light
This warning light indicates when the
driver or passenger seat belt is
unbuckled. When the ignition is first
placed in the ON/RUN or ACC/ON/
RUN position and if the driver’s seat belt is
unbuckled, a chime will sound and the light will
turn on. When driving, if the driver or front
passenger seat belt remains unbuckled, the
Seat Belt Reminder Light will flash or remain on
continuously and a chime will sound.
Refer to “Occupant Restraint Systems” in
“Safety” for further information.
Transmission Temperature Warning Light — If
Equipped
This warning light will illuminate to
warn of a high transmission fluid
temperature. This may occur with
strenuous usage such as trailer
towing. If this light turns on, stop the vehicle and
run the engine at idle or slightly faster, with the
transmission in PARK or NEUTRAL, until the
light turns off. Once the light turns off, you may
continue to drive normally.
WARNING!
If you continue operating the vehicle when
the Transmission Temperature Warning Light
is illuminated you could cause the fluid to boil
over, come in contact with hot engine or
exhaust components and cause a fire.
CAUTION!
Continuous driving with the Transmission
Temperature Warning Light illuminated will
eventually cause severe transmission
damage or transmission failure.
20_RT_OM_EN_USC_t.book Page 96
Page 121 of 380
SAFETY119
(Continued)
OCCUPANT RESTRAINT SYSTEMS
Some of the most important safety features in
your vehicle are the restraint systems:
Occupant Restraint Systems Features
Seat Belt Systems
Supplemental Restraint Systems (SRS) Air
Bags
Supplemental Active Head Restraints
Child Restraints
Some of the safety features described in this
section may be standard equipment on some
models, or may be optional equipment on
others. If you are not sure, ask an authorized
dealer.
Important Safety Precautions
Please pay close attention to the information in
this section. It tells you how to use your restraint
system properly, to keep you and your
passengers as safe as possible.
Here are some simple steps you can take to
minimize the risk of harm from a deploying air
bag:
1. Children 12 years old and under should
always ride buckled up in the rear seat of a
vehicle with a rear seat.
2. A child who is not big enough to wear the vehicle seat belt properly (Refer to “Child
Restraints” in this section for further
information) must be secured in the
appropriate child restraint or
belt-positioning booster seat in a rear
seating position.
3. If a child from 2 to 12 years old (not in a rear-facing child restraint) must ride in the
front passenger seat, move the seat as far
back as possible and use the proper child
restraint (Refer to “Child Restraints” in this
section for further information).
4. Never allow children to slide the shoulder belt behind them or under their arm.
5. You should read the instructions provided with your child restraint to make sure that
you are using it properly.
6. All occupants should always wear their lap and shoulder belts properly. 7. The driver and front passenger seats should
be moved back as far as practical to allow
the front air bags room to inflate.
8. Do not lean against the door or window. If your vehicle has side air bags, and
deployment occurs, the side air bags will
inflate forcefully into the space between
occupants and the door and occupants
could be injured.
9. If the air bag system in this vehicle needs to be modified to accommodate a disabled
person, refer to the “Customer Assistance”
section for customer service contact
information.
WARNING!
Never place a rear-facing child restraint in
front of an air bag. A deploying passenger
front air bag can cause death or serious
injury to a child 12 years or younger,
including a child in a rear-facing child
restraint.
4
20_RT_OM_EN_USC_t.book Page 119