fold seats DODGE GRAND CARAVAN 2020 Owners Manual
[x] Cancel search | Manufacturer: DODGE, Model Year: 2020, Model line: GRAND CARAVAN, Model: DODGE GRAND CARAVAN 2020Pages: 380, PDF Size: 14.92 MB
Page 4 of 380

2
INTRODUCTION
HOW TO USE THIS MANUAL .................................. 8
Essential Information .................................... 8
Symbols .......................................................... 8
WARNINGS AND CAUTIONS ................................. 8
VEHICLE MODIFICATIONS/ALTERATIONS ........... 8
GETTING TO KNOW YOUR VEHICLE
KEYS ........................................................................ 9
Key Fobs ......................................................... 9
IGNITION SWITCH .................................................11
Wireless Ignition Node (WIN) ...................... 11
REMOTE START — IF EQUIPPED .........................12
How To Use Remote Start ........................... 12
Remote Start Abort Messages .................... 12
To Enter Remote Start Mode ...................... 12
To Exit Remote Start Mode Without
Driving The Vehicle ..................................... 13 To Exit Remote Start Mode And Drive The
Vehicle .......................................................... 13 General Information .................................... 13
SENTRY KEY ..........................................................13
Key Programming ....................................... 14
Replacement Keys....................................... 14
General Information .................................... 14
VEHICLE SECURITY ALARM — IF EQUIPPED .....15
Rearming Of The System............................. 15
To Arm The System ..................................... 15
To Disarm The System ................................ 15
Tamper Alert................................................. 16 DOORS .................................................................. 16
Manual Door Locks...................................... 16
Power Door Locks — If Equipped ............... 17
Power Sliding Side Door — If Equipped ...... 18
Child Locks ................................................... 19
SEATS .................................................................... 20
Manual Adjustment (Front Seats) — If
Equipped ...................................................... 20 Manual Adjustment (Rear Seats) ............... 21
Power Seats — If Equipped ......................... 27
Heated Seats — If Equipped ....................... 28
Plastic Grocery Bag Retainer Hooks........... 30
HEAD RESTRAINTS .............................................. 30
Supplemental Active Head Restraints
— Front Seats ............................................... 30 Head Restraints — Second Row Quad
Seats............................................................. 31 Head Restraints — Second Row Bench ...... 32
Head Restraints — Third Row...................... 32
STEERING WHEEL ............................................... 33
Tilt/Telescoping Steering Column .............. 33
Heated Steering Wheel — If Equipped ....... 34
MIRRORS .............................................................. 34
Automatic Dimming Mirror
— If Equipped .............................................. 34 Automatic Dimming Mirror With Rear
View Camera Display — If Equipped ........... 35 Outside Mirrors ........................................... 35
Interior Observation Mirror.......................... 36
Power Mirrors — If Equipped ...................... 36
Outside Mirrors Folding Feature ................. 36 Heated Mirrors — If Equipped ..................... 37
Illuminated Vanity Mirrors
— If Equipped .............................................. 37
EXTERIOR LIGHTS ...............................................37
Headlight Switch.......................................... 37
Multifunction Lever .................................... 37
Daytime Running Lights (DRLs)
— If Equipped ............................................... 38 High/Low Beam Switch .............................. 38
Flash-To-Pass ............................................... 38
Automatic Headlights ................................. 38
Headlights On With Wipers
— If Equipped ............................................... 38 Headlight Delay — If Equipped.................... 38
Lights-On Reminder ..................................... 39
Front Fog Lights — If Equipped .................. 39
Turn Signals ................................................. 39
Lane Change Assist ..................................... 39
Battery Protection ....................................... 39
INTERIOR LIGHTS ................................................39
Courtesy/Interior Lighting ........................... 39
WINDSHIELD WIPER AND WASHERS ...............41
Windshield Wiper Operation ....................... 41
Rear Wiper And Washer .............................. 42
CLIMATE CONTROLS ...........................................42
Manual Climate Control Overview .............. 42
Automatic Climate Control Overview .......... 48
Climate Control Functions........................... 56
Automatic Temperature Control (ATC)
— If Equipped ............................................... 56 Operating Tips ............................................. 57
20_RT_OM_EN_USC_t.book Page 2
Page 23 of 380
GETTING TO KNOW YOUR VEHICLE21
Manual Reclining Seats — If Equipped
For models equipped with manual reclining
seats, the recline lever is located on the
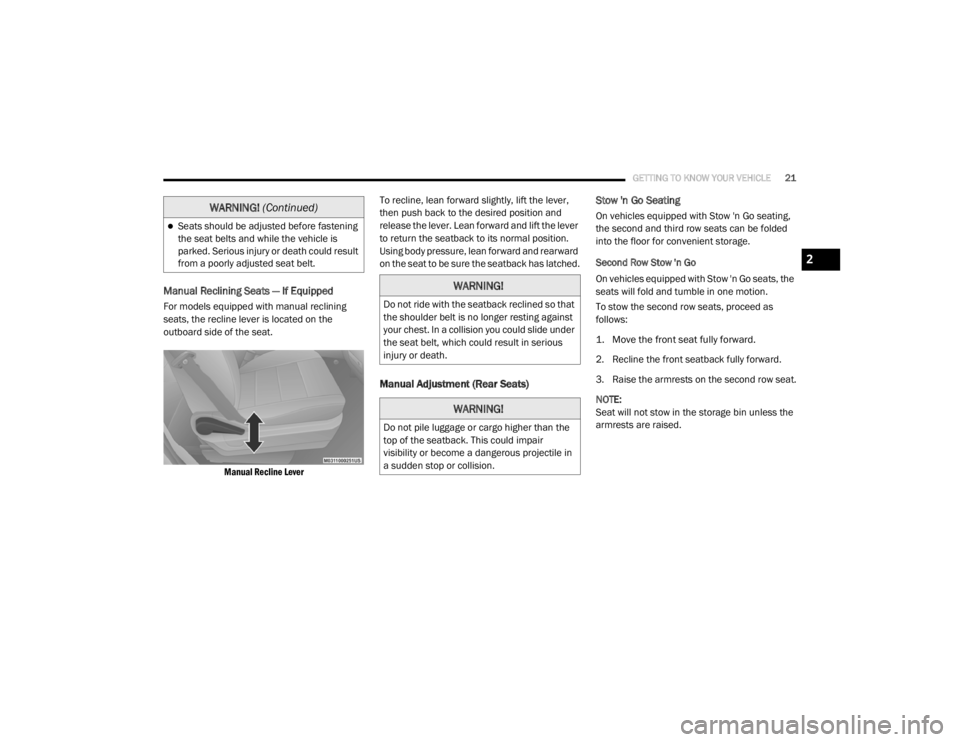
outboard side of the seat.
Manual Recline Lever
To recline, lean forward slightly, lift the lever,
then push back to the desired position and
release the lever. Lean forward and lift the lever
to return the seatback to its normal position.
Using body pressure, lean forward and rearward
on the seat to be sure the seatback has latched.
Manual Adjustment (Rear Seats)
Stow 'n Go Seating
On vehicles equipped with Stow 'n Go seating,
the second and third row seats can be folded
into the floor for convenient storage.
Second Row Stow 'n Go
On vehicles equipped with Stow 'n Go seats, the
seats will fold and tumble in one motion.
To stow the second row seats, proceed as
follows:
1. Move the front seat fully forward.
2. Recline the front seatback fully forward.
3. Raise the armrests on the second row seat.
NOTE:
Seat will not stow in the storage bin unless the
armrests are raised.Seats should be adjusted before fastening
the seat belts and while the vehicle is
parked. Serious injury or death could result
from a poorly adjusted seat belt.
WARNING!
(Continued)
WARNING!
Do not ride with the seatback reclined so that
the shoulder belt is no longer resting against
your chest. In a collision you could slide under
the seat belt, which could result in serious
injury or death.
WARNING!
Do not pile luggage or cargo higher than the
top of the seatback. This could impair
visibility or become a dangerous projectile in
a sudden stop or collision.
2
20_RT_OM_EN_USC_t.book Page 21
Page 24 of 380
22GETTING TO KNOW YOUR VEHICLE
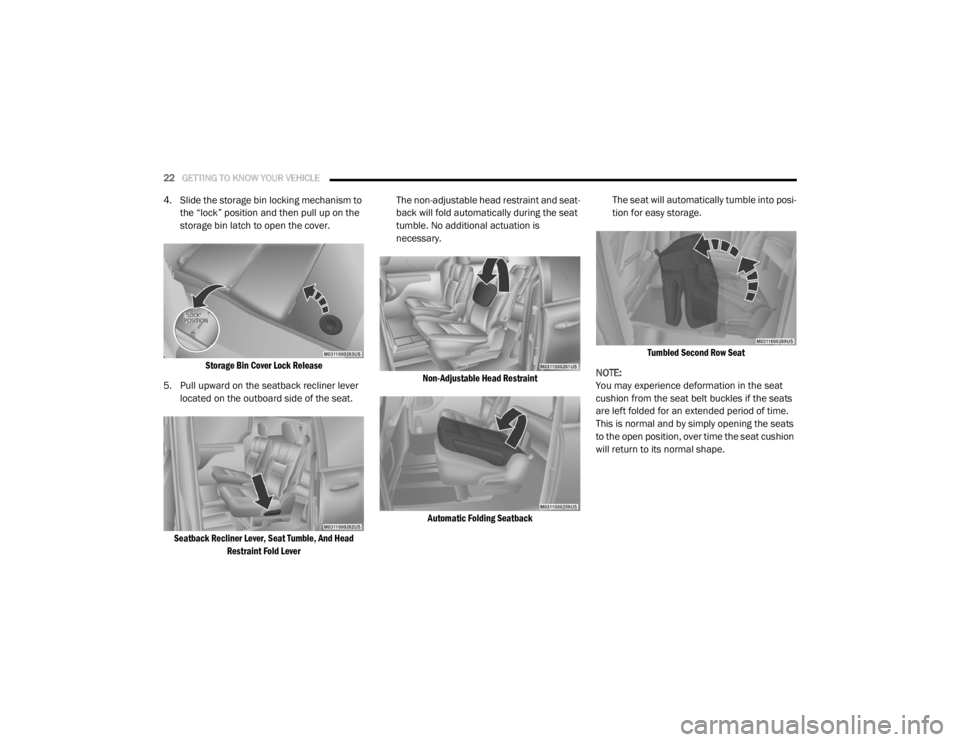
4. Slide the storage bin locking mechanism to
the “lock” position and then pull up on the
storage bin latch to open the cover.
Storage Bin Cover Lock Release
5. Pull upward on the seatback recliner lever located on the outboard side of the seat.
Seatback Recliner Lever, Seat Tumble, And Head Restraint Fold Lever
The non-adjustable head restraint and seat
-
back will fold automatically during the seat
tumble. No additional actuation is
necessary.
Non-Adjustable Head RestraintAutomatic Folding Seatback
The seat will automatically tumble into posi
-
tion for easy storage.
Tumbled Second Row Seat
NOTE:
You may experience deformation in the seat
cushion from the seat belt buckles if the seats
are left folded for an extended period of time.
This is normal and by simply opening the seats
to the open position, over time the seat cushion
will return to its normal shape.
20_RT_OM_EN_USC_t.book Page 22
Page 26 of 380
24GETTING TO KNOW YOUR VEHICLE
Stow 'n Go Seat — Folded And Latched Position
To tumble or stow the seat from the folded and
latched position, proceed as follows:
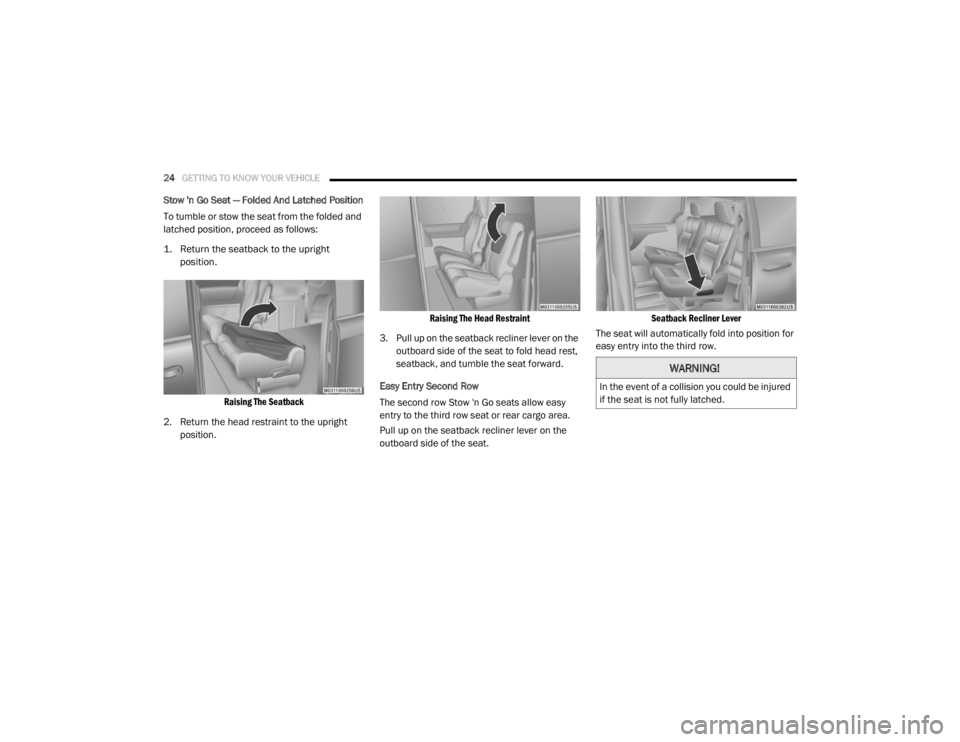
1. Return the seatback to the upright
position.
Raising The Seatback
2. Return the head restraint to the upright position.
Raising The Head Restraint
3. Pull up on the seatback recliner lever on the outboard side of the seat to fold head rest,
seatback, and tumble the seat forward.
Easy Entry Second Row
The second row Stow 'n Go seats allow easy
entry to the third row seat or rear cargo area.
Pull up on the seatback recliner lever on the
outboard side of the seat.
Seatback Recliner Lever
The seat will automatically fold into position for
easy entry into the third row.
WARNING!
In the event of a collision you could be injured
if the seat is not fully latched.
20_RT_OM_EN_USC_t.book Page 24
Page 27 of 380
GETTING TO KNOW YOUR VEHICLE25
Second Row Bench Seat — If Equipped
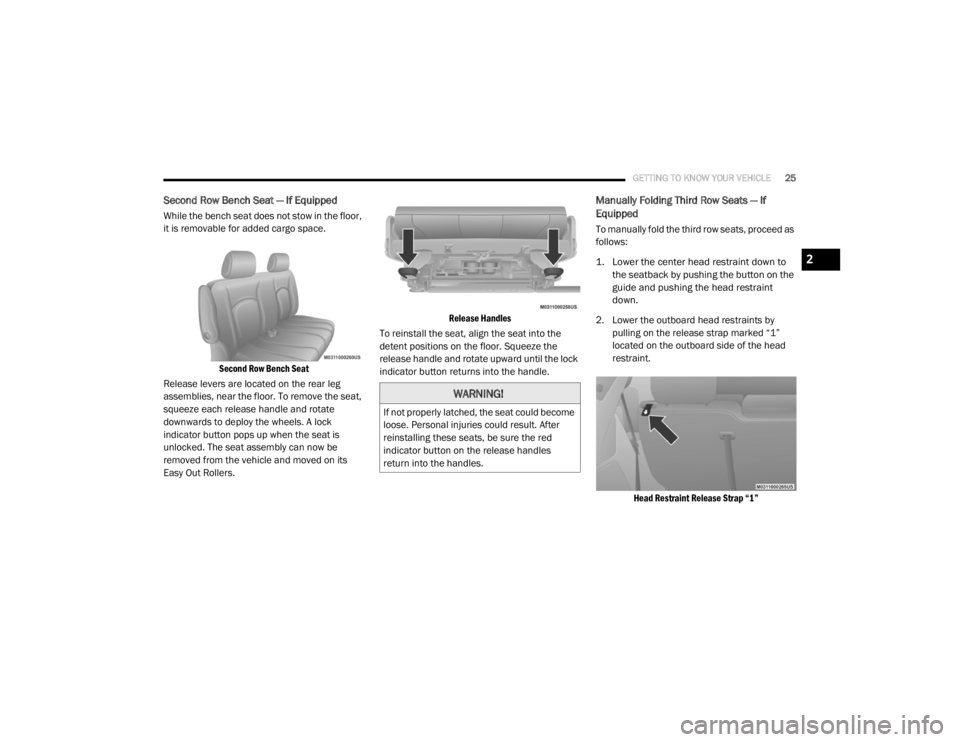
While the bench seat does not stow in the floor,
it is removable for added cargo space.
Second Row Bench Seat
Release levers are located on the rear leg
assemblies, near the floor. To remove the seat,
squeeze each release handle and rotate
downwards to deploy the wheels. A lock
indicator button pops up when the seat is
unlocked. The seat assembly can now be
removed from the vehicle and moved on its
Easy Out Rollers.
Release Handles
To reinstall the seat, align the seat into the
detent positions on the floor. Squeeze the
release handle and rotate upward until the lock
indicator button returns into the handle.
Manually Folding Third Row Seats — If
Equipped
To manually fold the third row seats, proceed as
follows:
1. Lower the center head restraint down to the seatback by pushing the button on the
guide and pushing the head restraint
down.
2. Lower the outboard head restraints by pulling on the release strap marked “1”
located on the outboard side of the head
restraint.
Head Restraint Release Strap “1”
WARNING!
If not properly latched, the seat could become
loose. Personal injuries could result. After
reinstalling these seats, be sure the red
indicator button on the release handles
return into the handles.
2
20_RT_OM_EN_USC_t.book Page 25
Page 28 of 380
26GETTING TO KNOW YOUR VEHICLE
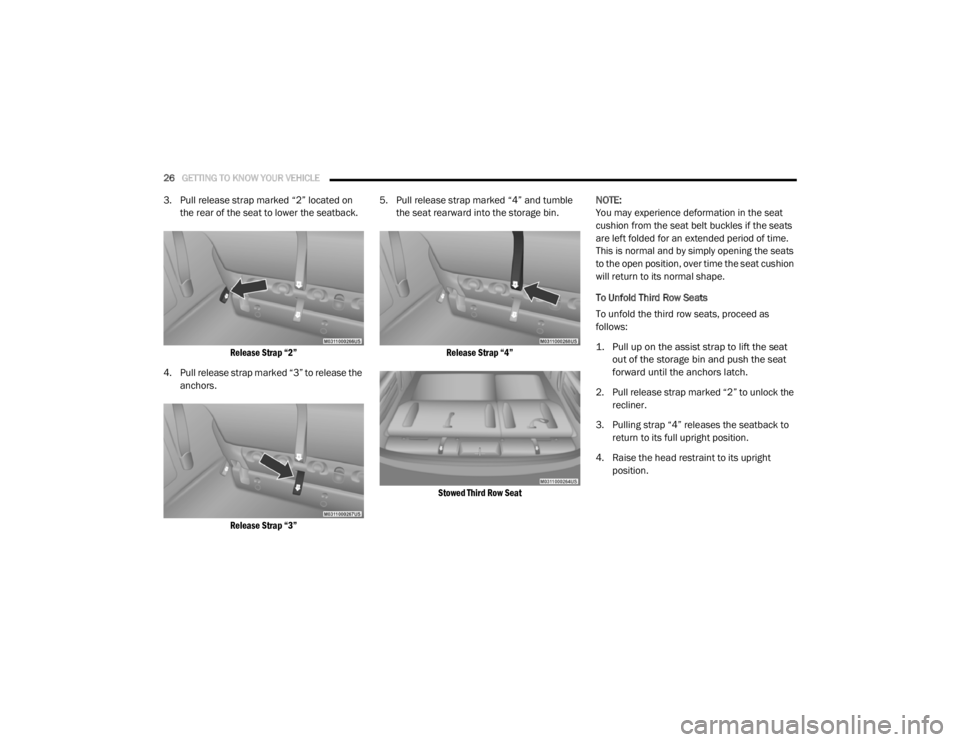
3. Pull release strap marked “2” located on
the rear of the seat to lower the seatback.
Release Strap “2”
4. Pull release strap marked “3” to release the anchors.
Release Strap “3”
5. Pull release strap marked “4” and tumble
the seat rearward into the storage bin.
Release Strap “4”
Stowed Third Row Seat
NOTE:
You may experience deformation in the seat
cushion from the seat belt buckles if the seats
are left folded for an extended period of time.
This is normal and by simply opening the seats
to the open position, over time the seat cushion
will return to its normal shape.
To Unfold Third Row Seats
To unfold the third row seats, proceed as
follows:
1. Pull up on the assist strap to lift the seat
out of the storage bin and push the seat
forward until the anchors latch.
2. Pull release strap marked “2” to unlock the recliner.
3. Pulling strap “4” releases the seatback to return to its full upright position.
4. Raise the head restraint to its upright position.
20_RT_OM_EN_USC_t.book Page 26
Page 29 of 380
GETTING TO KNOW YOUR VEHICLE27
Tailgate Mode
To fold the third row seats into Tailgate Mode,
proceed as follows:
1. Pull release strap “3”, then pull release
strap “4” to rotate the entire seat
rearward.
2. To restore the seat to its upright position, lift up on the seatback and push forward until
the anchors latch.
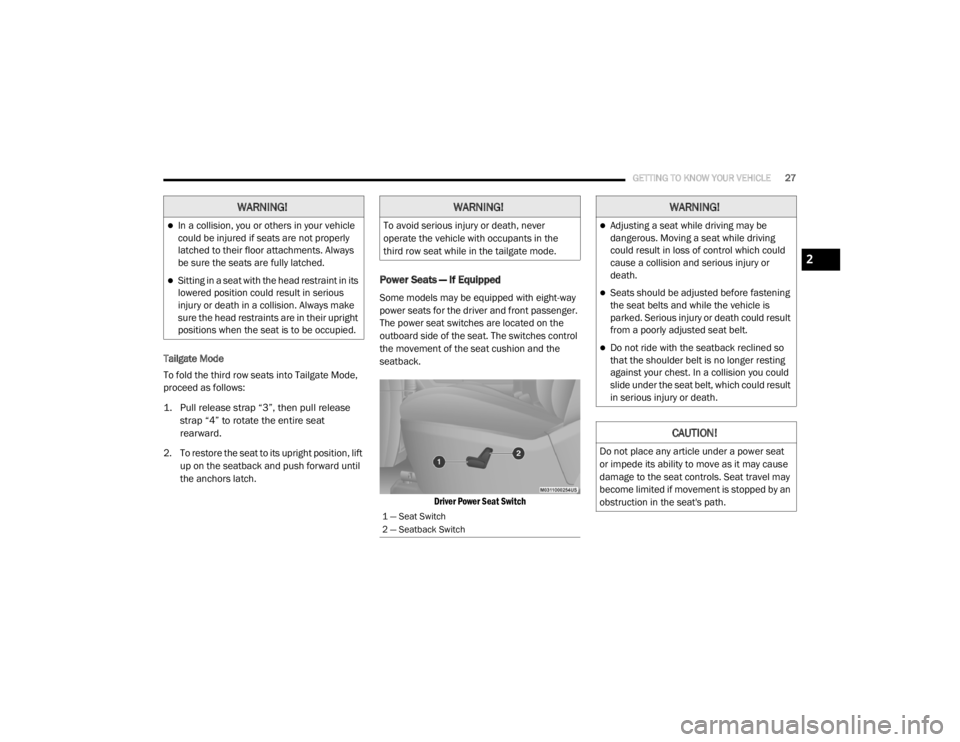
Power Seats — If Equipped
Some models may be equipped with eight-way
power seats for the driver and front passenger.
The power seat switches are located on the
outboard side of the seat. The switches control
the movement of the seat cushion and the
seatback.
Driver Power Seat Switch
WARNING!
In a collision, you or others in your vehicle
could be injured if seats are not properly
latched to their floor attachments. Always
be sure the seats are fully latched.
Sitting in a seat with the head restraint in its
lowered position could result in serious
injury or death in a collision. Always make
sure the head restraints are in their upright
positions when the seat is to be occupied.
WARNING!
To avoid serious injury or death, never
operate the vehicle with occupants in the
third row seat while in the tailgate mode.
1 — Seat Switch
2 — Seatback Switch
WARNING!
Adjusting a seat while driving may be
dangerous. Moving a seat while driving
could result in loss of control which could
cause a collision and serious injury or
death.
Seats should be adjusted before fastening
the seat belts and while the vehicle is
parked. Serious injury or death could result
from a poorly adjusted seat belt.
Do not ride with the seatback reclined so
that the shoulder belt is no longer resting
against your chest. In a collision you could
slide under the seat belt, which could result
in serious injury or death.
CAUTION!
Do not place any article under a power seat
or impede its ability to move as it may cause
damage to the seat controls. Seat travel may
become limited if movement is stopped by an
obstruction in the seat's path.
2
20_RT_OM_EN_USC_t.book Page 27
Page 33 of 380
GETTING TO KNOW YOUR VEHICLE31
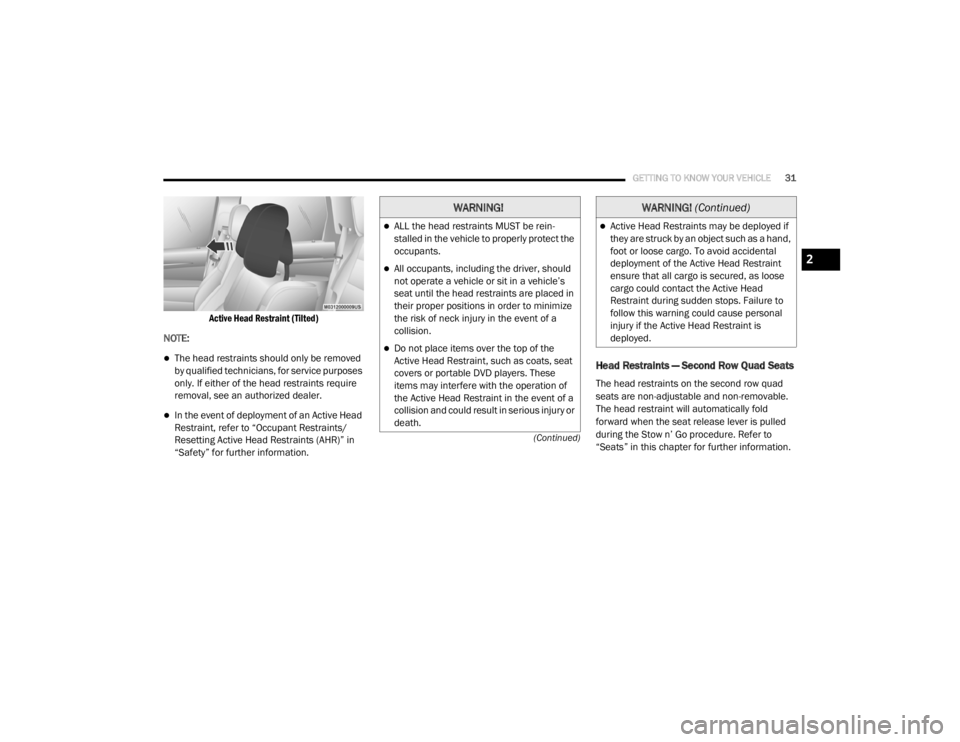
(Continued)
Active Head Restraint (Tilted)
NOTE:
The head restraints should only be removed
by qualified technicians, for service purposes
only. If either of the head restraints require
removal, see an authorized dealer.
In the event of deployment of an Active Head
Restraint, refer to “Occupant Restraints/
Resetting Active Head Restraints (AHR)” in
“Safety” for further information.
Head Restraints — Second Row Quad Seats
The head restraints on the second row quad
seats are non-adjustable and non-removable.
The head restraint will automatically fold
forward when the seat release lever is pulled
during the Stow n’ Go procedure. Refer to
“Seats” in this chapter for further information.
WARNING!
ALL the head restraints MUST be rein -
stalled in the vehicle to properly protect the
occupants.
All occupants, including the driver, should
not operate a vehicle or sit in a vehicle’s
seat until the head restraints are placed in
their proper positions in order to minimize
the risk of neck injury in the event of a
collision.
Do not place items over the top of the
Active Head Restraint, such as coats, seat
covers or portable DVD players. These
items may interfere with the operation of
the Active Head Restraint in the event of a
collision and could result in serious injury or
death.
Active Head Restraints may be deployed if
they are struck by an object such as a hand,
foot or loose cargo. To avoid accidental
deployment of the Active Head Restraint
ensure that all cargo is secured, as loose
cargo could contact the Active Head
Restraint during sudden stops. Failure to
follow this warning could cause personal
injury if the Active Head Restraint is
deployed.
WARNING! (Continued)
2
20_RT_OM_EN_USC_t.book Page 31
Page 34 of 380
32GETTING TO KNOW YOUR VEHICLE
Head Restraints — Second Row Bench
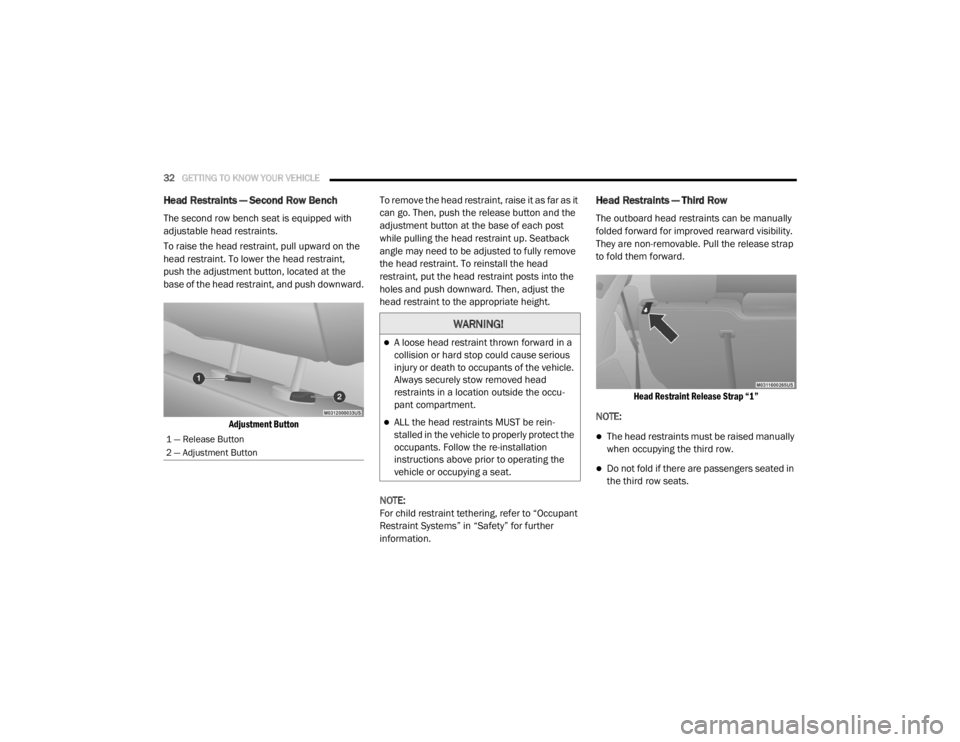
The second row bench seat is equipped with
adjustable head restraints.
To raise the head restraint, pull upward on the
head restraint. To lower the head restraint,
push the adjustment button, located at the
base of the head restraint, and push downward.
Adjustment Button
To remove the head restraint, raise it as far as it
can go. Then, push the release button and the
adjustment button at the base of each post
while pulling the head restraint up. Seatback
angle may need to be adjusted to fully remove
the head restraint. To reinstall the head
restraint, put the head restraint posts into the
holes and push downward. Then, adjust the
head restraint to the appropriate height.
NOTE:
For child restraint tethering, refer to “Occupant
Restraint Systems” in “Safety” for further
information.
Head Restraints — Third Row
The outboard head restraints can be manually
folded forward for improved rearward visibility.
They are non-removable. Pull the release strap
to fold them forward.
Head Restraint Release Strap “1”
NOTE:
The head restraints must be raised manually
when occupying the third row.
Do not fold if there are passengers seated in
the third row seats.
1 — Release Button
2 — Adjustment Button
WARNING!
A loose head restraint thrown forward in a
collision or hard stop could cause serious
injury or death to occupants of the vehicle.
Always securely stow removed head
restraints in a location outside the occu -
pant compartment.
ALL the head restraints MUST be rein -
stalled in the vehicle to properly protect the
occupants. Follow the re-installation
instructions above prior to operating the
vehicle or occupying a seat.
20_RT_OM_EN_USC_t.book Page 32
Page 38 of 380
36GETTING TO KNOW YOUR VEHICLE
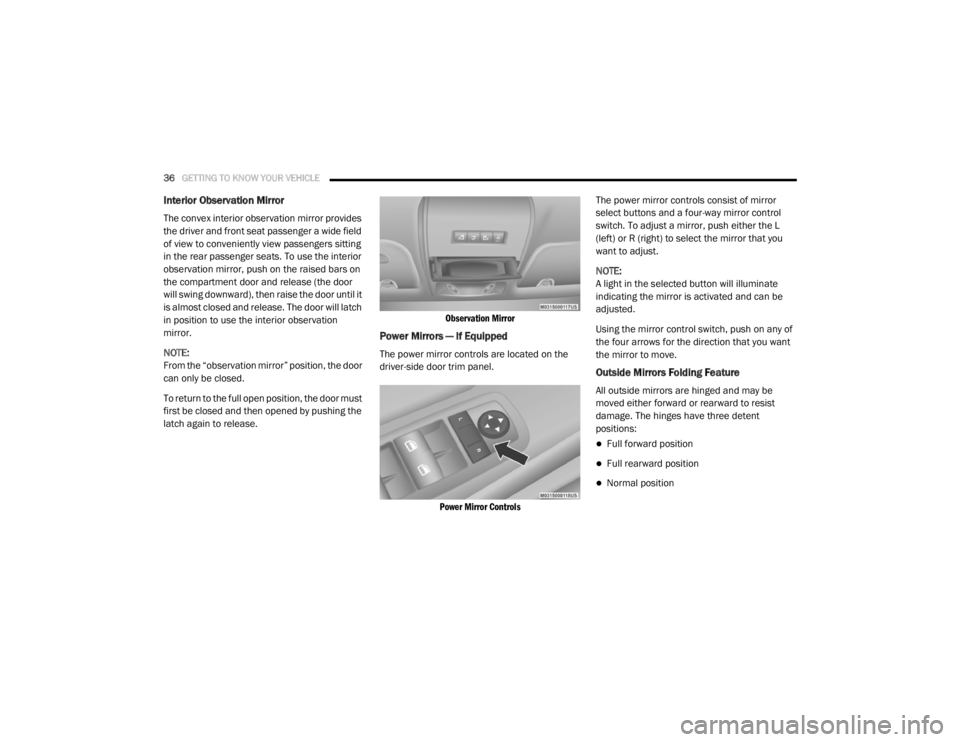
Interior Observation Mirror
The convex interior observation mirror provides
the driver and front seat passenger a wide field
of view to conveniently view passengers sitting
in the rear passenger seats. To use the interior
observation mirror, push on the raised bars on
the compartment door and release (the door
will swing downward), then raise the door until it
is almost closed and release. The door will latch
in position to use the interior observation
mirror.
NOTE:
From the “observation mirror” position, the door
can only be closed.
To return to the full open position, the door must
first be closed and then opened by pushing the
latch again to release.
Observation Mirror
Power Mirrors — If Equipped
The power mirror controls are located on the
driver-side door trim panel.
Power Mirror Controls
The power mirror controls consist of mirror
select buttons and a four-way mirror control
switch. To adjust a mirror, push either the L
(left) or R (right) to select the mirror that you
want to adjust.
NOTE:
A light in the selected button will illuminate
indicating the mirror is activated and can be
adjusted.
Using the mirror control switch, push on any of
the four arrows for the direction that you want
the mirror to move.
Outside Mirrors Folding Feature
All outside mirrors are hinged and may be
moved either forward or rearward to resist
damage. The hinges have three detent
positions:
Full forward position
Full rearward position
Normal position
20_RT_OM_EN_USC_t.book Page 36