sensor DODGE GRAND CARAVAN 2020 Owners Manual
[x] Cancel search | Manufacturer: DODGE, Model Year: 2020, Model line: GRAND CARAVAN, Model: DODGE GRAND CARAVAN 2020Pages: 380, PDF Size: 14.92 MB
Page 6 of 380

4
ENGINE BREAK-IN RECOMMENDATIONS ...... 163
PARK BRAKE ..................................................... 164
AUTOMATIC TRANSMISSION............................ 165 Key Ignition Park Interlock ........................ 166Brake/Transmission Shift Interlock
System ........................................................ 166 Fuel Economy (ECON) Mode .....................167Six-Speed Automatic Transmission ..........167
Gear Ranges ..............................................168
POWER STEERING ............................................. 172
Power Steering Fluid Check ......................173
SPEED CONTROL — IF EQUIPPED .................... 173
To Activate .................................................. 174To Set A Desired Speed .............................174To Vary The Speed Setting ........................ 174To Accelerate For Passing ........................ 175To Resume Speed......................................175
To Deactivate .............................................175
PARKSENSE REAR PARK ASSIST
— IF EQUIPPED ................................................... 175
ParkSense Sensors ...................................176
ParkSense Warning Display ......................176
ParkSense Display ..................................... 176Enabling/Disabling ParkSense ................. 178
Service The ParkSense Rear Park Assist
System ........................................................ 178 Cleaning The ParkSense System ..............178
ParkSense System Usage Precautions ....178 PARKVIEW REAR BACK UP CAMERA ............. 179
REFUELING THE VEHICLE ................................. 181
Loose Fuel Filler Cap Message ................. 181
VEHICLE LOADING ............................................182
Certification Label ..................................... 182
TRAILER TOWING ............................................... 183
Common Towing Definitions ..................... 183Trailer Hitch Classification ........................ 184
Trailer Towing Weights
(Maximum Trailer Weight Ratings) .......... 186 Trailer And Tongue Weight ....................... 186
Towing Requirements ............................... 187Towing Tips ................................................ 189
RECREATIONAL TOWING
(BEHIND MOTORHOME, ETC.) .......................... 191
Towing This Vehicle Behind Another
Vehicle ........................................................ 191 Recreational Towing — All Models ............ 191
DRIVING TIPS ...................................................... 192
Driving On Slippery Surfaces .................... 192
Driving Through Water .............................. 192
IN CASE OF EMERGENCY
HAZARD WARNING FLASHERS .......................194
BULB REPLACEMENT ........................................ 194Replacement Bulbs .................................. 194Replacing Exterior Bulbs ........................... 196 FUSES .................................................................. 197
General Information .................................. 198
Totally Integrated Power Module
(Fuses) ....................................................... 198
JACKING AND TIRE CHANGING ....................... 202
Jack Location ............................................. 203
Spare Tire Tools ......................................... 203To Access Spare Tire Winch Drive Nut ..... 203Spare Tire Removal .................................. 205
Spare Tire Removal Instructions .............. 205
Preparations For Jacking ......................... 206
Jacking Instructions................................... 206
Securing The Compact Spare Tire ............ 210
Road Tire Installation ................................ 211
TIRE SERVICE KIT — IF EQUIPPED ................... 212
JUMP STARTING ................................................ 219
Preparations For Jump Start ..................... 219
Jump Starting Procedure .......................... 220
IF YOUR ENGINE OVERHEATS ......................... 221
GEAR SELECTOR OVERRIDE ........................... 222
FREEING A STUCK VEHICLE ............................. 223
TOWING A DISABLED VEHICLE ....................... 224
ENHANCED ACCIDENT RESPONSE
SYSTEM (EARS) ................................................. 225
EVENT DATA RECORDER (EDR) ....................... 225
20_RT_OM_EN_USC_t.book Page 4
Page 91 of 380
GETTING TO KNOW YOUR INSTRUMENT PANEL89
Automatic Compass Calibration
This compass is self-calibrating, which
eliminates the need to set the compass
manually. When the vehicle is new, the
compass may appear erratic, and the
instrument cluster display will display “CAL”
until the compass is calibrated. You may also
calibrate the compass by completing one or
more 360–degree turns (in an area free from
large metal or metallic objects) until the “CAL”
message displayed in the instrument cluster
display turns off. The compass will now function
normally.
NOTE:
A good calibration requires a level surface and
an environment free from large metallic objects
such as buildings, bridges, underground cables,
railroad tracks, etc.
Manual Compass Calibration
If the compass appears erratic and the CAL
indicator does not appear in the instrument
cluster display, you must put the compass into
the Calibration Mode manually, as follows:
1. Turn ON the ignition switch.
2. Push and release the
up or down arrow
button until the System Setup
(Customer-Programmable Features) menu
is reached, then push and release the right
arrow button.
3. Push and release the down button until
“Calibrate Compass” is displayed in the
instrument cluster display then push and
release the right button.
4. Push and release the right button to start
the calibration. The “CAL” indicator will be
displayed in the instrument cluster display.
5. Complete one or more 360–degree turns (in an area free from large metal or metallic
objects) until the “CAL” indicator turns off.
The compass will now function normally.
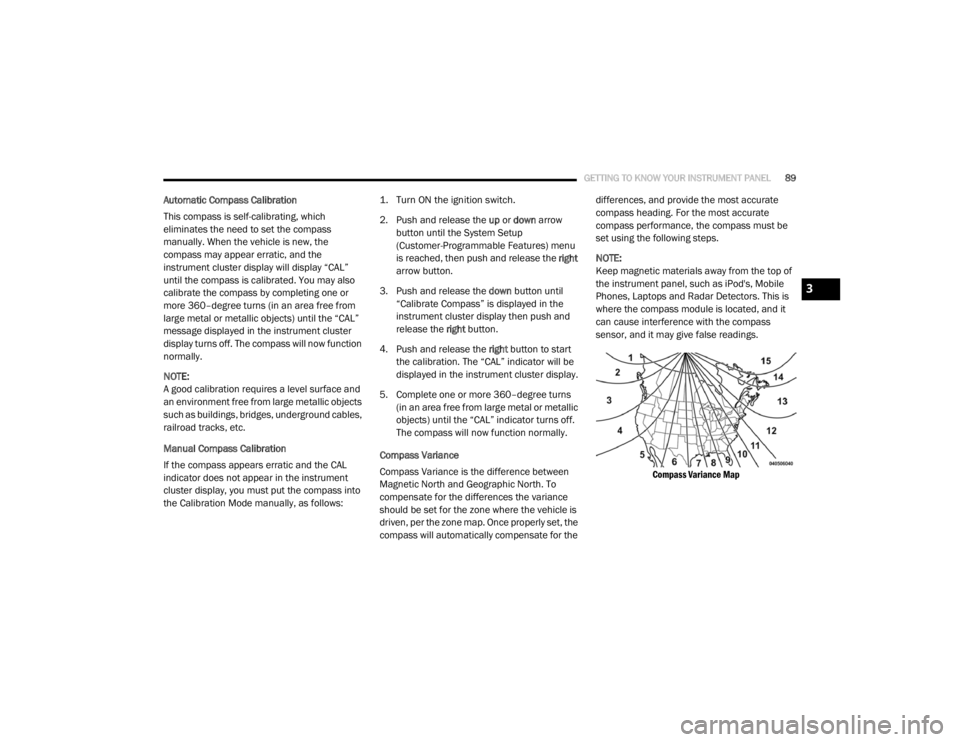
Compass Variance
Compass Variance is the difference between
Magnetic North and Geographic North. To
compensate for the differences the variance
should be set for the zone where the vehicle is
driven, per the zone map. Once properly set, the
compass will automatically compensate for the differences, and provide the most accurate
compass heading. For the most accurate
compass performance, the compass must be
set using the following steps.
NOTE:
Keep magnetic materials away from the top of
the instrument panel, such as iPod's, Mobile
Phones, Laptops and Radar Detectors. This is
where the compass module is located, and it
can cause interference with the compass
sensor, and it may give false readings.
Compass Variance Map
3
20_RT_OM_EN_USC_t.book Page 89
Page 95 of 380

GETTING TO KNOW YOUR INSTRUMENT PANEL93
Tilt Mirror In Reverse — If Equipped
When this feature is selected and the vehicle is
placed in a reverse gear, the driver's side mirror
will tilt downward to allow the driver to see into
the previous blind spot and avoid objects in
close proximity to the rear of the vehicle. To
make your selection, push and release the right
arrow button until a check-mark appears next to
the feature showing the system has been
activated, or the check-mark is removed
showing the system has been deactivated.
Blind Spot Alert — If Equipped
There are three selections when operating Blind
Spot Alert (“Blind Spot Alert Lights,” “Blind Spot
Alert Lights/CHM,” and “Blind Spot Alert Off”).
The Blind Spot Alert feature can be activated in
“Blind Spot Alert Lights” mode. When this mode
is selected, the Blind Spot Monitor (BSM)
system is activated and will only show a visual
alert in the outside mirrors. The Blind Spot Alert
feature can be activated in “Blind Spot Alert
Lights/CHM” mode. In this mode, the Blind Spot
Monitor (BSM) will show a visual alert in the
outside mirrors as well as an audible alert when
the turn signal is on. When “Blind Spot Alert Off”
is selected, the Blind Spot Monitor (BSM)
system is deactivated. To make your selection, push and release the
right
arrow button until a check-mark appears
next to the feature, showing the system has
been activated, or the check-mark is removed,
showing the system has been deactivated.
NOTE:
If your vehicle has experienced any damage in
the area where the sensor is located, even if the
fascia is not damaged, the sensor may have
become misaligned. Take your vehicle to an
authorized dealer to verify sensor alignment.
Having a sensor that is misaligned will result in
the BSM not operating to specification.
Calibrate Compass
Push the right arrow button to calibrate the
compass.
TRIP COMPUTER
Push and release the up or down arrow button
until “Trip Info” is highlighted in the instrument
cluster display and push the right button. Push
and release the up or down arrow button to
highlight one of the following functions. Trip A
Shows the total distance traveled for Trip A
since the last reset.
Shows the elapsed time traveled for Trip A
since the last reset.
Trip B
Shows the total distance traveled for Trip B
since the last reset.
Shows the elapsed time traveled for Trip B
since the last reset.
Elapsed Time
Shows the total elapsed time of travel since the
last reset when the ignition switch is in the ACC
position. Elapsed time will increment when the
ignition switch is in the ON or START position.
To Reset A Trip Function
Reset will only occur while a resettable function
is selected (highlighted). Push and hold the right
arrow button to clear the resettable function
being displayed.
3
20_RT_OM_EN_USC_t.book Page 93
Page 101 of 380

GETTING TO KNOW YOUR INSTRUMENT PANEL99
Each tire, including the spare (if provided),
should be checked monthly when cold and
inflated to the inflation pressure recommended
by the vehicle manufacturer on the vehicle
placard or tire inflation pressure label. If your
vehicle has tires of a different size than the size
indicated on the vehicle placard or tire inflation
pressure label, you should determine the
proper tire inflation pressure for those tires.
As an added safety feature, your vehicle has
been equipped with a Tire Pressure Monitoring
System (TPMS) that illuminates a low tire
pressure telltale when one or more of your tires
is significantly under-inflated. Accordingly, when
the low tire pressure telltale illuminates, you
should stop and check your tires as soon as
possible, and inflate them to the proper
pressure. Driving on a significantly
under-inflated tire causes the tire to overheat
and can lead to tire failure. Under-inflation also
reduces fuel efficiency and tire tread life, and
may affect the vehicle’s handling and stopping
ability. Please note that the TPMS is not a substitute for
proper tire maintenance, and it is the driver’s
responsibility to maintain correct tire pressure,
even if under-inflation has not reached the level
to trigger illumination of the TPMS low tire
pressure telltale.
Your vehicle has also been equipped with a
TPMS malfunction indicator to indicate when
the system is not operating properly. The TPMS
malfunction indicator is combined with the low
tire pressure telltale. When the system detects
a malfunction, the telltale will flash for approxi
-
mately one minute and then remain contin -
uously illuminated. This sequence will continue
upon subsequent vehicle start-ups as long as
the malfunction exists. When the malfunction
indicator is illuminated, the system may not be
able to detect or signal low tire pressure as
intended. TPMS malfunctions may occur for a
variety of reasons, including the installation of
replacement or alternate tires or wheels on the
vehicle that prevent the TPMS from functioning
properly. Always check the TPMS malfunction
telltale after replacing one or more tires or
wheels on your vehicle to ensure that the
replacement or alternate tires and wheels allow
the TPMS to continue to function properly.CAUTION!
The TPMS has been optimized for the original
equipment tires and wheels. TPMS pressures
and warning have been established for the
tire size equipped on your vehicle.
Undesirable system operation or sensor
damage may result when using replacement
equipment that is not of the same size, type,
and/or style. Aftermarket wheels can cause
sensor damage. Using aftermarket tire
sealants may cause the Tire Pressure
Monitoring System (TPMS) sensor to become
inoperable. After using an aftermarket tire
sealant it is recommended that you take your
vehicle to an authorized dealer to have your
sensor function checked.
3
20_RT_OM_EN_USC_t.book Page 99
Page 107 of 380
SAFETY105
Electronic Brake Force Distribution (EBD)
The Electronic Brake Force Distribution (EBD)
function manages the distribution of the
braking torque between the front and rear axles
by limiting braking pressure to the rear axle.
This is done to prevent overslip of the rear
wheels to avoid vehicle instability, and to
prevent the rear axle from entering ABS before
the front axle.
Electronic Roll Mitigation (ERM)
The Electronic Roll Mitigation (ERM) system
anticipates the potential for wheel lift by
monitoring the driver’s steering wheel input and
the speed of the vehicle. When ERM determines
that the rate of change of the steering wheel
angle and vehicle’s speed are sufficient to
potentially cause wheel lift, it then applies the
appropriate brake and may also reduce engine
power to lessen the chance that wheel lift will
occur. ERM can only reduce the chance of
wheel lift occurring during severe or evasive
driving maneuvers; it cannot prevent wheel lift
due to other factors, such as road conditions,
leaving the roadway, or striking objects or other
vehicles.
Electronic Stability Control (ESC)
This system enhances directional control and
stability of the vehicle under various driving
conditions. ESC corrects for oversteering or
understeering of the vehicle by applying the
brake of the appropriate wheel(s) to assist in
counteracting the oversteer or understeer
condition. Engine power may also be reduced to
help the vehicle maintain the desired path. ESC uses sensors in the vehicle to determine
the vehicle path intended by the driver and
compares it to the actual path of the vehicle.
When the actual path does not match the
intended path, ESC applies the brake of the
appropriate wheel to assist in counteracting the
oversteer or understeer condition.
Oversteer — when the vehicle is turning more
than appropriate for the steering wheel posi
-
tion.
Understeer — when the vehicle is turning less
than appropriate for the steering wheel
position.
The “ESC Activation/Malfunction Indicator
Light” located in the instrument cluster will start
to flash as soon as the ESC system becomes
active. The “ESC Activation/Malfunction
Indicator Light” also flashes when the TCS is
active. If the “ESC Activation/Malfunction
Indicator Light” begins to flash during
acceleration, ease up on the accelerator and
apply as little throttle as possible. Be sure to
adapt your speed and driving to the prevailing
road conditions.
WARNING!
Many factors, such as vehicle loading, road
conditions and driving conditions, influence
the chance that wheel lift or rollover may
occur. ERM cannot prevent all wheel lift or
rollovers, especially those that involve leaving
the roadway or striking objects or other
vehicles. The capabilities of an
ERM-equipped vehicle must never be
exploited in a reckless or dangerous manner
which could jeopardize the user's safety or
the safety of others.
4
20_RT_OM_EN_USC_t.book Page 105
Page 111 of 380

SAFETY109
Disabling And Enabling HSA
This feature can be turned on or turned off. To
change the current setting, proceed as follows:
For vehicles equipped with the instrument
cluster display, refer to “Instrument Cluster
Display” in “Getting To Know Your Instrument
Panel” for further information.
For vehicles not equipped with the instrument
cluster display, perform the following steps:
1. Center the steering wheel (front wheels
pointing straight forward).
2. Shift the transmission into PARK.
3. Apply the parking brake.
4. Start the engine.
5. Rotate the steering wheel slightly more than one-half turn to the left.
6. Push the “ESC OFF” button located in the lower switch bank below the climate control
four times within 20 seconds. The “ESC OFF
Indicator Light” should turn on and turn off
two times.
7. Rotate the steering wheel back to center and then an additional slightly more than
one-half turn to the right. 8. Place the ignition switch to the OFF position
and then back to the ON position. If the
sequence was completed properly, the
“ESC OFF Indicator Light” will blink several
times to confirm HSA is disabled.
9. Repeat these steps if you want to return this feature to its previous setting.
Traction Control System (TCS)
The Traction Control System (TCS) monitors the
amount of wheel spin of each of the driven
wheels. If wheel spin is detected, the TCS may
apply brake pressure to the spinning wheel(s)
and/or reduce vehicle power to provide
enhanced acceleration and stability. A feature
of the TCS, Brake Limited Differential (BLD),
functions similar to a limited slip differential
and controls the wheel spin across a driven
axle. If one wheel on a driven axle is spinning
faster than the other, the system will apply the
brake of the spinning wheel. This will allow more
vehicle torque to be applied to the wheel that is
not spinning. BLD may remain enabled even if
TCS and ESC are in a reduced mode.
Trailer Sway Control (TSC)
Trailer Sway Control (TSC) uses sensors in the
vehicle to recognize an excessively swaying
trailer and will take the appropriate actions to
attempt to stop the sway. TSC will become
active automatically once an excessively
swaying trailer is recognized. Note that TSC
cannot stop all trailers from swaying. Always
use caution when towing a trailer and follow the
trailer tongue weight recommendations. Refer
to “Trailer Towing” in “Starting And Operating”
for further information. When TSC is
functioning, the “ESC Activation/Malfunction
Indicator Light” will flash, the engine power may
be reduced and you may feel the brakes being
applied to individual wheels to attempt to stop
the trailer from swaying. TSC is disabled when
the ESC system is in the “Partial Off” mode.
WARNING!
If TSC activates while driving, slow the vehicle
down, stop at the nearest safe location, and
adjust the trailer load to eliminate trailer
sway.
4
20_RT_OM_EN_USC_t.book Page 109
Page 112 of 380
110SAFETY
AUXILIARY DRIVING SYSTEMS
Blind Spot Monitoring (BSM) — If Equipped
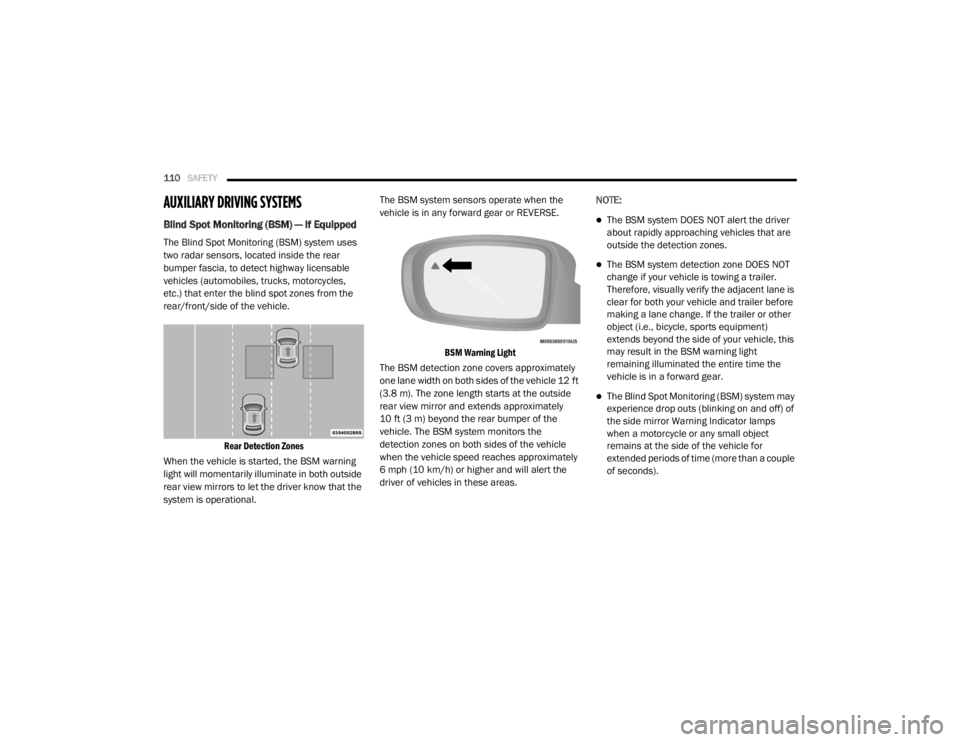
The Blind Spot Monitoring (BSM) system uses
two radar sensors, located inside the rear
bumper fascia, to detect highway licensable
vehicles (automobiles, trucks, motorcycles,
etc.) that enter the blind spot zones from the
rear/front/side of the vehicle.
Rear Detection Zones
When the vehicle is started, the BSM warning
light will momentarily illuminate in both outside
rear view mirrors to let the driver know that the
system is operational. The BSM system sensors operate when the
vehicle is in any forward gear or REVERSE.
BSM Warning Light
The BSM detection zone covers approximately
one lane width on both sides of the vehicle 12 ft
(3.8 m). The zone length starts at the outside
rear view mirror and extends approximately
10 ft (3 m) beyond the rear bumper of the
vehicle. The BSM system monitors the
detection zones on both sides of the vehicle
when the vehicle speed reaches approximately
6 mph (10 km/h) or higher and will alert the
driver of vehicles in these areas. NOTE:
The BSM system DOES NOT alert the driver
about rapidly approaching vehicles that are
outside the detection zones.
The BSM system detection zone DOES NOT
change if your vehicle is towing a trailer.
Therefore, visually verify the adjacent lane is
clear for both your vehicle and trailer before
making a lane change. If the trailer or other
object (i.e., bicycle, sports equipment)
extends beyond the side of your vehicle, this
may result in the BSM warning light
remaining illuminated the entire time the
vehicle is in a forward gear.
The Blind Spot Monitoring (BSM) system may
experience drop outs (blinking on and off) of
the side mirror Warning Indicator lamps
when a motorcycle or any small object
remains at the side of the vehicle for
extended periods of time (more than a couple
of seconds).
20_RT_OM_EN_USC_t.book Page 110
Page 113 of 380
SAFETY111
The area on the rear fascia where the radar
sensors are located must remain free of snow,
ice, and dirt/road contamination so that the
BSM system can function properly. Do not block
the area of the rear fascia where the radar
sensors are located with foreign objects
(bumper stickers, bicycle racks, etc.).
Sensor Location
The BSM system notifies the driver of objects in
the detection zones by illuminating the BSM
warning light located in the outside mirrors in
addition to sounding an audible (chime) alert
and reducing the radio volume. Refer to “Modes
Of Operation” in this section for further
information.
The BSM system monitors the detection zone
from three different entry points (side, rear,
front) while driving to see if an alert is
necessary. The BSM system will issue an alert
during these types of zone entries.
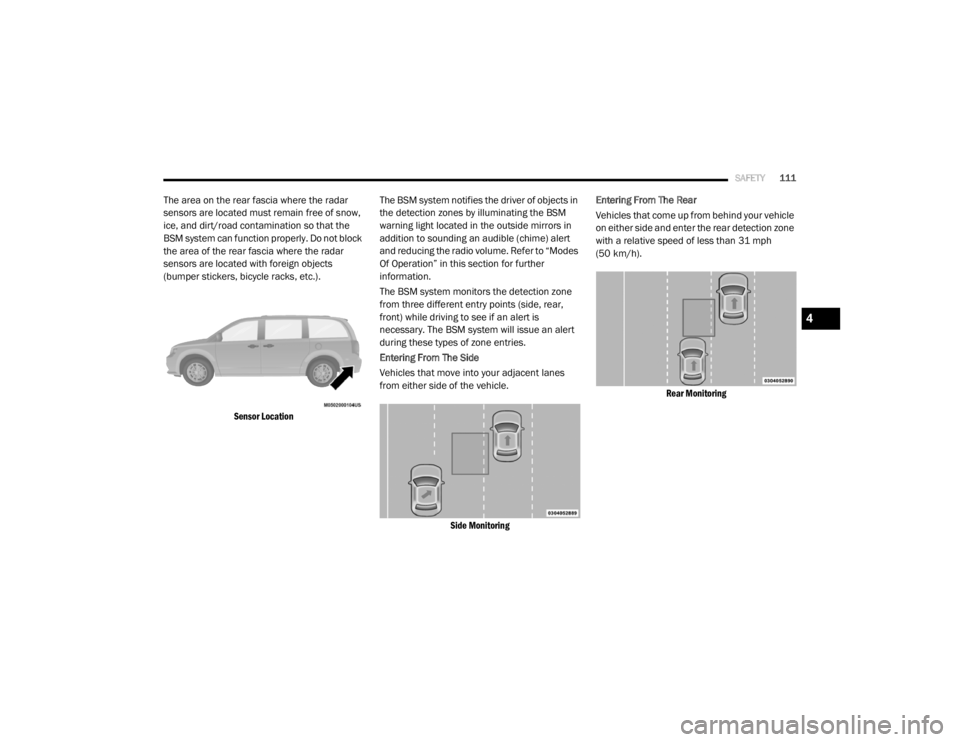
Entering From The Side
Vehicles that move into your adjacent lanes
from either side of the vehicle.
Side Monitoring
Entering From The Rear
Vehicles that come up from behind your vehicle
on either side and enter the rear detection zone
with a relative speed of less than 31 mph
(50 km/h).
Rear Monitoring
4
20_RT_OM_EN_USC_t.book Page 111
Page 115 of 380
SAFETY113
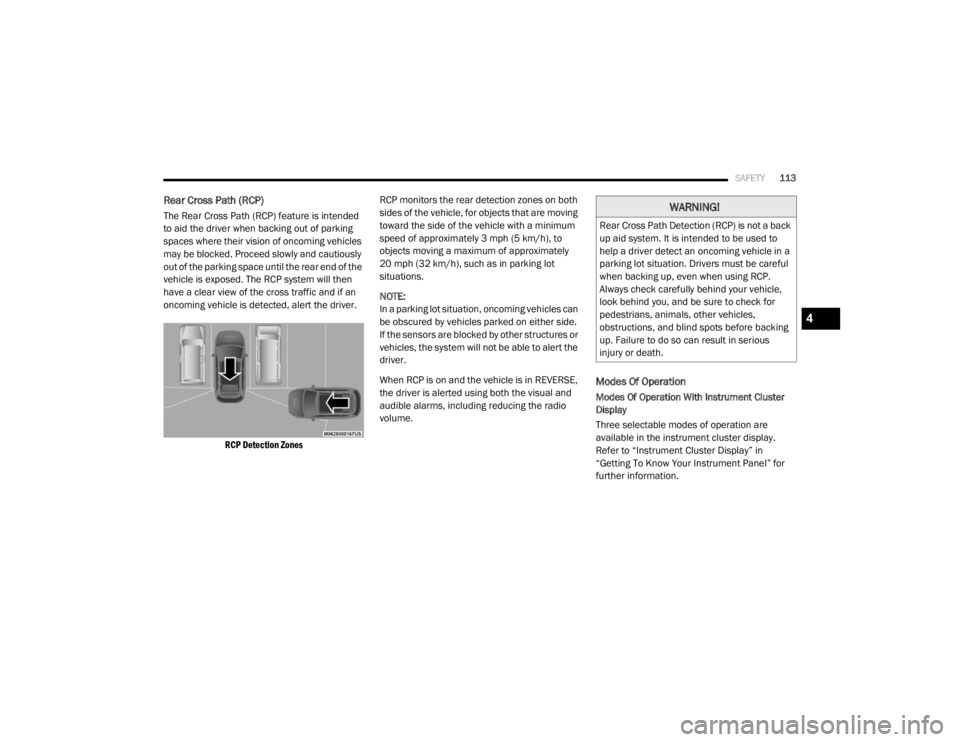
Rear Cross Path (RCP)
The Rear Cross Path (RCP) feature is intended
to aid the driver when backing out of parking
spaces where their vision of oncoming vehicles
may be blocked. Proceed slowly and cautiously
out of the parking space until the rear end of the
vehicle is exposed. The RCP system will then
have a clear view of the cross traffic and if an
oncoming vehicle is detected, alert the driver.
RCP Detection Zones
RCP monitors the rear detection zones on both
sides of the vehicle, for objects that are moving
toward the side of the vehicle with a minimum
speed of approximately 3 mph (5 km/h), to
objects moving a maximum of approximately
20 mph (32 km/h), such as in parking lot
situations.
NOTE:
In a parking lot situation, oncoming vehicles can
be obscured by vehicles parked on either side.
If the sensors are blocked by other structures or
vehicles, the system will not be able to alert the
driver.
When RCP is on and the vehicle is in REVERSE,
the driver is alerted using both the visual and
audible alarms, including reducing the radio
volume.
Modes Of Operation
Modes Of Operation With Instrument Cluster
Display
Three selectable modes of operation are
available in the instrument cluster display.
Refer to “Instrument Cluster Display” in
“Getting To Know Your Instrument Panel” for
further information.
WARNING!
Rear Cross Path Detection (RCP) is not a back
up aid system. It is intended to be used to
help a driver detect an oncoming vehicle in a
parking lot situation. Drivers must be careful
when backing up, even when using RCP.
Always check carefully behind your vehicle,
look behind you, and be sure to check for
pedestrians, animals, other vehicles,
obstructions, and blind spots before backing
up. Failure to do so can result in serious
injury or death.
4
20_RT_OM_EN_USC_t.book Page 113
Page 118 of 380

116SAFETY
(Continued)
NOTE:
When filling warm tires, the tire pressure may
need to be increased up to an additional 4 psi
(28 kPa) above the recommended cold placard
pressure in order to turn the TPMS Warning
Light off. NOTE:
The TPMS is not intended to replace normal
tire care and maintenance, or to provide
warning of a tire failure or condition.
The TPMS should not be used as a tire pres-
sure gauge while adjusting your tire pressure.
Driving on a significantly underinflated tire
causes the tire to overheat and can lead to
tire failure. Underinflation also reduces fuel
efficiency and tire tread life, and may affect
the vehicle’s handling and stopping ability.
The TPMS is not a substitute for proper tire
maintenance, and it is the driver’s responsi -
bility to maintain correct tire pressure using
an accurate tire pressure gauge, even if
underinflation has not reached the level to
trigger illumination of the TPMS Warning
Light.
Seasonal temperature changes will affect
tire pressure, and the TPMS will monitor the
actual tire pressure in the tire.
System Operation
The Tire Pressure Monitoring System (TPMS)
uses wireless technology with wheel
rim-mounted electronic sensors to monitor tire
pressure levels. Sensors, mounted to each
wheel as part of the valve stem, transmit tire
pressure readings to the Receiver Module.
NOTE:
It is particularly important for you to check the
tire pressure in all of your tires regularly and to
maintain the proper pressure.
CAUTION!
The TPMS has been optimized for the orig -
inal equipment tires and wheels. TPMS
pressures and warning have been estab -
lished for the tire size equipped on your
vehicle. Undesirable system operation or
sensor damage may result when using
replacement equipment that is not of the
same size, type, and/or style. The TPM
sensor is not designed for use on after -
market wheels and may contribute to a
poor overall system performance or sensor
damage. Customers are encouraged to use
OEM wheels to assure proper TPM feature
operation.
Using aftermarket tire sealants may cause
the Tire Pressure Monitoring System
(TPMS) sensor to become inoperable. After
using an aftermarket tire sealant it is
recommended that you take your vehicle to
your authorized dealer to have your sensor
function checked.
After inspecting or adjusting the tire pres -
sure always reinstall the valve stem cap.
This will prevent moisture and dirt from
entering the valve stem, which could
damage the TPMS sensor.
CAUTION! (Continued)
20_RT_OM_EN_USC_t.book Page 116