check engine light DODGE HORNET 2023 User Guide
[x] Cancel search | Manufacturer: DODGE, Model Year: 2023, Model line: HORNET, Model: DODGE HORNET 2023Pages: 288, PDF Size: 14.2 MB
Page 91 of 288
STARTING AND OPERATING89
If the “POWER STEERING SYSTEM HOT -
PERFORMANCE MAY BE LIMITED” message
and a steering wheel icon display on the
instrument cluster, it indicates that extreme
steering maneuvers may have occurred, which caused an
over temperature condition in the electric power steering
system. You will lose power steering assistance
momentarily until the over temperature condition no
longer exists. Once driving conditions are safe, pull over
and let the vehicle idle for a few moments until the light
turns off
Úpage 66.
NOTE:
Even if the power steering system is no longer opera -
tional, it is still possible to steer the vehicle. Under
these conditions there will be a substantial increase in
steering effort, especially at low speeds and during
parking maneuvers.
If the condition persists, see an authorized dealer for
service.
STOP/START SYSTEM — IF EQUIPPED
The Stop/Start function is designed to reduce fuel
consumption. The system will stop the engine
automatically during a vehicle stop if the required
conditions are met. Releasing the brake pedal or pressing
the accelerator pedal will automatically restart the engine.
This vehicle has been upgraded with a heavy-duty starter,
enhanced battery, and other upgraded engine parts, to
handle the additional engine starts.
AUTOSTOP MODE
The Stop/Start feature is enabled after every normal
customer engine start. At that time, the system will go into
STOP/START READY.
To Activate The Autostop Mode, The Following Must Occur:
The system must be in STOP/START READY state. A
“STOP/START READY” message will be displayed in the
instrument cluster display within the Stop/Start
section
Úpage 66.
The vehicle must be completely stopped.
The gear selector must be in a forward gear and the
brake pedal pressed.
The engine will shut down, the tachometer will move to the
zero position, and the Stop/Start telltale will illuminate
indicating you are in Autostop. Customer settings will be
maintained upon return to an engine-running condition.
POSSIBLE REASONS THE ENGINE DOES
N
OT AUTOSTOP
Prior to engine shut down, the system will check many
safety and comfort conditions to see if they are fulfilled.
Detailed information about the operation of the Stop/Start
system may be viewed in the instrument cluster display
Stop/Start Screen. In the following situations the engine
will not stop:
Driver’s seat belt is not buckled.
Driver’s door is not closed.
Battery temperature is too warm or cold.
Battery charge is low.
The vehicle is on a steep grade.
Cabin heating or cooling is in process and an accept -
able cabin temperature has not been achieved.
HVAC is set to full defrost mode at a high blower speed.
HVAC is set to MAX A/C.
Engine has not reached normal operating temperature.
The transmission is not in a forward gear.
Hood is open.
Brake pedal is not pressed with sufficient pressure.
Accelerator pedal input.
Engine temperature is too high.
5 mph (8 km/h) threshold has not been achieved from
previous Autostop.
Steering angle beyond threshold.
Adaptive Cruise Control is on and speed is set.
It may be possible for the vehicle to be driven several
times without the Stop/Start system going into a STOP/
START READY state under more extreme conditions of the
items listed previously.
4
23_GG_OM_EN_USC_t.book Page 89
Page 92 of 288
90STARTING AND OPERATING
TO START THE ENGINE WHILE IN
A
UTOSTOP MODE
While in a forward gear, the engine will start when the
brake pedal is released or the accelerator pedal is
pressed. The transmission will automatically re-engage
upon engine restart.
Conditions That Will Cause The Engine To Start
Automatically While In Autostop Mode:
The transmission selector is moved out of DRIVE (D).
To maintain cabin temperature comfort.
HVAC is set to full defrost mode.
HVAC system temperature or fan speed is manually
adjusted.
Battery voltage drops too low.
Stop/Start OFF switch is pressed.
A Stop/Start system error occurs.
Steering wheel is turned beyond threshold.
Conditions That Force An Application Of The Electric Park
Brake While In Autostop Mode:
The driver’s door is open and brake pedal released.
The driver’s door is open and the driver’s seat belt is
unbuckled.
The engine hood has been opened.
A Stop/Start system error occurs.
If the Electric Park Brake (EPB) is applied with the engine
off, the engine may require a manual restart and the EPB
may require a manual release (press brake pedal and
press EPB switch)
Úpage 66.
TO MANUALLY TURN OFF THE STOP/
S
TART SYSTEM
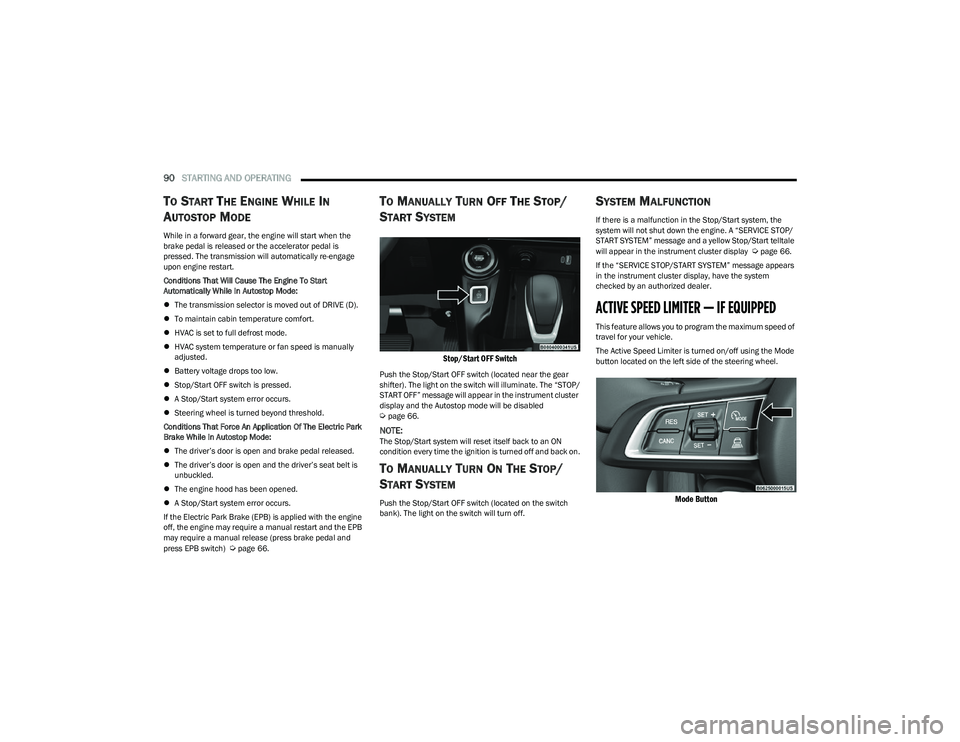
Stop/Start OFF Switch
Push the Stop/Start OFF switch (located near the gear
shifter). The light on the switch will illuminate. The “STOP/
START OFF” message will appear in the instrument cluster
display and the Autostop mode will be disabled
Úpage 66.
NOTE:The Stop/Start system will reset itself back to an ON
condition every time the ignition is turned off and back on.
TO MANUALLY TURN ON THE STOP/
S
TART SYSTEM
Push the Stop/Start OFF switch (located on the switch
bank). The light on the switch will turn off.
SYSTEM MALFUNCTION
If there is a malfunction in the Stop/Start system, the
system will not shut down the engine. A “SERVICE STOP/
START SYSTEM” message and a yellow Stop/Start telltale
will appear in the instrument cluster display
Úpage 66.
If the “SERVICE STOP/START SYSTEM” message appears
in the instrument cluster display, have the system
checked by an authorized dealer.
ACTIVE SPEED LIMITER — IF EQUIPPED
This feature allows you to program the maximum speed of
travel for your vehicle.
The Active Speed Limiter is turned on/off using the Mode
button located on the left side of the steering wheel.
Mode Button
23_GG_OM_EN_USC_t.book Page 90
Page 138 of 288
136MULTIMEDIA
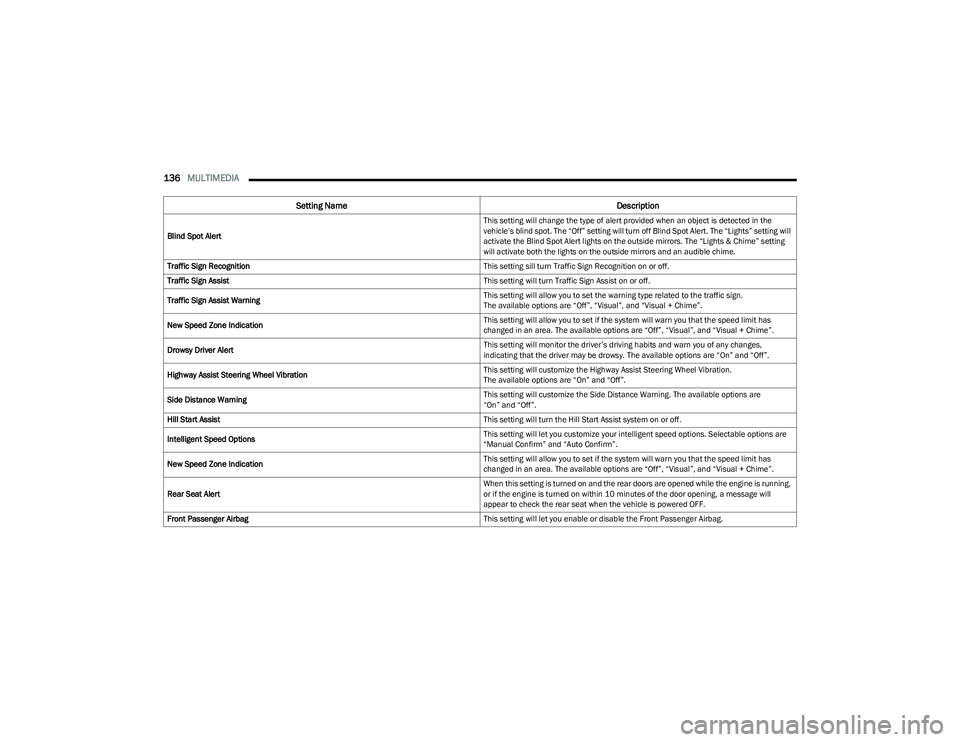
Blind Spot Alert This setting will change the type of alert provided when an object is detected in the
vehicle’s blind spot. The “Off” setting will turn off Blind Spot Alert. The “Lights” setting will
activate the Blind Spot Alert lights on the outside mirrors. The “Lights & Chime” setting
will activate both the lights on the outside mirrors and an audible chime.
Traffic Sign Recognition This setting sill turn Traffic Sign Recognition on or off.
Traffic Sign Assist This setting will turn Traffic Sign Assist on or off.
Traffic Sign Assist Warning This setting will allow you to set the warning type related to the traffic sign.
The available options are “Off”, “Visual”, and “Visual + Chime”.
New Speed Zone Indication This setting will allow you to set if the system will warn you that the speed limit has
changed in an area. The available options are “Off”, “Visual”, and “Visual + Chime”.
Drowsy Driver Alert This setting will monitor the driver’s driving habits and warn you of any changes,
indicating that the driver may be drowsy. The available options are “On” and “Off”.
Highway Assist Steering Wheel Vibration This setting will customize the Highway Assist Steering Wheel Vibration.
The available options are “On” and “Off”.
Side Distance Warning This setting will customize the Side Distance Warning. The available options are
“On” and “Off”.
Hill Start Assist This setting will turn the Hill Start Assist system on or off.
Intelligent Speed Options This setting will let you customize your intelligent speed options. Selectable options are
“Manual Confirm” and “Auto Confirm”.
New Speed Zone Indication This setting will allow you to set if the system will warn you that the speed limit has
changed in an area. The available options are “Off”, “Visual”, and “Visual + Chime”.
Rear Seat Alert When this setting is turned on and the rear doors are opened while the engine is running,
or if the engine is turned on within 10 minutes of the door opening, a message will
appear to check the rear seat when the vehicle is powered OFF.
Front Passenger Airbag This setting will let you enable or disable the Front Passenger Airbag.
Setting NameDescription
23_GG_OM_EN_USC_t.book Page 136
Page 178 of 288
176SAFETY
Air Bag Warning Light
The Occupant Restraint Controller (ORC)
monitors the readiness of the electronic parts
of the air bag system whenever the ignition
switch is in the START or ON/RUN position.
If the ignition switch is in the OFF position, the air bag
system is not on and the air bags will not inflate.
The ORC contains a backup power supply system that may
deploy the air bag system even if the battery loses power
or it becomes disconnected prior to deployment.
The ORC turns on the Air Bag Warning Light in the
instrument panel for approximately four to eight seconds
for a self-check when the ignition switch is first in the ON/
RUN position. After the self-check, the Air Bag Warning
Light will turn off. If the ORC detects a malfunction in any
part of the system, it turns on the Air Bag Warning Light,
either momentarily or continuously. A single chime will
sound to alert you if the light comes on again after initial
startup.
The ORC also includes diagnostics that will illuminate the
instrument panel Air Bag Warning Light if a malfunction is
detected that could affect the air bag system. The
diagnostics also record the nature of the malfunction.
While the air bag system is designed to be maintenance
free, if any of the following occurs, have an authorized
dealer service the air bag system immediately.
The Air Bag Warning Light does not come on during the
four to eight seconds when the ignition switch is first in
the ON/RUN position.
The Air Bag Warning Light remains on after the four to
eight-second interval.
The Air Bag Warning Light comes on intermittently or
remains on while driving.
NOTE:If the speedometer, tachometer, or any engine related
gauges are not working, the Occupant Restraint Controller
(ORC) may also be disabled. In this condition the air bags
may not be ready to inflate for your protection. Have an
authorized dealer service the air bag system immediately.
Redundant Air Bag Warning Light
If a fault with the Air Bag Warning Light is
detected, which could affect the Supplemental
Restraint System (SRS), the Redundant Air Bag
Warning Light will illuminate on the instrument
panel. The Redundant Air Bag Warning Light will stay on
until the fault is cleared. In addition, a single chime will
sound to alert you that the Redundant Air Bag Warning
Light has come on and a fault has been detected. If the Redundant Air Bag Warning Light comes on
intermittently or remains on while driving have an
authorized dealer service the vehicle immediately
Úpage 71.
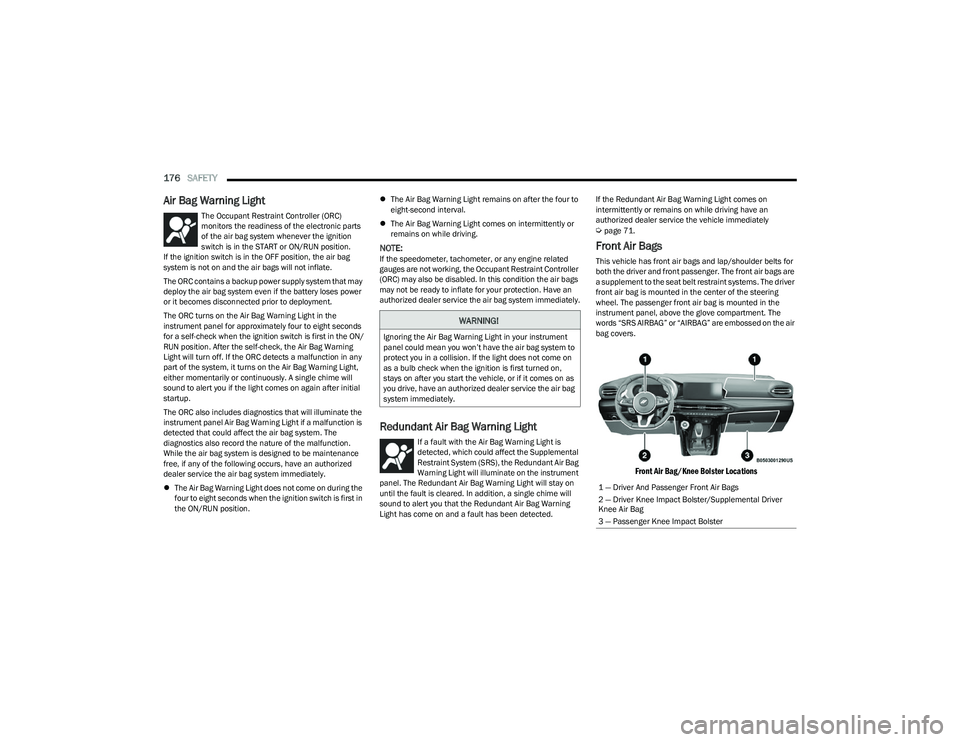
Front Air Bags
This vehicle has front air bags and lap/shoulder belts for
both the driver and front passenger. The front air bags are
a supplement to the seat belt restraint systems. The driver
front air bag is mounted in the center of the steering
wheel. The passenger front air bag is mounted in the
instrument panel, above the glove compartment. The
words “SRS AIRBAG” or “AIRBAG” are embossed on the air
bag covers.
Front Air Bag/Knee Bolster Locations
WARNING!
Ignoring the Air Bag Warning Light in your instrument
panel could mean you won’t have the air bag system to
protect you in a collision. If the light does not come on
as a bulb check when the ignition is first turned on,
stays on after you start the vehicle, or if it comes on as
you drive, have an authorized dealer service the air bag
system immediately.
1 — Driver And Passenger Front Air Bags
2 — Driver Knee Impact Bolster/Supplemental Driver
Knee Air Bag
3 — Passenger Knee Impact Bolster
23_GG_OM_EN_USC_t.book Page 176
Page 186 of 288
184SAFETY
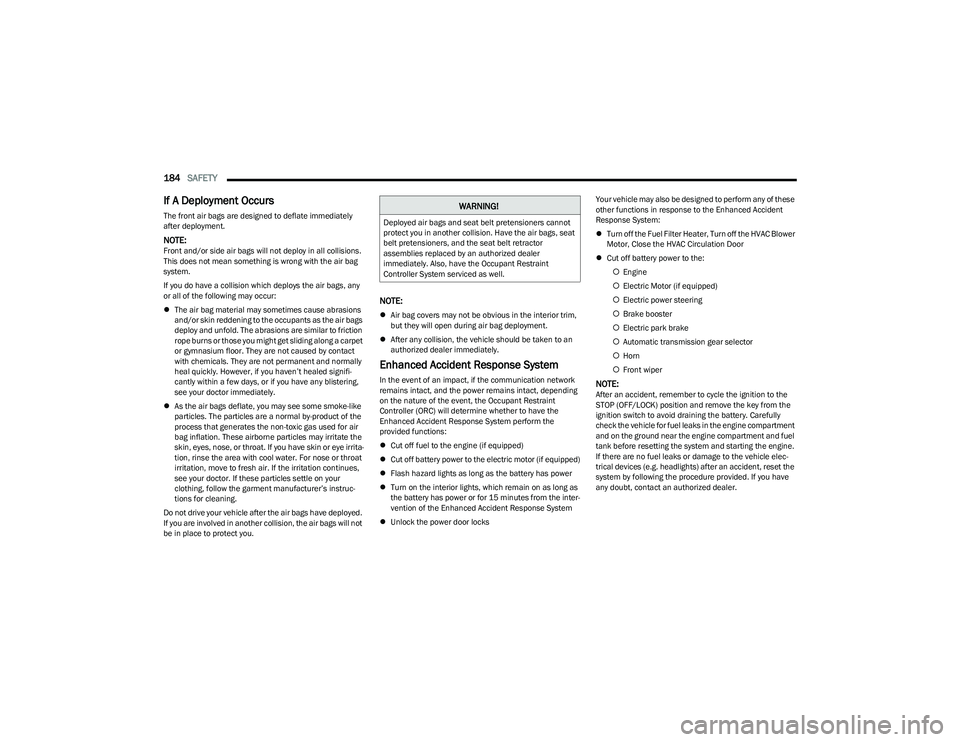
If A Deployment Occurs
The front air bags are designed to deflate immediately
after deployment.
NOTE:Front and/or side air bags will not deploy in all collisions.
This does not mean something is wrong with the air bag
system.
If you do have a collision which deploys the air bags, any
or all of the following may occur:
The air bag material may sometimes cause abrasions
and/or skin reddening to the occupants as the air bags
deploy and unfold. The abrasions are similar to friction
rope burns or those you might get sliding along a carpet
or gymnasium floor. They are not caused by contact
with chemicals. They are not permanent and normally
heal quickly. However, if you haven’t healed signifi -
cantly within a few days, or if you have any blistering,
see your doctor immediately.
As the air bags deflate, you may see some smoke-like
particles. The particles are a normal by-product of the
process that generates the non-toxic gas used for air
bag inflation. These airborne particles may irritate the
skin, eyes, nose, or throat. If you have skin or eye irrita -
tion, rinse the area with cool water. For nose or throat
irritation, move to fresh air. If the irritation continues,
see your doctor. If these particles settle on your
clothing, follow the garment manufacturer’s instruc -
tions for cleaning.
Do not drive your vehicle after the air bags have deployed.
If you are involved in another collision, the air bags will not
be in place to protect you.
NOTE:
Air bag covers may not be obvious in the interior trim,
but they will open during air bag deployment.
After any collision, the vehicle should be taken to an
authorized dealer immediately.
Enhanced Accident Response System
In the event of an impact, if the communication network
remains intact, and the power remains intact, depending
on the nature of the event, the Occupant Restraint
Controller (ORC) will determine whether to have the
Enhanced Accident Response System perform the
provided functions:
Cut off fuel to the engine (if equipped)
Cut off battery power to the electric motor (if equipped)
Flash hazard lights as long as the battery has power
Turn on the interior lights, which remain on as long as
the battery has power or for 15 minutes from the inter -
vention of the Enhanced Accident Response System
Unlock the power door locks Your vehicle may also be designed to perform any of these
other functions in response to the Enhanced Accident
Response System:
Turn off the Fuel Filter Heater, Turn off the HVAC Blower
Motor, Close the HVAC Circulation Door
Cut off battery power to the:
Engine
Electric Motor (if equipped)
Electric power steering
Brake booster
Electric park brake
Automatic transmission gear selector
Horn
Front wiperNOTE:After an accident, remember to cycle the ignition to the
STOP (OFF/LOCK) position and remove the key from the
ignition switch to avoid draining the battery. Carefully
check the vehicle for fuel leaks in the engine compartment
and on the ground near the engine compartment and fuel
tank before resetting the system and starting the engine.
If there are no fuel leaks or damage to the vehicle elec -
trical devices (e.g. headlights) after an accident, reset the
system by following the procedure provided. If you have
any doubt, contact an authorized dealer.
WARNING!
Deployed air bags and seat belt pretensioners cannot
protect you in another collision. Have the air bags, seat
belt pretensioners, and the seat belt retractor
assemblies replaced by an authorized dealer
immediately. Also, have the Occupant Restraint
Controller System serviced as well.
23_GG_OM_EN_USC_t.book Page 184
Page 187 of 288
SAFETY185
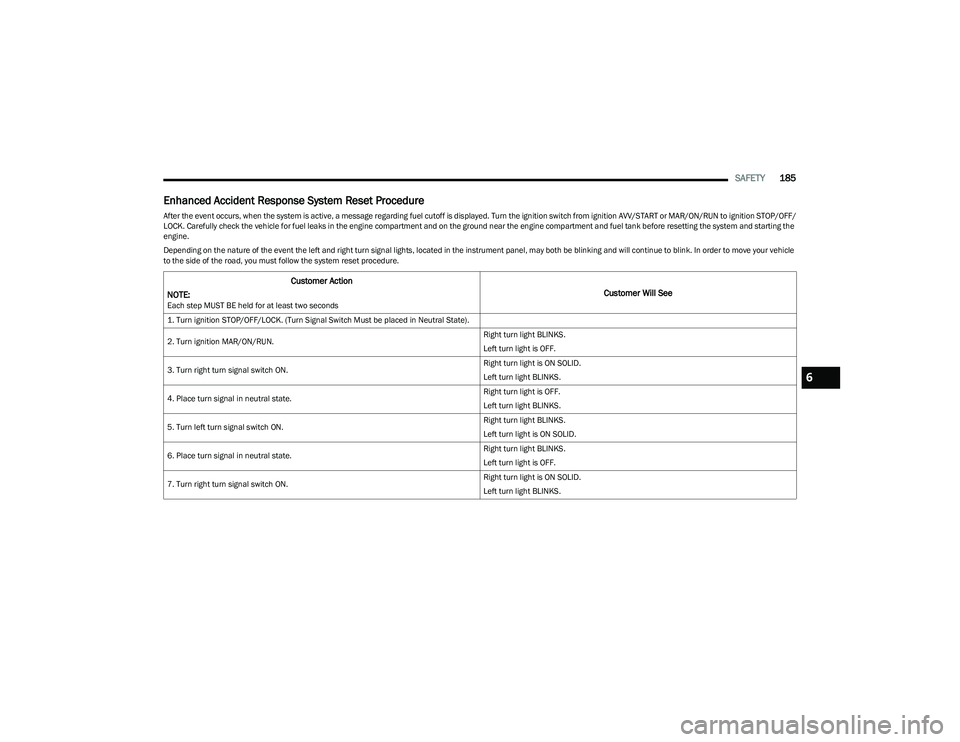
Enhanced Accident Response System Reset Procedure
After the event occurs, when the system is active, a message regarding fuel cutoff is displayed. Turn the ignition switch from ignition AVV/START or MAR/ON/RUN to ignition STOP/OFF/
LOCK. Carefully check the vehicle for fuel leaks in the engine compartment and on the ground near the engine compartment and fuel tank before resetting the system and starting the
engine.
Depending on the nature of the event the left and right turn signal lights, located in the instrument panel, may both be blinking and will continue to blink. In order to move your vehicle
to the side of the road, you must follow the system reset procedure.
Customer Action
NOTE:
Each step MUST BE held for at least two seconds
Customer Will See
1. Turn ignition STOP/OFF/LOCK. (Turn Signal Switch Must be placed in Neutral State).
2. Turn ignition MAR/ON/RUN. Right turn light BLINKS.
Left turn light is OFF.
3. Turn right turn signal switch ON. Right turn light is ON SOLID.
Left turn light BLINKS.
4. Place turn signal in neutral state. Right turn light is OFF.
Left turn light BLINKS.
5. Turn left turn signal switch ON. Right turn light BLINKS.
Left turn light is ON SOLID.
6. Place turn signal in neutral state. Right turn light BLINKS.
Left turn light is OFF.
7. Turn right turn signal switch ON. Right turn light is ON SOLID.
Left turn light BLINKS.
6
23_GG_OM_EN_USC_t.book Page 185
Page 202 of 288
200SAFETY
(Continued)
(Continued)
SAFETY CHECKS YOU SHOULD MAKE
I
NSIDE THE VEHICLE
Seat Belts
Inspect the seat belt system periodically, checking for
cuts, frays, and loose parts. Damaged parts must be
replaced immediately. Do not disassemble or modify
the system.
If your vehicle is involved in a collision, or if you have
questions regarding the seat belt or retractor conditions,
take your vehicle to an authorized FCA dealer or
authorized FCA Certified Collision Care Program facility for
inspection.
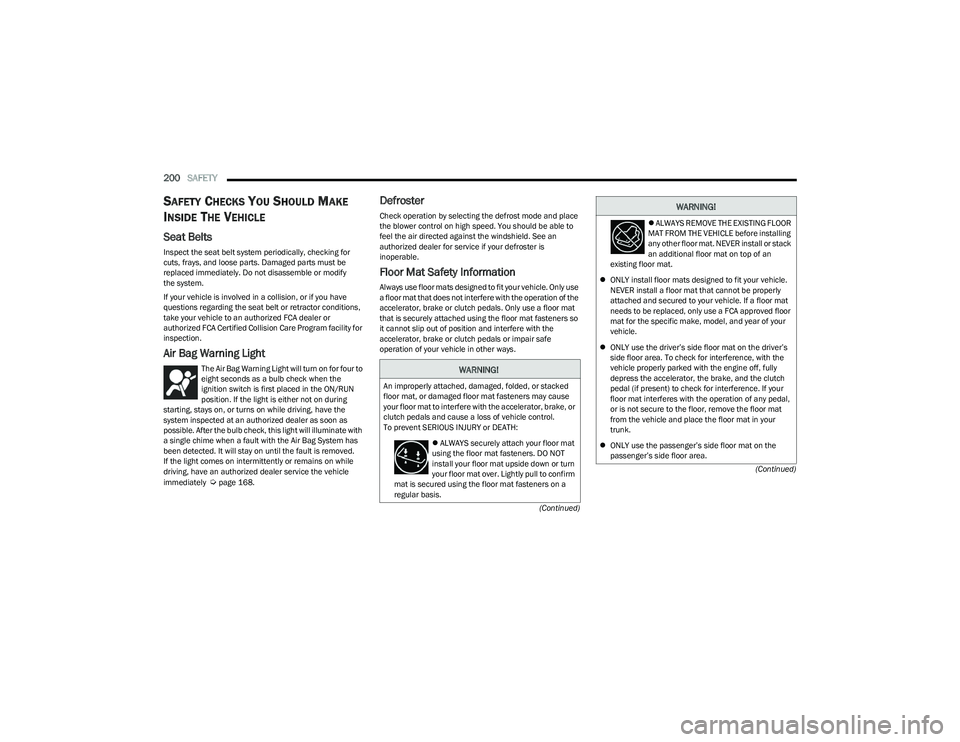
Air Bag Warning Light
The Air Bag Warning Light will turn on for four to
eight seconds as a bulb check when the
ignition switch is first placed in the ON/RUN
position. If the light is either not on during
starting, stays on, or turns on while driving, have the
system inspected at an authorized dealer as soon as
possible. After the bulb check, this light will illuminate with
a single chime when a fault with the Air Bag System has
been detected. It will stay on until the fault is removed.
If the light comes on intermittently or remains on while
driving, have an authorized dealer service the vehicle
immediately
Úpage 168.
Defroster
Check operation by selecting the defrost mode and place
the blower control on high speed. You should be able to
feel the air directed against the windshield. See an
authorized dealer for service if your defroster is
inoperable.
Floor Mat Safety Information
Always use floor mats designed to fit your vehicle. Only use
a floor mat that does not interfere with the operation of the
accelerator, brake or clutch pedals. Only use a floor mat
that is securely attached using the floor mat fasteners so
it cannot slip out of position and interfere with the
accelerator, brake or clutch pedals or impair safe
operation of your vehicle in other ways.
WARNING!
An improperly attached, damaged, folded, or stacked
floor mat, or damaged floor mat fasteners may cause
your floor mat to interfere with the accelerator, brake, or
clutch pedals and cause a loss of vehicle control.
To prevent SERIOUS INJURY or DEATH:
ALWAYS securely attach your floor mat
using the floor mat fasteners. DO NOT
install your floor mat upside down or turn
your floor mat over. Lightly pull to confirm
mat is secured using the floor mat fasteners on a
regular basis.
ALWAYS REMOVE THE EXISTING FLOOR
MAT FROM THE VEHICLE before installing
any other floor mat. NEVER install or stack
an additional floor mat on top of an
existing floor mat.
ONLY install floor mats designed to fit your vehicle.
NEVER install a floor mat that cannot be properly
attached and secured to your vehicle. If a floor mat
needs to be replaced, only use a FCA approved floor
mat for the specific make, model, and year of your
vehicle.
ONLY use the driver’s side floor mat on the driver’s
side floor area. To check for interference, with the
vehicle properly parked with the engine off, fully
depress the accelerator, the brake, and the clutch
pedal (if present) to check for interference. If your
floor mat interferes with the operation of any pedal,
or is not secure to the floor, remove the floor mat
from the vehicle and place the floor mat in your
trunk.
ONLY use the passenger’s side floor mat on the
passenger’s side floor area.
WARNING!
23_GG_OM_EN_USC_t.book Page 200
Page 225 of 288
223
SERVICING AND MAINTENANCE
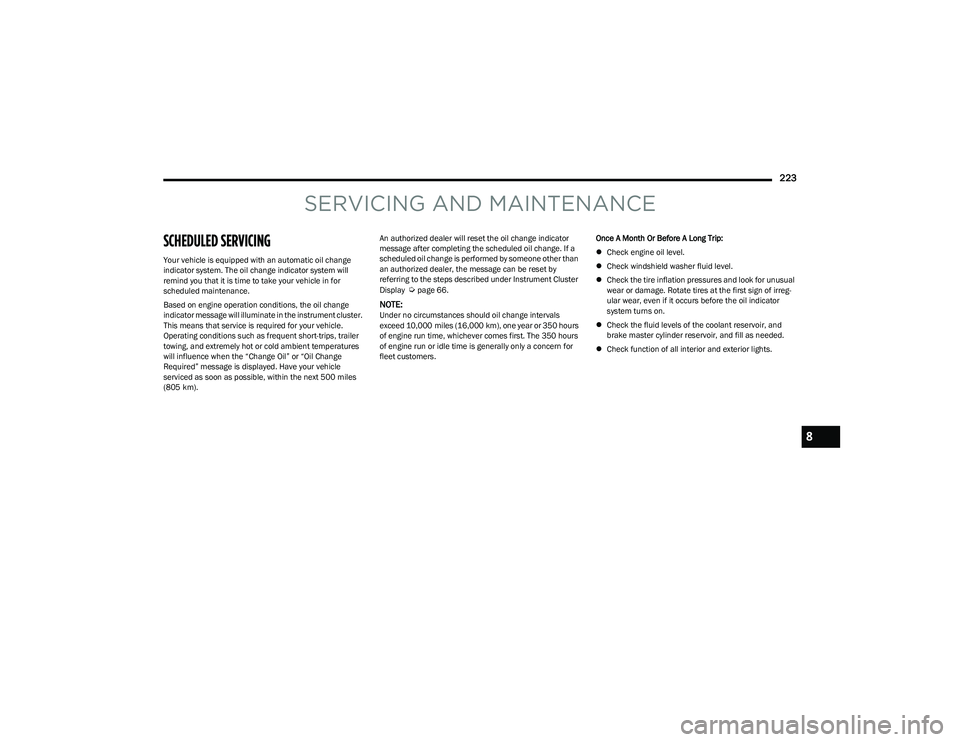
SCHEDULED SERVICING
Your vehicle is equipped with an automatic oil change
indicator system. The oil change indicator system will
remind you that it is time to take your vehicle in for
scheduled maintenance.
Based on engine operation conditions, the oil change
indicator message will illuminate in the instrument cluster.
This means that service is required for your vehicle.
Operating conditions such as frequent short-trips, trailer
towing, and extremely hot or cold ambient temperatures
will influence when the “Change Oil” or “Oil Change
Required” message is displayed. Have your vehicle
serviced as soon as possible, within the next 500 miles
(805 km).An authorized dealer will reset the oil change indicator
message after completing the scheduled oil change. If a
scheduled oil change is performed by someone other than
an authorized dealer, the message can be reset by
referring to the steps described under Instrument Cluster
Display
Úpage 66.
NOTE:Under no circumstances should oil change intervals
exceed 10,000 miles (16,000 km), one year or 350 hours
of engine run time, whichever comes first. The 350 hours
of engine run or idle time is generally only a concern for
fleet customers.
Once A Month Or Before A Long Trip:
Check engine oil level.
Check windshield washer fluid level.
Check the tire inflation pressures and look for unusual
wear or damage. Rotate tires at the first sign of irreg -
ular wear, even if it occurs before the oil indicator
system turns on.
Check the fluid levels of the coolant reservoir, and
brake master cylinder reservoir, and fill as needed.
Check function of all interior and exterior lights.
8
23_GG_OM_EN_USC_t.book Page 223
Page 238 of 288
236SERVICING AND MAINTENANCE
BRAKE SYSTEM
In order to ensure brake system performance, all brake
system components should be inspected periodically.
For the proper maintenance intervals
Úpage 224.
Brake Master Cylinder
The fluid in the master cylinder should be checked when
performing under hood services or immediately if the
Brake Warning Light is illuminated.
Be sure to clean the top of the master cylinder area before
removing the cap. If necessary, add fluid to bring the fluid
level up to the requirements described on the brake fluid
reservoir. With disc brakes, fluid level can be expected to
fall as the brake pads wear. Brake fluid level should be
checked when pads are replaced. However, low fluid level
may be caused by a leak and a checkup may be needed.
Use only the manufacturer recommended brake fluid
Úpage 269.
AUTOMATIC TRANSMISSION —
I
F EQUIPPED
Special Additives
It is strongly recommended against using any special
additives in the transmission. Automatic Transmission
Fluid (ATF) is an engineered product and its performance
may be impaired by supplemental additives. Therefore, do
not add any fluid additives to the transmission. Avoid
using transmission sealers as they may adversely affect
seals.
Fluid Level Check
The fluid level is preset at the factory and does not require
adjustment under normal operating conditions. Routine
fluid level checks are not required; therefore the
transmission has no dipstick. An authorized dealer can
check your transmission fluid level using special service
tools. If you notice fluid leakage or transmission
malfunction, visit an authorized dealer immediately to
have the transmission fluid level checked. Operating the
vehicle with an improper fluid level can cause severe
transmission damage.
WARNING!
Riding the brakes can lead to brake failure and possibly
a collision. Driving with your foot resting or riding on the
brake pedal can result in abnormally high brake
temperatures, excessive lining wear, and possible brake
damage. You would not have your full braking capacity
in an emergency.
WARNING!
Use only the manufacturer recommended brake fluid Úpage 269. Using the wrong type of brake fluid can
severely damage your brake system and/or impair its
performance. The proper type of brake fluid for your
vehicle is also identified on the original factory
installed hydraulic master cylinder reservoir.
To avoid contamination from foreign matter or
moisture, use only new brake fluid or fluid that has
been in a tightly closed container. Keep the master
cylinder reservoir cap secured at all times. Brake
fluid in an open container absorbs moisture from the
air resulting in a lower boiling point. This may cause
it to boil unexpectedly during hard or prolonged
braking, resulting in sudden brake failure.
This could result in a collision.
Overfilling the brake fluid reservoir can result in
spilling brake fluid on hot engine parts, causing the
brake fluid to catch fire. Brake fluid can also damage
painted and vinyl surfaces, care should be taken to
avoid its contact with these surfaces.
Do not allow petroleum-based fluid to contaminate
the brake fluid. Brake seal components could be
damaged, causing partial or complete brake failure.
This could result in a collision.
CAUTION!
Do not use chemical flushes in your transmission as the
chemicals can damage your transmission components.
Such damage is not covered by the New Vehicle Limited
Warranty.
23_GG_OM_EN_USC_t.book Page 236
Page 267 of 288
265
TECHNICAL SPECIFICATIONS
VEHICLE IDENTIFICATION NUMBER (VIN)
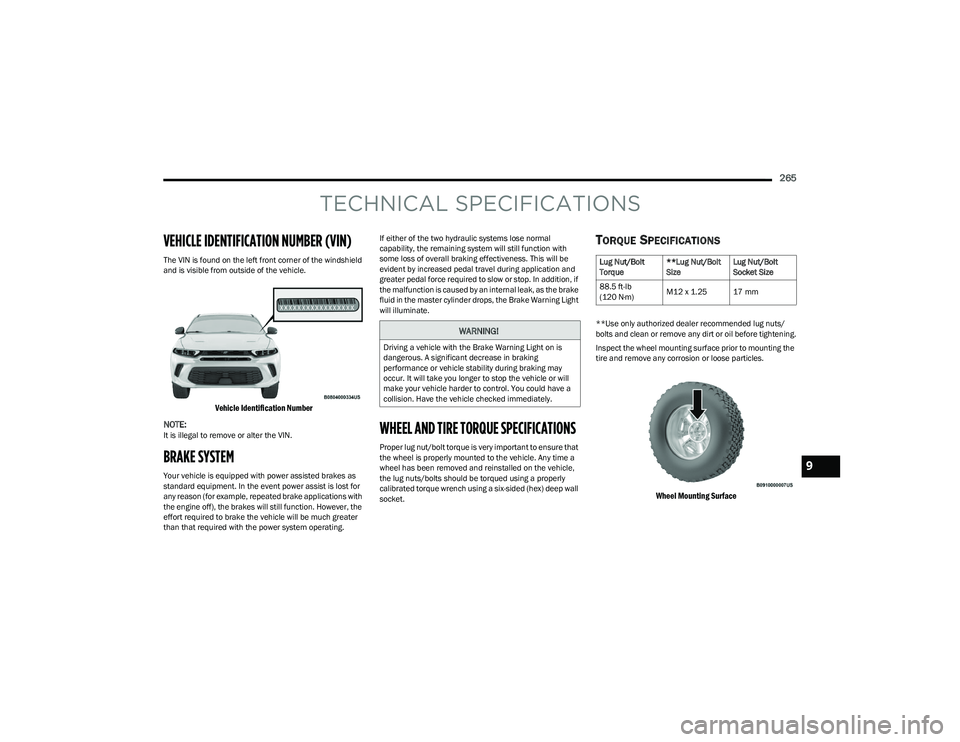
The VIN is found on the left front corner of the windshield
and is visible from outside of the vehicle.
Vehicle Identification Number
NOTE:
It is illegal to remove or alter the VIN.
BRAKE SYSTEM
Your vehicle is equipped with power assisted brakes as
standard equipment. In the event power assist is lost for
any reason (for example, repeated brake applications with
the engine off), the brakes will still function. However, the
effort required to brake the vehicle will be much greater
than that required with the power system operating. If either of the two hydraulic systems lose normal
capability, the remaining system will still function with
some loss of overall braking effectiveness. This will be
evident by increased pedal travel during application and
greater pedal force required to slow or stop. In addition, if
the malfunction is caused by an internal leak, as the brake
fluid in the master cylinder drops, the Brake Warning Light
will illuminate.
WHEEL AND TIRE TORQUE SPECIFICATIONS
Proper lug nut/bolt torque is very important to ensure that
the wheel is properly mounted to the vehicle. Any time a
wheel has been removed and reinstalled on the vehicle,
the lug nuts/bolts should be torqued using a properly
calibrated torque wrench using a six-sided (hex) deep wall
socket.
TORQUE SPECIFICATIONS
**Use only authorized dealer recommended lug nuts/
bolts and clean or remove any dirt or oil before tightening.
Inspect the wheel mounting surface prior to mounting the
tire and remove any corrosion or loose particles.
Wheel Mounting Surface
WARNING!
Driving a vehicle with the Brake Warning Light on is
dangerous. A significant decrease in braking
performance or vehicle stability during braking may
occur. It will take you longer to stop the vehicle or will
make your vehicle harder to control. You could have a
collision. Have the vehicle checked immediately.
Lug Nut/Bolt
Torque
**Lug Nut/Bolt
SizeLug Nut/Bolt
Socket Size
88.5 ft-lb
(120 N·m) M12 x 1.25 17 mm
9
23_GG_OM_EN_USC_t.book Page 265