battery location DODGE HORNET 2023 Owners Manual
[x] Cancel search | Manufacturer: DODGE, Model Year: 2023, Model line: HORNET, Model: DODGE HORNET 2023Pages: 288, PDF Size: 14.2 MB
Page 2 of 288

The driver’s primary responsibility is the safe operation of the vehicle. Driving w\
hile distracted can result in loss of vehicle control, resulting in an accident and personal
injury. FCA US LLC strongly recommends that the driver use extreme caution whe\
n using any device or feature that may take their attention off the road. Use of any electrical
devices, such as cellular telephones, computers, portable radios, vehicl\
e navigation or other devices, by the driver while the vehicle is moving is dangerous and could lead
to a serious accident. Texting while driving is also dangerous and should never be done while th\
e vehicle is moving. If you find yourself unable to devote your full attention
to vehicle operation, pull off the road to a safe location and stop your\
vehicle. Some states or provinces prohibit the use of cellular telephones or texting while driving. It is
always the driver’s responsibility to comply with all local laws.
This Owner’s Manual has been prepared to help you get acquainted with your new Dodge brand vehicle and to provide a convenient reference source for common questions.
Not all features shown in this manual may apply to your vehicle. For add\
itional information, visit mopar.com/om (U.S.), owners.mopar.ca (Canada) or your local Dodge brand
dealer.
DRIVING AND ALCOHOL
Drunk driving is one of the most frequent causes of accidents. Your driving ability can be seriously impaired with blood alcohol levels far
below the legal minimum. If you are drinking, don’t drive. Ride with \
a designated non-drinking driver, call a cab, a rideshare, a friend, or use public
transportation.
WARNING
Driving after drinking can lead to an accident. Your perceptions are less sharp, your reflexes are slower and your judg\
ment is impaired when you have
been drinking. Never drink and then drive.
WARNING: Operating, servicing and maintaining a passenger vehicle or off-highway \
motor vehicle can expose you to
chemicals including engine exhaust, carbon monoxide, phthalates, and lea\
d, which are known to the State of California to
cause cancer and birth defects or other reproductive harm. To minimize exposure, avoid breathing exhaust, do not idle the
engine except as necessary, service your vehicle in a well-ventilated area and wear gloves or wash\
your hands frequently
when servicing your vehicle. For more information go to www.P65Warnings.ca.gov/passenger-vehicle.
This Owner’s Manual illustrates and describes the operation of features and equipme\
nt that are either standard or optional on this vehicle. This manual may\
also include a description of features and equipment that are no longer available or were not ordered \
on this vehicle. Please disregard any features and equipment described i\
n this manual that are not on this vehicle. FCA US LLC reserves the right to make changes in design and specifications\
, and/or make additions to or improvements to its products without impos\
ing any obligation upon itself to install them on products previously manufactured.
With respect to any vehicles sold in Canada, the name FCA US LLC shall b\
e deemed to be deleted and the name FCA Canada Inc. used in substitution\
therefore.
This Owner’s Manual is intended to familiarize you with the important features of y\
our vehicle. Your most up-to-date Owner’s Manual, Owner Handbook, Radio Instruction Manual and Warranty Booklet can be found by visiting the website on the back cover.
U.S. Residents: If you are the first registered retail owner of your v\
ehicle, you may obtain a complimentary printed copy of the Warranty Booklet by calling 1-800-423-6343 or by contacting your dealer. Replacement kits can be purchased by visiting www.techauthority.com.
Canadian Residents: If you are the first registered retail owner of yo\
ur vehicle, you may obtain a complimentary printed copy of the W arranty Booklet or purchase a replacement kit by calling 1-800-387-1143 or by contacting your dealer.
FCA US LLC reserves the right to modify the terms or discontinue the Roa\
dside Assistance Program at any time. The Roadside Assistance Program i\
s subject to restrictions and conditions of use, that are determined solely by FCA US LLC.
ROADSIDE ASSISTANCE 24 HOURS, 7 DAYS A WEEK AT YOUR SERVICE. CALL 1-800-521-2779 OR VISIT CHRYSLER.RSAHELP.COM (USA) CALL 1-800-363-4869 OR VISIT FCA.ROADSIDEAID.COM (CANADA) SERVICES: Flat Tire Service, Out Of Gas/Fuel Delivery, Battery Jump Assistance, Lockout Service and Towing Service
Please see the Customer Assistance chapter in this Owner’s Manual for further information.
Page 5 of 288
3
EXTERIOR LIGHTS ...............................................................40Multifunction Lever .................................................... 40
Headlight Switch ......................................................... 40
Daytime Running Lights (DRLs) —
If Equipped .................................................................. 40
High/Low Beam Switch ............................................. 40
Automatic High Beam Headlamp Control —
If Equipped ................................................................. 41
Flash-To-Pass .............................................................. 41
Automatic Headlights — If Equipped ......................... 41
Headlights On Automatically With Wipers —
If Equipped .................................................................. 41
Headlight Delay ........................................................... 41
Lights-On Reminder .................................................... 41
Cornering Lights — If Equipped .................................. 41
Turn Signals ................................................................ 42
Lane Change Assist ................................................... 42
Battery Saver Feature................................................. 42
INTERIOR LIGHTS................................................................42 Interior Courtesy Lights............................................... 42
WINDSHIELD WIPERS AND WASHERS ........................... 44 Windshield Wiper Operation....................................... 44
Rain Sensing Wipers — If Equipped .......................... 45
Rear Window Wiper/Washer ..................................... 46
CLIMATE CONTROLS ..........................................................46 Automatic Climate Control Descriptions And
Functions ..................................................................... 46
Automatic Temperature
Control (ATC) ............................................................... 49
Climate Voice Commands .......................................... 49
Operating Tips ............................................................ 49 INTERIOR STORAGE AND EQUIPMENT ............................ 50
Storage ......................................................................... 50
USB Control .................................................................. 51
Power Outlets — If Equipped ....................................... 52
Wireless Charging Pad —
If Equipped ................................................................... 53
WINDOWS .......................................................................... 55 Power Window Controls............................................... 55
Automatic Window Features ......................................55
Power Window System Initialization........................... 55
Window Lockout Switch ..............................................56
Wind Buffeting ............................................................ 56
POWER SUNROOF — IF EQUIPPED ................................. 56 Opening And Closing The Sunroof ..............................57
Opening And Closing The Power Sunshade ............... 57
Pinch Protect Feature.................................................. 57
Re-Initialization Procedure .......................................... 58
Sunroof Maintenance.................................................. 58
HOOD ................................................................................... 58 Opening The Hood .......................................................58
Closing The Hood ......................................................... 59
LIFTGATE .............................................................................. 59 Unlock/Open The Liftgate ........................................... 59
Lock/Close The Liftgate ..............................................60
Power Liftgate — If Equipped ......................................60
Adjustable Power Liftgate Height ............................... 61
Hands-Free Liftgate — If Equipped ............................ 62
Cargo Area Features.................................................... 63GETTING TO KNOW YOUR
INSTRUMENT PANEL
PREMIUM INSTRUMENT CLUSTER................................... 65 Instrument Cluster Descriptions
b
.......................... 66
INSTRUMENT CLUSTER DISPLAY ..................................... 66 Instrument Cluster Display Location And
Controls........................................................................ 66
Oil Change Reset
b
.................................................. 68
Oil Change Indicator System ...................................... 68
Gear Shift Indicator (GSI) —
If Equipped................................................................... 68
Instrument Cluster Display Menu Items ................... 68
Battery Saver On/Battery Saver Mode Message —
Electrical Load Reduction Actions — If Equipped ...... 70
WARNING LIGHTS AND MESSAGES ................................ 71 Red Warning Lights ..................................................... 71
Yellow Warning Lights ................................................. 73
Yellow Indicator Lights ................................................ 77
Green Indicator Lights................................................. 77
White Indicator Lights ................................................. 78
Blue Indicator Lights ................................................... 78
ONBOARD DIAGNOSTIC SYSTEM — OBD II .................... 78 Onboard Diagnostic System (OBD II)
Cybersecurity ............................................................... 79
EMISSIONS INSPECTION AND MAINTENANCE
PROGRAMS ......................................................................... 79
23_GG_OM_EN_USC_t.book Page 3
Page 19 of 288
GETTING TO KNOW YOUR VEHICLE17
Starting The Engine With A Depleted Key Fob Battery
If the ignition state/mode does not change with the push
of a button, the key fob may have a low or depleted
battery. In this situation, a backup method can be used to
operate the ignition switch:
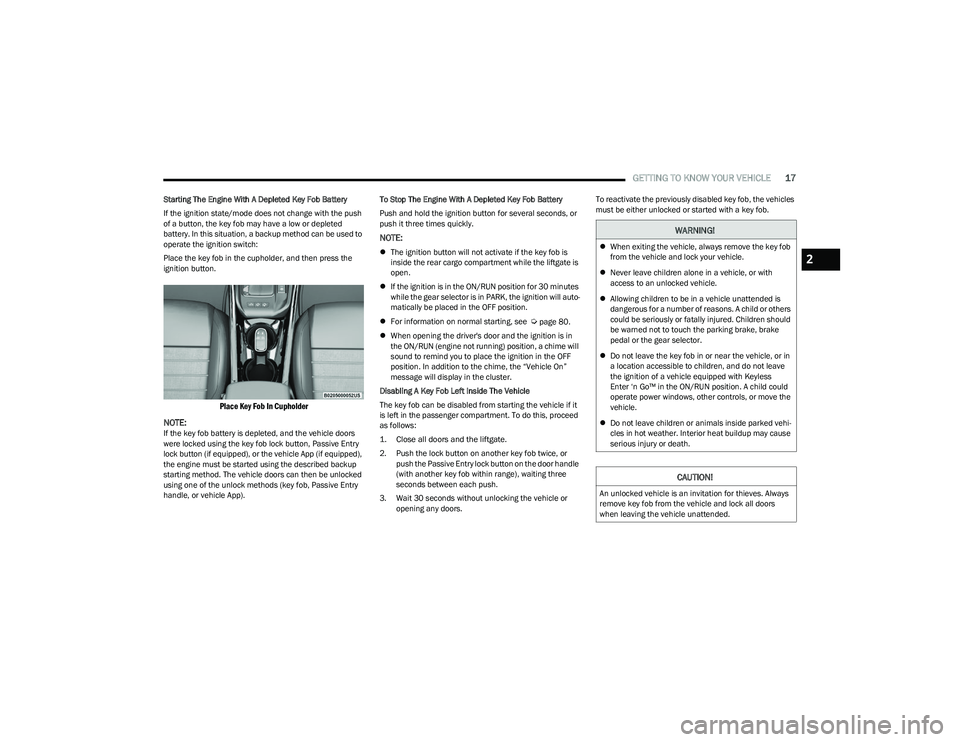
Place the key fob in the cupholder, and then press the
ignition button.
Place Key Fob In Cupholder
NOTE:
If the key fob battery is depleted, and the vehicle doors
were locked using the key fob lock button, Passive Entry
lock button (if equipped), or the vehicle App (if equipped),
the engine must be started using the described backup
starting method. The vehicle doors can then be unlocked
using one of the unlock methods (key fob, Passive Entry
handle, or vehicle App). To Stop The Engine With A Depleted Key Fob Battery
Push and hold the ignition button for several seconds, or
push it three times quickly.
NOTE:
The ignition button will not activate if the key fob is
inside the rear cargo compartment while the liftgate is
open.
If the ignition is in the ON/RUN position for 30 minutes
while the gear selector is in PARK, the ignition will auto -
matically be placed in the OFF position.
For information on normal starting, see
Úpage 80.
When opening the driver's door and the ignition is in
the ON/RUN (engine not running) position, a chime will
sound to remind you to place the ignition in the OFF
position. In addition to the chime, the “Vehicle On”
message will display in the cluster.
Disabling A Key Fob Left Inside The Vehicle
The key fob can be disabled from starting the vehicle if it
is left in the passenger compartment. To do this, proceed
as follows:
1. Close all doors and the liftgate.
2. Push the lock button on another key fob twice, or push the Passive Entry lock button on the door handle
(with another key fob within range), waiting three
seconds between each push.
3. Wait 30 seconds without unlocking the vehicle or opening any doors. To reactivate the previously disabled key fob, the vehicles
must be either unlocked or started with a key fob.
WARNING!
When exiting the vehicle, always remove the key fob
from the vehicle and lock your vehicle.
Never leave children alone in a vehicle, or with
access to an unlocked vehicle.
Allowing children to be in a vehicle unattended is
dangerous for a number of reasons. A child or others
could be seriously or fatally injured. Children should
be warned not to touch the parking brake, brake
pedal or the gear selector.
Do not leave the key fob in or near the vehicle, or in
a location accessible to children, and do not leave
the ignition of a vehicle equipped with Keyless
Enter ‘n Go™ in the ON/RUN position. A child could
operate power windows, other controls, or move the
vehicle.
Do not leave children or animals inside parked vehi -
cles in hot weather. Interior heat buildup may cause
serious injury or death.
CAUTION!
An unlocked vehicle is an invitation for thieves. Always
remove key fob from the vehicle and lock all doors
when leaving the vehicle unattended.
2
23_GG_OM_EN_USC_t.book Page 17
Page 60 of 288
58GETTING TO KNOW YOUR VEHICLE
RE-INITIALIZATION PROCEDURE
Automatic operation of the sunroof must be re-initialized
in case of faulty sunroof operation. It may also be
necessary to re-initialize the sunroof after the vehicle’s
battery has been disconnected and then reconnected.
NOTE:The anti-pinch safety device is deactivated during the
re-initialization procedure.
Proceed as follows:
1. Place the ignition in the ON/RUN position.
2. Make sure the sunroof glass and the power sunshade
are fully closed. Release the sunroof close switch,
then push and hold it again within five seconds.
Continue to hold the switch while the sunshade fully
opens, the sunroof glass fully opens, followed by the
glass fully closing then the sunshade fully closing.
3. Release the switch once all of the operations stop. Re-initialization of the sunroof motor is now
complete.
NOTE:If the switch is released prior to full completion of the oper -
ations described, the entire re-initialization procedure
must be repeated from step 1.
4. Confirm express operations for the sunroof glass and sunshade are functional for opening and closing
operations.
SUNROOF MAINTENANCE
Use only a non-abrasive cleaner and a soft cloth to clean
the glass panel. Periodically check for and clear out any
debris that may have collected in the tracks.
HOOD
OPENING THE HOOD
Two latches must be released to open the hood.
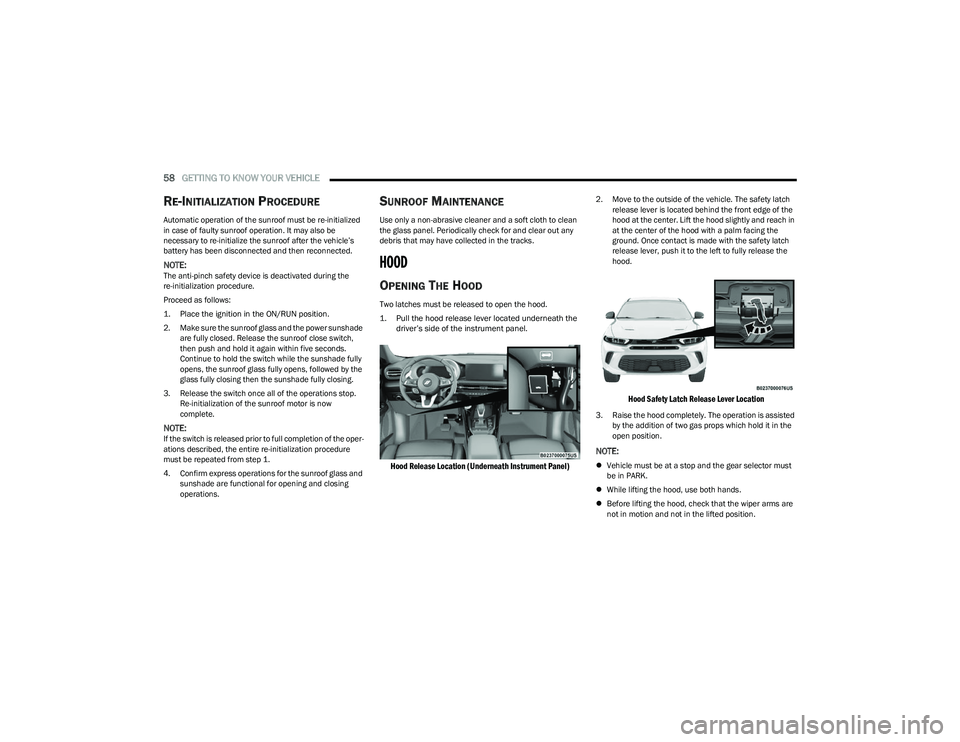
1. Pull the hood release lever located underneath the driver’s side of the instrument panel.
Hood Release Location (Underneath Instrument Panel)
2. Move to the outside of the vehicle. The safety latch release lever is located behind the front edge of the
hood at the center. Lift the hood slightly and reach in
at the center of the hood with a palm facing the
ground. Once contact is made with the safety latch
release lever, push it to the left to fully release the
hood.
Hood Safety Latch Release Lever Location
3. Raise the hood completely. The operation is assisted by the addition of two gas props which hold it in the
open position.
NOTE:
Vehicle must be at a stop and the gear selector must
be in PARK.
While lifting the hood, use both hands.
Before lifting the hood, check that the wiper arms are
not in motion and not in the lifted position.
23_GG_OM_EN_USC_t.book Page 58
Page 64 of 288
62GETTING TO KNOW YOUR VEHICLE
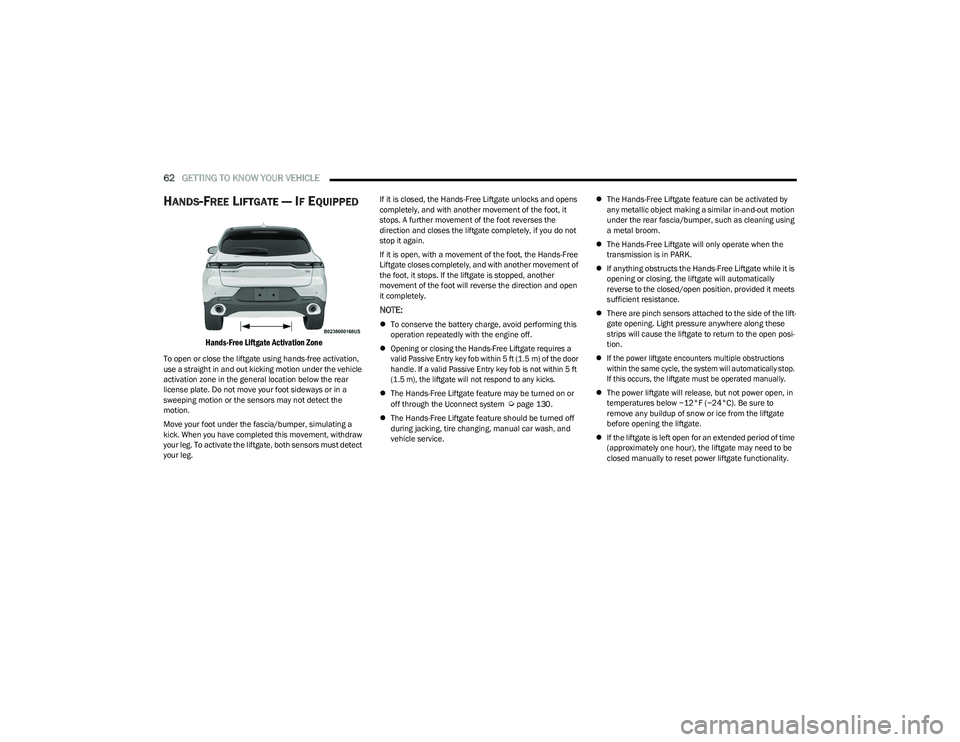
HANDS-FREE LIFTGATE — IF EQUIPPED
Hands-Free Liftgate Activation Zone
To open or close the liftgate using hands-free activation,
use a straight in and out kicking motion under the vehicle
activation zone in the general location below the rear
license plate. Do not move your foot sideways or in a
sweeping motion or the sensors may not detect the
motion.
Move your foot under the fascia/bumper, simulating a
kick. When you have completed this movement, withdraw
your leg. To activate the liftgate, both sensors must detect
your leg. If it is closed, the Hands-Free Liftgate unlocks and opens
completely, and with another movement of the foot, it
stops. A further movement of the foot reverses the
direction and closes the liftgate completely, if you do not
stop it again.
If it is open, with a movement of the foot, the Hands-Free
Liftgate closes completely, and with another movement of
the foot, it stops. If the liftgate is stopped, another
movement of the foot will reverse the direction and open
it completely.
NOTE:
To conserve the battery charge, avoid performing this
operation repeatedly with the engine off.
Opening or closing the Hands-Free Liftgate requires a
valid Passive Entry key fob within 5 ft (1.5 m) of the door
handle. If a valid Passive Entry key fob is not within 5 ft
(1.5 m), the liftgate will not respond to any kicks.
The Hands-Free Liftgate feature may be turned on or
off through the Uconnect system
Úpage 130.
The Hands-Free Liftgate feature should be turned off
during jacking, tire changing, manual car wash, and
vehicle service.
The Hands-Free Liftgate feature can be activated by
any metallic object making a similar in-and-out motion
under the rear fascia/bumper, such as cleaning using
a metal broom.
The Hands-Free Liftgate will only operate when the
transmission is in PARK.
If anything obstructs the Hands-Free Liftgate while it is
opening or closing, the liftgate will automatically
reverse to the closed/open position, provided it meets
sufficient resistance.
There are pinch sensors attached to the side of the lift -
gate opening. Light pressure anywhere along these
strips will cause the liftgate to return to the open posi -
tion.
If the power liftgate encounters multiple obstructions
within the same cycle, the system will automatically stop.
If this occurs, the liftgate must be operated manually.
The power liftgate will release, but not power open, in
temperatures below −12°F (−24°C). Be sure to
remove any buildup of snow or ice from the liftgate
before opening the liftgate.
If the liftgate is left open for an extended period of time
(approximately one hour), the liftgate may need to be
closed manually to reset power liftgate functionality.
23_GG_OM_EN_USC_t.book Page 62
Page 178 of 288
176SAFETY
Air Bag Warning Light
The Occupant Restraint Controller (ORC)
monitors the readiness of the electronic parts
of the air bag system whenever the ignition
switch is in the START or ON/RUN position.
If the ignition switch is in the OFF position, the air bag
system is not on and the air bags will not inflate.
The ORC contains a backup power supply system that may
deploy the air bag system even if the battery loses power
or it becomes disconnected prior to deployment.
The ORC turns on the Air Bag Warning Light in the
instrument panel for approximately four to eight seconds
for a self-check when the ignition switch is first in the ON/
RUN position. After the self-check, the Air Bag Warning
Light will turn off. If the ORC detects a malfunction in any
part of the system, it turns on the Air Bag Warning Light,
either momentarily or continuously. A single chime will
sound to alert you if the light comes on again after initial
startup.
The ORC also includes diagnostics that will illuminate the
instrument panel Air Bag Warning Light if a malfunction is
detected that could affect the air bag system. The
diagnostics also record the nature of the malfunction.
While the air bag system is designed to be maintenance
free, if any of the following occurs, have an authorized
dealer service the air bag system immediately.
The Air Bag Warning Light does not come on during the
four to eight seconds when the ignition switch is first in
the ON/RUN position.
The Air Bag Warning Light remains on after the four to
eight-second interval.
The Air Bag Warning Light comes on intermittently or
remains on while driving.
NOTE:If the speedometer, tachometer, or any engine related
gauges are not working, the Occupant Restraint Controller
(ORC) may also be disabled. In this condition the air bags
may not be ready to inflate for your protection. Have an
authorized dealer service the air bag system immediately.
Redundant Air Bag Warning Light
If a fault with the Air Bag Warning Light is
detected, which could affect the Supplemental
Restraint System (SRS), the Redundant Air Bag
Warning Light will illuminate on the instrument
panel. The Redundant Air Bag Warning Light will stay on
until the fault is cleared. In addition, a single chime will
sound to alert you that the Redundant Air Bag Warning
Light has come on and a fault has been detected. If the Redundant Air Bag Warning Light comes on
intermittently or remains on while driving have an
authorized dealer service the vehicle immediately
Úpage 71.
Front Air Bags
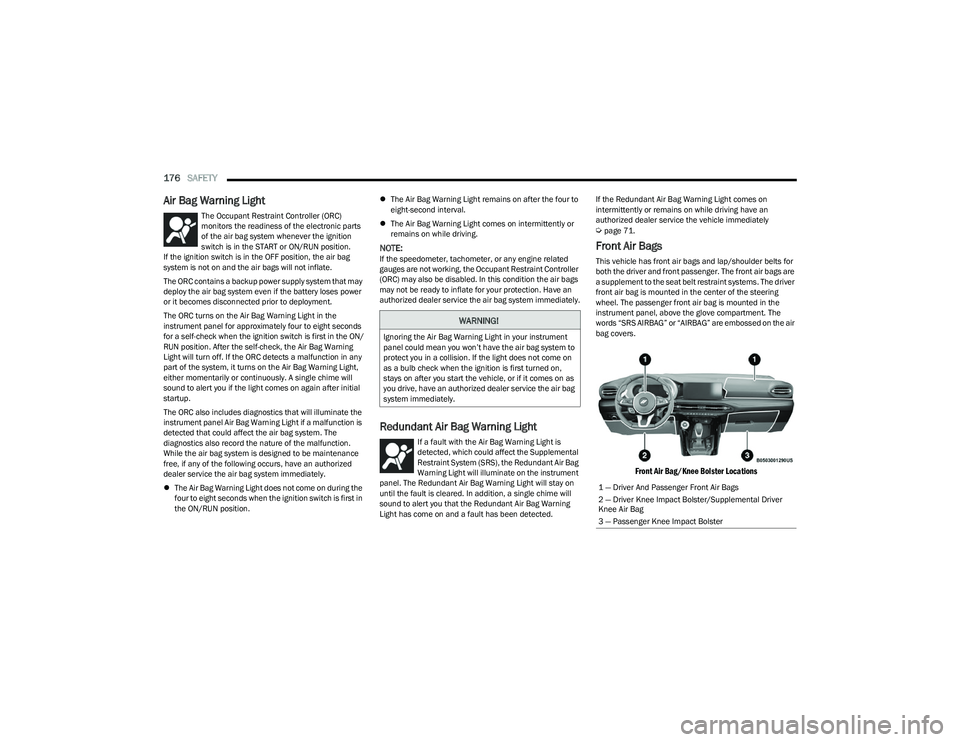
This vehicle has front air bags and lap/shoulder belts for
both the driver and front passenger. The front air bags are
a supplement to the seat belt restraint systems. The driver
front air bag is mounted in the center of the steering
wheel. The passenger front air bag is mounted in the
instrument panel, above the glove compartment. The
words “SRS AIRBAG” or “AIRBAG” are embossed on the air
bag covers.
Front Air Bag/Knee Bolster Locations
WARNING!
Ignoring the Air Bag Warning Light in your instrument
panel could mean you won’t have the air bag system to
protect you in a collision. If the light does not come on
as a bulb check when the ignition is first turned on,
stays on after you start the vehicle, or if it comes on as
you drive, have an authorized dealer service the air bag
system immediately.
1 — Driver And Passenger Front Air Bags
2 — Driver Knee Impact Bolster/Supplemental Driver
Knee Air Bag
3 — Passenger Knee Impact Bolster
23_GG_OM_EN_USC_t.book Page 176
Page 205 of 288
203
IN CASE OF EMERGENCY
HAZARD WARNING FLASHERS
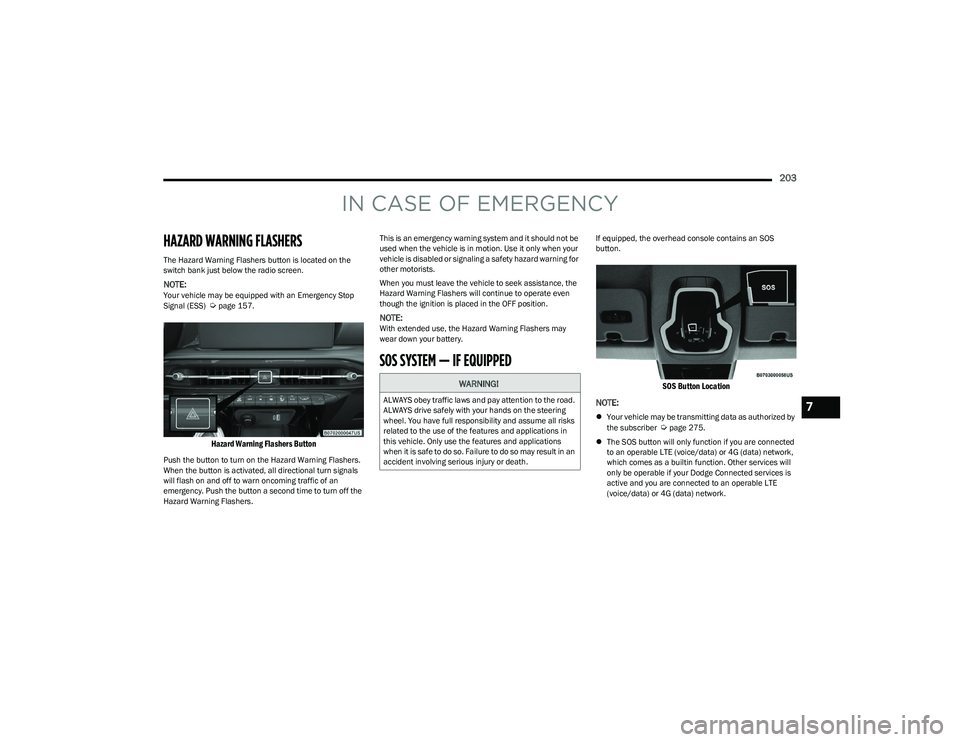
The Hazard Warning Flashers button is located on the
switch bank just below the radio screen.
NOTE:Your vehicle may be equipped with an Emergency Stop
Signal (ESS) Úpage 157.
Hazard Warning Flashers Button
Push the button to turn on the Hazard Warning Flashers.
When the button is activated, all directional turn signals
will flash on and off to warn oncoming traffic of an
emergency. Push the button a second time to turn off the
Hazard Warning Flashers.This is an emergency warning system and it should not be
used when the vehicle is in motion. Use it only when your
vehicle is disabled or signaling a safety hazard warning for
other motorists.
When you must leave the vehicle to seek assistance, the
Hazard Warning Flashers will continue to operate even
though the ignition is placed in the OFF position.
NOTE:With extended use, the Hazard Warning Flashers may
wear down your battery.
SOS SYSTEM — IF EQUIPPED
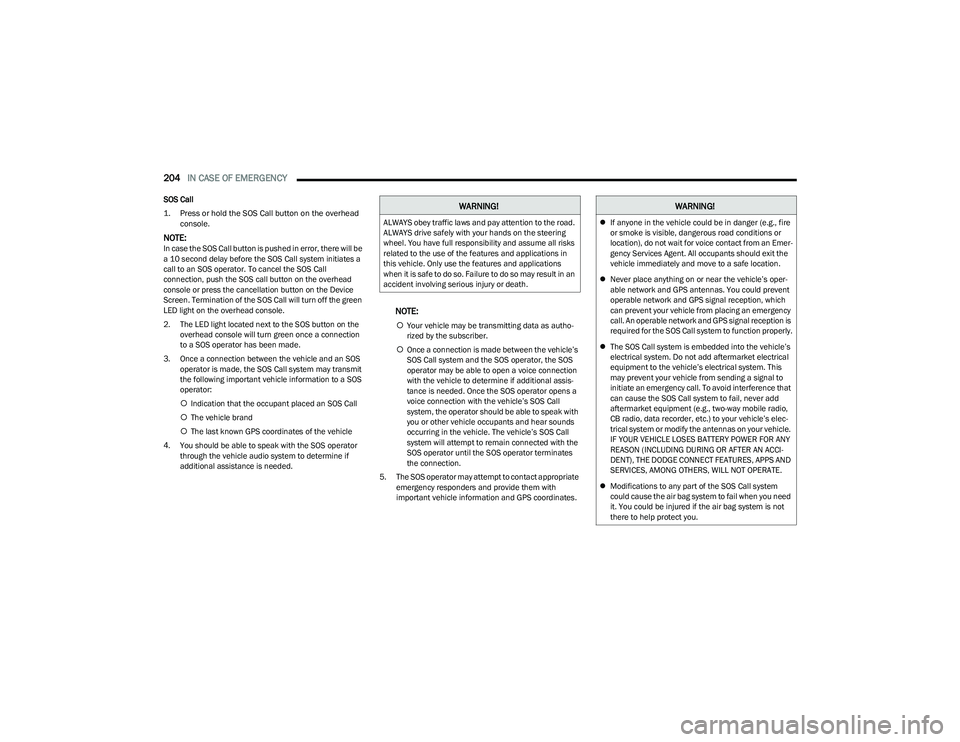
If equipped, the overhead console contains an SOS
button.
SOS Button Location
NOTE:
Your vehicle may be transmitting data as authorized by
the subscriber Úpage 275.
The SOS button will only function if you are connected
to an operable LTE (voice/data) or 4G (data) network,
which comes as a builtin function. Other services will
only be operable if your Dodge Connected services is
active and you are connected to an operable LTE
(voice/data) or 4G (data) network.
WARNING!
ALWAYS obey traffic laws and pay attention to the road.
ALWAYS drive safely with your hands on the steering
wheel. You have full responsibility and assume all risks
related to the use of the features and applications in
this vehicle. Only use the features and applications
when it is safe to do so. Failure to do so may result in an
accident involving serious injury or death.7
23_GG_OM_EN_USC_t.book Page 203
Page 206 of 288
204IN CASE OF EMERGENCY
SOS Call
1. Press or hold the SOS Call button on the overhead
console.
NOTE:In case the SOS Call button is pushed in error, there will be
a 10 second delay before the SOS Call system initiates a
call to an SOS operator. To cancel the SOS Call
connection, push the SOS call button on the overhead
console or press the cancellation button on the Device
Screen. Termination of the SOS Call will turn off the green
LED light on the overhead console.
2. The LED light located next to the SOS button on the overhead console will turn green once a connection
to a SOS operator has been made.
3. Once a connection between the vehicle and an SOS operator is made, the SOS Call system may transmit
the following important vehicle information to a SOS
operator:
Indication that the occupant placed an SOS Call
The vehicle brand
The last known GPS coordinates of the vehicle
4. You should be able to speak with the SOS operator through the vehicle audio system to determine if
additional assistance is needed.
NOTE:
Your vehicle may be transmitting data as autho -
rized by the subscriber.
Once a connection is made between the vehicle’s
SOS Call system and the SOS operator, the SOS
operator may be able to open a voice connection
with the vehicle to determine if additional assis -
tance is needed. Once the SOS operator opens a
voice connection with the vehicle’s SOS Call
system, the operator should be able to speak with
you or other vehicle occupants and hear sounds
occurring in the vehicle. The vehicle’s SOS Call
system will attempt to remain connected with the
SOS operator until the SOS operator terminates
the connection.
5. The SOS operator may attempt to contact appropriate emergency responders and provide them with
important vehicle information and GPS coordinates.
WARNING!
ALWAYS obey traffic laws and pay attention to the road.
ALWAYS drive safely with your hands on the steering
wheel. You have full responsibility and assume all risks
related to the use of the features and applications in
this vehicle. Only use the features and applications
when it is safe to do so. Failure to do so may result in an
accident involving serious injury or death.
WARNING!
If anyone in the vehicle could be in danger (e.g., fire
or smoke is visible, dangerous road conditions or
location), do not wait for voice contact from an Emer -
gency Services Agent. All occupants should exit the
vehicle immediately and move to a safe location.
Never place anything on or near the vehicle’s oper -
able network and GPS antennas. You could prevent
operable network and GPS signal reception, which
can prevent your vehicle from placing an emergency
call. An operable network and GPS signal reception is
required for the SOS Call system to function properly.
The SOS Call system is embedded into the vehicle’s
electrical system. Do not add aftermarket electrical
equipment to the vehicle’s electrical system. This
may prevent your vehicle from sending a signal to
initiate an emergency call. To avoid interference that
can cause the SOS Call system to fail, never add
aftermarket equipment (e.g., two-way mobile radio,
CB radio, data recorder, etc.) to your vehicle’s elec -
trical system or modify the antennas on your vehicle.
IF YOUR VEHICLE LOSES BATTERY POWER FOR ANY
REASON (INCLUDING DURING OR AFTER AN ACCI -
DENT), THE DODGE CONNECT FEATURES, APPS AND
SERVICES, AMONG OTHERS, WILL NOT OPERATE.
Modifications to any part of the SOS Call system
could cause the air bag system to fail when you need
it. You could be injured if the air bag system is not
there to help protect you.
23_GG_OM_EN_USC_t.book Page 204
Page 273 of 288
CUSTOMER ASSISTANCE271
ROADSIDE ASSISTANCE
Available 24 hours, 7 days a week.
Call 1-800-521-2779 or visit chrysler.rsahelp.com(USA)
Call 1-800-363-4869 or visit fca.roadsideaid.com
(Canada)
Who is Covered
You are covered by Roadside Assistance services if
you are a purchaser for use of the vehicle. Roadside
Assistance services last for five years or 60,000 miles on
the odometer, whichever occurs first, calculated from the
start date of the Basic Limited Warranty, as set forth in
your Warranty Information book.
1
1. Towing services provided through Cross Country Motor Club, Inc.
Medford, MA 02155, except in AK,CA, HI, OR, WI, and WY, where services
are provided by Cross Country Motor Club of California, Inc., Thousand
Oaks, CA 91360.
What to Do
If your vehicle requires jump start assistance, out of gas/
fuel delivery, tire service, lockout service or towing as a
result of a mechanical breakdown, dial toll-free: USA:
1-800-521-2779/Canada: 1-800-363-4869. Provide your
name, Vehicle Identification Number (VIN) required for
covered services, license plate number, and your location,
including the telephone number from which you are
calling. Briefly describe the nature of the problem and
answer a few simple questions. You will be given the name
of the service provider and an estimated time of arrival. If
you feel you are in an unsafe situation, please let us know.
With your consent, we will contact local police or safety
authorities. If Unable to Contact Roadside Assistance
If you are unable to contact Roadside Assistance or
unable to provide a valid Vehicle Identification Number
(VIN), and you obtain towing services on your own, you may
submit your original receipts from the licensed towing or
service facility, for services rendered within 30 days of the
occurrence. Be sure to include your VIN, odometer
mileage at the time of service, and current mailing
address. We will process the claim based on vehicle and
service eligibility. If eligible, we will reimburse you for the
reasonable amount actually paid, based on the usual and
customary charges for that service in the area where they
were provided. FCA US LLC’s determination relating to
reimbursement is final. Correspondence should be
mailed to:
FCA US LLC Customer Assistance
P.O. Box 9145
Medford, MA 02155
Attention Claims Department
FCA US LLC reserves the right to modify the terms or
discontinue the Roadside Assistance Program at anytime.
The Roadside Assistance program is subject to restrictions
and conditions of use, which are determined solely by
FCA US LLC.
Flat Tire Service
If you are inconvenienced by a flat tire, we will dispatch a
service provider to use your vehicle’s temporary spare tire
(if equipped) as recommended in your Owner’s Manual.
This is not a permanent flat tire repair.
Out of Gas/Fuel Delivery
Drivers cannot always count on a gas station being
nearby, especially when traveling away from home. We will
dispatch a service provider to deliver a small amount of
fuel (maximum two gallons) to get you to a nearby station.
This service is limited to two occurrences in a 12-month
period.
Battery Jump Assistance
No time is a good time for a depleted battery. With
Roadside Assistance, you do not have to worry about
being stranded. We will dispatch a service provider to
provide you with a battery jump anytime, day or night.
Lockout Service
Whether the keys are locked in your vehicle or frozen locks
are keeping you from getting on your way, help is just a
phone call away. This service is limited to providing access
to the vehicle’s seating area. It does not cover the cost of
replacement keys.
Towing Service
Our towing service gives you peace of mind and
confidence. If your vehicle becomes disabled as a result of
a mechanical breakdown, Roadside Assistance will
dispatch a towing service to transport your vehicle to the
closest authorized Chrysler, Dodge, Jeep®, or Ram dealer.
If you choose to go to another dealer, you will be
responsible for the cost if the extra distance exceeds
10 miles.
10
23_GG_OM_EN_USC_t.book Page 271
Page 279 of 288
277
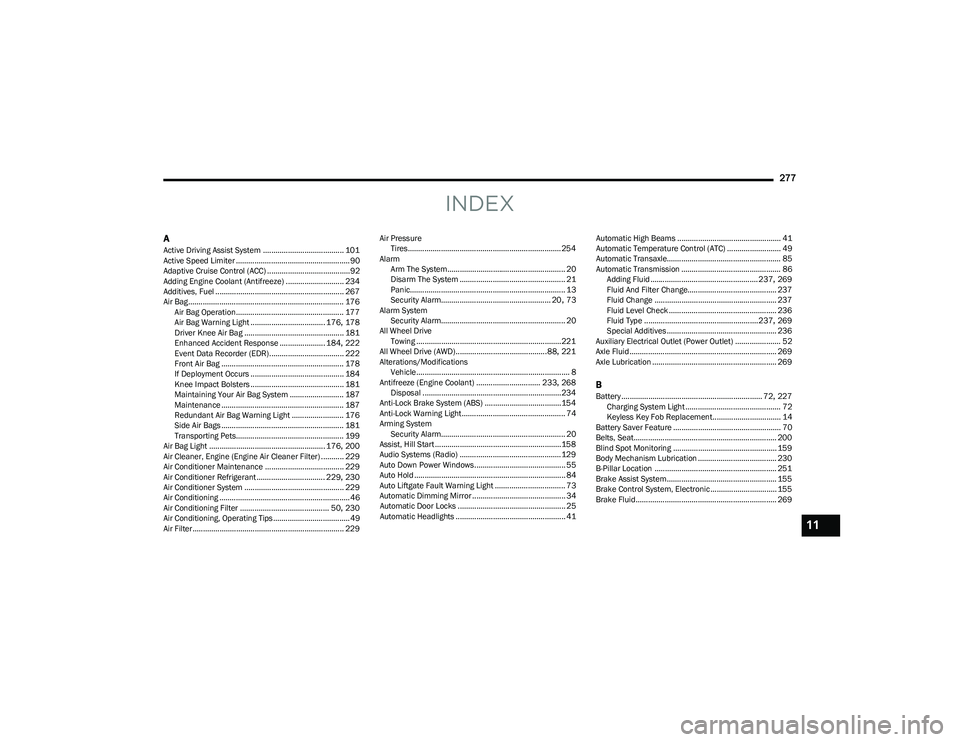
INDEX
AActive Driving Assist System ....................................... 101
Active Speed Limiter ....................................................... 90
Adaptive Cruise Control (ACC) ........................................92
Adding Engine Coolant (Antifreeze) ............................ 234
Additives, Fuel .............................................................. 267
Air Bag........................................................................... 176Air Bag Operation.................................................... 177
Air Bag Warning Light .................................... 176
, 178
Driver Knee Air Bag ................................................ 181
Enhanced Accident Response ...................... 184
, 222
Event Data Recorder (EDR).................................... 222 Front Air Bag ........................................................... 178
If Deployment Occurs ............................................. 184
Knee Impact Bolsters ............................................. 181
Maintaining Your Air Bag System .......................... 187
Maintenance ........................................................... 187
Redundant Air Bag Warning Light ......................... 176
Side Air Bags ........................................................... 181
Transporting Pets.................................................... 199
Air Bag Light ........................................................ 176
, 200
Air Cleaner, Engine (Engine Air Cleaner Filter) ........... 229
Air Conditioner Maintenance ...................................... 229
Air Conditioner Refrigerant ................................. 229
, 230
Air Conditioner System ................................................ 229
Air Conditioning ............................................................... 46
Air Conditioning Filter ........................................... 50
, 230
Air Conditioning, Operating Tips ..................................... 49 Air Filter......................................................................... 229 Air Pressure
Tires.......................................................................... 254
Alarm Arm The System......................................................... 20
Disarm The System ................................................... 21
Panic........................................................................... 13
Security Alarm..................................................... 20
, 73
Alarm System Security Alarm............................................................ 20
All Wheel Drive Towing ...................................................................... 221
All Wheel Drive (AWD)............................................88
, 221
Alterations/Modifications Vehicle.......................................................................... 8
Antifreeze (Engine Coolant) ............................... 233
, 268
Disposal ...................................................................234
Anti-Lock Brake System (ABS) ..................................... 154
Anti-Lock Warning Light.................................................. 74
Arming System Security Alarm............................................................ 20
Assist, Hill Start ............................................................. 158
Audio Systems (Radio) ................................................. 129
Auto Down Power Windows............................................ 55
Auto Hold ......................................................................... 84
Auto Liftgate Fault Warning Light .................................. 73
Automatic Dimming Mirror ............................................. 34 Automatic Door Locks .................................................... 25Automatic Headlights ..................................................... 41 Automatic High Beams .................................................. 41
Automatic Temperature Control (ATC) .......................... 49
Automatic Transaxle....................................................... 85
Automatic Transmission ................................................ 86 Adding Fluid .................................................... 237
, 269
Fluid And Filter Change........................................... 237
Fluid Change ........................................................... 237
Fluid Level Check .................................................... 236
Fluid Type .......................................................237
, 269
Special Additives ..................................................... 236
Auxiliary Electrical Outlet (Power Outlet) ...................... 52
Axle Fluid....................................................................... 269
Axle Lubrication ............................................................ 269
BBattery.................................................................... 72, 227
Charging System Light .............................................. 72
Keyless Key Fob Replacement................................. 14
Battery Saver Feature .................................................... 70
Belts, Seat..................................................................... 200
Blind Spot Monitoring .................................................. 159
Body Mechanism Lubrication ...................................... 230
B-Pillar Location ........................................................... 251
Brake Assist System..................................................... 155
Brake Control System, Electronic................................ 155
Brake Fluid.................................................................... 269
11
23_GG_OM_EN_USC_t.book Page 277