belt DODGE INTREPID 2004 2.G Owner's Manual
[x] Cancel search | Manufacturer: DODGE, Model Year: 2004, Model line: INTREPID, Model: DODGE INTREPID 2004 2.GPages: 249, PDF Size: 4.87 MB
Page 76 of 249
POWER SUN ROOF — IF EQUIPPED
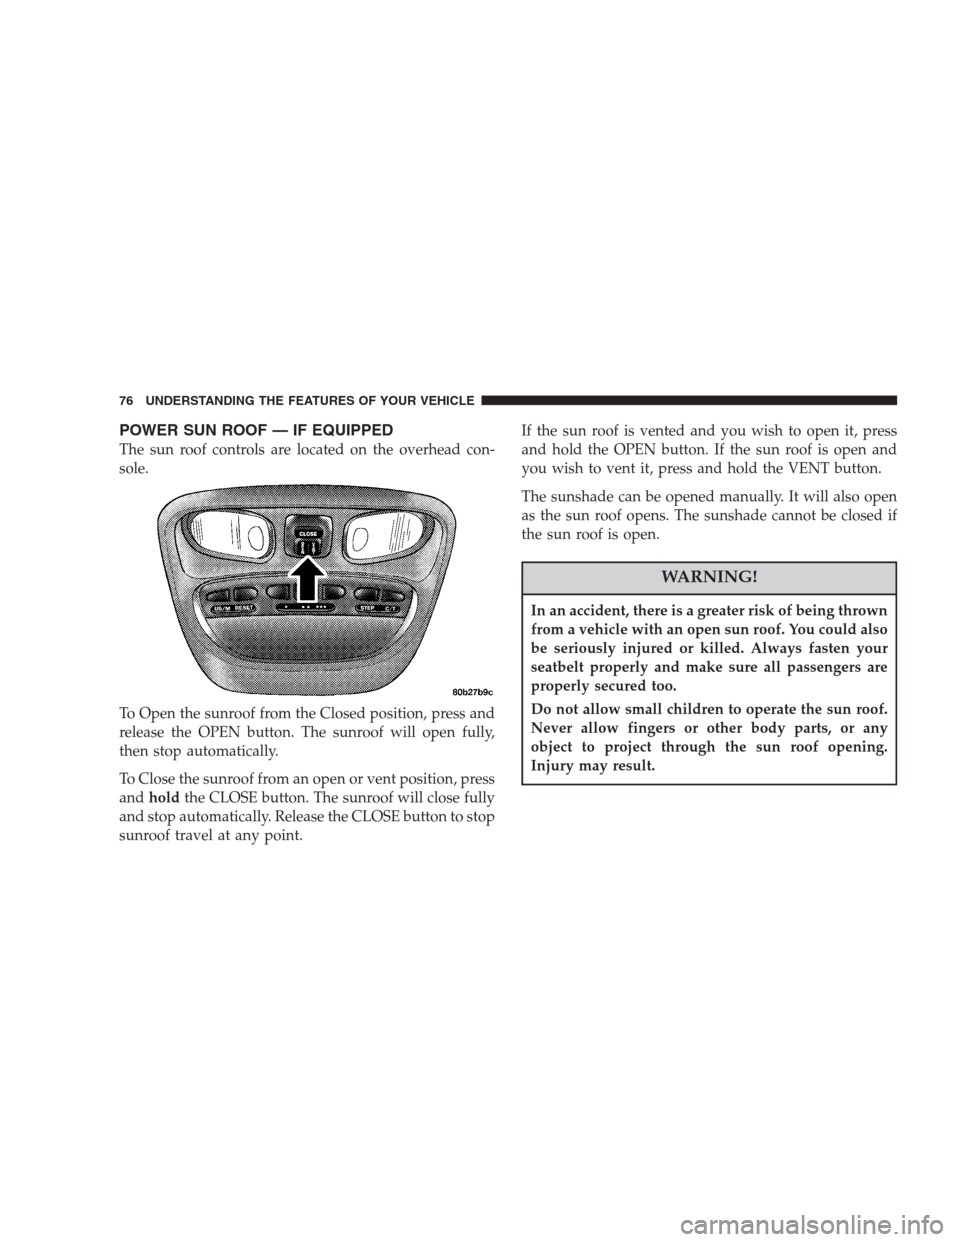
The sun roof controls are located on the overhead con-
sole.
To Open the sunroof from the Closed position, press and
release the OPEN button. The sunroof will open fully,
then stop automatically.
To Close the sunroof from an open or vent position, press
andholdthe CLOSE button. The sunroof will close fully
and stop automatically. Release the CLOSE button to stop
sunroof travel at any point.If the sun roof is vented and you wish to open it, press
and hold the OPEN button. If the sun roof is open and
you wish to vent it, press and hold the VENT button.
The sunshade can be opened manually. It will also open
as the sun roof opens. The sunshade cannot be closed if
the sun roof is open.
WARNING!
In an accident, there is a greater risk of being thrown
from a vehicle with an open sun roof. You could also
be seriously injured or killed. Always fasten your
seatbelt properly and make sure all passengers are
properly secured too.
Do not allow small children to operate the sun roof.
Never allow fingers or other body parts, or any
object to project through the sun roof opening.
Injury may result.
76 UNDERSTANDING THE FEATURES OF YOUR VEHICLE
Page 89 of 249
7. Turn Signal Indicators
The arrow will flash in unison with the exterior
turn signal, when using the turn signal lever.
8. High Beam Indicator
This light shows that the headlights are on high
beam. Pull the turn signal lever towards the
steering wheel to switch the headlights from high or
low beam.
9. Seat Belt Reminder Light
The light will come on after the ignition is
turned on. The light will remain lit until the
seatbelt is fastened.
10. Door Ajar Light
This light shows that a door is not completely
closed. A warning chime will sound if the vehicle
is moving with a door partially closed.
11. Speedometer
Shows vehicle speed in miles-per-hour or kilometers-per-
hour.
12. Low Washer Fluid Light
This symbol will light whenever the fluid reser-
voir is less than 1/4 filled. Adding washer fluid
will cause the light to go out the next time the
ignition is cycled. A warning chime will sound when
the light comes on.
13. Cruise (Speed Control) Light
This light shows that the Speed Control System is ON.
14. Temperature Light
This light warns of an overheated engine cool-
ant condition. A warning chime will sound
when the light comes on.
15. Engine Coolant Temperature Gauge
The temperature gauge shows engine coolant
temperature. Any reading within the 5 gauge
marks between Hot and Cold shows that the
engine cooling system is operating properly. The
gauge pointer may show a higher than normal tem-
perature when driving in hot weather, up mountain
grades, in heavy stop and go traffic, or when towing a
trailer.
UNDERSTANDING YOUR INSTRUMENT PANEL 89
4
Page 161 of 249
5. Connect the other cable, first to the negative jump start
attachment of the booster battery and then to the engine
of the vehicle with the discharged battery. Make sure you
have a good contact on the engine.
6. Start the engine in the vehicle which has the booster
battery, let the engine idle a few minutes, then start the
engine in the vehicle with the discharged battery.
7. When removing the jumper cables, reverse the above
sequence exactly. Be careful of the moving belts and fan.
DRIVING ON SLIPPERY SURFACES
Acceleration
Rapid acceleration on snow covered, wet, or other slip-
pery surfaces may cause the front wheels to pull errati-
cally to the right or left. This phenomenon occurs when
there is a difference in the surface traction under the front
(driving) wheels.
WARNING!
Rapid acceleration on slippery surfaces is danger-
ous. Unequal traction can cause sudden pulling of
the front wheels. You could lose control of the
vehicle and possibly have an accident. Accelerate
slowly and carefully whenever there is likely to be
poor traction (ice, snow, wet, mud, loose sand, etc.).
Traction
When driving on wet or slushy roads, it is possible for a
wedge of water to build up between the tire and road
surface. This is known as hydroplaning and may cause
partial or complete loss of vehicle control and stopping
ability. To reduce this possibility, the following precau-
tions should be observed:
WHAT TO DO IN EMERGENCIES 161
6
Page 178 of 249
on how and where used oil can be safely discarded in
your area.
Engine Oil Filter
The engine oil filter should be replaced at every engine
oil change.
Engine Oil Filter Selection
All of this manufacturer’s engines have a full-flow type
disposable oil filter. Use a filter of this type for replace-
ment. The quality of replacement filters varies consider-
ably. Only high quality filters should be used to assure
most efficient service. Mopar Engine Oil Filters are high
quality oil filters and are recommended.
Drive Belts – Check Condition and Tension
At the mileage shown in the maintenance schedules,
check all drive belts for condition and proper tension.
Improper belt tension can cause belt slippage and failure.
Inspect the drive belts for evidence of cuts, cracks, or
glazing and replace them if there is any sign of damage
which could result in belt failure. If adjustment is re-
quired, adjust the belts according to the specificationsand procedures shown in the Service Manual. See the
Consumer Assistance section for information on ordering
a Service Manual.
Special tools are required to properly measure tension
and to restore belt tension to factory specifications. Also,
check belt routing to make sure there is no interference
between the belts and other engine components.
Spark Plugs
Spark plugs must fire properly to assure engine perfor-
mance and emission control. New plugs should be in-
stalled at the mileage specified in the appropriate main-
tenance chart. The entire set should be replaced if there is
any malfunction due to a faulty spark plug. Check the
specifications section for the proper type of spark plug
for use in your vehicle.
Catalytic Converter
The catalytic converter requires the use of unleaded fuel
only. Leaded gasoline will destroy the effectiveness of the
catalyst as an emission control device.
178 MAINTAINING YOUR VEHICLE
Page 180 of 249
Engine Timing Belt
Replace the engine timing belt at the intervals described
in the appropriate maintenance schedule.
Crankcase Emission Control System
Proper operation of this system depends on freedom
from sticking or plugging due to deposits. As vehicle
mileage builds up, the PCV valve and passages may
accumulate deposits. If a valve is not working properly,
replace it with a new valve. DO NOT ATTEMPT TO
CLEAN THE OLD PCV VALVE!
Check ventilation hose for indication of damage or
plugging deposits. Replace if necessary.
Fuel Filter
A plugged fuel filter can cause hard starting or limit the
speed at which a vehicle can be driven. Should an
excessive amount of dirt accumulate in the fuel tank,
frequent replacement of the fuel filter which is mounted
in the fuel tank may be necessary. See your dealer for
service.
Air Cleaner Filter
Under normal driving conditions, replace the air filter at
the intervals shown on Schedule “A”. If, however, you
drive the vehicle frequently under dusty or severe con-
ditions, the filter element should be inspected periodi-
cally and replaced if necessary at the intervals shown on
Schedule “B”.
WARNING!
The air cleaner can provide a measure of protection
in the case of engine backfire. Do not remove the air
cleaner unless such removal is necessary for repair or
maintenance. Make sure that no one is near the
engine compartment before starting the vehicle with
the air cleaner removed. Failure to do so can result in
serious personal injury.
180 MAINTAINING YOUR VEHICLE
Page 201 of 249
Cleaning Plastic Instrument Cluster Lenses
The lenses in front of the instruments in this vehicle are
molded in clear plastic. When cleaning the lenses, care
must be taken to avoid scratching the plastic.
•Clean with a wet soft rag. A mild soap solution may be
used, but do not use high alcohol content or abrasive
cleaners. If soap is used, wipe clean with a clean damp
rag.
•Dry with a soft tissue.
Seat Belt Maintenance
Do not bleach, dye or clean the belts with chemical
solvents or abrasive cleaners. This will weaken the fabric.
If the belts need cleaning, use a mild soap solution or
lukewarm water. Do not remove the belts from the
vehicle to wash them.
Replace the belts if they appear frayed or worn or if the
buckles do not work properly.
FUSES
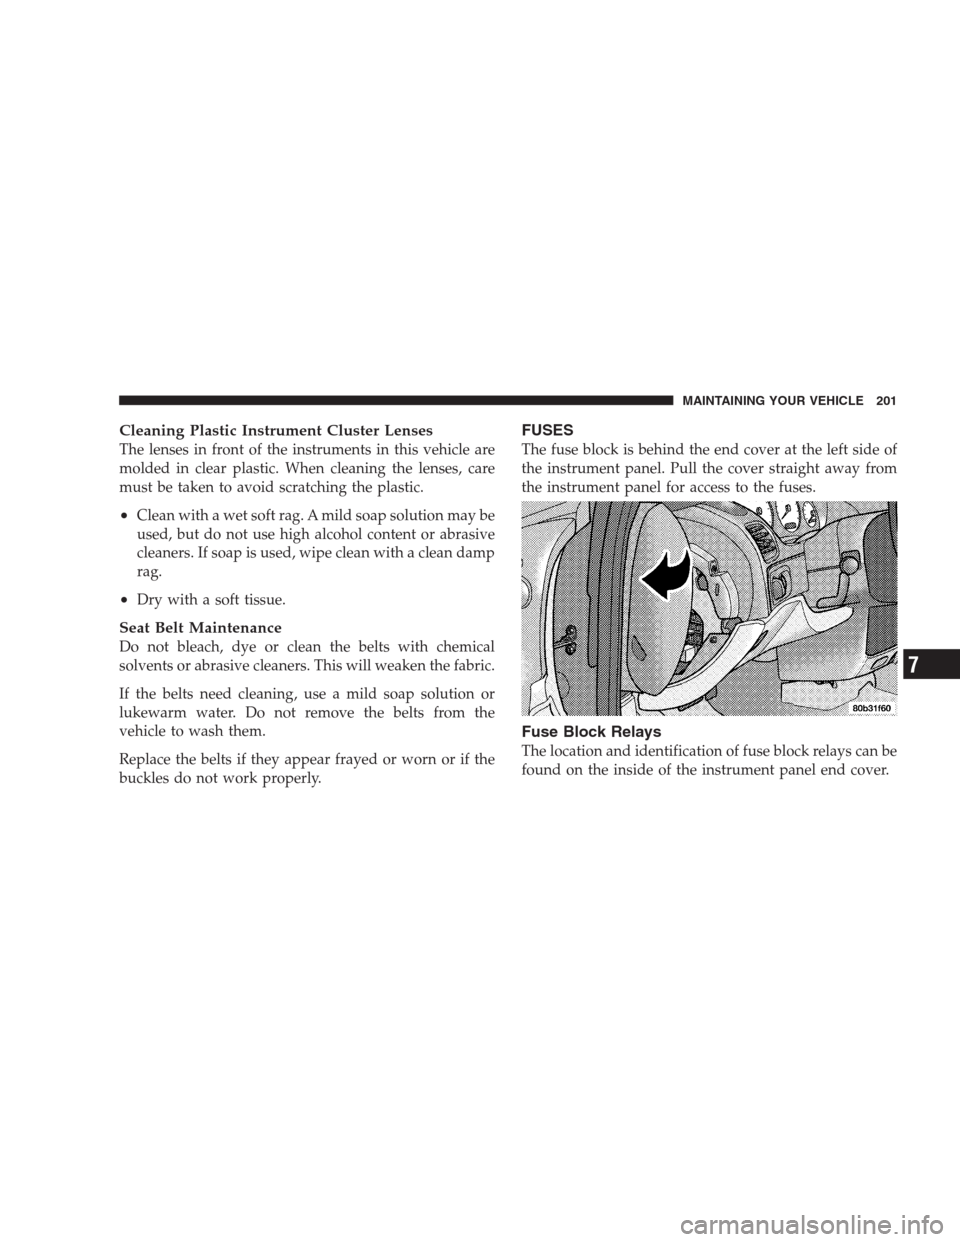
The fuse block is behind the end cover at the left side of
the instrument panel. Pull the cover straight away from
the instrument panel for access to the fuses.
Fuse Block Relays
The location and identification of fuse block relays can be
found on the inside of the instrument panel end cover.
MAINTAINING YOUR VEHICLE 201
7
Page 216 of 249
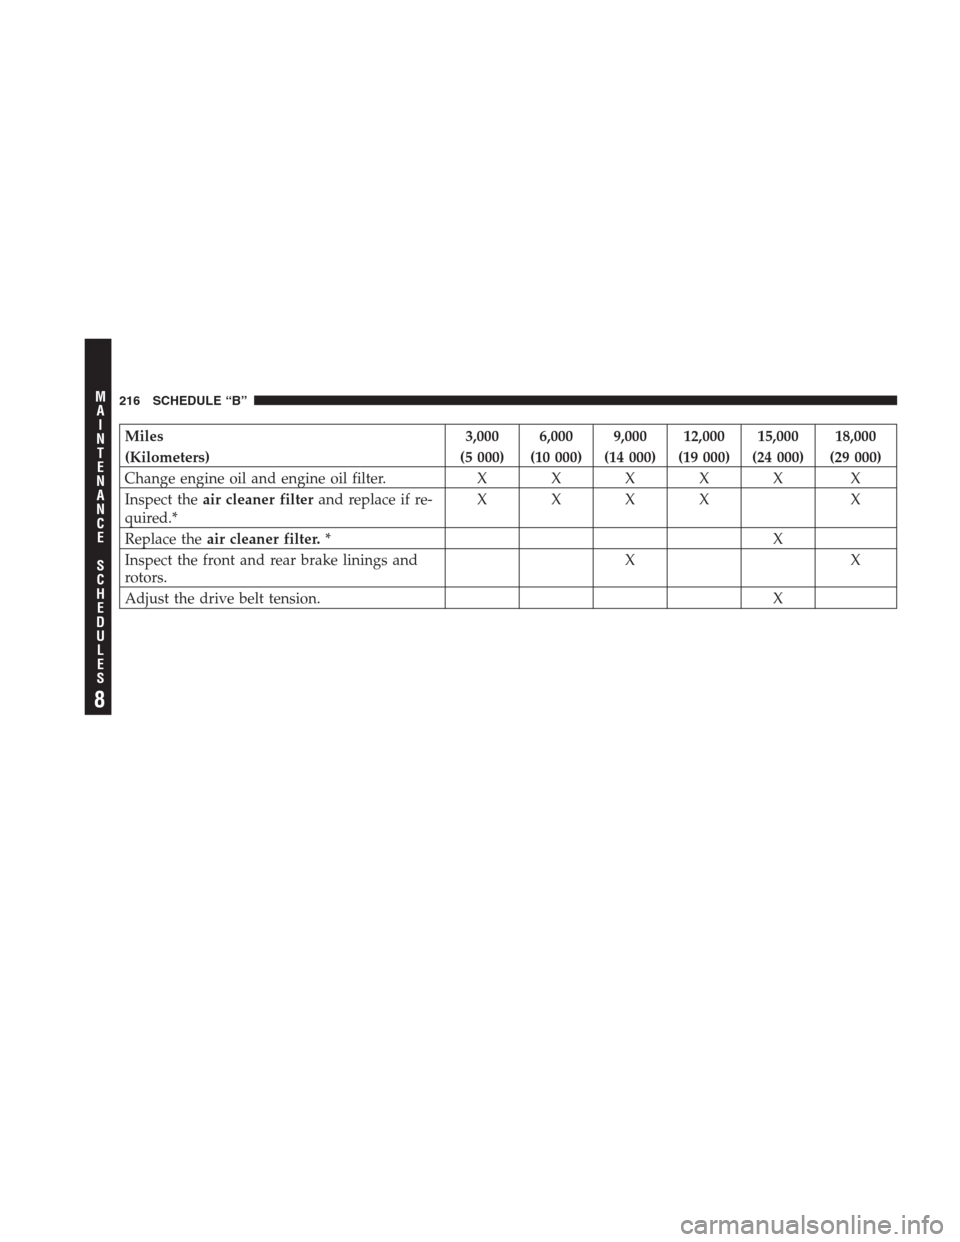
Miles 3,000 6,000 9,000 12,000 15,000 18,000
(Kilometers) (5 000) (10 000) (14 000) (19 000) (24 000) (29 000)
Change engine oil and engine oil filter.XXXXX X
Inspect theair cleaner filterand replace if re-
quired.*XXXX X
Replace theair cleaner filter.*X
Inspect the front and rear brake linings and
rotors.XX
Adjust the drive belt tension. X
216 SCHEDULE “B”
8
M
A
I
N
T
E
N
A
N
C
E
S
C
H
E
D
U
L
E
S
Page 217 of 249
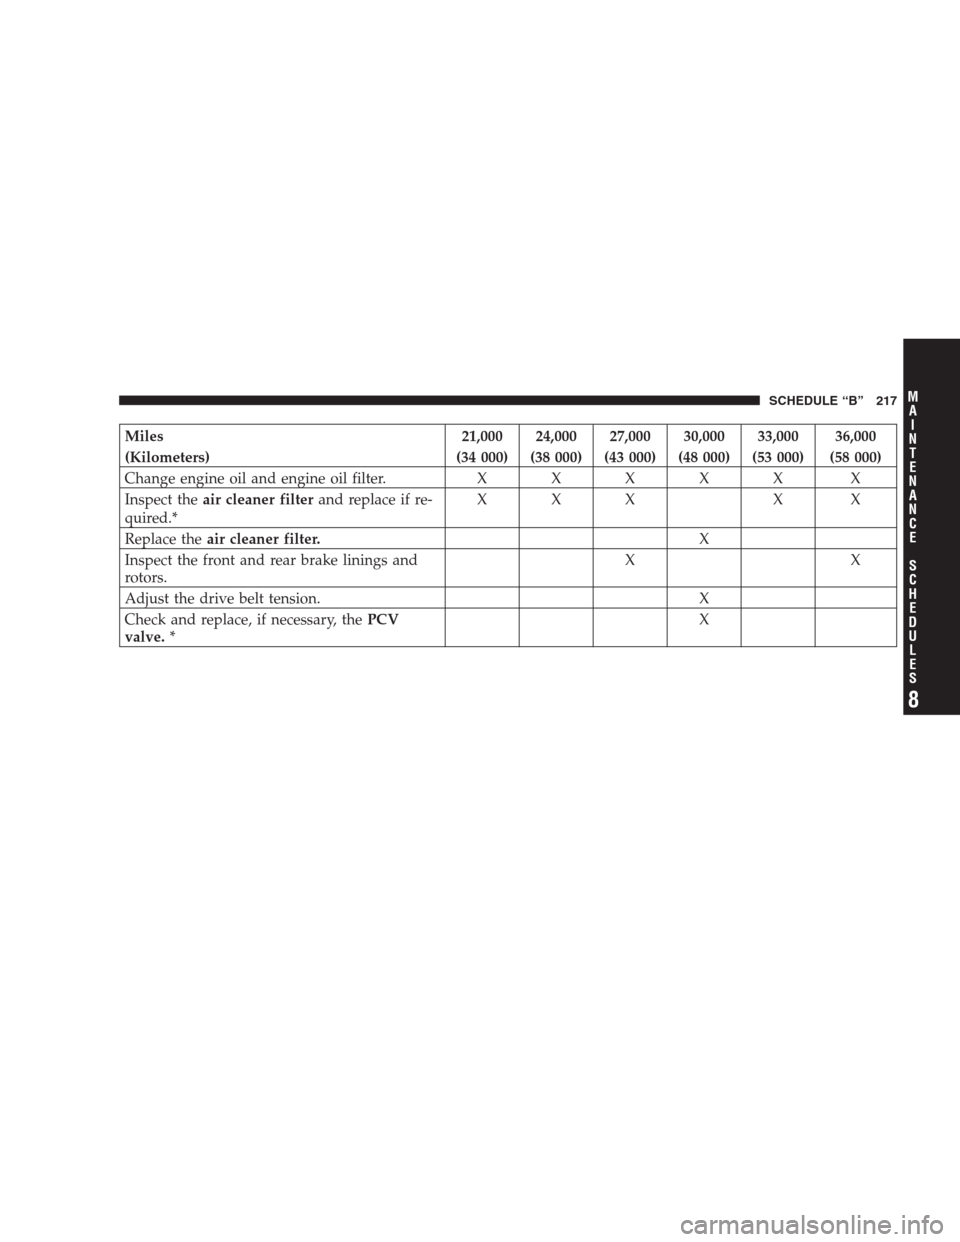
Miles 21,000 24,000 27,000 30,000 33,000 36,000
(Kilometers) (34 000) (38 000) (43 000) (48 000) (53 000) (58 000)
Change engine oil and engine oil filter.XXXXX X
Inspect theair cleaner filterand replace if re-
quired.*XXX X X
Replace theair cleaner filter.X
Inspect the front and rear brake linings and
rotors.XX
Adjust the drive belt tension. X
Check and replace, if necessary, thePCV
valve.*X
SCHEDULE “B” 217
8
M
A
I
N
T
E
N
A
N
C
E
S
C
H
E
D
U
L
E
S
Page 218 of 249
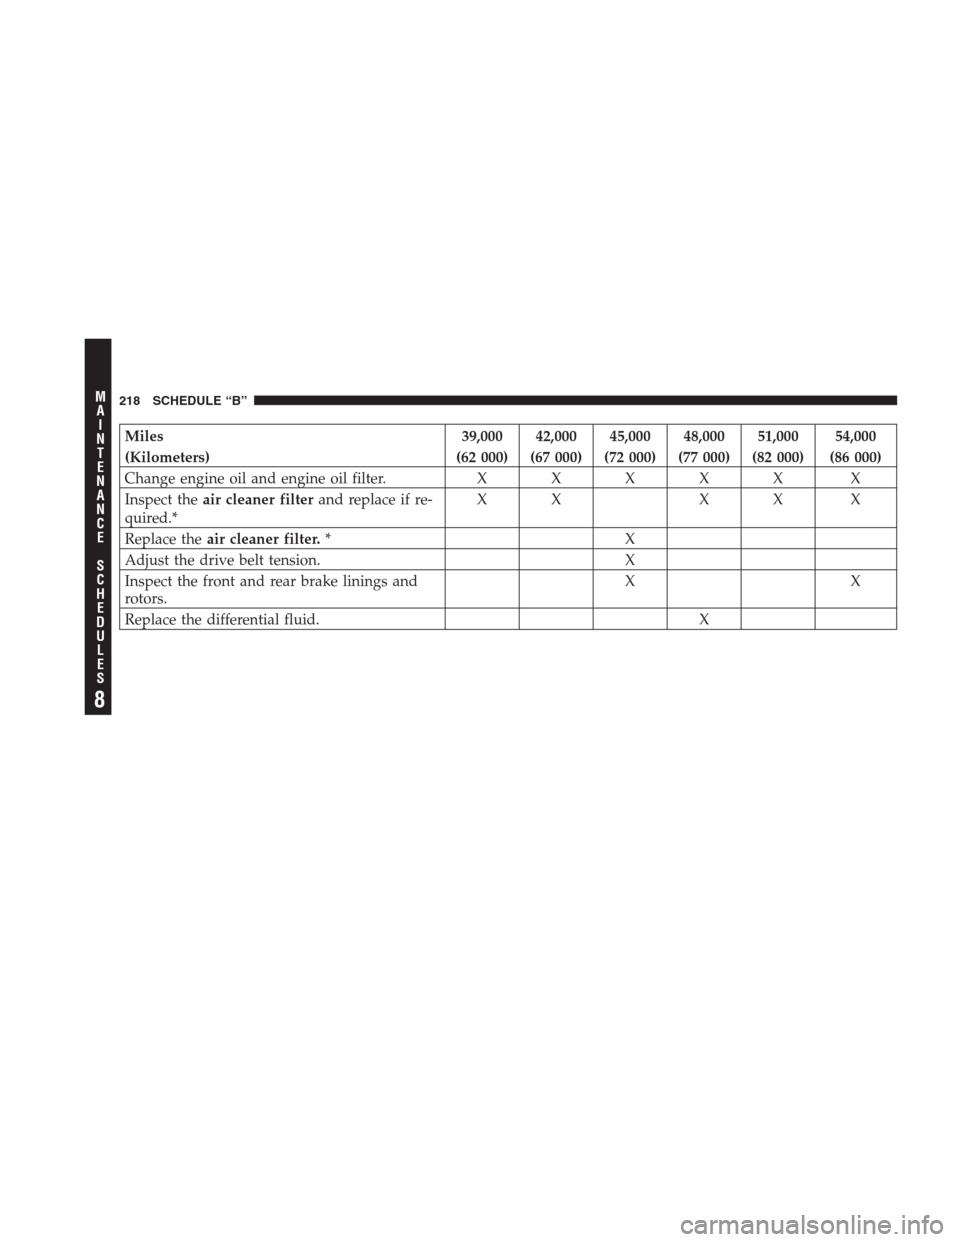
Miles 39,000 42,000 45,000 48,000 51,000 54,000
(Kilometers) (62 000) (67 000) (72 000) (77 000) (82 000) (86 000)
Change engine oil and engine oil filter.XXXXX X
Inspect theair cleaner filterand replace if re-
quired.*XX XX X
Replace theair cleaner filter.*X
Adjust the drive belt tension. X
Inspect the front and rear brake linings and
rotors.XX
Replace the differential fluid. X
218 SCHEDULE “B”
8
M
A
I
N
T
E
N
A
N
C
E
S
C
H
E
D
U
L
E
S
Page 219 of 249
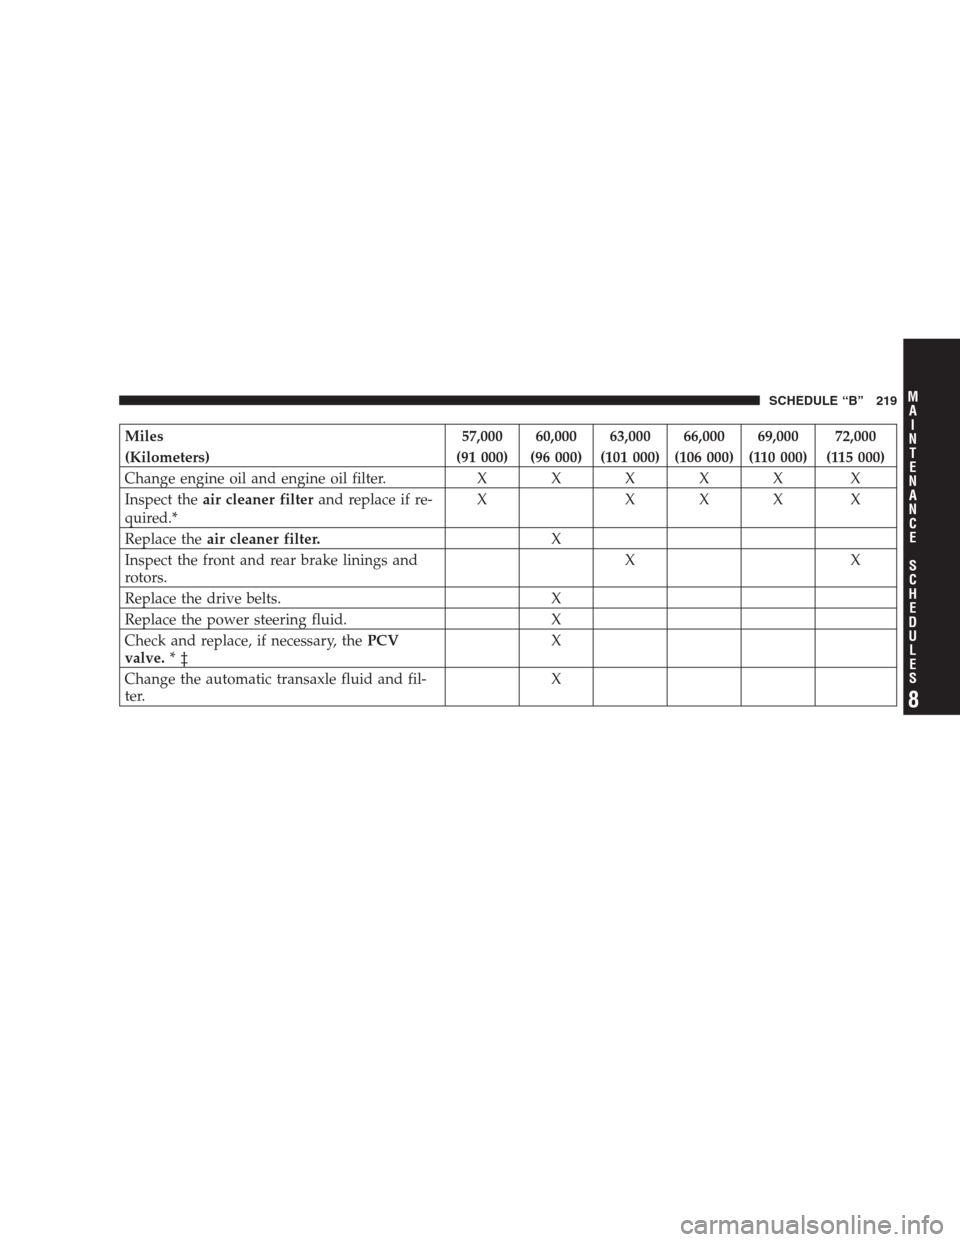
Miles 57,000 60,000 63,000 66,000 69,000 72,000
(Kilometers) (91 000) (96 000) (101 000) (106 000) (110 000) (115 000)
Change engine oil and engine oil filter.XXXXX X
Inspect theair cleaner filterand replace if re-
quired.*X XXX X
Replace theair cleaner filter.X
Inspect the front and rear brake linings and
rotors.XX
Replace the drive belts. X
Replace the power steering fluid. X
Check and replace, if necessary, thePCV
valve.*‡X
Change the automatic transaxle fluid and fil-
ter.X
SCHEDULE “B” 219
8
M
A
I
N
T
E
N
A
N
C
E
S
C
H
E
D
U
L
E
S