Cargo DODGE JOURNEY 2009 1.G User Guide
[x] Cancel search | Manufacturer: DODGE, Model Year: 2009, Model line: JOURNEY, Model: DODGE JOURNEY 2009 1.GPages: 523
Page 191 of 523
•A retractable cargo area cover (if equipped).
Seven Passenger System Features
•
A large built-in storage bin with a hinged hardcover
located in the floor behind the third-row passenger
seats.
•60/40 split second-row passenger seats with fold flat
feature, which allows for extended cargo space. Refer
to “Seats” in this section.
•50/50 split third-row passenger seats with fold flat
feature, which allows for extended cargo space. Refer
to “Seats” in this section.
•An optional front passenger seat with fold flat feature,
which extends cargo space even further. Refer to
“Seats” in this section.
•Cargo tie-downs.
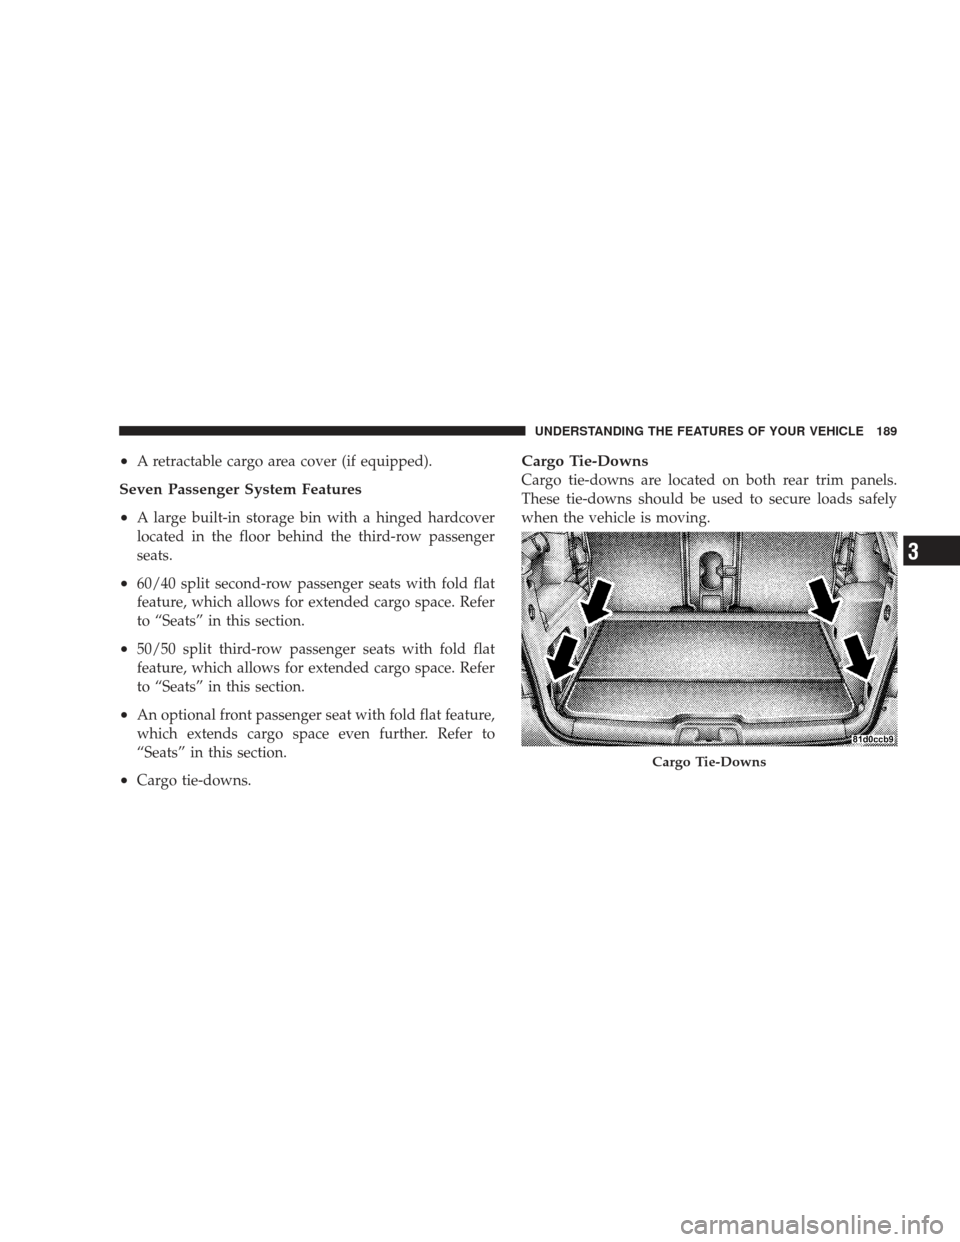
Cargo Tie-Downs
Cargo tie-downs are located on both rear trim panels.
These tie-downs should be used to secure loads safely
when the vehicle is moving.
Cargo Tie-Downs
UNDERSTANDING THE FEATURES OF YOUR VEHICLE 189
3
Page 192 of 523
WARNING!
•Cargo tie-downs are not safe anchors for a child
seat tether strap. In a sudden stop or collision, a
tie-down could pull loose and allow the child seat
to come loose. A child could be badly injured. Use
only the anchors provided for child seat tethers.
•The weight and position of cargo and passengers
can change the vehicle center of gravity and ve-
hicle handling. To avoid loss of control resulting
in personal injury, follow these guidelines for
loading your vehicle:
•Do not carry loads that exceed the load limits de-
scribed on the label attached to the left door or left
door center pillar.
•Always place cargo evenly on the cargo floor. Put
heavier objects as low and as far forward as possible.
•Place as much cargo as possible in front of the rear
axle. Too much weight or improperly placed weight
over or behind the rear axle can cause the vehicle to
sway.
•Do not pile luggage or cargo higher than the top of the
seatback. This could impair visibility or become a
dangerous projectile in a sudden stop or collision.
WARNING!
To help protect against personal injury, passengers
should not be seated in the rear cargo area. The rear
cargo space is intended for load carrying purposes
only, not for passengers, who should sit in seats and
use seat belts.
190 UNDERSTANDING THE FEATURES OF YOUR VEHICLE
Page 193 of 523
Retractable Cargo Area Cover (If Equipped) — Five
Passenger Models
NOTE:The purpose of this cover is for privacy, not to
secure loads. It will not prevent cargo from shifting or
protect passengers from loose cargo.
The removable retractable cargo area cover mounts in the
cargo area behind the top of the rear seats.
The cover, when extended, covers the cargo area to keep
items out of sight. Notches in the trim panels near the
liftgate opening secure the extended cover in place.
The cover rolls away neatly inside its housing when not
in use. You can also remove the cover from the vehicle to
make more room in the cargo area.
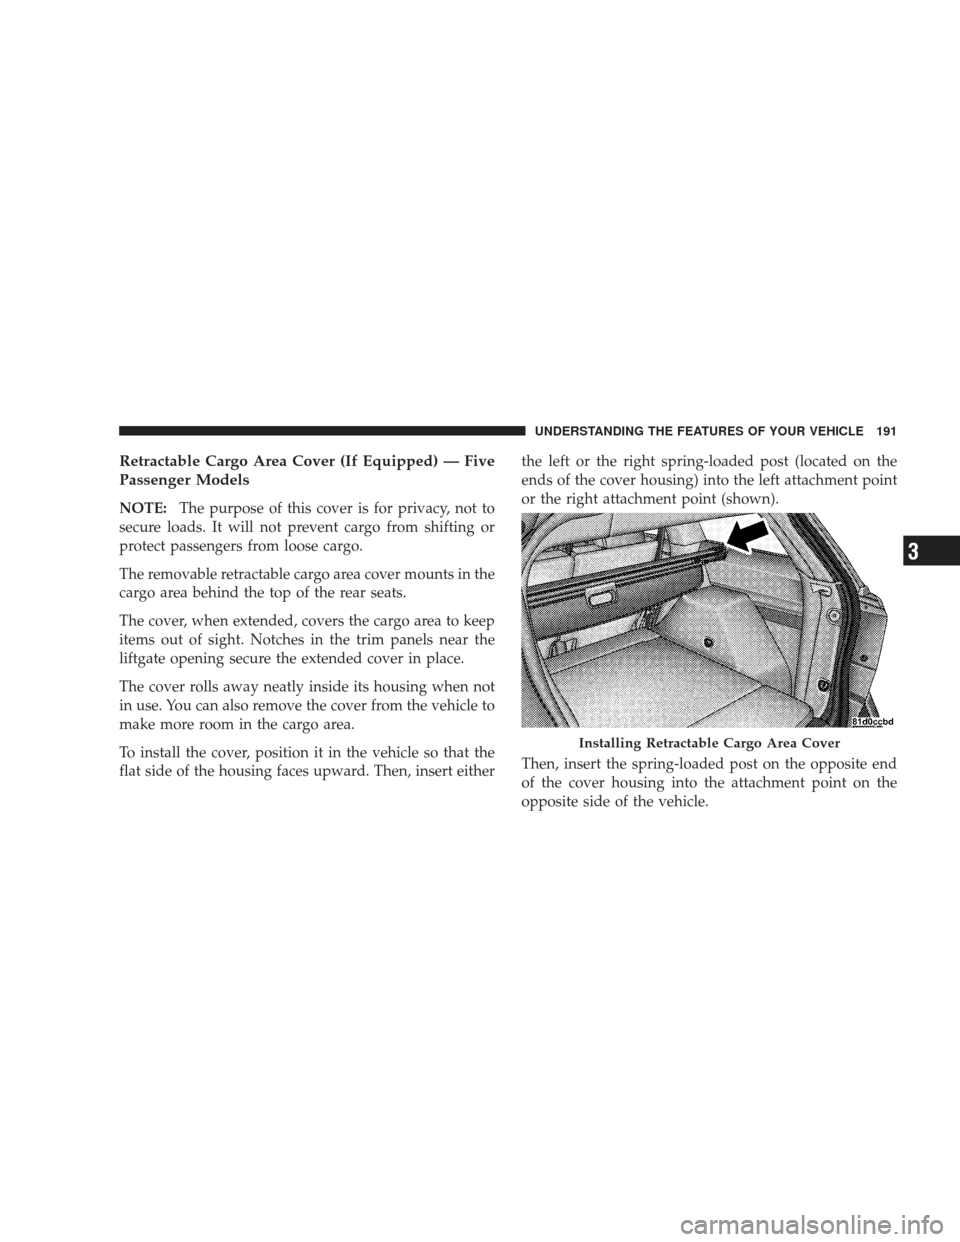
To install the cover, position it in the vehicle so that the
flat side of the housing faces upward. Then, insert either the left or the right spring-loaded post (located on the
ends of the cover housing) into the left attachment point
or the right attachment point (shown).
Then, insert the spring-loaded post on the opposite end
of the cover housing into the attachment point on the
opposite side of the vehicle.
Installing Retractable Cargo Area Cover
UNDERSTANDING THE FEATURES OF YOUR VEHICLE 191
3
Page 194 of 523
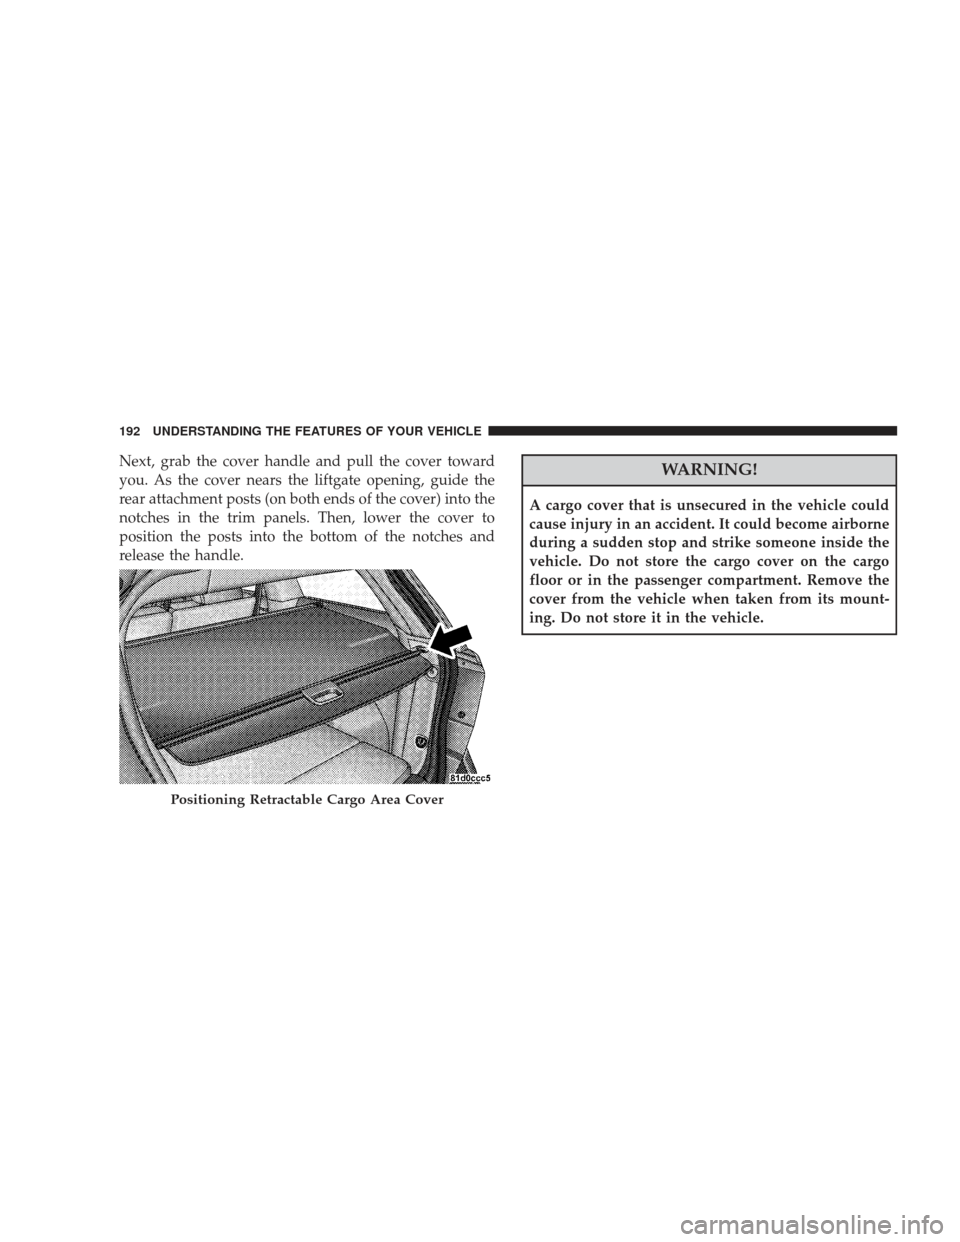
Next, grab the cover handle and pull the cover toward
you. As the cover nears the liftgate opening, guide the
rear attachment posts (on both ends of the cover) into the
notches in the trim panels. Then, lower the cover to
position the posts into the bottom of the notches and
release the handle.WARNING!
A cargo cover that is unsecured in the vehicle could
cause injury in an accident. It could become airborne
during a sudden stop and strike someone inside the
vehicle. Do not store the cargo cover on the cargo
floor or in the passenger compartment. Remove the
cover from the vehicle when taken from its mount-
ing. Do not store it in the vehicle.
Positioning Retractable Cargo Area Cover
192 UNDERSTANDING THE FEATURES OF YOUR VEHICLE
Page 198 of 523
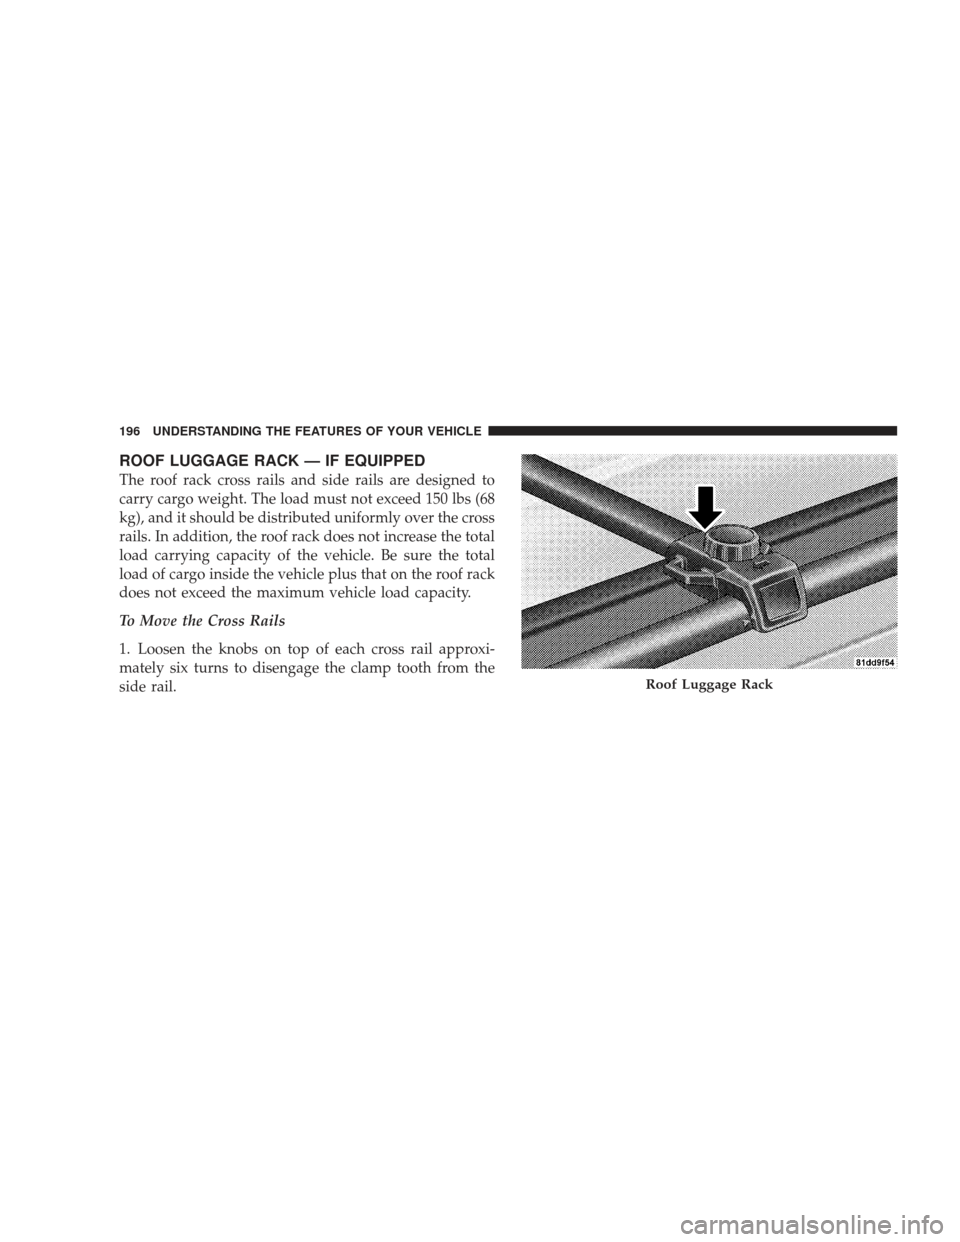
ROOF LUGGAGE RACK — IF EQUIPPED
The roof rack cross rails and side rails are designed to
carry cargo weight. The load must not exceed 150 lbs (68
kg), and it should be distributed uniformly over the cross
rails. In addition, the roof rack does not increase the total
load carrying capacity of the vehicle. Be sure the total
load of cargo inside the vehicle plus that on the roof rack
does not exceed the maximum vehicle load capacity.
To Move the Cross Rails
1. Loosen the knobs on top of each cross rail approxi-
mately six turns to disengage the clamp tooth from the
side rail.
Roof Luggage Rack
196 UNDERSTANDING THE FEATURES OF YOUR VEHICLE
Page 200 of 523
CAUTION!
•Cross rails should remain equally spaced or parallel
at any luggage rack position for proper function.
Noncompliance could result in damage to the roof
rack, cargo, and vehicle.
• To avoid damage to the roof rack and vehicle, do not
exceed the maximum roof rack load capacity of 150
lbs (68 kg). Always distribute loads as evenly as
possible and secure the load appropriately.
• Long loads, which extend over the windshield, such
as wood panels or surfboards, or loads with large
frontal area should be secured to both the front and
rear of the vehicle.
• Place a blanket or other protection between the sur-
face of the roof and the load.
• Travel at reduced speeds and turn corners carefully
when carrying large or heavy loads on the roof rack.
Wind forces, due to natural causes or nearby truck
traffic, can add sudden upward lift to loads. This is
especially true on large flat loads and may result in
damage to the cargo or your vehicle.
WARNING!
Cargo must be securely tied before driving your
vehicle. Improperly secured loads can fly off the
vehicle, particularly at high speeds, resulting in per-
sonal injury or property damage. Follow the Roof
Rack Cautions when carrying cargo on your roof
rack.
198 UNDERSTANDING THE FEATURES OF YOUR VEHICLE
Page 344 of 523
Loading
The vehicle maximum load on the tire must not exceed
the load carrying capacity of the tire on your vehicle. You
will not exceed the tire’s load carrying capacity if you
adhere to the loading conditions, tire size, and cold tire
inflation pressures specified on the Tire and Loading
Information placard and in the “Vehicle Loading” section
of this manual.
NOTE:Under a maximum loaded vehicle condition,
gross axle weight ratings (GAWRs) for the front and rear
axles must not be exceeded. For further information on
GAWRs, vehicle loading, and trailer towing, refer to
“Vehicle Loading” in this section.
To determine the maximum loading conditions of your
vehicle, locate the statement “The combined weight of
occupants and cargo should never exceed XXX kg or XXX
lbs.” on the Tire and Loading Information placard. The combined weight of occupants, cargo/luggage and
trailer tongue weight (if applicable) should never exceed
the weight referenced here.
Steps for Determining Correct Load Limit
1. Locate the statement “The combined weight of occu-
pants and cargo should never exceed XXX kg or XXX lbs”
on your vehicle’s placard.
2. Determine the combined weight of the driver and
passengers that will be riding in your vehicle.
3. Subtract the combined weight of the driver and pas-
sengers from XXX kg or XXX lbs.
4. The resulting figure equals the available amount of
cargo and luggage load capacity. For example, if “XXX”
amount equals 1,400 lbs (635 kg) and there will be five
150 lb (68 kg) passengers in your vehicle, the amount of
342 STARTING AND OPERATING
Page 345 of 523
![DODGE JOURNEY 2009 1.G User Guide available cargo and luggage load capacity is 650 lbs (295
kg) (since 5 x 150 = 750, and 1400 – 750 = 650 lbs [295 kg]).
5. Determine the combined weight of luggage and cargo
being loaded on the vehi DODGE JOURNEY 2009 1.G User Guide available cargo and luggage load capacity is 650 lbs (295
kg) (since 5 x 150 = 750, and 1400 – 750 = 650 lbs [295 kg]).
5. Determine the combined weight of luggage and cargo
being loaded on the vehi](/img/12/5639/w960_5639-344.png)
available cargo and luggage load capacity is 650 lbs (295
kg) (since 5 x 150 = 750, and 1400 – 750 = 650 lbs [295 kg]).
5. Determine the combined weight of luggage and cargo
being loaded on the vehicle. That weight may not safely
exceed the available cargo and luggage load capacity
calculated in Step 4.
6. If your vehicle will be towing a trailer, load from your
trailer will be transferred to your vehicle. Consult this
manual to determine how this reduces the available
cargo and luggage load capacity of your vehicle.NOTE:
The following table shows examples on how to
calculate total load, cargo/luggage, and towing capaci-
ties of your vehicle with varying seating configurations
and number and size of occupants. This table is for
illustration purposes only and may not be accurate for
the seating and load carry capacity of your vehicle.
NOTE: For the following example, the combined weight
of occupants and cargo should never exceed 865 lbs (392
kg).
STARTING AND OPERATING 343
5
Page 377 of 523
VEHICLE LOADING
The load carrying capacity of your vehicle is shown on
the “Vehicle Certification Label.” This information
should be used for passenger and luggage loading as
indicated.
Do not exceed the specified Gross Vehicle Weight Rating
(GVWR) or the Gross Axle Weight Rating (GAWR).
Vehicle Certification Label
Your vehicle has a Vehicle Certification Label affixed to
the rear of the driver’s door.
The label contains the following information:
•Name of manufacturer
•Month and year of manufacture
•Gross Vehicle Weight Rating (GVWR)
•Gross Axle Weight Rating (GAWR) front
•Gross Axle Weight Rating (GAWR) rear
•Vehicle Identification Number (VIN)
•Type of Vehicle
•Month Day and Hour of Manufacture (MDH)
The bar code allows a computer scanner to read the VIN.
Gross Vehicle Weight Rating (GVWR)
The GVWR is the total allowable weight of your vehicle.
This includes driver, passengers, and cargo. The total
load must be limited so that you do not exceed the
GVWR.
Gross Axle Weight Rating (GAWR)
The GAWR is the maximum capacity of the front and rear
axles. Distribute the load over the front and rear axles
evenly. Make sure that you do not exceed either front or
rear GAWR.
STARTING AND OPERATING 375
5
Page 379 of 523
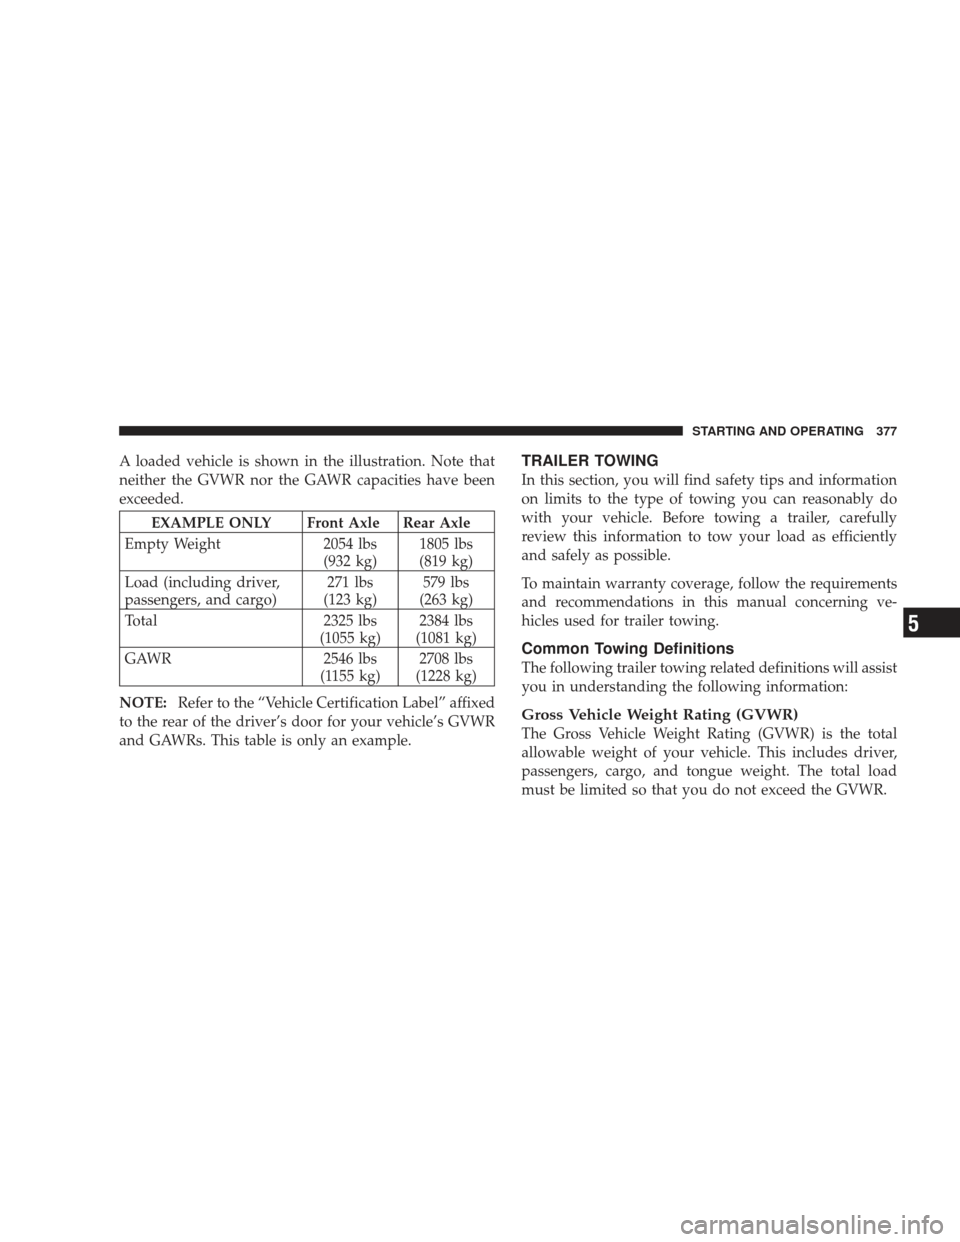
A loaded vehicle is shown in the illustration. Note that
neither the GVWR nor the GAWR capacities have been
exceeded.
EXAMPLE ONLY Front Axle Rear Axle
Empty Weight 2054 lbs
(932 kg) 1805 lbs
(819 kg)
Load (including driver,
passengers, and cargo) 271 lbs
(123 kg) 579 lbs
(263 kg)
Total 2325 lbs
(1055 kg) 2384 lbs
(1081 kg)
GAWR 2546 lbs
(1155 kg) 2708 lbs
(1228 kg)
NOTE: Refer to the “Vehicle Certification Label” affixed
to the rear of the driver’s door for your vehicle’s GVWR
and GAWRs. This table is only an example.
TRAILER TOWING
In this section, you will find safety tips and information
on limits to the type of towing you can reasonably do
with your vehicle. Before towing a trailer, carefully
review this information to tow your load as efficiently
and safely as possible.
To maintain warranty coverage, follow the requirements
and recommendations in this manual concerning ve-
hicles used for trailer towing.
Common Towing Definitions
The following trailer towing related definitions will assist
you in understanding the following information:
Gross Vehicle Weight Rating (GVWR)
The Gross Vehicle Weight Rating (GVWR) is the total
allowable weight of your vehicle. This includes driver,
passengers, cargo, and tongue weight. The total load
must be limited so that you do not exceed the GVWR.
STARTING AND OPERATING 377
5