ECO mode DODGE JOURNEY 2010 1.G User Guide
[x] Cancel search | Manufacturer: DODGE, Model Year: 2010, Model line: JOURNEY, Model: DODGE JOURNEY 2010 1.GPages: 88, PDF Size: 12.49 MB
Page 19 of 88
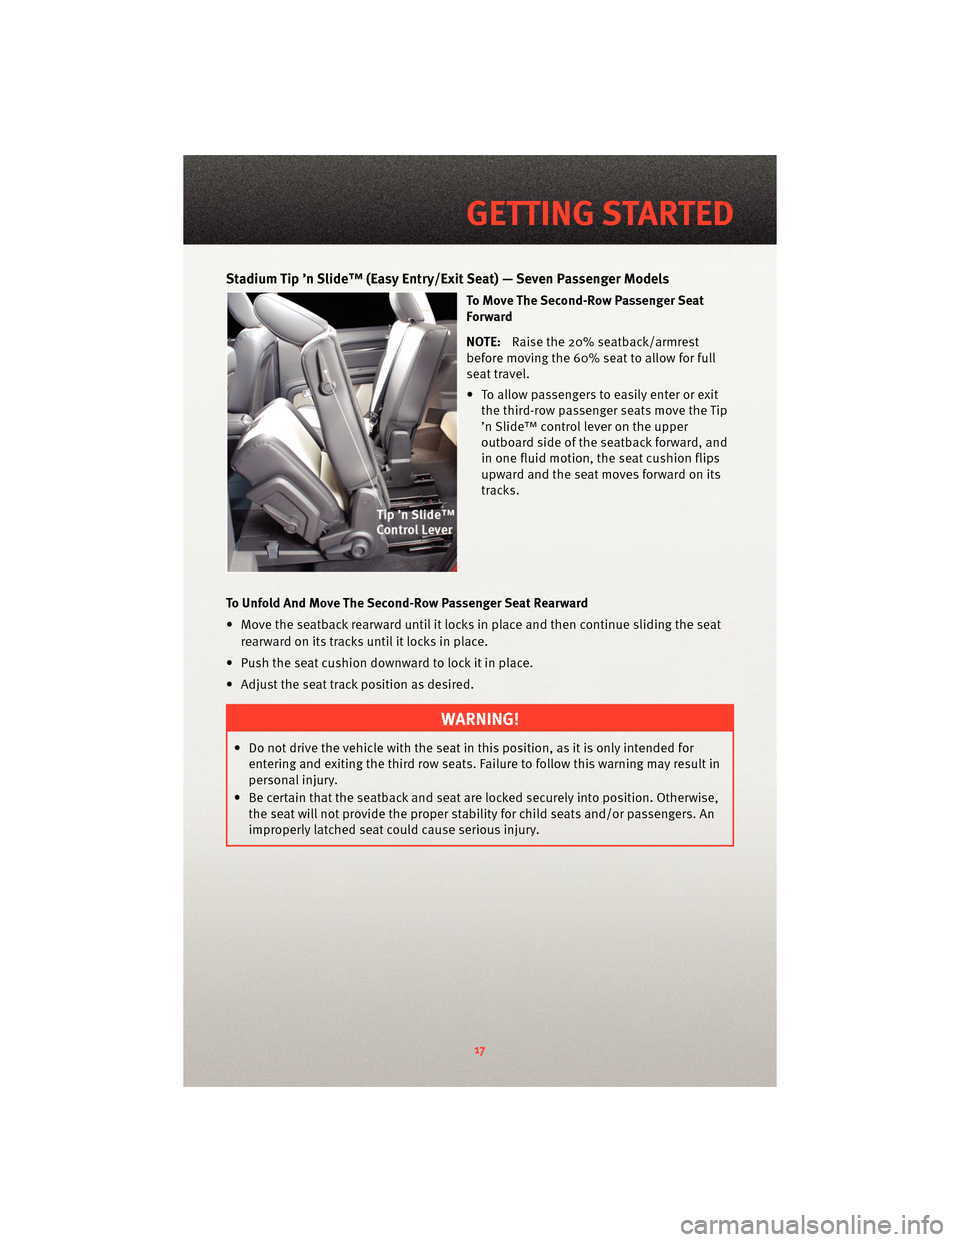
Stadium Tip ’n Slide™ (Easy Entry/ExitSeat) — Seven Passenger Models
To Move The Second-Row Passenger Seat
Forward
NOTE:Raise the 20% seatback/armrest
before moving the 60% seat to allow for full
seat travel.
• To allow passengers to easily enter or exit the third-row passenger seats move the Tip
’n Slide™ control lever on the upper
outboard side of the seatback forward, and
in one fluid motion, the seat cushion flips
upward and the seat moves forward on its
tracks.
To Unfold And Move The Second-Row Passenger Seat Rearward
• Move the seatback rearward until it locks in place and then continue sliding the seat rearward on its tracks until it locks in place.
• Push the seat cushion downward to lock it in place.
• Adjust the seat track position as desired.
WARNING!
• Do not drive the vehicle with the seat in this position, as it is only intended for entering and exiting the third row seats. Failure to follow this warning may result in
personal injury.
• Be certain that the seatback and seat are locked securely into position. Otherwise, the seat will not provide the proper stability for child seats and/or passengers. An
improperly latched seat could cause serious injury.
17
GETTING STARTED
Page 28 of 88
Air Recirculation
• Use recirculation for maximum A/C operation.
• For window defogging, turnthe recirculation button off.
• Recirculation is not allowed in defrost, floor or defrost/floor (mix) modes.
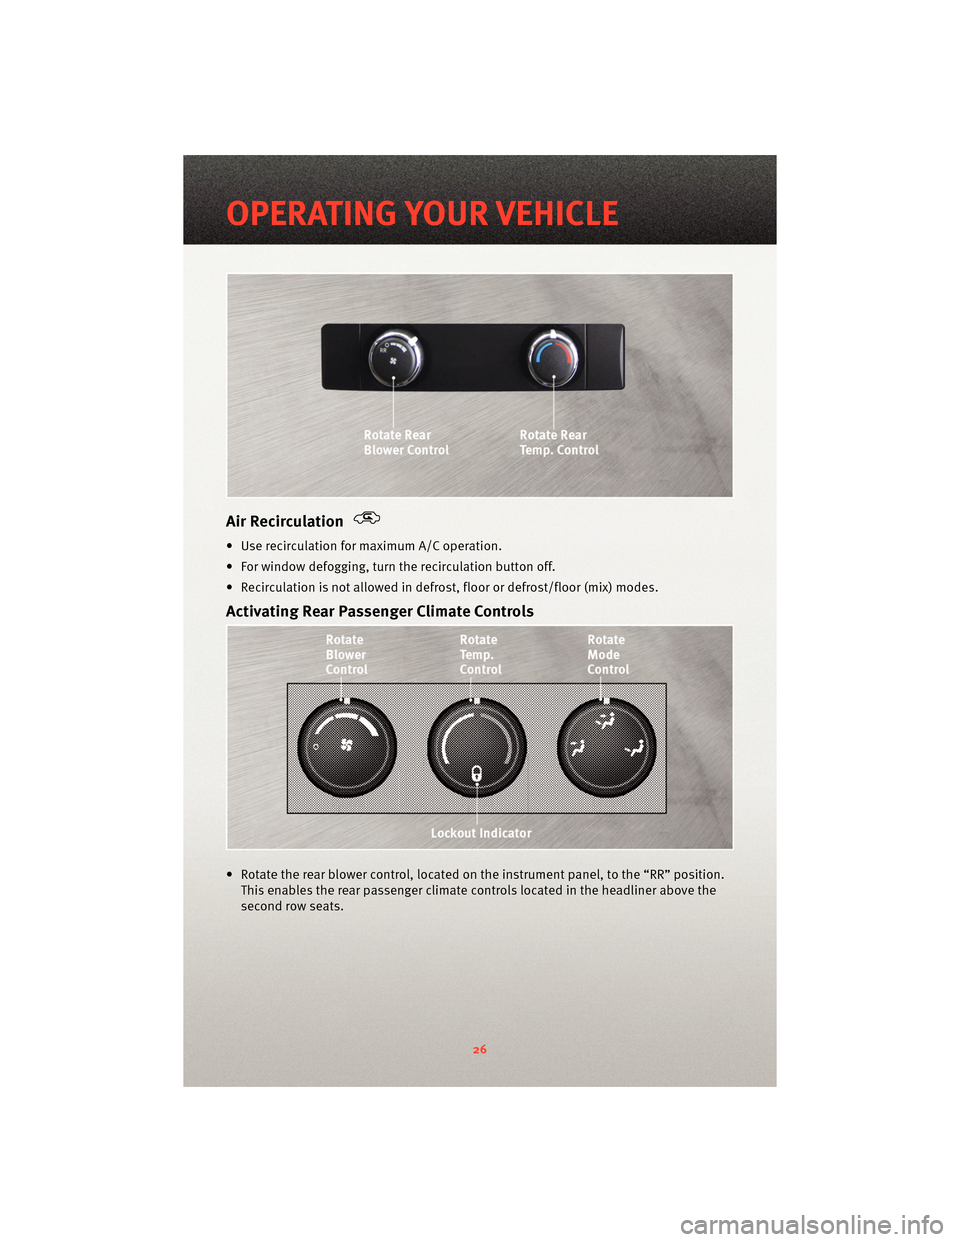
Activating Rear Passenger Climate Controls
• Rotate the rear blower control, located on the instrument panel, to the “RR” position. This enables the rear passenger climate controls located in the headliner above the
second row seats.
OPERATING YOUR VEHICLE
26
Page 30 of 88
SYNC Temperature Button
• Push the SYNC button once to control driver and passenger temperaturessimultaneously. Push the SYNC button a second time to control the temperatures
individually.
Air Recirculation
• Use recirculation for maximum A/C operation.
• For window defogging, turn the recirculation button off.
• If the Recirculation button is pushed while in the AUTO mode, the indicator light may flash three times to indicate the cabin air is being controlled automatically.
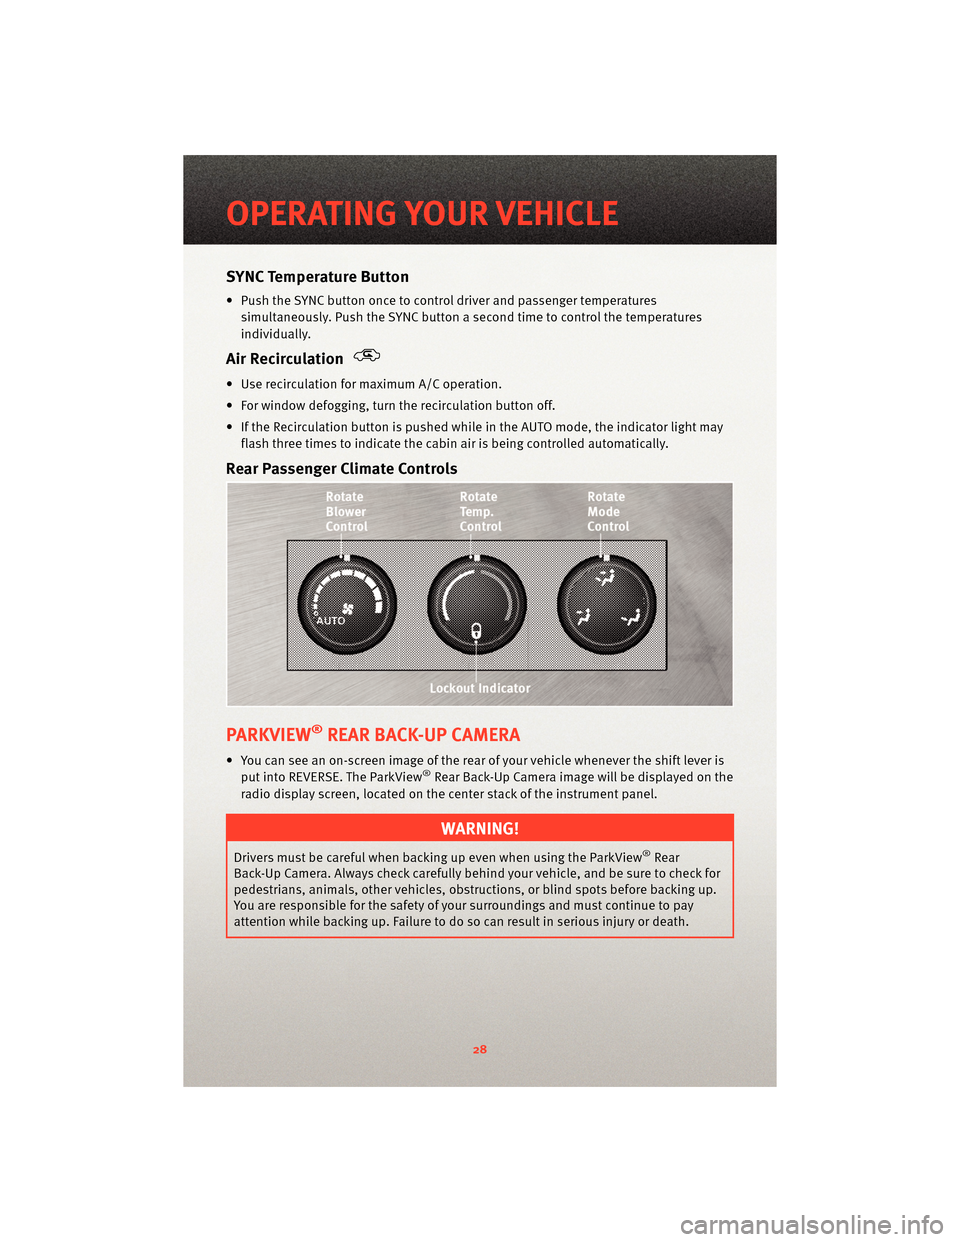
Rear Passenger Climate Controls
PARKVIEW®REAR BACK-UP CAMERA
• You can see an on-screen image of the rear of your vehicle whenever the shift lever isput into REVERSE. The ParkView®Rear Back-Up Camera image will be displayed on the
radio display screen, located on the center stack of the instrument panel.
WARNING!
Drivers must be careful when backing up even when using the ParkView®Rear
Back-Up Camera. Always check carefully behind your vehicle, and be sure to check for
pedestrians, animals, other vehicles, obstruction s, or blind spots before backing up.
You are responsible for the safety of your surroundings and must continue to pay
attention while backing up. Failure to do so can result in serious injury or death.
OPERATING YOUR VEHICLE
28
Page 35 of 88
Auxiliary Mode
• The auxiliary (AUX) jack allows a portable device, such as an MP3 player or a cassetteplayer, to be plugged into the radio and uti lize the vehicle’s audio system to amplify
the source and play through the vehicle speakers.
• Pressing the AUX button will change the mode to auxiliary device if the AUX jack is connected.
• The control of the external device cannot be provided by the radio; use the device controls instead.
Clock Setting
• Press and hold the TIME button until the hours blink; turn the TUNE/SCROLL controlknob to set the hours.
• Press the TUNE/SCROLL control knob until the minutes begin to blink; turn the TUNE/SCROLL control knob to set the minutes.
• Press the TUNE/SCROLL control knob to save the time change.
• To exit, press any button/knob or wait five seconds.
Station Presets
• Press the SET/RND button once and SET 1 will show in the display. Then select the button (1–6).
• A second station may be added to each push button. Press the SET/RND button twice and SET 2 will show in the display, then select button (1–6).
How To Load Multiple CDs/DVDs
REQ Radio Only
• Press the LOAD button and then press the button with the corresponding number
(1–6) where the CD is being loaded. The radio will display PLEASE WAIT and prompt
when to INSERT DISC.
• After the radio displays INSERT DISC, insert the CD into the player. The radio display will show LOADING DISC when the disc is loading and “READING DISC” when the radio
is reading the disc.
• Press the eject button and then the cor responding number (1–6) to eject the desired
disc.
33
ELECTRONICS
Page 43 of 88
Operation Of The RBZ Radio
• To view a DVD press the OPEN/CLOSE hard-key and insert the disc. Playback will beginautomatically after the DVD is recognized by the disc drive. If playback does not begin
automatically follow these steps:
• Press the MENU hard-key, then touch the REAR VES™ soft-key. If a chapter list appears on the right side of the screen touch the HIDE LIST soft-key to display the Rear VES™
Control screen.
• Touch the 1 soft-key to select an audio channel then touch the DISC soft-key in the MEDIA column.
• SIRIUS Backseat TV™
• Press the MENU hard-key, then touch the REAR VES™ soft-key. If a chapter list appears on the right side of the screen touch the HIDE LIST soft-key to display the
Rear VES™ Control screen.
• Touch the 1 soft-key to select an audio channel then touch the TV soft-key in the RADIO column to select SIRIUS Backseat TV™.
Operation Of The REU Radio
• To view a DVD video insert a video disc. Playback will begin automatically after theDVD is recognized by the disc drive. If playback does not begin automatically follow
these steps:
• Press the MENU button, then turn the CENTER CONTROL knob and press the JOYSTICK to select VES™ CONTROLS.
• Select channel 1 or 2, then select DISC.
• Turn the CENTER CONTROL knob to select FUNCTIONS, then select SHOW VIDEO.
• SIRIUS Backseat TV™
• Press the RADIO button, to highlight SATV, then press the LIST button to display a list of available video channels.
• Select the desired channel, then press the MENU button and select SHOW VIDEO.
Operation Of The Remote
• The remote control operates similarly to any DVD remote you have used before and
allows the rear seat passengers to change stations, tracks, discs and audio/video
modes.
• The remote control is designed to control either channel by using the selector switch
located on the right side of the remote.
• Pressing the power button will turn the VES™ system ON/OFF.
• Pressing the MODE button causes the Mode Selection menu to appear on the VES™ screen. Use the remote control arrow button s to scroll through the available modes,
then press ENTER to select the desired mode.
41
ELECTRONICS
Page 45 of 88
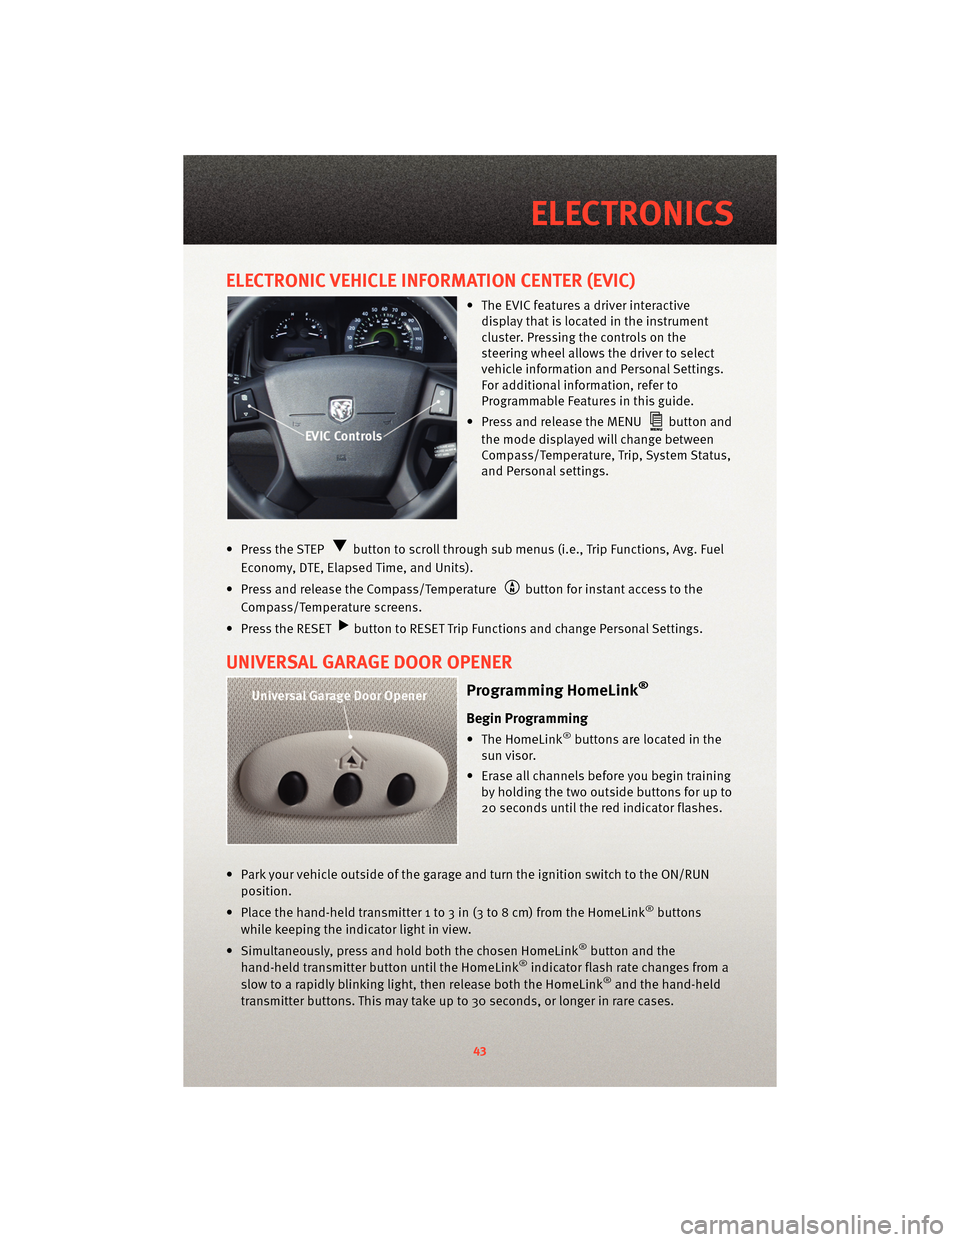
ELECTRONIC VEHICLE INFORMATION CENTER (EVIC)
• The EVIC features a driver interactivedisplay that is located in the instrument
cluster. Pressing the controls on the
steering wheel allows the driver to select
vehicle information and Personal Settings.
For additional information, refer to
Programmable Features in this guide.
• Press and release the MENU
button and
the mode displayed will change between
Compass/Temperature, Trip, System Status,
and Personal settings.
• Press the STEP
button to scroll through sub menus (i.e., Trip Functions, Avg. Fuel
Economy, DTE, Elapsed Time, and Units).
• Press and release the Compass/Temperature
button for instant access to the
Compass/Temperature screens.
• Press the RESET
button to RESET Trip Functions and change Personal Settings.
UNIVERSAL GARAGE DOOR OPENER
Programming HomeLink®
Begin Programming
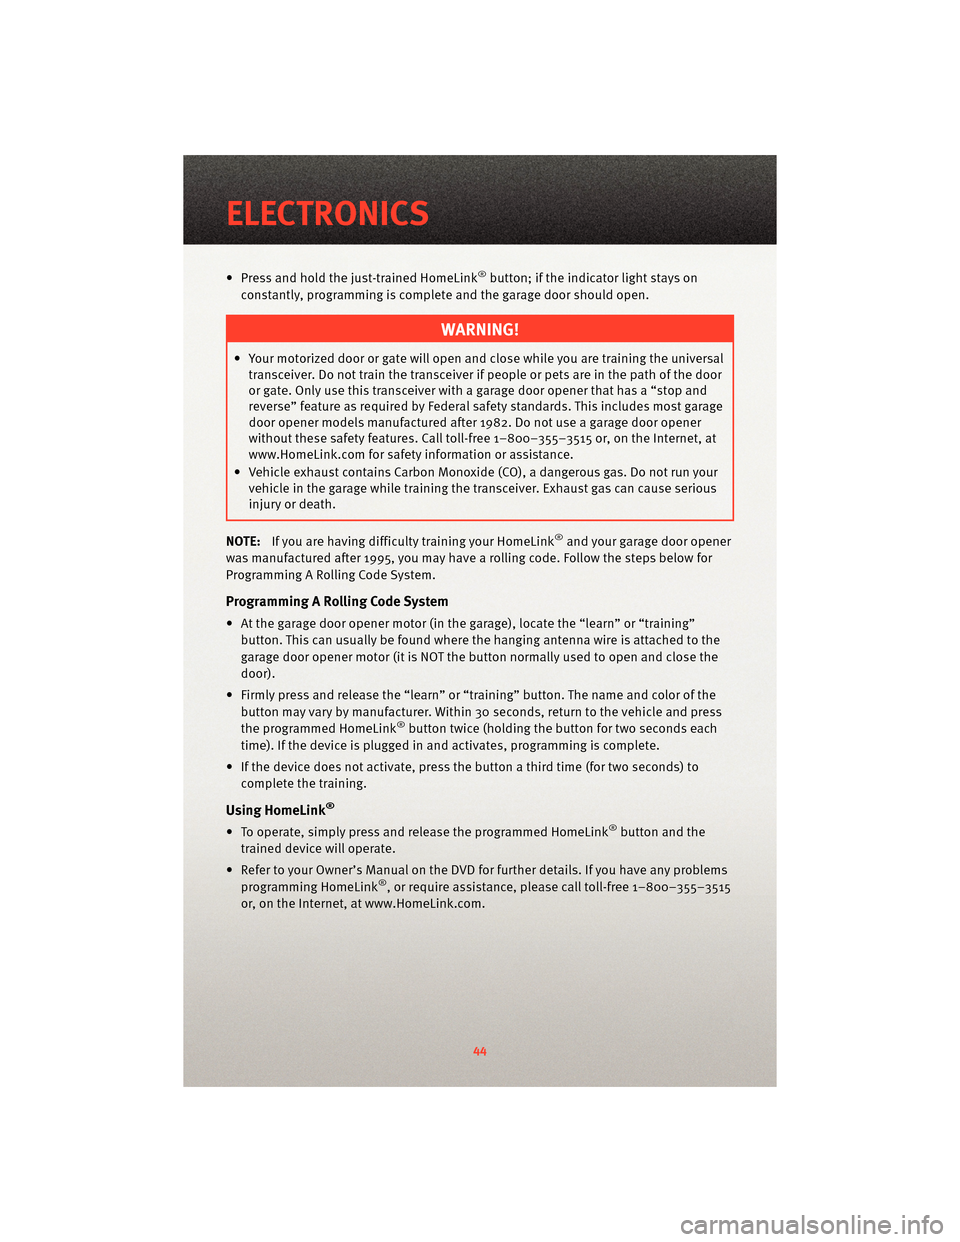
• The HomeLink®buttons are located in the
sun visor.
• Erase all channels before you begin training by holding the two outside buttons for up to
20 seconds until the red indicator flashes.
• Park your vehicle outside of the garage and turn the ignition switch to the ON/RUN position.
• Place the hand-held transmitter 1 to 3 in (3 to 8 cm) from the HomeLink
®buttons
while keeping the indicator light in view.
• Simultaneously, press and hold both the chosen HomeLink
®button and the
hand-held transmitter button until the HomeLink®indicator flash rate changes from a
slow to a rapidly blinking light, then release both the HomeLink®and the hand-held
transmitter buttons. This may take up to 30 seconds, or longer in rare cases.
43
ELECTRONICS
Page 46 of 88
• Press and hold the just-trained HomeLink®button; if the indicator light stays on
constantly, programming is complete and the garage door should open.
WARNING!
• Your motorized door or gate will open and close while you are training the universal transceiver. Do not train the transceiver if people or pets are in the path of the door
or gate. Only use this transceiver with a garage door opener that has a “stop and
reverse” feature as required by Federal sa fety standards. This includes most garage
door opener models manufactured after 1982. Do not use a garage door opener
without these safety features. Call toll-free 1–800–355–3515 or, on the Internet, at
www.HomeLink.com for safety inf ormation orassistance.
• Vehicle exhaust contains Carbon Monoxide (CO), a dangerous gas. Do not run your vehicle in the garage while training the transceiver. Exhaust gas can cause serious
injury or death.
NOTE: If you are having difficulty training your HomeLink
®and your garage door opener
was manufactured after 1995, you may have a rolling code. Follow the steps below for
Programming A Rolling Code System.
Programming A Rolling Code System
• At the garage door opener motor (in the garage), locate the “learn” or “training” button. This can usually be found where the hanging antenna wire is attached to the
garage door opener motor (it is NOT the button normally used to open and close the
door).
• Firmly press and release the “learn” or “training” button. The name and color of the
button may vary by manufacturer. Within 30 seconds, return to the vehicle and press
the programmed HomeLink
®button twice (holding the button for two seconds each
time). If the device is plugged in and activates, programming is complete.
• If the device does not activate, press the button a third time (for two seconds) to
complete the training.
Using HomeLink®
• To operate, simply press and release the programmed HomeLink®button and the
trained device will operate.
• Refer to your Owner’s Manual on the DVD for further details. If you have any problems programming HomeLink
®, or require assistance, please call toll-free 1–800–355–3515
or, on the Internet, at www.HomeLink.com.
ELECTRONICS
44
Page 56 of 88
Oil Change Indicator
Message
• If an “oil change” message (shownas CHAngE OIL) appears and a single chime
sounds, it is time for your next required oil change.
Resetting The Light After Servicing
• Turn the ignition switch to the ON/RUN position (do not start engine).
• Fully depress the accelerator pedal three times within 10 seconds.
• Turn the ignition switch to the OFF/LOCK position.
IF YOUR ENGINE OVERHEATS
• In any of the following situations, you c an reduce the potential for overheating by
taking the appropriate action.
• On the highways — slow down.
• In city traffic — while stopped, shift tran smission intoNEUTRAL, but do not increase
engine idle speed.
NOTE: There are steps that you can take to slow down an impending overheat
condition:
• If your air conditioner (A/C) is on, turn it off. The A/C system adds heat to the engine cooling system and turning the A/C off can help remove this heat.
• You can also turn the Temperature Control to maximum heat, the Mode Control to floor and the Fan Control to high. This allows the heater core to act as a supplement to the
radiator and aids in removing heat from the engine cooling system.
• If the temperature reading does not re turn to normal, turn the engine off immediately.
• We recommend that you do not operate the vehicle or engine damage will occur. Have the vehicle serviced immediately.
CAUTION!
Driving with a hot cooling system could dama ge your vehicle. If the temperature gauge
reads HOT (H), pull over and stop the vehicle. Idle the vehicle with the air conditioner
turned off until the pointer drops back into the normal range. If the pointer remains on
HOT (H), and you hear continuous chimes, t urn the engine off immediately and call for
service.
WARNING!
You or others can be badly burned by hot engine coolant (antifreeze) or steam from
your radiator. If you see or hear steam coming from under the hood, do not open the
hood until the radiator has had time to co ol. Never try to open a cooling system
pressure cap when the radiator or coolant bottle is hot.
WHAT TO DO IN EMERGENCIES
54
Page 64 of 88
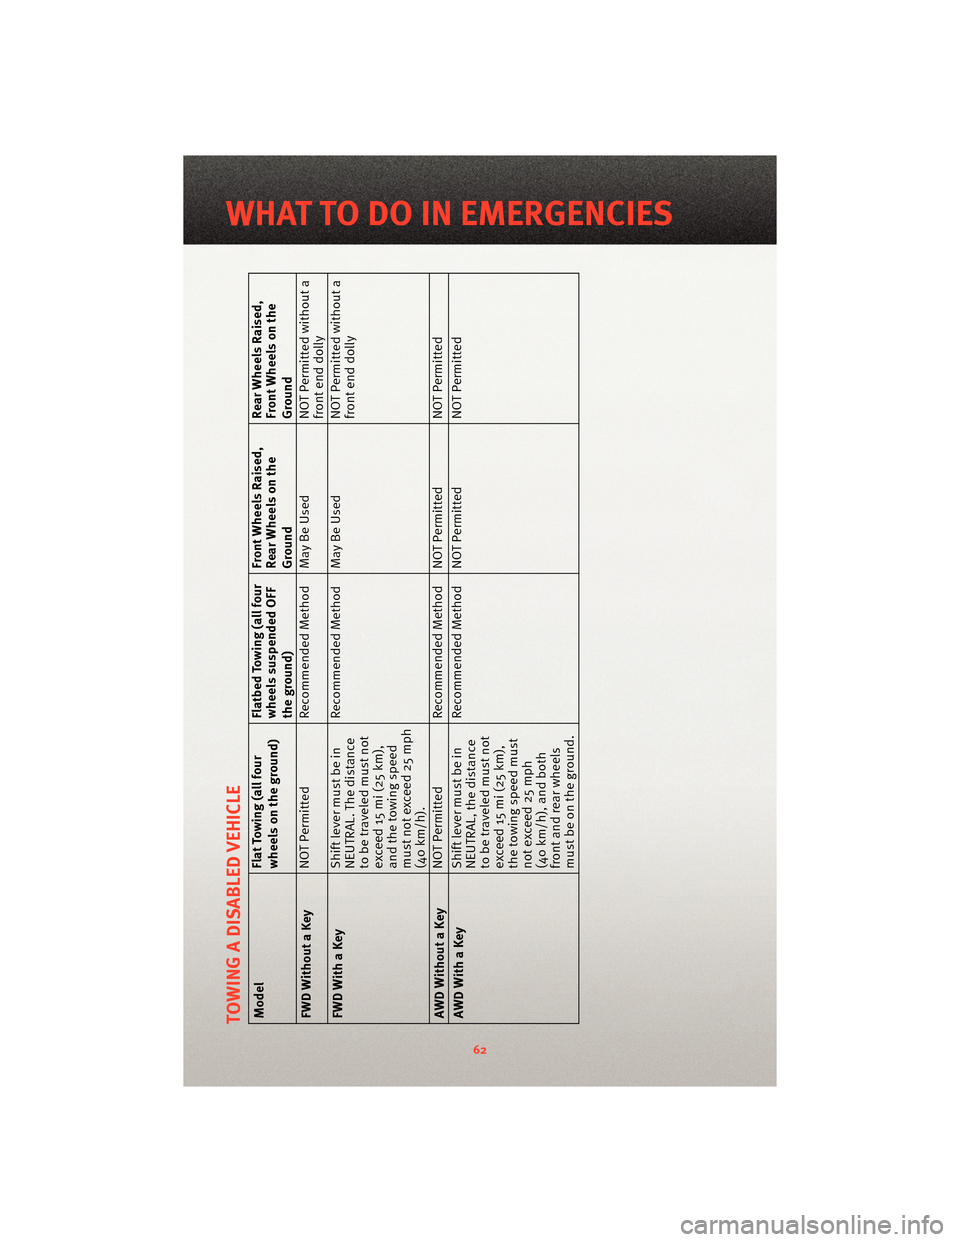
TOWING A DISABLED VEHICLEModelFlat Towing (all four
wheels on the ground)Flatbed Towing (all four
wheels suspended OFF
the ground)Front Wheels Raised,
Rear Wheels on the
GroundRear Wheels Raised,
Front Wheels on the
Ground
FWD Without a Key NOT Permitted
Recommended Method May Be Used NOT Permitted without a
front end dolly
FWD With a Key Shift lever must be in
NEUTRAL. The distance
to be traveled must not
exceed 15 mi (25 km),
and the towing speed
must not exceed 25 mph
(40 km/h).Recommended Method May Be Used
NOT Permitted without a
front end dolly
AWD Without a Key NOT Permitted
Recommended Method NOT Permitted NOT Permitted
AWD With a Key Shift lever must be in
NEUTRAL, the distance
to be traveled must not
exceed 15 mi (25 km),
the towing speed must
not exceed 25 mph
(40 km/h), and both
front and rear wheels
must be on the ground.Recommended Method NOT Permitted
NOT Permitted
62
WHAT TO DO IN EMERGENCIES
Page 70 of 88
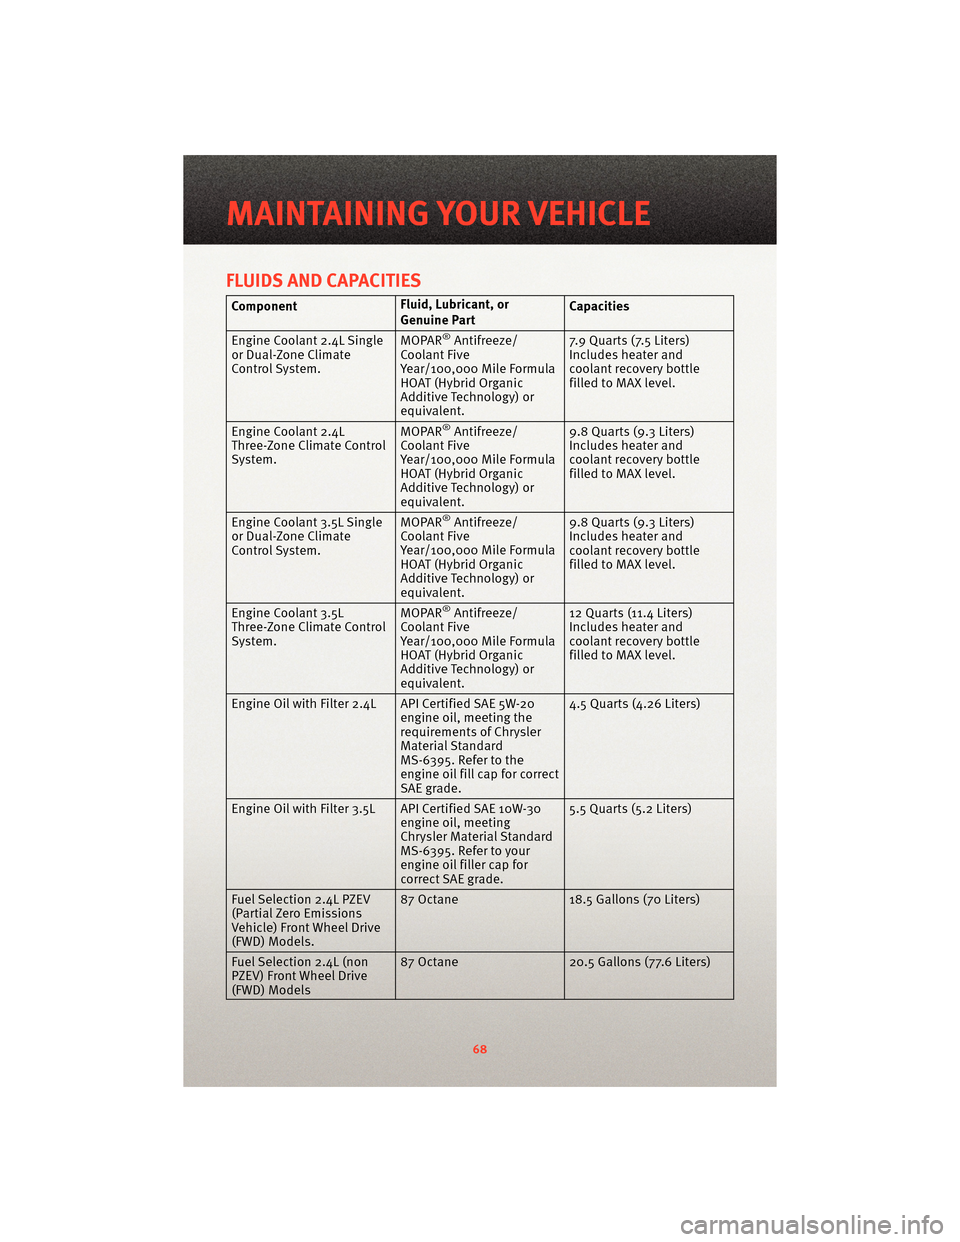
FLUIDS AND CAPACITIES
ComponentFluid, Lubricant, or
Genuine PartCapacities
Engine Coolant 2.4L Single
or Dual-Zone Climate
Control System. MOPAR
®Antifreeze/
Coolant Five
Year/100,000 Mile Formula
HOAT (Hybrid Organic
Additive Technology) or
equivalent. 7.9 Quarts (7.5 Liters)
Includes heater and
coolant recovery bottle
filled to MAX level.
Engine Coolant 2.4L
Three-Zone Climate Control
System. MOPAR
®Antifreeze/
Coolant Five
Year/100,000 Mile Formula
HOAT (Hybrid Organic
Additive Technology) or
equivalent. 9.8 Quarts (9.3 Liters)
Includes heater and
coolant recovery bottle
filled to MAX level.
Engine Coolant 3.5L Single
or Dual-Zone Climate
Control System. MOPAR
®Antifreeze/
Coolant Five
Year/100,000 Mile Formula
HOAT (Hybrid Organic
Additive Technology) or
equivalent. 9.8 Quarts (9.3 Liters)
Includes heater and
coolant recovery bottle
filled to MAX level.
Engine Coolant 3.5L
Three-Zone Climate Control
System. MOPAR
®Antifreeze/
Coolant Five
Year/100,000 Mile Formula
HOAT (Hybrid Organic
Additive Technology) or
equivalent. 12 Quarts (11.4 Liters)
Includes heater and
coolant recovery bottle
filled to MAX level.
Engine Oil with Filter 2.4L API Certified SAE 5W-20 engine oil, meeting the
requirements of Chrysler
Material Standard
MS-6395. Refer to the
engine oil fill cap for correct
SAE grade.4.5 Quarts (4.26 Liters)
Engine Oil with Filter 3.5L API Certified SAE 10W-30 engine oil, meeting
Chrysler Material Standard
MS-6395. Refer to your
engine oil filler cap for
correct SAE grade.5.5 Quarts (5.2 Liters)
Fuel Selection 2.4L PZEV
(Partial Zero Emissions
Vehicle) Front Wheel Drive
(FWD) Models. 87 Octane
18.5 Gallons (70 Liters)
Fuel Selection 2.4L (non
PZEV) Front Wheel Drive
(FWD) Models 87 Octane
20.5 Gallons (77.6 Liters)
MAINTAINING YOUR VEHICLE
68