steering wheel DODGE JOURNEY 2010 1.G User Guide
[x] Cancel search | Manufacturer: DODGE, Model Year: 2010, Model line: JOURNEY, Model: DODGE JOURNEY 2010 1.GPages: 88, PDF Size: 12.49 MB
Page 3 of 88
INTRODUCTION/WELCOME
WELCOME FROM CHRYSLER GROUP LLC . 2
CONTROLS AT A GLANCE
DRIVER COCKPIT.............. 4
INSTRUMENT CLUSTER ..........6
GETTING STARTED
KEYFOB...................8
THEFT ALARM................ 9
SEATBELT ................. 9
CHILD RESTRAINTS .............10
FRONTSEATS................13
REARSEATS ................16
HEATEDSEATS...............19
TILT / TELESCOPING STEERING
COLUMN ..................19
PROGRAMMABLEFEATURES ...... 20
OPERATING YOUR VEHICLE
TURN SIGNAL/LIGHTS LEVER ...... 22
WIPER/WASHER LEVER ..........23
SPEED CONTROL LEVER ......... 24
MANUAL CLIMATE CONTROLS .......25
THREE ZONE MANUAL CLIMATE
CONTROL..................25
TWO AND THREE ZONE AUTOMATIC
TEMPERATURE CONTROL (ATC) ......27
PARKVIEW
®REAR BACK-UP CAMERA . . 28
POWERSUNROOF ............ 29
WIND BUFFETING ............. 30
ELECTRONICS
NON-TOUCH-SCREENRADIOS.......31
NAVIGATION RADIO – SALES CODE REU .34
TOUCH-SCREEN MULTIMEDIA RADIO
–SALESCODERBZ............ 38
REMOTE AUDIO CONTROLS ....... 40
VIDEO ENTERTAINMENT SYSTEM
(VES)™.................. 40
UNIVERSAL CONSUMER INTERFACE . . . 42
ELECTRONIC VEHICLE INFORMATION
CENTER (EVIC) ...............43
UNIVERSAL GARAGE DOOR OPENER . . .43
POWERINVERTER .............45
POWER OUTLET ..............45 Uconnect™ Phone
........... 46
VOICECOMMAND .............47
UTILITY
TRAILER TOWING WEIGHTS (MAXIMUM
TRAILER WEIGHT RATINGS) ....... 49
RECREATIONAL TOWING (BEHIND
MOTORHOME, ETC.) ............50
BRAKE/TRANSAXLE INTERLOCK MANUAL
OVERRIDE .................50
WHAT TO DO IN EMERGENCIES
24 HOUR TOWING ASSISTANCE
- U.S. ONLY .................51
INSTRUMENT CLUSTER WARNING
LIGHTS ...................51
IF YOUR ENGINE OVERHEATS .......54
JACKINGANDTIRECHANGING.......55
JUMP-STARTING ..............59
TOWINGADISABLEDVEHICLE...... 62
FREEING A STUCK VEHICLE ........63
EVENT DATA RECORDER (EDR) ......63
MAINTAINING YOUR VEHICLE
OPENING THE HOOD............65
ENGINE COMPARTMENT ......... 66
FLUIDS AND CAPACITIES ......... 68
MAINTENANCE CHART ...........70
FUSES....................72
TIREPRESSURES..............75
WHEEL AND WHEEL TRIM CARE ......76
EXTERIOR BULBS ..............76
CONSUMER ASSISTANCE
CHRYSLER GROUP LLC CUSTOMER
CENTER...................77
CHRYSLER CANADA INC. CUSTOMER
CENTER...................77
ASSISTANCE FOR THE HEARING
IMPAIRED..................77
PUBLICATIONS ORDERING .........77
REPORTING SAFETY DEFECTS IN THE
50 UNITED STATES AND
WASHINGTON, D.C. ............78
TIRE WARRANTY ..............78
MOPAR ACCESSORIES
MOPAR®ACCESSORIES..........81
TABLE OF CONTENTS
Page 21 of 88
HEATED SEATS
Front Heated Seats
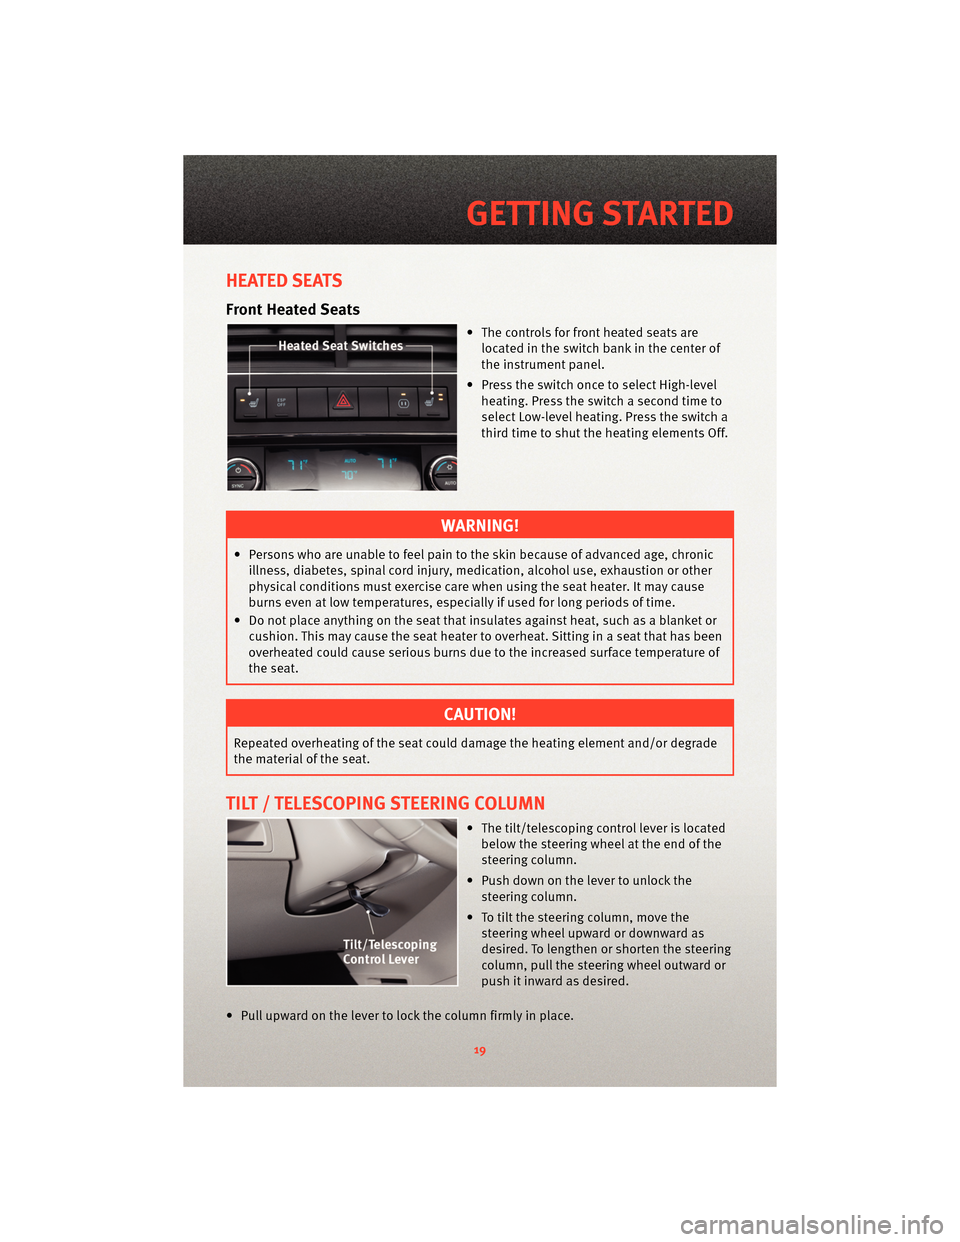
• The controls for front heatedseats are
located in the switch bank in the center of
the instrument panel.
• Press the switch once to select High-level heating. Press the switch a second time to
select Low-level heating. Press the switch a
third time to shut the heating elements Off.
WARNING!
• Persons who are unable to feel pain to the skin because of advanced age, chronicillness, diabetes, spinal cord injury, medication, alcohol use, exhaustion or other
physical conditions must exercise care when using the seat heater. It may cause
burns even at low temperatures, especially if used for long periods of time.
• Do not place anything on the seat that insulates against heat, such as a blanket or cushion. This may cause the seat heater to overheat. Sitting in a seat that has been
overheated could cause serious burns due to the increased surface temperature of
the seat.
CAUTION!
Repeated overheating of the seat could damage the heating element and/or degrade
the material of the seat.
TILT / TELESCOPING STEERING COLUMN
• The tilt/telescoping control lever is locatedbelow the steering wheel at the end of the
steering column.
• Push down on the lever to unlock the steering column.
• To tilt the steering column, move the steering wheel upward or downward as
desired. To lengthen or shorten the steering
column, pull the steering wheel outward or
push it inward as desired.
• Pull upward on the lever to lock the column firmly in place.
19
GETTING STARTED
Page 22 of 88
WARNING!
Do not adjust the steering wheel while driving. The tilt/telescoping adjustment must
be locked while driving. Adjusting the steering wheel while driving or driving without
the tilt/telescoping adjustment locked could cause the driver to lose control of the
vehicle. Failure to follow this warning may result in serious injury or death.
PROGRAMMABLE FEATURES
Electronic Vehicle Information Center (EVIC) – If Equipped
• The EVIC can be used to program the following Personal Settings. Press and release the MENU button
until Personal Settings displays, then press the SCROLL
button
to scroll through the settings. Press the FUNCTION SELECT buttonto
change the setting.
• Language • Headlamps With Wipers
• Auto UNLK On Exit • ILLUMIN Approach
• RKE Unlock • Key-Off Power Delay
• Sound Horn With Lock • NAV Turn By Turn
• Flash Lamp Lock • Display ECO Message
• Headlamp Off Delay • Display Units of Measure In
Key Fob Programmable Features
• The following features may also be programmed by using the Key Fob transmitter or the ignition switch and driver's door lock switch.
NOTE: Pressing the LOCK button while you are inside the vehicle will activate the
Vehicle Security Alarm. Opening a door with the Vehicle Security Alarm activated will
cause the alarm to sound. Press the UNLOCK button to deactivate the Vehicle Security
Alarm.
Unlock On First Press
• To unlock either the driver's side, or all doors, on the first press of the UNLOCK button:
• Press and hold the LOCK button for at least 4 seconds, but no longer than10 seconds. Then, press and hold the UNLOCK button while still holding the LOCK
button.
• Release both buttons at the same time.
GETTING STARTED
20
Page 42 of 88
REMOTE AUDIO CONTROLS
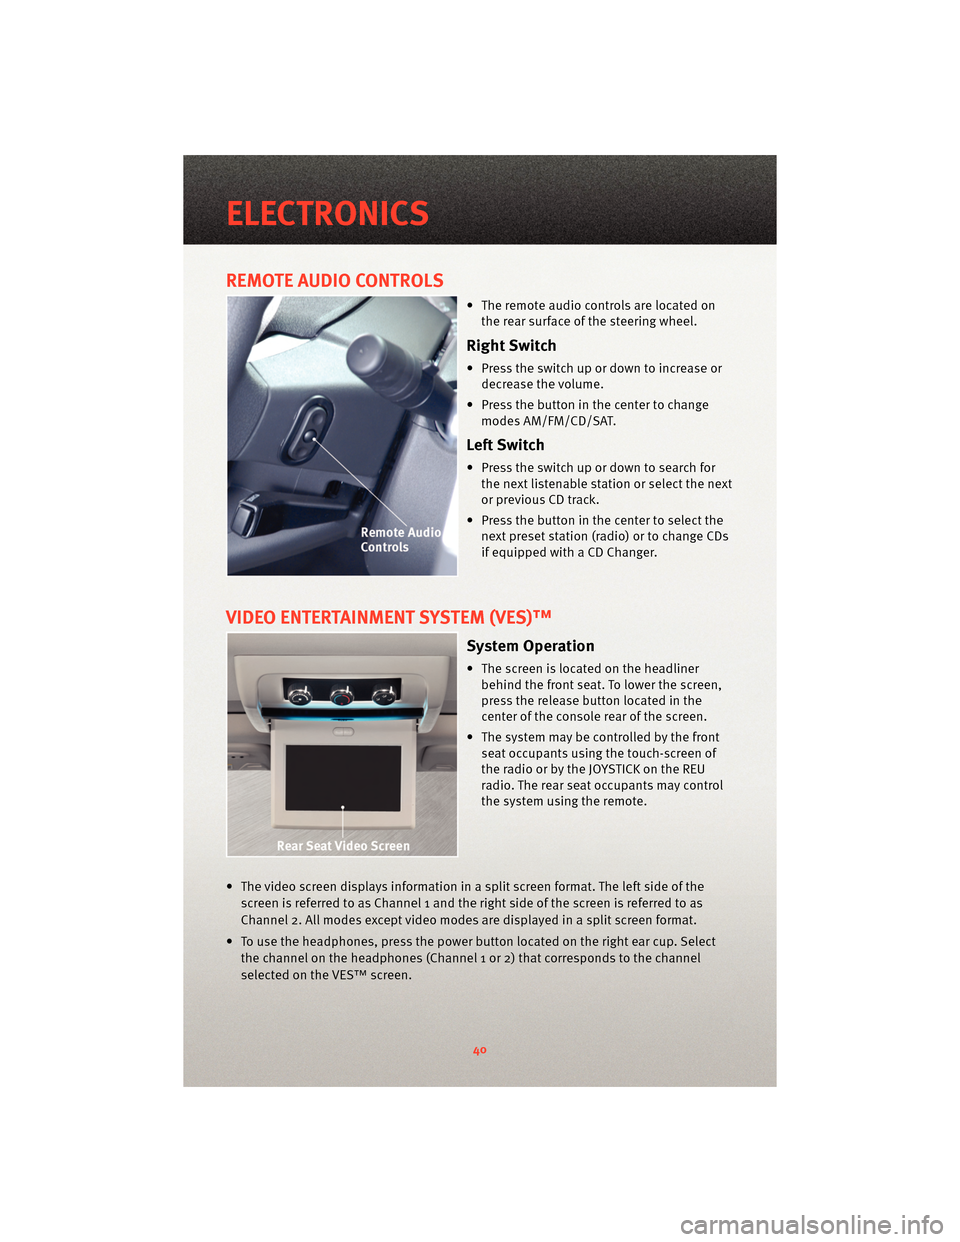
• The remote audio controls are located onthe rear surface of the steering wheel.
Right Switch
• Press the switch up or down to increase ordecrease the volume.
• Press the button in the center to change modes AM/FM/CD/SAT.
Left Switch
• Press the switch up or down to search forthe next listenable station or select the next
or previous CD track.
• Press the button in the center to select the next preset station (radio) or to change CDs
if equipped with a CD Changer.
VIDEO ENTERTAINMENT SYSTEM (VES)™
System Operation
• The screen is located on the headlinerbehind the front seat. To lower the screen,
press the release button located in the
center of the console rear of the screen.
• The system may be controlled by the front seat occupants using the touch-screen of
the radio or by the JOYSTICK on the REU
radio. The rear seat occupants may control
the system using the remote.
• The video screen displays information in a split screen format. The left side of the screen is referred to as Channel 1 and the right side of the screen is referred to as
Channel 2. All modes except video modes are displayed in a split screen format.
• To use the headphones, press the power button located on the right ear cup. Select the channel on the headphones (Channel 1 or 2) that corresponds to the channel
selected on the VES™ screen.
ELECTRONICS
40
Page 45 of 88
ELECTRONIC VEHICLE INFORMATION CENTER (EVIC)
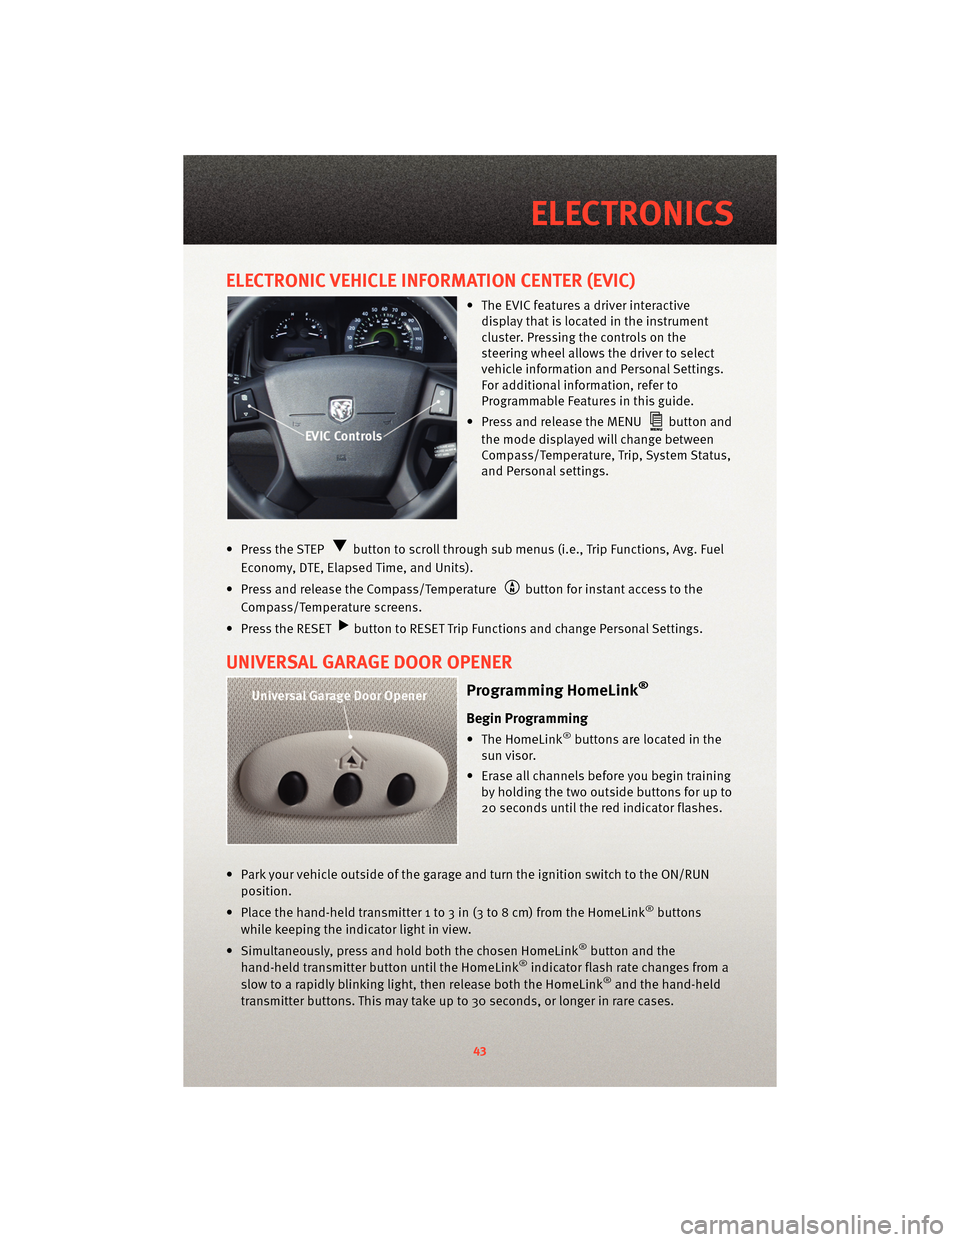
• The EVIC features a driver interactivedisplay that is located in the instrument
cluster. Pressing the controls on the
steering wheel allows the driver to select
vehicle information and Personal Settings.
For additional information, refer to
Programmable Features in this guide.
• Press and release the MENU
button and
the mode displayed will change between
Compass/Temperature, Trip, System Status,
and Personal settings.
• Press the STEP
button to scroll through sub menus (i.e., Trip Functions, Avg. Fuel
Economy, DTE, Elapsed Time, and Units).
• Press and release the Compass/Temperature
button for instant access to the
Compass/Temperature screens.
• Press the RESET
button to RESET Trip Functions and change Personal Settings.
UNIVERSAL GARAGE DOOR OPENER
Programming HomeLink®
Begin Programming
• The HomeLink®buttons are located in the
sun visor.
• Erase all channels before you begin training by holding the two outside buttons for up to
20 seconds until the red indicator flashes.
• Park your vehicle outside of the garage and turn the ignition switch to the ON/RUN position.
• Place the hand-held transmitter 1 to 3 in (3 to 8 cm) from the HomeLink
®buttons
while keeping the indicator light in view.
• Simultaneously, press and hold both the chosen HomeLink
®button and the
hand-held transmitter button until the HomeLink®indicator flash rate changes from a
slow to a rapidly blinking light, then release both the HomeLink®and the hand-held
transmitter buttons. This may take up to 30 seconds, or longer in rare cases.
43
ELECTRONICS
Page 65 of 88
FREEING A STUCK VEHICLE
• If your vehicle becomes stuck in mud, sand or snow, it can often be moved by arocking motion. Turn your steering wheel right and left to clear the area around the
front wheels. Then, move the shift lever back and forth between REVERSE and 1st gear.
Using minimal accelerator pedal pressure to maintain the rocking motion, without
spinning the wheels, is most effective.
NOTE: If your vehicle is equipped with Electronic Stability Program (ESP) or Traction
Control
, turn the system off before attempting to “rock” the vehicle.
WARNING!
Fast spinning tires can be dangerous. Forces generated by excessive wheel speeds
may cause tire damage or failure. A tire could explode and injure someone. Do not
spin your vehicle's wheels faster than 30 mph (48 km/h) when you are stuck. Do not
let anyone near a spinning wheel, no matter what the speed.
CAUTION!
• When “rocking” a stuck vehicle by moving between 1st and REVERSE, do not spin the wheels faster than 15 mph (24 km/h), or drivetrain damage may result.
• Revving the engine or s pinning the wheels too fast ma y lead to transmission
overheating and failure. It can also damage the tires. Do not spin the wheels above
30 mph (48 km/h) while in gear (no transmission shifting occurring).
EVENT DATA RECORDER (EDR)
• In the event of an accident, your vehicle is designed to record up to five seconds of
specific vehicle data parameters (see list below) in an event data recorder prior to the
moment of airbag deployment, or ne ar deployment (if applicable), and up to a quarter
second of either high-speed deceleration data or change in velocity during and/or
after airbag deployment or ne ar-deployment. EDR data is ONLY recorded if an airbag
deploys, or nearly deploys, and is otherwise unavailable.
NOTE:
• A near-deployment event occurs when the airbag sensor detects severe vehicle
deceleration usually indicative of a crash, but not severe enough to warrant airbag
deployment.
• Under certain circumstances, EDR data ma y not be recorded (e.g., loss of battery
power).
63
WHAT TO DO IN EMERGENCIES
Page 71 of 88
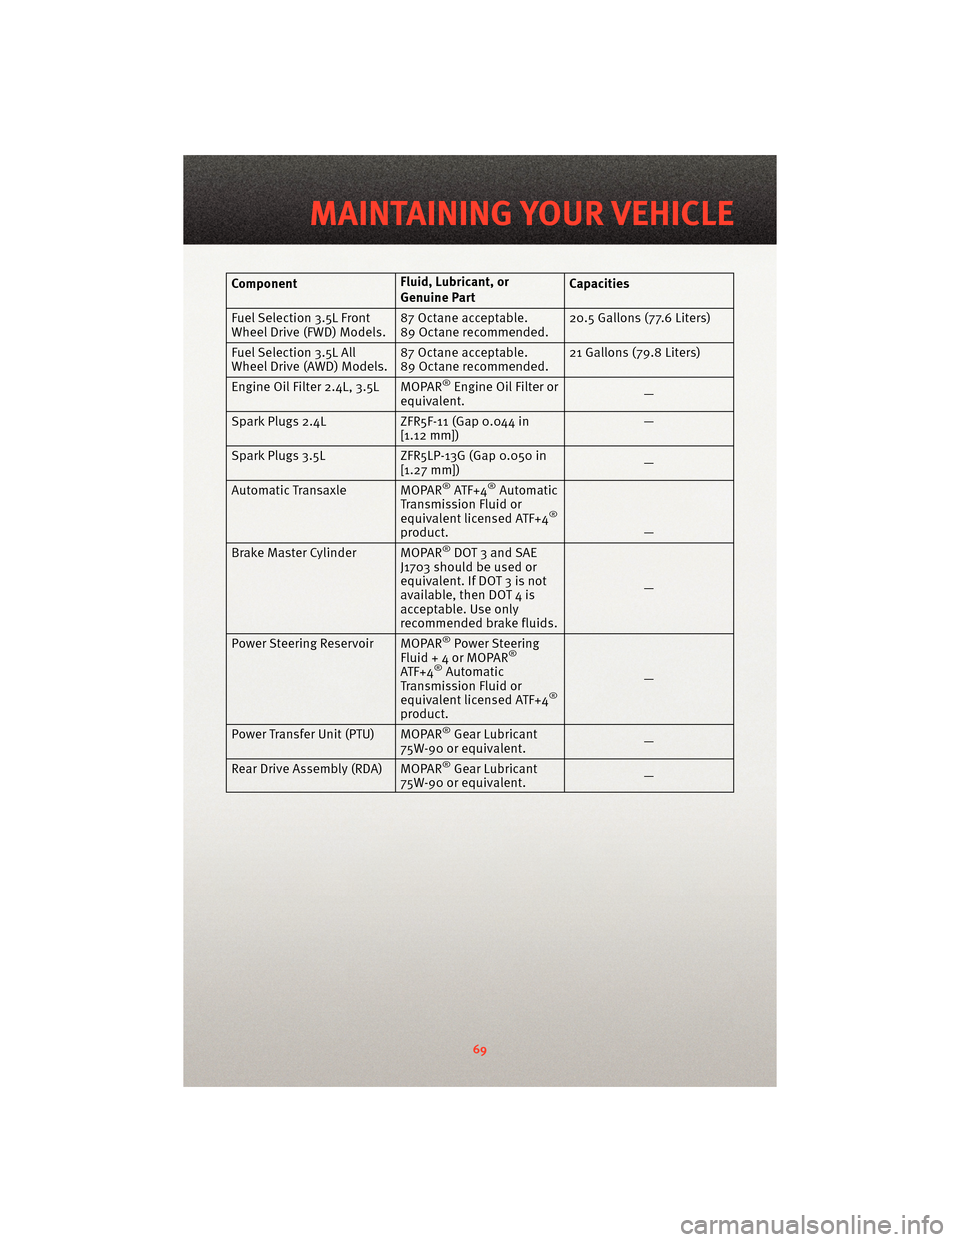
ComponentFluid, Lubricant, or
Genuine PartCapacities
Fuel Selection 3.5L Front
Wheel Drive (FWD) Models. 87 Octane acceptable.
89 Octane recommended.20.5 Gallons (77.6 Liters)
Fuel Selection 3.5L All
Wheel Drive (AWD) Models. 87 Octane acceptable.
89 Octane recommended.21 Gallons (79.8 Liters)
Engine Oil Filter 2.4L, 3.5L MOPAR
®Engine Oil Filter or
equivalent. —
Spark Plugs 2.4L ZFR5F-11 (Gap 0.044 in
[1.12 mm]) —
Spark Plugs 3.5L ZFR5LP-13G (Gap 0.050 in
[1.27 mm]) —
Automatic Transaxle MOPAR
®ATF+4®Automatic
Transmission Fluid or
equivalent licensed ATF+4
®
product. —
Brake Master Cylinder MOPAR®DOT 3 and SAE
J1703 should be used or
equivalent. If DOT 3 is not
available, then DOT 4 is
acceptable. Use only
recommended brake fluids. —
Power Steering Reservoir MOPAR
®Power Steering
Fluid+4orMOPAR®
ATF+4®Automatic
Transmission Fluid or
equivalent licensed ATF+4
®
product. —
Power Transfer Unit (PTU) MOPAR®Gear Lubricant
75W-90 or equivalent. —
Rear Drive Assembly (RDA) MOPAR
®Gear Lubricant
75W-90 or equivalent. —
69
MAINTAINING YOUR VEHICLE
Page 76 of 88
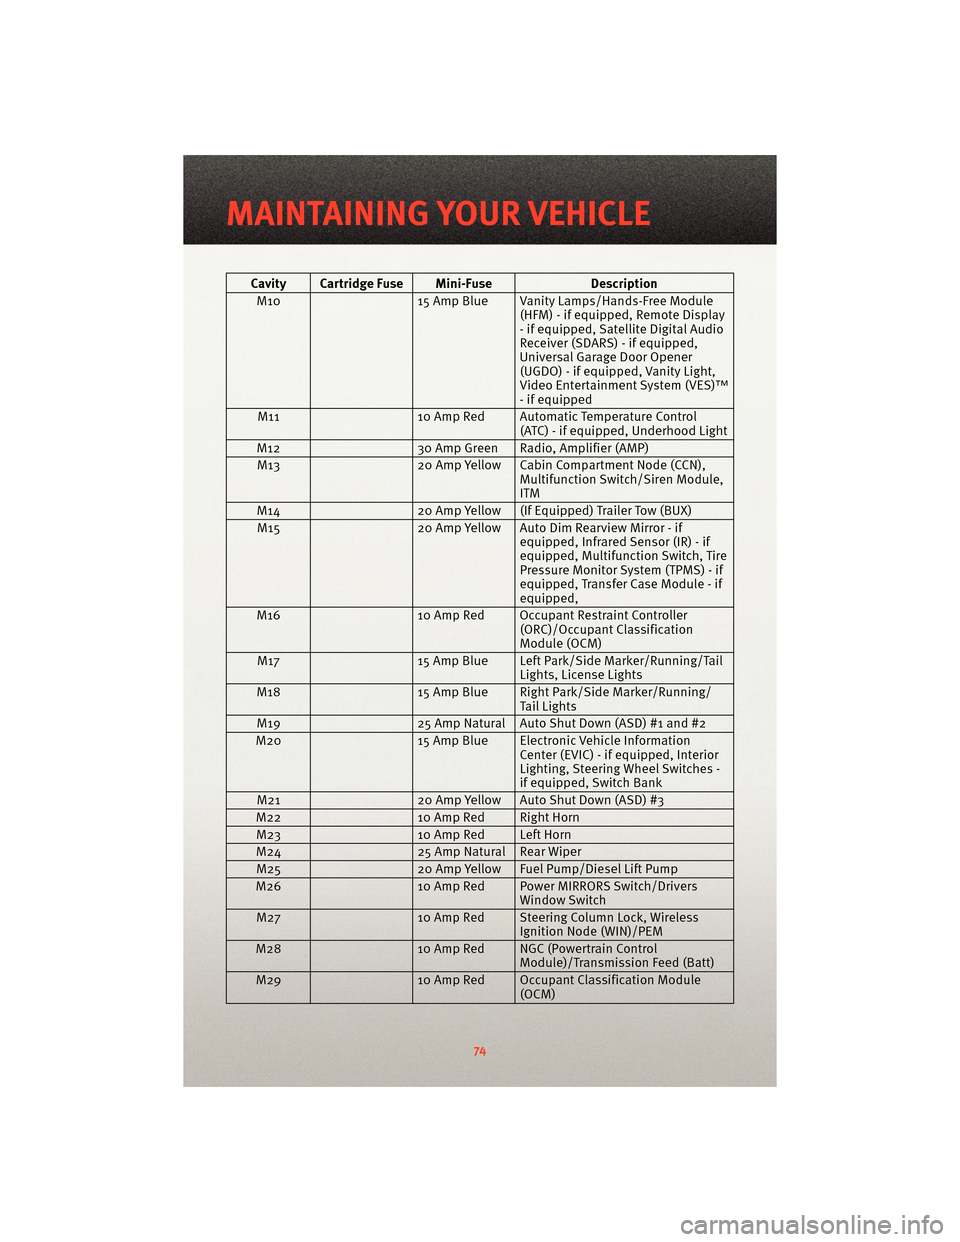
Cavity Cartridge Fuse Mini-FuseDescription
M10 15 Amp Blue Vanity Lamps/Hands-Free Module
(HFM) - if equipped, Remote Display
- if equipped, Satellite Digital Audio
Receiver (SDARS) - if equipped,
Universal Garage Door Opener
(UGDO) - if equipped, Vanity Light,
Video Entertainment System (VES)™
- if equipped
M11 10 Amp Red Automatic Temperature Control
(ATC) - if equipped, Underhood Light
M12 30 Amp Green Radio, Amplifier (AMP)
M13 20 Amp Yellow Cabin Compartment Node (CCN),
Multifunction Switch/Siren Module,
ITM
M14 20 Amp Yellow (If Equipped) Trailer Tow (BUX)
M15 20 Amp Yellow Auto Dim Rearview Mirror - if
equipped, Infrared Sensor (IR) - if
equipped, Multifunction Switch, Tire
Pressure Monitor System (TPMS) - if
equipped, Transfer Case Module - if
equipped,
M16 10 Amp Red Occupant Restraint Controller
(ORC)/OccupantClassification
Module (OCM)
M17 15 Amp Blue Left Park/Side Marker/Running/Tail
Lights, License Lights
M18 15 Amp Blue Right Park/Side Marker/Running/
Tail Lights
M19 25 Amp Natural Auto Shut Down (ASD) #1 and #2
M20 15 Amp Blue Electronic Vehicle Information
Center (EVIC) - if equipped, Interior
Lighting, Steering Wheel Switches -
if equipped, Switch Bank
M21 20 Amp Yellow Auto Shut Down (ASD) #3
M22 10 Amp Red Right Horn
M23 10 Amp Red Left Horn
M24 25 Amp Natural Rear Wiper
M25 20 Amp Yellow Fuel Pump/Diesel Lift Pump
M26 10 Amp Red Power MIRRORS Switch/Drivers
Window Switch
M27 10 Amp Red Steering Column Lock, Wireless
Ignition Node (WIN)/PEM
M28 10 Amp Red NGC (Powertrain Control
Module)/Transmission Feed (Batt)
M29 10 Amp Red Occupant Classification Module
(OCM)
MAINTAINING YOUR VEHICLE
74