door lock DODGE JOURNEY 2011 1.G User Guide
[x] Cancel search | Manufacturer: DODGE, Model Year: 2011, Model line: JOURNEY, Model: DODGE JOURNEY 2011 1.GPages: 108, PDF Size: 4.41 MB
Page 10 of 108
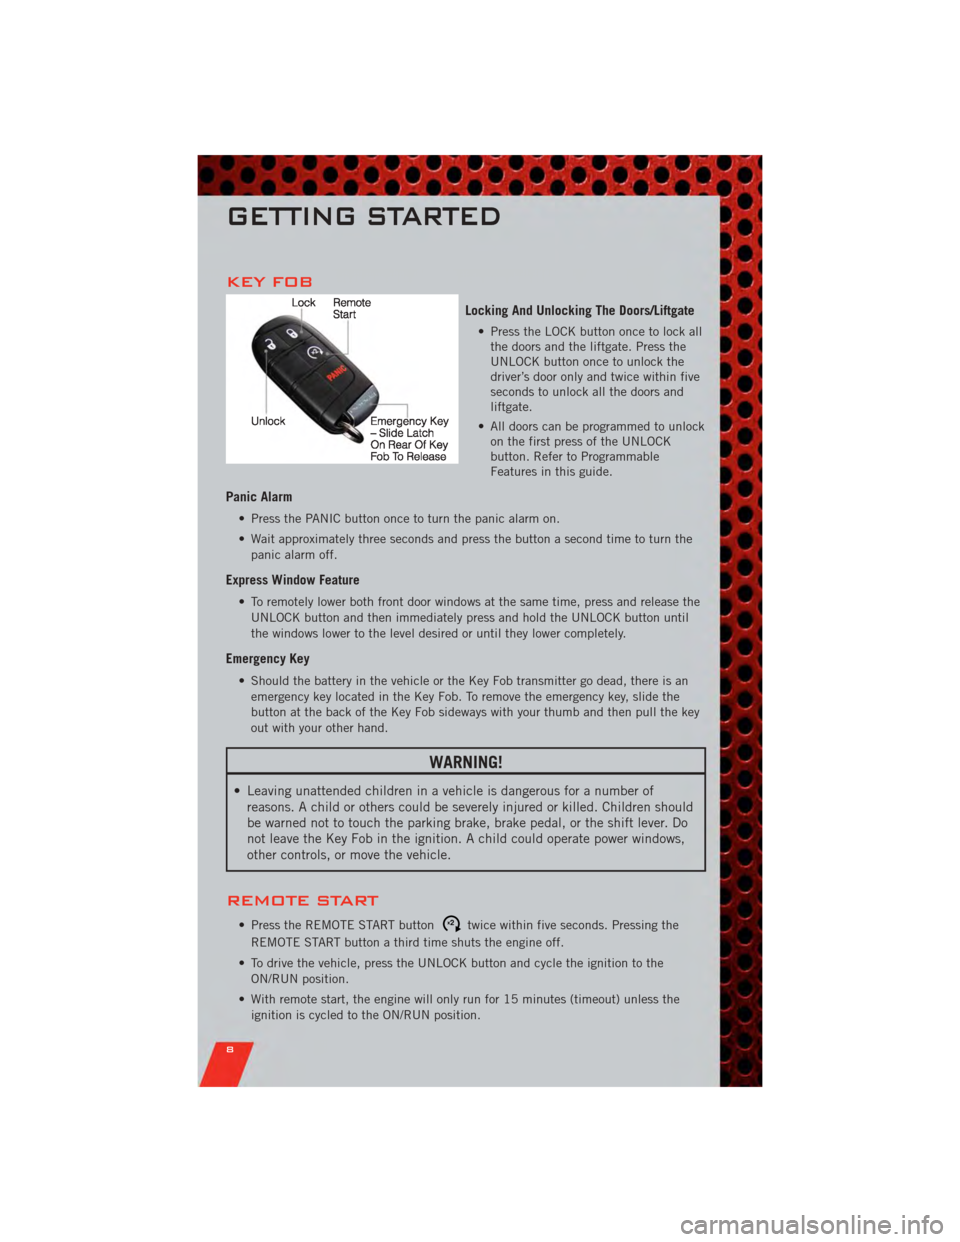
KEY FOB
Locking And Unlocking The Doors/Liftgate
• Press the LOCK button once to lock allthe doors and the liftgate. Press the
UNLOCK button once to unlock the
driver’s door only and twice within five
seconds to unlock all the doors and
liftgate.
• All doors can be programmed to unlock on the first press of the UNLOCK
button. Refer to Programmable
Features in this guide.
Panic Alarm
• Press the PANIC button once to turn the panic alarm on.
• Wait approximately three seconds and press the button a second time to turn the
panic alarm off.
Express Window Feature
• To remotely lower both front door windows at the same time, press and release theUNLOCK button and then immediately press and hold the UNLOCK button until
the windows lower to the level desired or until they lower completely.
Emergency Key
• Should the battery in the vehicle or the Key Fob transmitter go dead, there is anemergency key located in the Key Fob. To remove the emergency key, slide the
button at the back of the Key Fob sideways with your thumb and then pull the key
out with your other hand.
WARNING!
• Leaving unattended children in a vehicle is dangerous for a number ofreasons. A child or others could be severely injured or killed. Children should
be warned not to touch the parking brake, brake pedal, or the shift lever. Do
not leave the Key Fob in the ignition. A child could operate power windows,
other controls, or move the vehicle.
REMOTE START
• Press the REMOTE START buttonx2twice within five seconds. Pressing the
REMOTE START button a third time shuts the engine off.
• To drive the vehicle, press the UNLOCK button and cycle the ignition to the ON/RUN position.
• With remote start, the engine will only run for 15 minutes (timeout) unless the ignition is cycled to the ON/RUN position.
GETTING STARTED
8
Page 11 of 108
• The vehicle must be cycled to the ON/RUN position after two consecutivetimeouts.
WARNING!
• Do not start or run an engine in a closed garage or confined area. Exhaust gascontains Carbon Monoxide (CO) which is odorless and colorless. Carbon
Monoxide is poisonous and can cause you or others to be severely injured or
killed when inhaled.
• Keep Key Fob transmitters away from children. Operation of the Remote Start System, windows, door locks or other controls could cause you and others to
be severely injured or killed.
KEYLESS ENTER-N-GO
• The Keyless Enter-N-Go system is an enhancement to the vehicle's Key Fob. This
feature allows you to lock and unlock the vehicle's door(s) and liftgate without
having to press the Key Fob lock or unlock buttons, as well as starting and
stopping the vehicle with the press of a button.
To Unlock From The Driver or Passenger Side:
• With a valid Keyless Enter-N-Go Key Fob located outside the vehicle and within5 ft (1.5m) of the driver or passenger side door handle, grab either front door
handle to unlock the door automatically.
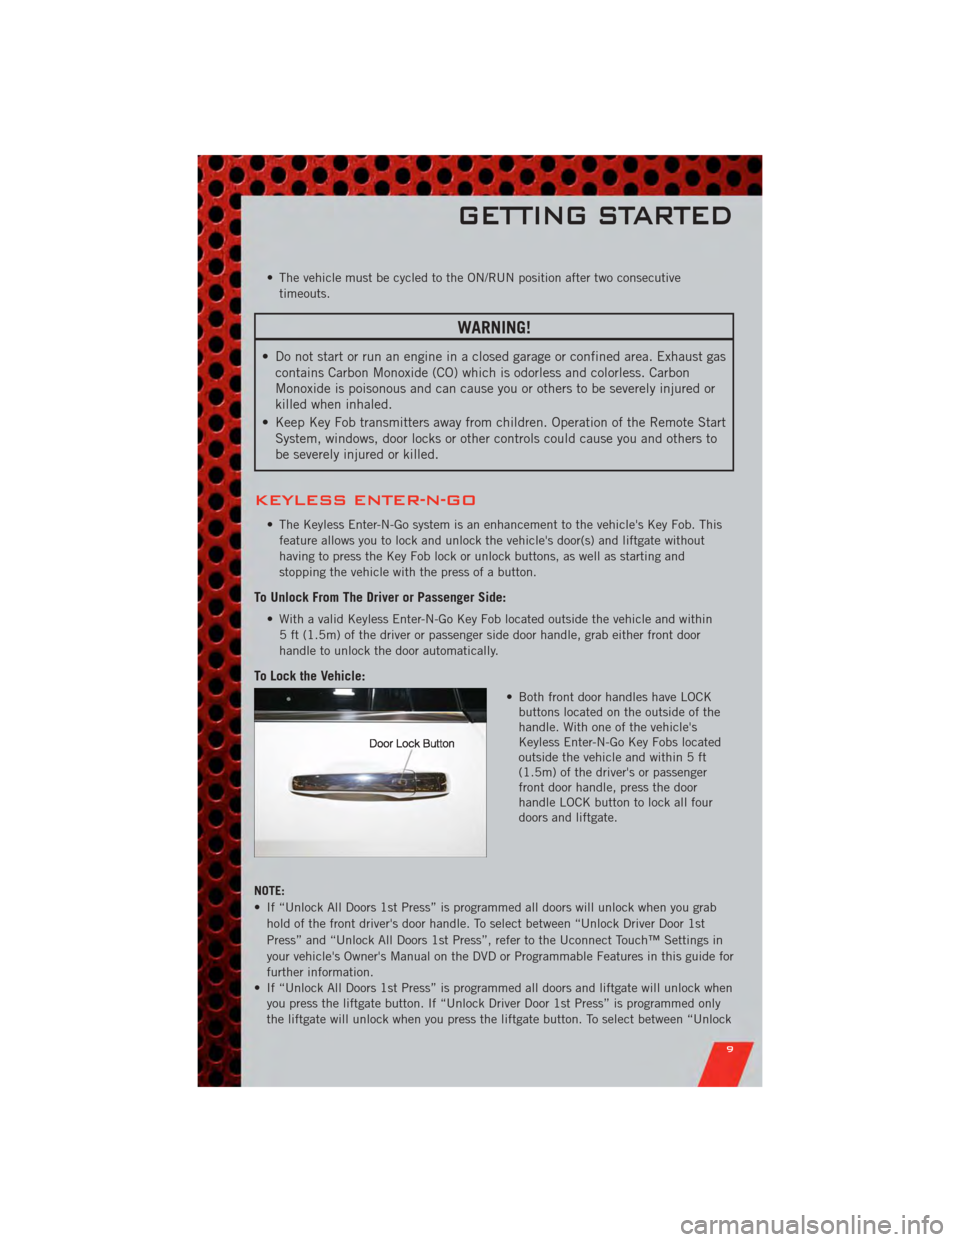
To Lock the Vehicle:
• Both front door handles have LOCKbuttons located on the outside of the
handle. With one of the vehicle's
Keyless Enter-N-Go Key Fobs located
outside the vehicle and within 5 ft
(1.5m) of the driver's or passenger
front door handle, press the door
handle LOCK button to lock all four
doors and liftgate.
NOTE:
• If “Unlock All Doors 1st Press” is programmed all doors will unlock when you grab hold of the front driver's door handle. To select between “Unlock Driver Door 1st
Press” and “Unlock All Doors 1st Press”, refer to the Uconnect Touch™ Settings in
your vehicle's Owner's Manual on the DVD or Programmable Features in this guide for
further information.
• If “Unlock All Doors 1st Press” is programmed all doors and liftgate will unlock when you press the liftgate button. If “Unlock Driver Door 1st Press” is programmed only
the liftgate will unlock when you press the liftgate button. To select between “Unlock
GETTING STARTED
9
Page 12 of 108
Driver Door 1st Press” and “Unlock All Doors 1st Press”, refer to the Uconnect
Touch™ Settings in your vehicle's Owner's Manual on the DVD or Programmable
Features in this guide for further information.
• If a Key Fob is detected in the vehicle when locking the vehicle using the power door lock switch, the doors and liftgate will unlock and the horn will chirp three times. On
the third attempt, your Key Fob can be locked inside the vehicle.
• After pressing the Keyless Enter-N-Go LOCK button, you must wait 2 seconds before you can lock or unlock the vehicle using the door handle.
• If a Keyless Enter-N-Go door handle has not been used for 72 hours, the Keyless Enter-N-Go feature for that handle may time out. Pulling the deactivated front door
handle will reactivate the door handle's Keyless Enter-N-Go feature.
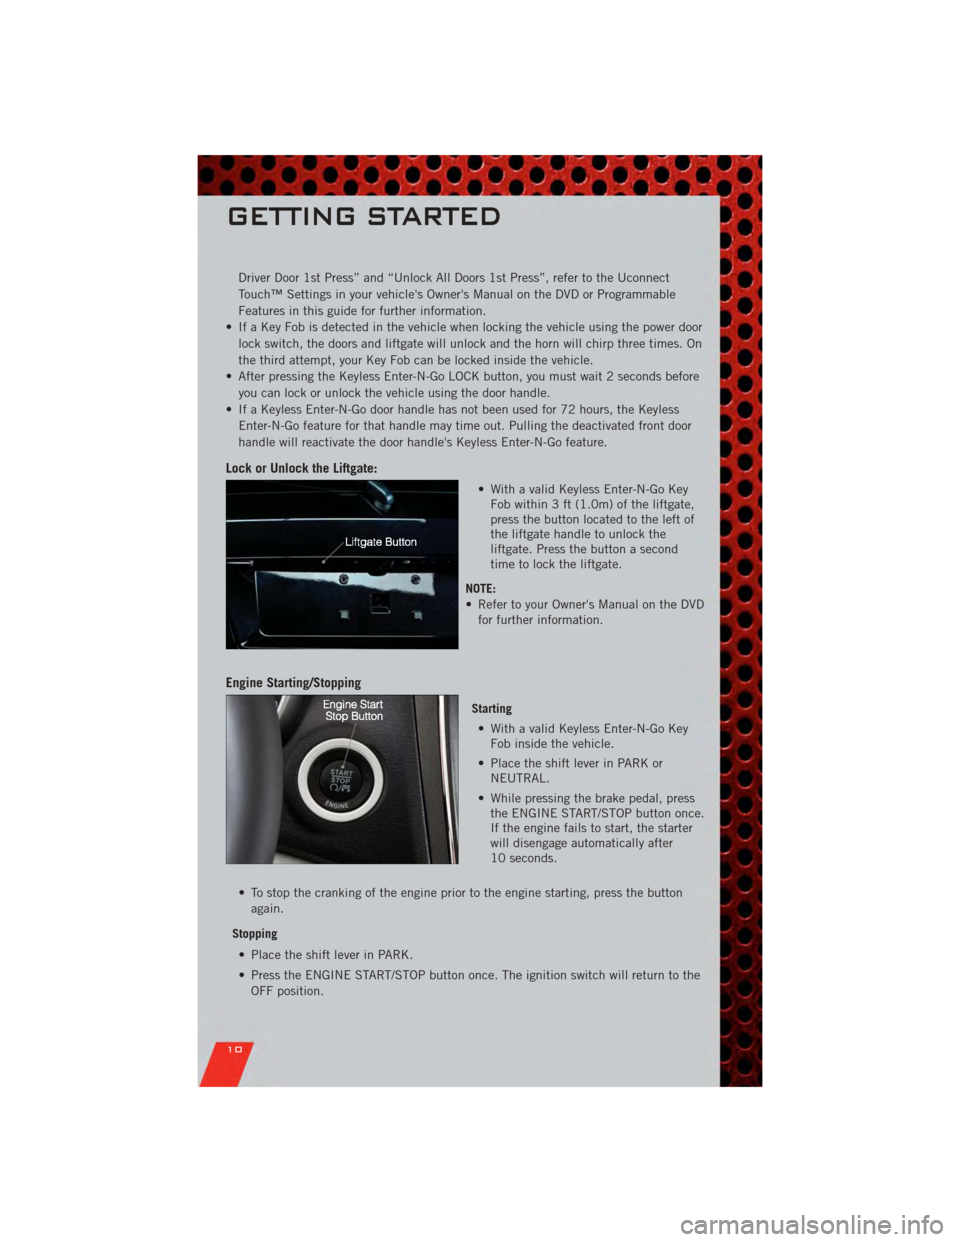
Lock or Unlock the Liftgate:
• With a valid Keyless Enter-N-Go KeyFob within 3 ft (1.0m) of the liftgate,
press the button located to the left of
the liftgate handle to unlock the
liftgate. Press the button a second
time to lock the liftgate.
NOTE:
• Refer to your Owner's Manual on the DVD for further information.
Engine Starting/Stopping
Starting
• With a valid Keyless Enter-N-Go Key Fob inside the vehicle.
• Place the shift lever in PARK or NEUTRAL.
• While pressing the brake pedal, press the ENGINE START/STOP button once.
If the engine fails to start, the starter
will disengage automatically after
10 seconds.
• To stop the cranking of the engine prior to the engine starting, press the button again.
Stopping • Place the shift lever in PARK.
• Press the ENGINE START/STOP button once. The ignition switch will return to the OFF position.
GETTING STARTED
10
Page 13 of 108
•If the shift lever is not in PARK, the ENGINE START/STOP button must be held for two
seconds and vehicle speed must be above 5 mph (8 km/h) before the engine will shut
off.
Accessory Positions with Engine Off
NOTE: The following functions are with the driver’s foot OFF the Brake Pedal
(Transmission in PARK or NEUTRAL Position).
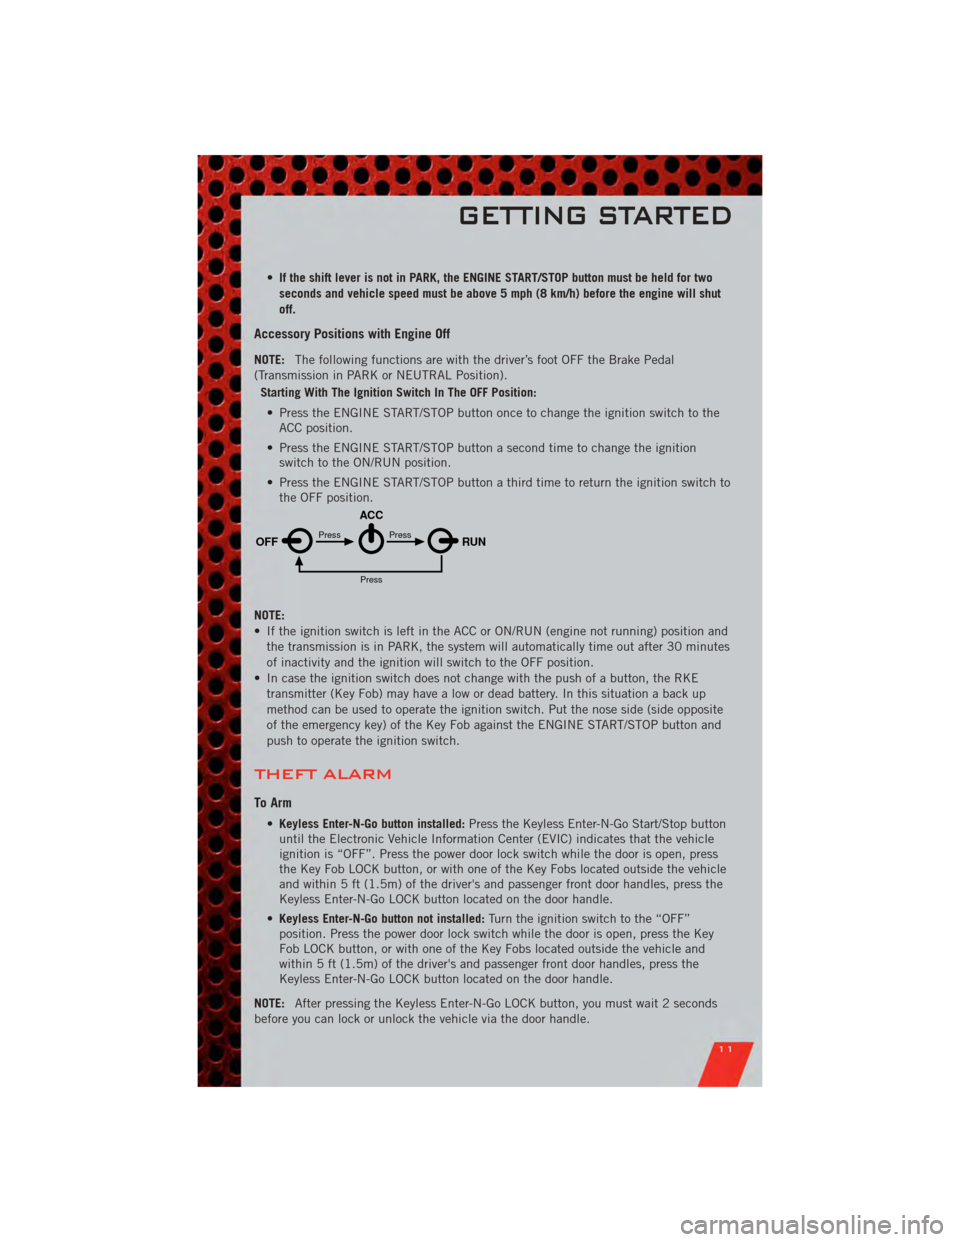
Starting With The Ignition Switch In The OFF Position:
• Press the ENGINE START/STOP button once to change the ignition switch to the ACC position.
• Press the ENGINE START/STOP button a second time to change the ignition switch to the ON/RUN position.
• Press the ENGINE START/STOP button a third time to return the ignition switch to the OFF position.
NOTE:
• If the ignition switch is left in the ACC or ON/RUN (engine not running) position and the transmission is in PARK, the system will automatically time out after 30 minutes
of inactivity and the ignition will switch to the OFF position.
• In case the ignition switch does not change with the push of a button, the RKE transmitter (Key Fob) may have a low or dead battery. In this situation a back up
method can be used to operate the ignition switch. Put the nose side (side opposite
of the emergency key) of the Key Fob against the ENGINE START/STOP button and
push to operate the ignition switch.
THEFT ALARM
To Arm
•Keyless Enter-N-Go button installed: Press the Keyless Enter-N-Go Start/Stop button
until the Electronic Vehicle Information Center (EVIC) indicates that the vehicle
ignition is “OFF”. Press the power door lock switch while the door is open, press
the Key Fob LOCK button, or with one of the Key Fobs located outside the vehicle
and within 5 ft (1.5m) of the driver's and passenger front door handles, press the
Keyless Enter-N-Go LOCK button located on the door handle.
• Keyless Enter-N-Go button not installed: Turn the ignition switch to the “OFF”
position. Press the power door lock switch while the door is open, press the Key
Fob LOCK button, or with one of the Key Fobs located outside the vehicle and
within 5 ft (1.5m) of the driver's and passenger front door handles, press the
Keyless Enter-N-Go LOCK button located on the door handle.
NOTE: After pressing the Keyless Enter-N-Go LOCK button, you must wait 2 seconds
before you can lock or unlock the vehicle via the door handle.
OFF RUN
ACCPress
Press
Press
GETTING STARTED
11
Page 14 of 108
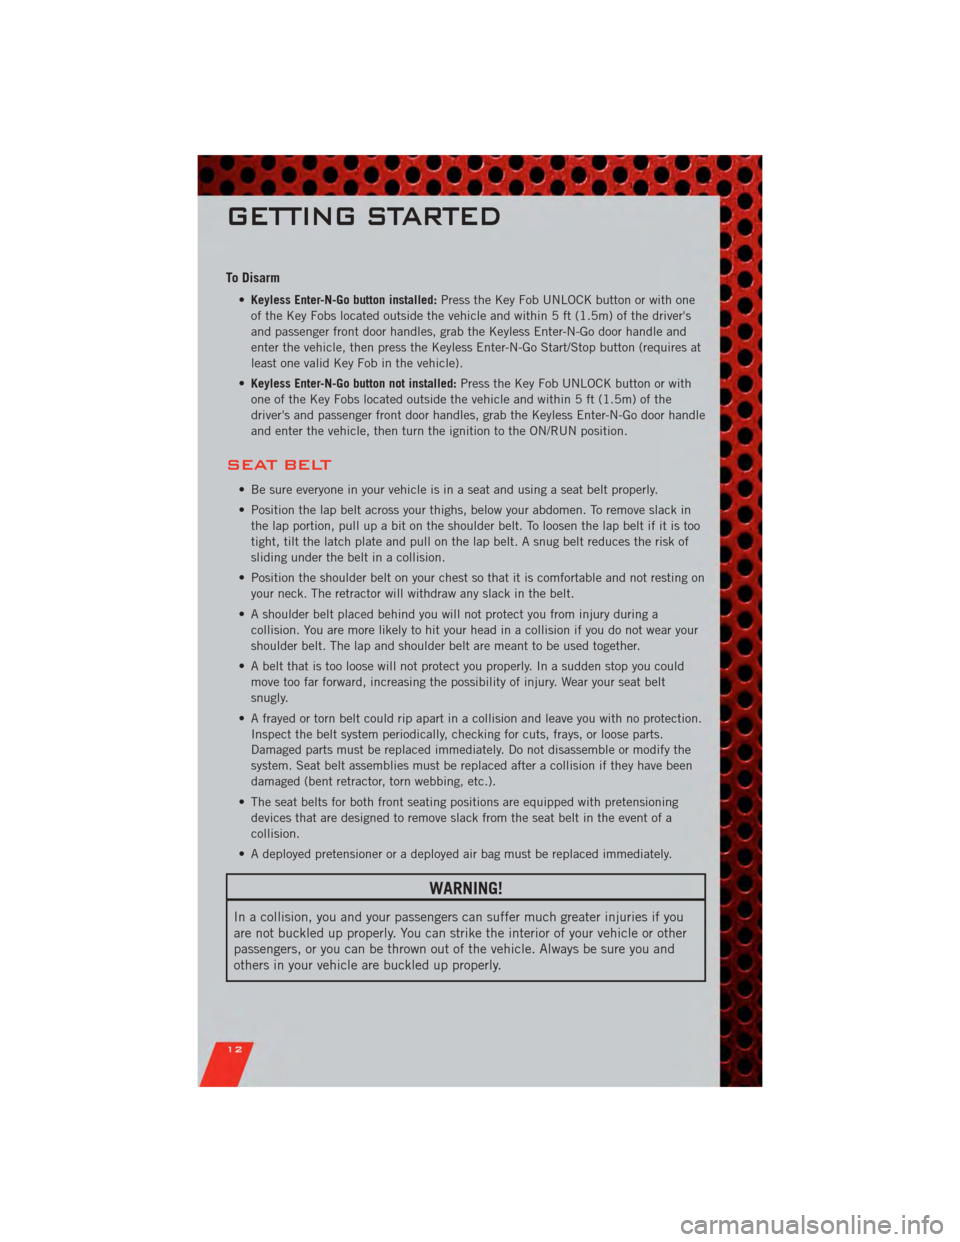
To Disarm
•Keyless Enter-N-Go button installed: Press the Key Fob UNLOCK button or with one
of the Key Fobs located outside the vehicle and within 5 ft (1.5m) of the driver's
and passenger front door handles, grab the Keyless Enter-N-Go door handle and
enter the vehicle, then press the Keyless Enter-N-Go Start/Stop button (requires at
least one valid Key Fob in the vehicle).
• Keyless Enter-N-Go button not installed: Press the Key Fob UNLOCK button or with
one of the Key Fobs located outside the vehicle and within 5 ft (1.5m) of the
driver's and passenger front door handles, grab the Keyless Enter-N-Go door handle
and enter the vehicle, then turn the ignition to the ON/RUN position.
SEAT BELT
• Be sure everyone in your vehicle is in a seat and using a seat belt properly.
• Position the lap belt across your thighs, below your abdomen. To remove slack in the lap portion, pull up a bit on the shoulder belt. To loosen the lap belt if it is too
tight, tilt the latch plate and pull on the lap belt. A snug belt reduces the risk of
sliding under the belt in a collision.
• Position the shoulder belt on your chest so that it is comfortable and not resting on your neck. The retractor will withdraw any slack in the belt.
• A shoulder belt placed behind you will not protect you from injury during a collision. You are more likely to hit your head in a collision if you do not wear your
shoulder belt. The lap and shoulder belt are meant to be used together.
• A belt that is too loose will not protect you properly. In a sudden stop you could move too far forward, increasing the possibility of injury. Wear your seat belt
snugly.
• A frayed or torn belt could rip apart in a collision and leave you with no protection. Inspect the belt system periodically, checking for cuts, frays, or loose parts.
Damaged parts must be replaced immediately. Do not disassemble or modify the
system. Seat belt assemblies must be replaced after a collision if they have been
damaged (bent retractor, torn webbing, etc.).
• The seat belts for both front seating positions are equipped with pretensioning devices that are designed to remove slack from the seat belt in the event of a
collision.
• A deployed pretensioner or a deployed air bag must be replaced immediately.
WARNING!
In a collision, you and your passengers can suffer much greater injuries if you
are not buckled up properly. You can strike the interior of your vehicle or other
passengers, or you can be thrown out of the vehicle. Always be sure you and
others in your vehicle are buckled up properly.
GETTING STARTED
12
Page 60 of 108
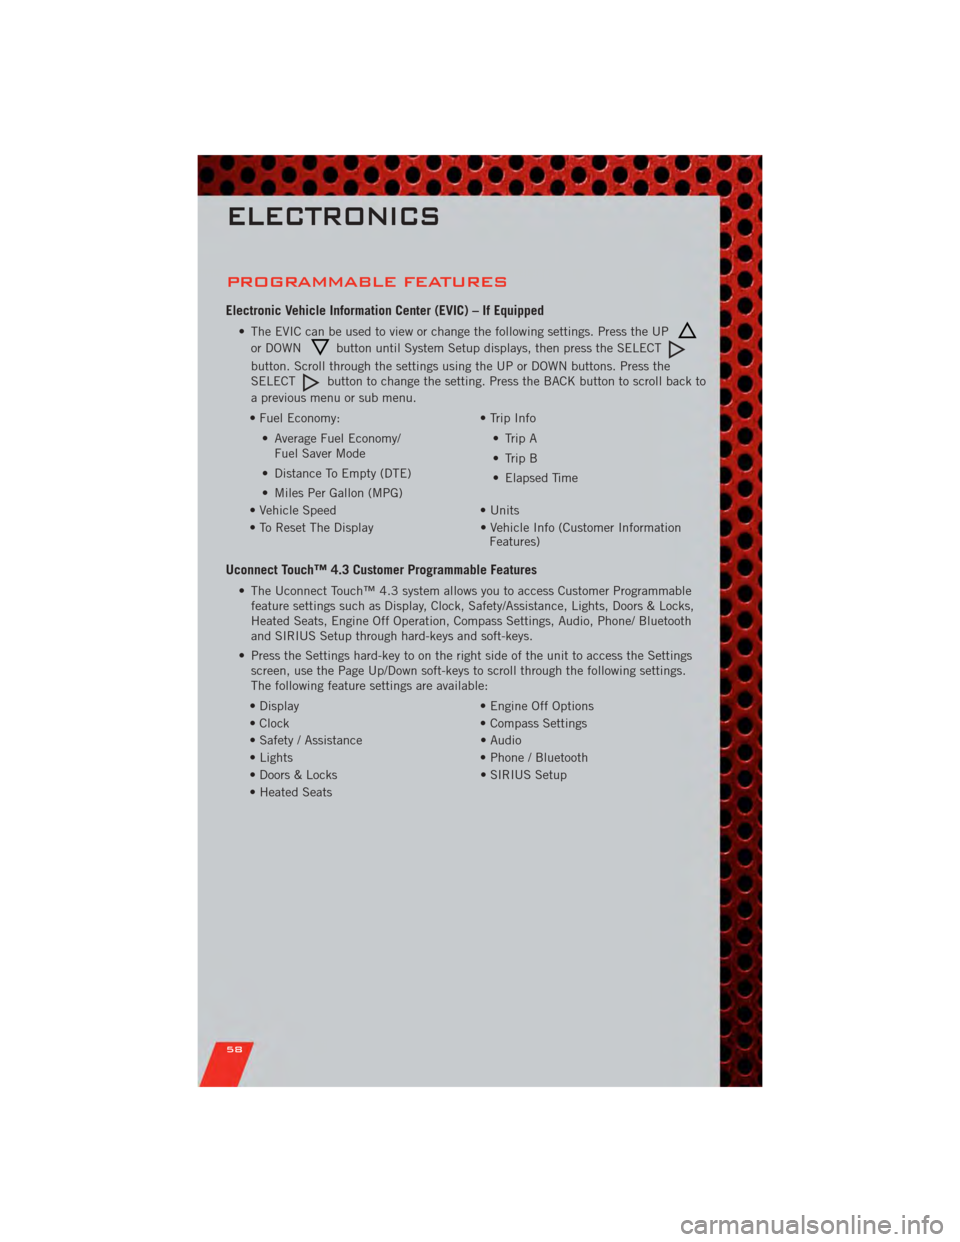
PROGRAMMABLE FEATURES
Electronic Vehicle Information Center (EVIC) – If Equipped
• The EVIC can be used to view or change the following settings. Press the UP
or DOWNbutton until System Setup displays, then press the SELECT
button. Scroll through the settings using the UP or DOWN buttons. Press the
SELECTbutton to change the setting. Press the BACK button to scroll back to
a previous menu or sub menu.
• Fuel Economy: • Average Fuel Economy/Fuel Saver Mode
• Distance To Empty (DTE)
• Miles Per Gallon (MPG) • Trip Info
• Trip A
• Trip B
• Elapsed Time
• Vehicle Speed • Units
• To Reset The Display • Vehicle Info (Customer Information Features)
Uconnect Touch™ 4.3 Customer Programmable Features
• The Uconnect Touch™ 4.3 system allows you to access Customer Programmable
feature settings such as Display, Clock, Safety/Assistance, Lights, Doors & Locks,
Heated Seats, Engine Off Operation, Compass Settings, Audio, Phone/ Bluetooth
and SIRIUS Setup through hard-keys and soft-keys.
• Press the Settings hard-key to on the right side of the unit to access the Settings screen, use the Page Up/Down soft-keys to scroll through the following settings.
The following feature settings are available:
• Display • Engine Off Options
• Clock • Compass Settings
• Safety / Assistance • Audio
• Lights • Phone / Bluetooth
• Doors & Locks • SIRIUS Setup
• Heated Seats
ELECTRONICS
58
Page 61 of 108
Uconnect Touch™ 8.4 Customer Programmable Features
• The Uconnect Touch™ 8.4 system allows you to access Customer Programmablefeature settings such as Display, Clock, Safety/Assistance, Lights, Doors & Locks,
Heated Seats, Engine Off Operation, Compass Settings, Audio, Phone/ Bluetooth
and SIRIUS Setup through soft-keys.
• Touch the More soft-key to on the bottom of the screen, then touch the Settings soft-key to access the Settings screen. When making a selection, scroll up or down
until the preferred setting is highlighted, then press and release the preferred
setting until a check-mark appears next to the setting, showing that setting has
been selected. The following feature settings are available:
• Display • Engine Off Options
• Clock • Compass Settings
• Safety / Assistance • Audio
• Lights • Phone / Bluetooth
• Doors & Locks • SIRIUS Setup
• Heated Seats
UNIVERSAL GARAGE DOOR OPENER
(HomeLink®)
Programming HomeLink®
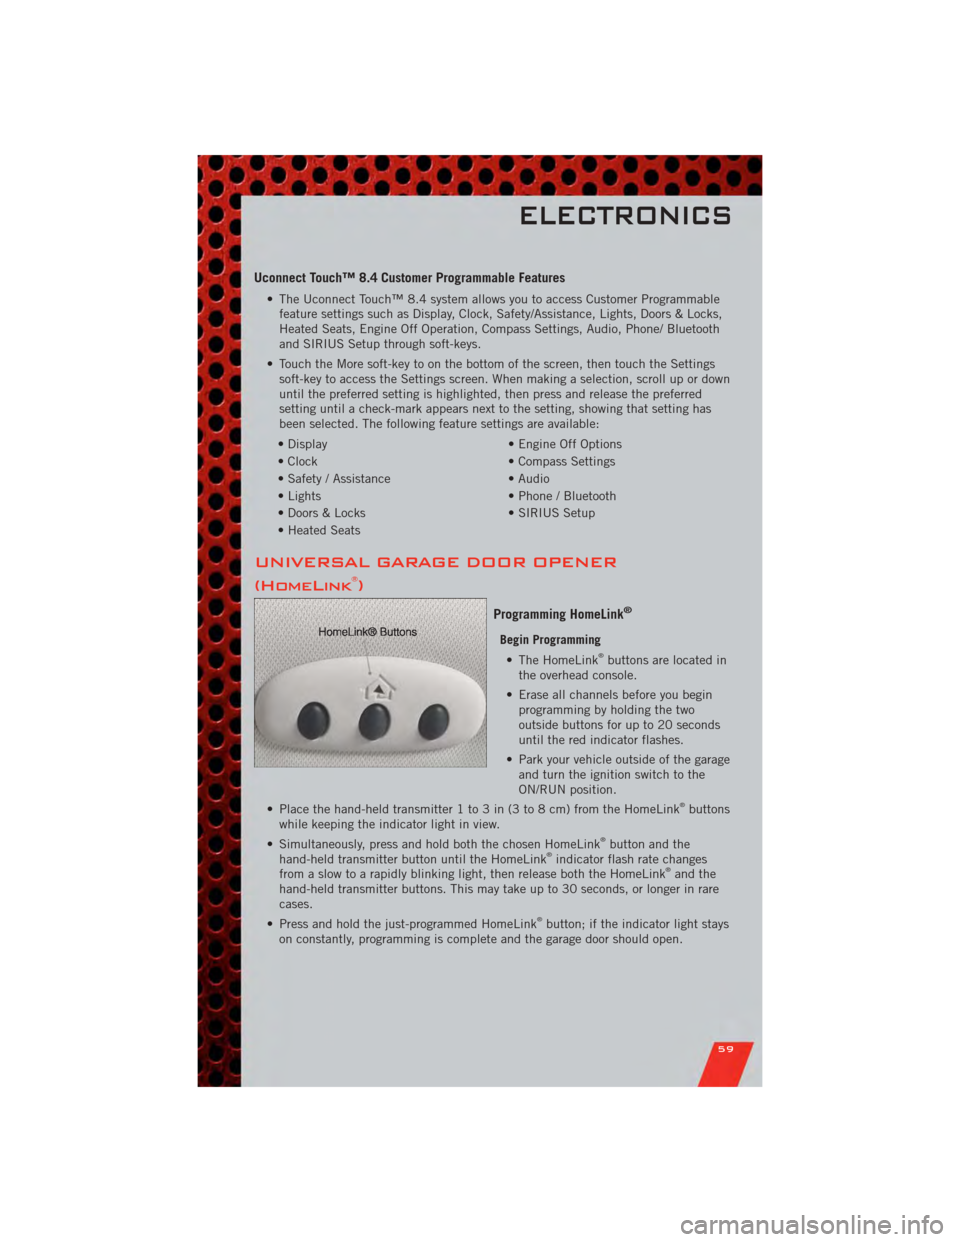
Begin Programming • The HomeLink®buttons are located in
the overhead console.
• Erase all channels before you begin programming by holding the two
outside buttons for up to 20 seconds
until the red indicator flashes.
• Park your vehicle outside of the garage and turn the ignition switch to the
ON/RUN position.
• Place the hand-held transmitter 1 to 3 in (3 to 8 cm) from the HomeLink
®buttons
while keeping the indicator light in view.
• Simultaneously, press and hold both the chosen HomeLink
®button and the
hand-held transmitter button until the HomeLink®indicator flash rate changes
from a slow to a rapidly blinking light, then release both the HomeLink®and the
hand-held transmitter buttons. This may take up to 30 seconds, or longer in rare
cases.
• Press and hold the just-programmed HomeLink
®button; if the indicator light stays
on constantly, programming is complete and the garage door should open.
ELECTRONICS
59
Page 82 of 108
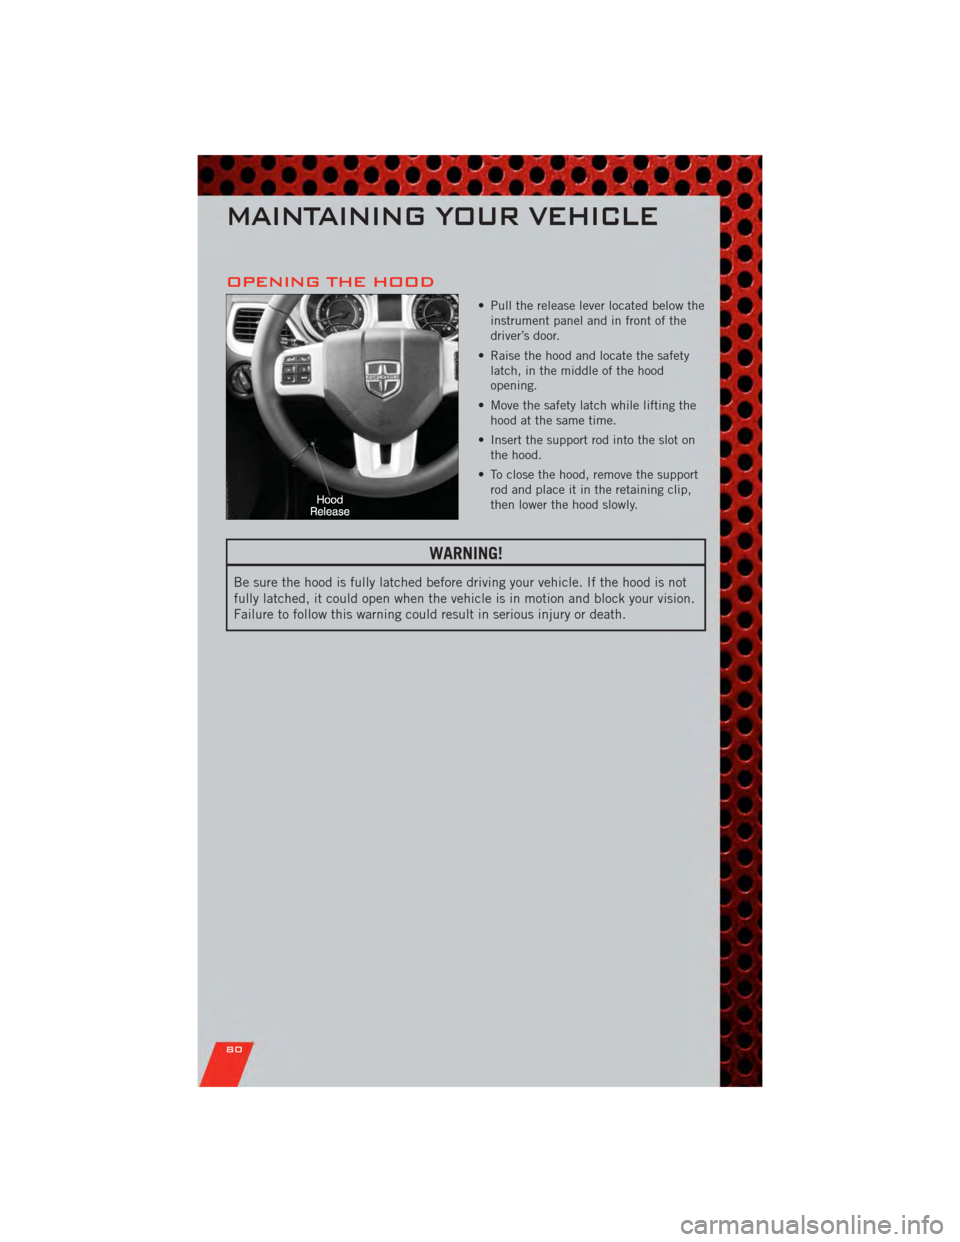
OPENING THE HOOD
• Pull the release lever located below theinstrument panel and in front of the
driver’s door.
• Raise the hood and locate the safety latch, in the middle of the hood
opening.
• Move the safety latch while lifting the hood at the same time.
• Insert the support rod into the slot on the hood.
• To close the hood, remove the support rod and place it in the retaining clip,
then lower the hood slowly.
WARNING!
Be sure the hood is fully latched before driving your vehicle. If the hood is not
fully latched, it could open when the vehicle is in motion and block your vision.
Failure to follow this warning could result in serious injury or death.
MAINTAINING YOUR VEHICLE
80
Page 90 of 108
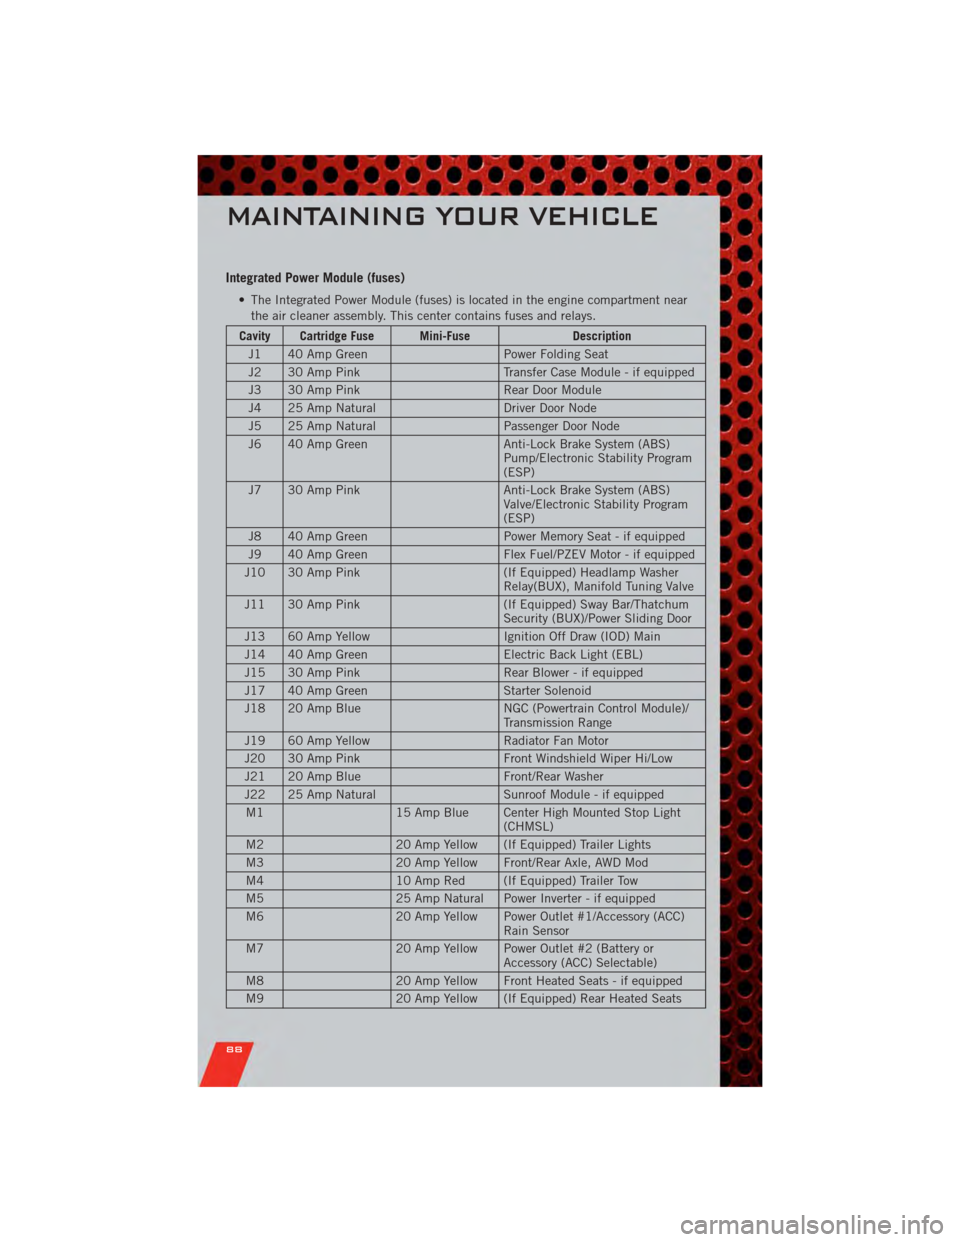
Integrated Power Module (fuses)
• The Integrated Power Module (fuses) is located in the engine compartment nearthe air cleaner assembly. This center contains fuses and relays.
Cavity Cartridge Fuse Mini-Fuse Description
J1 40 Amp Green Power Folding Seat
J2 30 Amp Pink Transfer Case Module - if equipped
J3 30 Amp Pink Rear Door Module
J4 25 Amp Natural Driver Door Node
J5 25 Amp Natural Passenger Door Node
J6 40 Amp Green Anti-Lock Brake System (ABS)
Pump/Electronic Stability Program
(ESP)
J7 30 Amp Pink Anti-Lock Brake System (ABS)
Valve/Electronic Stability Program
(ESP)
J8 40 Amp Green Power Memory Seat - if equipped
J9 40 Amp Green Flex Fuel/PZEV Motor - if equipped
J10 30 Amp Pink (If Equipped) Headlamp Washer
Relay(BUX), Manifold Tuning Valve
J11 30 Amp Pink (If Equipped) Sway Bar/Thatchum
Security (BUX)/Power Sliding Door
J13 60 Amp Yellow Ignition Off Draw (IOD) Main
J14 40 Amp Green Electric Back Light (EBL)
J15 30 Amp Pink Rear Blower - if equipped
J17 40 Amp Green Starter Solenoid
J18 20 Amp Blue NGC (Powertrain Control Module)/
Transmission Range
J19 60 Amp Yellow Radiator Fan Motor
J20 30 Amp Pink Front Windshield Wiper Hi/Low
J21 20 Amp Blue Front/Rear Washer
J22 25 Amp Natural Sunroof Module - if equipped
M1 15 Amp Blue Center High Mounted Stop Light
(CHMSL)
M2 20 Amp Yellow (If Equipped) Trailer Lights
M3 20 Amp Yellow Front/Rear Axle, AWD Mod
M4 10 Amp Red (If Equipped) Trailer Tow
M5 25 Amp Natural Power Inverter - if equipped
M6 20 Amp Yellow Power Outlet #1/Accessory (ACC)
Rain Sensor
M7 20 Amp Yellow Power Outlet #2 (Battery or
Accessory (ACC) Selectable)
M8 20 Amp Yellow Front Heated Seats - if equipped
M9 20 Amp Yellow (If Equipped) Rear Heated Seats
MAINTAINING YOUR VEHICLE
88
Page 91 of 108
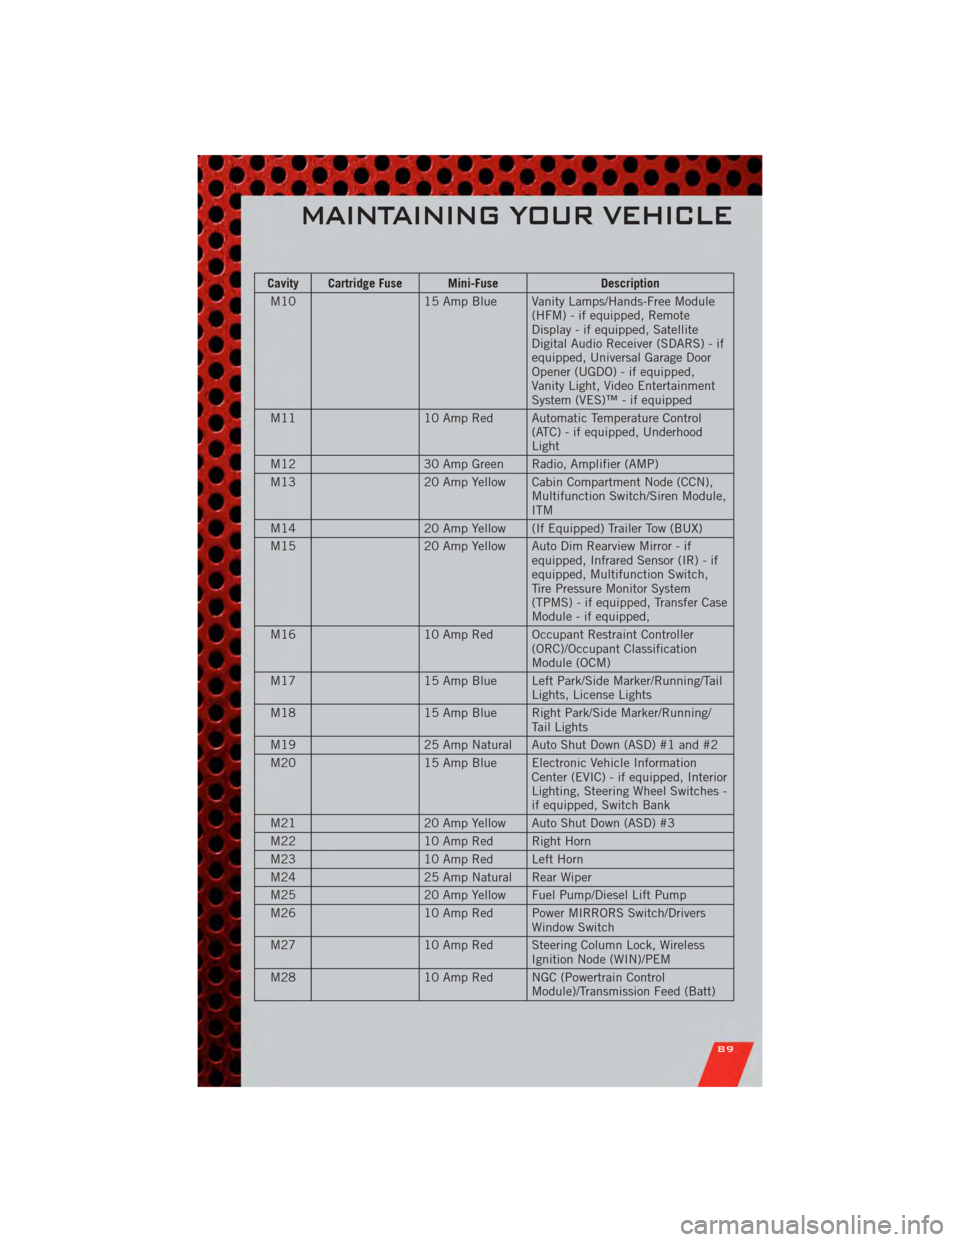
Cavity Cartridge Fuse Mini-FuseDescription
M10 15 Amp Blue Vanity Lamps/Hands-Free Module
(HFM) - if equipped, Remote
Display - if equipped, Satellite
Digital Audio Receiver (SDARS) - if
equipped, Universal Garage Door
Opener (UGDO) - if equipped,
Vanity Light, Video Entertainment
System (VES)™ - if equipped
M11 10 Amp Red Automatic Temperature Control
(ATC) - if equipped, Underhood
Light
M12 30 Amp Green Radio, Amplifier (AMP)
M13 20 Amp Yellow Cabin Compartment Node (CCN),
Multifunction Switch/Siren Module,
ITM
M14 20 Amp Yellow (If Equipped) Trailer Tow (BUX)
M15 20 Amp Yellow Auto Dim Rearview Mirror - if
equipped, Infrared Sensor (IR) - if
equipped, Multifunction Switch,
Tire Pressure Monitor System
(TPMS) - if equipped, Transfer Case
Module - if equipped,
M16 10 Amp Red Occupant Restraint Controller
(ORC)/Occupant Classification
Module (OCM)
M17 15 Amp Blue Left Park/Side Marker/Running/Tail
Lights, License Lights
M18 15 Amp Blue Right Park/Side Marker/Running/
Tail Lights
M19 25 Amp Natural Auto Shut Down (ASD) #1 and #2
M20 15 Amp Blue Electronic Vehicle Information
Center (EVIC) - if equipped, Interior
Lighting, Steering Wheel Switches -
if equipped, Switch Bank
M21 20 Amp Yellow Auto Shut Down (ASD) #3
M22 10 Amp Red Right Horn
M23 10 Amp Red Left Horn
M24 25 Amp Natural Rear Wiper
M25 20 Amp Yellow Fuel Pump/Diesel Lift Pump
M26 10 Amp Red Power MIRRORS Switch/Drivers
Window Switch
M27 10 Amp Red Steering Column Lock, Wireless
Ignition Node (WIN)/PEM
M28 10 Amp Red NGC (Powertrain Control
Module)/Transmission Feed (Batt)
MAINTAINING YOUR VEHICLE
89