spare tire location DODGE JOURNEY 2011 1.G User Guide
[x] Cancel search | Manufacturer: DODGE, Model Year: 2011, Model line: JOURNEY, Model: DODGE JOURNEY 2011 1.GPages: 108, PDF Size: 4.41 MB
Page 67 of 108

24-HOUR TOWING ASSISTANCE
• Dial toll-free 1-800-521-2779 or 1-800-363-4869 for Canadian residents.
• Provide your name, vehicle identification number and license plate number.
• Provide your location, including telephone number, from which you are calling.
• Briefly describe the nature of the problem and answer a few simple questions.
• You will be given the name of the service provider and an estimated time of arrival.If you feel you are in an “unsafe situation”, please let us know. With your consent,
we will contact local police or safety authorities.
INSTRUMENT CLUSTER WARNING LIGHTS
- Electronic Stability Control (ESC) Indicator Light
• If this indicator light flashes during acceleration, apply as little throttle aspossible. While driving, ease up on the accelerator. Adapt your speed and driving
to the prevailing road conditions. To improve the vehicle's traction when starting
off in deep snow, sand or gravel, it may be desirable to switch the ESC system off.
- Tire Pressure Monitoring System (TPMS) Light
• Each tire, including the spare (if provided), should be checked monthly, when coldand inflated to the inflation pressure recommended by the vehicle manufacturer on
the vehicle placard or tire inflation pressure label. (If your vehicle has tires of a
different size than the size indicated on the vehicle placard or tire inflation
pressure label, you should determine the proper tire inflation pressure for those
tires.)
• As an added safety feature, your vehicle has been equipped with a Tire Pressure Monitoring System (TPMS) that illuminates a low tire pressure telltale when one or
more of your tires is significantly under-inflated. Accordingly, when the low tire
pressure telltale illuminates, you should stop and check your tires as soon as
possible, and inflate them to the proper pressure. Driving on a significantly
under-inflated tire causes the tire to overheat and can lead to tire failure.
Under-inflation also reduces fuel efficiency and tire tread life, and may affect the
vehicle’s handling and stopping ability.
• IF THE LIGHT STARTS FLASHING INDICATING A LOW TIRE PRESSURE, ADJUST THE AIR
PRESSURE IN THE LOW TIRE TO THE AIR PRESSURE SHOWN ON THE VEHICLE PLACARD
OR TIRE INFLATION PRESSURE LABEL LOCATED ON THE DRIVER'S DOOR. NOTE: AFTER
INFLATION, THE VEHICLE MAY NEED TO BE DRIVEN FOR 20 MINUTES BEFORE THE
FLASHING LIGHT WILL TURN OFF.
• Please note that the TPMS is not a substitute for proper tire maintenance, and it is the driver’s responsibility to maintain correct tire pressure, even if under-inflation
has not reached the level to trigger illumination of the TPMS low tire pressure
telltale.
WHAT TO DO IN EMERGENCIES
65
Page 72 of 108

JACKING AND TIRE CHANGING
Jack Location
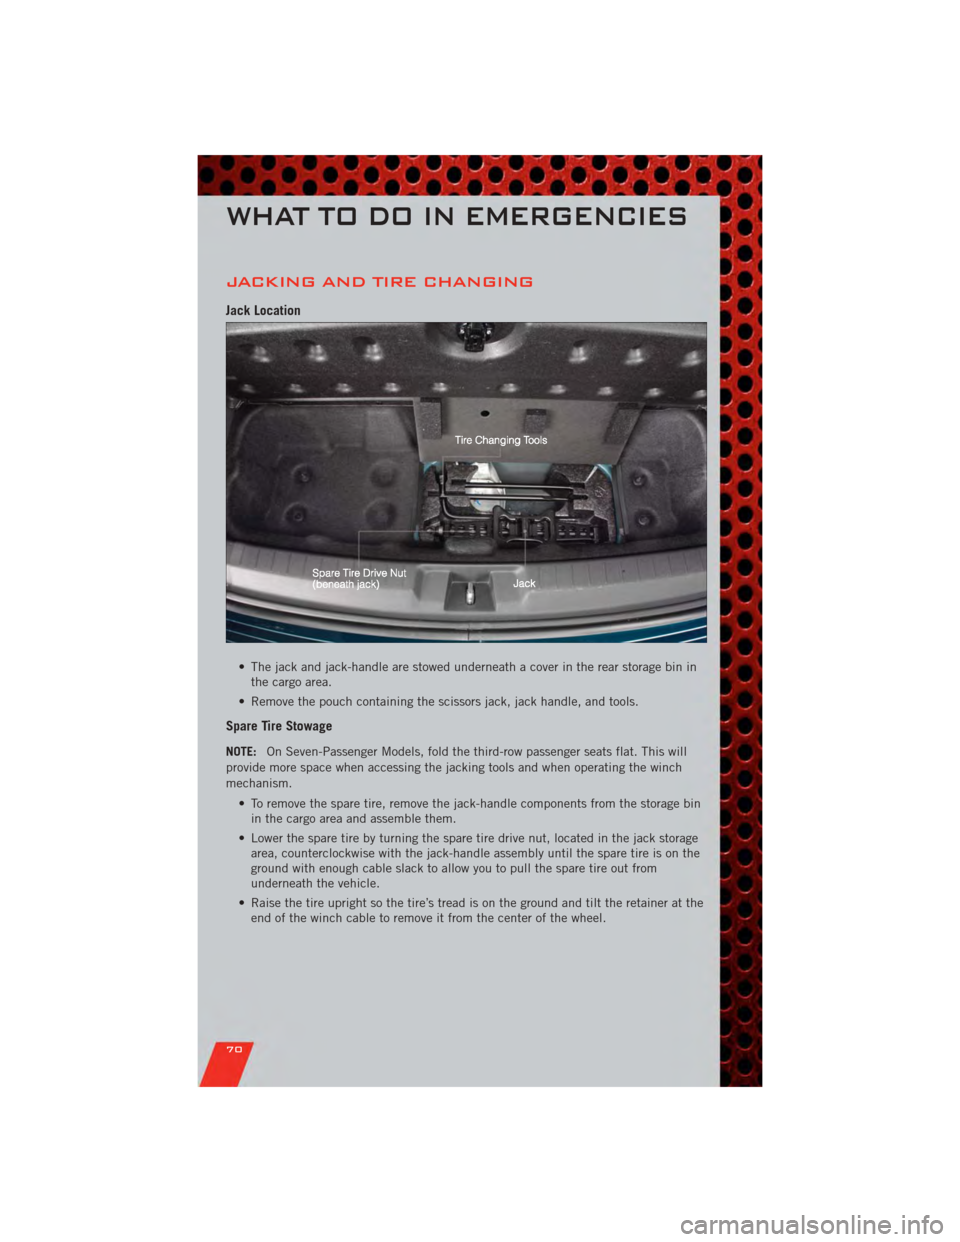
• The jack and jack-handle are stowed underneath a cover in the rear storage bin inthe cargo area.
• Remove the pouch containing the scissors jack, jack handle, and tools.
Spare Tire Stowage
NOTE: On Seven-Passenger Models, fold the third-row passenger seats flat. This will
provide more space when accessing the jacking tools and when operating the winch
mechanism.
• To remove the spare tire, remove the jack-handle components from the storage binin the cargo area and assemble them.
• Lower the spare tire by turning the spare tire drive nut, located in the jack storage area, counterclockwise with the jack-handle assembly until the spare tire is on the
ground with enough cable slack to allow you to pull the spare tire out from
underneath the vehicle.
• Raise the tire upright so the tire’s tread is on the ground and tilt the retainer at the end of the winch cable to remove it from the center of the wheel.
WHAT TO DO IN EMERGENCIES
70
Page 74 of 108

Jacking And Tire Changing Instructions
• Remove the spare tire, jack and tools from the stored location.
• Loosen (but do not remove) the wheel lug nuts by turning them counterclockwiseone turn while the wheel is still on the ground.
• Assemble the jack and jacking tools. Connect the jack handle driver to the extension, then to the lug wrench.
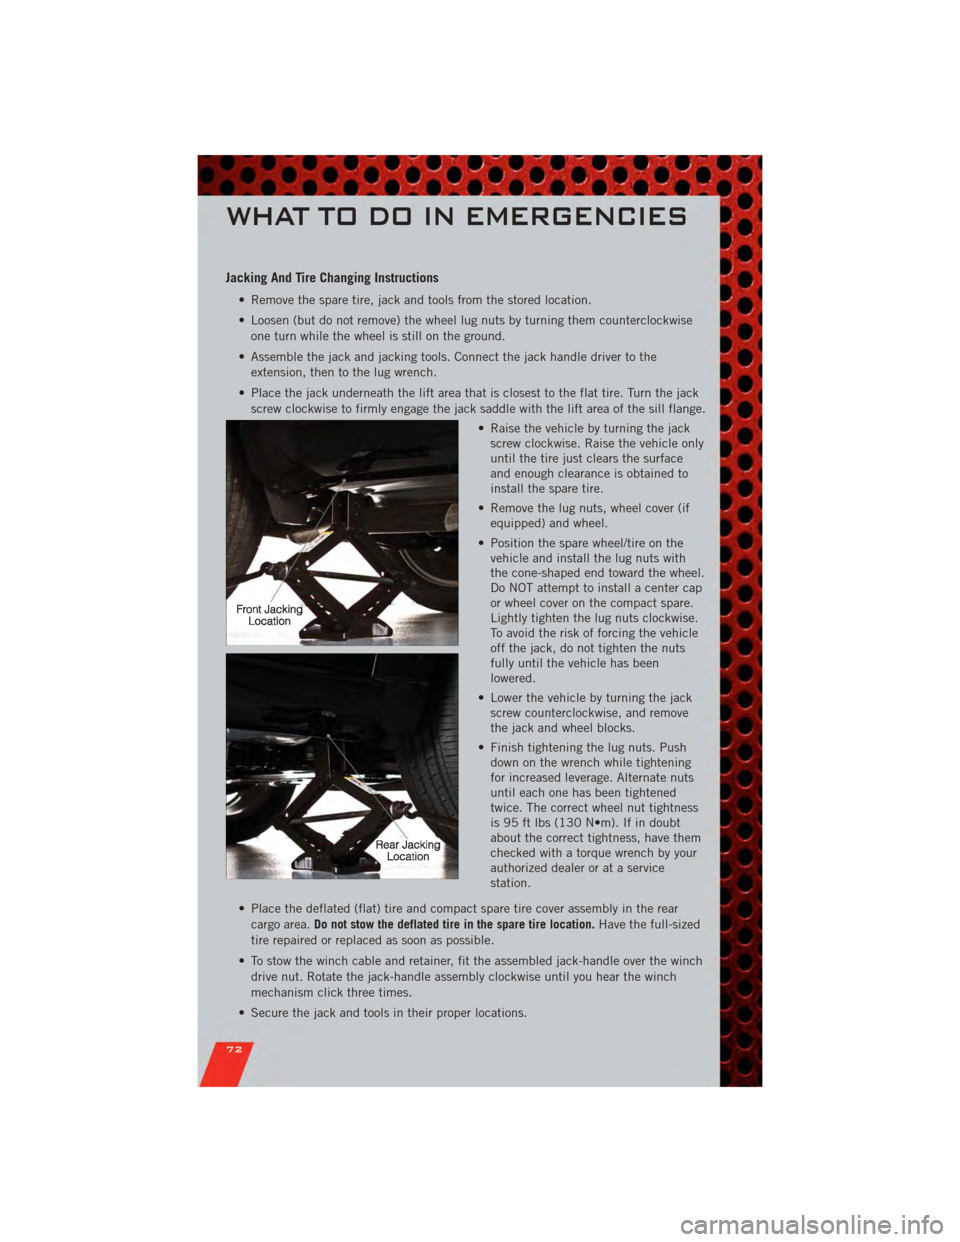
• Place the jack underneath the lift area that is closest to the flat tire. Turn the jack screw clockwise to firmly engage the jack saddle with the lift area of the sill flange.
• Raise the vehicle by turning the jackscrew clockwise. Raise the vehicle only
until the tire just clears the surface
and enough clearance is obtained to
install the spare tire.
• Remove the lug nuts, wheel cover (if equipped) and wheel.
• Position the spare wheel/tire on the vehicle and install the lug nuts with
the cone-shaped end toward the wheel.
Do NOT attempt to install a center cap
or wheel cover on the compact spare.
Lightly tighten the lug nuts clockwise.
To avoid the risk of forcing the vehicle
off the jack, do not tighten the nuts
fully until the vehicle has been
lowered.
• Lower the vehicle by turning the jack screw counterclockwise, and remove
the jack and wheel blocks.
• Finish tightening the lug nuts. Push down on the wrench while tightening
for increased leverage. Alternate nuts
until each one has been tightened
twice. The correct wheel nut tightness
is 95 ft lbs (130 N•m). If in doubt
about the correct tightness, have them
checked with a torque wrench by your
authorized dealer or at a service
station.
• Place the deflated (flat) tire and compact spare tire cover assembly in the rear cargo area. Do not stow the deflated tire in the spare tire location. Have the full-sized
tire repaired or replaced as soon as possible.
• To stow the winch cable and retainer, fit the assembled jack-handle over the winch drive nut. Rotate the jack-handle assembly clockwise until you hear the winch
mechanism click three times.
• Secure the jack and tools in their proper locations.
WHAT TO DO IN EMERGENCIES
72
Page 98 of 108

Jack Location.............. 70
Jump Starting .............. 74
KeyFob .................. 8
Keyless Enter-N-Go ........... 9
Lock/Unlock ............ 9,10
Starting/Stopping .......... 10
Lane Change Assist .......... 24
LATCH (Lower Anchors and Tether for
CHildren) ................ 15
Lights Warning (Instrument Cluster
Description) .............. 6
Maintenance Record .......... 86
MaintenanceSchedule ........ 85
MOPAR
®Accessories ......... 94
Navigation ................ 43
Oil Change Indicator .......... 68
Oil, Engine Capacity ............... 83
Outlet Power ................. 61
Overheating, Engine .......... 69
Panic Alarm ............... 8
Phone (Uconnect) ........... 49
Placard, Tire and Loading
Information ............... 90
Power Glass Sunroof ............ 30
Inverter ................ 61
Outlet (Auxiliary Electrical
Outlet) ................ 61
Seats ................. 17
Steering ................ 83
Preparation for Jacking ........ 71
Programmable Electronic Features . . 58
Radio Operation ............ 38
Rain Sensitive Wiper System ..... 24
RearCamera .............. 30
Rear Park Sense System ........ 30
RearSeat,Folding ........... 19 Recreational Towing
.......... 64
Remote Starting System ........ 8
Replacement Bulbs .......... 91
Reporting Safety Defects ....... 93
Restraints, Child ............ 14
Rocking Vehicle When Stuck ..... 78
Seat Belts ................ 12
Seats ................... 17
Adjustment .............. 17
Folding Front Passenger ...... 18
Heated ................ 21
Lumbar Support ........... 17
Power ................. 17
RearFolding ............. 19
Setting the Clock .......... 35,37
Shift Lever Override .......... 76
Signals, Turn .............. 24
SIRIUS Travel Link ........... 47
SpareTire ................ 70
Spark Plugs ............... 83
Speed Control Accel/Decel .............. 26
Cancel ................ 26
Resume ................ 26
Speed Control (Cruise Control) .... 26
Starting Remote ................. 8
Steering Tilt Column .............. 23
Store Radio Presets .......... 39
Stuck, Freeing ............. 78
SunRoof ................ 30
Supplemental Restraint System -
Airbag .................. 13
Temperature Control, Automatic
(ATC) ................... 27
Temperature Gauge, Engine
Coolant ................. 69
Theft Alarm (Security Alarm) ..... 11
Theft System Arming ......... 11
Theft System Disarming ........ 12
Tilt Steering Column .......... 23
Tires A
irPressure ............. 90
Changing ............... 72
FlatChanging ............ 72
INDEX
96