transmission DODGE JOURNEY 2014 1.G User Guide
[x] Cancel search | Manufacturer: DODGE, Model Year: 2014, Model line: JOURNEY, Model: DODGE JOURNEY 2014 1.GPages: 124, PDF Size: 3.37 MB
Page 14 of 124
Stopping
• Place the shift lever in PARK.
• Press the ENGINE START/STOP button once. The ignition switch will return to the OFFposition.
•
If the shift lever is not in PARK, the ENGINE START/STOP button must be held for two
seconds and vehicle speed must be above 5 mph (8 km/h) before the engine will shut off.
Accessory Positions With Engine Off
NOTE:
The following functions are with the driver’s foot OFF the Brake Pedal (Transmission in PARK
or NEUTRAL Position).
Starting With The Ignition Switch In The OFF Position:
• Press the ENGINE START/STOP button once to change the ignition switch to the ACC position.
• Press the ENGINE START/STOP button a second time to change the ignition switch to the ON/RUN position.
• Press the ENGINE START/STOP button a third time to return the ignition switch to the OFF position.
NOTE:
If the ignition switch is left in the ACC or
ON/RUN (engine not running) position and
the transmission is in PARK, the system will
automatically time out after 30 minutes of
inactivity and the ignition will switch to the
OFF position.
• In case the ignition switch does not change with the push of a button, the RKE
transmitter (Key Fob) may have a low or
dead battery. In this situation a back up
method can be used to operate the ignition switch. Put the nose side (side opposite of the
emergency key) of the Key Fob against the ENGINE START/STOP button and push to
operate the ignition switch.
GETTING STARTED
12
Page 30 of 124
ENGINE BREAK-IN RECOMMENDATIONS
A long break-in period is not required for the engine and drivetrain (transmission and axle)
in your vehicle.
Drive moderately during the first 300 miles (500 km). After the initial 60 miles (100 km),
speeds up to 50 or 55 mph (80 or 90 km/h) are desirable.
While cruising, brief full-throttle acceleration within the limits of local traffic laws contrib-
utes to a good break-in. Wide-open throttle acceleration in low gear can be detrimental and
should be avoided.
The engine oil installed in the engine at the factory is a high-quality energy conserving type
lubricant. Oil changes should be consistent with anticipated climate conditions under
which vehicle operations will occur. For the recommended viscosity and quality grades,
refer to “Maintaining Your Vehicle.”
NOTE:
A new engine may consume some oil during its first few thousand miles (kilometers) of
operation. This should be considered a normal part of the break-in and not interpreted as an
indication of an engine problem or malfunction.
CAUTION!
Never use Non-Detergent Oil or Straight Mineral Oil in the engine or damage may result.
TURN SIGNAL/WIPER/WASHER/HIGH BEAM LEVER
Turn Signal/Lane Change Assist
• Tap the lever up or down once and the turn signal (right or left) will flash three times andautomatically turn off.
OPERATING YOUR VEHICLE
28
Page 68 of 124
Uconnect® 8.4 Customer Programmable Features
• The Uconnect® 8.4 system allows you to access Customer Programmable feature set-tings such as Display, Clock, Safety/Assistance, Lights, Doors & Locks, Heated Seats,
Engine Off Operation, Compass Settings, Audio, Phone/Bluetooth® and SIRIUS Setup
through soft-keys.
• Touch the “More” soft-key on the bottom of the screen, then touch the “Settings” soft-key to access the Settings screen. When making a selection, scroll up or down until
the preferred setting is highlighted, then press and release the preferred setting until a
check-mark appears next to the setting, showing that setting has been selected.
The following feature settings are available:
• Display • Auto On Comfort & Remote Start
• Clock • Engine Off Options
• Safety/Assistance • Audio
• Lights • Phone/Bluetooth®
• Doors & Locks • SIRIUS Setup
UNIVERSAL GARAGE DOOR OPENER (HomeLink®)
• HomeLink® replaces up to three hand-held transmitters that operate devices such as
garage door openers, motorized gates, lighting or home security systems. The
HomeLink® unit is powered by your vehicles 12 Volt battery.
• The HomeLink® buttons that are located in the overhead console or sunvisor designate the three different HomeLink® channels.
• The HomeLink® indicator is located above the center button.
Before You Begin Programming
HomeLink®
Ensure that your vehicle is parked outside of
the garage before you begin programming.
For efficient programming and accurate
transmission of the radio-frequency signal,
it is recommended that a new battery be
placed in the hand-held transmitter of the
device that is being programmed to the
HomeLink® system.
Erase all channels before you begin pro-
gramming. To erase the channels, place the
ignition switch into the ON/RUN position,
then press and hold the two outside HomeLink® buttons (I and III) for up to 20 seconds or
until the red indicator flashes.
ELECTRONICS
66
Page 73 of 124

TRAILER TOWING WEIGHTS (MAXIMUM TRAILER WEIGHT RATINGS)
Engine/TransmissionGCWR (Gross Combined
Wt. Rating) Frontal Area Max. GTW
(Gross Trailer Wt.) Max. Tongue Wt.
2.4L/Automatic 6,000 lbs (2,722 kg) 22 sq ft (2.0 sq m) 1,000 lbs (454 kg) which
includes up to 5 persons & Luggage 100 lbs (45 kg)
3.6L/Automatic 7,300 lbs (3,311 kg) 32 sq ft (3.0 sq m)
2,500 lbs (1 134 kg) which
includes 1 to 2 persons & Luggage 200 lbs (91 kg)
7,300 lbs (3,311 kg) 32 sq ft (3.0 sq m) 2,000 lbs (907 kg) which
includes 3 to 4 persons & Luggage 150 lbs (68 kg)
7,300 lbs (3,311 kg) 32 sq ft (3.0 sq m) 1,500 lbs (680 kg) which
includes 5 to 7 persons & Luggage 100 lbs (45 kg)
* Except for AWD models
NOTE:
• The trailer tongue weight must be considered as part of the combined weight of occupants and cargo, and should never exceed the weight
referenced on the Tire and Loading Information placard.
• * For All Wheel Drive (AWD) models carrying 5 to 7 persons and luggage will exceed the rear Gross Axle Weight Rating (GAWR) and therefore should not be attempted.
UTILITY
71
Page 74 of 124
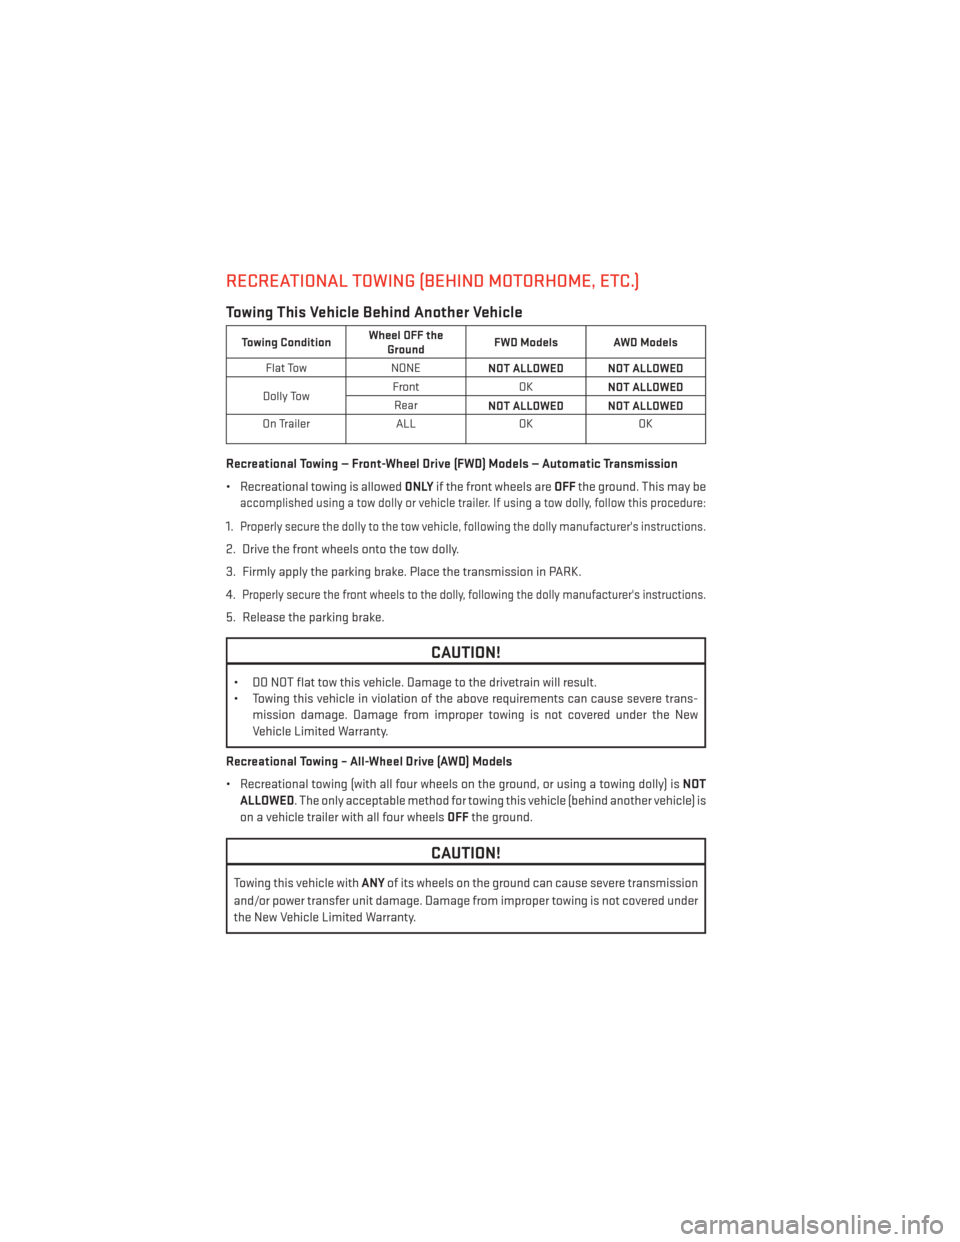
RECREATIONAL TOWING (BEHIND MOTORHOME, ETC.)
Towing This Vehicle Behind Another Vehicle
Towing ConditionWheel OFF the
Ground FWD Models AWD Models
Flat Tow NONE
NOT ALLOWED NOT ALLOWED
Dolly Tow Front
OK
NOT ALLOWED
Rear NOT ALLOWED NOT ALLOWED
On Trailer ALLOKOK
Recreational Towing — Front-Wheel Drive (FWD) Models — Automatic Transmission
• Recreational towing is allowed ONLYif the front wheels are OFFthe ground. This may be
accomplished using a tow dolly or vehicle trailer. If using a tow dolly, follow this procedure:
1.Properly secure the dolly to the tow vehicle, following the dolly manufacturer's instructions.
2. Drive the front wheels onto the tow dolly.
3. Firmly apply the parking brake. Place the transmission in PARK.
4.
Properly secure the front wheels to the dolly, following the dolly manufacturer's instructions.
5. Release the parking brake.
CAUTION!
• DO NOT flat tow this vehicle. Damage to the drivetrain will result.
• Towing this vehicle in violation of the above requirements can cause severe trans-
mission damage. Damage from improper towing is not covered under the New
Vehicle Limited Warranty.
Recreational Towing – All-Wheel Drive (AWD) Models
• Recreational towing (with all four wheels on the ground, or using a towing dolly) is NOT
ALLOWED. The only acceptable method for towing this vehicle (behind another vehicle) is
on a vehicle trailer with all four wheels OFFthe ground.
CAUTION!
Towing this vehicle with ANYof its wheels on the ground can cause severe transmission
and/or power transfer unit damage. Damage from improper towing is not covered under
the New Vehicle Limited Warranty.
UTILITY
72
Page 77 of 124
Please note that the TPMS is not a substitute for proper tire maintenance, and it is the
driver’s responsibility to maintain correct tire pressure, even if under-inflation has not
reached the level to trigger illumination of the TPMS low EVIC display.
Your vehicle has also been equipped with a TPMS malfunction indicator to indicate when
the system is not operating properly. The TPMS malfunction indicator is combined with the
low tire pressure telltale. When the system detects a malfunction, the telltale will flash for
approximately one minute and then remain continuously illuminated. This sequence will
continue each time the vehicle is restarted as long as the malfunction exists.
When the malfunction indicator is illuminated, the system may not be able to detect or
signal low tire pressure as intended. TPMS malfunctions may occur for a variety of reasons,
including the installation of replacement or alternate tires or wheels on the vehicle that
prevent the TPMS from functioning properly. Always check the TPMS malfunction telltale
after replacing one or more tires or wheels on your vehicle, to ensure that the replacement
or alternate tires and wheels allow the TPMS to continue to function properly.
NOTE:
Tire pressures change by approximately 1 psi (7 kPa) per 12° F (7° C) of air temperature
change. Keep this in mind when checking tire pressure inside a garage, especially in the
Winter. Example: If garage temperature is 68°F (20°C) and the outside temperature is 32°F
(0°C), then the cold tire inflation pressure should be increased by 3 psi (21 kPa), which equals
1 psi (7 kPa) for every 12°F (7°C) for this outside temperature condition.
CAUTION!
The TPMS has been optimized for the original equipment tires and wheels. TPMS
pressures and warning have been established for the tire size equipped on your vehicle.
Undesirable system operation or sensor damage may result when using replacement
equipment that is not of the same size, type, and/or style. Aftermarket wheels can cause
sensor damage. Do not use tire sealant from a can, or balance beads if your vehicle is
equipped with a TPMS, as damage to the sensors may result.
- Engine Temperature Warning Light
This light warns of an overheated engine condition.
If the light turns on and a warning chime sounds while driving, safely pull over and stop the
vehicle. If the A/C system is on, turn it off. Also, shift the transmission into NEUTRAL and idle the
vehicle. If the temperature reading does not return to normal, turn the engine off immediately.
We recommend that you do not operate the vehicle or engine damage will occur. Have the
vehicle serviced immediately.
WARNING!
A hot engine cooling system is dangerous. You or others could be badly burned by steam
or boiling coolant.
WHAT TO DO IN EMERGENCIES
75
Page 79 of 124
- Malfunction Indicator Light (MIL)
The Malfunction Indicator Light (MIL) is part of an onboard diagnostic system called OBD II
that monitors engine and automatic transmission control systems. The light will illuminate
when the key is in the ON/RUN position before engine start. If the bulb does not come on
when turning the key from OFF to ON/RUN, have the condition checked promptly.
Certain conditions, poor fuel quality, etc., may illuminate the light after engine start. The
vehicle should be serviced if the light stays on through several of your typical driving cycles.
In most situations, the vehicle will drive normally and will not require towing.
CAUTION!
Prolonged driving with the Malfunction Indicator Light (MIL) on could cause damage to
the engine control system. It also could affect fuel economy and driveability. If the MIL is
flashing, severe catalytic converter damage and power loss will soon occur. Immediate
service is required.
WARNING!
A malfunctioning catalytic converter, as referenced above, can reach higher tempera-
tures than in normal operating conditions. This can cause a fire if you drive slowly or park
over flammable substances such as dry plants, wood, cardboard, etc. This could result in
death or serious injury to the driver, occupants or others.
- Electronic Stability Control (ESC) Activation/Malfunction
Indicator Light
• If this indicator light flashes during acceleration, apply as little throttle as possible. While
driving, ease up on the accelerator. Adapt your speed and driving to the prevailing road
conditions. To improve the vehicle's traction when starting off in deep snow, sand or
gravel, it may be desirable to switch the ESC system off.
- Electronic Stability Control (ESC) OFF Indicator Light
The ESC OFF indicator will illuminate when the Electronic Stability Control (ESC) is turned off.
- Turn Signal Indicator
The arrows will flash with the exterior turn signals when the turn signal lever is operated.
A tone will chime, and an EVIC message will appear if either turn signal is left on for more
than 1 mile (1.6 km).
NOTE:
If either indicator flashes at a rapid rate, check for a defective outside light bulb.
WHAT TO DO IN EMERGENCIES
77
Page 81 of 124
IF YOUR ENGINE OVERHEATS
In any of the following situations, you can reduce the potential for overheating by taking the
appropriate action:
• On the highways — slow down.
• In city traffic — while stopped, shift the transmission to NEUTRAL, but do not increaseengine idle speed.
NOTE:
There are steps that you can take to slow down an impending overheat condition:
• If your air conditioner (A/C) is on, turn it off. The A/C system adds heat to the engine cooling system and turning the A/C off can help remove this heat.
• You can also turn the temperature control to maximum heat, the mode control to floor and the blower control to high. This allows the heater core to act as a supplement to the
radiator and aids in removing heat from the engine cooling system.
CAUTION!
Driving with a hot cooling system could damage your vehicle. If the temperature gauge
reads HOT (H), pull over and stop the vehicle. Idle the vehicle with the air conditioner
turned off until the pointer drops back into the normal range. If the pointer remains on
HOT (H), and you hear continuous chimes, turn the engine off immediately, and call for
service.
WARNING!
You or others can be badly burned by hot engine coolant (antifreeze) or steam from your
radiator. If you see or hear steam coming from under the hood, do not open the hood until
the radiator has had time to cool. Never try to open a cooling system pressure cap when
the radiator or coolant bottle is hot.
WHAT TO DO IN EMERGENCIES
79
Page 88 of 124
WARNING!
• Do not attempt to change a tire on the side of the vehicle close to moving traffic. Pullfar enough off the road to avoid the danger of being hit when operating the jack or
changing the wheel.
• Being under a jacked-up vehicle is dangerous. The vehicle could slip off the jack and
fall on you. You could be crushed. Never put any part of your body under a vehicle that
is on a jack. If you need to get under a raised vehicle, take it to an authorized service
center where it can be raised on a lift.
• Never start or run the engine while the vehicle is on a jack.
• The jack is designed to be used as a tool for changing tires only. The jack should not
be used to lift the vehicle for service purposes. The vehicle should be jacked on a firm
level surface only. Avoid ice or slippery areas.
• Carefully follow these tire changing warnings to help prevent personal injury or
damage to your vehicle:
• Always park on a firm, level surface as far from the edge of the roadway as possible
before raising the vehicle.
• Turn on the Hazard Warning flasher.
• Block the wheel diagonally opposite the wheel to be raised.
• Set the parking brake firmly and set an automatic transmission in PARK.
• Do not let anyone sit in the vehicle when it is on a jack.
• Do not get under the vehicle when it is on a jack.
• Only use the jack in the positions indicated and for lifting this vehicle during a tire
change.
• If working on or near a roadway, be extremely careful of motor traffic.
• To assure that spare tires, flat or inflated, are securely stowed, spares must be
stowed with the valve stem facing the ground.
• Raising the vehicle higher than necessary can make the vehicle less stable. It could
slip off the jack and hurt someone near it. Raise the vehicle only enough to remove
the tire.
• To avoid possible personal injury, handle the wheel covers with care to avoid contact
with any sharp edges.
• To avoid the risk of forcing the vehicle off the jack, do not tighten the wheel nuts fully
until the vehicle has been lowered. Failure to follow this warning may result in
personal injury.
• A loose tire or jack, thrown forward in a collision or hard stop could endanger the
occupants of the vehicle. Always stow the jack parts and the spare tire in the places
provided. Have the deflated (flat) tire repaired or replaced immediately.
WHAT TO DO IN EMERGENCIES
86
Page 89 of 124
JUMP-STARTING
• If your vehicle has a discharged battery itcan be jump-started using a set of jumper
cables and a battery in another vehicle or
by using a portable battery booster pack.
• Jump-starting can be dangerous if done improperly so please follow the proce-
dures in this section carefully.
NOTE:
When using a portable battery booster pack
follow the manufacturer's operating instruc-
tions and precautions.
Preparations For Jump-Start
• The battery in your vehicle is located between the left front headlight assembly and the left front wheel splash shield. To allow jump-starting there are remote battery posts
located on the left side of the engine compartment.
• Set the parking brake, shift the automatic transmission into PARK and turn the ignition to LOCK.
• Turn off the heater, radio, and all unnecessary electrical accessories.
• Remove the protective cover over the remote positive (+)battery post. To remove the
cover, press the locking tab and pull upward on the cover.
• If using another vehicle to jump-start the battery, park the vehicle within the jumper cables reach, set the parking brake and make sure the ignition is OFF.
Jump-Starting Procedure
1. Connect the positive (+)end of the jumper cable to the remote positive (+)post of the
vehicle with discharged battery.
2. Connect the opposite end of the positive (+)jumper cable to the positive (+)post of the
booster battery.
3. Connect the negative end (-)of the jumper cable to the negative (-)post of the booster
battery.
WHAT TO DO IN EMERGENCIES
87