control DODGE JOURNEY 2015 1.G Owners Manual
[x] Cancel search | Manufacturer: DODGE, Model Year: 2015, Model line: JOURNEY, Model: DODGE JOURNEY 2015 1.GPages: 648
Page 367 of 648
Display Settings
When watching a video source (DVD Video with the disc
in Play mode, Aux Video, etc.), pushing the remote
control’s SETUP button activates the Display Settings
menu. These settings control the appearance of the video
on the screen. The factory default settings are already set
for optimum viewing, so there is no need to change these
settings under normal circumstances.
To change the settings, push the remote control’s naviga-
tion buttons to select an item, then push the remote
control’s navigation buttons to change the value for the
currently selected item. To reset all values back to the
original settings, select the Default Settings menu option
and push the remote control’s ENTER button.
Listening To Audio With The Screen Closed
To listen to only audio portion of the channel with the
screen closed:
•Set the audio to the desired source and channel.
•Close the video screen.
•To change the current audio mode, push the remote
control’s MODE button. This will automatically select
the next available audio mode without using the
MODE/SOURCE Select menu.
If the screen is closed and there is no audio heard, verify
that the headphones are turned on (the ON indicator is
illuminated) and the headphone selector switch is on the
desired channel. If the headphones are turned on, push
the remote control’s power button to turn audio on. If
audio is still not heard, check that fully charged batteries
are installed in the headphones.
4
UNDERSTANDING YOUR INSTRUMENT PANEL 365
Page 370 of 648
Windows Media Audio) and ACC (MPEG-4 audio; sam-
pling frequencies 8 to 48 kHz; mono and stereo) audio
files with the from a CD Data disc (usually a CD-R or
CD-RW).
•The DVD player always uses the file extension to
determine the audio format, so MP3 files must always
end with the extension#.mp3#or#.MP3#, WMA files
must always end with the extension#.wma#or#WMA#,
and ACC files must end with the extensions “.acc” or
“.m4a”. To prevent incorrect playback, do not use
these extensions for any other types of files.
•For MP3 files, ID3 tag data v1, v1.1, v2 and v2.4 (such
as artist name, track title, album, etc.) are supported.
•Any file that is copy protected (such as those down-
loaded from many online music stores) will not play.
The DVD player will automatically skip the file and
begin playing the next available file.
•Other compression formats such as AAC, MP3 Pro,
Ogg Vorbis, and ATRAC3 will not play. The DVD
player will automatically skip the file and begin play-
ing the next available file.
•If you are creating your own files, the recommended
fixed bit rate for MP3 files is between 96 and 192Kbps
and the recommended fixed bit rate for WMA files is
between 64 and 192Kbps. Variable bit rates are also
supported. For both formats, the recommended
sample rate is either 44.1kHz or 48kHz.
•To change the current file, use the remote control’s or
DVD player ’s$button to advance to the next file, or
the"button to return to the start of the current or
previous file.
•To change the current directory, use the remote con-
trol’s PROG UP and Down buttons or Rewind/skip
back and fast fwd/skip forward.
368 UNDERSTANDING YOUR INSTRUMENT PANEL
Page 372 of 648
General Information
This device complies with Part 15 of the FCC rules and
RSS 210 of Industry Canada. Operation is subject to the
following conditions:
1. This device may not cause harmful interference.
2.This device must accept any interference received, in-
cluding interference that may cause undesired operation.
iPod®/USB/MP3 CONTROL
This feature allows an iPod® or external USB device to be
plugged into the USB port.
iPod® control supports Mini, 4G, Photo, Nano, 5G iPod®
and iPhone® devices. Some iPod® software versions
may not fully support the iPod® control features. Please
visit Apple’s website for software updates.
For further information, refer to the Uconnect® Supple-
ment Manual.
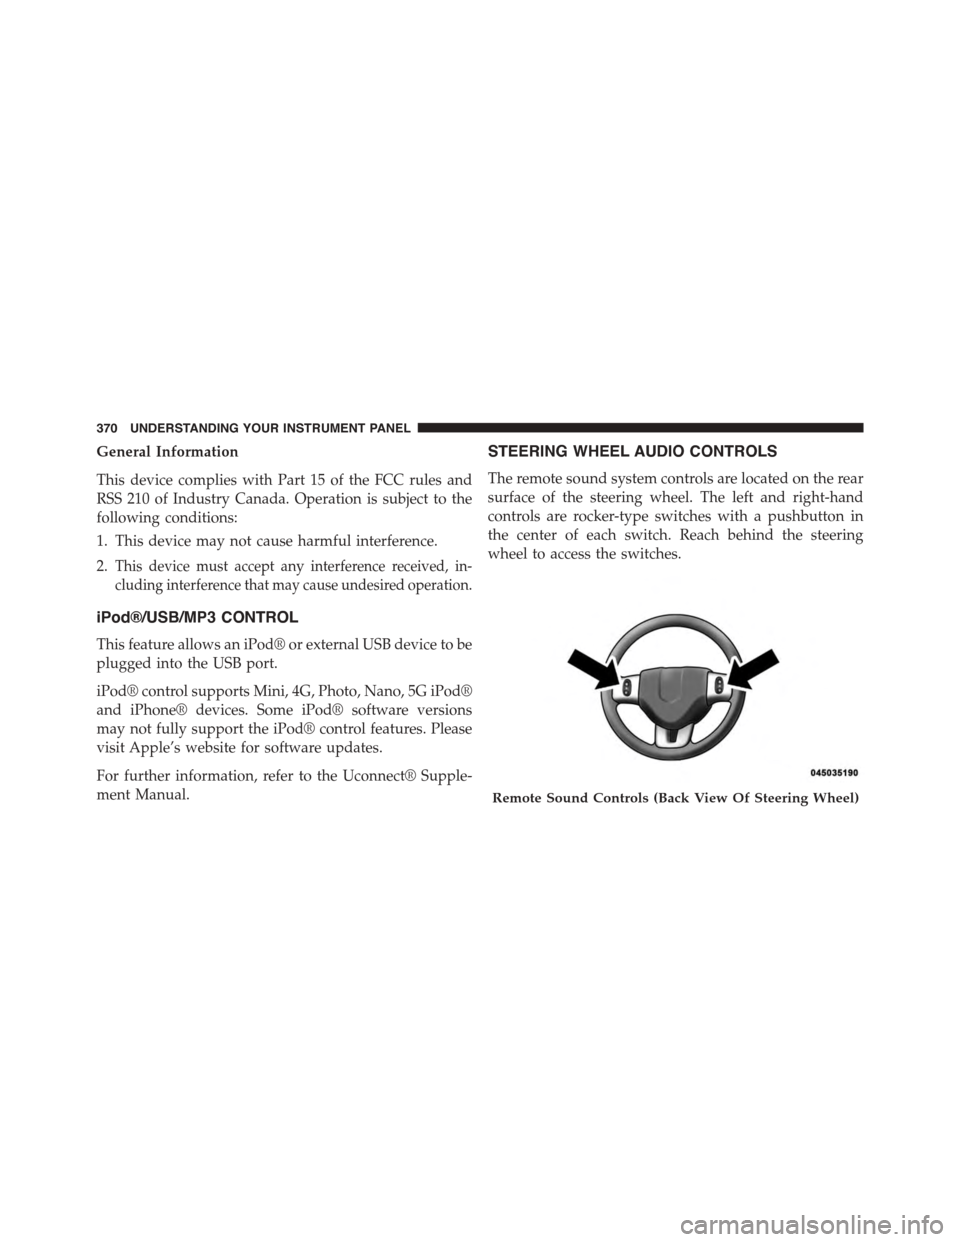
STEERING WHEEL AUDIO CONTROLS
The remote sound system controls are located on the rear
surface of the steering wheel. The left and right-hand
controls are rocker-type switches with a pushbutton in
the center of each switch. Reach behind the steering
wheel to access the switches.
Remote Sound Controls (Back View Of Steering Wheel)
370 UNDERSTANDING YOUR INSTRUMENT PANEL
Page 375 of 648
CLIMATE CONTROLS
The air conditioning and heating system is designed to
make you comfortable in all types of weather. This
system can be operated through either the instrument
panel or through the Uconnect® system display.
When the Uconnect® system is in different modes (Ra-
dio, Player, Settings, More, etc.) the driver and passenger
temperature settings will be indicated at the top of the
display.
Manual Climate Controls With Touchscreen — If
Equipped
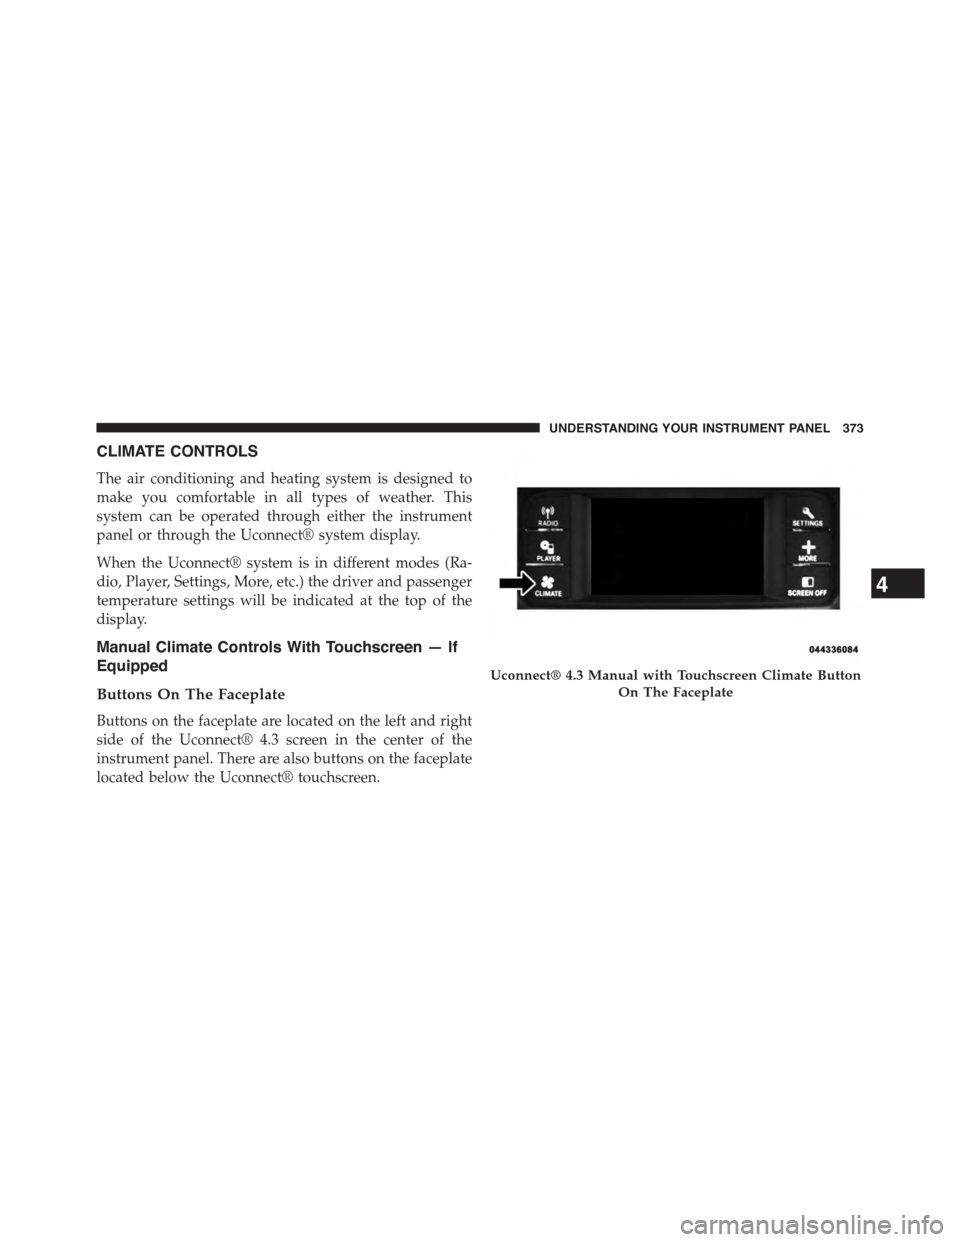
Buttons On The Faceplate
Buttons on the faceplate are located on the left and right
side of the Uconnect® 4.3 screen in the center of the
instrument panel. There are also buttons on the faceplate
located below the Uconnect® touchscreen.
Uconnect® 4.3 Manual with Touchscreen Climate Button
On The Faceplate
4
UNDERSTANDING YOUR INSTRUMENT PANEL 373
Page 376 of 648
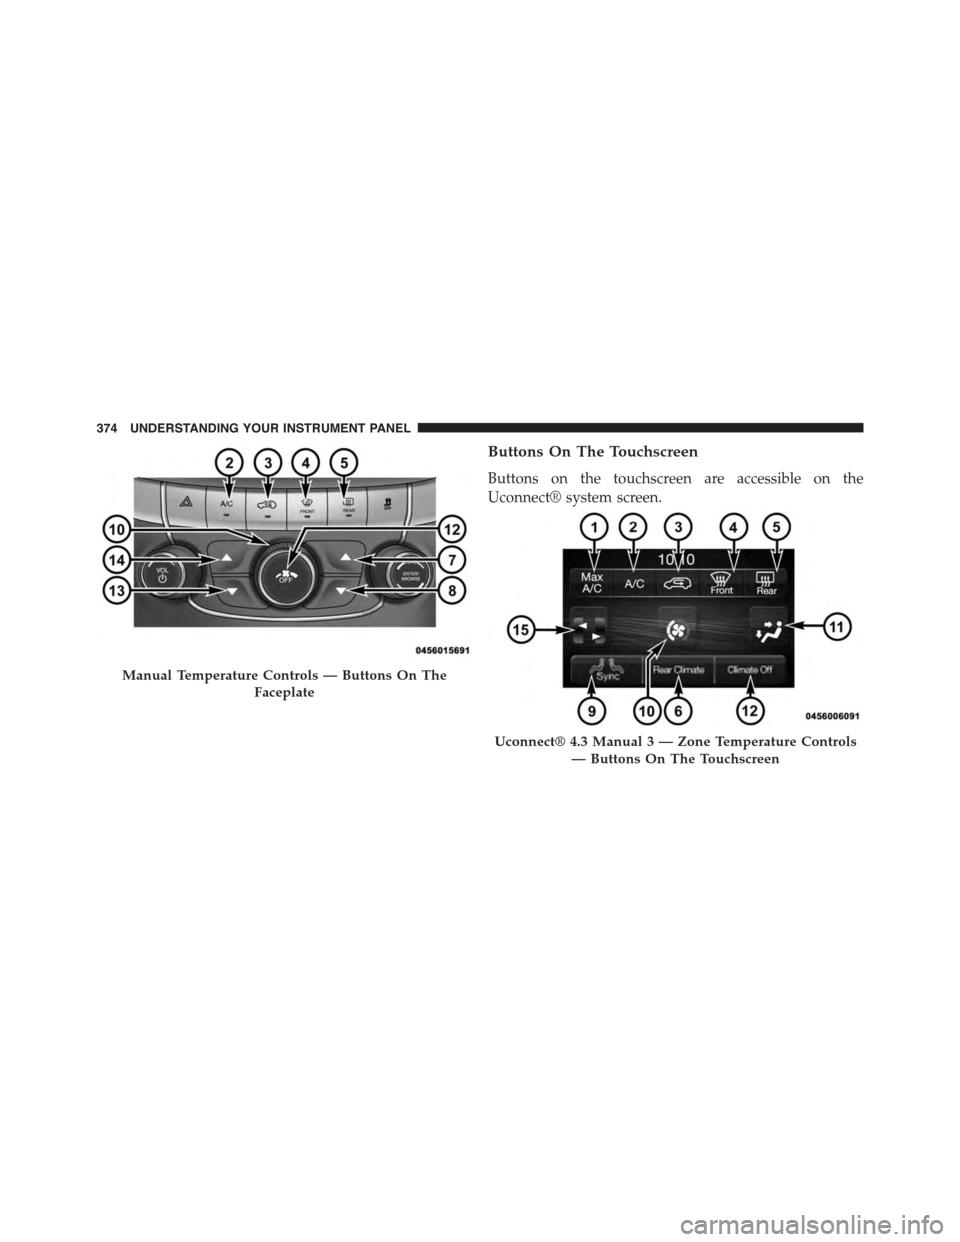
Buttons On The Touchscreen
Buttons on the touchscreen are accessible on the
Uconnect® system screen.
Manual Temperature Controls — Buttons On The
Faceplate
Uconnect® 4.3 Manual 3 — Zone Temperature Controls
— Buttons On The Touchscreen
374 UNDERSTANDING YOUR INSTRUMENT PANEL
Page 377 of 648
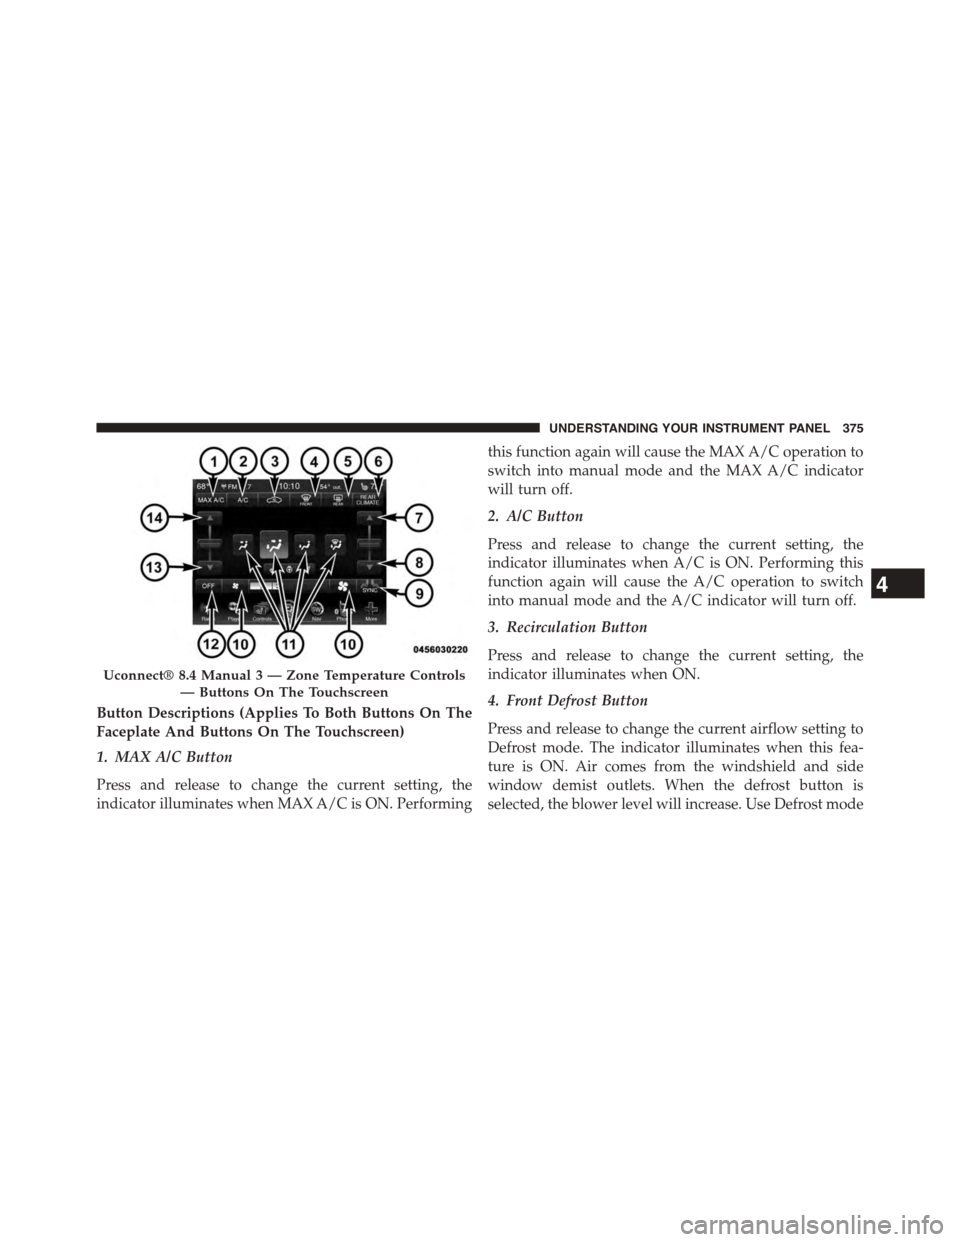
Button Descriptions (Applies To Both Buttons On The
Faceplate And Buttons On The Touchscreen)
1. MAX A/C Button
Press and release to change the current setting, the
indicator illuminates when MAX A/C is ON. Performing
this function again will cause the MAX A/C operation to
switch into manual mode and the MAX A/C indicator
will turn off.
2. A/C Button
Press and release to change the current setting, the
indicator illuminates when A/C is ON. Performing this
function again will cause the A/C operation to switch
into manual mode and the A/C indicator will turn off.
3. Recirculation Button
Press and release to change the current setting, the
indicator illuminates when ON.
4. Front Defrost Button
Press and release to change the current airflow setting to
Defrost mode. The indicator illuminates when this fea-
ture is ON. Air comes from the windshield and side
window demist outlets. When the defrost button is
selected, the blower level will increase. Use Defrost mode
Uconnect® 8.4 Manual 3 — Zone Temperature Controls
— Buttons On The Touchscreen
4
UNDERSTANDING YOUR INSTRUMENT PANEL 375
Page 378 of 648
with maximum temperature settings for best windshield
and side window defrosting and defogging. Performing
this function will cause the ATC to switch into manual
mode. If the front defrost mode is turned off the climate
system will return the previous setting.
5. Rear Defrost Button
Press and release this button to turn on the rear window
defroster and the heated outside mirrors (if equipped).
An indicator will illuminate when the rear window
defroster is on. The rear window defroster automatically
turns off after 10 minutes.
CAUTION!
Failure to follow these cautions can cause damage to
the heating elements:
(Continued)
CAUTION!(Continued)
•Use care when washing the inside of the rear
window. Do not use abrasive window cleaners on
the interior surface of the window. Use a soft cloth
and a mild washing solution, wiping parallel to the
heating elements. Labels can be peeled off after
soaking with warm water.
•Do not use scrapers, sharp instruments, or abrasive
window cleaners on the interior surface of the
window.
•Keep all objects a safe distance from the window.
6. Rear Climate Button — If Equipped
Press and release this button to turn on the rear climate
controls. The indicator will illuminate when the rear
climate controls are ON. Performing this function again
will turn OFF the rear climate controls.
376 UNDERSTANDING YOUR INSTRUMENT PANEL
Page 379 of 648
7. Passenger Temperature Control Up Button
(Uconnect® 8.4 Only)
Provides the passenger with independent temperature
control. Push the button for warmer temperature set-
tings.
NOTE:Pressing this button while in Sync mode will
automatically exit Sync.
8. Passenger Temperature Control Down Button
(Uconnect® 8.4 Only)
Provides the passenger with independent temperature
control. Push the button for cooler temperature settings.
NOTE:Pressing this button while in Sync mode will
automatically exit Sync.
9. SYNC
Press the Sync button on the touchscreen to toggle the
Sync feature On/Off. The Sync indicator is illuminated
when this feature is enabled. Sync is used to synchronize
the passenger temperature setting with the driver tem-
perature setting. Changing the passenger temperature
setting while in Sync will automatically exit this feature.
10. Blower Control
Blower control is used to regulate the amount of air
forced through the climate system. There are seven
blower speeds available. Adjusting the blower will cause
automatic mode to switch to manual operation. The
speeds can be selected using either the blower control
knob or the buttons on the touchscreen as follows:
Blower Control Knob On The Faceplate
The blower speed increases as you turn the blower
control knob clockwise from the lowest blower setting.
The blower speed decreases as you turn the blower
control knob counterclockwise.
4
UNDERSTANDING YOUR INSTRUMENT PANEL 377
Page 381 of 648
12. Climate Control OFF Button
Press and release this button to turn the Climate Control
ON/OFF.
13. Driver Temperature Control Down Button
(Uconnect® 8.4 Only)
Provides the driver with independent temperature con-
trol. Push the button for cooler temperature settings.
NOTE:In Sync mode, this button will also automatically
adjust the passenger temperature setting at the same
time.
14. Driver Temperature Control Up Button (Uconnect®
8.4 Only)
Provides the driver with independent temperature con-
trol. Push the button for warmer temperature settings.
NOTE:In Sync mode, this button will also automatically
adjust the passenger temperature setting at the same time.
15. Temperature Control (Uconnect® 4.3 Only)
Press the driver or passenger temperature button on the
touchscreen to regulate the temperature of the air inside
the passenger compartment. Moving the temperature bar
into the red area, indicates warmer temperatures. Mov-
ing the temperature bar into the blue area indicates cooler
temperatures. Driver and passenger have independent
temperature control if Sync mode is not illuminated.
Climate Control Functions
A/C (Air Conditioning)
The Air Conditioning (A/C) button allows the operator
to manually activate or deactivate the air conditioning
system. When the air conditioning system is turned on,
cool dehumidified air will flow through the outlets into
the cabin. For improved fuel economy, press the A/C
button to turn off the air conditioning and manually
4
UNDERSTANDING YOUR INSTRUMENT PANEL 379
Page 382 of 648
adjust the blower and airflow mode settings. Also, make
sure to select only Panel, Bi-Level or Floor modes.
NOTE:
•For Manual Climate Controls, if the system is in Mix,
Floor or Defrost Mode, the A/C can be turned off, but
the A/C system shall remain active to prevent fogging
of the windows.
•If fog or mist appears on the windshield or side glass,
select Defrost mode and adjust blower speed if
needed.
•If your air conditioning performance seems lower than
expected, check the front of the A/C condenser (lo-
cated in front of the radiator), for an accumulation of
dirt or insects. Clean with a gentle water spray from
the front of the radiator and through the condenser.
MAX A/C
MAX A/C sets the control for maximum cooling perfor-
mance.
Press and release to toggle between MAX A/C and the
prior settings. The button on the touchscreen illuminates
when MAX A/C is ON.
In MAX A/C, the blower level and mode position can be
adjusted to desired user settings. Pressing other settings
will cause the MAX A/C operation to switch to the
selected setting and MAX A/C to exit.
Recirculation Control
When outside air contains smoke, odors, or
high humidity, or if rapid cooling is desired,
you may wish to recirculate interior air by
pressing the Recirculation control button. The
recirculation indicator will illuminate when this button is
380 UNDERSTANDING YOUR INSTRUMENT PANEL