display DODGE JOURNEY 2015 1.G User Guide
[x] Cancel search | Manufacturer: DODGE, Model Year: 2015, Model line: JOURNEY, Model: DODGE JOURNEY 2015 1.GPages: 648
Page 156 of 648
NOTE:For phones which are not made a favorite, the
phone priority is determined by the order in which it was
paired. The latest phone paired will have the higher
priority.
You can also use the following VR commands to bring up
the Paired Phone screen from any screen on the radio:
•“Show Paired Phones”
•“Connect My Phone”
Pair A Bluetooth® Streaming Audio Device
1. Press the “Player” button on the touchscreen to begin.
2. Change the Source to Bluetooth®.
3. Press the “Bluetooth®” button on the touchscreen to
display the Paired Audio Devices screen.
4. Press the “Add Device” button on the touchscreen.
NOTE:If there is no device currently connected with the
system, a pop-up will appear.
5. Search for available devices on your Bluetooth® en-
abled audio device. When prompted on the device,
enter the PIN shown on the Uconnect® screen.
6. Uconnect® Phone will display an in process screen
while the system is connecting.
7. When the pairing process has successfully completed,
the system will prompt you to choose whether or not
this is your favorite device. Selecting “Yes” will make
this device the highest priority. This device will take
precedence over other paired devices within range.
NOTE:For devices which are not made a favorite, the
device priority is determined by the order in which it was
paired. The latest device paired will have the higher
priority.
154 UNDERSTANDING THE FEATURES OF YOUR VEHICLE
Page 157 of 648
You can also use the following VR command to bring up
a list of paired audio devices:
•“Show Paired Phones”
•“Connect My Phone”
Connecting To A Particular Mobile Phone Or
Audio Device After Pairing
Uconnect® Phone will automatically connect to the high-
est priority paired phone and/or Audio Device within
range. If you need to choose a particular phone or Audio
Device follow these steps:
1. Press the “Settings” button on the touchscreen.
2. Press the “Paired Phones” or “Paired Audio Sources”
button on the touchscreen.
3. Press to select the particular Phone or the particular
Audio Device.
4. Press the “X” to exit out of the Settings screen.
Disconnecting A Phone Or Audio Device
1. Press the “Settings” button on the touchscreen.
2. Press the “Paired Phones” or “Paired Audio Devices”
button on the touchscreen.
3. Press the settings icon button located to the right of the
device name.
4. The options pop-up will be displayed.
5. Press the “Disconnect Device” button on the touch-
screen.
6. Press the “X” to exit out of the Settings screen.
3
UNDERSTANDING THE FEATURES OF YOUR VEHICLE 155
Page 158 of 648
Deleting A Phone Or Audio Device
1. Press the “Settings” button on the touchscreen.
2. Press the “Pair Phones” or “Paired Audio Devices”
button on the touchscreen.
3. Press the settings icon button located to the right of the
device name for a different Phone or Audio Device
than the currently connected device.
4. The options pop-up will be displayed.
5. Press the “Delete Device” button on the touchscreen.
6. Press the “X” to exit out of the Settings screen.
Making A Phone Or Audio Device A Favorite
1. Press the “Settings” button on the touchscreen.
2. Press the “Paired Phones” or “Paired Audio Devices”
button on the touchscreen.
3. Press the settings icon button located to the right of the
device name.
4. The options pop-up will be displayed.
5. Press the “Make Favorite” button on the touchscreen;
you will see the chosen device move to the top of the
list.
6. Press the “X” to exit out of the Settings screen.
Phonebook Download (Automatic Phonebook
Transfer From Mobile Phone) — If Equipped
If equipped and specifically supported by your phone,
Uconnect® Phone automatically downloads names (text
names) and number entries from the mobile phone’s
phonebook. Specific Bluetooth® Phones with Phone
Book Access Profile may support this feature. See
Uconnect® website,UconnectPhone.com, for supported
phones.
156 UNDERSTANDING THE FEATURES OF YOUR VEHICLE
Page 160 of 648
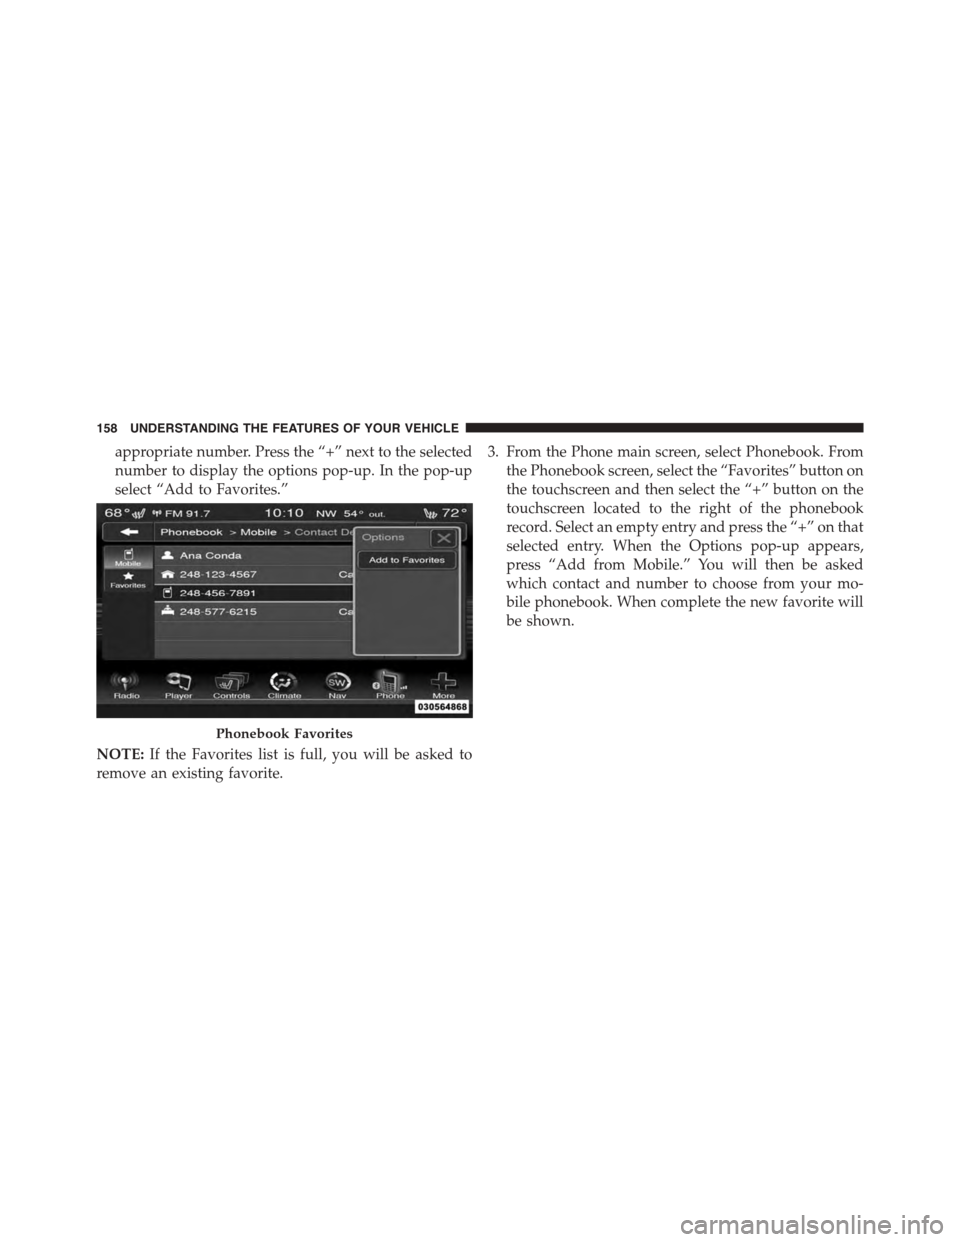
appropriate number. Press the “+” next to the selected
number to display the options pop-up. In the pop-up
select “Add to Favorites.”
NOTE:If the Favorites list is full, you will be asked to
remove an existing favorite.
3. From the Phone main screen, select Phonebook. From
the Phonebook screen, select the “Favorites” button on
the touchscreen and then select the “+” button on the
touchscreen located to the right of the phonebook
record. Select an empty entry and press the “+” on that
selected entry. When the Options pop-up appears,
press “Add from Mobile.” You will then be asked
which contact and number to choose from your mo-
bile phonebook. When complete the new favorite will
be shown.
Phonebook Favorites
158 UNDERSTANDING THE FEATURES OF YOUR VEHICLE
Page 161 of 648
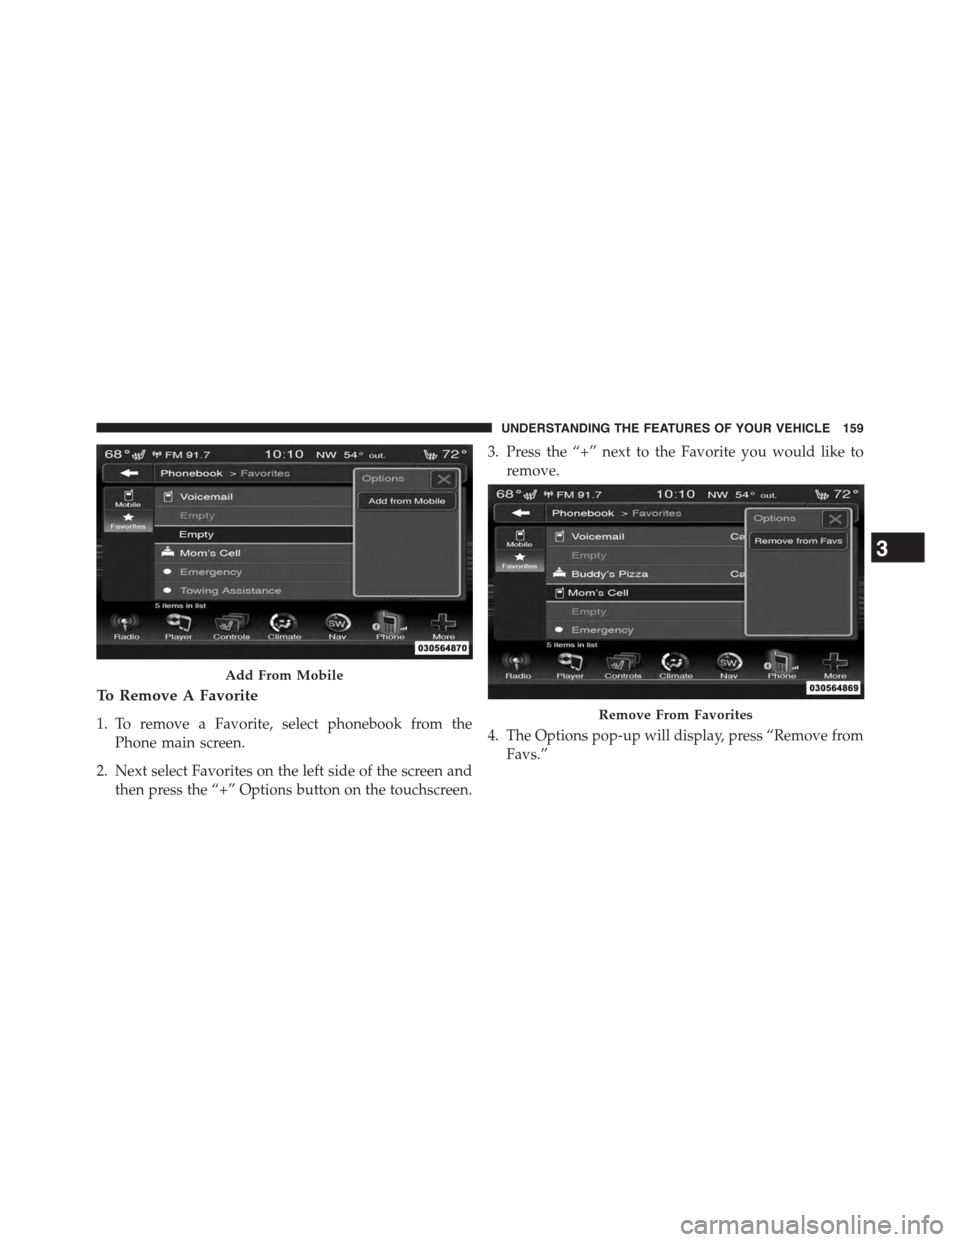
To Remove A Favorite
1. To remove a Favorite, select phonebook from the
Phone main screen.
2. Next select Favorites on the left side of the screen and
then press the “+” Options button on the touchscreen.
3. Press the “+” next to the Favorite you would like to
remove.
4. The Options pop-up will display, press “Remove from
Favs.”
Add From Mobile
Remove From Favorites
3
UNDERSTANDING THE FEATURES OF YOUR VEHICLE 159
Page 164 of 648
3. The Uconnect® Phone will dial the number associated
with John Doe, or if there are multiple numbers it will
ask which number you want to call for John Doe.
Call Controls
The touchscreen allows you to control the following call
features:
•Answer
•End
•Ignore
•Hold/unhold
•Mute/unmute
•Transfer the call to/from the phone
•Swap two active calls
•Join two active calls together
Touch-Tone Number Entry
1. Press the “Phone” button on the touchscreen.
2. Press the “Dial” button on the touchscreen.
3. The Touch-Tone screen will be displayed.
4. Use the numbered buttons on the touchscreens to
enter the number and press “Call.”
To send a touch-tone using Voice Recognition (VR), push
the “VR”button on your steering wheel while in
a call and say “Send 1234#” or you can say “Send
Voicemail Password” if Voicemail password is stored
in your mobile phonebook.
Recent Calls
You may browse up to 34 of the most recent of each of the
following call types:
162 UNDERSTANDING THE FEATURES OF YOUR VEHICLE
Page 165 of 648
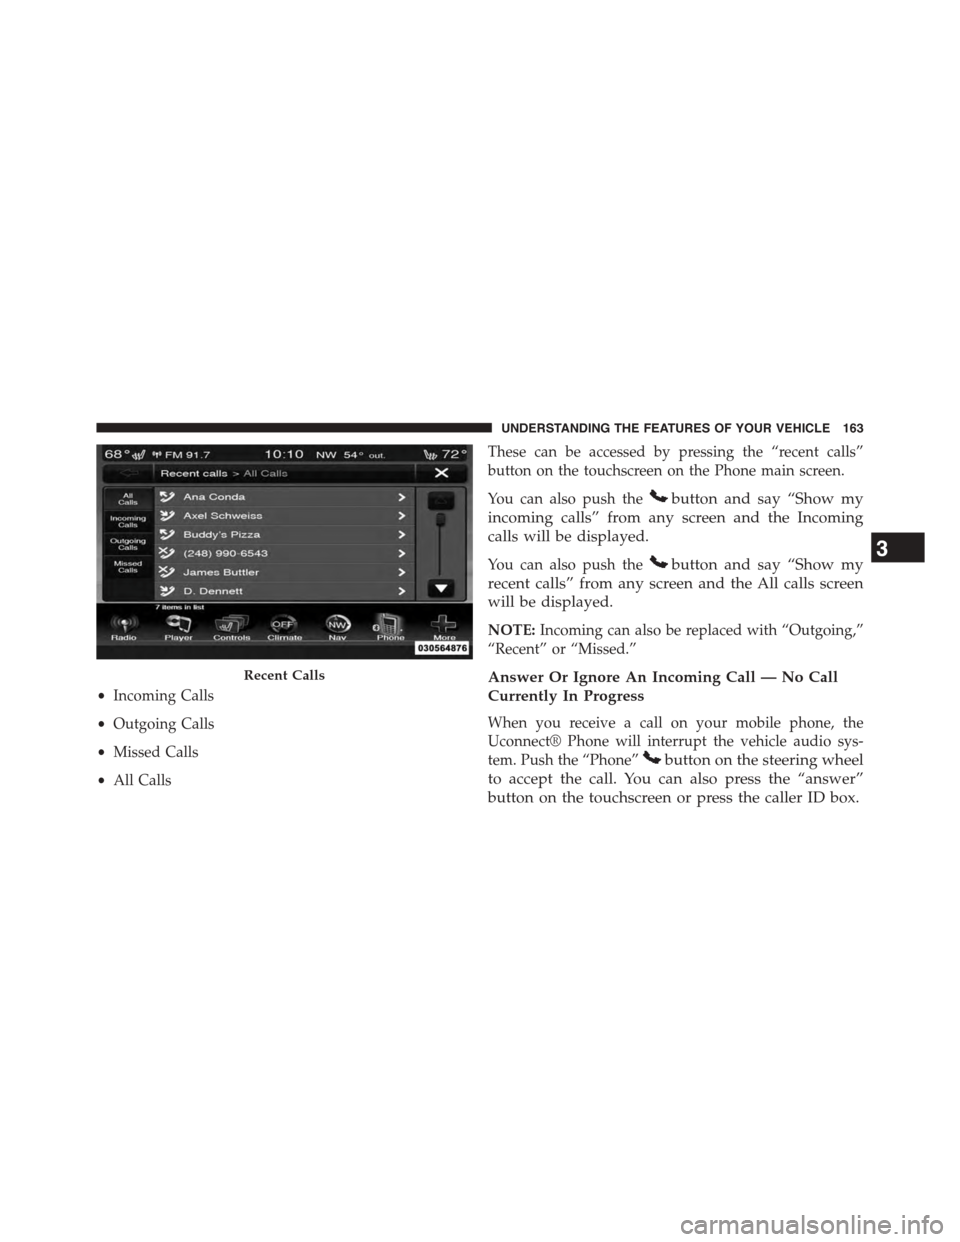
•Incoming Calls
•Outgoing Calls
•Missed Calls
•All Calls
These can be accessed by pressing the “recent calls”
button on the touchscreen on the Phone main screen.
You can also push thebutton and say “Show my
incoming calls” from any screen and the Incoming
calls will be displayed.
You can also push thebutton and say “Show my
recent calls” from any screen and the All calls screen
will be displayed.
NOTE:Incoming can also be replaced with “Outgoing,”
“Recent” or “Missed.”
Answer Or Ignore An Incoming Call — No Call
Currently In Progress
When you receive a call on your mobile phone, the
Uconnect® Phone will interrupt the vehicle audio sys-
tem. Push the “Phone”button on the steering wheel
to accept the call. You can also press the “answer”
button on the touchscreen or press the caller ID box.
Recent Calls
3
UNDERSTANDING THE FEATURES OF YOUR VEHICLE 163
Page 171 of 648
1. Press the “More” button on the touchscreen (where
available), then press the “Settings” button on the
touchscreen.
2. Press the “Display” button on the touchscreen, then
scroll down to Voice Response Length.
3. Select either “Brief” or “Detailed” by pressing the box
next to the selection. A check-mark will appear to
indicate your selection.
Phone And Network Status Indicators
Uconnect® Phone will provide notification to inform you
of your phone and network status when you are attempt-
ing to make a phone call using Uconnect® Phone. The
status is given for network signal strength and phone
battery strength.
Dialing Using The Mobile Phone Keypad
WARNING!
Driving while distracted can result in loss of vehicle
control, accident and injury. It is strongly recom-
mended that you use extreme caution when using
any device or feature that may take your focus off the
road or your hands off the steering wheel. Your
primary responsibility is the safe operation of your
vehicle. We recommend against the use of any hand-
held device while driving, encourage the use of
voice-operated systems when possible and that you
become aware of applicable laws that may affect the
use of electronic devices while driving.
You can dial a phone number with your mobile phone
keypad and still use the Uconnect® Phone (while dialing
via the mobile phone keypad, the user must exercise
caution and take precautionary safety measures). By
3
UNDERSTANDING THE FEATURES OF YOUR VEHICLE 169
Page 187 of 648
The system will best recognize your speech if the win-
dows are closed, and the heater/air conditioning fan is
set to low.
At any point, if the system does not recognize one of your
commands, you will be prompted to repeat it.
To hear available commands, push the Uconnect® Voice
Commandbutton and say “Help.” You will hear
available commands for the screen displayed.
Natural Speech
Natural speech allows the user to speak commands in
phrases or complete sentences. The system filters out
certain non-word utterances and sounds such as “ah”
and “eh.” The system handles fill-in words such as “I
would like to.”
The system handles multiple inputs in the same phrase
or sentence such as “make a phone call” and “to Kelly
Smith.” For multiple inputs in the same phrase or sen-
tence, the system identifies the topic or context and
provides the associated follow-up prompt such as “Who
do you want to call?” in the case where a phone call was
requested but the specific name was not recognized.
The system utilizes continuous dialog; when the system
requires more information from the user it will ask a
question to which the user can respond without pressing
the Uconnect® Voice Commandbutton.
3
UNDERSTANDING THE FEATURES OF YOUR VEHICLE 185
Page 203 of 648
Front Heated Seats — If Equipped
The front heated seats control buttons are located within
the Uconnect® system. You can gain access to the control
buttons through the climate screen or the controls screen.
•Press the heated seat buttononce to turn the High
setting ON.
•Press the heated seat buttona second time to turn
the Low setting ON.
•Press the heated seat buttona third time to turn
the heating elements OFF.
When the HI-level setting is selected, the heater will
provide a boosted heat level during the first four minutes
of operation. Then, the heat output will drop to the
normal HI-level. If the HI-level setting is selected, the
system will automatically switch to LO-level after ap-
proximately 60 minutes of continuous operation. At that
time, the display will change from HI to LO, indicating
the change. The LO-level setting will turn OFF automati-
cally after approximately 45 minutes.
NOTE:The engine must be running for the heated seats
to operate.
Vehicles Equipped With Remote Start
On models that are equipped with remote start, the
heated seats can be programed to come on during a
remote start.
This feature can be programmed through the Uconnect®
system. Refer to “Uconnect® Settings” in “Understand-
ing Your Instrument Panel” for further information.
3
UNDERSTANDING THE FEATURES OF YOUR VEHICLE 201