control DODGE JOURNEY 2015 1.G Owner's Manual
[x] Cancel search | Manufacturer: DODGE, Model Year: 2015, Model line: JOURNEY, Model: DODGE JOURNEY 2015 1.GPages: 648
Page 108 of 648
not lit during starting, or if the light stays on, flickers, or
turns on while driving, have the system checked by an
authorized dealer.
Defroster
Check operation by selecting the defrost mode and place
the blower control on high speed. You should be able to
feel the air directed against the windshield. See your
authorized dealer for service if your defroster is inoper-
able.
Floor Mat Safety Information
Always use floor mats designed to fit the footwell of your
vehicle. Use only floor mats that leave the pedal area
unobstructed and that are firmly secured so that they
cannot slip out of position and interfere with the pedals
or impair safe operation of your vehicle in other ways.
WARNING!
Pedals that cannot move freely can cause loss of
vehicle control and increase the risk of serious per-
sonal injury.
•Always make sure that floor mats are properly
attached to the floor mat fasteners.
•Never place or install floor mats or other floor
coverings in the vehicle that cannot be properly
secured to prevent them from moving and interfer-
ing with the pedals or the ability to control the
vehicle.
•Never put floor mats or other floor coverings on top
of already installed floor mats. Additional floor
mats and other coverings will reduce the size of the
pedal area and interfere with the pedals.
(Continued)
106 THINGS TO KNOW BEFORE STARTING YOUR VEHICLE
Page 109 of 648
WARNING!(Continued)
•Check mounting of mats on a regular basis. Always
properly reinstall and secure floor mats that have
been removed for cleaning.
•Always make sure that objects cannot fall into the
driver footwell while the vehicle is moving. Ob-
jects can become trapped under the brake pedal
and accelerator pedal causing a loss of vehicle
control.
•If required, mounting posts must be properly in-
stalled, if not equipped from the factory.
Failure to properly follow floor mat installation or
mounting can cause interference with the brake
pedal and accelerator pedal operation causing loss of
control of the vehicle.
Periodic Safety Checks You Should Make Outside
The Vehicle
Tires
Examine tires for excessive tread wear and uneven wear
patterns. Check for stones, nails, glass, or other objects
lodged in the tread or sidewall. Inspect the tread for cuts
and cracks. Inspect sidewalls for cuts, cracks and bulges.
Check the wheel nuts for tightness. Check the tires
(including spare) for proper cold inflation pressure.
Lights
Have someone observe the operation of brake lights and
exterior lights while you work the controls. Check turn
signal and high beam indicator lights on the instrument
panel.
Door Latches
Check for positive closing, latching, and locking.
2
THINGS TO KNOW BEFORE STARTING YOUR VEHICLE 107
Page 114 of 648
!TILT/TELESCOPING STEERING COLUMN . . .234
!HEATED STEERING WHEEL —
IF EQUIPPED.........................235
!ELECTRONIC SPEED CONTROL —
IF EQUIPPED.........................236
▫To Activate..........................237
▫To Set A Desired Speed.................237
▫To Deactivate........................238
▫To Resume Speed.....................238
▫To Vary The Speed Setting...............238
▫To Accelerate For Passing................239
!PARKSENSE® REAR PARK ASSIST — IF
EQUIPPED...........................240
▫ParkSense® Sensors....................240
▫ParkSense® Warning Display.............241
▫ParkSense® Display....................241
▫Enabling And Disabling ParkSense®........244
▫Service The ParkSense® Rear Park Assist
System.............................245
▫Cleaning The ParkSense® System..........245
▫ParkSense® System Usage Precautions.......246
!PARKVIEW® REAR BACK UP CAMERA — IF
EQUIPPED...........................248
!OVERHEAD CONSOLE..................250
▫Courtesy/Reading Lights................251
▫Sunglasses Storage....................252
▫Interior Observation Mirror..............252
▫Power Sunroof Switch — If Equipped.......253
11 2 U N D E R S TA N D I N G T H E F E AT U R E S O F Y O U R V E H I C L E
Page 117 of 648
MIRRORS
Inside Day/Night Mirror — If Equipped
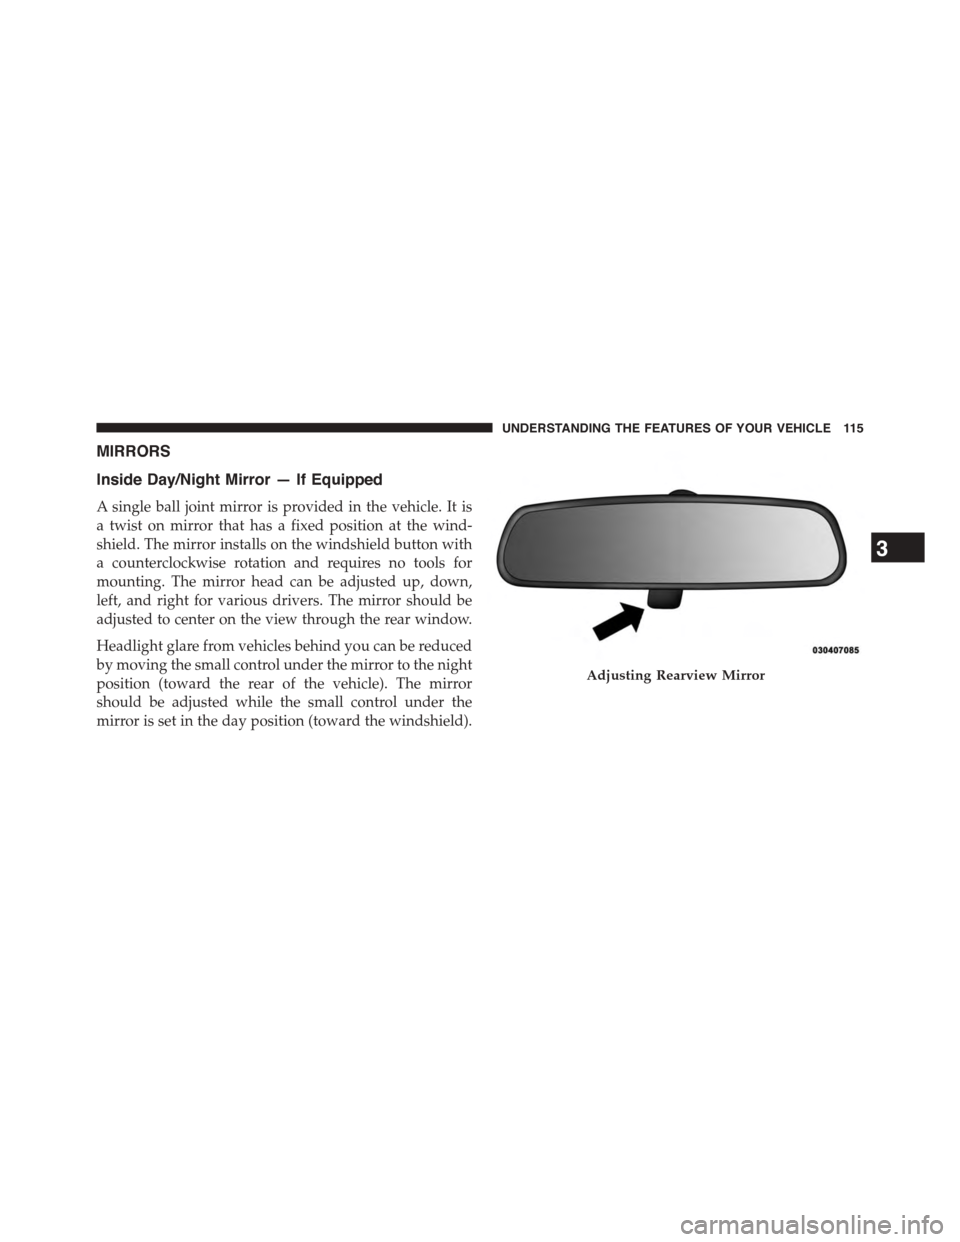
A single ball joint mirror is provided in the vehicle. It is
a twist on mirror that has a fixed position at the wind-
shield. The mirror installs on the windshield button with
a counterclockwise rotation and requires no tools for
mounting. The mirror head can be adjusted up, down,
left, and right for various drivers. The mirror should be
adjusted to center on the view through the rear window.
Headlight glare from vehicles behind you can be reduced
by moving the small control under the mirror to the night
position (toward the rear of the vehicle). The mirror
should be adjusted while the small control under the
mirror is set in the day position (toward the windshield).
Adjusting Rearview Mirror
3
UNDERSTANDING THE FEATURES OF YOUR VEHICLE 115
Page 125 of 648
phone and one audio device can be used with the system
at a time. The system is available in English, Spanish, or
French languages.
Uconnect® Phone Button
The Uconnect® PhoneButton is used to
enter the phone mode and make calls, show
recent, incoming, outgoing calls, view phone-
book etc., When you press the button you will
hear a BEEP. The beep is your signal to give a command.
Uconnect® Voice Command Button
The Uconnect® Voice CommandButton
is only used for “barge in” and when you are
already in a call and you want to send Tones
or make another call.
The Uconnect® Phone is fully integrated with the vehi-
cle’s audio system. The volume of the Uconnect® Phone
can be adjusted either from the radio volume control
knob or from the steering wheel radio control (right
switch), if so equipped.
Operation
Voice commands can be used to operate the Uconnect®
Phone and to navigate through the Uconnect® Phone
menu structure. Voice commands are required after most
Uconnect® Phone prompts. There are two general meth-
ods for how Voice Command works:
1.Say compound commands like “Call John Smith mobile.”
2. Say the individual commands and allow the system to
guide you to complete the task.
You will be prompted for a specific command and then
guided through the available options.
•Prior to giving a voice command, one must wait for the
beep, which follows the “Listen” prompt or another
prompt.
3
UNDERSTANDING THE FEATURES OF YOUR VEHICLE 123
Page 127 of 648
question to which the user can respond without pushing
the “Voice Command”button on your steering
wheel.
Voice Command Tree
Refer to “Voice Tree” in this section.
Help Command
If you need assistance at any prompt, or if you want to
know your options at any prompt, say “Help” following
the beep.
To activate the Uconnect® Phone from idle, simply push
thebutton on your steering wheel and say a
command or say “help.” All Uconnect® Phone ses-
sions begin with a push of thebutton on the radio
control head.
Cancel Command
At any prompt, after the beep, you can say “Cancel” and
you will be returned to the main menu.
You can also push theorbutton on your
steering wheel when the system is listening for a
command and be returned to the main or previous
menu.
Pair (Link) Uconnect® Phone To A Mobile Phone
To begin using your Uconnect® Phone, you must pair
your compatible Bluetooth® enabled mobile phone.
To complete the pairing process, you will need to refer-
ence your mobile phone Owner’s Manual. The
Uconnect® website may also provide detailed instruc-
tions for pairing.
3
UNDERSTANDING THE FEATURES OF YOUR VEHICLE 125
Page 133 of 648
NOTE:All of the above operations except Redial can be
done with one call or less active.
Dial By Saying A Number
1. Push thebutton to begin.
2. After the “Listening” prompt and the following beep,
say “Dial 248-555-1212.”
3. The Uconnect® Phone will dial 248-555-1212.
Call By Saying A Phonebook Name
1. Push the “Phone”button on your steering wheel
to begin.
2. After the “Listening” prompt and the following beep,
say “Call John Doe Mobile.”
3. The Uconnect® Phone will dial the number associated
with John Doe, or if there are multiple numbers it will
ask which number you want to call for John Doe.
Call Controls
The touchscreen allows you to control the following call
features:
•Answer
•End
•Ignore
•Hold/unhold
•Mute/unmute
•Transfer the call to/from the phone
•Swap two active calls
•Join two active calls together
3
UNDERSTANDING THE FEATURES OF YOUR VEHICLE 131
Page 141 of 648
Dialing Using The Mobile Phone Keypad
WARNING!
Driving while distracted can result in loss of vehicle
control, accident and injury. It is strongly recom-
mended that you use extreme caution when using
any device or feature that may take your focus off the
road or your hands off the steering wheel. Your
primary responsibility is the safe operation of your
vehicle. We recommend against the use of any hand-
held device while driving, encourage the use of
voice-operated systems when possible and that you
become aware of applicable laws that may affect the
use of electronic devices while driving.
You can dial a phone number with your mobile phone
keypad and still use the Uconnect® Phone (while dialing
via the mobile phone keypad, the user must exercise
caution and take precautionary safety measures). By
dialing a number with your connected Bluetooth® mo-
bile phone, the audio will be played through your
vehicle’s audio system. The Uconnect® Phone will work
the same as if you dial the number using voice a
command.
NOTE:Certain brands of mobile phones do not send the
dial ring to the Uconnect® Phone to play it on the vehicle
audio system, so you will not hear it. Under this situa-
tion, after successfully dialing a number the user may feel
that the call did not go through even though the call is in
progress. Once your call is answered, you will hear the
audio.
3
UNDERSTANDING THE FEATURES OF YOUR VEHICLE 139
Page 151 of 648
your vehicle is equipped. Please see the Uconnect®
Voice Command section for direction on how to use
thebutton.
The Uconnect® Phone is fully integrated with the ve-
hicles audio system. The volume of the Uconnect® Phone
can be adjusted either from the radio volume control
knob or from the steering wheel radio control (right
switch), if so equipped.
Operation
Voice commands can be used to operate the Uconnect®
Phone and to navigate through the Uconnect® Phone
menu structure. Voice commands are required after most
Uconnect® Phone prompts. There are two general meth-
ods for how Voice Command works:
1. Say compound commands like “Call John Smith mo-
bile.”
2. Say the individual commands and allow the system to
guide you to complete the task.
You will be prompted for a specific command and then
guided through the available options.
•Prior to giving a voice command, one must wait for the
beep, which follows the “Listen” prompt or another
prompt.
•For certain operations, compound commands can be
used. For example, instead of saying “Call” and then
“John Smith” and then “mobile”, the following com-
pound command can be said: “Call John Smith mo-
bile.”
•For each feature explanation in this section, only the
compound command form of the voice command is
given. You can also break the commands into parts and
say each part of the command when you are asked for
it. For example, you can use the compound command
3
UNDERSTANDING THE FEATURES OF YOUR VEHICLE 149
Page 153 of 648
Help Command
If you need assistance at any prompt, or if you want to
know your options at any prompt, say “Help” following
the beep.
To activate the Uconnect® Phone from idle, simply push
thebutton on your steering wheel and say a
command or say “help.” All Uconnect® Phone ses-
sions begin with a push of thebutton on the radio
control head.
Cancel Command
At any prompt, after the beep, you can say “Cancel” and
you will be returned to the main menu.
You can also push theorbutton on your
steering wheel when the system is listening for a
command and be returned to the main or previous
menu.
Pair (Link) Uconnect® Phone To A Mobile Phone
To begin using your Uconnect® Phone, you must pair
your compatible Bluetooth® enabled mobile phone.
NOTE:
•You must have Bluetooth® enabled on your mobile
phone to complete this procedure.
•The vehicle must be in PARK.
To complete the pairing process, you will need to refer-
ence your mobile phone Owner’s Manual. The
Uconnect® website may also provide detailed instruc-
tions for pairing.
1. Press the “Phone” button on the touchscreen to begin.
3
UNDERSTANDING THE FEATURES OF YOUR VEHICLE 151