keyless DODGE JOURNEY 2015 1.G Owner's Manual
[x] Cancel search | Manufacturer: DODGE, Model Year: 2015, Model line: JOURNEY, Model: DODGE JOURNEY 2015 1.GPages: 648
Page 44 of 648
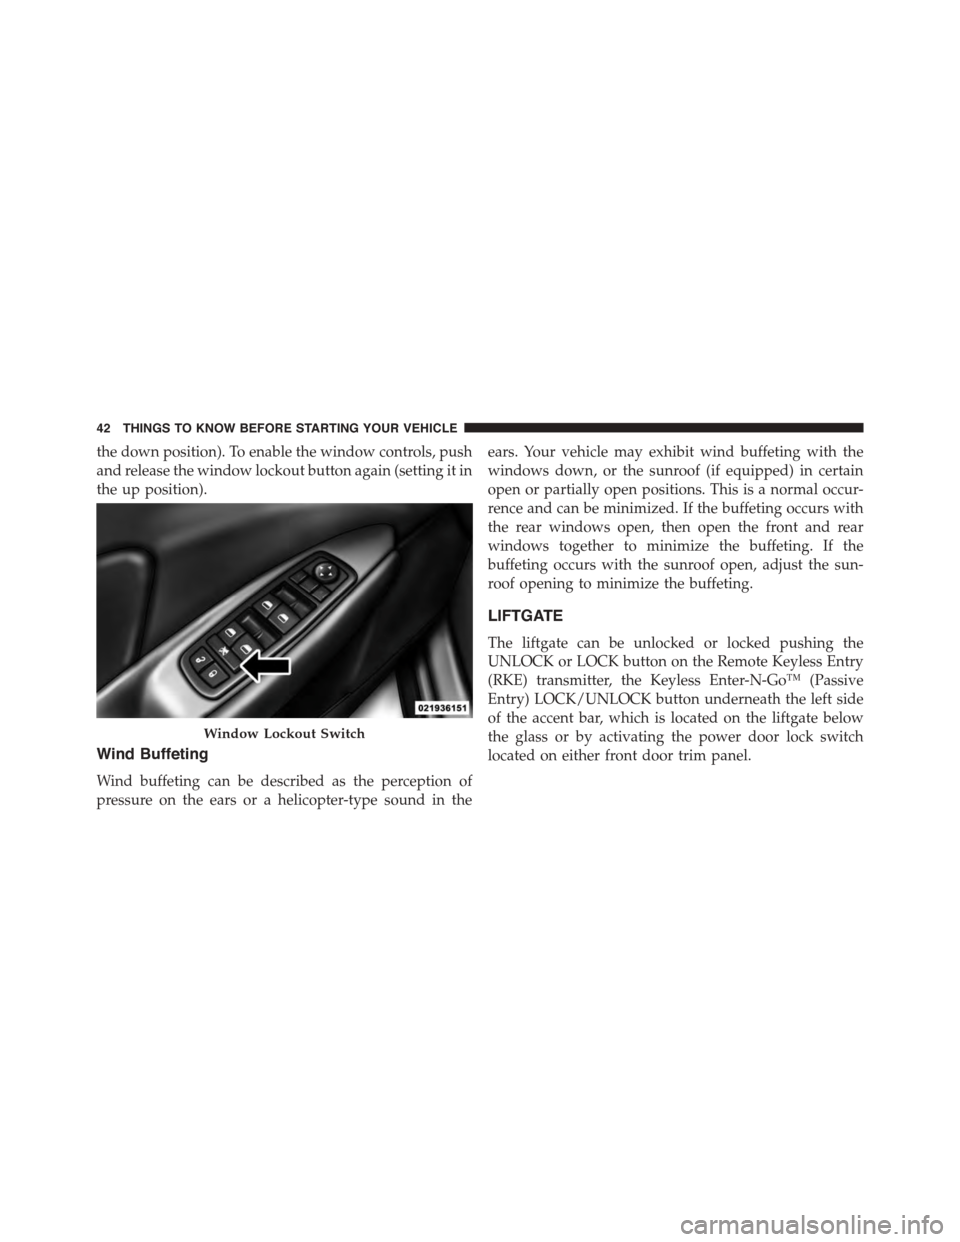
the down position). To enable the window controls, push
and release the window lockout button again (setting it in
the up position).
Wind Buffeting
Wind buffeting can be described as the perception of
pressure on the ears or a helicopter-type sound in the
ears. Your vehicle may exhibit wind buffeting with the
windows down, or the sunroof (if equipped) in certain
open or partially open positions. This is a normal occur-
rence and can be minimized. If the buffeting occurs with
the rear windows open, then open the front and rear
windows together to minimize the buffeting. If the
buffeting occurs with the sunroof open, adjust the sun-
roof opening to minimize the buffeting.
LIFTGATE
The liftgate can be unlocked or locked pushing the
UNLOCK or LOCK button on the Remote Keyless Entry
(RKE) transmitter, the Keyless Enter-N-Go™ (Passive
Entry) LOCK/UNLOCK button underneath the left side
of the accent bar, which is located on the liftgate below
the glass or by activating the power door lock switch
located on either front door trim panel.
Window Lockout Switch
42 THINGS TO KNOW BEFORE STARTING YOUR VEHICLE
Page 45 of 648
For further information on Keyless Enter-N-Go™ (Pas-
sive Entry), refer to “Keyless Enter-N-Go™” in “Things
To Know Before Starting Your Vehicle”.
NOTE:The liftgate cannot be unlocked or locked with
the manual door lock plungers on the door trim panels or
the door lock cylinder on the driver’s door.
To open the unlocked liftgate, squeeze the handle and
pull the liftgate toward you. Gas props will raise and
support the liftgate in the open position.
NOTE:
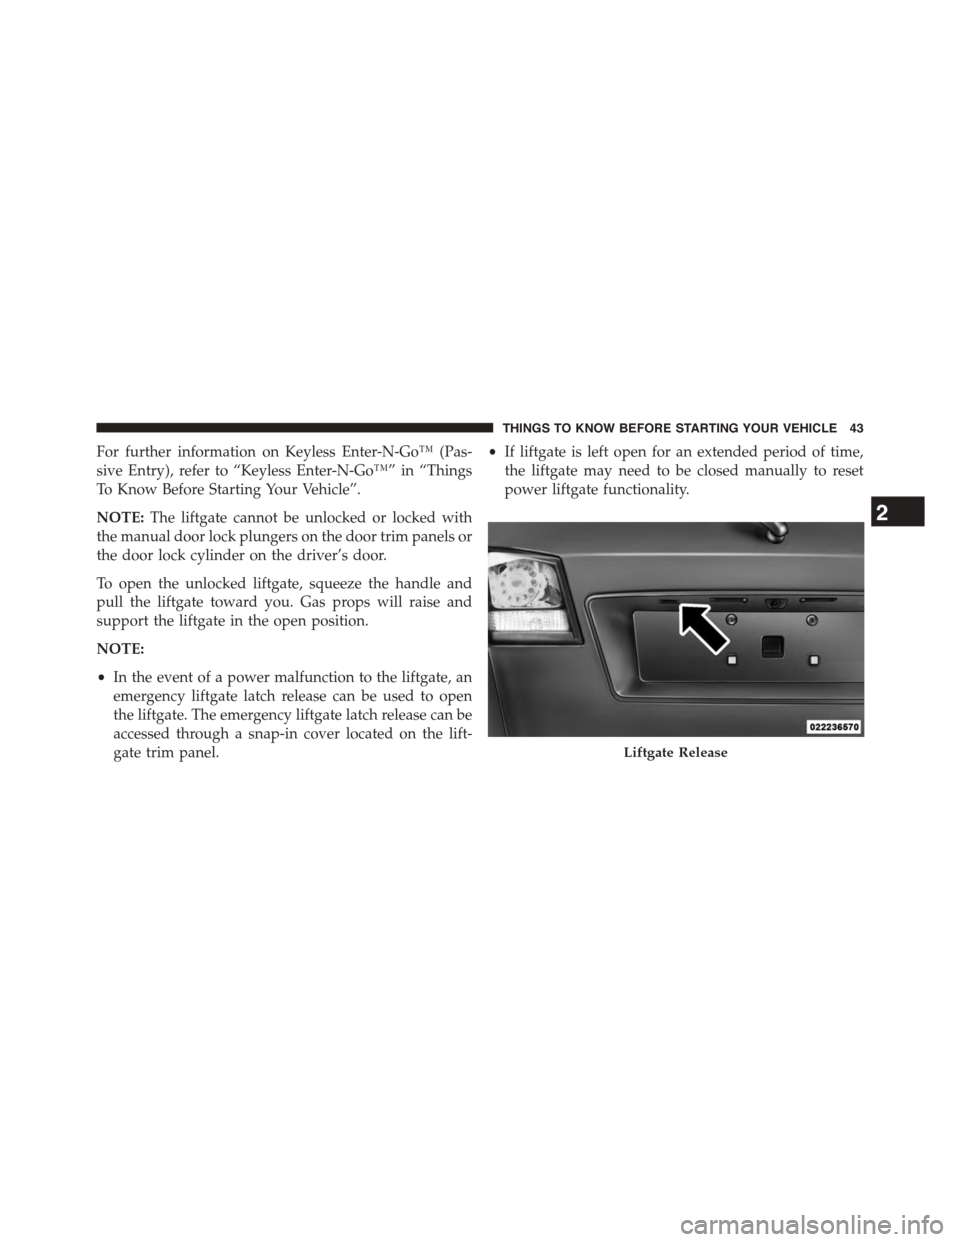
•In the event of a power malfunction to the liftgate, an
emergency liftgate latch release can be used to open
the liftgate. The emergency liftgate latch release can be
accessed through a snap-in cover located on the lift-
gate trim panel.
•If liftgate is left open for an extended period of time,
the liftgate may need to be closed manually to reset
power liftgate functionality.
Liftgate Release
2
THINGS TO KNOW BEFORE STARTING YOUR VEHICLE 43
Page 253 of 648
Courtesy/Reading Lights
The overhead console has two courtesy lights. The lights
turn on when a front door, a sliding door or the liftgate is
opened. If your vehicle is equipped with Remote Keyless
Entry (RKE) the lights will also turn on when the
UNLOCK button on the RKE transmitter is pressed. The
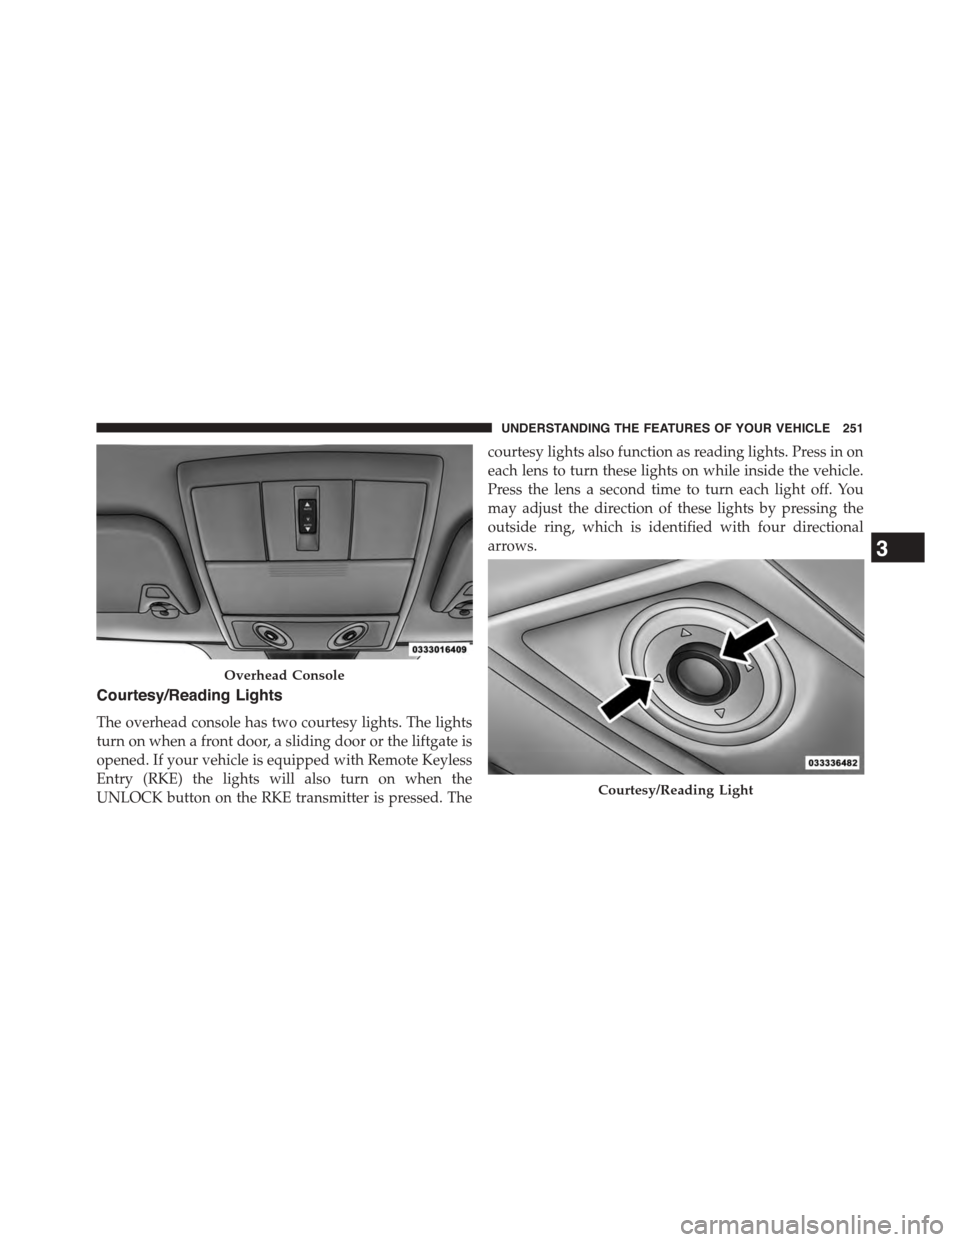
courtesy lights also function as reading lights. Press in on
each lens to turn these lights on while inside the vehicle.
Press the lens a second time to turn each light off. You
may adjust the direction of these lights by pressing the
outside ring, which is identified with four directional
arrows.
Overhead Console
Courtesy/Reading Light
3
UNDERSTANDING THE FEATURES OF YOUR VEHICLE 251
Page 266 of 648
WARNING!
•Never leave children unattended in a vehicle, or
with access to an unlocked vehicle. Never leave the
Key Fob in or near the vehicle, or in a location
accessible to children. Do not leave the ignition of
a vehicle equipped with Keyless Enter-N-Go™ in
the ACC or ON/RUN mode. Occupants, particu-
larly unattended children, can become entrapped
by the power sunroof while operating the power
sunroof switch. Such entrapment may result in
serious injury or death.
•In a collision, there is a greater risk of being thrown
from a vehicle with an open sunroof. You could
also be seriously injured or killed. Always fasten
your seat belt properly and make sure all passen-
gers are also properly secured.
(Continued)
WARNING!(Continued)
•Do not allow small children to operate the sunroof.
Never allow your fingers, other body parts, or any
object, to project through the sunroof opening.
Injury may result.
Opening Sunroof — Express
Press the switch rearward and release it within one-half
second. The sunroof and sunshade will open automati-
cally from any position. The sunroof and sunshade will
open fully and stop automatically. This is called “Express
Open”. During Express Open operation, any movement
of the sunroof switch will stop the sunroof.
Opening Sunroof — Manual Mode
To open the sunroof, press and hold the switch rearward
to full open. Any release of the switch will stop the
264 UNDERSTANDING THE FEATURES OF YOUR VEHICLE
Page 312 of 648
•Unstored Messages Until RUN
These messages deal primarily with the Remote Start
feature. This message type is displayed until the ignition
is in the RUN state. Examples of this message type are
#Remote Start Aborted - Door Ajar#and#Push Brake
Pedal and Push Button to Start#.
•Five Second Unstored Messages
When the appropriate conditions occur, this type of mes-
sage takes control of the main display area for five seconds
and then returns to the previous screen. Examples of this
message type are#Memory System Unavailable - Not in
Park#and#Automatic High Beams On#.
The Reconfigurable Telltales section is divided into the
white telltales area on the right, amber telltales in the
middle, and red telltales on the left.
When the appropriate conditions exist, the EVIC displays
the following messages:
•Remote start aborted — Door ajar
•Remote start aborted — Hood ajar
•Remote start aborted — L/Gate ajar
•Remote start aborted — Fuel low
•Remote start disabled — Start Vehicle to Reset
•Remote start active — Push Start Button
•Vehicle Not in Park
•Key Left Vehicle
•Key Not Detected
•Push Brake Pedal and Push Button to Start
•Service Keyless System
310 UNDERSTANDING YOUR INSTRUMENT PANEL
Page 327 of 648
Brake Control System” in “Starting And Operating” for
system function and operating information. To make
your selection, press the “Hill Start Assist” button on the
touchscreen and select “ON” or “OFF.” Then press the
back arrow button on the touchscreen.
Lights
•Illuminated Approach
Press the “Illuminated Approach” button on the touch-
screen to change this display. When this feature is se-
lected, the headlights will activate and remain on for 0,
30, 60, or 90 seconds when the doors are unlocked with
the Remote Keyless Entry (RKE) transmitter. To change
the Illuminated Approach status, press the “0,” “30,”
“60” or “90” button on the touchscreen. Then press the
back arrow button on the touchscreen.
•Headlights With Wipers
Press the “Headlights With Wipers” button on the touch-
screen to change this display. When this feature is se-
lected, and the headlight switch is in the AUTO position,
the headlights will turn on approximately 10 seconds
after the wipers are turned on. The headlights will also
turn off when the wipers are turned off if they were
turned on by this feature. To make your selection, press
the “Headlights With Wipers” button on the touchscreen
and select “ON” or “OFF.” Then press the back arrow
button on the touchscreen.
•Auto High Beams
Press the “Auto High Beams” button on the touchscreen
to change this display. When this feature is selected, the
high beam headlights will deactivate automatically un-
der certain conditions. To make your selection, press the
“Auto High Beams” button on the touchscreen and select
“ON” or “OFF.” Then press the back arrow button on the
4
UNDERSTANDING YOUR INSTRUMENT PANEL 325
Page 328 of 648
touchscreen. Refer to “Lights/SmartBeam™ — If
Equipped” in “Understanding The Features Of Your
Vehicle” for further information.
•Daytime Running Lights — If Available
Press the “Daytime Running Lights” button on the touch-
screen to change this display. When this feature is se-
lected, the headlights will turn on whenever the engine is
running. To make your selection, press the “Daytime
Running Lights” button on the touchscreen and select
“ON” or “OFF.” Then press the back arrow button on the
touchscreen.
•Steering Directed Lights — If Equipped
Press the “Steering Directed Lights” button on the touch-
screen to change this display. When this feature is se-
lected, the headlights turn relative to a change in direc-
tion of the steering wheel. To make your selection, press
the “Steering Directed Lights” button on the touchscreen
and select “ON” or ‘OFF.” Then press the back arrow
button on the touchscreen.
•Flash Lamps With Lock
Press the “Flash Lamps With Lock” button on the touch-
screen to change this display. When this feature is se-
lected, the exterior lights will flash when the doors are
locked with the Remote Keyless Entry (RKE) transmitter.
This feature may be selected with or without the sound
horn on lock feature selected. To make your selection,
press the “Flash Lamps With Lock” button on the touch-
screen and select “ON” or “OFF.” Then press the back
arrow button on the touchscreen.
326 UNDERSTANDING YOUR INSTRUMENT PANEL
Page 329 of 648
Doors & Locks
•Auto Unlock On Exit
Press the “Auto Unlock On Exit” button on the touch-
screen to change this display. When this feature is se-
lected, all doors will unlock when the vehicle is stopped
and the transmission is in the PARK or NEUTRAL
position and the driver’s door is opened. To make your
selection, press the “Auto Unlock On Exit” button on the
touchscreen and select “ON” or “OFF.” Then press the
back arrow button on the touchscreen.
•Auto Lock
When this feature is selected, all doors will lock auto-
matically when the vehicle reaches a speed of 15 mph
(24 km/h). To make your selection, press the “Auto
Lock” button on the touchscreen, until a check-mark
appears next to setting, indicating that the setting has
been selected. Press the back arrow button on the touch-
screen to return to the previous menu.
•Flash Lamps With Lock
Press the “Flash Lamps With Lock” button on the touch-
screen to change this display. When this feature is se-
lected, the exterior lamps will flash when the doors are
locked or unlocked with the Remote Keyless Entry (RKE)
transmitter. To make your selection, press the “Flash
Lights With Lock” button on the touchscreen and select
“ON” or “OFF.” Then press the back arrow button on the
touchscreen.
•Sound Horn With Remote Start
Press the “Sound Horn With Remote Start” button on the
touchscreen to change this display. When this feature is
selected, the horn will sound when the remote start is
activated. To make your selection, press the “Sound Horn
With Remote Start” button on the touchscreen and select
“ON” or “OFF.” Then press the back arrow button on the
touchscreen.
4
UNDERSTANDING YOUR INSTRUMENT PANEL 327
Page 330 of 648
•Sounds Horn With Lock
Press the “Sounds Horn With Lock” button on the
touchscreen to change this display. When this feature is
selected, the horn will chirp when the doors are locked or
unlocked with the Remote Keyless Entry (RKE) transmit-
ter. To make your selection, press the “Sounds Horn With
Lock” button on the touchscreen and select “ON” or
“OFF.” Then press the back arrow button on the touch-
screen.
•Remote Door Unlock Order
Press the “Remote Door Unlock Order” button on the
touchscreen to change this display. When Unlock Driver
Door Only On 1st Press is selected, only the driver’s door
will unlock on the first press of the Remote Keyless Entry
(RKE) transmitter UNLOCK button. When Unlock
Driver Door Only On 1st Press is selected, you must press
the RKE transmitter UNLOCK button twice to unlock the
passenger’s doors. When Unlock All Doors On 1st Press
is selected, all of the doors will unlock on the first press
of the RKE transmitter UNLOCK button.
NOTE:If the vehicle is equipped with Keyless Enter-N-
Go™ (Passive Entry) and the EVIC is programmed to
Unlock All Doors On 1st Press, all doors will unlock no
matter which Passive Entry equipped door handle is
grasped. If Unlock Driver Door Only On 1st Press is
programmed, only the driver ’s door will unlock when
the driver ’s door is grasped. With Passive Entry, if
Unlock Driver Door Only On 1st Press is programmed,
pressing the handle more than once will only result in the
driver ’s door opening. If Unlock Driver Door Only On
1st Press is selected, once the driver door is opened, the
interior door lock/unlock switch can be used to unlock
all the doors (or use the RKE transmitter).
328 UNDERSTANDING YOUR INSTRUMENT PANEL
Page 331 of 648
•Passive Entry (Keyless Enter-N-Go™)
Press the “Passive Entry” button on the touchscreen to
change this display. This feature allows you to lock and
unlock the vehicle’s door(s) without having to press the
RKE transmitter lock or unlock buttons. To make your
selection, press the “Passive Entry” button on the touch-
screen and select “ON” or “OFF.” Then press the back
arrow button on the touchscreen. Refer to “Keyless
Enter-N-Go™” in “Things To Know Before Starting Your
Vehicle”.
Auto-On Comfort & Remote Start
•Auto On Heated Seats — If Equipped
Press the “Auto On Heated Seats” button on the touch-
screen to change this display. When the temperatures are
below 40° F (4.4° C) the Driver ’s heated seat will turn on.
To make your selection, press the “Auto On Heated
Seats” button on the touchscreen and select “ON” or
“OFF.” Then press the back arrow button on the touch-
screen.
Engine Off Options
•Headlight Off Delay
Press the “Headlight Off Delay” button on the touch-
screen to change this display. When this feature is se-
lected, the driver can choose to have the headlights
remain on for 0, 30, 60, or 90 seconds when exiting the
vehicle. To change the Headlight Off Delay status, press
the “0,” “30,” “60” or “90” button on the touchscreen.
Then press the back arrow button on the touchscreen.
•Engine Off Power Delay
Press the “Engine Off Power Delay” button on the
touchscreen to change this display. When this feature is
selected, the power window switches, radio, Uconnect®
phone system (if equipped), DVD video system (if
4
UNDERSTANDING YOUR INSTRUMENT PANEL 329