automatic DODGE JOURNEY 2015 1.G Owner's Manual
[x] Cancel search | Manufacturer: DODGE, Model Year: 2015, Model line: JOURNEY, Model: DODGE JOURNEY 2015 1.GPages: 140, PDF Size: 23.09 MB
Page 43 of 140
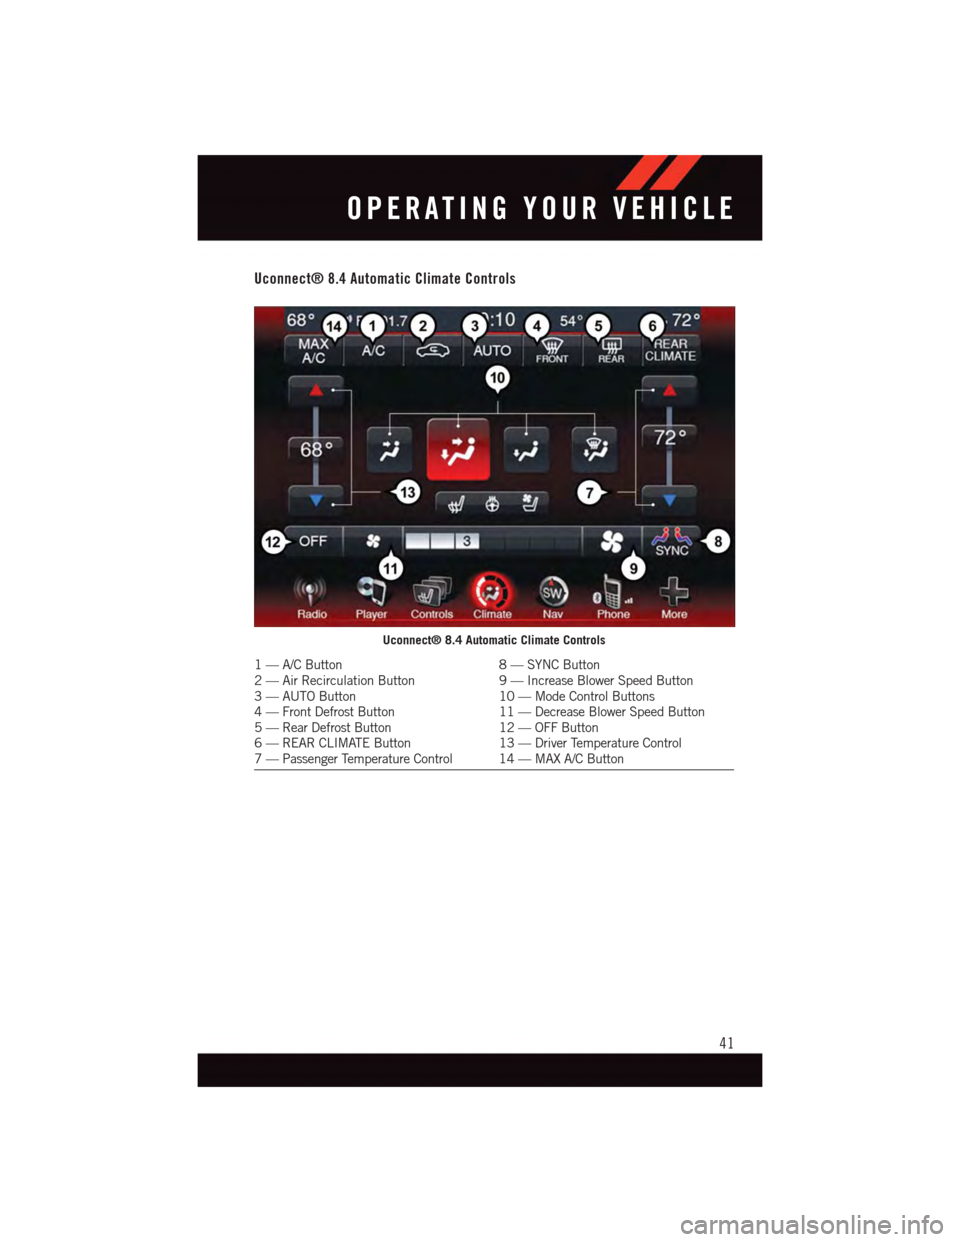
Uconnect® 8.4 Automatic Climate Controls
Uconnect® 8.4 Automatic Climate Controls
1—A/CButton8—SYNCButton2—AirRecirculationButton9—IncreaseBlowerSpeedButton3—AUTOButton10 — Mode Control Buttons4—FrontDefrostButton11 — Decrease Blower Speed Button5—RearDefrostButton12 — OFF Button6—REARCLIMATEButton13 — Driver Temperature Control7—PassengerTemperatureControl 14—MAXA/CButton
OPERATING YOUR VEHICLE
41
Page 44 of 140
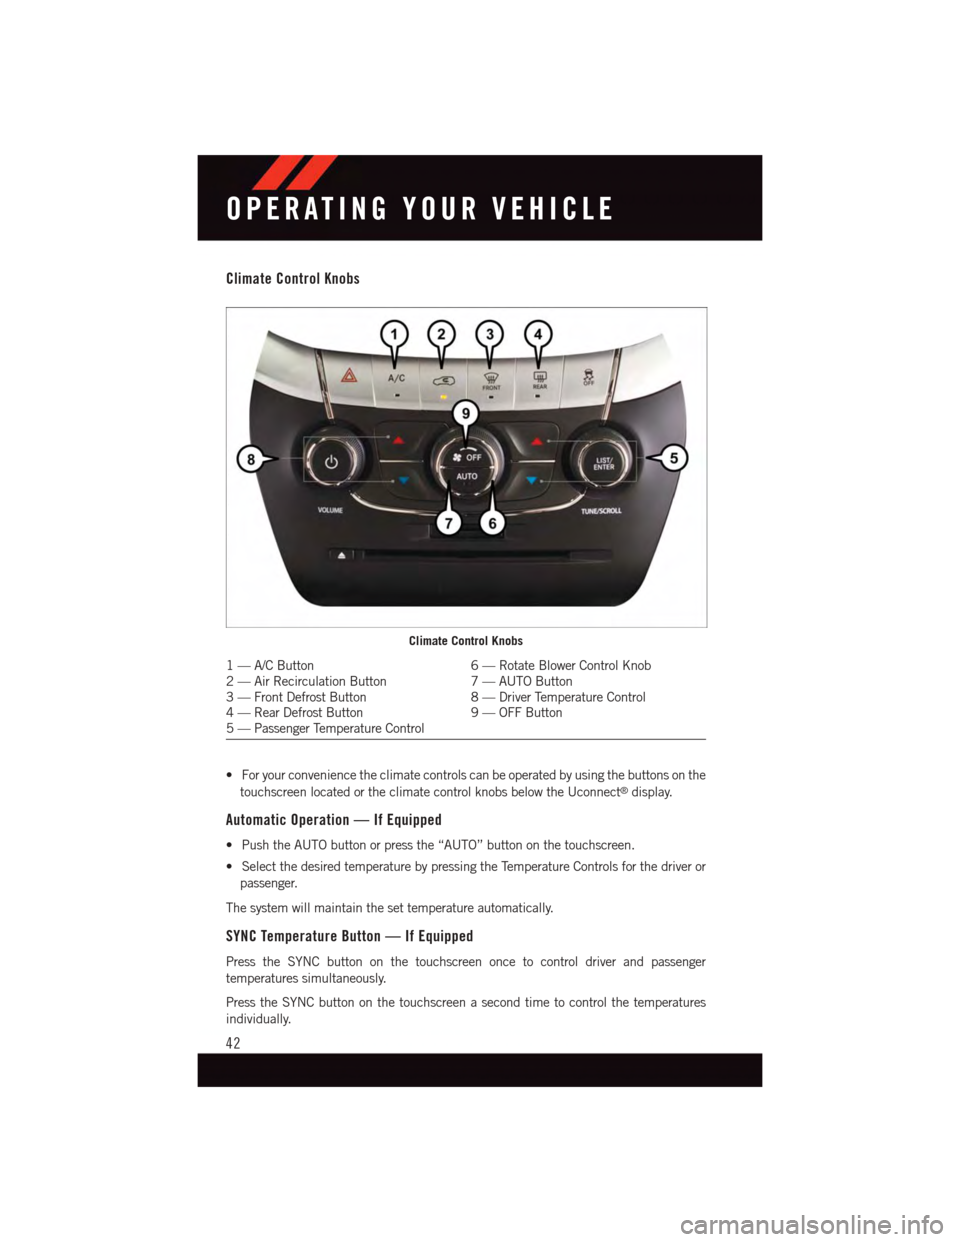
Climate Control Knobs
•Foryourconveniencetheclimatecontrolscanbeoperatedbyusingthebuttonsonthe
touchscreen located or the climate control knobs below the Uconnect®display.
Automatic Operation — If Equipped
•PushtheAUTObuttonorpressthe“AUTO”buttononthetouchscreen.
•SelectthedesiredtemperaturebypressingtheTemperatureControlsforthedriveror
passenger.
The system will maintain the set temperature automatically.
SYNC Temperature Button — If Equipped
Press the SYNC button on the touchscreen once to control driver and passenger
temperatures simultaneously.
Press the SYNC button on the touchscreen a second time to control the temperatures
individually.
Climate Control Knobs
1—A/CButton6—RotateBlowerControlKnob2—AirRecirculationButton7—AUTOButton3—FrontDefrostButton8—DriverTemperatureControl4—RearDefrostButton9—OFFButton5—PassengerTemperatureControl
OPERATING YOUR VEHICLE
42
Page 45 of 140
Air Recirculation
•UserecirculationformaximumA/Coperation.
•Forwindowdefogging,turntherecirculationbuttonoff.
•IftheRecirculationbuttononthefaceplateispushedwhileintheAUTOmode,the
indicator light may flash three times to indicate the cabin air is being controlled
automatically. The “Recirculation” button on the touchscreen will be greyed out in
these conditions.
Heated Mirrors
The mirrors are heated to melt frost or ice. This feature is activated whenever you turn on
the rear window defroster.
PARKVIEW® REAR BACK-UP CAMERA
Yo u c a n s e e a n o n - s c r e e n i m a g e o f t h e r e a r o f y o u r v e h i c l e w h e n e v e r t h e s h i f t l e v e r i s p u t
into REVERSE. The ParkView®Rear Back-Up Camera image will be displayed on the radio
display screen, located on the center stack of the instrument panel.
If the radio display screen appears foggy, clean the camera lens located on the liftgate.
Refer to your Owner's Manual on the DVD for further details.
WARNING!
Drivers must be careful when backing up; even when using the ParkView®Rear
Back-Up Camera. Always check carefully behind your vehicle, and be sure to check for
pedestrians, animals, other vehicles, obstructions, or blind spots before backing up.
Yo u m u s t c o n t i n u e t o p a y a t t e n t i o n w h i l e b a c k i n g u p . F a i l u r e t o d o s o c a n r e s u l t i n
serious injury or death.
OPERATING YOUR VEHICLE
43
Page 46 of 140
POWER SUNROOF
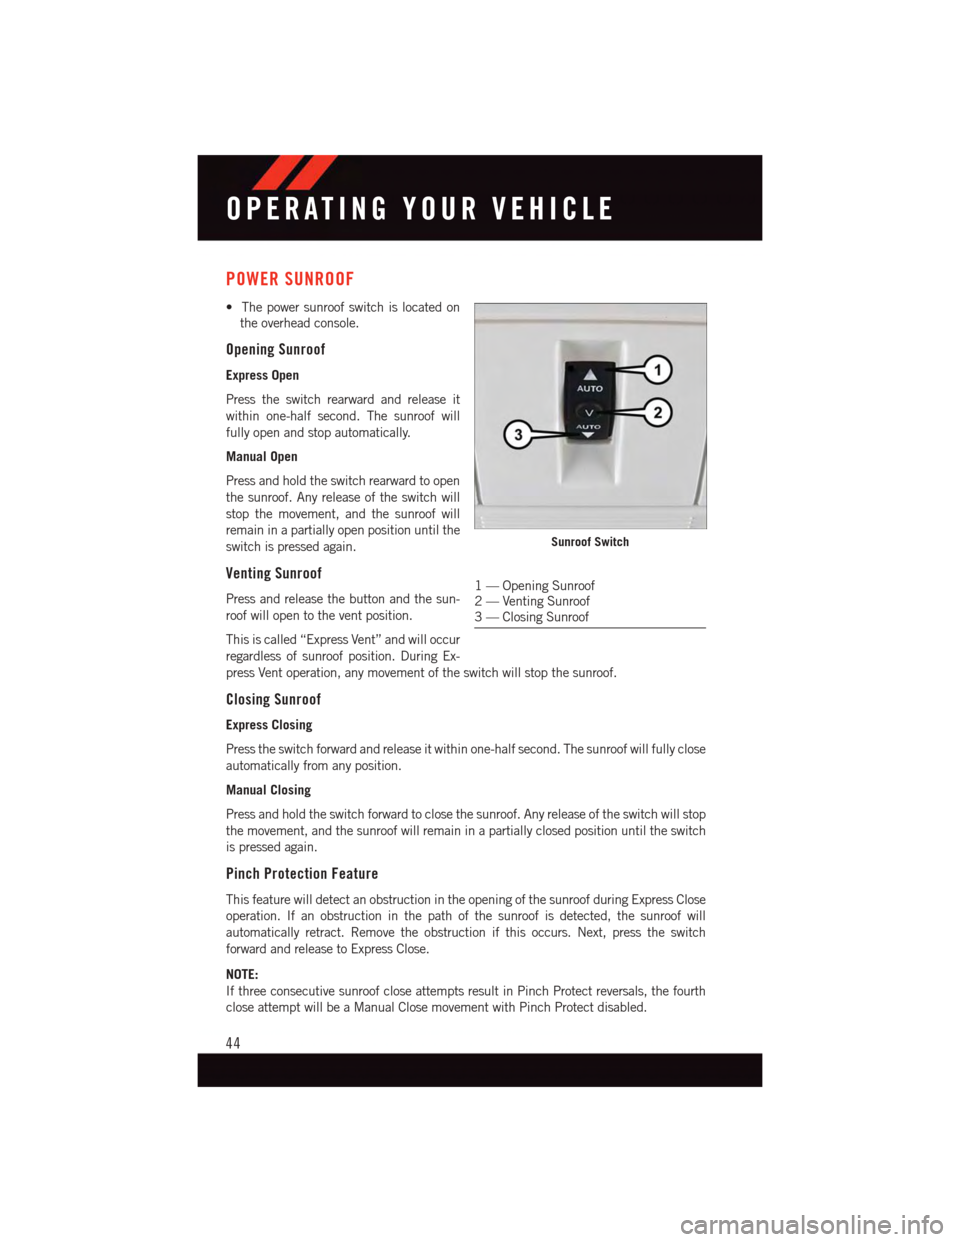
•Thepowersunroofswitchislocatedon
the overhead console.
Opening Sunroof
Express Open
Press the switch rearward and release it
within one-half second. The sunroof will
fully open and stop automatically.
Manual Open
Press and hold the switch rearward to open
the sunroof. Any release of the switch will
stop the movement, and the sunroof will
remain in a partially open position until the
switch is pressed again.
Venting Sunroof
Press and release the button and the sun-
roof will open to the vent position.
This is called “Express Vent” and will occur
regardless of sunroof position. During Ex-
press Vent operation, any movement of the switch will stop the sunroof.
Closing Sunroof
Express Closing
Press the switch forward and release it within one-half second. The sunroof will fully close
automatically from any position.
Manual Closing
Press and hold the switch forward to close the sunroof. Any release of the switch will stop
the movement, and the sunroof will remain in a partially closed position until the switch
is pressed again.
Pinch Protection Feature
This feature will detect an obstruction in the opening of the sunroof during Express Close
operation. If an obstruction in the path of the sunroof is detected, the sunroof will
automatically retract. Remove the obstruction if this occurs. Next, press the switch
forward and release to Express Close.
NOTE:
If three consecutive sunroof close attempts result in Pinch Protect reversals, the fourth
close attempt will be a Manual Close movement with Pinch Protect disabled.
Sunroof Switch
1—OpeningSunroof2—VentingSunroof3—ClosingSunroof
OPERATING YOUR VEHICLE
44
Page 54 of 140
Setting The Time
•Model8.4NsynchronizestimeautomaticallyviaGPS,soshouldnotrequireanytime
adjustment. If you do need to set the time manually, follow the instructions below for
Model 8.4.
•ForModel8.4,turntheuniton,thenpressthe“TimeDisplay”atthetopofthescreen.
Press “Yes”.
•Ifthetimeisnotdisplayedatthetopofthescreen,press“More”buttononthe
touchscreen and then “Settings” button on the touchscreen. In the Settings screen,
press the “Clock” button on the touchscreen, then check or uncheck this option.
•Press“+”or“–”nexttoSetTimeHoursandSetTimeMinutestoadjustthetime.
•Ifthesefeaturesarenotavailable,uncheckthe“Sync”withGPSbox.
•Press“X”tosaveyoursettingsandexitoutoftheClockSettingscreen.
Audio Settings
•Pressthe“Audio”buttononthetouchscreentoactivatetheAudiosettingsscreento
adjust Balance\Fade, Equalizer and Speed Adjusted Volume.
•YoucanreturntotheRadioscreenbypressingthe“X”locatedatthetopright.
Balance/Fade
•Pressthe“Balance/Fade”buttononthetouchscreentoBalanceaudiobetweenthe
front speakers or fade the audio between the rear and front speakers.
•Pressingthe“Front,”“Rear,””Left”or“Right”buttonsonthetouchscreenorpress
and drag the red Speaker Icon to adjust the Balance/Fade.
Equalizer
•Pressthe“Equalizer”buttononthetouchscreentoactivatetheEqualizerscreen.
•Pressthe“+”or“–”buttonsonthetouchscreen,orbypressinganddraggingoverthe
level bar for each of the equalizer bands. The level value, which spans between ±9, is
displayed at the bottom of each of the Bands.
Speed Adjusted Volume
•Pressthe“SpeedAdjustedVolume”buttononthetouchscreentoactivatetheSpeed
Adjusted Volume screen. The Speed Adjusted Volume is adjusted by pressing the “+”
and “–” buttons or by pressing and dragging over the level bar. This alters the automatic
adjustment of the audio volume with variation to vehicle speed.
ELECTRONICS
52
Page 58 of 140
Traffic & Weather (U.S. Residents/8.4 & 8.4N Only)
•AutomaticallytellsyouwhenTraffic&Weatherforafavoritecityisavailable,andgives
you the option to switch to that channel. Select Traffic & Weather then press “Jump” to
activate the feature. After listening to Traffic and Weather, press “Jump” again to return
to the previous channel.
Fav (8.4 & 8.4N Only)
•Activatesthefavoritesmenu.Youcanaddupto50favoriteartistsorsongs.Justpress
“Add Fav Artist” or “Add Fav Song” while the song is playing. You will then be alerted
any time one of these songs, or works by these artists, is playing on other SiriusXM
Satellite Radio channels.
SiriusXM Parental Controls
•Youcanskiporhidecertainchannelsfromviewifyoudonotwantaccesstothem.Push
the SETTINGS button on the faceplate (4.3S) or press the “More” button on the
touchscreen, then the “Settings” button on the touchscreen (8.4 & 8.4N), next press
the “SiriusXM Satellite Radio Setup” button on the touchscreen, then select “Channel
Skip.” Press the channel(s) to be skipped (4.3S) or press the box, check-mark, next to
the channel you want skipped (8.4 & 8.4N). They will not show up in normal usage.
•SiriusXMSatelliteRadioalsoofferstheoptiontopermanentlyblockselectedchannels.
Call 1-888-539-7474 and request the Family Package.
Browse
•LetsyoubrowsetheSiriusXMSatelliteRadiochannellisting,Favorites,Genres,Game
Zone, and Weather channels. Jump setting, and also provides the SiriusXM Satellite
Radio channel list. Browse contains many sub-menus.
BrowseSub-MenuSub-Menu Description
All Shows the channel listing.
GenreProvides a list of all genres, and lets you jump to a channel within the selectedgenre.
Presets (8.4 &8.4N Only)Lets you scroll the list of Preset satellite channels. Press the “Chan-nel”, or press “Enter” on the Tune knob, to go to that channel. Pressthe “Trash can” icon to delete a preset. Your presets are also shown atthe top of the main Satellite Radio screen.
FavoritesLets you manage artists and songs in the Favorites list and configure AlertSettings to let you know when favorite songs or artists are playing on otherchannels). Also, view a list of channels airing any of your Favorites.
Game Zone Provides alerts when your favorite sports teams are starting a gamewhich is being aired on other SiriusXM Satellite Radio channels, orwhen their game score is announced. You can select and manage yourTe a m s l i s t h e r e , a n d c o n f i g u r e a l e r t s .
Tr a f f i c / W e a t h e r(4.3S only)Lets you browse Traffic & Weather information by city.
Jump (8.4 &8.4N only)Lets you select your favorite cities for Traffic & Weather information, byselecting Traffic, then Jump feature on the main satellite radio screen.
ELECTRONICS
56
Page 60 of 140
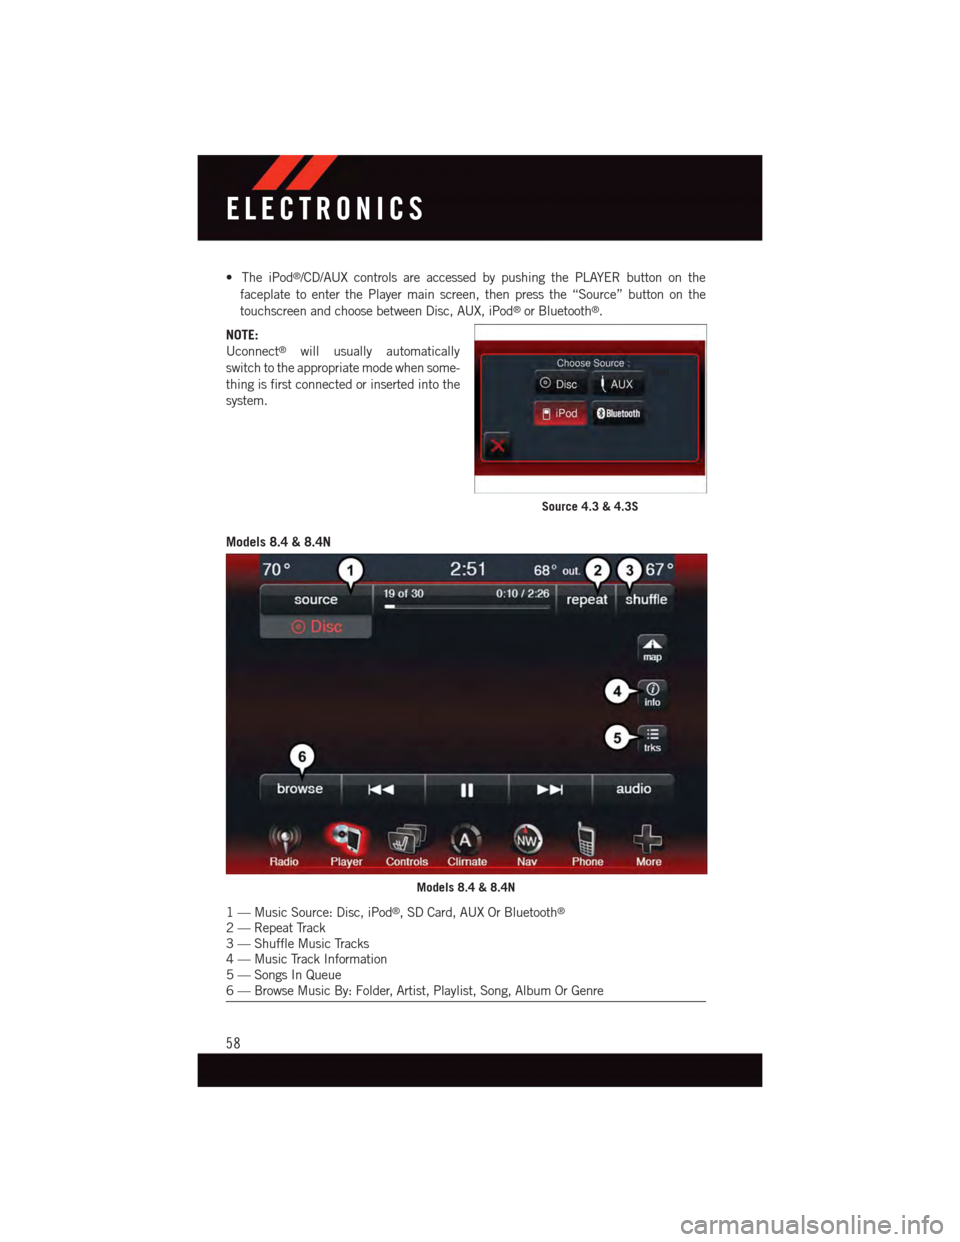
•TheiPod®/CD/AUX controls are accessed by pushing the PLAYER button on the
faceplate to enter the Player main screen, then press the “Source” button on the
touchscreen and choose between Disc, AUX, iPod®or Bluetooth®.
NOTE:
Uconnect®will usually automatically
switch to the appropriate mode when some-
thing is first connected or inserted into the
system.
Models 8.4 & 8.4N
Source 4.3 & 4.3S
Models 8.4 & 8.4N
1—MusicSource:Disc,iPod®,SDCard,AUXOrBluetooth®
2—RepeatTrack3—ShuffleMusicTracks4—MusicTrackInformation5—SongsInQueue6—BrowseMusicBy:Folder,Artist,Playlist,Song,AlbumOrGenre
ELECTRONICS
58
Page 61 of 140
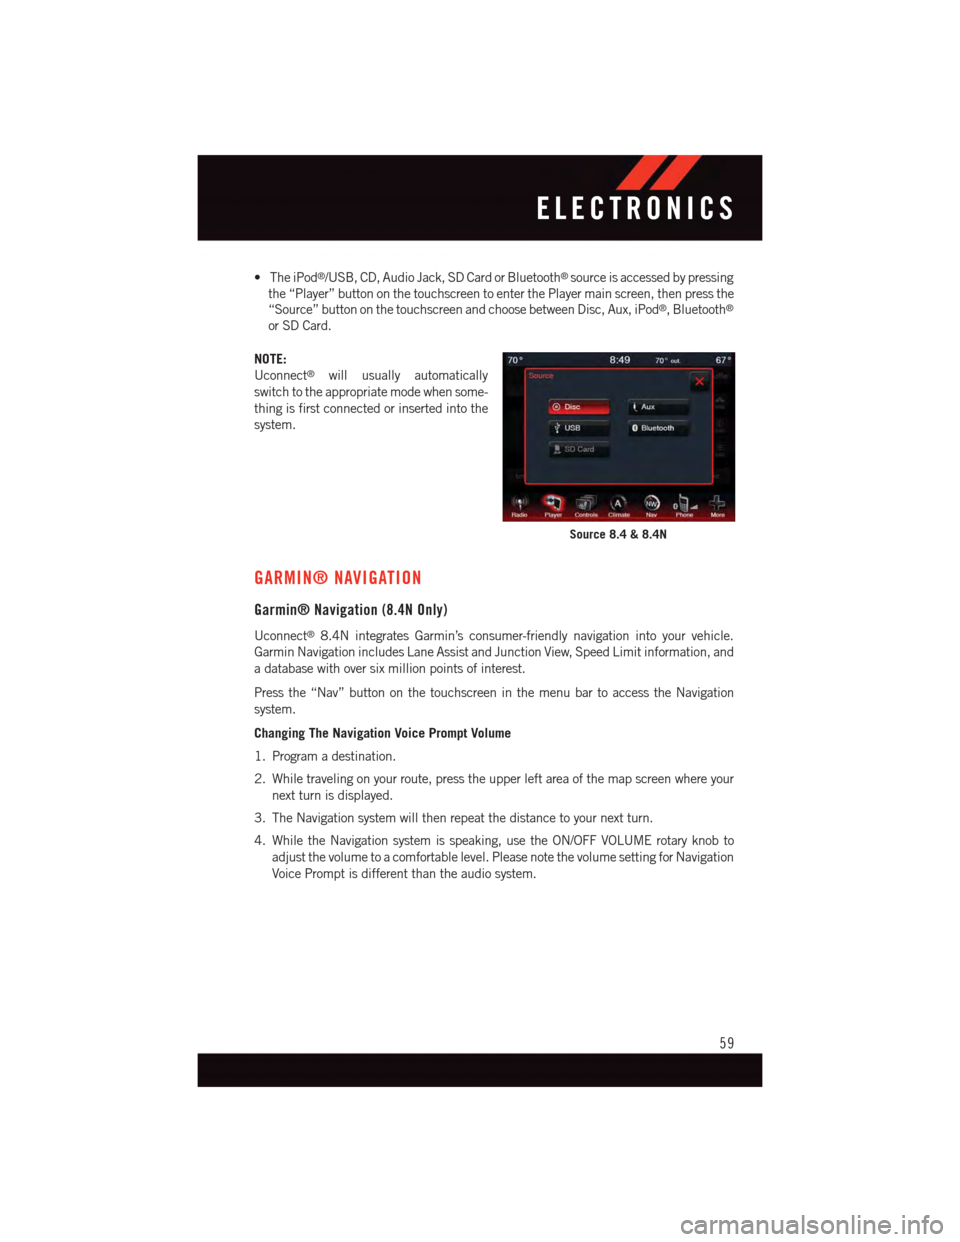
•TheiPod®/USB, CD, Audio Jack, SD Card or Bluetooth®source is accessed by pressing
the “Player” button on the touchscreen to enter the Player main screen, then press the
“Source” button on the touchscreen and choose between Disc, Aux, iPod®,Bluetooth®
or SD Card.
NOTE:
Uconnect®will usually automatically
switch to the appropriate mode when some-
thing is first connected or inserted into the
system.
GARMIN® NAVIGATION
Garmin® Navigation (8.4N Only)
Uconnect®8.4N integrates Garmin’s consumer-friendly navigation into your vehicle.
Garmin Navigation includes Lane Assist and Junction View, Speed Limit information, and
adatabasewithoversixmillionpointsofinterest.
Press the “Nav” button on the touchscreen in the menu bar to access the Navigation
system.
Changing The Navigation Voice Prompt Volume
1. Program a destination.
2. While traveling on your route, press the upper left area of the map screen where your
next turn is displayed.
3. The Navigation system will then repeat the distance to your next turn.
4. While the Navigation system is speaking, use the ON/OFF VOLUME rotary knob to
adjust the volume to a comfortable level. Please note the volume setting for Navigation
Voice Prompt is different than the audio system.
Source 8.4 & 8.4N
ELECTRONICS
59
Page 70 of 140
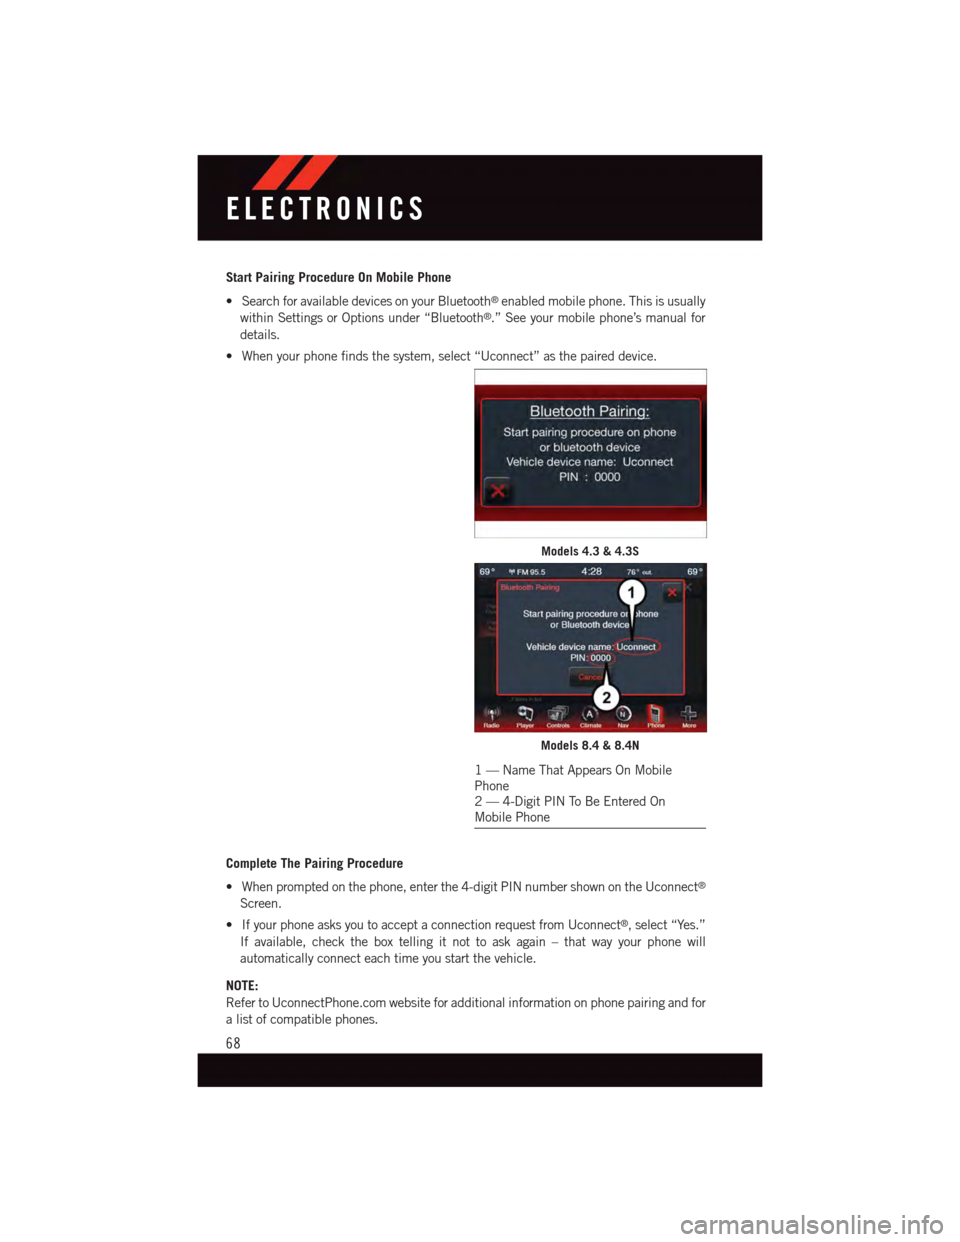
Start Pairing Procedure On Mobile Phone
•SearchforavailabledevicesonyourBluetooth®enabled mobile phone. This is usually
within Settings or Options under “Bluetooth®.” See your mobile phone’s manual for
details.
•Whenyourphonefindsthesystem,select“Uconnect”asthepaireddevice.
Complete The Pairing Procedure
•Whenpromptedonthephone,enterthe4-digitPINnumbershownontheUconnect®
Screen.
•IfyourphoneasksyoutoacceptaconnectionrequestfromUconnect®,select“Yes.”
If available, check the box telling it not to ask again – that way your phone will
automatically connect each time you start the vehicle.
NOTE:
Refer to UconnectPhone.com website for additional information on phone pairing and for
alistofcompatiblephones.
Models 4.3 & 4.3S
Models 8.4 & 8.4N
1—NameThatAppearsOnMobilePhone2—4-DigitPINToBeEnteredOnMobile Phone
ELECTRONICS
68
Page 73 of 140
Mute (Or Unmute) Microphone During Call
•Duringacall,pressthe“mute”buttononthetouchscreentomuteandunmutethe
call.
Transfer Ongoing Call Between Handset And Vehicle
During an on-going call, press the “Transfer” button on the touchscreen to transfer an
on-going call between handset and vehicle.
Common Phone Commands (Examples)
•“CallJohnSmith”
•“CallJohnSmithmobile”
•“Dial12485551212”
•“CallEmergency”
•“CallTowingAssistance”
•“Redial”
Phonebook
•Uconnect®radios will automatically download your phonebook from your paired
phone, if this feature is supported by your phone. Entries are updated each time that
the phone is connected. If your phone book entries do not appear, check the settings on
your phone. Some phones require you to enable this feature manually.
•Yourphonebookcanbebrowsedonyourradioscreen,buteditingcanonlybedoneon
your phone. To browse, press the “Phone” button on the touchscreen, then the
“Phonebook” button on the touchscreen.
•FavoritephonebookentriescanbesavedasFavoritesforquickeraccess.Favoritesare
shown at the top of your main phone screen.
Voice Command Tips (8.4 And 8.4N Only)
•Usingcompletenames(i.e;CallJohnDoevs.CallJohn)willresultingreatersystem
accuracy.
•Youcan“chain”commandstogetherforfasterresults.Say“CallJohnDoemobile,”for
example.
•Ifyouarelisteningtoavailablevoicecommandoptions,youdonothavetolistentothe
entire list. When you hear the command that you need, press thebutton on the
steering wheel, wait for the beep and say your command.
Changing The Volume
•StartadialoguebypressingthePhonebutton,thensayacommandforexample
-"Help."
•UsetheradioON/OFFVOLUMErotaryknobtoadjustthevolumetoacomfortablelevel
while the Uconnect®system is speaking. Please note the volume setting for Uconnect®
is different than the audio system.
ELECTRONICS
71