service DODGE JOURNEY 2015 1.G Owner's Manual
[x] Cancel search | Manufacturer: DODGE, Model Year: 2015, Model line: JOURNEY, Model: DODGE JOURNEY 2015 1.GPages: 140, PDF Size: 23.09 MB
Page 100 of 140
12. To stow the winch cable and retainer, fit the assembled jack-handle over the winch
drive nut. Rotate the jack-handle assembly clockwise until you hear the winch
mechanism click three times. It cannot be over tightened.
13. Stow the jack-handle and jack.
14. Check the tire pressure as soon as possible. Adjust the tire pressure as required.
Road Tire Installation
Vehicles Equipped With Wheel Covers
1. Mount the road tire on the axle.
2. To ease the installation process for steel wheels with wheel covers, install two lug nuts
on the mounting studs which are on each side of the valve stem. Install the lug nuts
with the cone shaped end of the nut toward the wheel. Lightly tighten the lug nuts.
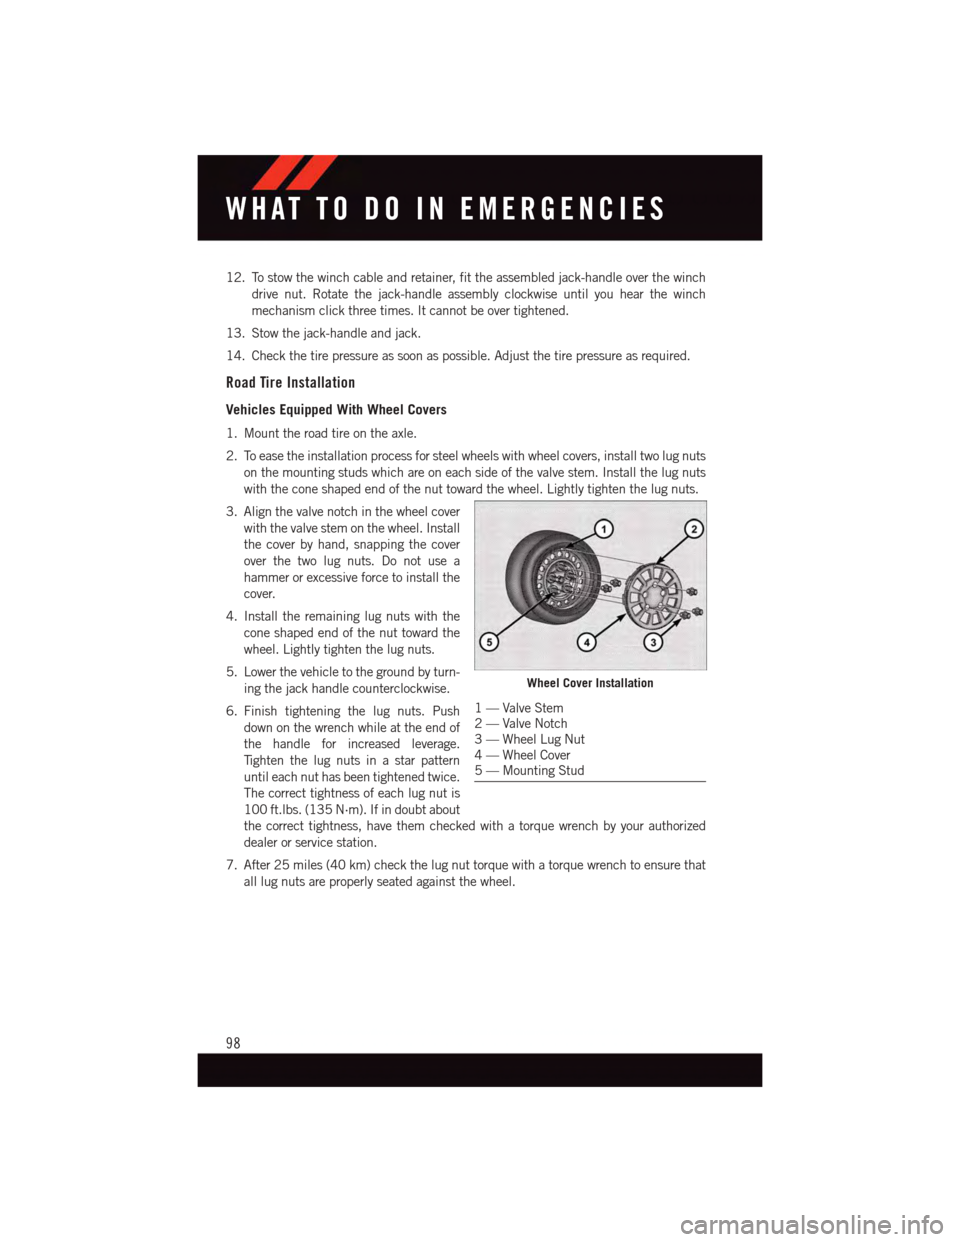
3. Align the valve notch in the wheel cover
with the valve stem on the wheel. Install
the cover by hand, snapping the cover
over the two lug nuts. Do not use a
hammer or excessive force to install the
cover.
4. Install the remaining lug nuts with the
cone shaped end of the nut toward the
wheel. Lightly tighten the lug nuts.
5. Lower the vehicle to the ground by turn-
ing the jack handle counterclockwise.
6. Finish tightening the lug nuts. Push
down on the wrench while at the end of
the handle for increased leverage.
Ti g h t e n t h e l u g n u t s i n a s t a r p a t t e r n
until each nut has been tightened twice.
The correct tightness of each lug nut is
100 ft.lbs. (135 N·m). If in doubt about
the correct tightness, have them checked with a torque wrench by your authorized
dealer or service station.
7. After 25 miles (40 km) check the lug nut torque with a torque wrench to ensure that
all lug nuts are properly seated against the wheel.
Wheel Cover Installation
1—ValveStem2—ValveNotch3—WheelLugNut4—WheelCover5—MountingStud
WHAT TO DO IN EMERGENCIES
98
Page 101 of 140
Vehicles Without Wheel Covers
1. Mount the road tire on the axle.
2. Install the remaining lug nuts with the cone shaped end of the nut toward the wheel.
Lightly tighten the lug nuts.
3. Lower the vehicle to the ground by turning the jack handle counterclockwise.
4. Finish tightening the lug nuts. Push down on the wrench while at the end of the handle
for increased leverage. Tighten the lug nuts in a star pattern until each nut has been
tightened twice. The correct tightness of each lug nut is 100 ft.lbs. (135 N·m). If in
doubt about the correct tightness, have them checked with a torque wrench by your
authorized dealer or service station.
5. After 25 miles (40 km) check the lug nut torque with a torque wrench to ensure that
all lug nuts are properly seated against the wheel.
CAUTION!
•Thewinchmechanismisdesignedforusewiththejack-handleonly.Useofanair
wrench or other power tools is not recommended and they can damage the winch.•Donotattempttoraisethevehiclebyjackingonlocationsotherthanthose
indicated in the Jacking Instructions for this vehicle.
•Besuretomountthesparetirewiththevalvestemfacingoutward.Thevehicle
could be damaged if the spare tire is mounted incorrectly.
WHAT TO DO IN EMERGENCIES
99
Page 102 of 140
WARNING!
•Donotattempttochangeatireonthesideofthevehicleclosetomovingtraffic.
Pull far enough off the road to avoid the danger of being hit when operating the jack
or changing the wheel.
•Beingunderajacked-upvehicleisdangerous.Thevehiclecouldslipoffthejack
and fall on you. You could be crushed. Never put any part of your body under a
vehicle that is on a jack. If you need to get under a raised vehicle, take it to an
authorized service center where it can be raised on a lift.
•Neverstartorruntheenginewhilethevehicleisonajack.
•Thejackisdesignedtobeusedasatoolforchangingtiresonly.Thejackshouldnot
be used to lift the vehicle for service purposes. The vehicle should be jacked on a
firm level surface only. Avoid ice or slippery areas.
•Carefullyfollowthesetirechangingwarningstohelppreventpersonalinjuryor
damage to your vehicle:
•Alwaysparkonafirm,levelsurfaceasfarfromtheedgeoftheroadwayaspossible
before raising the vehicle.
•TurnontheHazardWarningflasher.
•Blockthewheeldiagonallyoppositethewheeltoberaised.
•SettheparkingbrakefirmlyandsetanautomatictransmissioninPARK.
•Donotletanyonesitinthevehiclewhenitisonajack.
•Donotgetunderthevehiclewhenitisonajack.
•Onlyusethejackinthepositionsindicatedandforliftingthisvehicleduringatire
change.
•Ifworkingonorneararoadway,beextremelycarefulofmotortraffic.
•Toassurethatsparetires,flatorinflated,aresecurelystowed,sparesmustbe
stowed with the valve stem facing the ground.
•Raisingthevehiclehigherthannecessarycanmakethevehiclelessstable.Itcould
slip off the jack and hurt someone near it. Raise the vehicle only enough to remove
the tire.
•Toavoidpossiblepersonalinjury,handlethewheelcoverswithcaretoavoidcontact
with any sharp edges.
•Toavoidtheriskofforcingthevehicleoffthejack,donottightenthewheelnuts
fully until the vehicle has been lowered. Failure to follow this warning may result in
personal injury.
•Aloosetireorjack,thrownforwardinacollisionorhardstopcouldendangerthe
occupants of the vehicle. Always stow the jack parts and the spare tire in the places
provided. Have the deflated (flat) tire repaired or replaced immediately.
WHAT TO DO IN EMERGENCIES
100
Page 116 of 140
Chassis
ComponentFluid, Lubricant, or Genuine Part
Automatic Transmission
Use only ATF+4®Automatic TransmissionFluid.Failure to use ATF+4®fluid may affect thefunction or performance of your transmis-sion.We recommend MOPAR®AT F + 4®fluid.
Power Transfer Unit (PTU)We recommend you use MOPAR®GearLubricant 75W-90.
Rear Drive Assembly (RDA)We recommend you use MOPAR®GearLubricant 75W-90.
Brake Master CylinderWe recommend you use MOPAR®DOT 3,SAE J1703. If DOT 3 brake fluid is notavailable, then DOT 4 is acceptable.
Power Steering ReservoirWe recommend you use MOPAR®PowerSteering Fluid + 4, or MOPAR®AT F + 4®
Automatic Transmission Fluid.
MAINTENANCE PROCEDURES
For information on the maintenance procedures for your vehicle, please refer to “Main-
tenance Procedures” in “Maintaining Your Vehicle” in your Owner’s Manual or applicable
supplement on the DVD for further details.
MAINTENANCE SCHEDULE
Yo u r v e h i c l e i s e q u i p p e d w i t h a n a u t o m a t i c o i l c h a n g e i n d i c a t o r s y s t e m . T h e o i l c h a n g e
indicator system will remind you that it is time to take your vehicle in for scheduled
maintenance.
Based on engine operation conditions, the oil change indicator message will illuminate.
This means that service is required for your vehicle. Operating conditions such as frequent
short-trips, trailer tow, extremely hot or cold ambient temperatures, and E85 fuel usage
will influence when the “Change Oil” or “Oil Change Required” message is displayed.
Severe Operating Conditions can cause the change oil message to illuminate as early as
3,500 miles (5,600 km) since last reset. Have your vehicle serviced as soon as possible,
within the next 500 miles (805 km).
On Electronic Vehicle Information Center (EVIC) equipped vehicles, “Oil Change Re-
quired” will be displayed in the EVIC and a single chime will sound, indicating that an oil
change is necessary.
On Non-EVIC equipped vehicles, “Change Oil” will flash in the instrument cluster
odometer and a single chime will sound, indicating that an oil change is necessary.
MAINTAINING YOUR VEHICLE
114
Page 119 of 140

Mileage or time passed(whichever comes first)
20,000
30,000
40,000
50,000
60,000
70,000
80,000
90,000
100,000
110,000
120,000
130,000
140,000
150,000
Or Years: 2 3 4 5 6 7 8 9 10 11 12 13 14 15
Or Kilometers:
32,000
48,000
64,000
80,000
96,000
112,000
128,000
144,000
160,000
176,000
192,000
208,000
224,000
240,000
Replace rear drive assembly (RDA) fluid.
X
X
Replace power transfer unit (PTU) fluid.
X
X
Inspect and replace PCV valve if necessary.
X
** The spark plug change interval is mileage based only, yearly intervals do not apply.
WARNING!
•Youcanbebadlyinjuredworkingonoraroundamotorvehicle.Doonlyserviceworkforwhichyouhavetheknowledgeandtheright
equipment. If you have any doubt about your ability to perform a service job, take your vehicle to a competent mechanic.
•Failuretoproperlyinspectandmaintainyourvehiclecouldresultinacomponentmalfunctionandeffectvehiclehandlingand
performance. This could cause an accident.
MAINTAINING YOUR VEHICLE
117
Page 120 of 140
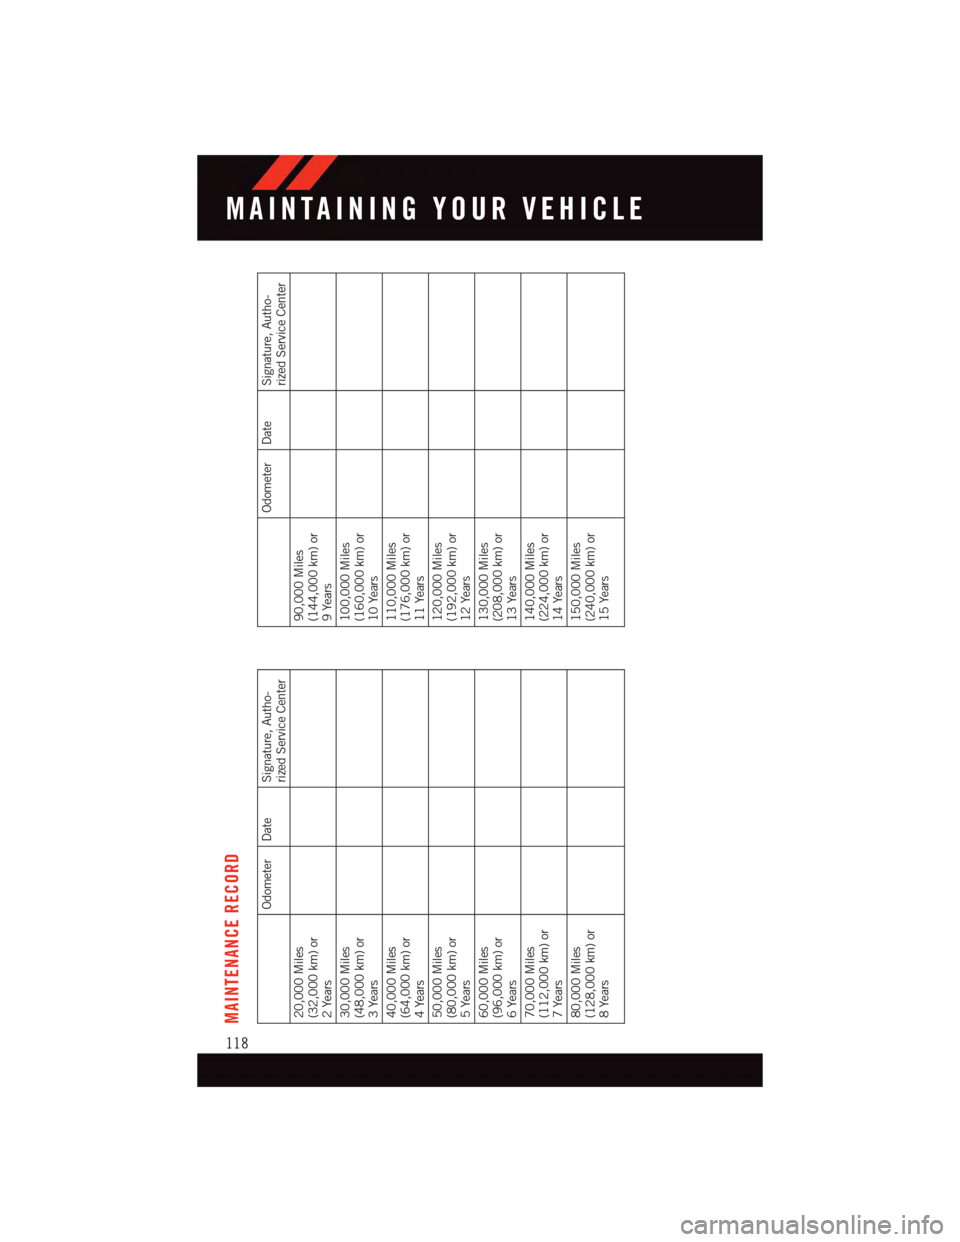
MAINTENANCE RECORD
Odometer Date Signature, Autho-
rized Service Center
20,000 Miles(32,000 km) or2Years30,000 Miles(48,000 km) or3Years40,000 Miles(64,000 km) or4Years50,000 Miles(80,000 km) or5Years60,000 Miles(96,000 km) or6Years70,000 Miles(112,000 km) or7Years80,000 Miles(128,000 km) or8Years
Odometer Date Signature, Autho-
rized Service Center
90,000 Miles(144,000 km) or9Years100,000 Miles(160,000 km) or10 Years110,000 Miles(176,000 km) or11 Years120,000 Miles(192,000 km) or12 Years130,000 Miles(208,000 km) or13 Years140,000 Miles(224,000 km) or14 Years150,000 Miles(240,000 km) or15 Years
MAINTAINING YOUR VEHICLE
118
Page 124 of 140
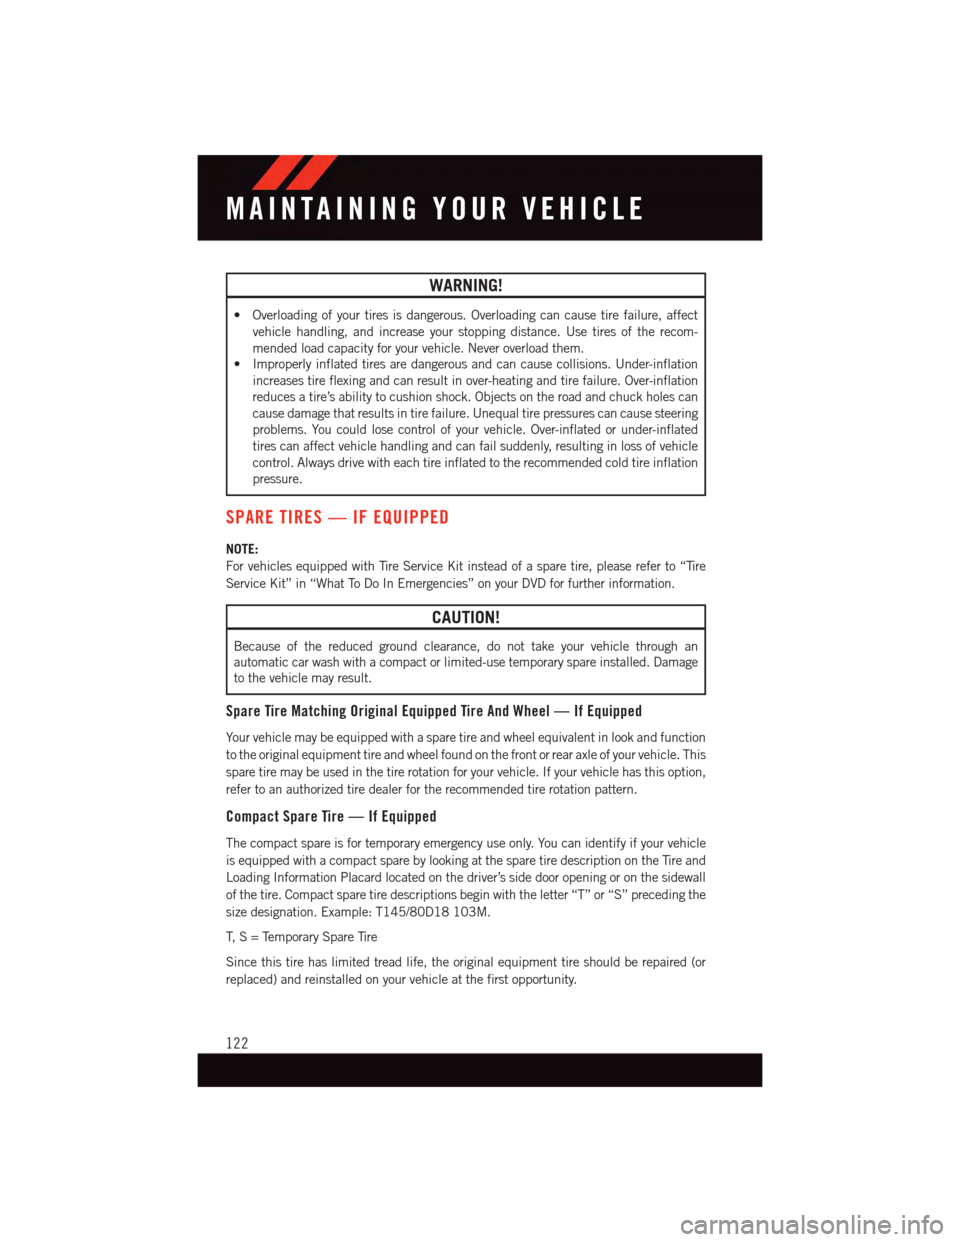
WARNING!
•Overloadingofyourtiresisdangerous.Overloadingcancausetirefailure,affect
vehicle handling, and increase your stopping distance. Use tires of the recom-
mended load capacity for your vehicle. Never overload them.
•Improperlyinflatedtiresaredangerousandcancausecollisions.Under-inflation
increases tire flexing and can result in over-heating and tire failure. Over-inflation
reduces a tire’s ability to cushion shock. Objects on the road and chuck holes can
cause damage that results in tire failure. Unequal tire pressures can cause steering
problems. You could lose control of your vehicle. Over-inflated or under-inflated
tires can affect vehicle handling and can fail suddenly, resulting in loss of vehicle
control. Always drive with each tire inflated to the recommended cold tire inflation
pressure.
SPARE TIRES — IF EQUIPPED
NOTE:
For vehicles equipped with Tire Service Kit instead of a spare tire, please refer to “Tire
Service Kit” in “What To Do In Emergencies” on your DVD for further information.
CAUTION!
Because of the reduced ground clearance, do not take your vehicle through an
automatic car wash with a compact or limited-use temporary spare installed. Damage
to the vehicle may result.
Spare Tire Matching Original Equipped Tire And Wheel — If Equipped
Yo u r v e h i c l e m a y b e e q u i p p e d w i t h a s p a r e t i r e a n d w h e e l e q u i v a l e n t i n l o o k a n d f u n c t i o n
to the original equipment tire and wheel found on the front or rear axle of your vehicle. This
spare tire may be used in the tire rotation for your vehicle. If your vehicle has this option,
refer to an authorized tire dealer for the recommended tire rotation pattern.
Compact Spare Tire — If Equipped
The compact spare is for temporary emergency use only. You can identify if your vehicle
is equipped with a compact spare by looking at the spare tire description on the Tire and
Loading Information Placard located on the driver’s side door opening or on the sidewall
of the tire. Compact spare tire descriptions begin with the letter “T” or “S” preceding the
size designation. Example: T145/80D18 103M.
T, S = Temporary Spare Tire
Since this tire has limited tread life, the original equipment tire should be repaired (or
replaced) and reinstalled on your vehicle at the first opportunity.
MAINTAINING YOUR VEHICLE
122
Page 126 of 140
WHEEL AND WHEEL TRIM CARE
All wheels and wheel trim, especially aluminum and chrome plated wheels, should be
cleaned regularly with a mild soap and water to prevent corrosion.
To r e m o v e h e a v y s o i l a n d / o r e x c e s s i v e b r a k e d u s t , u s e M O PA R®Wheel Cleaner or
equivalent or select a non-abrasive, non-acidic cleaner.
CAUTION!
Do not use scouring pads, steel wool, a bristle brush, or metal polishes. Do not use oven
cleaner. These products may damage the wheel's protective finish. Avoid automatic car
washes that use acidic solutions or harsh brushes that may damage the wheel's
protective finish. Only MOPAR®Wheel Cleaner or equivalent is recommended.
REPLACEMENT BULBS
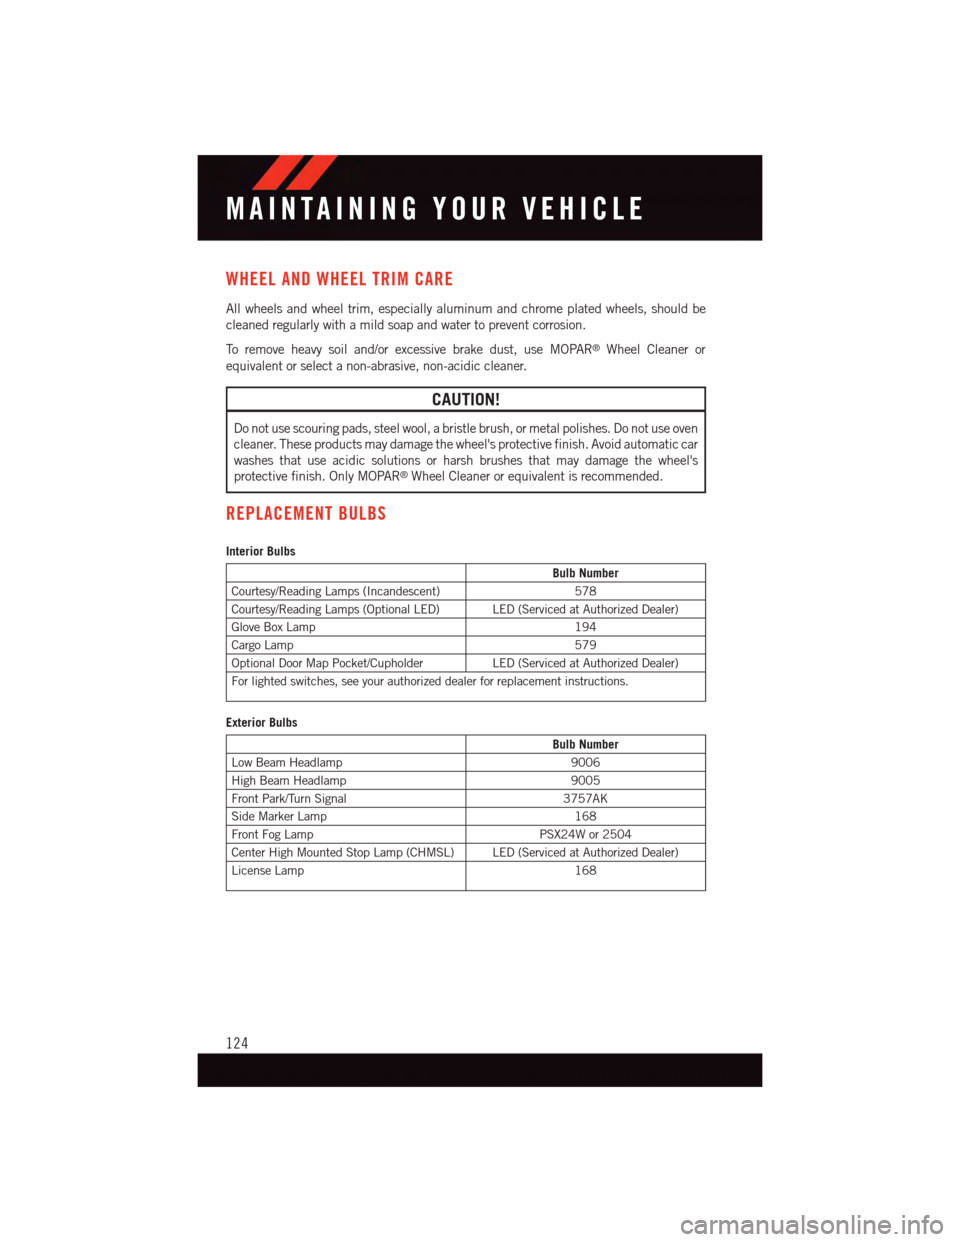
Interior Bulbs
Bulb Number
Courtesy/Reading Lamps (Incandescent)578
Courtesy/Reading Lamps (Optional LED) LED (Serviced at Authorized Dealer)
Glove Box Lamp194
Cargo Lamp579
Optional Door Map Pocket/CupholderLED (Serviced at Authorized Dealer)
For lighted switches, see your authorized dealer for replacement instructions.
Exterior Bulbs
Bulb Number
Low Beam Headlamp9006
High Beam Headlamp9005
Front Park/Turn Signal3757AK
Side Marker Lamp168
Front Fog LampPSX24W or 2504
Center High Mounted Stop Lamp (CHMSL) LED (Serviced at Authorized Dealer)
License Lamp168
MAINTAINING YOUR VEHICLE
124
Page 127 of 140
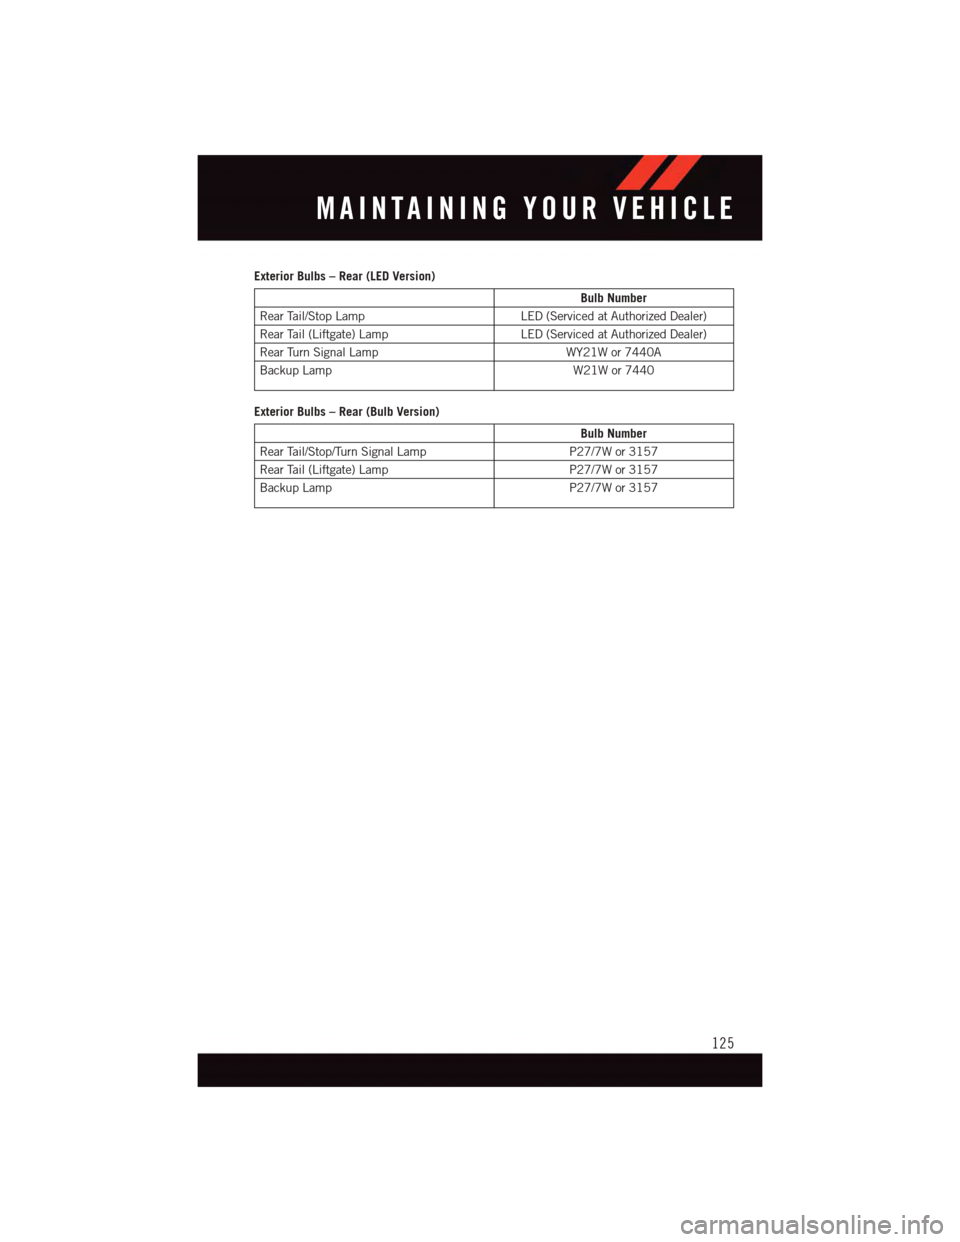
Exterior Bulbs – Rear (LED Version)
Bulb Number
Rear Tail/Stop LampLED (Serviced at Authorized Dealer)
Rear Tail (Liftgate) LampLED (Serviced at Authorized Dealer)
Rear Turn Signal LampWY21W or 7440A
Backup LampW21W or 7440
Exterior Bulbs – Rear (Bulb Version)
Bulb Number
Rear Tail/Stop/Turn Signal LampP27/7W or 3157
Rear Tail (Liftgate) LampP27/7W or 3157
Backup LampP27/7W or 3157
MAINTAINING YOUR VEHICLE
125
Page 128 of 140
CHRYSLER GROUP LLC CUSTOMER CENTER
P. O . B o x 2 1 – 8 0 0 4 A u b u r n H i l l s , M I 4 8 3 2 1 – 8 0 0 4 P h o n e : 1 – 8 0 0 – 4 2 3 – 6 3 4 3
CHRYSLER CANADA INC. CUSTOMER CENTER
P. O . B o x 1 6 2 1 W i n d s o r , O n t a r i o N 9 A 4 H 6 P h o n e : 1 – 8 0 0 – 4 6 5 – 2 0 0 1 ( E n g l i s h ) P h o n e :
1–800–387–9983 (French)
ASSISTANCE FOR THE HEARING IMPAIRED
To a s s i s t c u s t o m e r s w h o h a v e h e a r i n g d i f f i c u l t i e s , t h e m a n u f a c t u r e r h a s i n s t a l l e d s p e c i a l
TDD (Telecommunication Devices for the Deaf) equipment at its customer center. Any
hearing or speech impaired customer, who has access to a TDD or a conventional
teletypewriter (TTY) in the United States, can communicate with the manufacturer by
dialing 1–800–380–CHRY. Canadian residents with hearing difficulties that require
assistance can use the special needs relay service offered by Bell Canada. For TTY
teletypewriter users, dial 711 and for Voice callers, dial 1–800–855–0511 to connect
with a Bell Relay Service operator.
WARNING!
Engine exhaust, some of its constituents, and certain vehicle components contain, or
emit, chemicals known to the State of California to cause cancer and birth defects, or
other reproductive harm. In addition, certain fluids contained in vehicles and certain
products of component wear contain, or emit, chemicals known to the State of
California to cause cancer and birth defects, or other reproductive harm.
PUBLICATIONS ORDERING
•Ifyouarethefirstregisteredretailownerofyourvehicle,youmayobtainacomplimen-
tary printed copy of the Owner's Manual, Navigation/Uconnect®Manuals or Warranty
Booklet. United States customers may visit the Dodge Contact Us page at
www.dodge.com scroll to the bottom of the page and select the “Contact Us” link, then
select the “Owner’s Manual and Glove Box Material” from the left menu. You may
also obtain a complimentary copy by calling 1–800–423–6343 (U.S.) or
1–800–387–1143 (Canada).
•ReplacementUserGuidekitsorDVDsor,ifyouprefer,additionalprintedcopiesofthe
Owner's Manual, Warranty Booklet or Radio Manuals may be purchased by visiting
www.techauthority.com or by calling 1–800–890–4038 (U.S.) or 1–800–387–1143
(Canada). Visa, Master Card, American Express and Discover orders are accepted. If
you prefer mailing your order, please call the above numbers for an order form.
CONSUMER ASSISTANCE
126