battery DODGE JOURNEY 2015 1.G User Guide
[x] Cancel search | Manufacturer: DODGE, Model Year: 2015, Model line: JOURNEY, Model: DODGE JOURNEY 2015 1.GPages: 140, PDF Size: 23.09 MB
Page 10 of 140
KEY FOB
Locking And Unlocking The Doors And
Liftgate
Lock The Doors And Liftgate
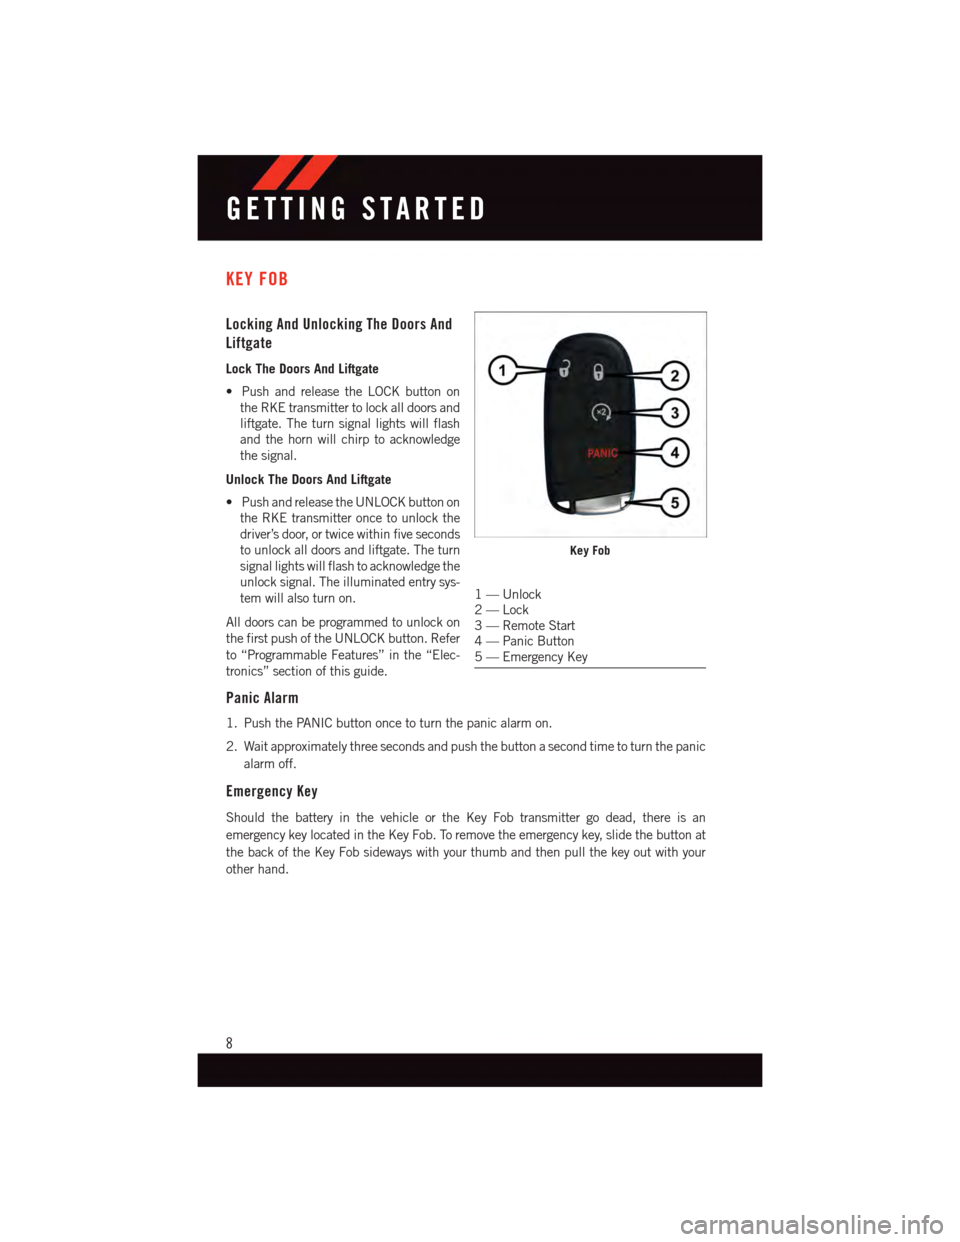
•PushandreleasetheLOCKbuttonon
the RKE transmitter to lock all doors and
liftgate. The turn signal lights will flash
and the horn will chirp to acknowledge
the signal.
Unlock The Doors And Liftgate
•PushandreleasetheUNLOCKbuttonon
the RKE transmitter once to unlock the
driver’s door, or twice within five seconds
to unlock all doors and liftgate. The turn
signal lights will flash to acknowledge the
unlock signal. The illuminated entry sys-
tem will also turn on.
All doors can be programmed to unlock on
the first push of the UNLOCK button. Refer
to “Programmable Features” in the “Elec-
tronics” section of this guide.
Panic Alarm
1. Push the PANIC button once to turn the panic alarm on.
2. Wait approximately three seconds and push the button a second time to turn the panic
alarm off.
Emergency Key
Should the battery in the vehicle or the Key Fob transmitter go dead, there is an
emergency key located in the Key Fob. To remove the emergency key, slide the button at
the back of the Key Fob sideways with your thumb and then pull the key out with your
other hand.
Key Fob
1—Unlock2—Lock3—RemoteStart4—PanicButton5—EmergencyKey
GETTING STARTED
8
Page 14 of 140
ENGINE STARTING/STOPPING
Starting
•WithavalidKeylessEnter-N-Go™Key
Fob inside the vehicle.
•Place the shift lever in PARK or NEUTRAL.
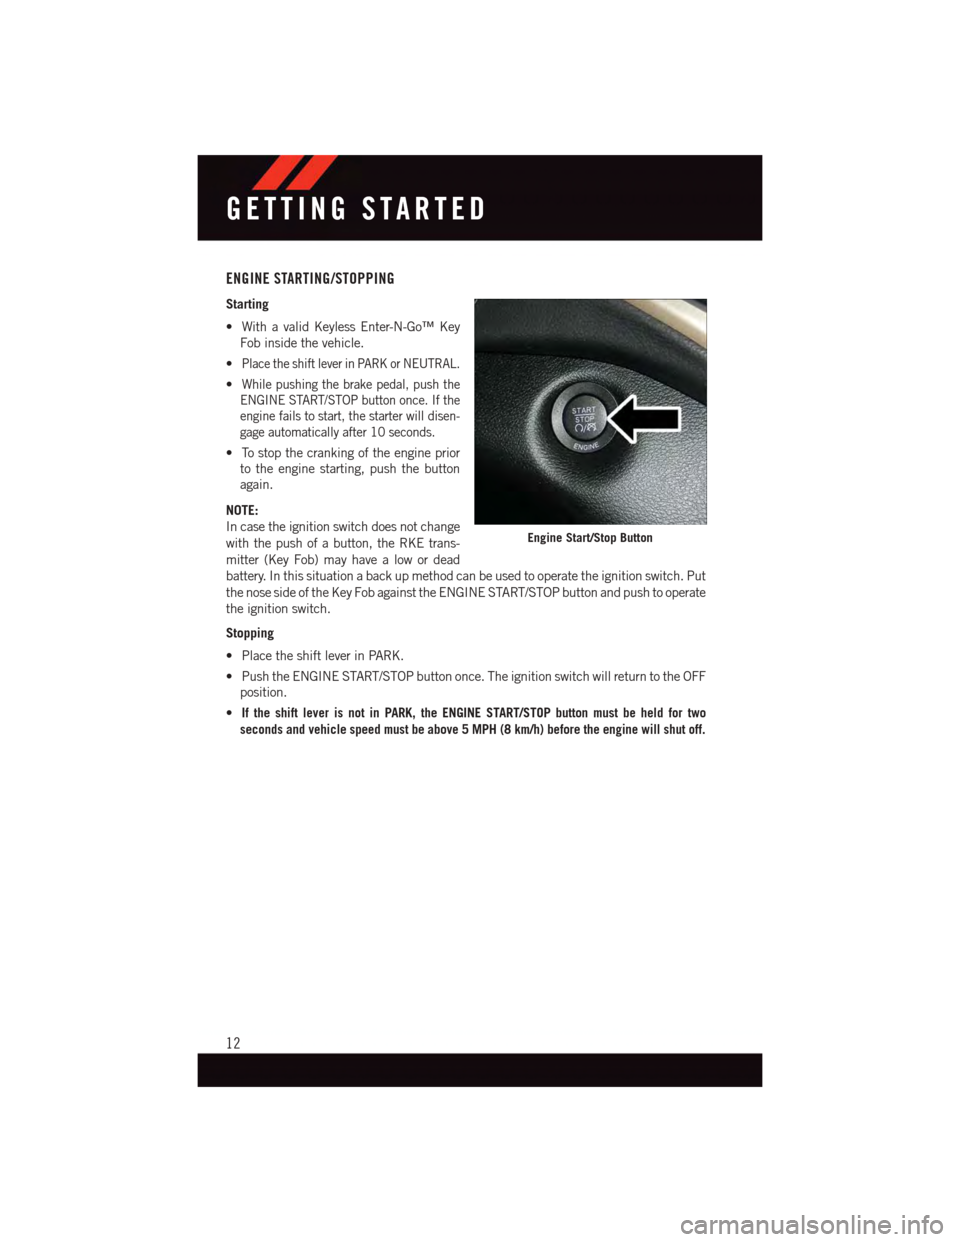
•While pushing the brake pedal, push the
ENGINE START/STOP button once. If the
engine fails to start, the starter will disen-
gage automatically after 10 seconds.
•Tostopthecrankingoftheengineprior
to the engine starting, push the button
again.
NOTE:
In case the ignition switch does not change
with the push of a button, the RKE trans-
mitter (Key Fob) may have a low or dead
battery. In this situation a back up method can be used to operate the ignition switch. Put
the nose side of the Key Fob against the ENGINE START/STOP button and push to operate
the ignition switch.
Stopping
•PlacetheshiftleverinPARK.
•PushtheENGINESTART/STOPbuttononce.TheignitionswitchwillreturntotheOFF
position.
•If the shift lever is not in PARK, the ENGINE START/STOP button must be held for two
seconds and vehicle speed must be above 5 MPH (8 km/h) before the engine will shut off.
Engine Start/Stop Button
GETTING STARTED
12
Page 15 of 140
Accessory Positions With Engine Off
NOTE:
The following functions are with the driver’s foot OFF the Brake Pedal (Transmission in
PA R K o r N E U T R A L P o s i t i o n ) .
Starting With The Ignition Switch In The OFF Position:
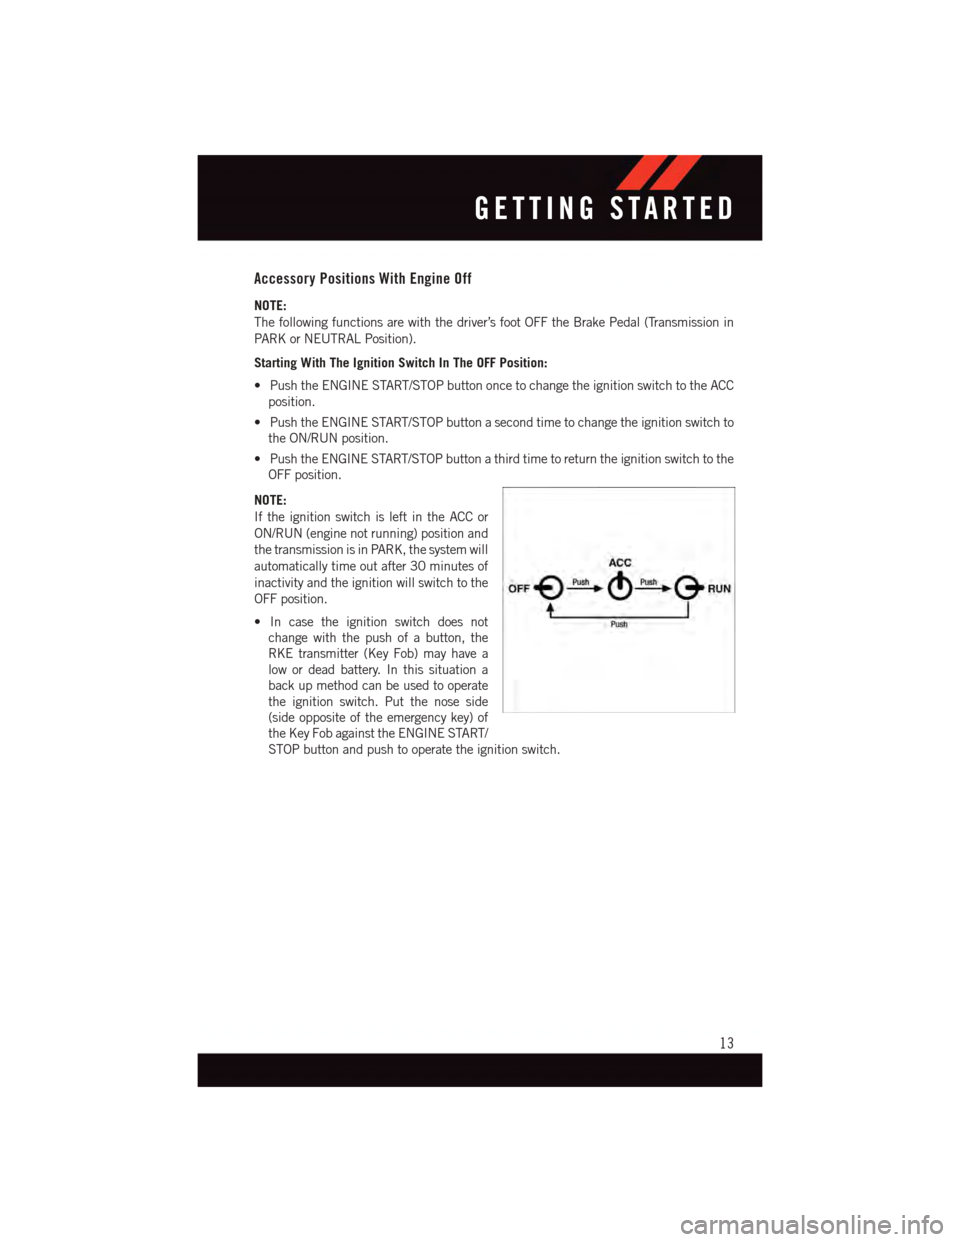
•PushtheENGINESTART/STOPbuttononcetochangetheignitionswitchtotheACC
position.
•PushtheENGINESTART/STOPbuttonasecondtimetochangetheignitionswitchto
the ON/RUN position.
•PushtheENGINESTART/STOPbuttonathirdtimetoreturntheignitionswitchtothe
OFF position.
NOTE:
If the ignition switch is left in the ACC or
ON/RUN (engine not running) position and
the transmission is in PARK, the system will
automatically time out after 30 minutes of
inactivity and the ignition will switch to the
OFF position.
•Incasetheignitionswitchdoesnot
change with the push of a button, the
RKE transmitter (Key Fob) may have a
low or dead battery. In this situation a
back up method can be used to operate
the ignition switch. Put the nose side
(side opposite of the emergency key) of
the Key Fob against the ENGINE START/
STOP button and push to operate the ignition switch.
GETTING STARTED
13
Page 67 of 140
PLAYING iPod®/USB/MP3 DEVICES
•TherearemanywaystoplaymusicfromiPod®/MP3 players or USB devices through
your vehicles sound system.
Audio Jack (AUX)
•TheAudioJack,locatedinthecenterconsole,allowsaportabledevice,suchasan
MP3 player or an iPod®,tobepluggedintotheradioandutilizethevehiclessound
system, using a 3.5 mm audio cable, to amplify the source and play through the vehicle
speakers.
•Pressingthe“Player”buttononthetouchscreenthenchooseAUXsourcewillchange
the mode to auxiliary device if the Audio Jack is connected, allowing the music from
your portable device to be heard through the vehicles speakers.
•Thefunctionsoftheportabledevicearecontrolledusingthedevicebuttons.The
volume may be controlled using the radio or portable device.
•Toroutetheaudiocableoutofthecenterconsole,usetheaccesscutoutinthefront
of the console.
USB Port
•ConnectyouriPod®or compatible device using a USB cable into the USB Port. The
USB Port is contained within the center console. USB Memory sticks with audio files
can also be used. Then, audio from the device can be played on the vehicles sound
system while providing metadata (artist, track title, album, etc.) information on the
radio display.
•Whenconnected,theiPod®/compatible USB device can be controlled using the radio
or Steering Wheel Audio Controls to play, skip to the next or previous track, browse, and
list the contents.
•TheiPod®battery charges when plugged into the USB port (if supported by the specific
device).
•ToroutetheUSB/iPod®cable out of the center console, use the access cut out in the
front of the console.
NOTE:
•WhenconnectingyouriPod®device for the first time, the system may take several
minutes to read your music, depending on the number of files. For example, the system
will take approximately five minutes for every 1000 songs loaded on the device. Also
during the reading process, the Shuffle and Browse functions will be disabled. This
process is needed to ensure the full use of your iPod®features and only happens the
first time it is connected. After the first time, the reading process of your iPod®will take
considerably less time unless changes are made or new songs are added to the playlist.
•TheUSBportsupportscertainMini,Classic,Nano,Touch,andiPhone®devices. The
USB port also supports playing music from compatible external USB Mass Storage
Class memory devices. Some iPod®software versions may not fully support the USB
port features. Please visit Apple’s website for iPod®software updates.
ELECTRONICS
65
Page 71 of 140
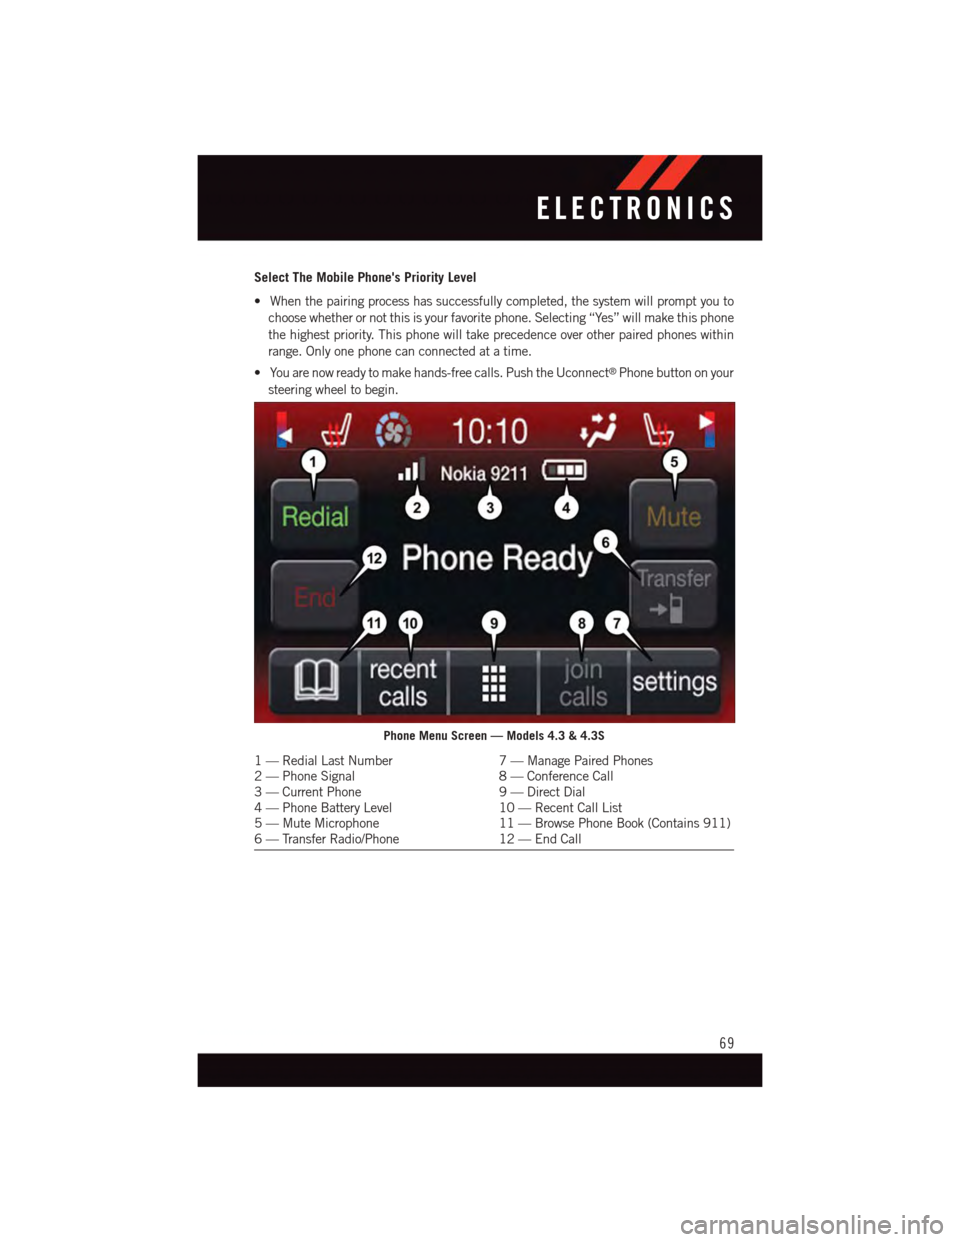
Select The Mobile Phone's Priority Level
•Whenthepairingprocesshassuccessfullycompleted,thesystemwillpromptyouto
choose whether or not this is your favorite phone. Selecting “Yes” will make this phone
the highest priority. This phone will take precedence over other paired phones within
range. Only one phone can connected at a time.
•Youarenowreadytomakehands-freecalls.PushtheUconnect®Phone button on your
steering wheel to begin.
Phone Menu Screen — Models 4.3 & 4.3S
1—RedialLastNumber7—ManagePairedPhones2—PhoneSignal8—ConferenceCall3—CurrentPhone9—DirectDial4—PhoneBatteryLevel10 — Recent Call List5—MuteMicrophone11 — Browse Phone Book (Contains 911)6—TransferRadio/Phone12 — End Call
ELECTRONICS
69
Page 72 of 140
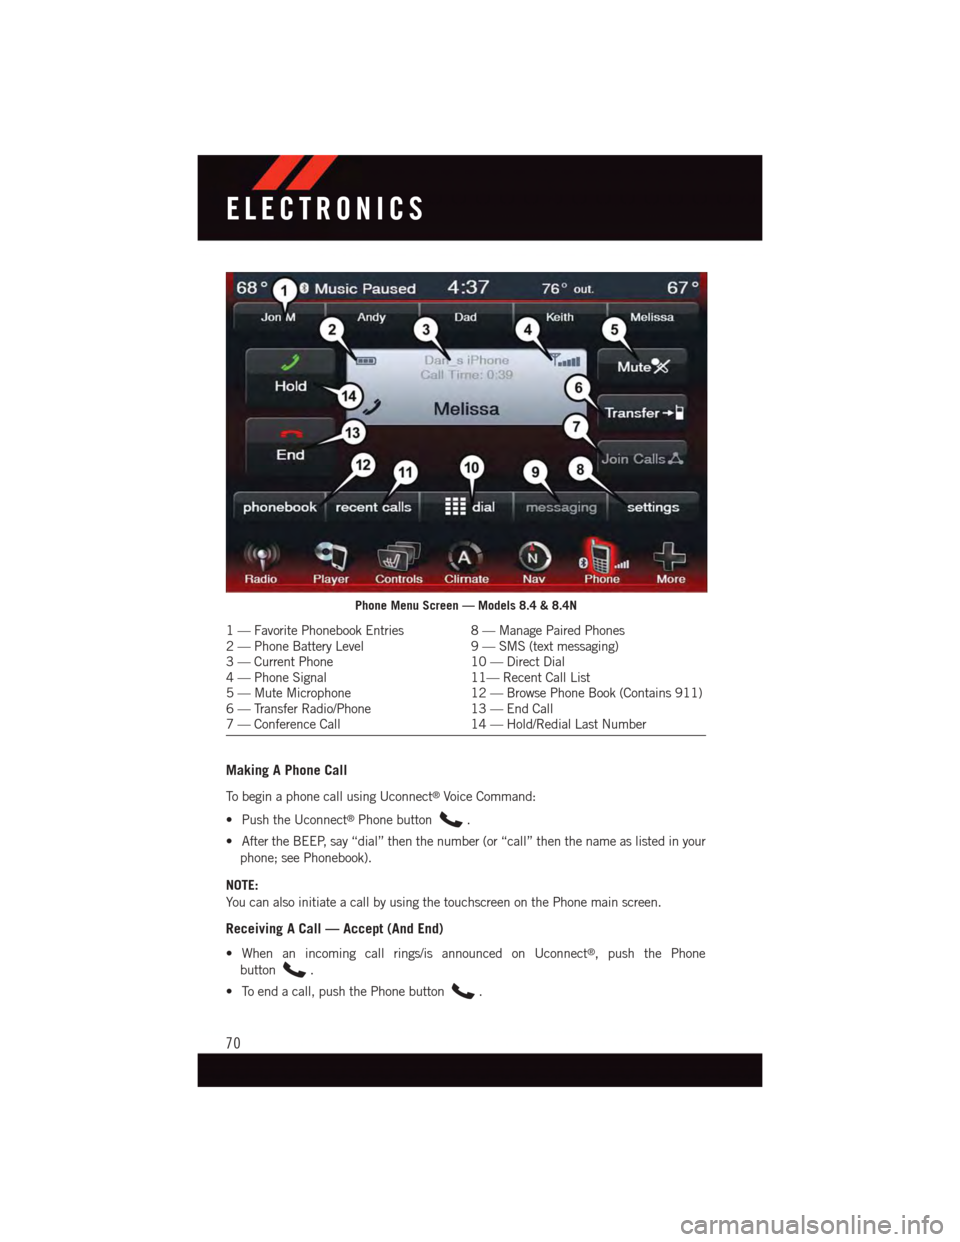
Making A Phone Call
To b e g i n a p h o n e c a l l u s i n g U c o n n e c t®Voice Command:
•PushtheUconnect®Phone button.
•AftertheBEEP,say“dial”thenthenumber(or“call”thenthenameaslistedinyour
phone; see Phonebook).
NOTE:
Yo u c a n a l s o i n i t i a t e a c a l l b y u s i n g t h e t o u c h s c r e e n o n t h e P h o n e m a i n s c r e e n .
Receiving A Call — Accept (And End)
•Whenanincomingcallrings/isannouncedonUconnect®,pushthePhone
button.
•Toendacall,pushthePhonebutton.
Phone Menu Screen — Models 8.4 & 8.4N
1—FavoritePhonebookEntries8—ManagePairedPhones2—PhoneBatteryLevel9—SMS(textmessaging)3—CurrentPhone10 — Direct Dial4—PhoneSignal11— Recent Call List5—MuteMicrophone12 — Browse Phone Book (Contains 911)6—TransferRadio/Phone13 — End Call7—ConferenceCall14 — Hold/Redial Last Number
ELECTRONICS
70
Page 80 of 140
Uconnect® 8.4 Customer Programmable Features
•TheUconnect®8.4 system allows you to access Customer Programmable feature
settings such as Display, Clock, Safety/Assistance, Lights, Doors & Locks, Heated
Seats, Engine Off Operation, Compass Settings, Audio, Phone/Bluetooth®and SIRIUS
Setup through buttons on the touchscreen.
•Pressthe“More”buttononthebottomofthetouchscreen,thenpressthe“Settings”
button on the faceplate to access the Settings screen. When making a selection, scroll
up or down until the preferred setting is highlighted, then press and release the
preferred setting until a check-mark appears next to the setting, showing that setting
has been selected. The following feature settings are available:
•Display•AutoOnComfort&RemoteStart
•Clock•EngineOffOptions
•Safety/Assistance•Audio
•Lights•Phone/Bluetooth®
•Doors&Locks•SIRIUSSetup
UNIVERSAL GARAGE DOOR OPENER (HomeLink®)
•HomeLink®replaces up to three hand-held transmitters that operate devices such as
garage door openers, motorized gates, lighting or home security systems. The
HomeLink®unit is powered by your vehicles 12 Volt battery.
•TheHomeLink®buttons that are located in the overhead console or sunvisor designate
the three different HomeLink®channels.
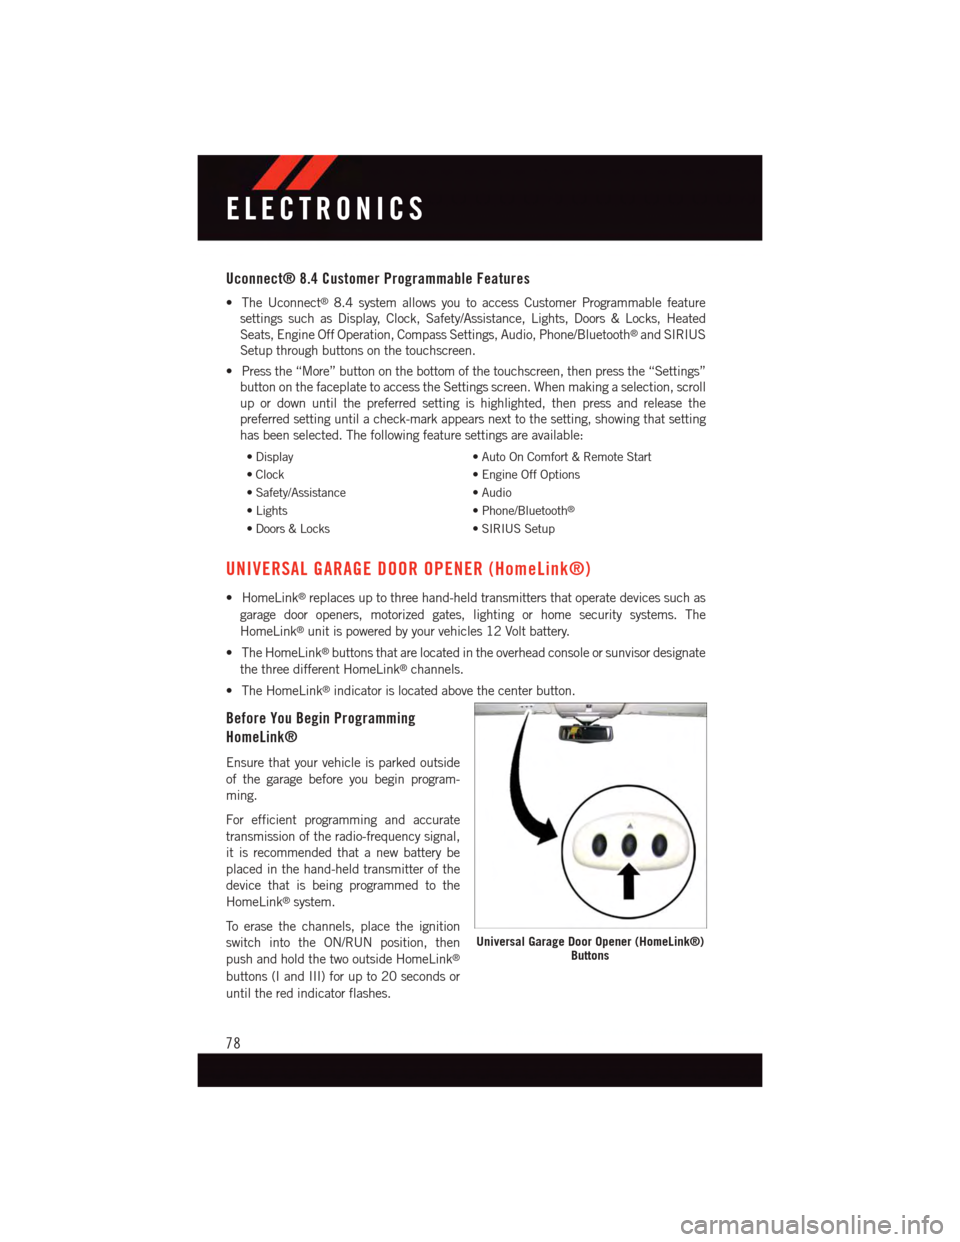
•TheHomeLink®indicator is located above the center button.
Before You Begin Programming
HomeLink®
Ensure that your vehicle is parked outside
of the garage before you begin program-
ming.
For efficient programming and accurate
transmission of the radio-frequency signal,
it is recommended that a new battery be
placed in the hand-held transmitter of the
device that is being programmed to the
HomeLink®system.
To e r a s e t h e c h a n n e l s , p l a c e t h e i g n i t i o n
switch into the ON/RUN position, then
push and hold the two outside HomeLink®
buttons (I and III) for up to 20 seconds or
until the red indicator flashes.
Universal Garage Door Opener (HomeLink®)Buttons
ELECTRONICS
78
Page 103 of 140
JUMP-STARTING
•Ifyourvehiclehasadischargedbatteryit
can be jump-started using a set of
jumper cables and a battery in another
vehicle or by using a portable battery
booster pack.
•Jump-startingcanbedangerousifdone
improperly so please follow the proce-
dures in this section carefully.
NOTE:
When using a portable battery booster pack
follow the manufacturer's operating instruc-
tions and precautions.
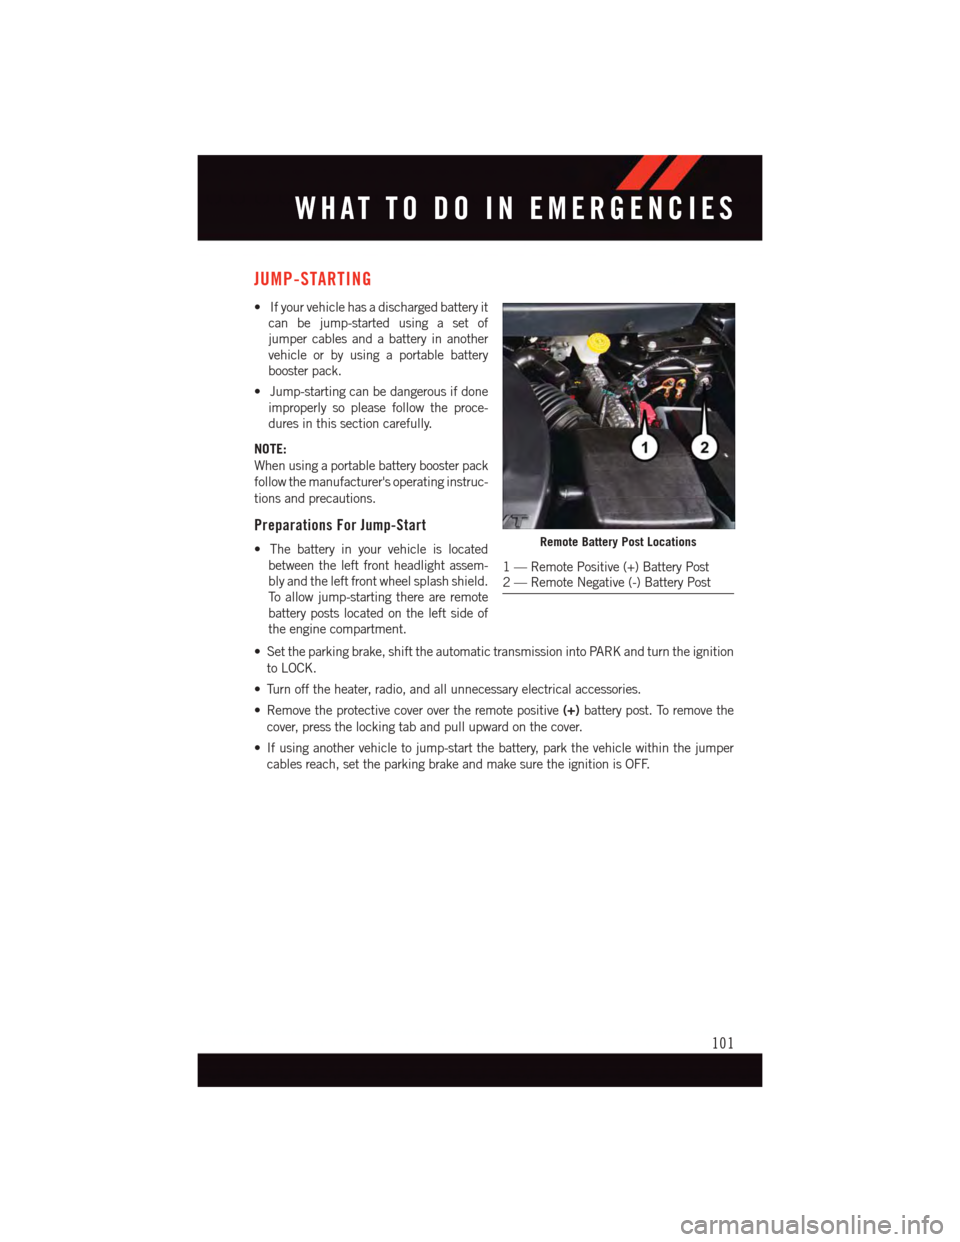
Preparations For Jump-Start
•Thebatteryinyourvehicleislocated
between the left front headlight assem-
bly and the left front wheel splash shield.
To a l l o w j u m p - s t a r t i n g t h e r e a r e r e m o t e
battery posts located on the left side of
the engine compartment.
•Settheparkingbrake,shifttheautomatictransmissionintoPARKandturntheignition
to LOCK.
•Turnofftheheater,radio,andallunnecessaryelectricalaccessories.
•Removetheprotectivecoverovertheremotepositive(+)battery post. To remove the
cover, press the locking tab and pull upward on the cover.
•Ifusinganothervehicletojump-startthebattery,parkthevehiclewithinthejumper
cables reach, set the parking brake and make sure the ignition is OFF.
Remote Battery Post Locations
1—RemotePositive(+)BatteryPost2—RemoteNegative(-)BatteryPost
WHAT TO DO IN EMERGENCIES
101
Page 104 of 140
Jump-Starting Procedure
1. Connect the positive(+)end of the jumper cable to the remote positive(+)post of the
vehicle with discharged battery.
2. Connect the opposite end of the positive(+)jumper cable to the positive(+)post of the
booster battery.
3. Connect the negative(-)end of the jumper cable to the negative(-)post of the booster
battery.
4. Connect the opposite end of the negative(-)jumper cable to the remote negative(-)
post of the vehicle with the discharged battery.
5. Start the engine in the vehicle that has the booster battery, let the engine idle a few
minutes, and then start the engine in the vehicle with the discharged battery.
Once the engine is started, remove the jumper cables in the reverse sequence:
1. Disconnect the negative(-)end of the jumper cable from the remote negative(-)post
of the vehicle with the discharged battery.
2. Disconnect the opposite end of the negative(-)jumper cable from the negative(-)post
of the booster battery.
3. Disconnect the positive(+)end of the jumper cable from the positive(+)post of the
booster battery.
4. Disconnect the opposite end of the positive(+)jumper cable from the remote positive
(+)post of the discharged vehicle.
5. Reinstall the protective cover over the remote positive(+)post of the vehicle with the
discharged battery.
6. Reinstall the protective plug over the remote negative(-)post of the vehicle with the
discharged battery.
NOTE:
If frequent jump-starting is required to start your vehicle you should have the battery and
charging system inspected at your authorized dealer.
WHAT TO DO IN EMERGENCIES
102
Page 105 of 140
CAUTION!
•Donotuseaportablebatteryboosterpackoranyotherboostersourcewithasystem
voltage greater than 12 Volts or damage to the battery, starter motor, alternator or
electrical system may occur.
•Failuretofollowtheseprocedurescouldresultindamagetothechargingsystemof
the booster vehicle or the discharged vehicle.
•Accessoriesthatcanbepluggedintothevehiclepoweroutletsdrawpowerfromthe
vehicle’s battery, even when not in use (e.g., cellular phones, etc.). Eventually, if
plugged in long enough, the vehicle’s battery discharges sufficiently to degrade
battery life and/or prevent the engine from starting.
WARNING!
•Whentemperaturesarebelowthefreezingpoint,electrolyteinadischargedbattery
may freeze. Do not attempt jump-starting because the battery could rupture or
explode and cause personal injury. Battery temperature must be brought above the
freezing point before attempting a jump-start.
•Takecaretoavoidtheradiatorcoolingfanwheneverthehoodisraised.Itcanstart
anytime the ignition switch is on. You can be injured by moving fan blades.
•Removeanymetaljewelry,suchaswatchbandsorbracelets,thatmightmakean
inadvertent electrical contact. You could be severely injured.
•Batteriescontainsulfuricacidthatcanburnyourskinoreyesandgenerate
hydrogen gas which is flammable and explosive. Keep open flames or sparks away
from the battery.
•Donotallowvehiclestotoucheachotherasthiscouldestablishaground
connection and personal injury could result.
•Failuretofollowthisprocedurecouldresultinpersonalinjuryorpropertydamage
due to battery explosion.
•Donotconnectthecabletothenegativepost(-)ofthedischargedbattery.The
resulting electrical spark could cause the battery to explode and could result in
personal injury.
WHAT TO DO IN EMERGENCIES
103