display DODGE JOURNEY 2015 1.G User Guide
[x] Cancel search | Manufacturer: DODGE, Model Year: 2015, Model line: JOURNEY, Model: DODGE JOURNEY 2015 1.GPages: 140, PDF Size: 23.09 MB
Page 6 of 140
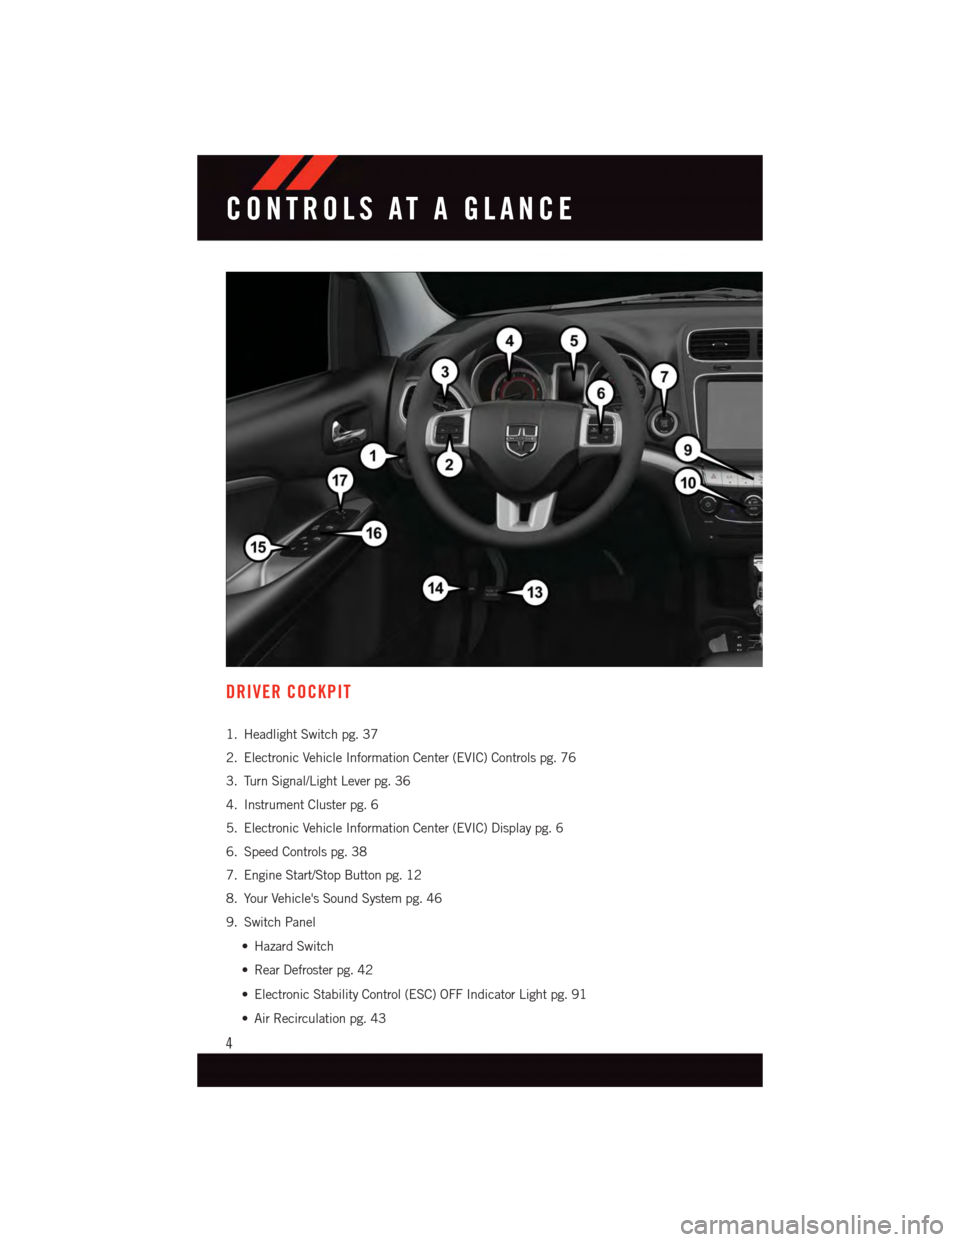
DRIVER COCKPIT
1. Headlight Switch pg. 37
2. Electronic Vehicle Information Center (EVIC) Controls pg. 76
3. Turn Signal/Light Lever pg. 36
4. Instrument Cluster pg. 6
5. Electronic Vehicle Information Center (EVIC) Display pg. 6
6. Speed Controls pg. 38
7. Engine Start/Stop Button pg. 12
8. Your Vehicle's Sound System pg. 46
9. Switch Panel
•HazardSwitch
•RearDefrosterpg.42
•ElectronicStabilityControl(ESC)OFFIndicatorLightpg.91
•AirRecirculationpg.43
CONTROLS AT A GLANCE
4
Page 8 of 140
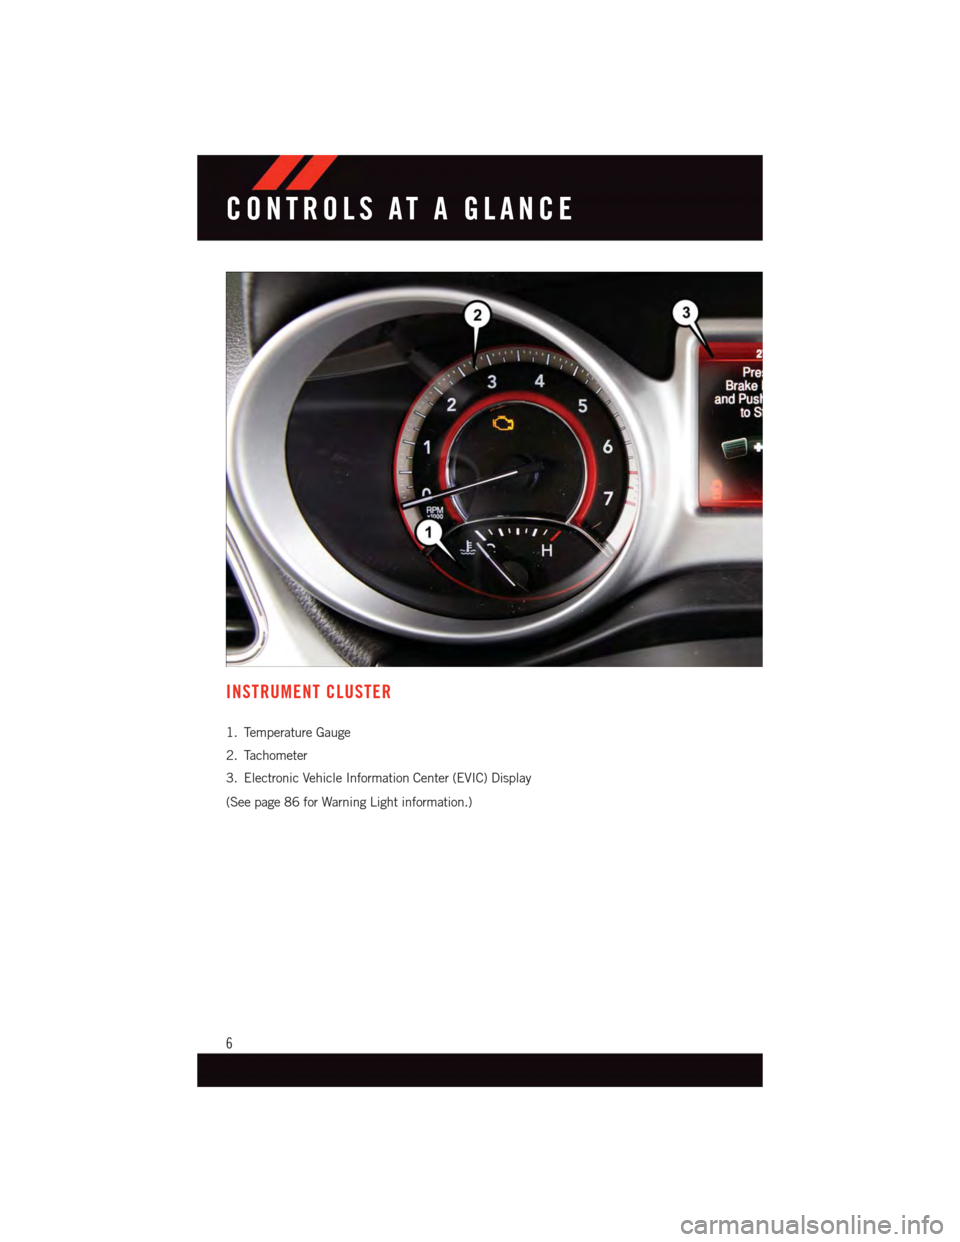
INSTRUMENT CLUSTER
1. Temperature Gauge
2. Tachometer
3. Electronic Vehicle Information Center (EVIC) Display
(See page 86 for Warning Light information.)
CONTROLS AT A GLANCE
6
Page 44 of 140
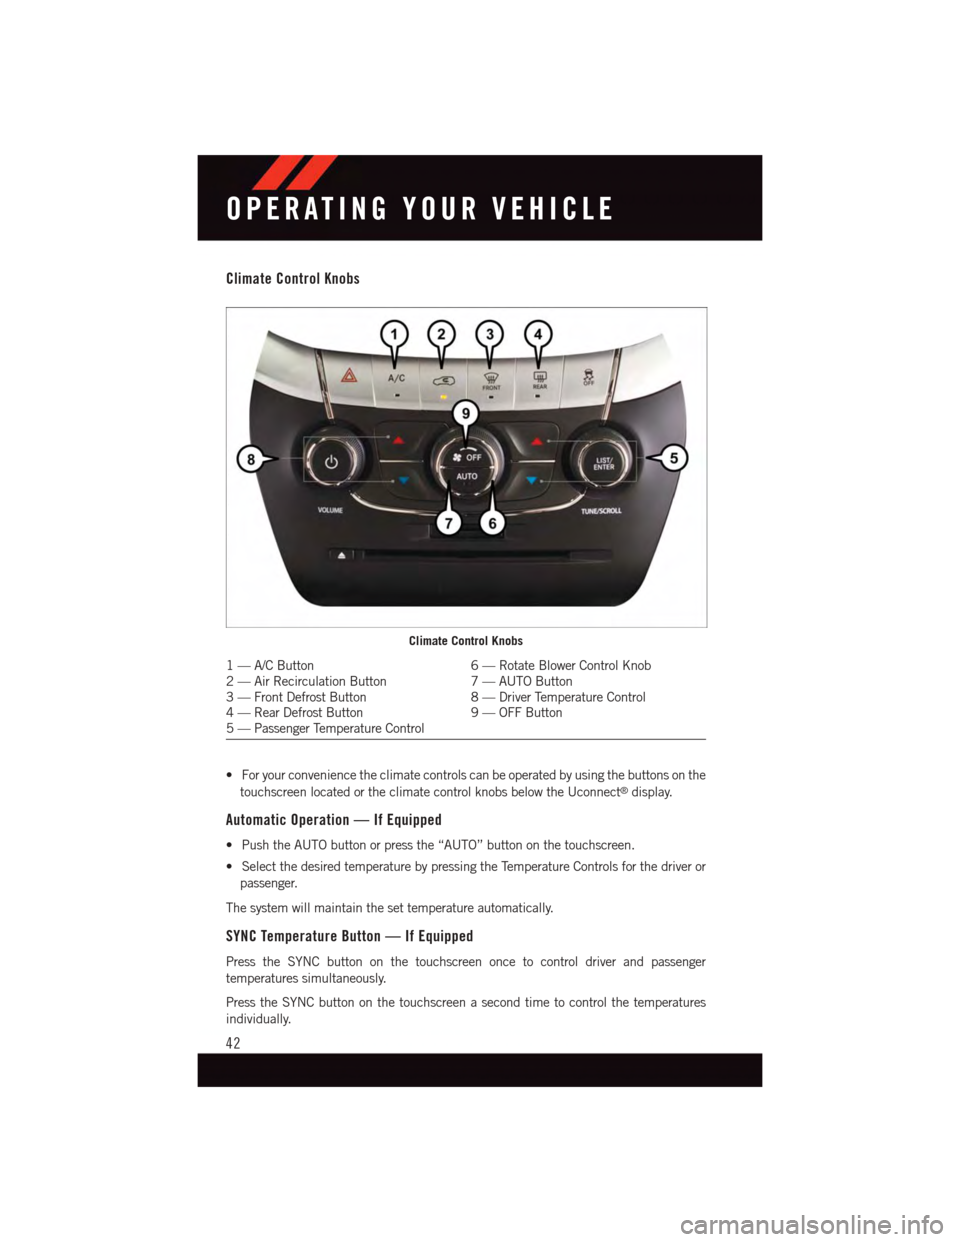
Climate Control Knobs
•Foryourconveniencetheclimatecontrolscanbeoperatedbyusingthebuttonsonthe
touchscreen located or the climate control knobs below the Uconnect®display.
Automatic Operation — If Equipped
•PushtheAUTObuttonorpressthe“AUTO”buttononthetouchscreen.
•SelectthedesiredtemperaturebypressingtheTemperatureControlsforthedriveror
passenger.
The system will maintain the set temperature automatically.
SYNC Temperature Button — If Equipped
Press the SYNC button on the touchscreen once to control driver and passenger
temperatures simultaneously.
Press the SYNC button on the touchscreen a second time to control the temperatures
individually.
Climate Control Knobs
1—A/CButton6—RotateBlowerControlKnob2—AirRecirculationButton7—AUTOButton3—FrontDefrostButton8—DriverTemperatureControl4—RearDefrostButton9—OFFButton5—PassengerTemperatureControl
OPERATING YOUR VEHICLE
42
Page 45 of 140
Air Recirculation
•UserecirculationformaximumA/Coperation.
•Forwindowdefogging,turntherecirculationbuttonoff.
•IftheRecirculationbuttononthefaceplateispushedwhileintheAUTOmode,the
indicator light may flash three times to indicate the cabin air is being controlled
automatically. The “Recirculation” button on the touchscreen will be greyed out in
these conditions.
Heated Mirrors
The mirrors are heated to melt frost or ice. This feature is activated whenever you turn on
the rear window defroster.
PARKVIEW® REAR BACK-UP CAMERA
Yo u c a n s e e a n o n - s c r e e n i m a g e o f t h e r e a r o f y o u r v e h i c l e w h e n e v e r t h e s h i f t l e v e r i s p u t
into REVERSE. The ParkView®Rear Back-Up Camera image will be displayed on the radio
display screen, located on the center stack of the instrument panel.
If the radio display screen appears foggy, clean the camera lens located on the liftgate.
Refer to your Owner's Manual on the DVD for further details.
WARNING!
Drivers must be careful when backing up; even when using the ParkView®Rear
Back-Up Camera. Always check carefully behind your vehicle, and be sure to check for
pedestrians, animals, other vehicles, obstructions, or blind spots before backing up.
Yo u m u s t c o n t i n u e t o p a y a t t e n t i o n w h i l e b a c k i n g u p . F a i l u r e t o d o s o c a n r e s u l t i n
serious injury or death.
OPERATING YOUR VEHICLE
43
Page 51 of 140
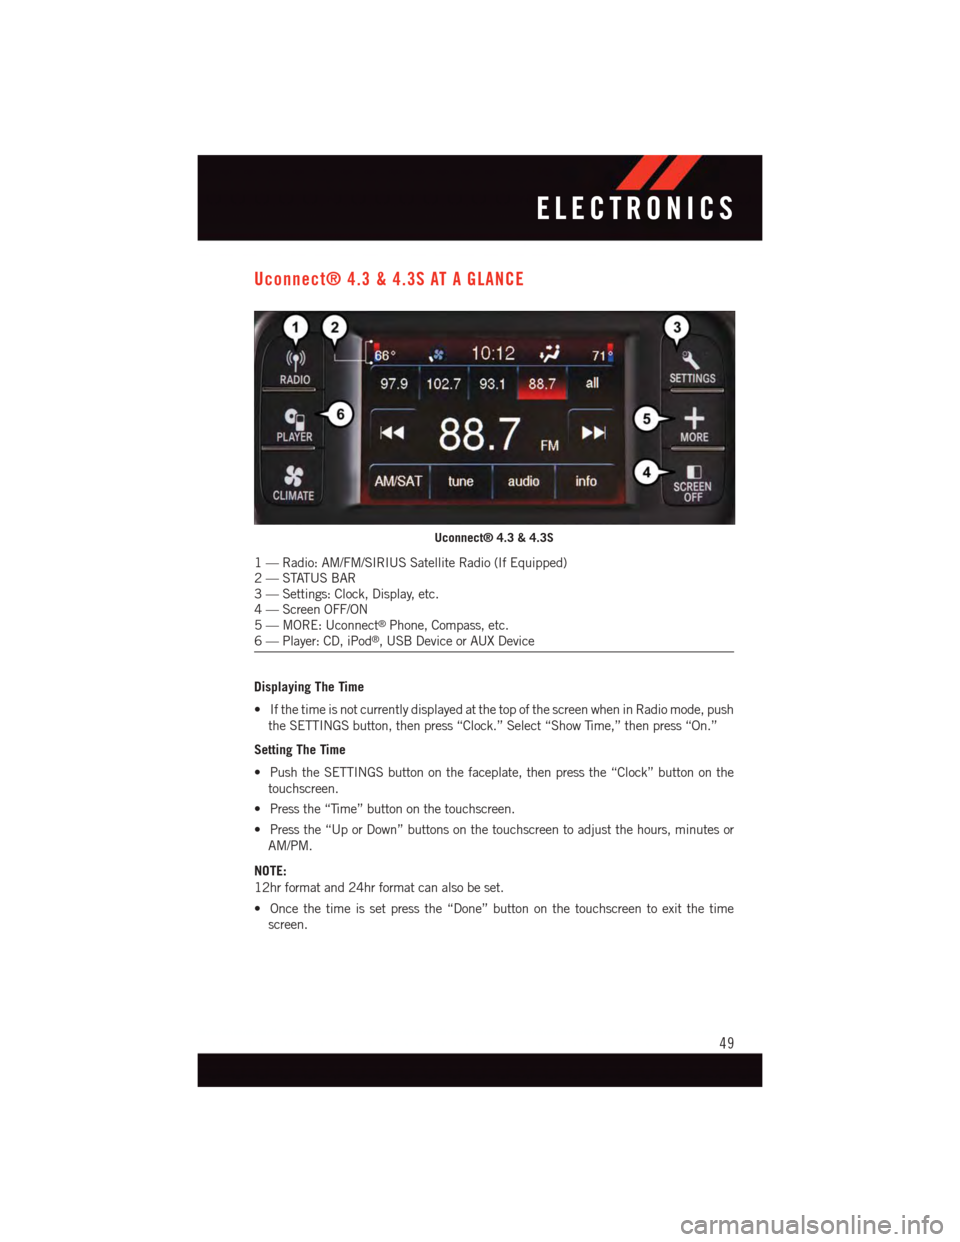
Uconnect® 4.3 & 4.3S AT A GLANCE
Displaying The Time
•IfthetimeisnotcurrentlydisplayedatthetopofthescreenwheninRadiomode,push
the SETTINGS button, then press “Clock.” Select “Show Time,” then press “On.”
Setting The Time
•PushtheSETTINGSbuttononthefaceplate,thenpressthe“Clock”buttononthe
touchscreen.
•Pressthe“Time”buttononthetouchscreen.
•Pressthe“UporDown”buttonsonthetouchscreentoadjustthehours,minutesor
AM/PM.
NOTE:
12hr format and 24hr format can also be set.
•Oncethetimeissetpressthe“Done”buttononthetouchscreentoexitthetime
screen.
Uconnect® 4.3 & 4.3S
1—Radio:AM/FM/SIRIUSSatelliteRadio(IfEquipped)2—STATUSBAR3—Settings:Clock,Display,etc.4—ScreenOFF/ON5—MORE:Uconnect®Phone, Compass, etc.6—Player:CD,iPod®,USBDeviceorAUXDevice
ELECTRONICS
49
Page 53 of 140
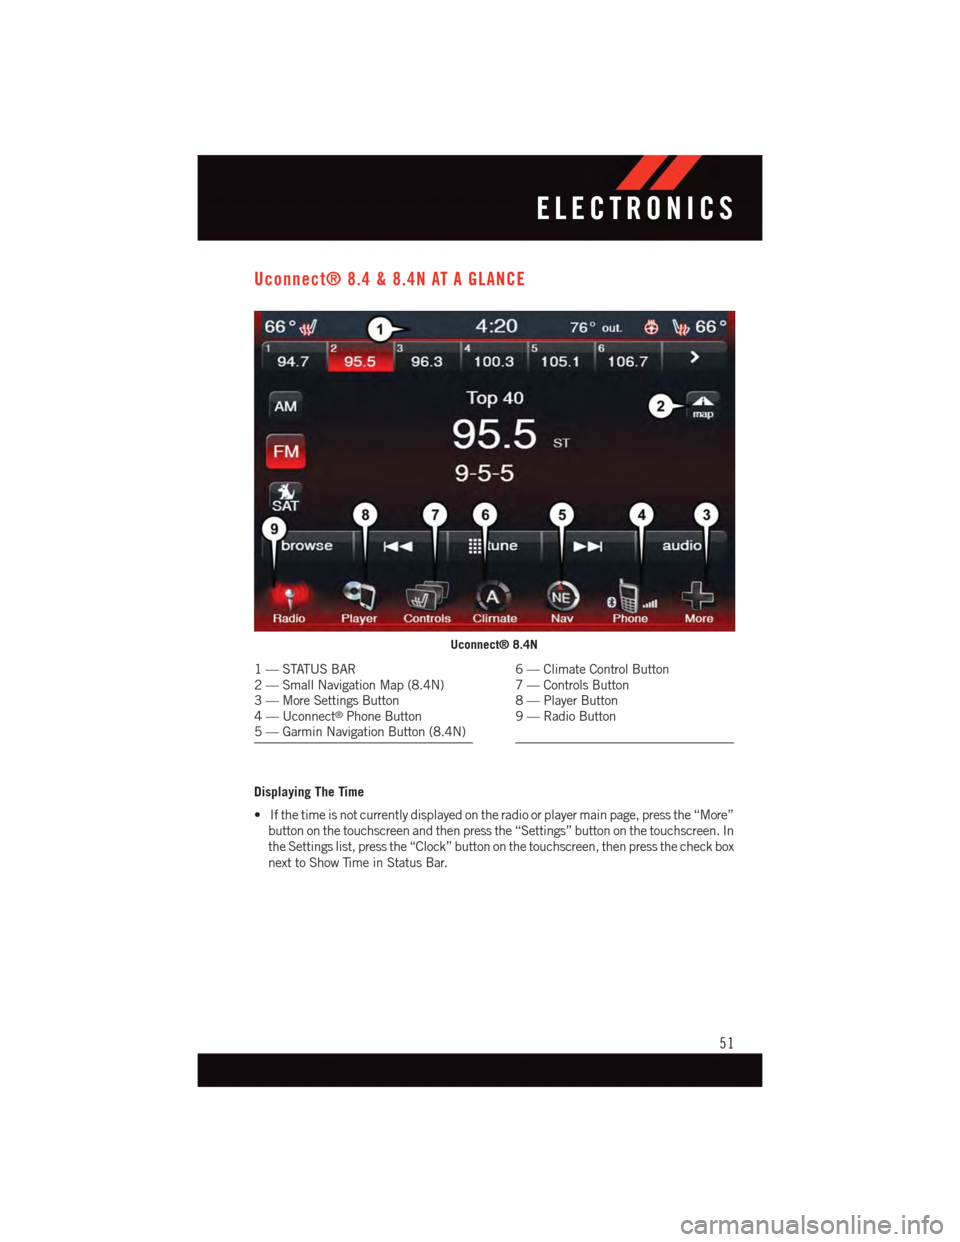
Uconnect® 8.4 & 8.4N AT A GLANCE
Displaying The Time
•Ifthetimeisnotcurrentlydisplayedontheradioorplayermainpage,pressthe“More”
button on the touchscreen and then press the “Settings” button on the touchscreen. In
the Settings list, press the “Clock” button on the touchscreen, then press the check box
next to Show Time in Status Bar.
Uconnect® 8.4N
1—STATUSBAR2—SmallNavigationMap(8.4N)3—MoreSettingsButton4—Uconnect®Phone Button5—GarminNavigationButton(8.4N)
6—ClimateControlButton7—ControlsButton8—PlayerButton9—RadioButton
ELECTRONICS
51
Page 54 of 140
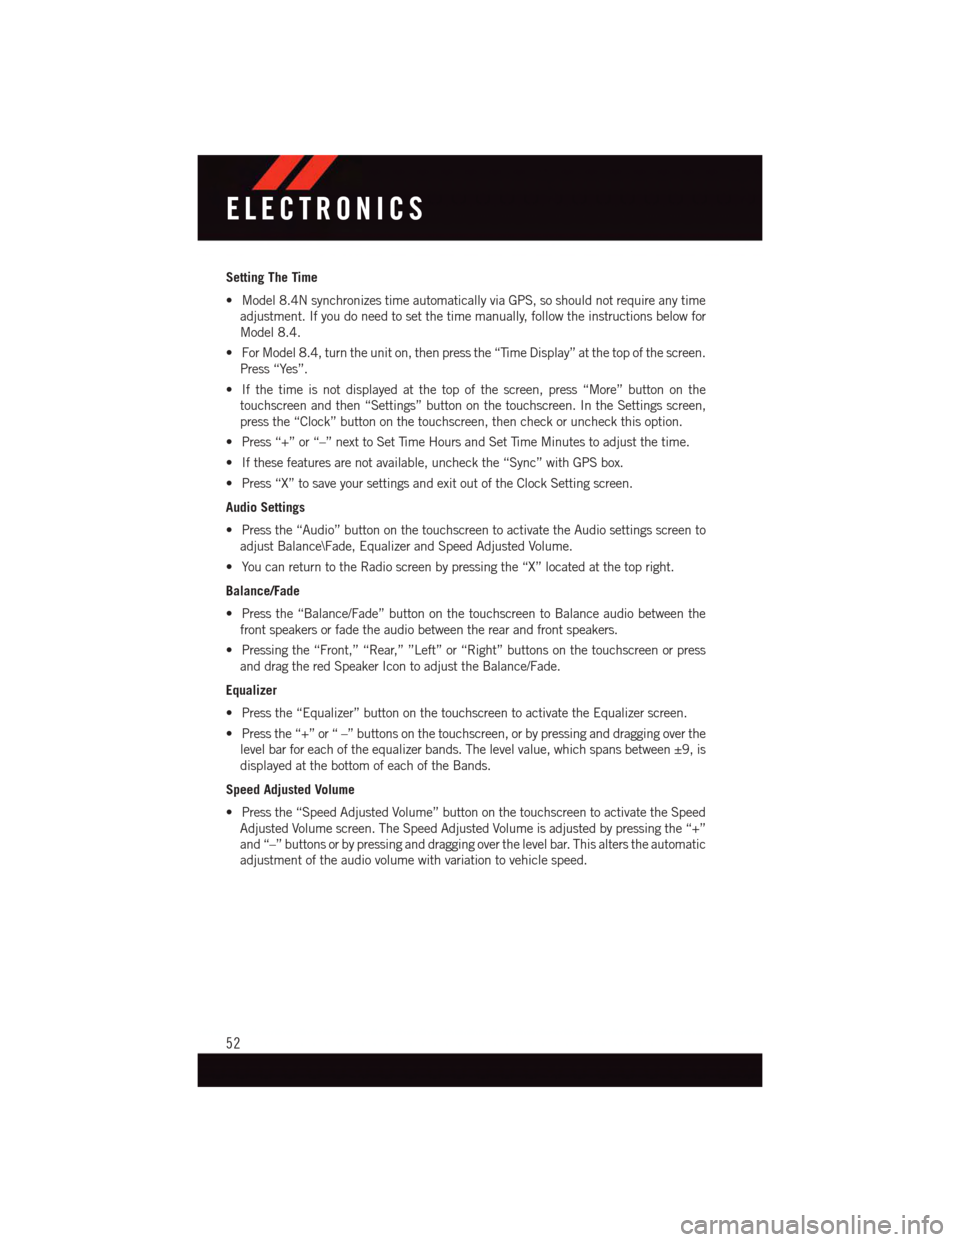
Setting The Time
•Model8.4NsynchronizestimeautomaticallyviaGPS,soshouldnotrequireanytime
adjustment. If you do need to set the time manually, follow the instructions below for
Model 8.4.
•ForModel8.4,turntheuniton,thenpressthe“TimeDisplay”atthetopofthescreen.
Press “Yes”.
•Ifthetimeisnotdisplayedatthetopofthescreen,press“More”buttononthe
touchscreen and then “Settings” button on the touchscreen. In the Settings screen,
press the “Clock” button on the touchscreen, then check or uncheck this option.
•Press“+”or“–”nexttoSetTimeHoursandSetTimeMinutestoadjustthetime.
•Ifthesefeaturesarenotavailable,uncheckthe“Sync”withGPSbox.
•Press“X”tosaveyoursettingsandexitoutoftheClockSettingscreen.
Audio Settings
•Pressthe“Audio”buttononthetouchscreentoactivatetheAudiosettingsscreento
adjust Balance\Fade, Equalizer and Speed Adjusted Volume.
•YoucanreturntotheRadioscreenbypressingthe“X”locatedatthetopright.
Balance/Fade
•Pressthe“Balance/Fade”buttononthetouchscreentoBalanceaudiobetweenthe
front speakers or fade the audio between the rear and front speakers.
•Pressingthe“Front,”“Rear,””Left”or“Right”buttonsonthetouchscreenorpress
and drag the red Speaker Icon to adjust the Balance/Fade.
Equalizer
•Pressthe“Equalizer”buttononthetouchscreentoactivatetheEqualizerscreen.
•Pressthe“+”or“–”buttonsonthetouchscreen,orbypressinganddraggingoverthe
level bar for each of the equalizer bands. The level value, which spans between ±9, is
displayed at the bottom of each of the Bands.
Speed Adjusted Volume
•Pressthe“SpeedAdjustedVolume”buttononthetouchscreentoactivatetheSpeed
Adjusted Volume screen. The Speed Adjusted Volume is adjusted by pressing the “+”
and “–” buttons or by pressing and dragging over the level bar. This alters the automatic
adjustment of the audio volume with variation to vehicle speed.
ELECTRONICS
52
Page 59 of 140
Replay
•Letsyoureplayupto44minutesofthecontentofthecurrentSiriusXMSatelliteRadio
channel.
ReplayOptionOption Description
Play/Pause Press to Pause content playback. Press “Pause/Play” again to resumeplayback.
Rewind/RW Rewinds the channel content in steps of five seconds. Press and hold torewind continuously, then release to begin playing content at that point.
FastForward/FWForwards the content, and works similarly to Rewind/RW. However, FastForward/FW can only be used when content has been previously rewound.
Replay Time Displays the amount of time in the upper center of the screen by which yourcontent lags the Live channel.
Live Resumes playback of Live content at any time while replaying rewoundcontent.
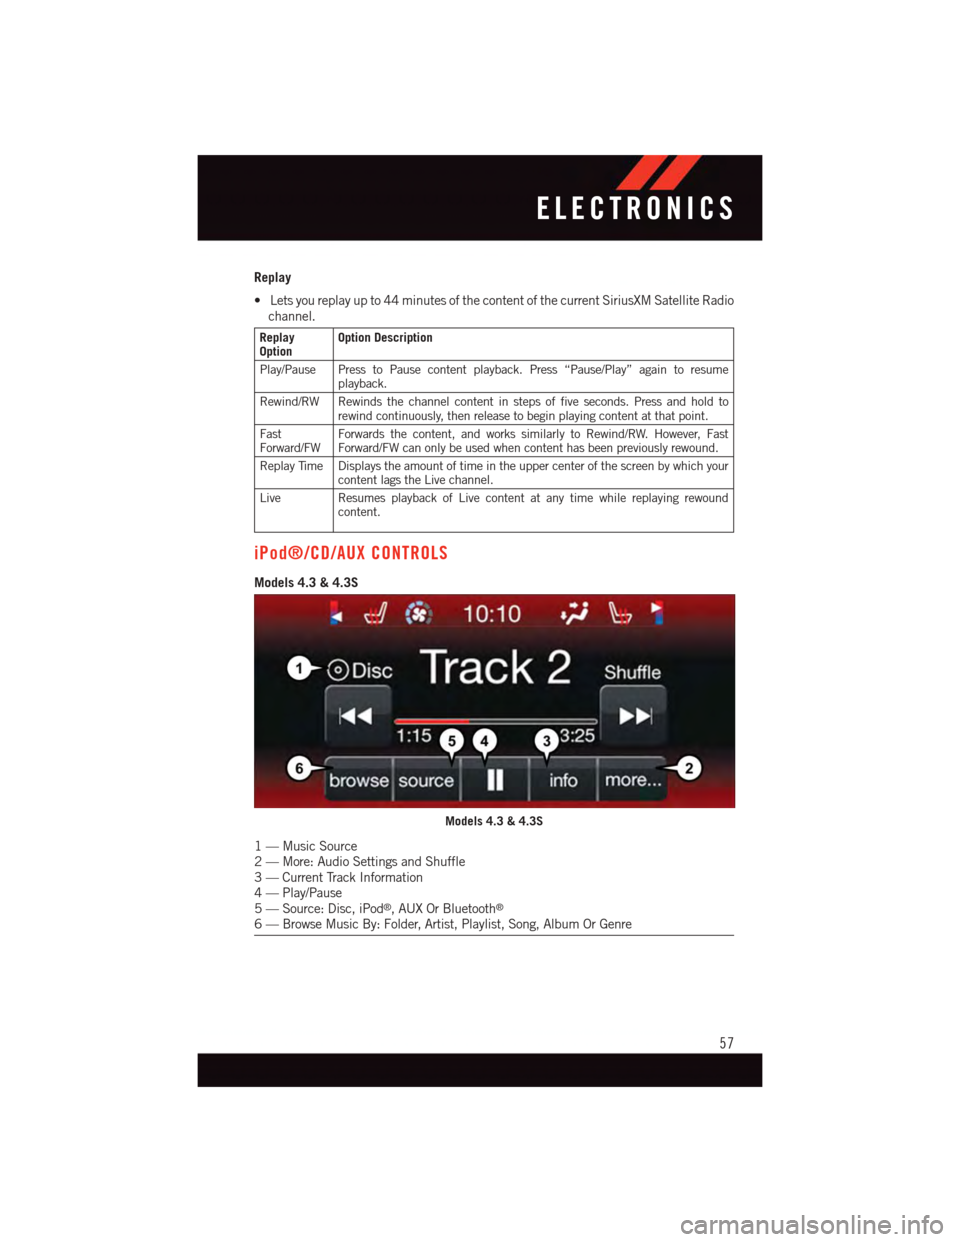
iPod®/CD/AUX CONTROLS
Models 4.3 & 4.3S
Models 4.3 & 4.3S
1—MusicSource2—More:AudioSettingsandShuffle3—CurrentTrackInformation4—Play/Pause5—Source:Disc,iPod®,AUXOrBluetooth®
6—BrowseMusicBy:Folder,Artist,Playlist,Song,AlbumOrGenre
ELECTRONICS
57
Page 61 of 140
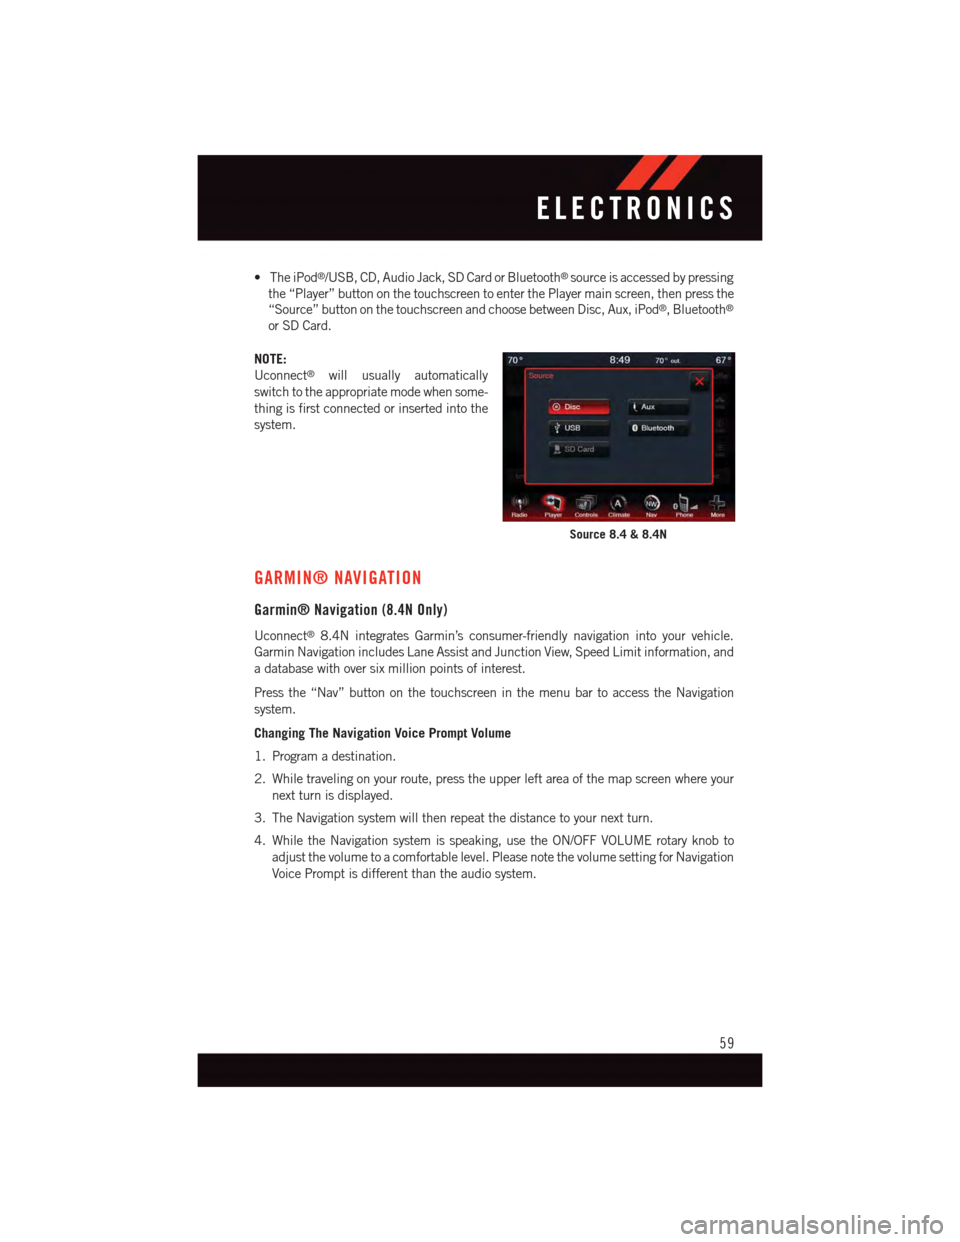
•TheiPod®/USB, CD, Audio Jack, SD Card or Bluetooth®source is accessed by pressing
the “Player” button on the touchscreen to enter the Player main screen, then press the
“Source” button on the touchscreen and choose between Disc, Aux, iPod®,Bluetooth®
or SD Card.
NOTE:
Uconnect®will usually automatically
switch to the appropriate mode when some-
thing is first connected or inserted into the
system.
GARMIN® NAVIGATION
Garmin® Navigation (8.4N Only)
Uconnect®8.4N integrates Garmin’s consumer-friendly navigation into your vehicle.
Garmin Navigation includes Lane Assist and Junction View, Speed Limit information, and
adatabasewithoversixmillionpointsofinterest.
Press the “Nav” button on the touchscreen in the menu bar to access the Navigation
system.
Changing The Navigation Voice Prompt Volume
1. Program a destination.
2. While traveling on your route, press the upper left area of the map screen where your
next turn is displayed.
3. The Navigation system will then repeat the distance to your next turn.
4. While the Navigation system is speaking, use the ON/OFF VOLUME rotary knob to
adjust the volume to a comfortable level. Please note the volume setting for Navigation
Voice Prompt is different than the audio system.
Source 8.4 & 8.4N
ELECTRONICS
59
Page 67 of 140
PLAYING iPod®/USB/MP3 DEVICES
•TherearemanywaystoplaymusicfromiPod®/MP3 players or USB devices through
your vehicles sound system.
Audio Jack (AUX)
•TheAudioJack,locatedinthecenterconsole,allowsaportabledevice,suchasan
MP3 player or an iPod®,tobepluggedintotheradioandutilizethevehiclessound
system, using a 3.5 mm audio cable, to amplify the source and play through the vehicle
speakers.
•Pressingthe“Player”buttononthetouchscreenthenchooseAUXsourcewillchange
the mode to auxiliary device if the Audio Jack is connected, allowing the music from
your portable device to be heard through the vehicles speakers.
•Thefunctionsoftheportabledevicearecontrolledusingthedevicebuttons.The
volume may be controlled using the radio or portable device.
•Toroutetheaudiocableoutofthecenterconsole,usetheaccesscutoutinthefront
of the console.
USB Port
•ConnectyouriPod®or compatible device using a USB cable into the USB Port. The
USB Port is contained within the center console. USB Memory sticks with audio files
can also be used. Then, audio from the device can be played on the vehicles sound
system while providing metadata (artist, track title, album, etc.) information on the
radio display.
•Whenconnected,theiPod®/compatible USB device can be controlled using the radio
or Steering Wheel Audio Controls to play, skip to the next or previous track, browse, and
list the contents.
•TheiPod®battery charges when plugged into the USB port (if supported by the specific
device).
•ToroutetheUSB/iPod®cable out of the center console, use the access cut out in the
front of the console.
NOTE:
•WhenconnectingyouriPod®device for the first time, the system may take several
minutes to read your music, depending on the number of files. For example, the system
will take approximately five minutes for every 1000 songs loaded on the device. Also
during the reading process, the Shuffle and Browse functions will be disabled. This
process is needed to ensure the full use of your iPod®features and only happens the
first time it is connected. After the first time, the reading process of your iPod®will take
considerably less time unless changes are made or new songs are added to the playlist.
•TheUSBportsupportscertainMini,Classic,Nano,Touch,andiPhone®devices. The
USB port also supports playing music from compatible external USB Mass Storage
Class memory devices. Some iPod®software versions may not fully support the USB
port features. Please visit Apple’s website for iPod®software updates.
ELECTRONICS
65