weight DODGE JOURNEY 2015 1.G User Guide
[x] Cancel search | Manufacturer: DODGE, Model Year: 2015, Model line: JOURNEY, Model: DODGE JOURNEY 2015 1.GPages: 140, PDF Size: 23.09 MB
Page 3 of 140
INTRODUCTION/WELCOME
WELCOME FROM CHRYSLERGROUP LLC..................2
CONTROLS AT A GLANCE
DRIVER COCKPIT...............4INSTRUMENT CLUSTER...........6
GETTING STARTED
KEY FOB . . . . . . . . . . . . . . . . . . . . . 8REMOTE START . . . . . . . . . . . . . . . . 9KEYLESS ENTER-N-GO™.........10VEHICLE SECURITY ALARM........14SEAT BELT SYSTEMS............15SUPPLEMENTAL RESTRAINT SYSTEM(SRS) — AIR BAGS.............16CHILD RESTRAINTS............19HEAD RESTRAINTS.............25FRONT SEATS................27REAR SEATS.................30HEATED SEATS . . . . . . . . . . . . . . . 32HEATED STEERING WHEEL........33TILT/TELESCOPING STEERINGCOLUMN...................34
OPERATING YOUR VEHICLE
ENGINE BREAK-INRECOMMENDATIONS............35TURN SIGNAL/WIPER/WASHER/HIGHBEAM LEVER.................36HEADLIGHT SWITCH............37ELECTRONIC SPEED CONTROL......38CLIMATE CONTROL.............40PA R K V I E W®REAR BACK-UP CAMERA . . 43POWER SUNROOF..............44WIND BUFFETING..............45
ELECTRONICS
YOUR VEHICLE'S SOUND SYSTEM....46IDENTIFYING YOUR RADIO.........48Uconnect®4.3 & 4.3S AT A GLANCE . . . 49Uconnect®8.4 & 8.4N AT A GLANCE . . . 51RADIO.....................53SiriusXM SATELLITE RADIO.........55iPod®/CD/AUX CONTROLS..........57GARMIN®NAVIGATION...........59SiriusXM TRAVEL LINK...........64PLAYING iPod®/USB/MP3 DEVICES....65Uconnect®PHONE..............66Uconnect®VOICE COMMAND(8.4 & 8.4N ONLY)..............72VIDEO ENTERTAINMENTSYSTEM (VES™)...............75STEERING WHEEL AUDIO CONTROLS . . 76ELECTRONIC VEHICLE INFORMATIONCENTER (EVIC)................76PROGRAMMABLE FEATURES.......77
UNIVERSAL GARAGE DOOR OPENER(HomeLink®).................78POWER INVERTER.............81POWER OUTLETS..............82
UTILITY
TRAILER TOWING WEIGHTS (MAXIMUMTRAILER WEIGHT RATINGS)........84RECREATIONAL TOWING (BEHINDMOTORHOME, ETC.)............85
WHAT TO DO IN EMERGENCIES
ROADSIDE ASSISTANCE..........86INSTRUMENT CLUSTER WARNINGLIGHTS....................86INSTRUMENT CLUSTER INDICATORLIGHTS....................91IF YOUR ENGINE OVERHEATS.......92JACKING AND TIRE CHANGING......93JUMP-STARTING..............101SHIFT LEVER OVERRIDE.........104TOWING A DISABLED VEHICLE.....105FREEING A STUCK VEHICLE.......105EVENT DATA RECORDER (EDR).....106
MAINTAINING YOUR VEHICLE
OPENING THE HOOD...........107ENGINE COMPARTMENT.........108FLUID CAPACITIES............112FLUIDS, LUBRICANTS AND GENUINEPA RT S . . . . . . . . . . . . . . . . . . . . 1 1 2MAINTENANCE PROCEDURES......114MAINTENANCE SCHEDULE........114MAINTENANCE RECORD.........118FUSES....................119TIRE PRESSURES.............121SPARE TIRES — IF EQUIPPED......122WHEEL AND WHEEL TRIM CARE....124REPLACEMENT BULBS..........124
CONSUMER ASSISTANCE
CHRYSLER GROUP LLC CUSTOMERCENTER...................126CHRYSLER CANADA INC. CUSTOMERCENTER...................126ASSISTANCE FOR THE HEARINGIMPAIRED..................126PUBLICATIONS ORDERING........126REPORTING SAFETY DEFECTS IN THEUNITED STATES..............127
MOPAR® ACCESSORIES
AUTHENTIC ACCESSORIES BYMOPAR®...................128
FREQUENTLY ASKED QUESTIONS
FREQUENTLY ASKED QUESTIONS....129
INDEX.....................130
TABLE OF CONTENTS
Page 21 of 140
CHILD RESTRAINTS
Children 12 years or younger should ride properly buckled up in a rear seat, if available.
According to crash statistics, children are safer when properly restrained in the rear seats
rather than in the front.
Every state in the United States and all Canadian provinces require that small children
ride in proper restraint systems. This is the law, and you can be prosecuted for ignoring it.
NOTE:
•Foradditionalinformation,refertowww.Seatcheck.orgorcall1-866-SEATCHECK.
•CanadianresidentsshouldrefertoTransportCanada’swebsiteforadditionalinforma-
tion: http://www.tc.gc.ca/eng/motorvehiclesafety/safedrivers-childsafety-index-53.htm
LATCH — Lower Anchors And Tethers For CHildren
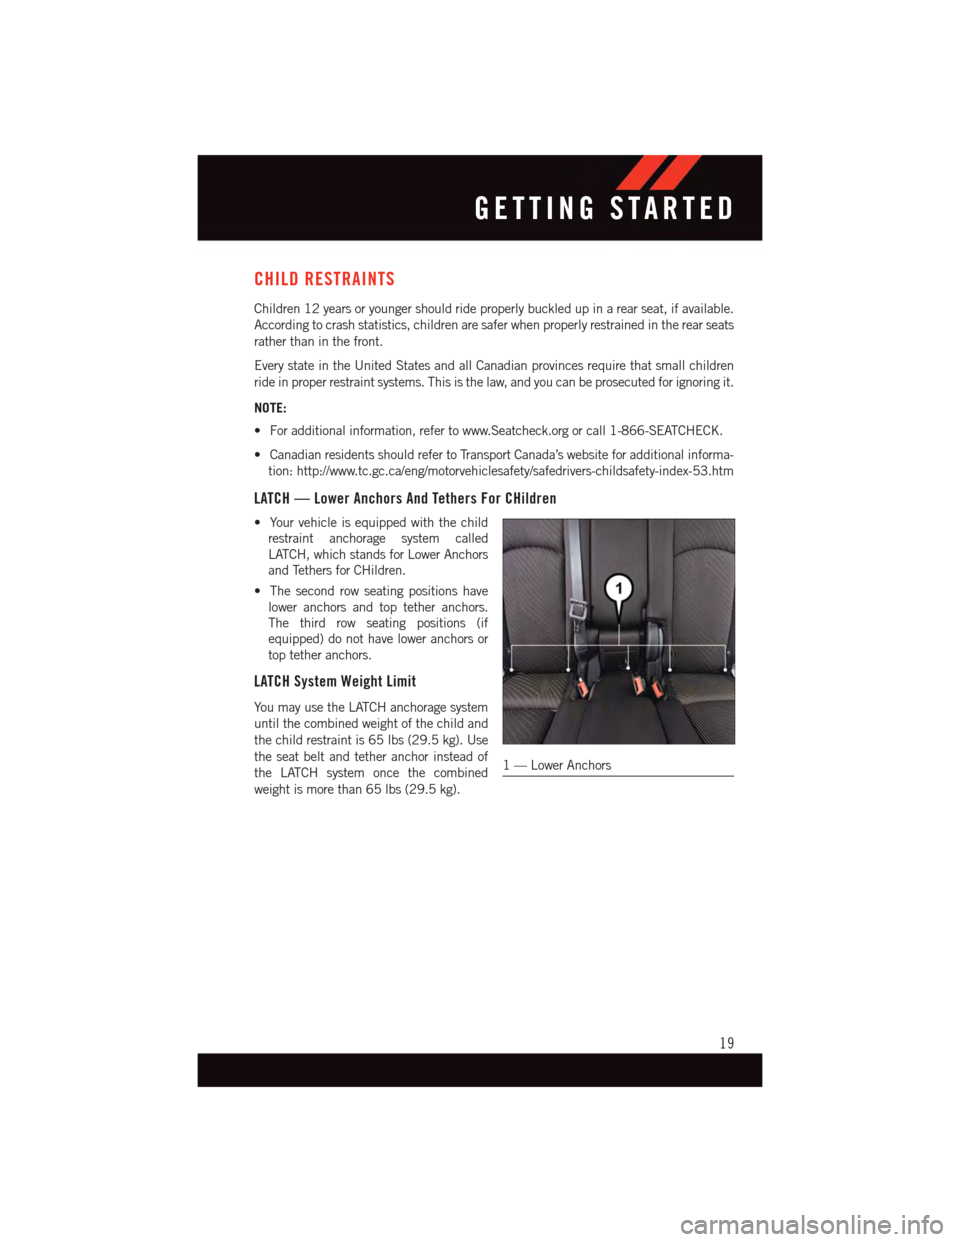
•Yourvehicleisequippedwiththechild
restraint anchorage system called
LATCH, which stands for Lower Anchors
and Tethers for CHildren.
•Thesecondrowseatingpositionshave
lower anchors and top tether anchors.
The third row seating positions (if
equipped) do not have lower anchors or
top tether anchors.
LATCH System Weight Limit
Yo u m a y u s e t h e L AT C H a n c h o r a g e s y s t e m
until the combined weight of the child and
the child restraint is 65 lbs (29.5 kg). Use
the seat belt and tether anchor instead of
the LATCH system once the combined
weight is more than 65 lbs (29.5 kg).
1—LowerAnchors
GETTING STARTED
19
Page 23 of 140
Center Seat LATCH
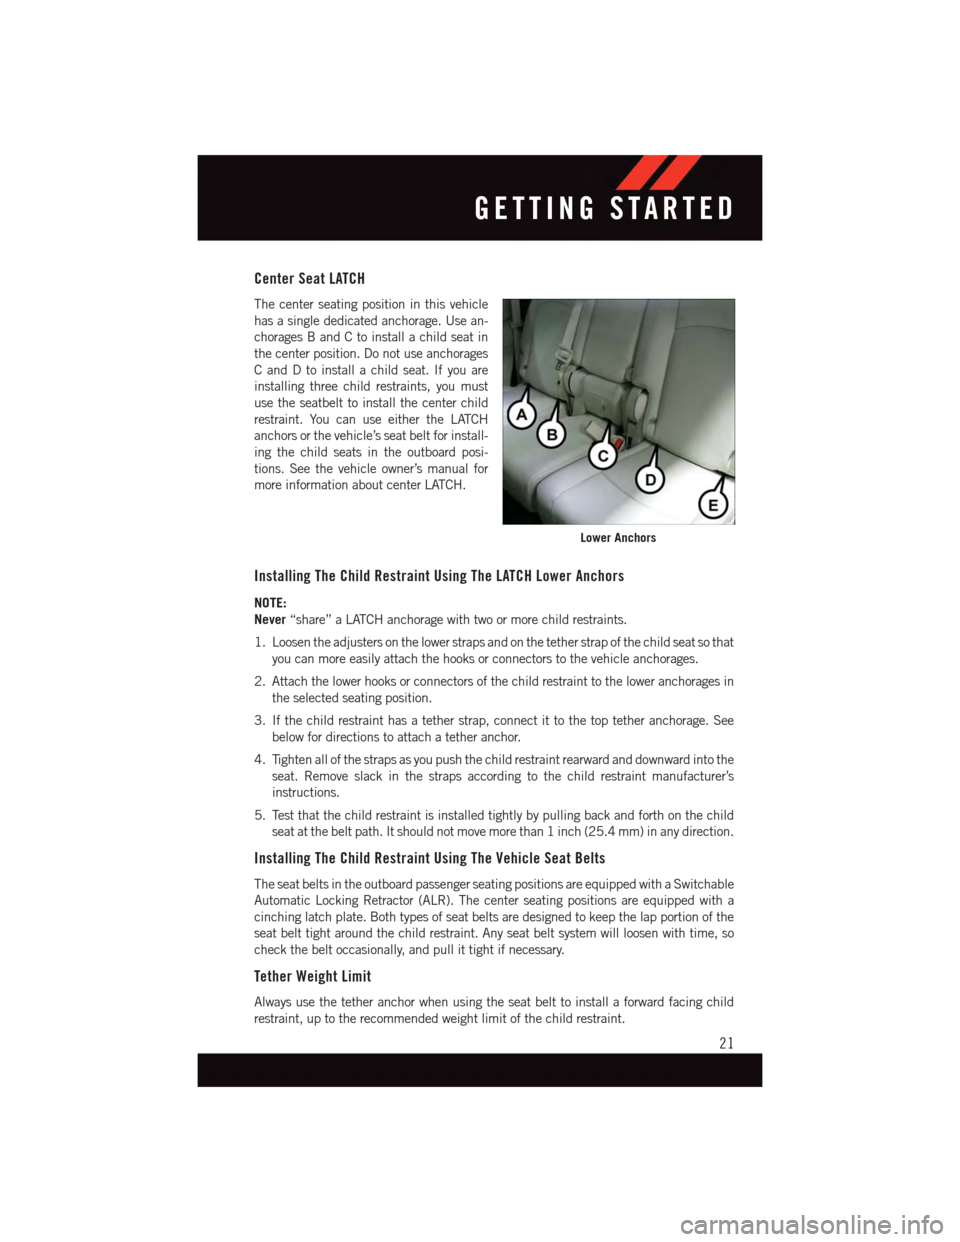
The center seating position in this vehicle
has a single dedicated anchorage. Use an-
chorages B and C to install a child seat in
the center position. Do not use anchorages
CandDtoinstallachildseat.Ifyouare
installing three child restraints, you must
use the seatbelt to install the center child
restraint. You can use either the LATCH
anchors or the vehicle’s seat belt for install-
ing the child seats in the outboard posi-
tions. See the vehicle owner’s manual for
more information about center LATCH.
Installing The Child Restraint Using The LATCH Lower Anchors
NOTE:
Never“share” a LATCH anchorage with two or more child restraints.
1. Loosen the adjusters on the lower straps and on the tether strap of the child seat so that
you can more easily attach the hooks or connectors to the vehicle anchorages.
2. Attach the lower hooks or connectors of the child restraint to the lower anchorages in
the selected seating position.
3. If the child restraint has a tether strap, connect it to the top tether anchorage. See
below for directions to attach a tether anchor.
4. Tighten all of the straps as you push the child restraint rearward and downward into the
seat. Remove slack in the straps according to the child restraint manufacturer’s
instructions.
5. Test that the child restraint is installed tightly by pulling back and forth on the child
seat at the belt path. It should not move more than 1 inch (25.4 mm) in any direction.
Installing The Child Restraint Using The Vehicle Seat Belts
The seat belts in the outboard passenger seating positions are equipped with a Switchable
Automatic Locking Retractor (ALR). The center seating positions are equipped with a
cinching latch plate. Both types of seat belts are designed to keep the lap portion of the
seat belt tight around the child restraint. Any seat belt system will loosen with time, so
check the belt occasionally, and pull it tight if necessary.
Tether Weight Limit
Always use the tether anchor when using the seat belt to install a forward facing child
restraint, up to the recommended weight limit of the child restraint.
Lower Anchors
GETTING STARTED
21
Page 24 of 140
To Install A Child Seat Using An ALR:
1. Pull enough of the seat belt webbing from the retractor to pass it through the belt path
of the child restraint. Do not twist the belt webbing in the belt path.
2. Slide the latch plate into the buckle until you hear a “click.”
3. Pull on the webbing to make the lap portion tight against the child seat.
4. To lock the seat belt, pull down on the shoulder part of the belt until you have pulled
all the seat belt webbing out of the retractor. Then, allow the webbing to retract back
into the retractor. As the webbing retracts, you will hear a clicking sound. This means
the seat belt is now in the Automatic Locking mode.
5. Try to pull the webbing out of the retractor. If it is locked, you should not be able to pull
out any webbing. If the retractor is not locked, repeat the last step.
6. Finally, pull up on any extra webbing to tighten the lap portion around the child
restraint while you push the child restraint rearward and downward into the vehicle
seat.
7. If the child restraint has a top tether strap and the seating position has a top tether
anchorage, connect the tether strap to the anchorage and tighten the tether strap. See
below for directions to attach a tether anchor.
8. Test that the child restraint is installed tightly by pulling back and forth on the child
seat at the belt path. It should not move more than 1 inch (25.4 mm) in any direction.
To Install A Child Seat Using A Cinching Latch Plate:
1. Place the child seat in the center of the seating position.
2. Next, pull enough of the seat belt webbing from the retractor to pass it through the belt
path of the child restraint. Do not twist the belt webbing in the belt path.
3. Slide the latch plate into the buckle until you hear a “click.”
4. Finally, pull up on any excess webbing to tighten the lap portion around the child
restraint while you push the child restraint rearward and downward into the vehicle
seat.
5. If the child restraint has a top tether strap and the seating position has a top tether
anchorage, connect the tether strap to the anchorage and tighten the tether strap. See
below for directions to attach a tether anchor.
6. Test that the child restraint is installed tightly by pulling back and forth on the child
seat at the belt path. It should not move more than 1 inch (25.4 mm) in any direction.
Installing The Top Tether Strap (With Either Lower Anchors Or Vehicle Seat Belt):
When installing a forward-facing child restraint, always secure the top tether strap, up to
the tether anchor weight limit, whether the child restraint is installed with the lower
anchors or the vehicle seat belt.
GETTING STARTED
22
Page 25 of 140
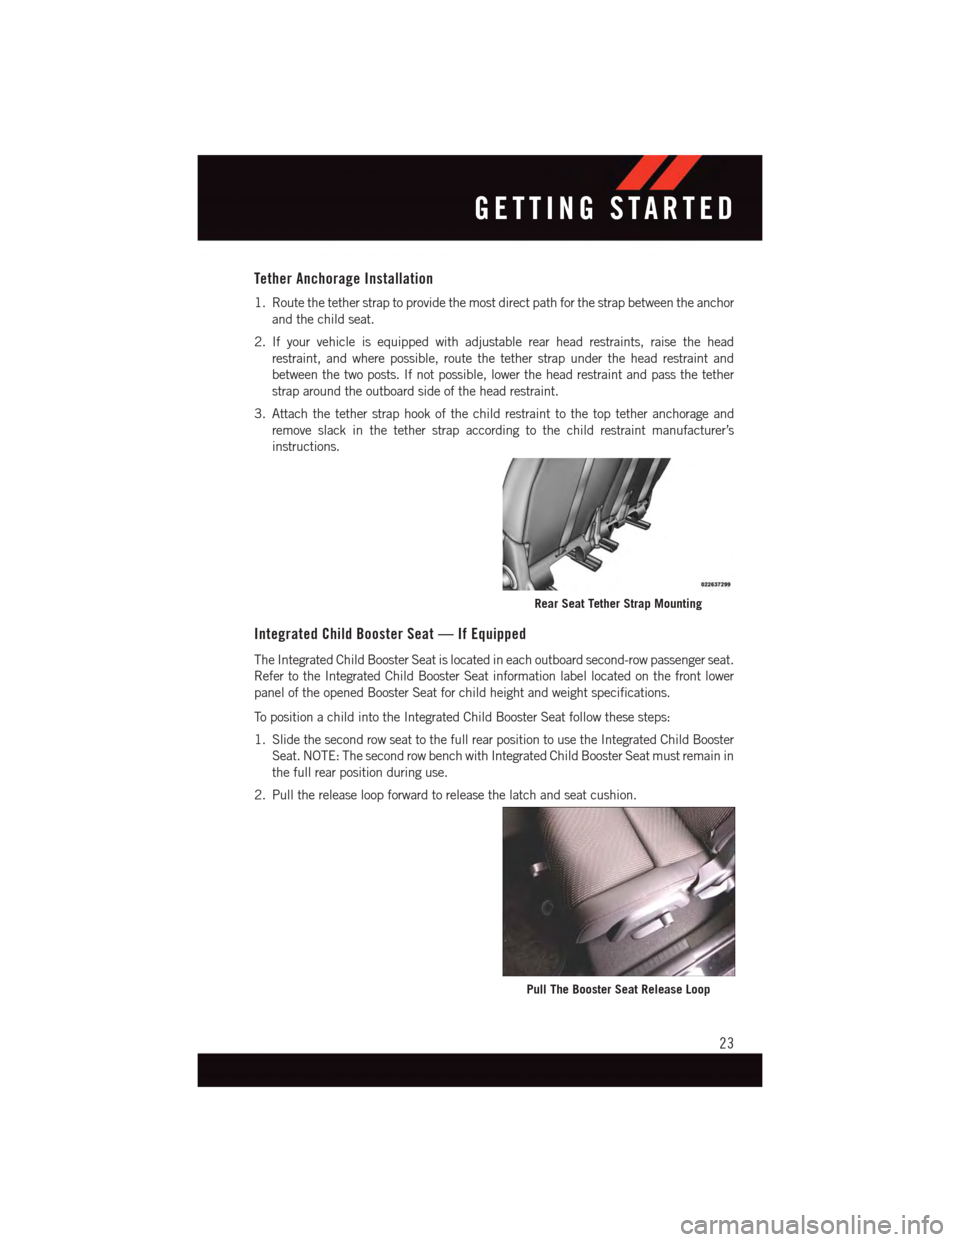
Tether Anchorage Installation
1. Route the tether strap to provide the most direct path for the strap between the anchor
and the child seat.
2. If your vehicle is equipped with adjustable rear head restraints, raise the head
restraint, and where possible, route the tether strap under the head restraint and
between the two posts. If not possible, lower the head restraint and pass the tether
strap around the outboard side of the head restraint.
3. Attach the tether strap hook of the child restraint to the top tether anchorage and
remove slack in the tether strap according to the child restraint manufacturer’s
instructions.
Integrated Child Booster Seat — If Equipped
The Integrated Child Booster Seat is located in each outboard second-row passenger seat.
Refer to the Integrated Child Booster Seat information label located on the front lower
panel of the opened Booster Seat for child height and weight specifications.
To p o s i t i o n a c h i l d i n t o t h e I n t e g r a t e d C h i l d B o o s t e r S e a t f o l l o w t h e s e s t e p s :
1. Slide the second row seat to the full rear position to use the Integrated Child Booster
Seat. NOTE: The second row bench with Integrated Child Booster Seat must remain in
the full rear position during use.
2. Pull the release loop forward to release the latch and seat cushion.
Rear Seat Tether Strap Mounting
Pull The Booster Seat Release Loop
GETTING STARTED
23
Page 86 of 140
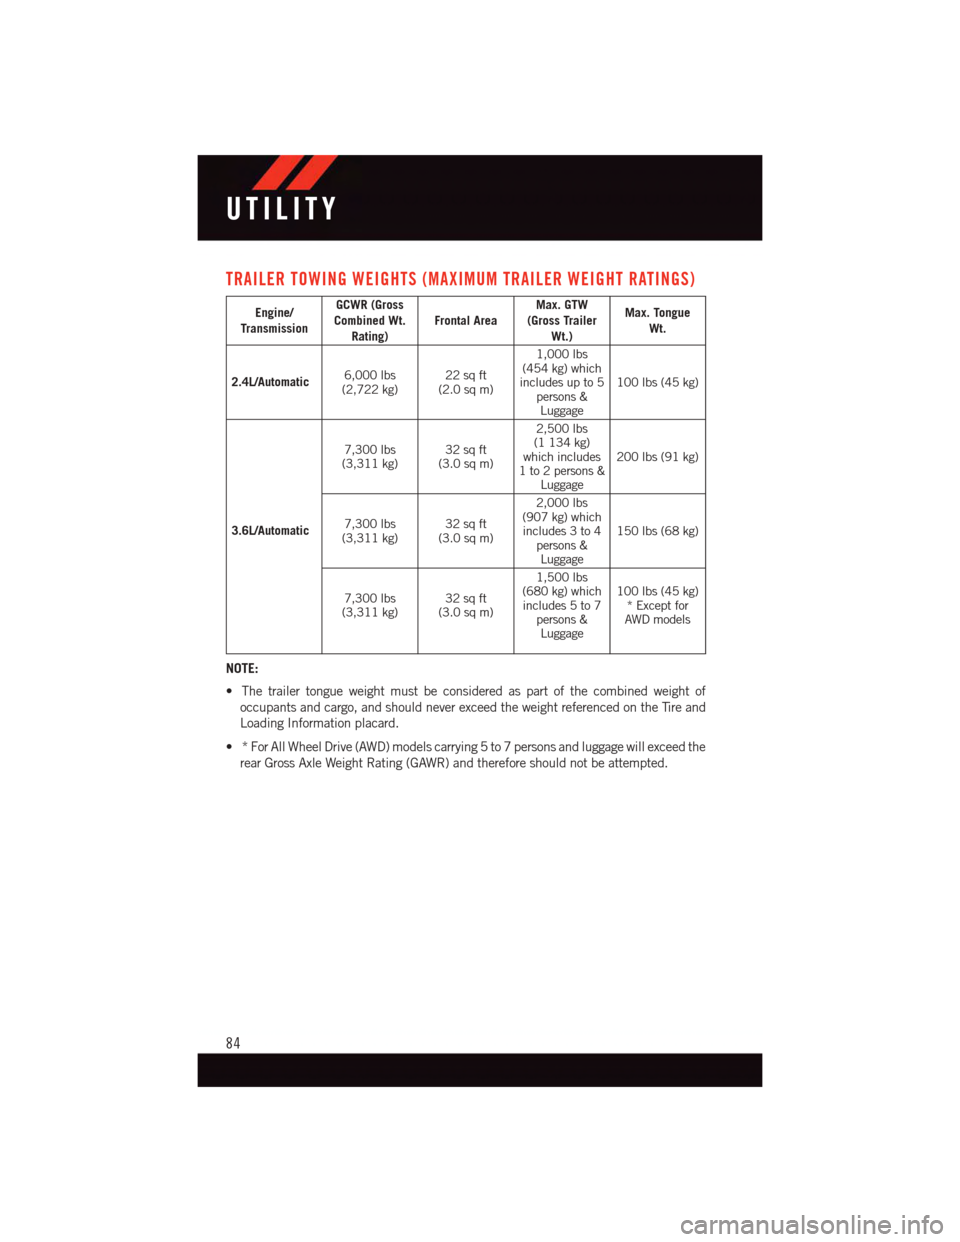
TRAILER TOWING WEIGHTS (MAXIMUM TRAILER WEIGHT RATINGS)
Engine/Transmission
GCWR (GrossCombined Wt.Rating)Frontal AreaMax. GTW(Gross TrailerWt.)
Max. TongueWt.
2.4L/Automatic6,000 lbs(2,722 kg)22 sq ft(2.0 sq m)
1,000 lbs(454 kg) whichincludes up to 5persons &Luggage
100 lbs (45 kg)
3.6L/Automatic
7,300 lbs(3,311 kg)32 sq ft(3.0 sq m)
2,500 lbs(1 134 kg)which includes1to2persons&Luggage
200 lbs (91 kg)
7,300 lbs(3,311 kg)32 sq ft(3.0 sq m)
2,000 lbs(907 kg) whichincludes 3 to 4persons &Luggage
150 lbs (68 kg)
7,300 lbs(3,311 kg)32 sq ft(3.0 sq m)
1,500 lbs(680 kg) whichincludes 5 to 7persons &Luggage
100 lbs (45 kg)*ExceptforAWD models
NOTE:
•Thetrailertongueweightmustbeconsideredaspartofthecombinedweightof
occupants and cargo, and should never exceed the weight referenced on the Tire and
Loading Information placard.
•*ForAllWheelDrive(AWD)modelscarrying5to7personsandluggagewillexceedthe
rear Gross Axle Weight Rating (GAWR) and therefore should not be attempted.
UTILITY
84