stop start DODGE JOURNEY 2017 1.G User Guide
[x] Cancel search | Manufacturer: DODGE, Model Year: 2017, Model line: JOURNEY, Model: DODGE JOURNEY 2017 1.GPages: 510
Page 159 of 510
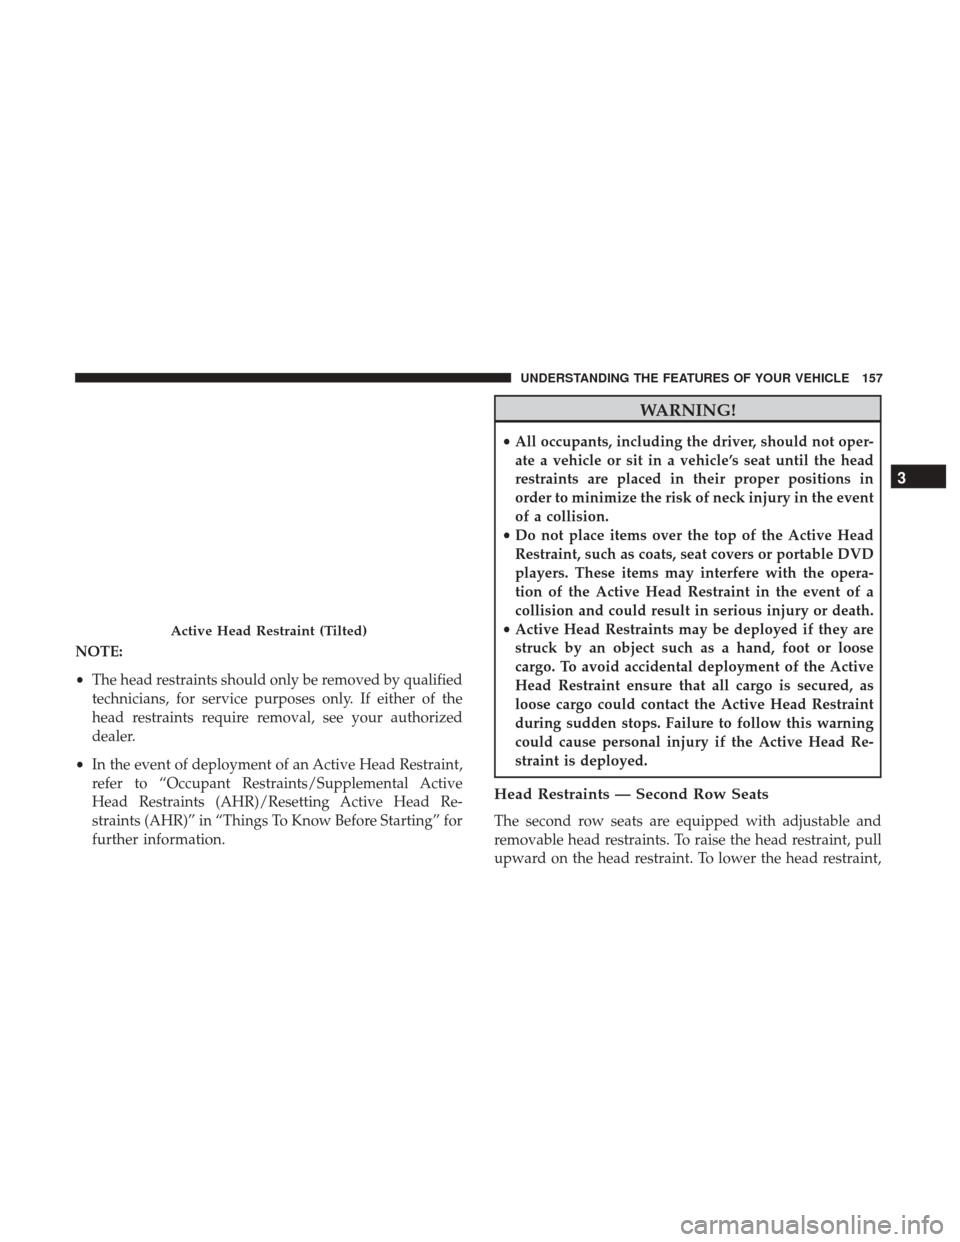
NOTE:
•The head restraints should only be removed by qualified
technicians, for service purposes only. If either of the
head restraints require removal, see your authorized
dealer.
• In the event of deployment of an Active Head Restraint,
refer to “Occupant Restraints/Supplemental Active
Head Restraints (AHR)/Resetting Active Head Re-
straints (AHR)” in “Things To Know Before Starting” for
further information.
WARNING!
• All occupants, including the driver, should not oper-
ate a vehicle or sit in a vehicle’s seat until the head
restraints are placed in their proper positions in
order to minimize the risk of neck injury in the event
of a collision.
• Do not place items over the top of the Active Head
Restraint, such as coats, seat covers or portable DVD
players. These items may interfere with the opera-
tion of the Active Head Restraint in the event of a
collision and could result in serious injury or death.
• Active Head Restraints may be deployed if they are
struck by an object such as a hand, foot or loose
cargo. To avoid accidental deployment of the Active
Head Restraint ensure that all cargo is secured, as
loose cargo could contact the Active Head Restraint
during sudden stops. Failure to follow this warning
could cause personal injury if the Active Head Re-
straint is deployed.
Head Restraints — Second Row Seats
The second row seats are equipped with adjustable and
removable head restraints. To raise the head restraint, pull
upward on the head restraint. To lower the head restraint,
Active Head Restraint (Tilted)
3
UNDERSTANDING THE FEATURES OF YOUR VEHICLE 157
Page 160 of 510
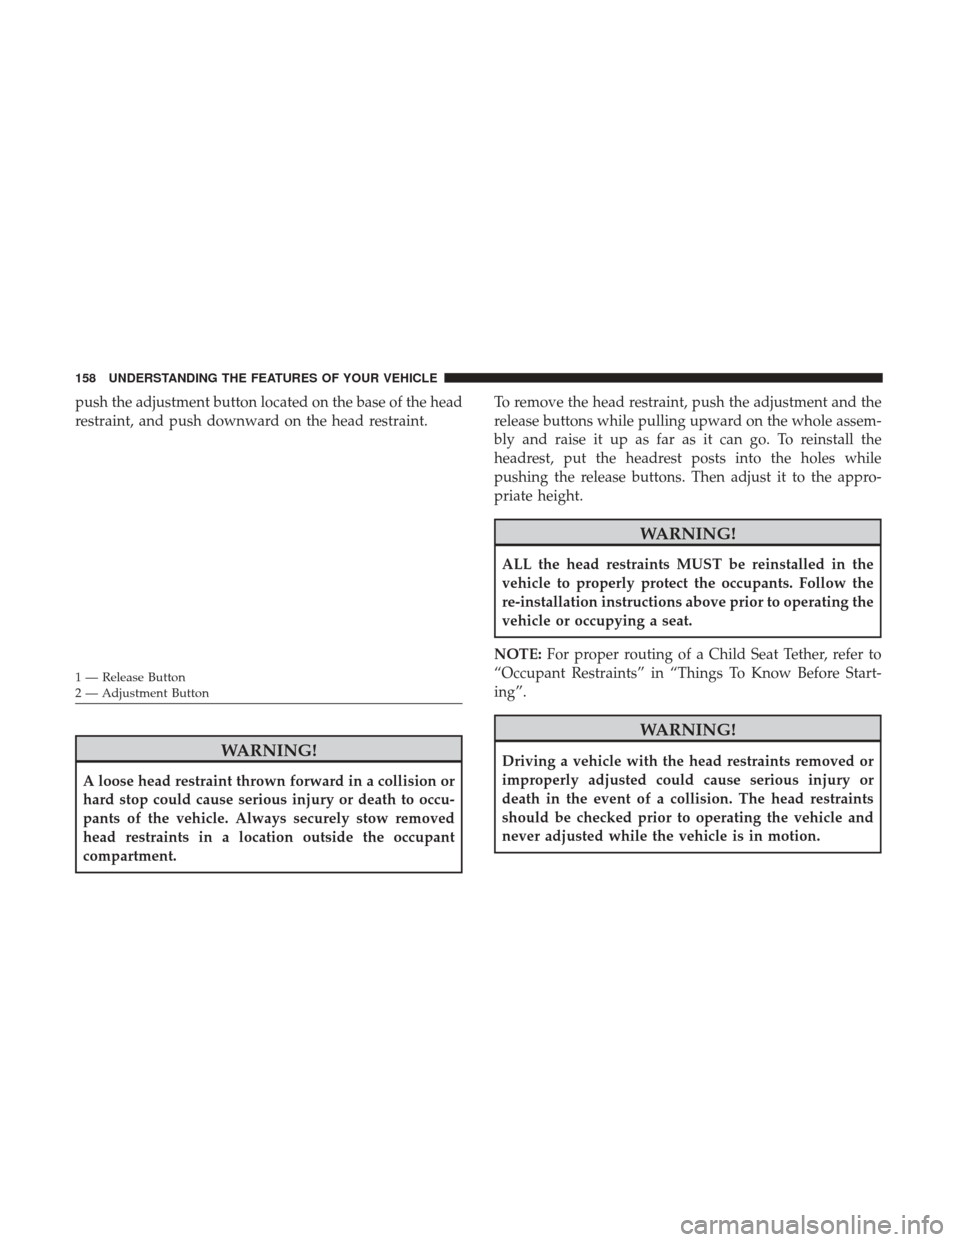
push the adjustment button located on the base of the head
restraint, and push downward on the head restraint.
WARNING!
A loose head restraint thrown forward in a collision or
hard stop could cause serious injury or death to occu-
pants of the vehicle. Always securely stow removed
head restraints in a location outside the occupant
compartment.To remove the head restraint, push the adjustment and the
release buttons while pulling upward on the whole assem-
bly and raise it up as far as it can go. To reinstall the
headrest, put the headrest posts into the holes while
pushing the release buttons. Then adjust it to the appro-
priate height.
WARNING!
ALL the head restraints MUST be reinstalled in the
vehicle to properly protect the occupants. Follow the
re-installation instructions above prior to operating the
vehicle or occupying a seat.
NOTE: For proper routing of a Child Seat Tether, refer to
“Occupant Restraints” in “Things To Know Before Start-
ing”.
WARNING!
Driving a vehicle with the head restraints removed or
improperly adjusted could cause serious injury or
death in the event of a collision. The head restraints
should be checked prior to operating the vehicle and
never adjusted while the vehicle is in motion.
1 — Release Button
2 — Adjustment Button 158 UNDERSTANDING THE FEATURES OF YOUR VEHICLE
Page 224 of 510
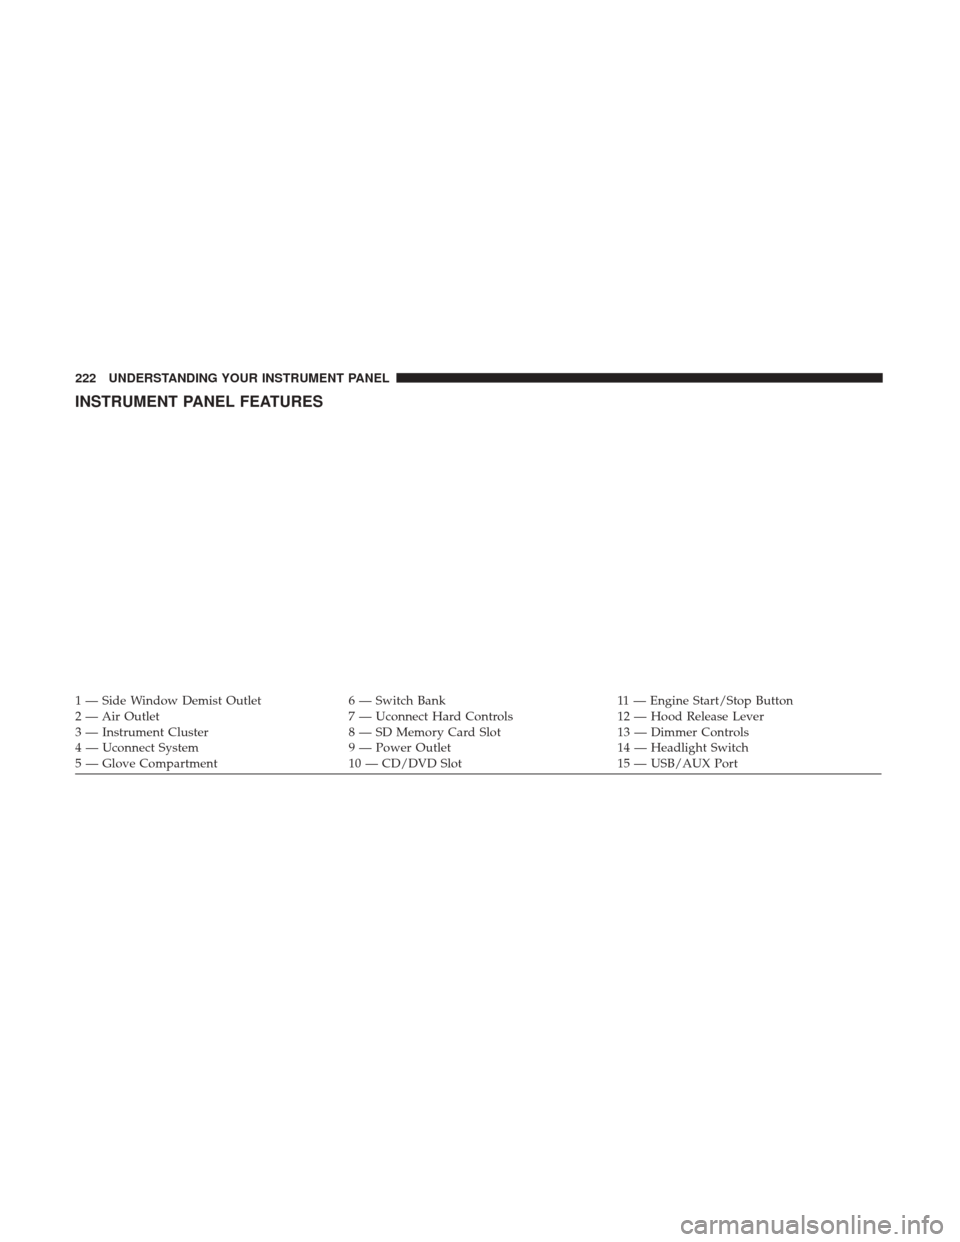
INSTRUMENT PANEL FEATURES
1 — Side Window Demist Outlet6 — Switch Bank11 — Engine Start/Stop Button
2 — Air Outlet 7 — Uconnect Hard Controls12 — Hood Release Lever
3 — Instrument Cluster 8 — SD Memory Card Slot13 — Dimmer Controls
4 — Uconnect System 9 — Power Outlet14 — Headlight Switch
5 — Glove Compartment 10 — CD/DVD Slot15 — USB/AUX Port
222 UNDERSTANDING YOUR INSTRUMENT PANEL
Page 232 of 510
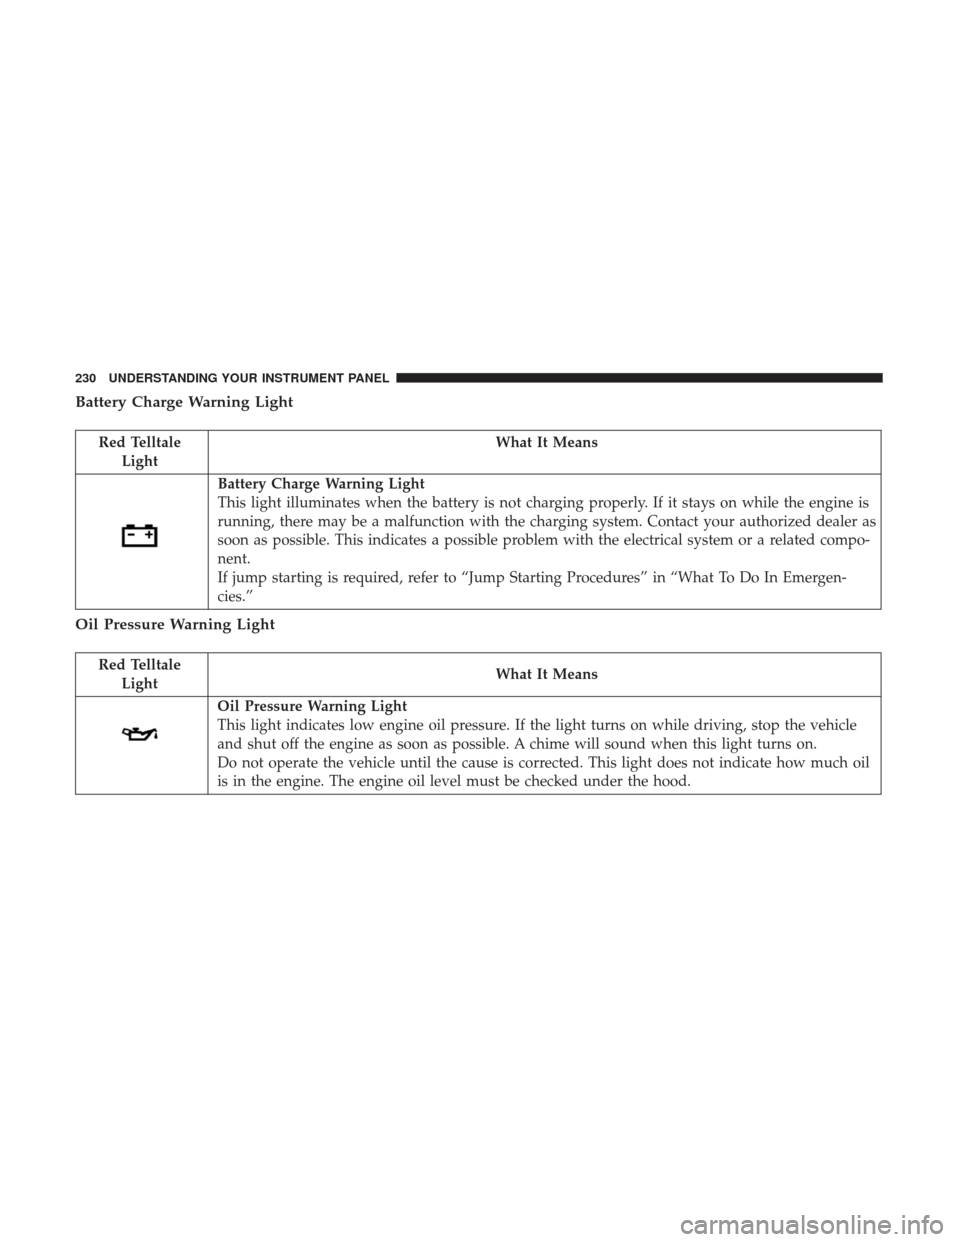
Battery Charge Warning Light
Red TelltaleLight What It Means
Battery Charge Warning Light
This light illuminates when the battery is not charging properly. If it stays on while the engine is
running, there may be a malfunction with the charging system. Contact your authorized dealer as
soon as possible. This indicates a possible problem with the electrical system or a related compo-
nent.
If jump starting is required, refer to “Jump Starting Procedures” in “What To Do In Emergen-
cies.”
Oil Pressure Warning Light
Red Telltale
Light What It Means
Oil Pressure Warning Light
This light indicates low engine oil pressure. If the light turns on while driving, stop the vehicle
and shut off the engine as soon as possible. A chime will sound when this light turns on.
Do not operate the vehicle until the cause is corrected. This light does not indicate how much oil
is in the engine. The engine oil level must be checked under the hood.
230 UNDERSTANDING YOUR INSTRUMENT PANEL
Page 233 of 510
Electronic Throttle Control (ETC) Warning Light
Red TelltaleLight What It Means
Electronic Throttle Control (ETC) Warning Light
This light informs you of a problem with the Electronic Throttle Control (ETC) system. If a prob-
lem is detected while the engine is running, the light will either stay on or flash depending on
the nature of the problem. Cycle the ignition key when the vehicle is safely and completely
stopped and the transmission is placed in the PARK position. The light should turn off. If the
light remains on with the engine running, your vehicle will usually be drivable; however, see an
authorized dealer for service as soon as possible.
If the light continues to flash when the engine is running, immediate service is required and you
may experience reduced performance, an elevated/rough idle, or engine stall and your vehicle
may require towing. The light will come on when the ignition is first turned to ON/RUN and
remain on briefly as a bulb check. If the light does not come on during starting, have the system
checked by an authorized dealer.
4
UNDERSTANDING YOUR INSTRUMENT PANEL 231
Page 247 of 510
Unless reset, this message will continue to display each
time you cycle the ignition to the ON/RUN position. To
turn off the message temporarily, push and release theUP
arrow button. To reset the oil change indicator sys-
tem (after performing the scheduled maintenance), per-
form the following procedure:
1. Without pushing the brake pedal, push and release the ENGINE START/STOP button and cycle the ignition to
the ON/RUN position (do not start the engine).
2. Fully push the accelerator pedal, slowly, three times within 10 seconds.
3. Without pushing the brake pedal, push and release the ENGINE START/STOP button once to return the igni-
tion to the OFF/LOCK position.
NOTE: If the indicator message illuminates when you start
the vehicle, the oil change indicator system did not reset. If
necessary, repeat this procedure.
Fuel Economy
Push and release the UPorDOWNarrow button
until “Fuel Economy” displays highlighted in the In-
strument Cluster Display and push the RIGHT
ar-
row button. The following Fuel Economy functions will
display in the Instrument Cluster Display:
• Average Fuel Economy
• Distance To Empty (DTE)
• Instantaneous Fuel Economy
Average Fuel Economy
Shows the average fuel economy since the last reset. When
the fuel economy is reset, the display will read “RESET” or
show dashes for two seconds. Then, the history informa-
tion will be erased, and the averaging will continue from
the last fuel average reading before the reset.
Fuel Economy
4
UNDERSTANDING YOUR INSTRUMENT PANEL 245
Page 260 of 510
Doors & Locks
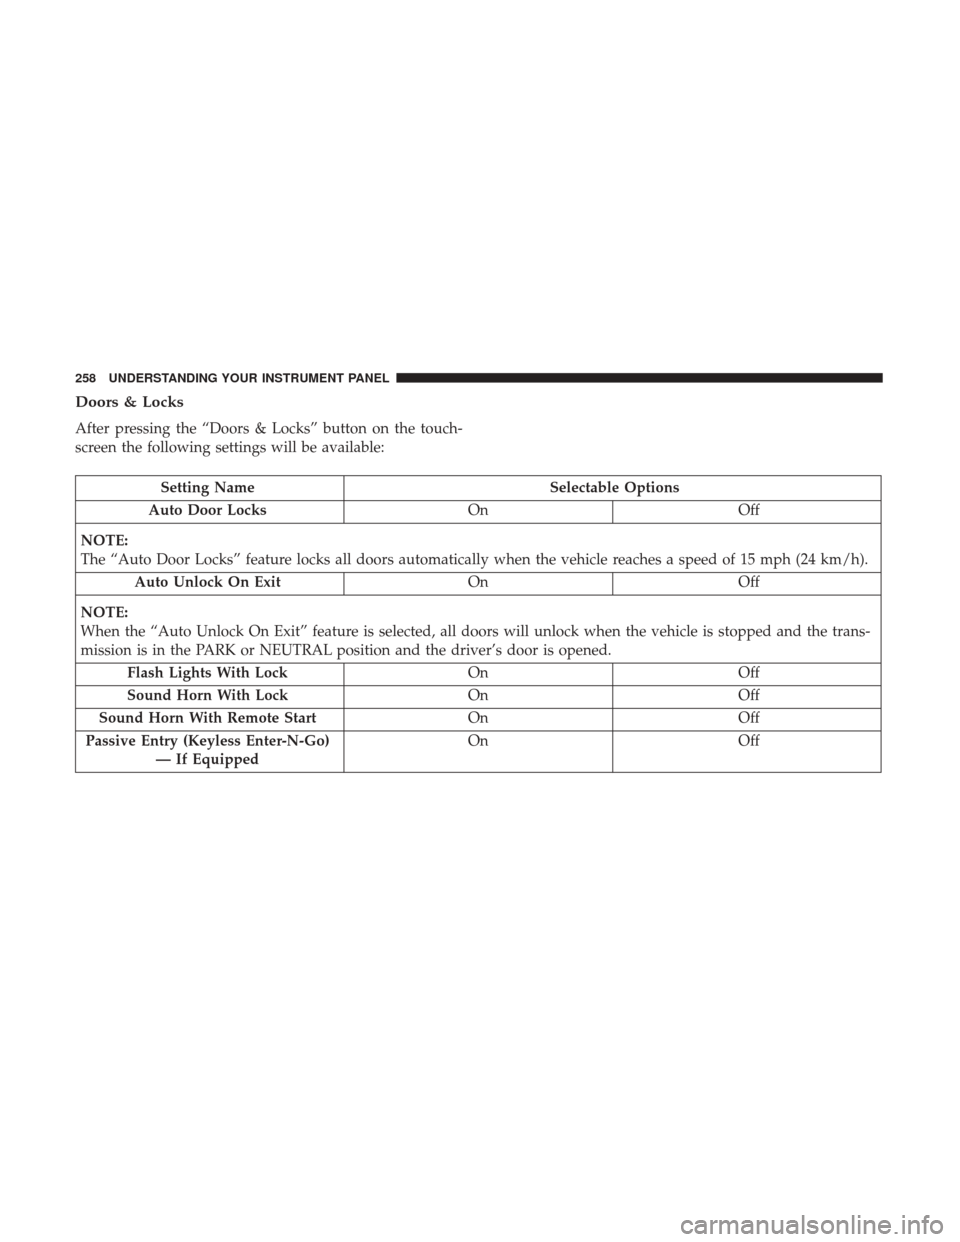
After pressing the “Doors & Locks” button on the touch-
screen the following settings will be available:
Setting NameSelectable Options
Auto Door Locks OnOff
NOTE:
The “Auto Door Locks” feature locks all doors automatically when the vehicle reaches a speed of 15 mph (24 km/h). Auto Unlock On Exit OnOff
NOTE:
When the “Auto Unlock On Exit” feature is selected, all doors will unlock when the vehicle is stopped and the trans-
mission is in the PARK or NEUTRAL position and the driver’s door is opened. Flash Lights With Lock OnOff
Sound Horn With Lock OnOff
Sound Horn With Remote Start OnOff
Passive Entry (Keyless Enter-N-Go) — If Equipped On
Off
258 UNDERSTANDING YOUR INSTRUMENT PANEL
Page 274 of 510
Doors & Locks
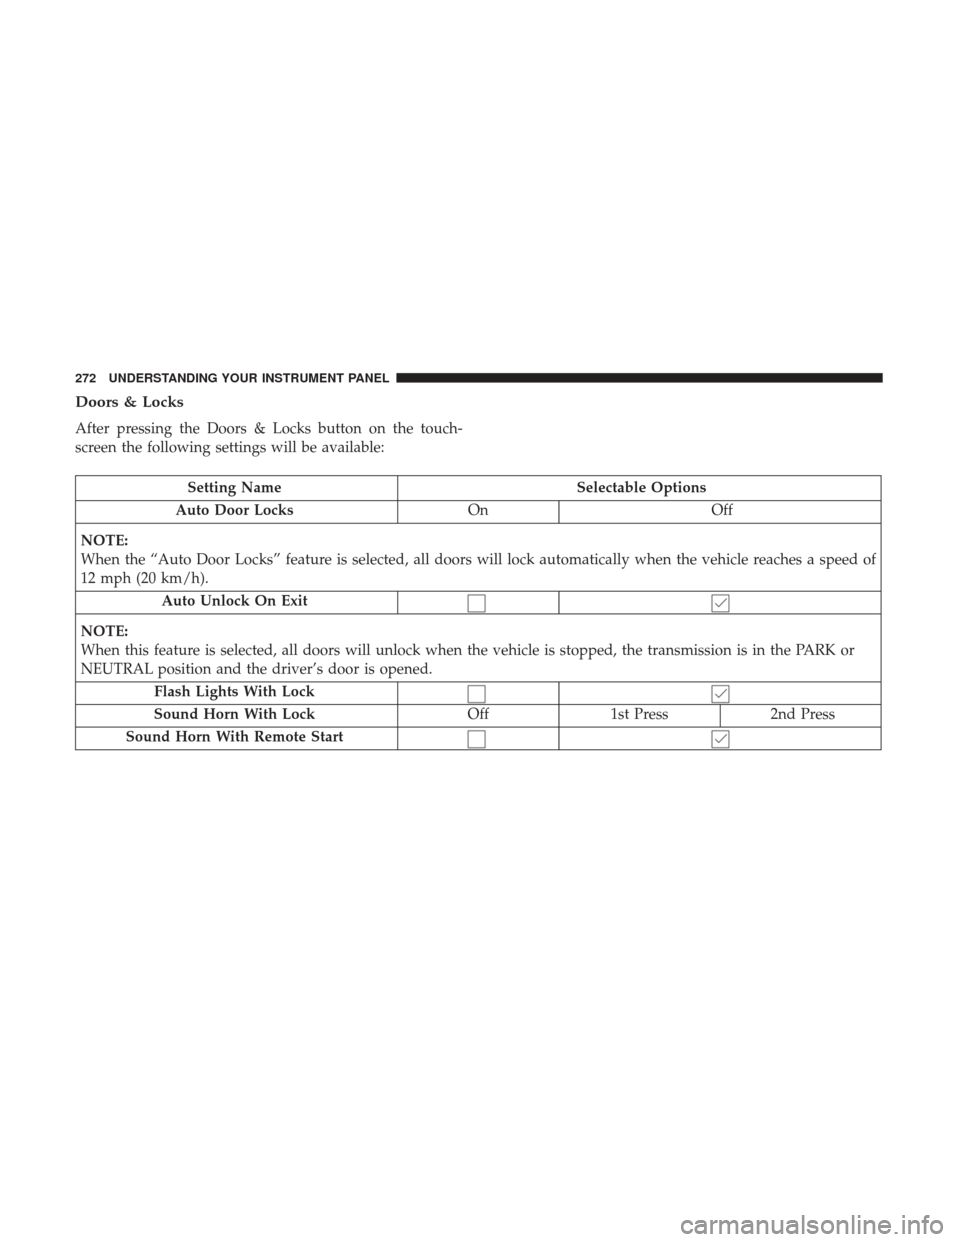
After pressing the Doors & Locks button on the touch-
screen the following settings will be available:
Setting NameSelectable Options
Auto Door Locks OnOff
NOTE:
When the “Auto Door Locks” feature is selected, all doors will lock automatically when the vehicle reaches a speed of
12 mph (20 km/h). Auto Unlock On Exit
NOTE:
When this feature is selected, all doors will unlock when the vehicle is stopped, the transmission is in the PARK or
NEUTRAL position and the driver’s door is opened. Flash Lights With Lock
Sound Horn With Lock Off1st Press 2nd Press
Sound Horn With Remote Start
272 UNDERSTANDING YOUR INSTRUMENT PANEL
Page 285 of 510
Important Notes For Single Video Screen System
•VES is able to transmit two channels of stereo audio
simultaneously.
• In split screen mode the left side equates to Channel 1
and right side equates to Channel 2.
• If a video source is selected on Channel 1, then Channel
2 is for audio only.
• When selecting a video source on Channel 1, the video
will display on the screen and the audio will be heard on
Channel 1 in the headphones.
• Audio can be heard through the headphones even when
the Video Screen is closed.
Play A DVD Using The Touchscreen Radio
1. Insert the DVD with the label facing up. The radio automatically selects the appropriate mode after the disc
is recognized and displays the menu screen or starts
playing the first track.
Using The Remote Control
1. Push the MODE button on the Remote Control. 2. While looking at the Video Screen, highlight DISC by
either pushing Up/Down/Left/Right buttons or by
repeatedly pushing the MODE button, then push EN-
TER.
NOTE:
• The VES system will retain the last setting when turned
off.
• Viewing a DVD on the Touchscreen radio screen is not
available in some regions or locations, the vehicle must
be stopped, and the gear selector must be in the PARK
position. Refer to local and state laws.
Using The Touchscreen Radio Controls
1. Press the “MORE” button on the touchscreen.
2. Press the “Rear Entertainment” button on the touch- screen to display the Rear Entertainment Controls.
3. If the Rear Entertainment is turned off, press the “Power” button on the touchscreen.
4. Press the “1” or “2” button on the touchscreen for the channel desired and press the “Source” button on the
touchscreen to select the desired mode.
4
UNDERSTANDING YOUR INSTRUMENT PANEL 283
Page 327 of 510
STARTING PROCEDURES
Before starting your vehicle, adjust your seat, adjust the
inside and outside mirrors, fasten your seat belt, and if
present, instruct all other occupants to buckle their seat
belts.
WARNING!
•Before exiting a vehicle, always shift the automatic
transmission into PARK and apply the parking
brake. Always make sure the keyless ignition node is
in the “OFF” mode, remove the key fob from the
vehicle and lock the vehicle.
•
Never leave children alone in a vehicle, or with access
to an unlocked vehicle. Leaving children in a vehicle
unattended is dangerous for a number of reasons. A
child or others could be seriously or fatally injured.
Children should be warned not to touch the parking
brake, brake pedal or the gear selector.
•Do not leave the key fob in or near the vehicle, or in a
location accessible to children, and do not leave the
ignition of a vehicle equipped with Keyless Enter-N-Go
in the ACC or ON/RUN mode. A child could operate
power windows, other controls, or move the vehicle.
(Continued)
WARNING! (Continued)
•Do not leave children or animals inside parked
vehicles in hot weather. Interior heat build-up may
cause serious injury or death.
Automatic Transmission
The gear selector must be in the NEUTRAL or PARK
position before you can start the engine. Apply the brakes
before shifting into any driving gear.
CAUTION!
Damage to the transmission may occur if the following
precautions are not observed:
• Do not shift from REVERSE, PARK, or NEUTRAL
into any forward gear when the engine is above idle
speed.
• Shift into PARK only after the vehicle has come to a
complete stop.
• Shift into or out of REVERSE only after the vehicle
has come to a complete stop and the engine is at idle
speed.
• Before shifting into any gear, make sure your foot is
firmly on the brake pedal.
5
STARTING AND OPERATING 325