light DODGE JOURNEY 2019 Owners Manual
[x] Cancel search | Manufacturer: DODGE, Model Year: 2019, Model line: JOURNEY, Model: DODGE JOURNEY 2019Pages: 524, PDF Size: 5.29 MB
Page 265 of 524
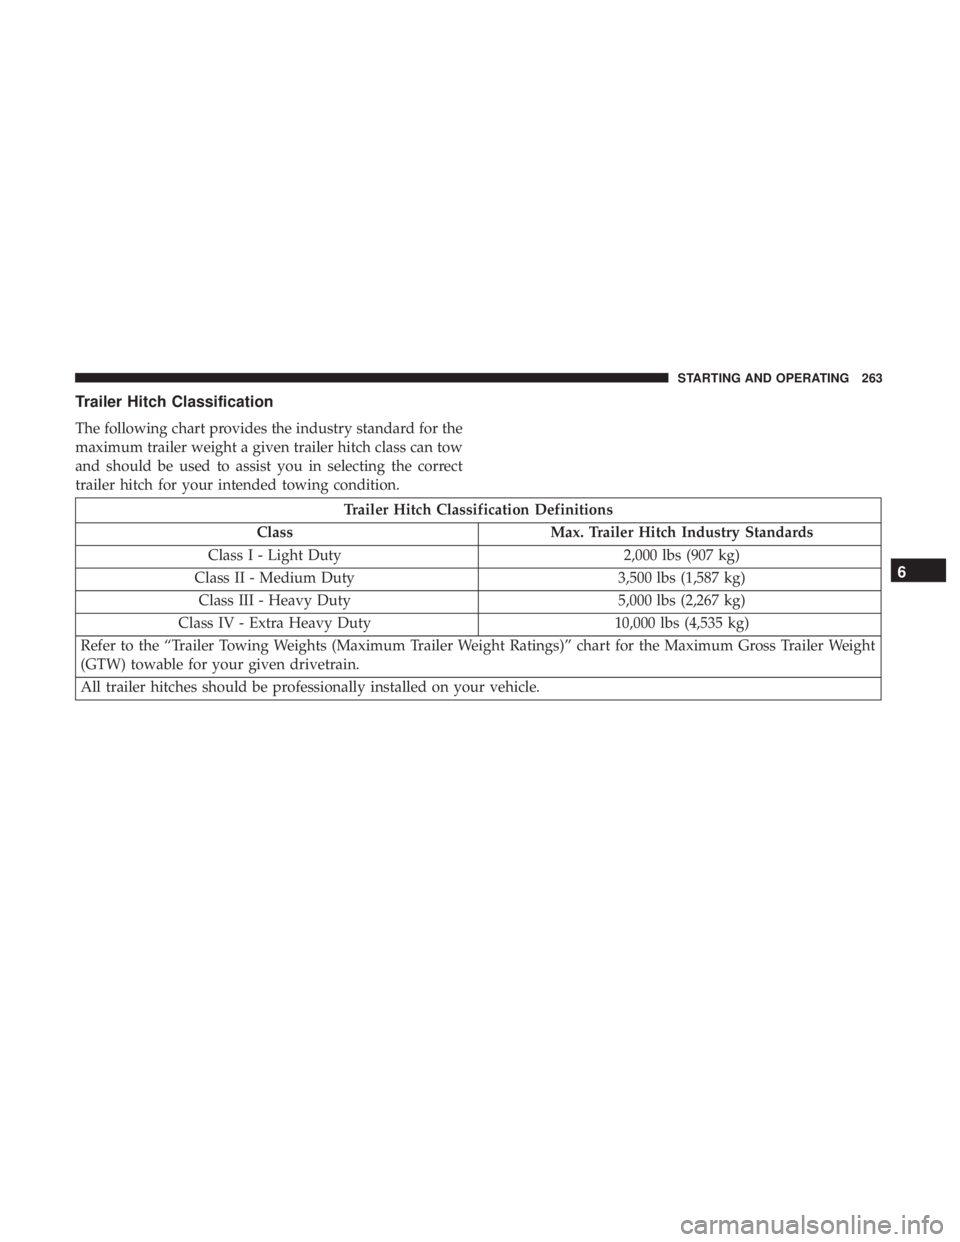
Trailer Hitch Classification
The following chart provides the industry standard for the
maximum trailer weight a given trailer hitch class can tow
and should be used to assist you in selecting the correct
trailer hitch for your intended towing condition.
Trailer Hitch Classification Definitions
Class Max. Trailer Hitch Industry Standards
Class I - Light Duty 2,000 lbs (907 kg)
Class II - Medium Duty 3,500 lbs (1,587 kg)
Class III - Heavy Duty 5,000 lbs (2,267 kg)
Class IV - Extra Heavy Duty 10,000 lbs (4,535 kg)
Refer to the “Trailer Towing Weights (Maximum Trailer Weight Ratings)” chart for the Maximum Gross Trailer Weight
(GTW) towable for your given drivetrain.
All trailer hitches should be professionally installed on your vehicle.
6
STARTING AND OPERATING 263
Page 270 of 524
•When replacing tires, refer to “Tires” in “Servicing And
Maintenance” for the proper tire replacement proce-
dures. Replacing tires with a higher load carrying capac-
ity will not increase the vehicle’s GVWR and GAWR
limits.
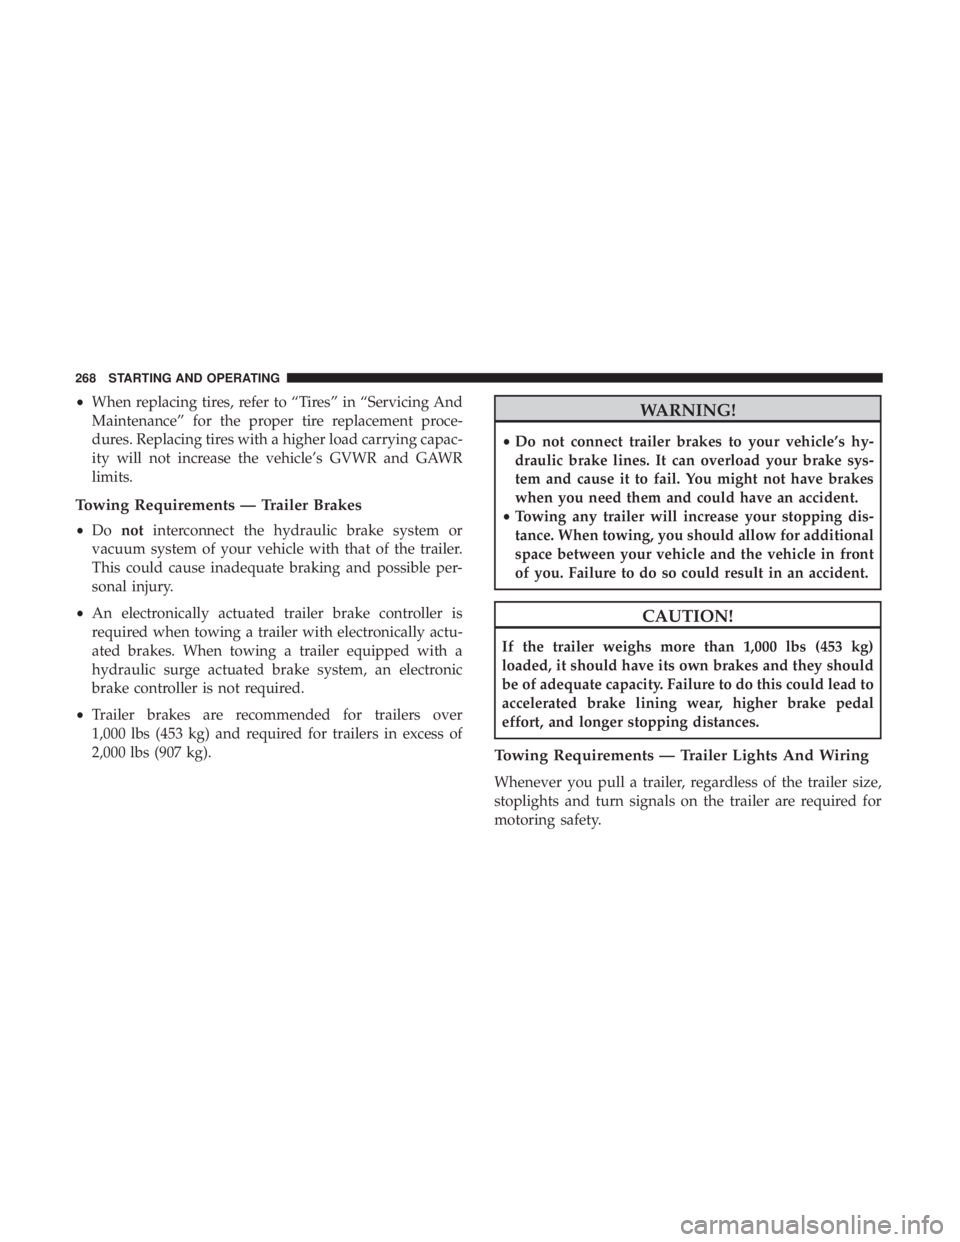
Towing Requirements — Trailer Brakes
• Do not interconnect the hydraulic brake system or
vacuum system of your vehicle with that of the trailer.
This could cause inadequate braking and possible per-
sonal injury.
• An electronically actuated trailer brake controller is
required when towing a trailer with electronically actu-
ated brakes. When towing a trailer equipped with a
hydraulic surge actuated brake system, an electronic
brake controller is not required.
• Trailer brakes are recommended for trailers over
1,000 lbs (453 kg) and required for trailers in excess of
2,000 lbs (907 kg).
WARNING!
• Do not connect trailer brakes to your vehicle’s hy-
draulic brake lines. It can overload your brake sys-
tem and cause it to fail. You might not have brakes
when you need them and could have an accident.
• Towing any trailer will increase your stopping dis-
tance. When towing, you should allow for additional
space between your vehicle and the vehicle in front
of you. Failure to do so could result in an accident.
CAUTION!
If the trailer weighs more than 1,000 lbs (453 kg)
loaded, it should have its own brakes and they should
be of adequate capacity. Failure to do this could lead to
accelerated brake lining wear, higher brake pedal
effort, and longer stopping distances.
Towing Requirements — Trailer Lights And Wiring
Whenever you pull a trailer, regardless of the trailer size,
stoplights and turn signals on the trailer are required for
motoring safety.
268 STARTING AND OPERATING
Page 273 of 524
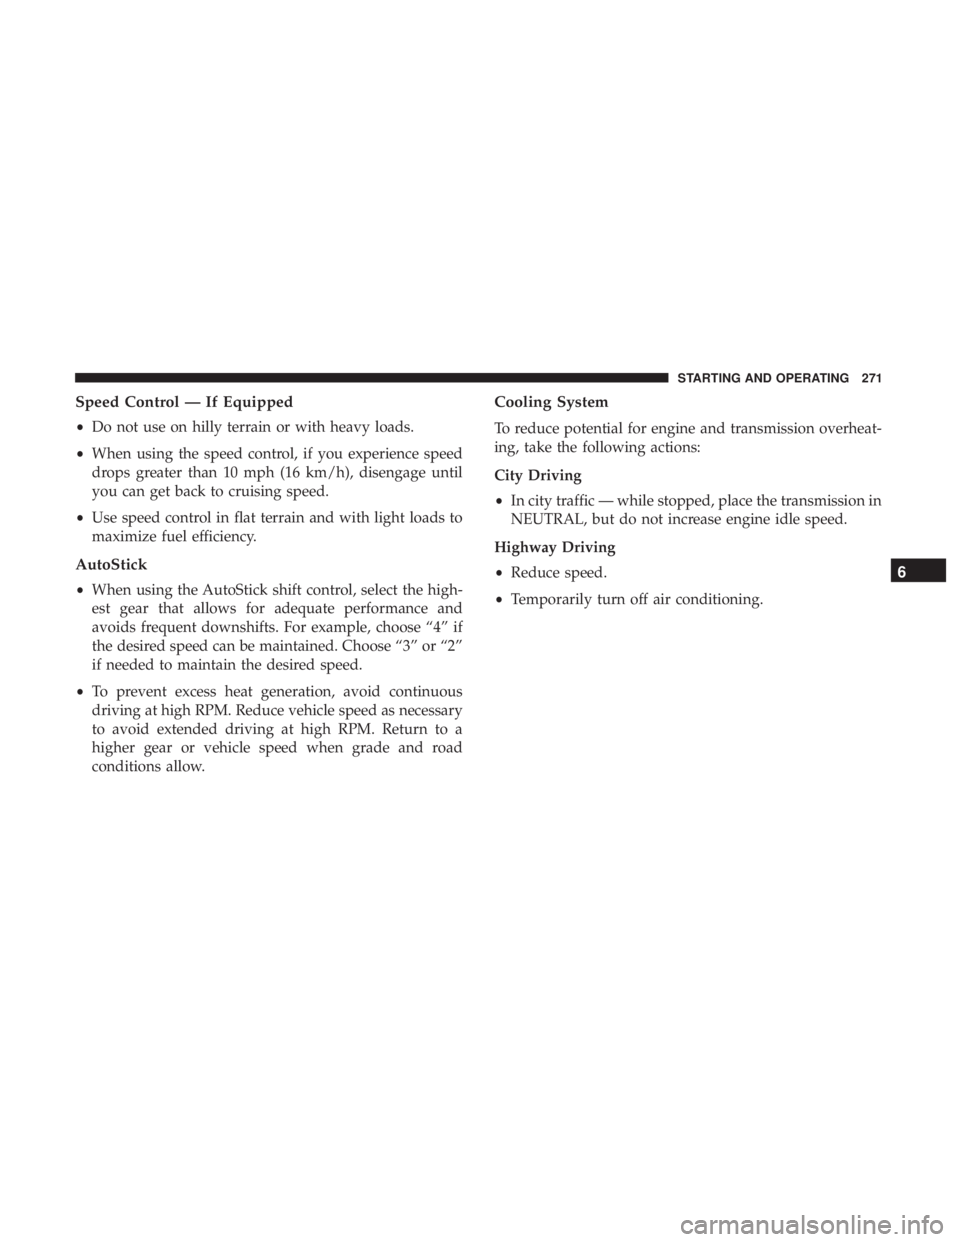
Speed Control — If Equipped
•Do not use on hilly terrain or with heavy loads.
• When using the speed control, if you experience speed
drops greater than 10 mph (16 km/h), disengage until
you can get back to cruising speed.
• Use speed control in flat terrain and with light loads to
maximize fuel efficiency.
AutoStick
• When using the AutoStick shift control, select the high-
est gear that allows for adequate performance and
avoids frequent downshifts. For example, choose “4” if
the desired speed can be maintained. Choose “3” or “2”
if needed to maintain the desired speed.
• To prevent excess heat generation, avoid continuous
driving at high RPM. Reduce vehicle speed as necessary
to avoid extended driving at high RPM. Return to a
higher gear or vehicle speed when grade and road
conditions allow.
Cooling System
To reduce potential for engine and transmission overheat-
ing, take the following actions:
City Driving
• In city traffic — while stopped, place the transmission in
NEUTRAL, but do not increase engine idle speed.
Highway Driving
• Reduce speed.
• Temporarily turn off air conditioning.
6
STARTING AND OPERATING 271
Page 276 of 524
•Maintain sufficient distance between your vehicle and
the vehicle in front of you to avoid a collision in a
sudden stop.
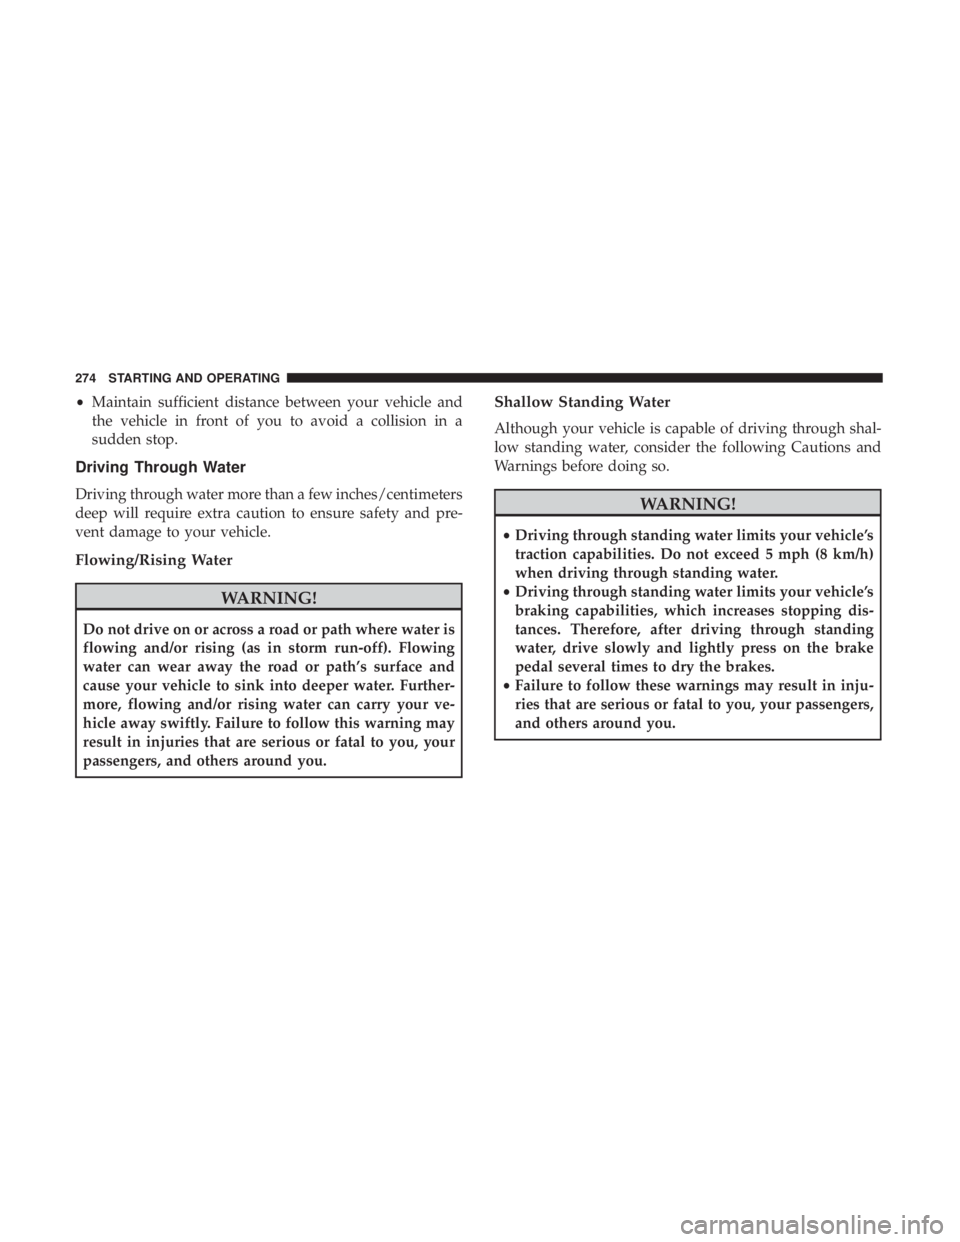
Driving Through Water
Driving through water more than a few inches/centimeters
deep will require extra caution to ensure safety and pre-
vent damage to your vehicle.
Flowing/Rising Water
WARNING!
Do not drive on or across a road or path where water is
flowing and/or rising (as in storm run-off). Flowing
water can wear away the road or path’s surface and
cause your vehicle to sink into deeper water. Further-
more, flowing and/or rising water can carry your ve-
hicle away swiftly. Failure to follow this warning may
result in injuries that are serious or fatal to you, your
passengers, and others around you.
Shallow Standing Water
Although your vehicle is capable of driving through shal-
low standing water, consider the following Cautions and
Warnings before doing so.
WARNING!
• Driving through standing water limits your vehicle’s
traction capabilities. Do not exceed 5 mph (8 km/h)
when driving through standing water.
• Driving through standing water limits your vehicle’s
braking capabilities, which increases stopping dis-
tances. Therefore, after driving through standing
water, drive slowly and lightly press on the brake
pedal several times to dry the brakes.
• Failure to follow these warnings may result in inju-
ries that are serious or fatal to you, your passengers,
and others around you.
274 STARTING AND OPERATING
Page 280 of 524
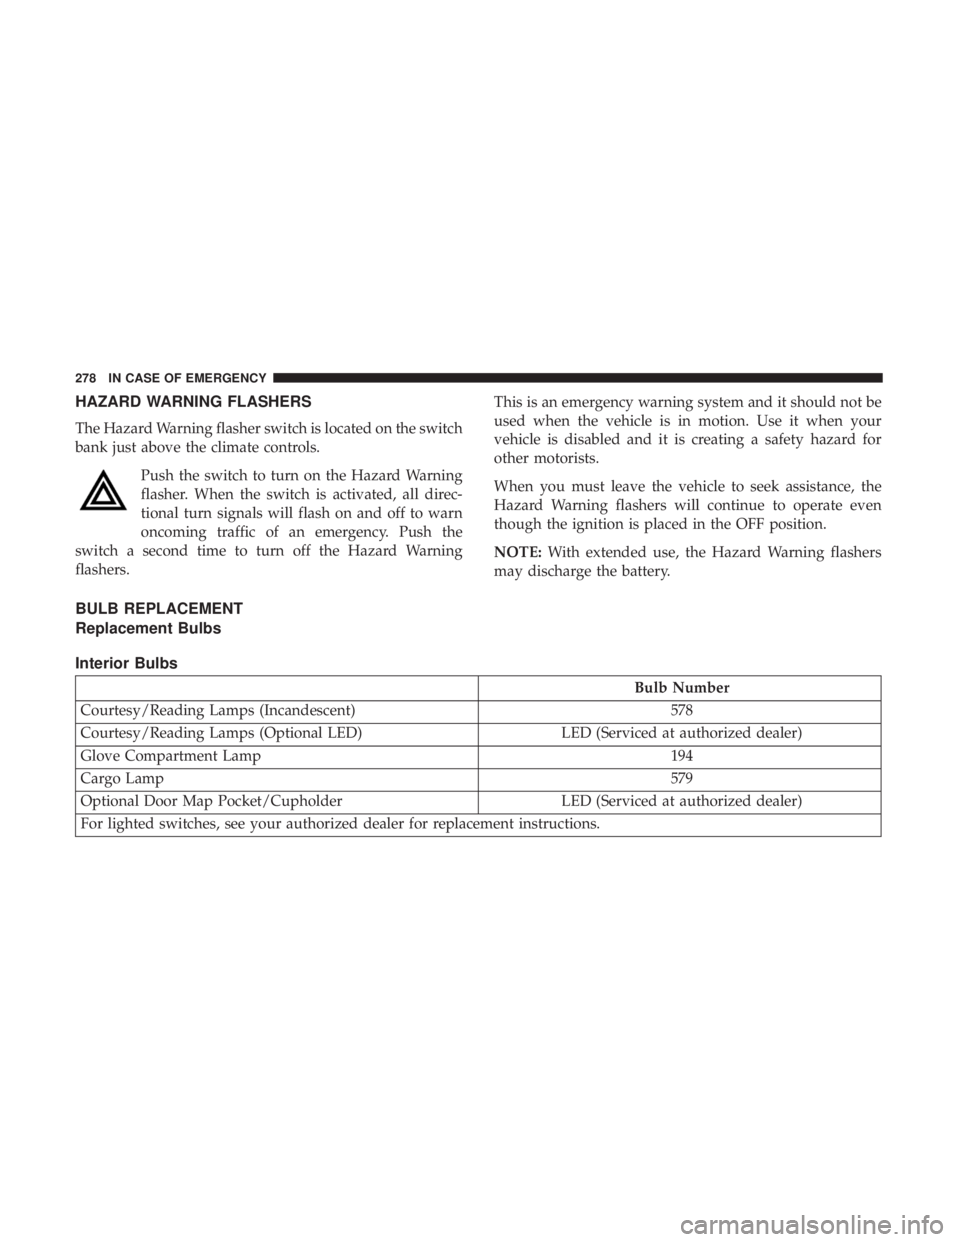
HAZARD WARNING FLASHERS
The Hazard Warning flasher switch is located on the switch
bank just above the climate controls.Push the switch to turn on the Hazard Warning
flasher. When the switch is activated, all direc-
tional turn signals will flash on and off to warn
oncoming traffic of an emergency. Push the
switch a second time to turn off the Hazard Warning
flashers. This is an emergency warning system and it should not be
used when the vehicle is in motion. Use it when your
vehicle is disabled and it is creating a safety hazard for
other motorists.
When you must leave the vehicle to seek assistance, the
Hazard Warning flashers will continue to operate even
though the ignition is placed in the OFF position.
NOTE:
With extended use, the Hazard Warning flashers
may discharge the battery.
BULB REPLACEMENT
Replacement Bulbs
Interior Bulbs
Bulb Number
Courtesy/Reading Lamps (Incandescent) 578
Courtesy/Reading Lamps (Optional LED) LED (Serviced at authorized dealer)
Glove Compartment Lamp 194
Cargo Lamp 579
Optional Door Map Pocket/Cupholder LED (Serviced at authorized dealer)
For lighted switches, see your authorized dealer for replacement instructions.
278 IN CASE OF EMERGENCY
Page 286 of 524
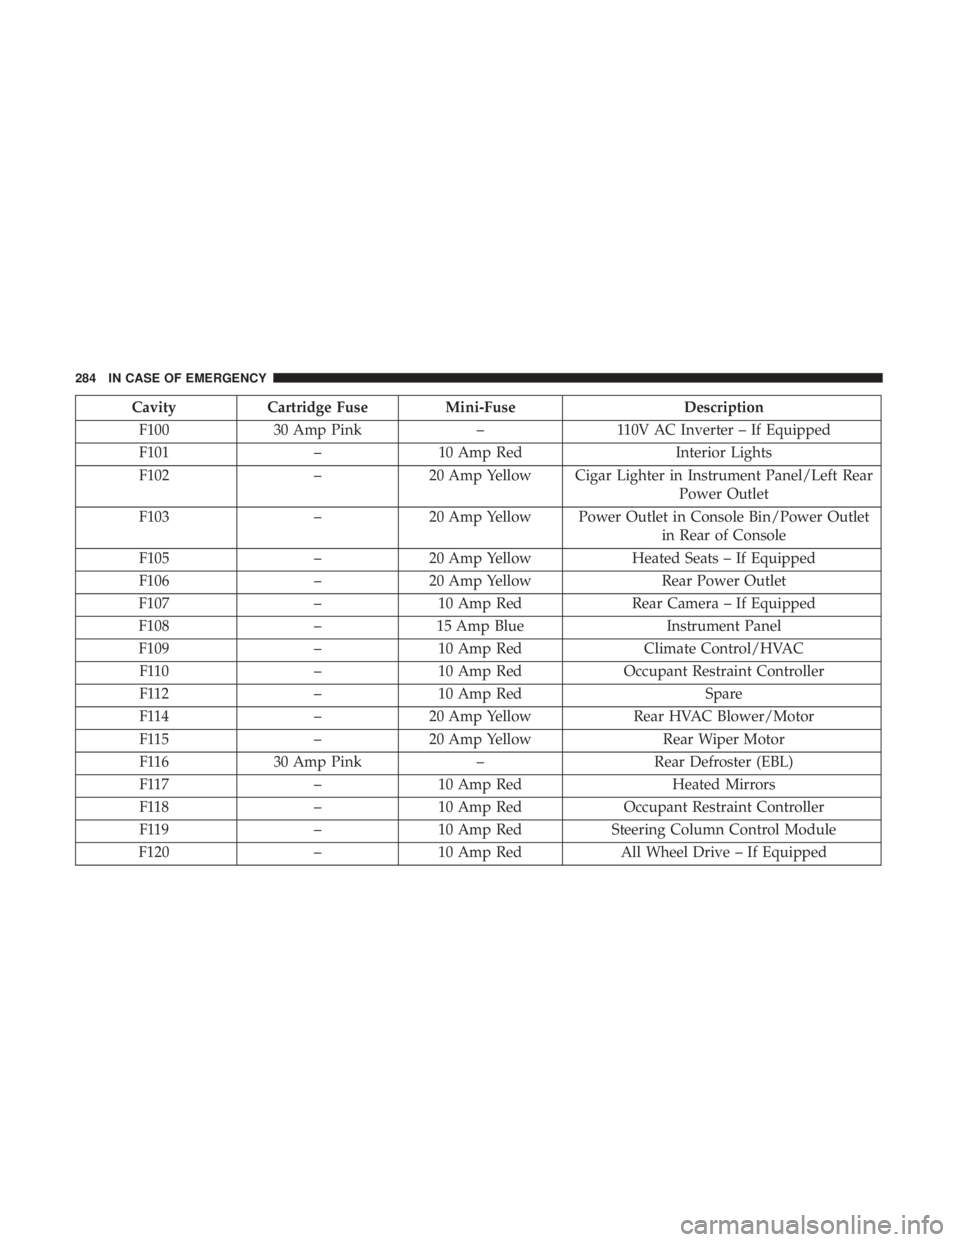
CavityCartridge Fuse Mini-Fuse Description
F100 30 Amp Pink –110V AC Inverter – If Equipped
F101 –10 Amp Red Interior Lights
F102 –20 Amp Yellow Cigar Lighter in Instrument Panel/Left Rear
Power Outlet
F103 –20 Amp Yellow Power Outlet in Console Bin/Power Outlet
in Rear of Console
F105 –20 Amp Yellow Heated Seats – If Equipped
F106 –20 Amp Yellow Rear Power Outlet
F107 –10 Amp Red Rear Camera – If Equipped
F108 –15 Amp Blue Instrument Panel
F109 –10 Amp Red Climate Control/HVAC
F110 –10 Amp Red Occupant Restraint Controller
F112 –10 Amp Red Spare
F114 –20 Amp Yellow Rear HVAC Blower/Motor
F115 –20 Amp Yellow Rear Wiper Motor
F116 30 Amp Pink –Rear Defroster (EBL)
F117 –10 Amp Red Heated Mirrors
F118 –10 Amp Red Occupant Restraint Controller
F119 –10 Amp Red Steering Column Control Module
F120 –10 Amp Red All Wheel Drive – If Equipped
284 IN CASE OF EMERGENCY
Page 289 of 524
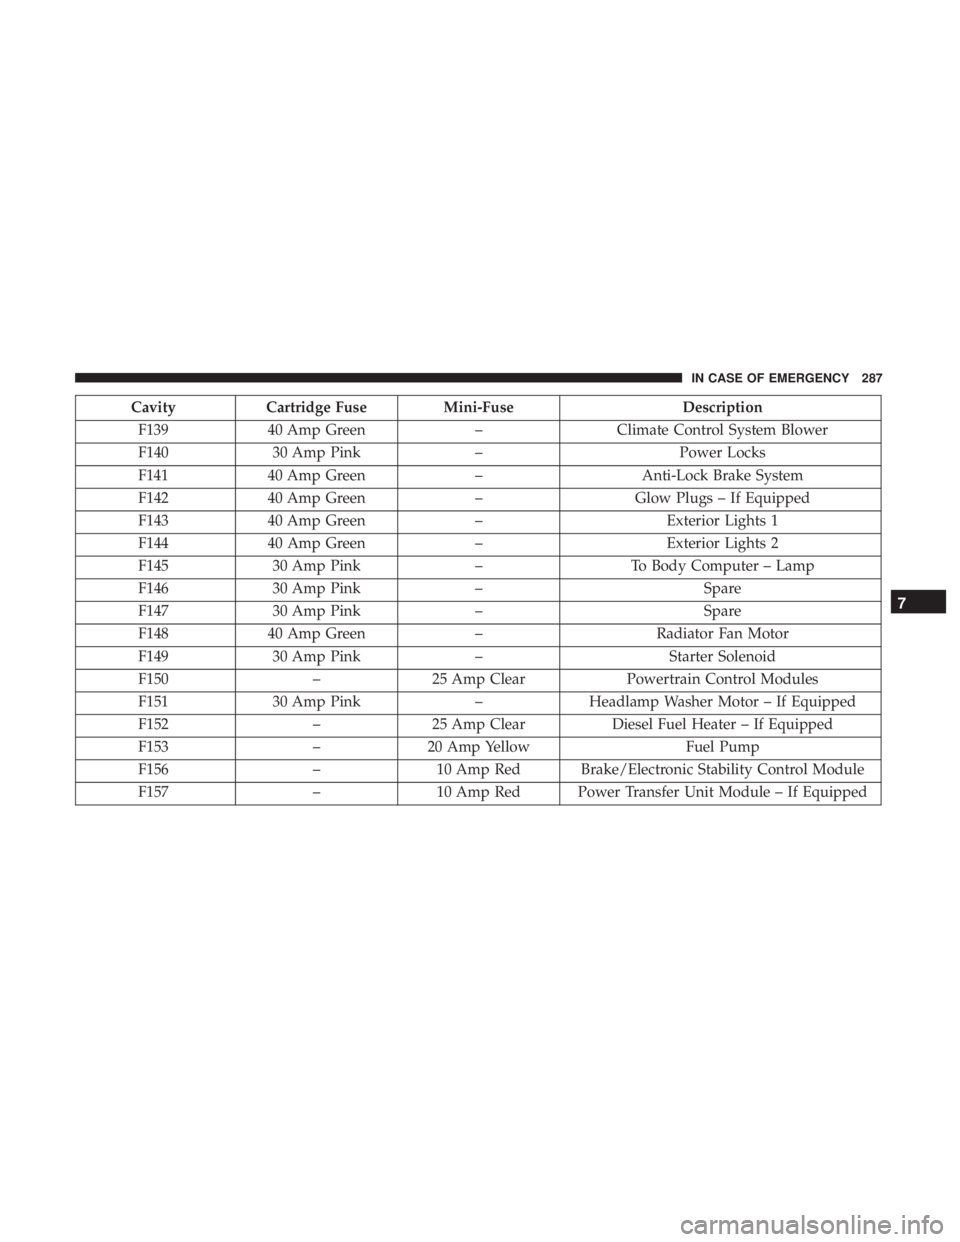
CavityCartridge Fuse Mini-Fuse Description
F139 40 Amp Green –Climate Control System Blower
F140 30 Amp Pink – Power Locks
F141 40 Amp Green –Anti-Lock Brake System
F142 40 Amp Green –Glow Plugs – If Equipped
F143 40 Amp Green –Exterior Lights 1
F144 40 Amp Green –Exterior Lights 2
F145 30 Amp Pink –To Body Computer – Lamp
F146 30 Amp Pink – Spare
F147 30 Amp Pink – Spare
F148 40 Amp Green –Radiator Fan Motor
F149 30 Amp Pink –Starter Solenoid
F150 –25 Amp Clear Powertrain Control Modules
F151 30 Amp Pink –Headlamp Washer Motor – If Equipped
F152 –25 Amp Clear Diesel Fuel Heater – If Equipped
F153 –20 Amp Yellow Fuel Pump
F156 –10 Amp Red Brake/Electronic Stability Control Module
F157 –10 Amp Red Power Transfer Unit Module – If Equipped
7
IN CASE OF EMERGENCY 287
Page 290 of 524
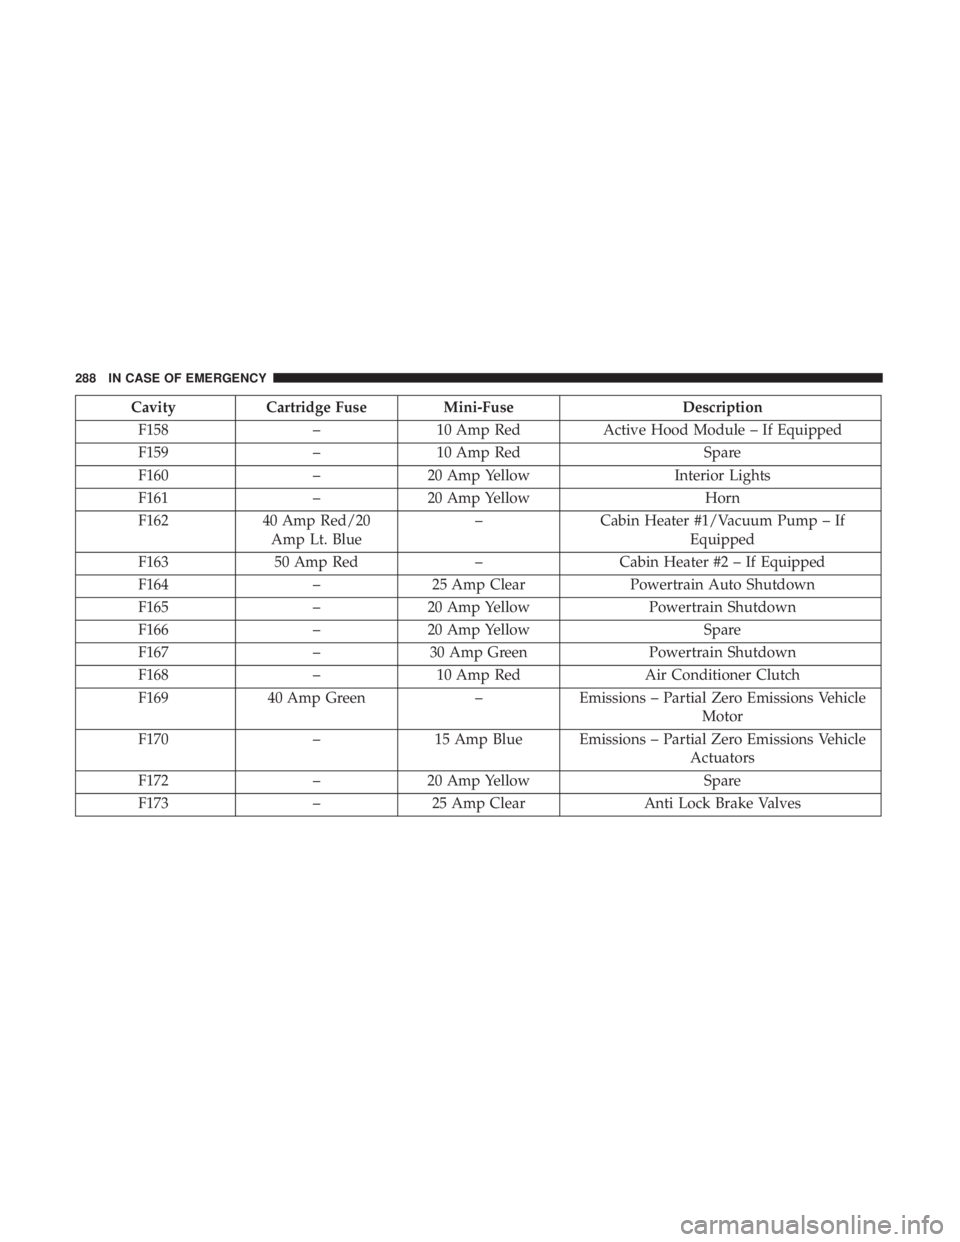
CavityCartridge Fuse Mini-Fuse Description
F158 –10 Amp Red Active Hood Module – If Equipped
F159 –10 Amp Red Spare
F160 –20 Amp Yellow Interior Lights
F161 –20 Amp Yellow Horn
F162 40 Amp Red/20
Amp Lt. Blue –
Cabin Heater #1/Vacuum Pump – If
Equipped
F163 50 Amp Red –Cabin Heater #2 – If Equipped
F164 –25 Amp Clear Powertrain Auto Shutdown
F165 –20 Amp Yellow Powertrain Shutdown
F166 –20 Amp Yellow Spare
F167 –30 Amp Green Powertrain Shutdown
F168 –10 Amp Red Air Conditioner Clutch
F169 40 Amp Green –Emissions – Partial Zero Emissions Vehicle
Motor
F170 –15 Amp Blue Emissions – Partial Zero Emissions Vehicle
Actuators
F172 –20 Amp Yellow Spare
F173 –25 Amp Clear Anti Lock Brake Valves
288 IN CASE OF EMERGENCY
Page 299 of 524
NOTE:•For vehicles so equipped, do not attempt to install a
center cap or wheel cover on the compact spare.
• Refer to “Compact Spare Tire” and to “Limited-Use
Spare” under “Tires” in “Servicing And Maintenance”
for additional warnings, cautions, and information
about the spare tire, its use, and operation.
7. Install the wheel nuts with the cone-shaped end of the nut toward the wheel. Lightly tighten the wheel nuts.
WARNING!
To avoid the risk of forcing the vehicle off the jack, do
not tighten the wheel nuts fully until the vehicle has
been lowered. Failure to follow this warning may
result in serious injury.
8. Lower the vehicle by turning the jack screw counter- clockwise with the jack handle.
9. Finish tightening the lug nuts. Push down on the wrench while at the end of the handle for increased
leverage. Tighten the lug nuts in a star pattern until each nut has been tightened twice. For the correct lug nut
torque, refer to “Torque Specifications” in “Technical
Specifications”. If in doubt about the correct tightness,
have them checked with a torque wrench by your
authorized dealer or service station.
10. Lower the jack to its fully closed position.
11. Place the deflated (flat) tire in the cargo area. Do not
stow the deflated tire in the spare tire stowage
location. Have the deflated (flat) tire repaired or re-
placed as soon as possible.
12. To stow the winch cable and retainer, fit the assembled jack-handle over the winch drive nut. Rotate the jack-
handle assembly clockwise until you hear the winch
mechanism click three times. It cannot be over tight-
ened.
13. Stow the jack-handle and jack. Remove the wheel blocks from the vehicle and release the park brake.
14. Check the tire pressure as soon as possible. Adjust the tire pressure as required.
7
IN CASE OF EMERGENCY 297
Page 300 of 524
Road Tire Installation
Vehicles Equipped With Wheel Covers
1. Mount the road tire on the axle.
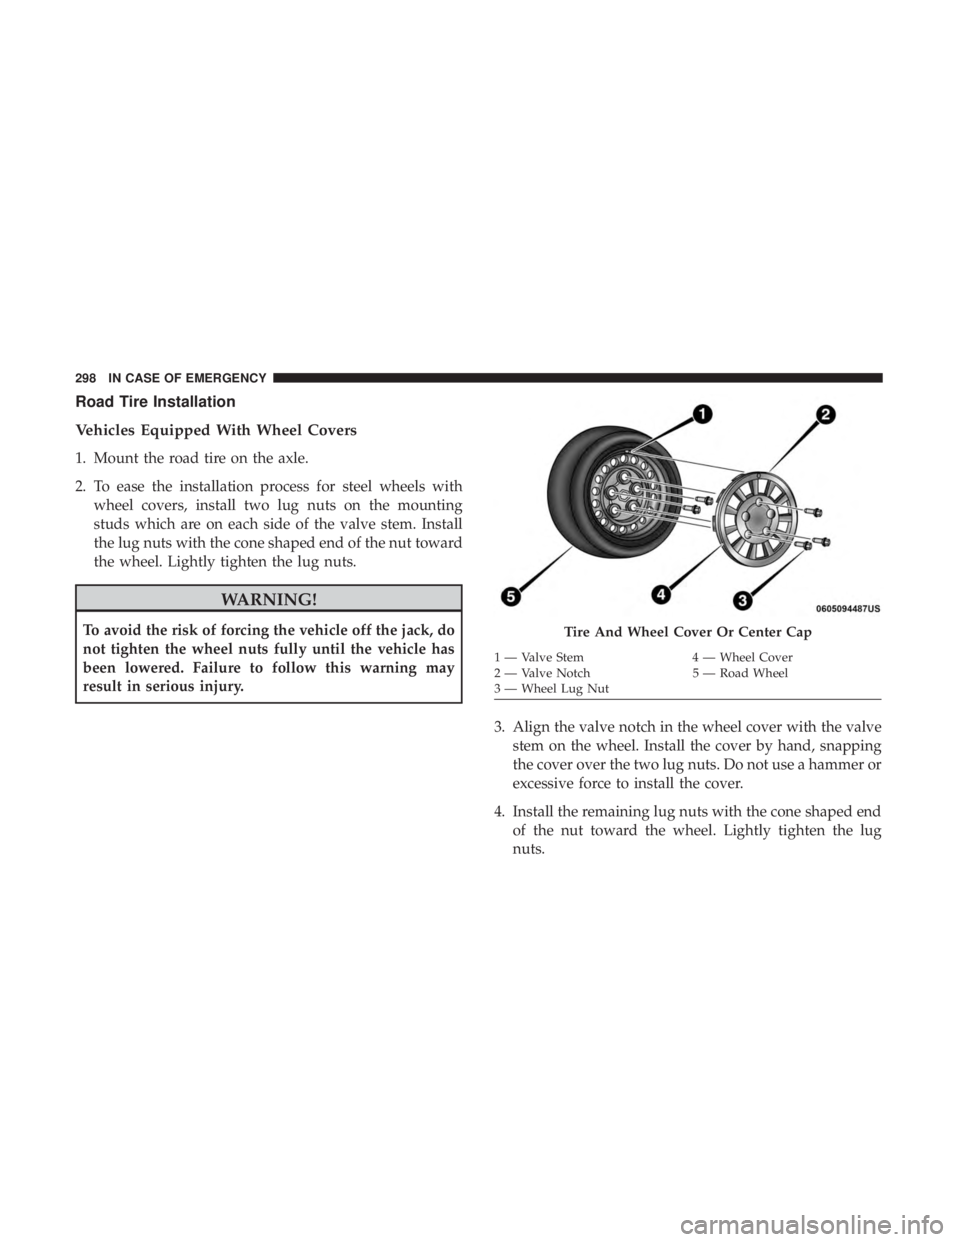
2. To ease the installation process for steel wheels withwheel covers, install two lug nuts on the mounting
studs which are on each side of the valve stem. Install
the lug nuts with the cone shaped end of the nut toward
the wheel. Lightly tighten the lug nuts.
WARNING!
To avoid the risk of forcing the vehicle off the jack, do
not tighten the wheel nuts fully until the vehicle has
been lowered. Failure to follow this warning may
result in serious injury.
3. Align the valve notch in the wheel cover with the valvestem on the wheel. Install the cover by hand, snapping
the cover over the two lug nuts. Do not use a hammer or
excessive force to install the cover.
4. Install the remaining lug nuts with the cone shaped end of the nut toward the wheel. Lightly tighten the lug
nuts.Tire And Wheel Cover Or Center Cap
1 — Valve Stem 4 — Wheel Cover
2 — Valve Notch 5 — Road Wheel
3 — Wheel Lug Nut
298 IN CASE OF EMERGENCY