hood open DODGE JOURNEY 2020 Owners Manual
[x] Cancel search | Manufacturer: DODGE, Model Year: 2020, Model line: JOURNEY, Model: DODGE JOURNEY 2020Pages: 396, PDF Size: 25.53 MB
Page 5 of 396
3
CLIMATE CONTROLS ...........................................47
Manual Climate Control Overview .. ............ 47
Automatic Climate Controls Overview . . ...... 58
Climate Control Functions . . ......................... 70
Automatic Temperature Control (ATC) — If
Equipped . ..................................................... 70
O
perating Tips . . ........................................... 71
WINDOWS . . ..........................................................72
Power Windows .. ......................................... 72
Wind Buffeting . . .......................................... 74
POWER SUNROOF — IF EQUIPPED. . ...................74
Opening Sunroof .. ........................................ 75
Closing Sunroof . . .......................................... 75
Wind Buffeting . . ........................................... 75
Sunshade Operation. . .................................. 75
Anti Pinch Protect Feature . . ........................ 75
Sunroof Maintenance . . ................................ 75
Ignition Off Operation . . ................................ 76
HOOD. .....................................................................76
O pening ........................................................ 76
C losing . ......................................................... 76
L
IFTGATE . ...............................................................77
O pening ........................................................ 77
C argo Area Features . . ................................. 78
GARAGE DOOR OPENER — IF EQUIPPED . . ........80
Before You Begin Programming
HomeLink® . .
................................................ 80
Canadian/Gate Operator Programming . . ... 82Using HomeLink®.
.
...................................... 83
Security. ........................................................ 83
T roubleshooting Tips . . ................................. 83
General Information . . .................................. 84
INTERNAL EQUIPMENT . . ...................................... 84
Storage ......................................................... 84
C upholders . . ................................................ 86
Power Outlets. . ............................................. 87
Power Inverter — If Equipped . . ................... 89
Sunglasses Storage . . .................................. 90
ROOF LUGGAGE RACK — IF EQUIPPED . . .......... 91
GETTING TO KNOW YOUR
INSTRUMENT PANEL
INSTRUMENT CLUSTER ....................................... 93
Instrument Cluster Descriptions .. ............... 94
INSTRUMENT CLUSTER DISPLAY. . ..................... 95
Instrument Cluster Display Location And
Controls . ....................................................... 95
O
il Change Due . . ......................................... 96
Instrument Cluster Display Selectable
Menu Items . .
................................................ 96
Battery Saver On/Battery Saver Mode
Message — Electrical Load Reduction
Actions — If Equipped . .
............................... 99 WARNING LIGHTS AND MESSAGES .
.
............. 100
Red Warning Lights .. ................................. 100
Yellow Warning Lights . . ............................. 103
Green Indicator Lights . . ............................. 106
White Indicator Lights . . ............................. 106
Blue Indicator Lights . . ............................... 106
ONBOARD DIAGNOSTIC SYSTEM — OBD II . . . 107
Onboard Diagnostic System (OBD II)
Cybersecurity . .
........................................... 107
EMISSIONS INSPECTION AND MAINTENANCE
PROGRAMS . .
...................................................... 108
SAFETY
SAFETY FEATURES ............................................ 109
Anti-Lock Brake System (ABS) .. ............... 109
Electronic Brake Control (EBC) System. . .. 110
AUXILIARY DRIVING SYSTEMS . . ...................... 116
Tire Pressure Monitoring System
(TPMS) . ....................................................... 116
O
CCUPANT RESTRAINT SYSTEMS . . ............... 120
Occupant Restraint Systems Features .. .. 120
Important Safety Precautions . . ................. 121
Seat Belt Systems . . .................................. 121
Supplemental Restraint
Systems (SRS) . .
......................................... 130
Child Restraints . . ....................................... 139
Transporting Pets . . ................................... 154
Page 16 of 396
14 GETTING TO KNOW YOUR VEHICLE
(Continued)
IGNITION OR ACCESSORY ON MESSAGE
Opening the driver's door when the ignition is in
the ACC or ON (engine not running) position, a
chime will sound to remind you to place the
ignition in the OFF position. In addition to the
chime, the ignition or accessory on message will
display in the cluster.
NOTE:
With the Uconnect system, the power window
s w
itches, radio, power sunroof (if equipped),
and power outlets will remain active for up to
10 minutes after the ignition is placed in the
O F
F position. Opening either front door will
cancel this feature. The time for this feature is
programmable. Refer to “Uconnect Settings” in
“Multimedia” for further information.
REMOTE START — IF EQUIPPED
HOW TO USE REMOTE START
All of the following conditions must be met
before the engine will remote start:
Gear selector in PARK
Doors closed
Hood closed
Liftgate closed
Hazard switch off
Brake switch inactive (brake pedal not pushed)
Battery at an acceptable charge level
System not disabled from previous remote
start event
Vehicle security alarm not active
Ignition in the OFF position
Malfunction Indicator Light (MIL) is not illumi -
nated
WARNING!
Before exiting a vehicle, always shift the
automatic transmission into PARK and
apply the parking brake. Always make sure
the keyless ignition is in the OFF position,
remove the key fob from the vehicle and
lock the vehicle.
Never leave children alone in a vehicle, or
with access to an unlocked vehicle.
Allowing children to be in a vehicle unat -
tended is dangerous for a number of
r e
asons. A child or others could be seriously
or fatally injured. Children should be
warned not to touch the parking brake,
brake pedal or the gear selector.
Do not leave the key fob in or near the
vehicle, or in a location accessible to chil-
dren, and do not leave the ignition of a
v e
hicle equipped with Keyless Enter-N-Go
in the ACC or ON/RUN position. A child
could operate power windows, other
controls, or move the vehicle.
Do not leave children or animals inside parked
vehicles in hot weather. Interior heat build-up
may cause serious injury or death.
CAUTION!
An unlocked vehicle is an invitation for
thieves. Always remove the key fobs from
vehicle, place the ignition in the OFF position
and lock all doors when leaving the vehicle
unattended.
WARNING! (Continued)
Page 17 of 396
GETTING TO KNOW YOUR VEHICLE 15
REMOTE START ABORT MESSAGE
The following messages will appear in the
instrument cluster display if the vehicle fails to
remote start or exits remote start prematurely if
equipped with Remote Start:
Remote Start Cancelled — Door Open
Remote Start Cancelled — Hood Open
Remote Start Cancelled — Fuel Low
Remote Start Cancelled — L/Gate Open
Remote Start Disabled — Start Vehicle To
Reset The message stays active until the ignition is
p
l
aced in the ON/RUN position.
TO ENTER REMOTE START MODE
Push and release the remote start button on the
key fob twice within five seconds. The vehicle
doors will lock, the parking lights will flash and
the horn will chirp twice (if programmed). Then,
the engine will start and the vehicle will remain
in the Remote Start mode for a 15 minute cycle.
NOTE:
If an engine fault is present or fuel level is
low, the vehicle will start and then shut down
in 10 seconds.
The park lamps will turn on and remain on
during Remote Start mode.
For security, power window and power
sunroof operation (if equipped) are disabled
when the vehicle is in the Remote Start
mode.
The engine can be started two consecutive
times (two 15 minute cycles) with the key
f o
b. However, the ignition must be placed in
the ON/RUN position before you can repeat
the start sequence for a third cycle.
TO EXIT REMOTE START MODE
W
ITHOUT DRIVING THE VEHICLE
Push and release the remote start button one
time or allow the engine to run for the entire
15 minute cycle.
NOTE:
To avoid unintentional shutdowns, the system
wi
ll disable for two seconds after receiving a
valid Remote Start request.
TO EXIT REMOTE START MODE AND
D
RIVE THE VEHICLE
Before the end of 15 minute cycle, push and
re
lease the unlock button on the key fob to
unlock the doors and disarm the vehicle
security alarm (if equipped). Then, prior to the
end of the 15 minute cycle, push and release
t h
e START/STOP ignition button.
NOTE:
The message “Push Start Button” will appear in
t h
e instrument cluster display until you push the
START/STOP ignition button.
WARNING!
Do not start or run an engine in a closed
garage or confined area. Exhaust gas
contains Carbon Monoxide (CO) which is
odorless and colorless. Carbon Monoxide is
poisonous and can cause serious injury or
death when inhaled.
Keep key fobs away from children. Opera -
tion of the Remote Start System, windows,
d o
or locks or other controls could cause
serious injury or death.
2
Page 78 of 396
76 GETTING TO KNOW YOUR VEHICLE
IGNITION OFF OPERATION
The power sunroof switch will remain active for
up to approximately ten minutes after the
ignition is placed in the OFF position. Opening
either front door will cancel this feature.
NOTE:
Ignition Off time is programmable through the
U c
onnect System. Refer to “Uconnect Settings/
Customer Programmable Features” in “Multi -
media” for further information.
HOOD
OPENING
Two latches must be released to open the hood.
1. P ull the hood release lever located under
t
he left side of the instrument panel.
Hood Release
2. Outside of the vehicle, locate the safety l
atch lever near the center of the grille
between the grille and hood opening. Push
the safety latch lever to the left and raise
the hood.
Underhood Safety Latch
3. U
se the hood prop rod to secure the hood in
t
he open position. Place the upper end of
the prop rod in the hole on the underside of
the hood.
Hood Prop Rod
CLOSING
WARNING!
Be sure the hood is fully latched before
driving your vehicle. If the hood is not fully
latched, it could open when the vehicle is in
motion and block your vision. Failure to follow
this warning could result in serious injury or
death.
Page 79 of 396
GETTING TO KNOW YOUR VEHICLE 77
LIFTGATE
OPENING
The liftgate can be unlocked or locked pushing
the unlock or lock button on the Remote
Keyless Entry key fob, the Keyless Enter-N-Go
(Passive Entry) lock/unlock button underneath
the left side of the accent bar, which is located
on the liftgate below the glass, or by activating
the power door lock switch located on either
front door trim panel. Refer to “Keyless Enter-N-Go — Passive Entry” in
“
D
oors” in this chapter for further information
on Keyless Enter-N-Go (Passive Entry).
NOTE:
The liftgate cannot be unlocked or locked with
th
e manual door locks on the door trim panels
or the door lock cylinder on the driver's door.
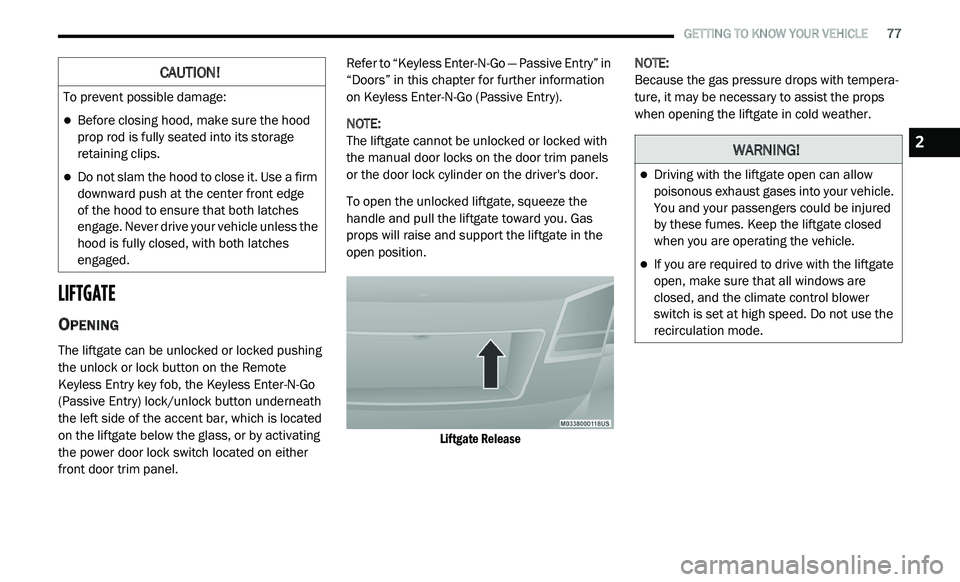
To open the unlocked liftgate, squeeze the
h a
ndle and pull the liftgate toward you. Gas
props will raise and support the liftgate in the
open position.
Liftgate Release
NOTE:
Because the gas pressure drops with tempera -
ture, it may be necessary to assist the props
w h
en opening the liftgate in cold weather.
CAUTION!
To prevent possible damage:
Before closing hood, make sure the hood
prop rod is fully seated into its storage
retaining clips.
Do not slam the hood to close it. Use a firm
downward push at the center front edge
of the hood to ensure that both latches
e n
gage. Never drive your vehicle unless the
hood is fully closed, with both latches
engaged.
WARNING!
Driving with the liftgate open can allow
poisonous exhaust gases into your vehicle.
You and your passengers could be injured
by these fumes. Keep the liftgate closed
when you are operating the vehicle.
If you are required to drive with the liftgate
open, make sure that all windows are
closed, and the climate control blower
switch is set at high speed. Do not use the
recirculation mode.
2
Page 161 of 396
STARTING AND OPERATING 159
(Continued)
COLD WEATHER OPERATION
(B
ELOW –22°F OR −30°C)
To ensure reliable starting at these
temperatures, use of an externally powered
electric engine block heater (available from an
authorized dealer) is recommended.
IF ENGINE FAILS TO START
If the engine fails to start after you have
followed the "Normal Starting" or "Cold Weather
Operation" procedure it may be flooded. Push
the accelerator pedal all the way to the floor and
hold it there. Crank the engine for no more than
15 seconds. This should clear any excess fuel in
case the engine is flooded. Leave the ignition
key in the RUN position, release the accelerator
pedal and repeat the “Normal Starting”
procedure.
AFTER STARTING
The idle speed is controlled automatically, and
it will decrease as the engine warms up.
ENGINE BLOCK HEATER — IF EQUIPPED
The engine block heater warms the engine, and
permits quicker starts in cold weather. Connect
the cord to a standard 110-115 Volt AC
electrical outlet with a grounded, three-wire
extension cord.
The engine block heater must be plugged in at
le
ast one hour to have an adequate effect on
the engine.
The engine block heater cord is bundled under
t h
e hood between the headlight assembly and
the Totally Integrated Power Module (Fuse Box)
on the driver's side of the vehicle.
WARNING!
Never pour fuel or other flammable liquid
into the throttle body air inlet opening in an
attempt to start the vehicle. This could
result in flash fire causing serious personal
injury.
Do not attempt to push or tow your vehicle
to get it started. Vehicles equipped with an
automatic transmission cannot be started
this way. Unburned fuel could enter the
catalytic converter and once the engine has
started, ignite and damage the converter
and vehicle.
If the vehicle has a discharged battery,
booster cables may be used to obtain a
start from a booster battery or the battery in
another vehicle. This type of start can be
dangerous if done improperly. Refer to
“Jump Starting Procedure” in “In Case Of
Emergency” for further information.
CAUTION!
To prevent damage to the starter, do not
continuously crank the engine for more than
25 seconds at a time. Wait 60 seconds
before trying again.
WARNING! (Continued)
WARNING!
Remember to disconnect the engine block
heater cord before driving. Damage to the
110-115 Volt electrical cord could cause
electrocution.
5
Page 193 of 396
IN CASE OF EMERGENCY 191
REPLACING EXTERIOR BULBS
NOTE:
Lens fogging can occur under certain atmo -
spheric conditions. This will usually clear as
a t
mospheric conditions change to allow the
condensation to change back into a vapor.
Turning the lamps on will usually accelerate the
clearing process.
Front Low/High Beam Headlamp, Turn
Signal/Park Lamp, And Side Marker Lamp
1. Open the hood.
NOTE:
It may be necessary to remove the air cleaner
f i
lter housing and position the Totally Integrated
Power Module (TIPM) aside to replace certain
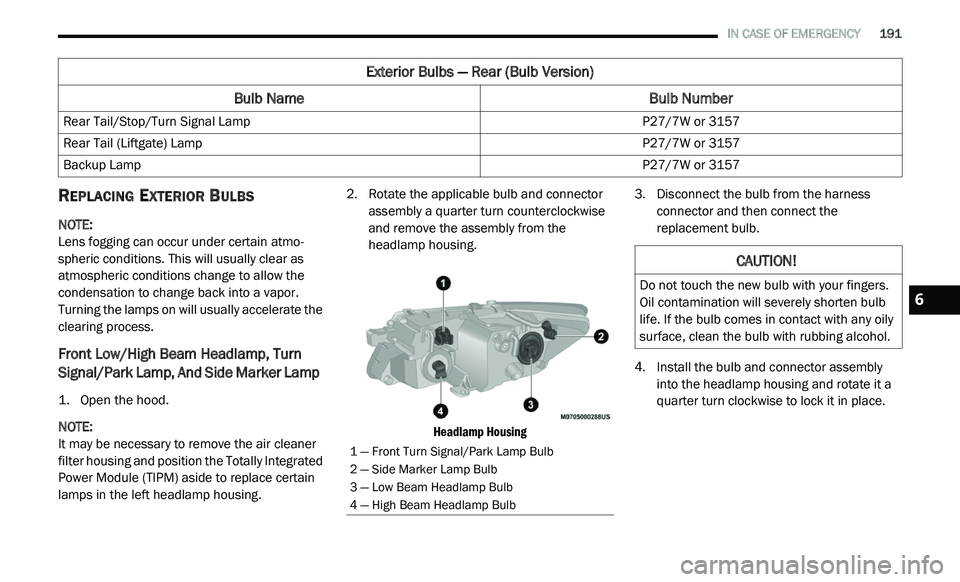
lamps in the left headlamp housing. 2. R
otate the applicable bulb and connector
a
ssembly a quarter turn counterclockwise
and remove the assembly from the
headlamp housing.
Headlamp Housing
3. Disconnect the bulb from the harness
c onnector and then connect the
replacement bulb.
4. I nstall the bulb and connector assembly
i
nto the headlamp housing and rotate it a
quarter turn clockwise to lock it in place.
Exterior Bulbs — Rear (Bulb Version)
Bulb Name Bulb Number
Rear Tail/Stop/Turn Signal Lamp P27/7W or 3157
Rear Tail (Liftgate) Lamp P27/7W or 3157
Backup Lamp P27/7W or 3157
1 — Front Turn Signal/Park Lamp Bulb
2 — Side Marker Lamp Bulb
3 — Low Beam Headlamp Bulb
4 — High Beam Headlamp Bulb
CAUTION!
Do not touch the new bulb with your fingers.
Oil contamination will severely shorten bulb
life. If the bulb comes in contact with any oily
surface, clean the bulb with rubbing alcohol.6
Page 209 of 396
IN CASE OF EMERGENCY 207
(Continued)
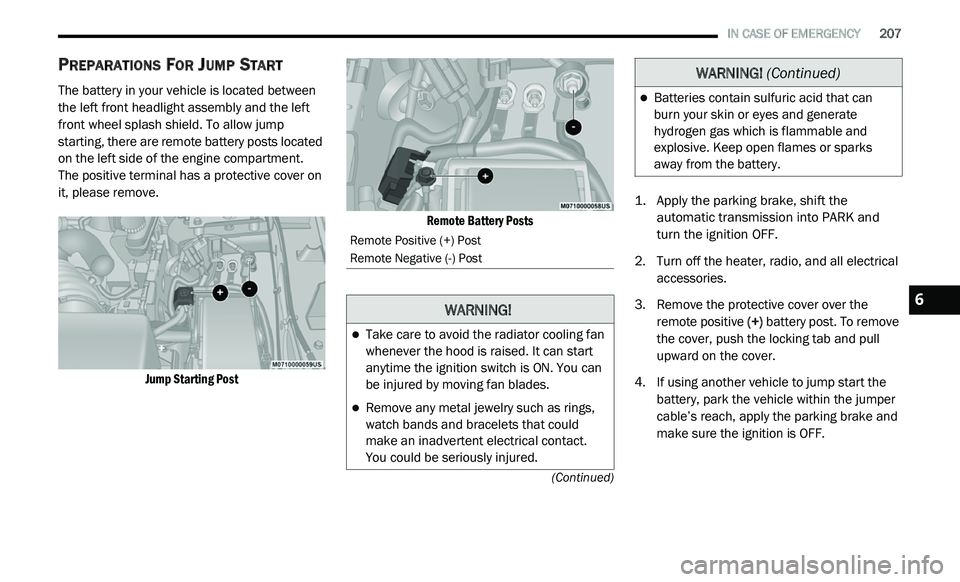
PREPARATIONS FOR JUMP START
The battery in your vehicle is located between
the left front headlight assembly and the left
front wheel splash shield. To allow jump
starting, there are remote battery posts located
on the left side of the engine compartment.
The positive terminal has a protective cover on
i t
, please remove.
Jump Starting Post Remote Battery Posts
1. Ap
ply the parking brake, shift the
a
utomatic transmission into PARK and
turn the ignition OFF.
2. T urn off the heater, radio, and all electrical
a
ccessories.
3. R emove the protective cover over the
r
emote positive (+) battery post. To remove
the cover, push the locking tab and pull
upward on the cover.
4. If using another vehicle to jump start the b
attery, park the vehicle within the jumper
cable’s reach, apply the parking brake and
make sure the ignition is OFF.
Remote Positive (+) Post
Remote Negative (-) Post
WARNING!
Take care to avoid the radiator cooling fan
whenever the hood is raised. It can start
anytime the ignition switch is ON. You can
be injured by moving fan blades.
Remove any metal jewelry such as rings,
watch bands and bracelets that could
make an inadvertent electrical contact.
You could be seriously injured.
Batteries contain sulfuric acid that can
burn your skin or eyes and generate
hydrogen gas which is flammable and
explosive. Keep open flames or sparks
away from the battery.
WARNING! (Continued)
6
Page 211 of 396
IN CASE OF EMERGENCY 209
Disconnecting The Jumper Cables
1. D isconnect the negative
(-)
jumper cable
from the remote negative (-)
post of the
vehicle with the discharged battery.
2. D isconnect the negative end (
-) of the
jumper cable from the negative (-) post of
the booster battery.
3. D isconnect the opposite end of the
p
ositive (+)
jumper cable from the
positive (+)
post of the booster battery.
4. D isconnect the positive (
+) end of the
jumper cable from the remote positive (+)
post of the discharged vehicle.
5. R einstall the protective cover over the
r
emote positive (+) battery post of the
discharged vehicle.
If frequent jump starting is required to start
your vehicle, you should have the battery and
c h
arging system inspected at an authorized
dealer.
IF YOUR ENGINE OVERHEATS
In any of the following situations, you can
reduce the potential for overheating by taking
the appropriate action.
On the highways — slow down.
In city traffic — while stopped, place the trans -
mission in NEUTRAL, but do not increase the
e n
gine idle speed while preventing vehicle
motion with the brakes. NOTE:
There are steps that you can take to slow down
an
impending overheat condition:
If your Air Conditioner (A/C) is on, turn it off.
The A/C system adds heat to the engine
cooling system and turning the A/C off can
help remove this heat.
You can also turn the temperature control to
maximum heat, the mode control to floor and
the blower control to high. This allows the
heater core to act as a supplement to the
radiator and aids in removing heat from the
engine cooling system.
CAUTION!
Accessories plugged into the vehicle power
outlets draw power from the vehicle’s battery,
even when not in use (i.e., cellular devices,
etc.). Eventually, if plugged in long enough
without engine operation, the vehicle’s battery
will discharge sufficiently to degrade battery
life and/or prevent the engine from starting.
WARNING!
You or others can be badly burned by hot
engine coolant (antifreeze) or steam from
your radiator. If you see or hear steam coming
from under the hood, do not open the hood
until the radiator has had time to cool. Never
try to open a cooling system pressure cap
when the radiator or coolant bottle is hot.
6
Page 230 of 396
228 SERVICING AND MAINTENANCE
(Continued)
Under normal operating conditions, the catalytic
converter will not require maintenance. However,
it is important to keep the engine properly tuned
to ensure proper catalyst operation and prevent
possible catalyst damage.
NOTE:
Intentional tampering with emissions control
s y
stems can result in civil penalties being
assessed against you.
In unusual situations involving grossly
m a
lfunctioning engine operation, a scorching odor
may suggest severe and abnormal catalyst
overheating. If this occurs, stop the vehicle, turn off
the engine and allow it to cool. Service, including a
tune-up to manufacturer's specifications, should be
obtained immediately.
To minimize the possibility of catalytic converter
d a
mage:
Do not interrupt the ignition when the trans -
mission is in gear and the vehicle is in
m o
tion.
Do not try to start the vehicle by pushing or
towing the vehicle.
Do not idle the engine with any ignition
components disconnected or removed, such
as when diagnostic testing, or for prolonged
periods during very rough idle or malfunc -
tioning operating conditions.
COOLING SYSTEM
Coolant Checks
Check the engine coolant (antifreeze) protection
every 12 months (before the onset of freezing
w e
ather, where applicable). If the engine coolant
(antifreeze) is dirty or rusty in appearance, the
system should be drained, flushed, and refilled
with fresh engine coolant (antifreeze). Check the
front of the A/C condenser for any accumulation
of bugs, leaves, etc. If dirty, clean by gently
spraying water from a garden hose vertically
down the face of the condenser.
Check the coolant recovery bottle tubing for
b r
ittle rubber, cracking, tears, cuts, and
tightness of the connection at the bottle and
radiator. Inspect the entire system for leaks.
WARNING!
You or others can be badly burned by hot
engine coolant (antifreeze) or steam from your
radiator. If you see or hear steam coming from
under the hood, do not open the hood until the
radiator has had time to cool. Never open a
cooling system pressure cap when the radiator
or coolant bottle is hot.
Keep hands, tools, clothing, and jewelry
away from the radiator cooling fan when
the hood is raised. The fan starts automati -
cally and may start at any time, whether the
e n
gine is running or not.
When working near the radiator cooling fan,
disconnect the fan motor lead or turn the
ignition to the OFF mode. The fan is
temperature controlled and can start at any
time the ignition is in the ON mode.
WARNING!
The warning words “DO NOT OPEN HOT” on
the cooling system pressure cap are a
safety precaution. Never add engine
coolant (antifreeze) when the engine is
overheated. Do not loosen or remove the
cap to cool an overheated engine. Heat
causes pressure to build up in the cooling
system. To prevent scalding or injury, do not
remove the pressure cap while the system
is hot or under pressure.