radio DODGE JOURNEY 2020 Owners Manual
[x] Cancel search | Manufacturer: DODGE, Model Year: 2020, Model line: JOURNEY, Model: DODGE JOURNEY 2020Pages: 396, PDF Size: 25.53 MB
Page 2 of 396

WARNING: Operating, servicing and maintaining a passenger vehicle or off-highway \
motor vehicle can expose you to
chemicals including engine exhaust, carbon monoxide, phthalates, and lea\
d, which are known to the State of California to
cause cancer and birth defects or other reproductive harm. To minimize exposure, avoid breathing exhaust, do not idle the
engine except as necessary, service your vehicle in a well-ventilated area and wear gloves or wash\
your hands frequently
when servicing your vehicle. For more information go to www.P65Warnings.ca.gov/passenger-vehicle.
This Owner’s Manual illustrates and describes the operation of features and equipme\
nt that are either standard or optional on this vehicle. This manual may also include
a description of features and equipment that are no longer available or \
were not ordered on this vehicle. Please disregard any features and equipment described in this
manual that are not on this vehicle. FCA US LLC reserves the right to make changes in design and specificat\
ions, and/or make additions to or improvements to its
products without imposing any obligation upon itself to install them on \
products previously manufactured.
With respect to any vehicles sold in Canada, the name FCA US LLC shall b\
e deemed to be deleted and the name FCA Canada Inc. used in substitution therefore.
If you are the first registered retail owner of your vehicle, you may \
obtain a complimentary printed copy of the Warranty Booklet by calling 1-800-423-6343 (U.S.) or
1-800-387-1143 (Canada) or by contacting your dealer.
This Owner’s Manual is intended to familiarize you with the important features of y\
our vehicle. Your most up-to-date Owner’s Manual, Navigation/Uconnect manuals and
Warranty Booklet can be found by visiting the website on the back cover. U.S. residents can purchase replacement kits by visiting www.techauthority.com and Canadian
residents can purchase replacement kits by calling 1-800-387-1143.
The driver’s primary responsibility is the safe operation of the vehicle. Driving w\
hile distracted can result in loss of vehicle control, resulting in an accident and
personal injury. FCA US LLC strongly recommends that the driver use extreme caution whe\
n using any device or feature that may take their attention off the road.
Use of any electrical devices, such as cellular telephones, computers, p\
ortable radios, vehicle navigation or other devices, by the driver while the vehicle is moving
is dangerous and could lead to a serious accident. Texting while driving is also dangerous and should never be done while th\
e vehicle is moving. If you find yourself
unable to devote your full attention to vehicle operation, pull off the \
road to a safe location and stop your vehicle. Some states or provinces prohibit the use of
cellular telephones or texting while driving. It is always the driver’\
s responsibility to comply with all local laws.
This Owner’s Manual has been prepared to help you get acquainted with your new Dodg\
e brand vehicle and to provide a convenient reference source
for common questions.
Not all features shown in this manual may apply to your vehicle. For add\
itional information, visit www.mopar.com (U.S.), www.mopar.ca (Canada) or your local
Dodge brand dealer.
Drunk driving is one of the most frequent causes of accidents. Your driving ability can be seriously impaired with blood alcohol levels
far below the legal minimum. If you are drinking, don’t drive. Ride with a designated non-drinking driver, call a cab, a friend or use
public transportation.
DRIVING AND ALCOHOL
Driving after drinking can lead to an accident. Your perceptions are less sharp, your reflexes are slower and your judg\
ment is impaired
when you have been drinking. Never drink and then drive.
WARNING
Page 8 of 396
6
MULTIMEDIA
CYBERSECURITY ............................................... 265
UCONNECT SETTINGS .. .................................... 266
Customer Programmable
Features — Radio 4.3 Settings. .
................266
Customer Programmable Features —
Uconnect 3/3 NAV Settings .
.
....................274
SAFETY AND GENERAL INFORMATION . . ........ 285
Safety Guidelines .. .....................................285
RADIO 4.3 . .......................................................... 286
I ntroduction .. ..............................................286
Radio Mode . . ..............................................287
Media Mode . . .............................................291
Uconnect Phone (4.3) . . .............................294
More Mode . . ...............................................305
UCONNECT 3/3 NAV WITH 8.4-INCH
DISPLAY . ............................................................. 306
I
ntroduction To the Uconnect 3/3 NAV
With 8.4-Inch Display. .
...............................306
Radio Mode . . ..............................................307
Media Mode . . .............................................316
Uconnect Phone. . .......................................324
Navigation Mode — If Equipped . . ..............339
More Mode . . ...............................................363
STEERING WHEEL AUDIO CONTROLS — IF
EQUIPPED . .
........................................................ 363
Radio Operation .. .......................................364
Media Mode . . .............................................364
IPOD®/USB/MP3 CONTROL . . ......................... 364UCONNECT MULTIMEDIA — VIDEO
ENTERTAINMENT SYSTEM (VES)
(IF EQUIPPED) . .
..................................................365
Getting Started .. ........................................ 365
Single Video Screen. . ................................. 365
Play Video Games . . .................................... 365
Listen To An Audio Source On Channel 2 While
A Video Is Playing On Channel 1 . .
............. 366
Play A DVD Using The Touchscreen
Radio . ......................................................... 367
V
ES Remote Control — If Equipped . . ........ 367
Remote Control Storage . . .......................... 369
Locking The Remote Control. . ................... 369
Replacing The Remote Control
Batteries . .................................................... 369
I
mportant Notes For Single Video Screen
System . ....................................................... 369
U
connect Headphones Operation . . .......... 370
Controls . ..................................................... 370
R eplacing The Headphone Batteries . . ..... 371
Accessibility. . .............................................. 371
Stereo Headphone Lifetime Limited
Warranty . .................................................... 371
S
ystem Information . . ................................. 372
RADIO OPERATION AND MOBILE PHONES . . .. 376
Regulatory And Safety Information.. ......... 377
VOICE COMMAND (UCONNECT 3/3 NAV) .
..... 378
U
connect 3/3 NAV ..................................... 378
U
connect Voice Commands . . .................... 379
CUSTOMER ASSISTANCE
SUGGESTIONS FOR OBTAINING SERVICE FOR
YOUR VEHICLE .................................................. 380
Prepare For The Appointment .. ................ 380
Prepare A List. . ........................................... 380
Be Reasonable With Requests . . ............... 380
IF YOU NEED ASSISTANCE . . ............................ 380
FCA US LLC Customer Center ..
................. 381
FCA Canada Inc. Customer Center . . ......... 381
In Mexico Contact . . .................................... 381
Puerto Rico And US Virgin Islands . . .......... 381
Customer Assistance For The Hearing Or
Speech Impaired (TDD/TTY) . .
................... 381
Service Contract . . ..................................... 381
WARRANTY INFORMATION . . ............................ 382
MOPAR PARTS.. ................................................. 382
REPORTING SAFETY DEFECTS .. ...................... 382
In The 50 United States And
Washington, D.C. . .
..................................... 382
In Canada . .................................................. 383
P
UBLICATION ORDER FORMS . . ...................... 383
Page 13 of 396
GETTING TO KNOW YOUR VEHICLE 11
Using The Panic Alarm
To turn the Panic Alarm feature on or off, push
the Panic button on the key fob. When the Panic
Alarm is activated, the turn signals will flash, the
horn will pulse on and off, and the interior lights
will turn on.
The Panic Alarm will stay on for three minutes
un
less you turn it off by either pushing the Panic
button a second time or drive the vehicle at a
speed of 15 mph (24 km/h) or greater.
NOTE:
The interior lights will turn off if you place the
ignition in the ACC or ON/RUN position while
the Panic Alarm is activated. However, the
exterior lights and horn will remain on.
You may need to be less than 35 ft (11 m)
fr
om the vehicle when using the key fob to
turn off the Panic Alarm due to the radio
frequency noises emitted by the system.
Key Fob Battery Replacement
The recommended replacement battery is one
CR2032 battery.
NOTE:
Perchlorate Material – special handling may
apply. See www.dtsc.ca.gov/hazard -
ouswaste/perchlorate .
Do not touch the battery terminals that are
on the back housing or the printed circuit
board.
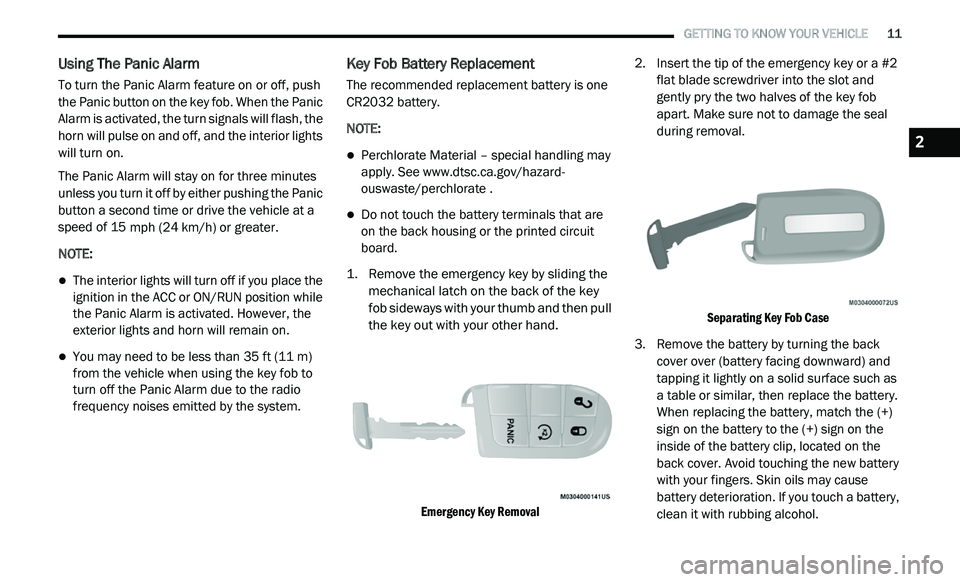
1. R emove the emergency key by sliding the
m
echanical latch on the back of the key
fob sideways with your thumb and then pull
the key out with your other hand.
Emergency Key Removal
2. I
nsert the tip of the emergency key or a #2
f
lat blade screwdriver into the slot and
gently pry the two halves of the key fob
apart. Make sure not to damage the seal
during removal.
Separating Key Fob Case
3. R emove the battery by turning the back
c
over over (battery facing downward) and
tapping it lightly on a solid surface such as
a table or similar, then replace the battery.
When replacing the battery, match the (+)
sign on the battery to the (+) sign on the
inside of the battery clip, located on the
back cover. Avoid touching the new battery
with your fingers. Skin oils may cause
battery deterioration. If you touch a battery,
clean it with rubbing alcohol.
2
Page 14 of 396
12 GETTING TO KNOW YOUR VEHICLE
4. To assemble the key fob case, snap the two
halves together.
Programming Additional Key Fobs
Programming the key fob may be performed by
an authorized dealer.
NOTE:
Once a key fob is programmed to a vehicle, it
c a
nnot be repurposed and reprogrammed to
another vehicle.
General Information
The following regulatory statement applies to all
Radio Frequency (RF) devices equipped in this
vehicle:
This device complies with Part 15 of the FCC
R u
les and with Innovation, Science and
Economic Development Canada license-exempt
RSS standard(s). Operation is subject to the
following two conditions:
1. T his device may not cause harmful
i
nterference, and
2. T his device must accept any interference
r
eceived, including interference that may
cause undesired operation. Le présent appareil est conforme aux CNR
d
`
Innovation, Science and Economic
Development applicables aux appareils radio
exempts de licence. L'exploitation est autorisée
aux deux conditions suivantes:
1. l 'appareil ne doit pas produire de
b
rouillage, et
2. l 'utilisateur de l'appareil doit accepter tout
b
rouillage radioélectrique subi, même si le
brouillage est susceptible d'en compro -
mettre le fonctionnement.
La operación de este equipo está sujeta a las
s i
guientes dos condiciones:
1. e s posible que este equipo o dispositivo no
c
ause interferencia perjudicial y
2. e ste equipo o dispositivo debe aceptar
c
ualquier interferencia, incluyendo la que
pueda causar su operación no deseada.
NOTE:
Changes or modifications not expressly
a p
proved by the party responsible for compli -
ance could void the user’s authority to operate
t h
e equipment.
IGNITION SWITCH
KEYLESS PUSH BUTTON IGNITION
This feature allows the driver to operate the
ignition with the push of a button as long as the
key fob is in the passenger compartment.
The Keyless Push Button Ignition has four
op
erating positions, three of which are labeled
and will illuminate when in position. The three
positions are OFF, ACC, and ON/RUN. The fourth
position is START. During START, RUN will
illuminate.
NOTE:
If the ignition switch does not change with the
p u
sh of a button, the key fob may have a low or
depleted battery. In this situation, a back up
method can be used to operate the ignition
switch. Put the nose side (side opposite of the
emergency key) of the key fob against the
START/STOP ignition button and push to
operate the ignition switch.
Page 16 of 396
14 GETTING TO KNOW YOUR VEHICLE
(Continued)
IGNITION OR ACCESSORY ON MESSAGE
Opening the driver's door when the ignition is in
the ACC or ON (engine not running) position, a
chime will sound to remind you to place the
ignition in the OFF position. In addition to the
chime, the ignition or accessory on message will
display in the cluster.
NOTE:
With the Uconnect system, the power window
s w
itches, radio, power sunroof (if equipped),
and power outlets will remain active for up to
10 minutes after the ignition is placed in the
O F
F position. Opening either front door will
cancel this feature. The time for this feature is
programmable. Refer to “Uconnect Settings” in
“Multimedia” for further information.
REMOTE START — IF EQUIPPED
HOW TO USE REMOTE START
All of the following conditions must be met
before the engine will remote start:
Gear selector in PARK
Doors closed
Hood closed
Liftgate closed
Hazard switch off
Brake switch inactive (brake pedal not pushed)
Battery at an acceptable charge level
System not disabled from previous remote
start event
Vehicle security alarm not active
Ignition in the OFF position
Malfunction Indicator Light (MIL) is not illumi -
nated
WARNING!
Before exiting a vehicle, always shift the
automatic transmission into PARK and
apply the parking brake. Always make sure
the keyless ignition is in the OFF position,
remove the key fob from the vehicle and
lock the vehicle.
Never leave children alone in a vehicle, or
with access to an unlocked vehicle.
Allowing children to be in a vehicle unat -
tended is dangerous for a number of
r e
asons. A child or others could be seriously
or fatally injured. Children should be
warned not to touch the parking brake,
brake pedal or the gear selector.
Do not leave the key fob in or near the
vehicle, or in a location accessible to chil-
dren, and do not leave the ignition of a
v e
hicle equipped with Keyless Enter-N-Go
in the ACC or ON/RUN position. A child
could operate power windows, other
controls, or move the vehicle.
Do not leave children or animals inside parked
vehicles in hot weather. Interior heat build-up
may cause serious injury or death.
CAUTION!
An unlocked vehicle is an invitation for
thieves. Always remove the key fobs from
vehicle, place the ignition in the OFF position
and lock all doors when leaving the vehicle
unattended.
WARNING! (Continued)
Page 18 of 396
16 GETTING TO KNOW YOUR VEHICLE
REMOTE START COMFORT SYSTEM — IF
E
QUIPPED
When Remote Start is activated, the driver
heated seat feature will automatically turn on in
cold weather. This feature will stay on through
the duration of Remote Start or until the ignition
switch is placed in the ON/RUN position.
The Remote Start Comfort system can be
a c
tivated and deactivated through the
Uconnect system. Refer to “Uconnect Settings”
in “Multimedia” for further information on
Remote Start Comfort system operation.
GENERAL INFORMATION
The following regulatory statement applies to all
Radio Frequency (RF) devices equipped in this
vehicle:
This device complies with Part 15 of the FCC
R u
les and with Innovation, Science and
Economic Development Canada license-exempt
RSS standard(s). Operation is subject to the
following two conditions:
1. T his device may not cause harmful
i
nterference, and
2. T
his device must accept any interference
r
eceived, including interference that may
cause undesired operation.
Le présent appareil est conforme aux CNR
d`
Innovation, Science and Economic
Development applicables aux appareils radio
exempts de licence. L'exploitation est autorisée
aux deux conditions suivantes:
1. l 'appareil ne doit pas produire de
b
rouillage, et
2. l 'utilisateur de l'appareil doit accepter tout
b
rouillage radioélectrique subi, même si le
brouillage est susceptible d'en compro -
mettre le fonctionnement.
La operación de este equipo está sujeta a las
s i
guientes dos condiciones:
1. e s posible que este equipo o dispositivo no
c
ause interferencia perjudicial y
2. e ste equipo o dispositivo debe aceptar
c
ualquier interferencia, incluyendo la que
pueda causar su operación no deseada. NOTE:
Changes or modifications not expressly
a p
proved by the party responsible for compli -
ance could void the user’s authority to operate
t h
e equipment.
SENTRY KEY
The Sentry Key Immobilizer system prevents
unauthorized vehicle operation by disabling the
engine. The system does not need to be armed
or activated. Operation is automatic, regardless
of whether the vehicle is locked or unlocked.
The system uses a key fob and a Keyless Push
Bu
tton Ignition, and a Radio Frequency (RF)
receiver to prevent unauthorized vehicle
operation. Therefore, only key fobs that are
programmed to the vehicle can be used to start
and operate the vehicle. If an invalid key fob
is used to attempt to start and operate the
v e
hicle, the system will not allow the engine to
crank. If an invalid key fob is used to start the
engine, the system will shut the engine off in
two seconds.
Page 19 of 396
GETTING TO KNOW YOUR VEHICLE 17
After placing the ignition in the ON/RUN position,
the vehicle security light will turn on for
three seconds for a bulb check. If the light
r e
mains on after the bulb check, it indicates
that there is a problem with the electronics.
In addition, if the light begins to flash after the
b u
lb check, it indicates that someone used an
invalid key fob to start the engine. Either of these
conditions will result in the engine being shut off
after two seconds.
If the vehicle security light turns on during
no
rmal vehicle operation (vehicle running for
longer than 10 seconds), it indicates that there
is a fault in the electronics. Should this occur,
have the vehicle serviced as soon as possible by
an authorized dealer.
All of the key fobs provided with your new
v e
hicle have been programmed to the vehicle
electronics.
KEY PROGRAMMING
Programming key fobs may be performed at an
authorized dealer.
REPLACEMENT KEYS
NOTE:
Only key fobs that are programmed to the
v e
hicle electronics can be used to start and
operate the vehicle. Once a key fob is
programmed to a vehicle, it cannot be
programmed to any other vehicle.
NOTE:
Duplication of key fobs may be performed at an
a u
thorized dealer. This procedure consists of
programming a blank key fob to the vehicle
electronics. A blank key fob is one that has
never been programmed. When having the Sentry Key Immobilizer system
s
e
rviced, bring all vehicle keys with you to an
authorized dealer.
GENERAL INFORMATION
The following regulatory statement applies to all
Radio Frequency (RF) devices equipped in this
vehicle:
This device complies with Part 15 of the FCC
R u
les and with Innovation, Science and
Economic Development Canada license-exempt
RSS standard(s). Operation is subject to the
following two conditions:
1. T his device may not cause harmful
i
nterference, and
2. T his device must accept any interference
r
eceived, including interference that may
cause undesired operation.CAUTION!
The Sentry Key Immobilizer system is not
compatible with some aftermarket remote
starting systems. Use of these systems may
result in vehicle starting problems and loss of
security protection.
CAUTION!
Always remove the key fobs from the
vehicle and lock all doors when leaving the
vehicle unattended.
For vehicles equipped with Keyless
Enter-N-Go — Ignition, always remember to
place the ignition in the OFF position.
2
Page 20 of 396
18 GETTING TO KNOW YOUR VEHICLE
Le présent appareil est conforme aux CNR
d`Innovation, Science and Economic
Development applicables aux appareils radio
exempts de licence. L'exploitation est autorisée
aux deux conditions suivantes:
1. l 'appareil ne doit pas produire de
b
rouillage, et
2. l 'utilisateur de l'appareil doit accepter tout
b
rouillage radioélectrique subi, même si le
brouillage est susceptible d'en compro -
mettre le fonctionnement.
La operación de este equipo está sujeta a las
s i
guientes dos condiciones:
1. e s posible que este equipo o dispositivo no
c
ause interferencia perjudicial y
2. e ste equipo o dispositivo debe aceptar
c
ualquier interferencia, incluyendo la que
pueda causar su operación no deseada.
NOTE:
Changes or modifications not expressly
a p
proved by the party responsible for compli -
ance could void the user’s authority to operate
t h
e equipment.
VEHICLE SECURITY ALARM — IF EQUIPPED
The vehicle security alarm monitors the vehicle
doors and liftgate for unauthorized entry and the
START/STOP ignition button for unauthorized
operation. While the vehicle security alarm is
armed, interior switches for door locks are
disabled. If something triggers the alarm, the
vehicle security alarm will provide the following
audible and visible signals: the horn will pulse,
the headlights will turn on, the park lamps and/or
turn signals will flash, and the vehicle security
light in the instrument cluster will flash.
TO ARM THE SYSTEM
Follow these steps to arm the vehicle security
alarm:
1. M ake sure the vehicle ignition system is
O
FF (refer to "Starting The Engine" in
"Starting And Operating" for further
information).
2. Perform one of the following methods to l
ock the vehicle:
Push lock on the interior power door lock
switch with the driver and/or passenger
door open.
Push the lock button on the exterior
Passive Entry Door Handle with a valid
key fob available in the same exterior
zone (refer to "Keyless Enter-N-Go —
Passive Entry" in “Doors” in this chapter
for further information).
Push the lock button on the key fob.
3. I f any doors are open, close them.
TO DISARM THE SYSTEM
The vehicle security alarm can be disarmed
using any of the following methods:
Push the unlock button on the key fob.
Grasp the Passive Entry Door Handle with a
valid key fob within 5 ft (1.5 m) of the passive
e n
try door handle (if equipped). Refer to
"Keyless Enter-N-Go — Passive Entry" in
“Doors” in this chapter for further information.
Cycle the vehicle ignition system out of the
OFF position.
For vehicles equipped with Keyless
Enter-N-Go — Passive Entry, push the
START/STOP ignition button (requires at
least one valid key fob in the vehicle).
Page 25 of 396
GETTING TO KNOW YOUR VEHICLE 23
The vehicle doors can also be locked by using
the key fob lock button or the lock button
located on the vehicle’s interior door panel.
General Information
The following regulatory statement applies to all
Radio Frequency (RF) devices equipped in this
vehicle:
This device complies with Part 15 of the FCC
Ru
les and with Innovation, Science and
Economic Development Canada license-exempt
RSS standard(s). Operation is subject to the
following two conditions:
1. T his device may not cause harmful
i
nterference, and
2. T his device must accept any interference
r
eceived, including interference that may
cause undesired operation. Le présent appareil est conforme aux CNR
d
`
Innovation, Science and Economic
Development applicables aux appareils radio
exempts de licence. L'exploitation est autorisée
aux deux conditions suivantes:
1. l 'appareil ne doit pas produire de
b
rouillage, et
2. l 'utilisateur de l'appareil doit accepter tout
b
rouillage radioélectrique subi, même si le
brouillage est susceptible d'en compro -
mettre le fonctionnement.
La operación de este equipo está sujeta a las
s i
guientes dos condiciones:
1. e s posible que este equipo o dispositivo no
c
ause interferencia perjudicial y
2. e ste equipo o dispositivo debe aceptar
c
ualquier interferencia, incluyendo la que
pueda causar su operación no deseada.
NOTE:
Changes or modifications not expressly
a p
proved by the party responsible for compli -
ance could void the user’s authority to operate
t h
e equipment.
CHILD-PROTECTION DOOR LOCK
S
YSTEM — REAR DOORS
To Engage The Child-Protection Door Lock
System
To provide a safer environment for small
c h
ildren riding in the rear seats, the rear doors
are equipped with a Child-Protection Door Lock
system.
1. Open the rear door.
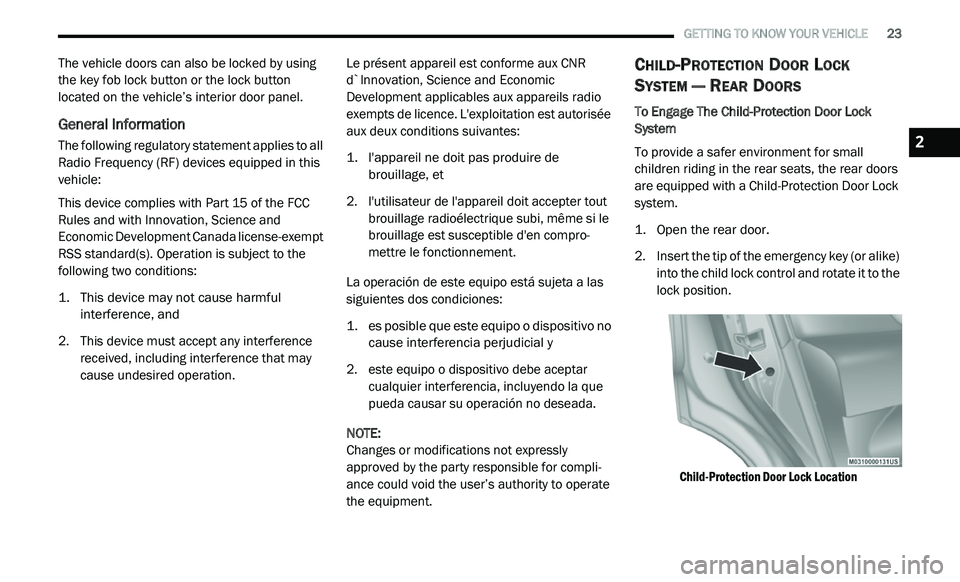
2
. I nsert the tip of the emergency key (or alike)
i
nto the child lock control and rotate it to the
lock position.
Child-Protection Door Lock Location
2
Page 45 of 396
GETTING TO KNOW YOUR VEHICLE 43
INTERIOR LIGHTS
COURTESY/INTERIOR LIGHTING
The interior lights come on when a door is
opened.
To protect the battery, the interior lights will turn
of
f automatically 10 minutes after the ignition is
p l
aced in the OFF position. This will occur if the
interior lights were switched on manually or are
on because a door is open. The battery
protection also includes the glove compartment
light. To restore interior light operation after
automatic battery protection is enabled (lights
off), either place the ignition in the ON/RUN
position or cycle the light switch.
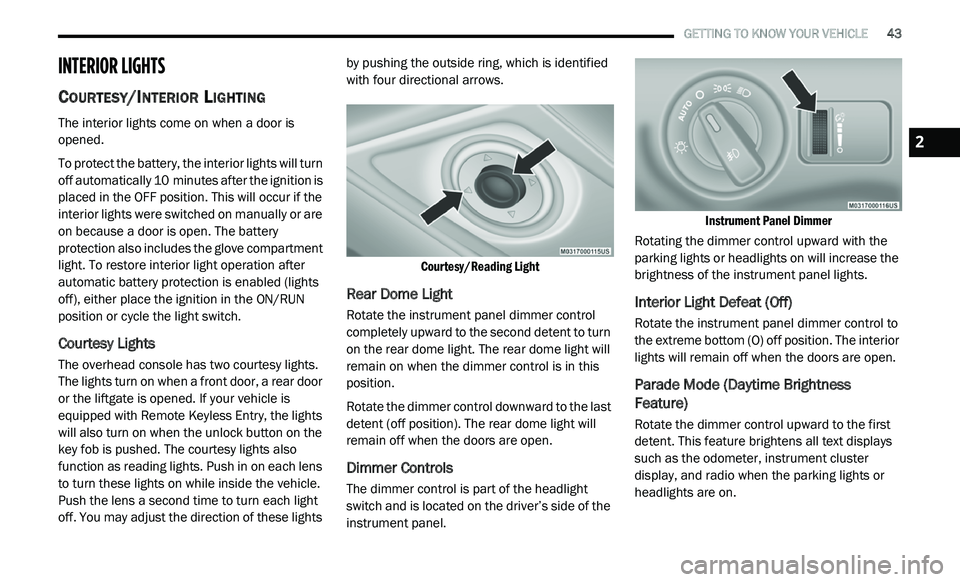
Courtesy Lights
The overhead console has two courtesy lights.
The lights turn on when a front door, a rear door
or the liftgate is opened. If your vehicle is
equipped with Remote Keyless Entry, the lights
will also turn on when the unlock button on the
key fob is pushed. The courtesy lights also
function as reading lights. Push in on each lens
to turn these lights on while inside the vehicle.
Push the lens a second time to turn each light
off. You may adjust the direction of these lights by pushing the outside ring, which is identified
with four directional arrows.
Courtesy/Reading Light
Rear Dome Light
Rotate the instrument panel dimmer control
completely upward to the second detent to turn
on the rear dome light. The rear dome light will
remain on when the dimmer control is in this
position.
Rotate the dimmer control downward to the last
de
tent (off position). The rear dome light will
remain off when the doors are open.
Dimmer Controls
The dimmer control is part of the headlight
switch and is located on the driver’s side of the
instrument panel.
Instrument Panel Dimmer
Rotating the dimmer control upward with the
p a
rking lights or headlights on will increase the
brightness of the instrument panel lights.
Interior Light Defeat (Off)
Rotate the instrument panel dimmer control to
the extreme bottom (O) off position. The interior
lights will remain off when the doors are open.
Parade Mode (Daytime Brightness
Feature)
Rotate the dimmer control upward to the first
detent. This feature brightens all text displays
such as the odometer, instrument cluster
display, and radio when the parking lights or
headlights are on.
2