oil change DODGE NEON SRT 2004 2.G Owners Manual
[x] Cancel search | Manufacturer: DODGE, Model Year: 2004, Model line: NEON SRT, Model: DODGE NEON SRT 2004 2.GPages: 200, PDF Size: 3.23 MB
Page 42 of 200

²The lap portion should be low on the hips and as snug
as possible.
²Check belt fit periodically. A child's squirming or
slouching can move the belt out of position.
²If the shoulder belt contacts the face or neck, move the
child closer to the center of the vehicle. Never allow a
child to put the shoulder belt under an arm or behind
their back.
Transporting Pets
Airbags deploying in the front seat could harm your pet.
An unrestrained pet will be thrown about and possibly
injured, or injure a passenger during panic braking or in
a collision.
Pets should be restrained in the rear seat in pet harnesses
or pet carriers that are secured by seat belts.
ENGINE BREAK-IN RECOMMENDATIONS
The engine in your new vehicle does not require a long
break-in period.
Drive moderately during the first 300 miles (500 km).
After the initial 60 miles (100 km), speeds up to 50 or 55
mph (80 or 90 km/h) are desirable.
While cruising, brief full-throttle acceleration, within the
limits of local traffic laws, contributes to a good break-in.
Wide open throttle acceleration in low gear can be
detrimental and should be avoided.
The crankcase oil installed in the engine at the factory is
a high quality energy conserving type lubricant. Oil
changes should be consistent with expected climate con-
ditions under which vehicle operations will occur. The
recommended viscosity and quality grades are in Section
7 of this manual.
Do not use non-detergent or straight mineral oils.The
manufacturer recommends the use of Mobil 1t10W30
synthetic engine oil.
42 THINGS TO KNOW BEFORE STARTING YOUR VEHICLE
Page 138 of 200

Change Engine Oil
Road conditions and your kind of driving affects the
interval at which your oil should be changed. Check the
following list to decide if any apply to you.
²Day and night temperatures are below 32ÉF (0ÉC)
²Stop and Go driving
²Extensive engine idling
²Driving in dusty conditions
²Short trips of less than 10 miles (16.2 km)
²More than 50% of your driving is at sustained high
speeds during hot weather, above 90ÉF (32ÉC)
²Trailer towing
²Taxi, Police, or delivery service (commercial service)
²Off-road or desert operation
²If equipped for and operating with E-85 (ethanol) fuel
NOTE:IfANYof these apply to you then change your
engine oil every 3,000 miles (5 000 km) or 3 months,whichever comes first and follow schedule ªBº of the
9Maintenance Schedules9section of this manual.
If none of these apply to you, then change your engine oil
at every interval shown on schedule9A9of the9Mainte-
nance Schedules9section of this manual.
Engine Oil Selection
For best performance and maximum protection under all
types of operating conditions, the manufacture only
recommends engine oils that are API certified and meet
138 MAINTAINING YOUR VEHICLE
Page 140 of 200

the engine oil. Engine oil is an engineered product and
it's performance may be impaired by supplemental ad-
ditives.
Disposing of Used Engine Oil
Care should be taken in disposing of used engine oil from
your vehicle. Used oil, indiscriminately discarded, can
present a problem to the environment. Contact your
dealer, service station, or governmental agency for advice
on how and where used oil can be safely discarded in
your area.
Engine Oil Filter
The engine oil filter should be replaced at every engine
oil change.
Engine Oil Filter Selection
All of this manufacturers engines have a full-flow type
disposable oil filter. Use a filter of this type for replace-
ment. The quality of replacement filters varies consider-
ably. Only high quality filters should be used to assure
most efficient service. Mopar Engine Oil Filters are high
quality oil filters and are recommended.
Drive Belts Ð Check Condition and Tension
At the mileage shown in the maintenance schedules,
check all drive belts for condition and proper tension.
Improper belt tension can cause belt slippage and failure.
Inspect the drive belts for evidence of cuts, cracks, or
glazing and replace them if there is any sign of damage
which could result in belt failure. If adjustment is re-
quired, adjust the belts according to the specifications
and procedures shown in the Service Manual.
Special tools are required to properly measure tension
and to restore belt tension to factory specifications. Also,
check belt routing to make sure there is no interference
between the belts and other engine components.
Spark Plugs
Spark plugs must fire properly to assure engine perfor-
mance and emission control. New plugs should be in-
stalled at the specified mileage. The entire set should be
replaced if there is any malfunction due to a faulty spark
plug. Check the specifications section for the proper type
of spark plug for use in your vehicle.
140 MAINTAINING YOUR VEHICLE
Page 146 of 200

Windshield Wiper Blades
Clean the rubber edges of the wiper blades and the
windshield periodically with a sponge or soft cloth and a
mild non abrasive cleaner, or use the washer solvent. This
will remove accumulations of salt or road film and help
reduce streaking and smearing.
Operation of the wipers on dry glass for long periods
may cause deterioration of the wiper blades. Always use
washer fluid when using the wipers to remove salt or dirt
from a dry windshield. Avoid using the wiper blades to
remove frost or ice from the windshield. Make sure that
they are not frozen to the glass before turning them on to
avoid damaging the blade. Keep the blade rubber out of
contact with petroleum products such as engine oil,
gasoline, etc.
Windshield Wiper Blade Replacement
1. Lift the wiper arm away from the glass.
2. Rotate the blade 45 degrees to gain access to the
release tab.3. Push the release tab shown in the picture and slide the
wiper blade assembly down along the arm. Gently place
the wiper arm on the windshield.
4. Install the new blade assembly onto the wiper arm tip
until it locks in place.Windshield Washer Aiming
To change the aim of the windshield washers, place a
safety pin into the nozzle opening and move the nozzle
slightly. Continue making slight adjustments until you
obtain the desired pattern.
146 MAINTAINING YOUR VEHICLE
Page 147 of 200
Windshield Washer Reservoir
The washer fluid reservoir is located in the engine
compartment and should be checked for fluid level at
regular intervals. Fill the reservoir with windshield
washer solvent (not radiator antifreeze)
Exhaust System
The best protection against carbon monoxide entry into
the vehicle body is a properly maintained engine exhaust
system.
If you notice a change in the sound of the exhaust system;
or if exhaust fumes can be detected inside the vehicle; or
when the underside or rear of the vehicle is damaged;
have a competent mechanic inspect the complete exhaust
system and adjacent body areas of broken, damaged,
deteriorated, or mispositioned parts. Open seams or
loose connections could permit exhaust fumes to seep
into the passenger compartment. In addition, inspect the
exhaust system each time the vehicle is raised for lubri-
cation or oil change. Replace as required.
WARNING!
Exhaust gases can injure or kill. They contain carbon
monoxide which is colorless and odorless. Breathing
it can make you unconscious and can eventually
poison you. Follow the above precautions to keep
your exhaust system as safe as possible.
MAINTAINING YOUR VEHICLE 147
7
Page 153 of 200
Brake System
In order to assure brake system performance, all brake
system components should be inspected periodically.
Suggested service intervals can be found in the Mainte-
nance Section.
WARNING!
Riding the brakes can lead to brake failure and
possibly an accident. Driving with your foot resting
or riding on the brake pedal can result in abnormally
high brake temperatures, excessive lining wear, and
possible brake damage. You wouldn't have your full
braking capacity in an emergency.
Brake and Power Steering System Hoses
When servicing the vehicle for scheduled maintenance,
inspect surface of hoses and nylon tubing for evidence of
heat and mechanical damage. Hard and brittle rubber,
cracking, checking, tears, cuts, abrasions, and excessive
swelling suggest deterioration of the rubber. Particularattention should be made to examining those hose sur-
faces nearest to high heat sources, such as the exhaust
manifold.
Inspect all hose clamps and couplings to make sure they
are secure and no leaks are present.
Insure nylon tubing in these areas has not melted or
collapsed.
NOTE:Often, fluids such as oil, power steering fluid,
and brake fluid are used during assembly plant opera-
tions to ease the assembly of hoses to couplings. There-
fore, oil wetness at the hose-coupling area is not neces-
sarily an indication of leakage. Actual dripping of hot
fluid when systems are under pressure (during vehicle
operation) should be noted before hose is replaced based
on leakage.
NOTE:Inspection of brake hoses should be done
whenever the brake system is serviced and every engine
oil change.
MAINTAINING YOUR VEHICLE 153
7
Page 169 of 200
NOTE:IfANYof these apply to you then change your
engine oil every 3,000 miles (5 000 km) or 3 months,
whichever comes first and follow schedule ªBº of the
9Maintenance Schedules9section of this manual.
NOTE:Most vehicles are operated under the conditions
listed for Schedule9B9.
Second is ScheduleªAº. It is for vehicles that are not
operated under any of the conditions listed under Sched-
ule9B9
Use the schedule that best describes your driving condi-
tions. Where time and mileage are listed, follow the
interval that occurs first.
CAUTION!
Failure to perform the required maintenance items
may result in damage to the vehicle.
At Each Stop for Fuel
²
Check the engine oil level about 5 minutes after a fully
warmed engine is shut off. Checking the oil level while
the vehicle is on level ground will improve the accu-
racy of the oil level reading. Add oil only when the
level is at or below the ADD or MIN mark.
²Check the windshield washer solvent and add if
required.
Once a Month
²
Check tire pressure and look for unusual wear or
damage.
²Inspect the battery and clean and tighten the terminals
as required.
²Check the fluid levels of coolant reservoir, brake
master cylinder and transaxle and add as needed.
²Check all lights and all other electrical items for correct
operation.
²Check rubber seals on each side of the radiator for
proper fit.
MAINTENANCE SCHEDULES 169
8
M
A
I
N
T
E
N
A
N
C
E
S
C
H
E
D
U
L
E
S
Page 170 of 200
At Each Oil Change
²
Change the engine oil filter.
²Inspect the exhaust system.
²Inspect the brake hoses.
²Inspect the CV joints and front suspension compo-
nents.
²Check the manual transaxle fluid level and fill plug
condition.
²Check the coolant level, hoses, and clamps.
²Rotate the tires at each oil change interval shown on
SCHEDULE ªAº 5,000 miles (8 000 km), or every other
interval shown on SCHEDULE ªBº 6,000 miles (10,000
km).
170 MAINTENANCE SCHEDULES
8
M
A
I
N
T
E
N
A
N
C
E
S
C
H
E
D
U
L
E
S
Page 171 of 200
SCHEDULE ªBº
Follow schedule ªBº If you usually operate your vehicle
under one or more of the following conditions.
Change the manual transaxle fluid every 48,000 miles (77
000 km) if the vehicle is usually operated under one or
more of the conditions marked with an ².
²Day or night temperatures are below 32É F (0É C ).
²Stop and go driving.
²Extensive engine idling.
²Driving in dusty conditions.
²Short trips of less than 10 miles (16.2 km).
²More than 50% of your driving is at sustained high
speeds during hot weather, above 90É F (32É C).
²Trailer towing.²
²Taxi, police, or delivery service (commercial service).²
²Off-road or desert operation.
²If equipped for and operating with E-85 (ethanol)
fuel.
NOTE:IfANYof these apply to you then change your
engine oil every 3,000 miles (5 000 km) or 3 months,
whichever comes first and follow schedule ªBº of the
9Maintenance Schedules9section of this manual.
If none of these apply to you, then change your engine oil
at every interval shown on schedule9A9of the9Mainte-
nance Schedules9section of this manual.
SCHEDULE ªBº 171
8
M
A
I
N
T
E
N
A
N
C
E
S
C
H
E
D
U
L
E
S
Page 172 of 200
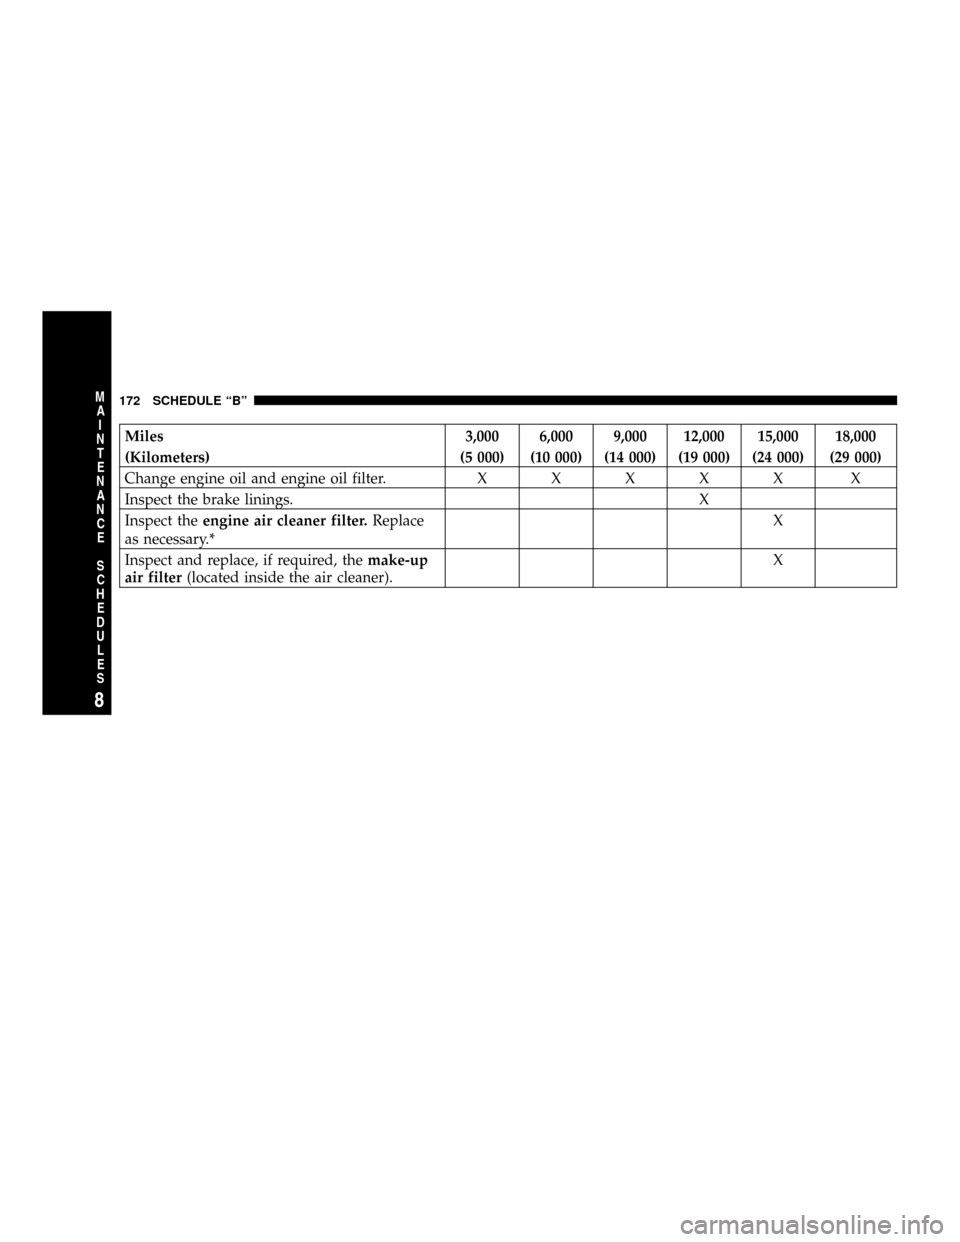
Miles 3,000 6,000 9,000 12,000 15,000 18,000
(Kilometers) (5 000) (10 000) (14 000) (19 000) (24 000) (29 000)
Change engine oil and engine oil filter.XXXXX X
Inspect the brake linings. X
Inspect theengine air cleaner filter.Replace
as necessary.*X
Inspect and replace, if required, themake-up
air filter(located inside the air cleaner).X
172 SCHEDULE ªBº
8
M
A
I
N
T
E
N
A
N
C
E
S
C
H
E
D
U
L
E
S