service interval DODGE NITRO 2008 1.G Owners Manual
[x] Cancel search | Manufacturer: DODGE, Model Year: 2008, Model line: NITRO, Model: DODGE NITRO 2008 1.GPages: 434, PDF Size: 6.2 MB
Page 63 of 434
Maintaining Your Airbag System
WARNING!
²Modifications to any part of the airbag system could cause it to fail
when you need it. You could be injured if the airbag system is not
there to protect you. Do not modify the components or wiring,
including adding any kind of badges or stickers to the steering wheel
hub trim cover or the upper right side of the instrument panel. Do not
modify the front bumper or vehicle body structure.
²Do not attempt to modify any part of your advanced airbag system.
The airbag may inflate accidentally or may not function properly if
modifications are made. Take your vehicle to an authorized dealer for
any advanced airbag system service. If your seat including your trim
cover and cushion needs to be serviced in any way (including removal
or loosening/tightening of seat attachment bolts), take the vehicle to
your authorized dealer. Only manufacturer approved seat accessories
may be used. If it is necessary to modify an advanced airbag system
for persons with disabilities, contact your authorized dealer.
²Do not place or hang any items such as add-on video players on the
right front passenger seat back. The additional weight may cause the
Occupant Classification System to be unable to correctly classify the
right front occupant. This could allow the passenger frontal airbag to
inflate when it is not desired.
²It is dangerous to try to repair any part of the airbag system yourself.
Be sure to tell anyone who works on your vehicle that it has an airbag
system.
NOTE:Perchlorate Material ± special handling may
apply, See www.dtsc.ca.gov/hazardouswaste/perchlorate
Airbag Warning Light
You will want to have the airbag system ready to inflate
for your protection in an impact. The airbag system is
designed to be maintenance free. If any of the following
occurs, have an authorized dealer service the system
promptly:
²Does not come on during the 6 to 8 seconds after the
ignition switch is first turned on.
²Remains on after the 6 to 8 second interval.
²Comes on for any period of time while driving.
THINGS TO KNOW BEFORE STARTING YOUR VEHICLE 63
2
Page 177 of 434

26. Odometer/Trip Odometer
The odometer shows the total distance the vehicle has
been driven.
The trip odometer shows individual trip mileage. To
toggle between the odometer and the trip odometer,
press the Odometer/Trip Odometer Button. To reset the
Trip Odometer, press and hold the button while in trip
mode, until the Trip Odometer resets.
If the vehicle diagnostic system determines that the fuel
filler cap is loose, improperly installed, or damaged,
GASCAP will be displayed in the instrument cluster.
Tighten the fuel filler cap properly and press the odom-
eter reset button to turn the GASCAP message off. If the
problem continues, the message will appear the next time
the vehicle is started.
U.S. federal regulations require that upon transfer of
vehicle ownership, the seller certify to the purchaser thecorrect mileage that the vehicle has been driven. There-
fore, if the odometer reading is changed during repair or
replacement, be sure to keep a record of the reading
before and after the service so that the correct mileage can
be determined.
Change Oil Message
Your vehicle is equipped with an engine oil change
indicator system. The ªChange Oilº message will flash in
the instrument cluster odometer for approximately 12
seconds after a single chime has sounded to indicate the
next scheduled oil change interval. The engine oil change
indicator system is duty cycle based, which means the
engine oil change interval may fluctuate dependent upon
your personal driving style. Unless reset, this message
will continue to display each time you turn the ignition
switch to the ON/RUN position. To turn off the message
temporarily, press and release the Trip Odometer button
INSTRUMENT PANEL AND CONTROLS 177
4
Page 354 of 434

MAINTENANCE PROCEDURES
The pages that follow contain therequiredmaintenance
services determined by the engineers who designed your
vehicle.
Besides the maintenance items for which there are fixed
maintenance intervals, there are other items that should
operate satisfactorily without periodic maintenance.
However, if a malfunction of these items does occur, it
could adversely affect the engine or vehicle performance.
These items should be inspected if a malfunction is
observed or suspected.
Engine Oil
Checking Oil Level
To assure proper lubrication of your vehicle's engine, the
engine oil must be maintained at the correct level. The
best time to check the engine oil level is about 5 minutes
after a fully warmed up engine is shut off or before
starting the engine after it has sat overnight.Checking the oil while the vehicle is on level ground will
improve the accuracy of the oil level readings. Always
maintain the oil level within the SAFE zone on the
dipstick. Adding one quart of oil when the reading is at
the bottom of the SAFE zone will result in a reading at the
top of the safe zone on these engines.
354 MAINTAINING YOUR VEHICLE
Page 355 of 434
CAUTION!
Overfilling or underfilling the crankcase will cause
aeration or loss of oil pressure. This could damage
your engine.
Change Engine Oil
Road conditions as well as your kind of driving affect the
interval at which your oil should be changed. Check the
following to determine if any apply to you:
²Day or night temperatures are below 32ÉF (0ÉC)
²Stop and go driving
²Extensive engine idling
²Driving in dusty conditions
²Short trip driving of less than 10 miles (16.2 km)
²More than 50% of your driving is at sustained high
speeds during hot weather, above 90ÉF (32ÉC)
²Taxi, Police, or delivery service (commercial service)
²Trailer towing
²If equipped for and operating with E±85 (ethanol) fuel
IfANYof these apply to you, then change your engine oil
at every interval shown in schedule ªBº of the ªMainte-
nance Schedulesº section of this manual.
If none of these apply to you, then change your engine oil
at every interval shown on schedule ªAº of the ªMain-
tenance Schedulesº section of this manual
NOTE:Under no circumstances should oil change in-
tervals exceed 6,000 miles (10 000 km) or 6 months
whichever comes first.
MAINTAINING YOUR VEHICLE 355
7
Page 358 of 434

Engine Oil Filter Selection
All of the manufacturer's engines have a full-flow type
disposable oil filter. Use a filter of this type for replace-
ment. The quality of replacement filters varies consider-
ably. Only high quality filters should be used to assure
most efficient service. Mopartengine oil filters are high
quality oil filters and are recommended.
Drive Belts Ð Check Condition and Tension
Belt tension is controlled by means of an automatic
tensioner. No belt tension adjustments are required.
However, belt and belt tensioner condition should be
inspected at the specified intervals, and replaced if re-
quired. See your authorized dealer for service
At the mileage indicated in the appropriate ªMainte-
nance Scheduleº, all belts and tensioner should be
checked for condition. Improper belt tension can cause
belt slippage and failure.Belts should be inspected for evidence of cuts, cracks,
glazing, or frayed cords and replaced if there is indication
of damage which could result in belt failure. Low gen-
erator belt tension can cause battery failure.
Also check belt routing to make sure there is no interfer-
ence between the belts and other engine components.
Spark Plugs
Spark plugs must fire properly to assure engine perfor-
mance and emission control. New plugs should be in-
stalled at the mileage specified in the appropriate main-
tenance chart. The entire set should be replaced if there is
any malfunction due to a faulty spark plug.
Refer to the ªVehicle Emission Control Informationº label
in the engine compartment for spark plug information.
358 MAINTAINING YOUR VEHICLE
Page 363 of 434
WARNING!
²Use only refrigerants and compressor lubricants
approved by the manufacturer for your air condi-
tioning system. Some unapproved refrigerants are
flammable and can explode, injuring you. Other
unapproved refrigerants or lubricants can cause
the system to fail, requiring costly repairs. Refer to
Section 3 of the Warranty Information Book for
additional warranty information.
²The air conditioning system contains refrigerant
under high pressure. To avoid risk of personal
injury or damage to the system, adding refrigerant
or any repair requiring lines to be disconnected
should be done by an experienced repairman.
Refrigerant Recovery and Recycling
R-134a Air Conditioning Refrigerant is a hydrofluorocar-
bon (HFC) that is endorsed by the Environmental Pro-
tection Agency and is an ozone-saving product. How-
ever, the manufacturer recommends that air conditioning
service be performed by dealers or other service facilities
using recovery and recycling equipment.
Power Steering Fluid Check
Checking the power steering fluid level at a defined
service interval is not required. The fluid should only be
checked if a leak is suspected, abnormal noises are
apparent, and/or the system is not functioning as antici-
pated. Coordinate inspection efforts through a certified
DaimlerChrysler Dealership.9
MAINTAINING YOUR VEHICLE 363
7
Page 372 of 434
are present. Components should be replaced immedi-
ately if there is any evidence of degradation that could
cause failure.
Brake System
In order to assure brake system performance, all brake
system components should be inspected periodically.
Refer to the appropriate ªMaintenance Scheduleº in
Section 8 for suggested service intervals.
WARNING!
Riding the brakes can lead to brake failure and
possibly an accident. Driving with your foot resting
or riding on the brake pedal can result in abnormally
high brake temperatures, excessive lining wear, and
possible brake damage. You wouldn't have your full
braking capacity in an emergency.
Brake and Power Steering System Hoses
When servicing the vehicle for scheduled maintenance,
inspect surface of hoses for evidence of heat and me-
chanical damage. Hard and brittle rubber, cracking, tears,
cuts, abrasion, and excessive swelling suggest deteriora-
tion of the rubber. Particular attention should be made to
examining those hose surfaces nearest to high heat
sources, such as the exhaust manifold.
Inspect all hose clamps and couplings to make sure they
are secure and no leaks are present.
NOTE:Inspection of brake hoses should be done when-
ever the brake system is serviced and every engine oil
change.
372 MAINTAINING YOUR VEHICLE
Page 402 of 434
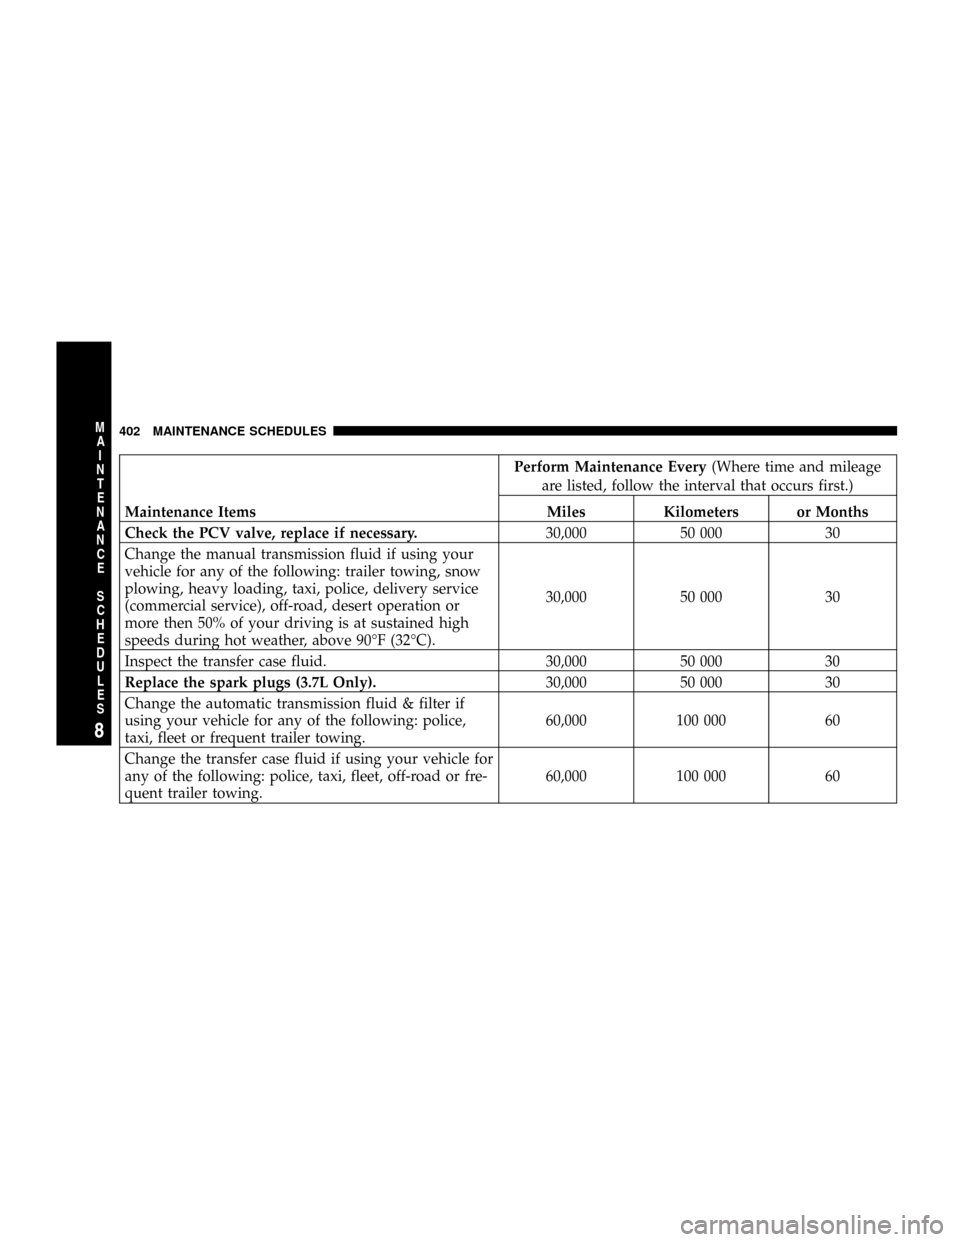
Perform Maintenance Every(Where time and mileage
are listed, follow the interval that occurs first.)
Maintenance Items Miles Kilometers or Months
Check the PCV valve, replace if necessary.30,000 50 000 30
Change the manual transmission fluid if using your
vehicle for any of the following: trailer towing, snow
plowing, heavy loading, taxi, police, delivery service
(commercial service), off-road, desert operation or
more then 50% of your driving is at sustained high
speeds during hot weather, above 90ÉF (32ÉC).30,000 50 000 30
Inspect the transfer case fluid. 30,000 50 000 30
Replace the spark plugs (3.7L Only).30,000 50 000 30
Change the automatic transmission fluid & filter if
using your vehicle for any of the following: police,
taxi, fleet or frequent trailer towing.60,000 100 000 60
Change the transfer case fluid if using your vehicle for
any of the following: police, taxi, fleet, off-road or fre-
quent trailer towing.60,000 100 000 60
402 MAINTENANCE SCHEDULES
8
M
A
I
N
T
E
N
A
N
C
E
S
C
H
E
D
U
L
E
S
Page 403 of 434
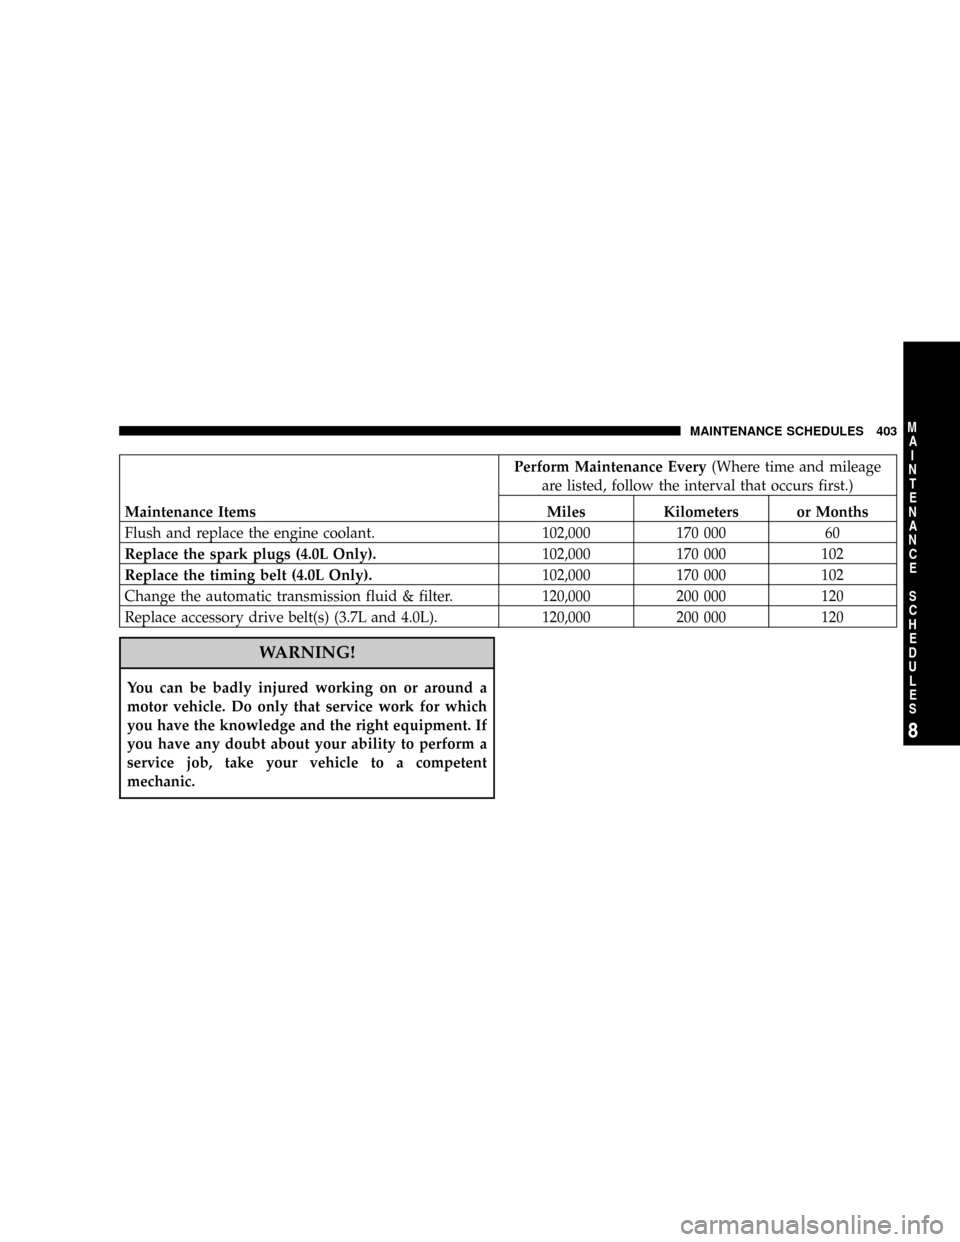
Perform Maintenance Every(Where time and mileage
are listed, follow the interval that occurs first.)
Maintenance Items Miles Kilometers or Months
Flush and replace the engine coolant. 102,000 170 000 60
Replace the spark plugs (4.0L Only).102,000 170 000 102
Replace the timing belt (4.0L Only).102,000 170 000 102
Change the automatic transmission fluid & filter. 120,000 200 000 120
Replace accessory drive belt(s) (3.7L and 4.0L). 120,000 200 000 120
WARNING!
You can be badly injured working on or around a
motor vehicle. Do only that service work for which
you have the knowledge and the right equipment. If
you have any doubt about your ability to perform a
service job, take your vehicle to a competent
mechanic.
MAINTENANCE SCHEDULES 403
8
M
A
I
N
T
E
N
A
N
C
E
S
C
H
E
D
U
L
E
S
Page 434 of 434

INTRODUCTION INTRODUCTION ROLLOVER WARNING HOW TO USE THIS MANUAL WARNINGS AND CAUTIONS VEHICLE IDENTIFICATION NUMBER VEHICLE MODIFICATIONS/ALTERATIONS THINGS TO KNOW BEFORE STARTING YOUR VEHICLE A WORD
ABOUT YOUR KEYS Ignition Key RemovalKey-In-Ignition ReminderSENTRY KEY Replacement KeysCustomer Key ProgrammingGeneral InformationSTEERING WHEEL LOCK - IF EQUIPPED To Manually Lock the Steering WheelTo Release the Steering Wheel Lock
SECURITY ALARM SYSTEM - IF EQUIPPED To Arm the SystemTo Disarm the SystemILLUMINATED ENTRY REMOTE KEYLESS ENTRY To Unlock the Doors and LiftgateTo Lock the Doors and LiftgateUsing the Panic AlarmProgramming Additional TransmittersBattery
ReplacementGeneral InformationREMOTE STARTING SYSTEM - IF EQUIPPED DOOR LOCKS Manual Door LocksPower Door LocksAutomatic Door LocksAutomatic Unlock Doors on ExitChild-Protection Door Lock System (Rear Doors)WINDOWS Power WindowsWind
BuffetingLIFTGATE OCCUPANT RESTRAINTS Lap/Shoulder BeltsLap/Shoulder Belt Operating InstructionsAdjustable Upper Shoulder Belt AnchorageAutomatic Locking Mode - If EquippedEnergy Management FeatureSeat Belt PretensionersEnhanced Seat Belt Use
Reminder System (BeltAlert)Seat Belts and Pregnant WomenSeat Belt ExtenderDriver And Front Passenger Supplemental Restraint Systems (SRS) ChildRestraintENGINE BREAK-IN RECOMMENDATIONS SAFETY TIPS Exhaust GasSafety Checks You Should Make
Inside The VehicleSafety Checks You Should Make Outside The VehicleUNDERSTANDING THE FEATURES OF YOUR VEHICLE MIRRORS Inside Day/Night MirrorAutomatic Dimming Mirror - If EquippedOutside MirrorsExterior Mirrors Folding FeaturePower Remote Control
MirrorsIlluminated Vanity Mirrors - If EquippedHANDS-FREE COMMUNICATION (UConnect) - IF EQUIPPED OperationPhone Call FeaturesUConnect System FeaturesAdvanced Phone ConnectivityThings You Should Know About Your UConnect SystemGeneral Information
SEATS Front Manual Seat AdjustmentFront Seat Adjustment - Recline6-Way Drivers Power Seat with Manual ReclinerFold Flat Front Passenger SeatHead RestraintsHeated Seats - If Equipped60/40 Split Folding Rear Seat with Fold Flat FeatureTO OPEN AND CLOSE
THE HOOD LIGHTS Interior LightsMulti-Function Control LeverParking Lights, Instrument Panel Lights, and HeadlightsLights-On ReminderHeadlight Dimmer SwitchPassing LightFront Fog Lights - If EquippedTurn SignalsDaytime Running Lights - If EquippedWINDSHIELD
WIPERS AND WASHERS Intermittent Wiper SystemWindshield Wiper OperationWindshield WashersMist FeatureTILT STEERING COLUMN ELECTRONIC SPEED CONTROL - IF EQUIPPED Electronic Speed Control OperationTo ActivateTo Set At A Desired SpeedTo
DeactivateTo Resume SpeedTo Vary The Speed SettingManual TransmissionTo Accelerate For PassingELECTRONIC BRAKE CONTROL SYSTEM ABS (Anti-Lock Brake System)TCS (Traction Control System)BAS (Brake Assist System)ERM (Electronic Roll Mitigation)
ESP (Electronic Stability Program)ESP/BAS Warning LampGARAGE DOOR OPENER - IF EQUIPPED Programming HomeLinkGate Operator/Canadian ProgrammingUsing HomeLinkReprogramming a Single HomeLink ButtonSecurityTroubleshooting TipsGeneral
InformationPOWER SUNROOF - IF EQUIPPED Opening Sunroof - ExpressClosing Sunroof - ExpressPinch Protect FeaturePinch Protect OverrideVenting Sunroof - ExpressSunshade OperationWind BuffetingSunroof MaintenanceELECTRICAL POWER OUTLET Electrical
Outlet Use With Engine OffPOWER INVERTER CUP HOLDERS STORAGE Front Storage CompartmentConsole Storage CompartmentCARGO AREA FEATURES Cargo LightCargo Tie-Down HooksCargo Load Floor - If EquippedRear Cargo Slide Out System (LOAD N
GO) - If EquippedREAR WINDOW FEATURES Rear Window Wiper/Washer - If EquippedRear Window Defroster - If EquippedROOF LUGGAGE RACK- NON FUNCTIONAL INSTRUMENT PANEL AND CONTROLS INSTRUMENT PANEL AND CONTROLS INSTRUMENT
CLUSTER INSTRUMENT CLUSTER DESCRIPTION COMPASS AND TRIP COMPUTER - IF EQUIPPED Control ButtonsTrip ConditionsCompass/Temperature DisplayELECTRONIC VEHICLE INFORMATION CENTER (EVIC) - IF EQUIPPED Electronic Vehicle Information
Center (EVIC) DisplaysOil Change RequiredTrip FunctionsCompass DisplayTelephone - If EquippedPersonal Settings (Customer Programmable Features)RADIO GENERAL INFORMATION Radio Broadcast SignalsTwo Types of SignalsElectrical DisturbancesAM Reception
FM ReceptionSALES CODE REQ - AM/FM STEREO RADIO AND 6-DISC CD/DVD CHANGER (MP3/WMA AUX JACK) Operating Instructions - Radio ModeOperation Instructions - (DISC MODE for CD and MP3/WMA Audio Play, DVD-VIDEO)Notes On Playing MP3/WMA
FilesLIST Button (DISC Mode for MP3/WMA Play)INFO Button (DISC Mode for MP3/WMA Play)SALES CODE RES - AM/FM STEREO RADIO WITH CD PLAYER (MP3 AUX JACK) Operating Instructions - Radio ModeOperation Instructions - CD MODE for CD and MP3
Audio PlayNotes On Playing MP3 FilesLIST Button (CD Mode for MP3 Play)INFO Button (CD Mode for MP3 Play)SALES CODE RER - AM/FM/CD/DVD RADIO WITH NAVIGATION SYSTEM - IF EQUIPPED Operating Instructions - Satellite RadioClock Setting Procedure
SATELLITE RADIO (RSC) - IF EQUIPPED (RER/REQ/REN RADIOS ONLY) System ActivationElectronic Serial Number/Sirius Identification Number (ENS/SID)Selecting Satellite ModeSatellite AntennaReception QualityOperating Instructions - Satellite ModeOperating
Instructions - Hands Free Phone (If Equipped)Operating Instructions - Video Entertainment System (VES) (If Equipped)VIDEO ENTERTAINMENT SYSTEM (SALES CODE XRV) - IF EQUIPPED REMOTE SOUND SYSTEM CONTROLS - IF EQUIPPED Radio Operation
CD PlayerCD/DVD DISC MAINTENANCE CLIMATE CONTROLS Manual Air Conditioning and Heating SystemOperating TipsSTARTING AND OPERATING STARTING PROCEDURES Manual TransmissionAutomatic TransmissionNormal StartingExtreme Cold Weather
(below -20 degrees F or -29 degrees C)If Engine Fails to StartAfter StartingENGINE BLOCK HEATER - IF EQUIPPED MANUAL TRANSMISSION - IF EQUIPPED 6-Speed Manual TransmissionAUTOMATIC TRANSMISSION Shift Lock Manual Override - If Equipped
Brake/Transmission Interlock System4-Speed Automatic Transmission (3.7L Engine)5-Speed Automatic Transmission (4.0L Engine)Gear RangesFOUR-WHEEL DRIVE OPERATION MP 143 Single-Speed Part-Time Transfer Case - If EquippedShifting Procedure -
Electronically Shifted Transfer CaseMP 140 Single-Speed Full-Time Transfer Case - If EquippedON-ROAD DRIVING TIPS OFF-ROAD DRIVING TIPS When To Use 4L or 4LO (Low) RangeDriving Through WaterDriving In Snow, Mud and SandHill ClimbingTraction Downhill
After Driving Off-RoadPARKING BRAKE ANTI-LOCK BRAKE SYSTEM POWER STEERING TIRE SAFETY INFORMATION Tire Markings Tire Identification Number (TIN)Tire Loading and Tire PressureTIRES - GENERAL INFORMATION Tire PressureTire Inflation Pressures
Tire Pressures for High Speed OperationRadial-Ply TiresTire SpinningTread Wear IndicatorsLife of TireReplacement TiresAlignment and BalanceTIRE CHAINS TIRE ROTATION RECOMMENDATIONS TIRE PRESSURE MONITOR SYSTEM (TPMS) - IF EQUIPPED Base
System - If EquippedPremium System - If EquippedGeneral InformationFUEL REQUIREMENTS 3.7L Engine (If Equipped)4.0L Engine (If Equipped)Reformulated GasolineGasoline/Oxygenate BlendsMMT In GasolineMaterials Added To FuelFuel System CautionsCarbon
Monoxide WarningsADDING FUEL Fuel Filler Cap (Gas Cap)Loose Fuel Filler Cap MessageVEHICLE LOADING Certification LabelTRAILER TOWING Common Towing DefinitionsTrailer Hitch ClassificationTrailer Towing Weights (Maximum Trailer Weight Ratings)Trailer
and Tongue WeightTowing RequirementsTowing TipsRECREATIONAL TOWING (BEHIND MOTORHOME, ETC.) Towing - 2WD ModelsTowing - 4WD or All-Wheel Drive ModelsWHAT TO DO IN EMERGENCIES HAZARD WARNING FLASHERS IF YOUR ENGINE
OVERHEATS JACKING AND TIRE CHANGING Jack LocationSpare Tire StowageSpare Tire RemovalPreparations For JackingJacking InstructionsJUMP STARTING TOWING A DISABLED VEHICLE Two-Wheel Drive VehiclesFour-Wheel Drive VehiclesMAINTAINING YOUR
VEHICLE ENGINE COMPARTMENT - 3.7L ENGINE COMPARTMENT - 4.0L ONBOARD DIAGNOSTIC SYSTEM - OBD II Loose Fuel Filler Cap MessageEMISSIONS INSPECTION ANDMAINTENANCE PROGRAMS REPLACEMENT PARTS DEALER SERVICE
MAINTENANCE PROCEDURES Engine OilDrive Belts - Check Condition and TensionSpark PlugsCatalytic ConverterCrankcase Emission Control SystemFuelFilterEngine Air Cleaner FilterMaintenance-Free BatteryAir Conditioner MaintenancePower Steering Fluid Check
Driveline And Steering Component LubricationBody LubricationWindshield Wiper BladesWindshield WashersExhaust SystemCooling SystemHoses andVacuum/Vapor HarnessesBrake SystemAutomatic TransmissionHydraulic Clutch Fluid - Manual TransmissionManual
TransmissionTransfer CaseFront/Rear Axle FluidAppearance Care And Protection From CorrosionFUSES (INTEGRATED POWER MODULE) REPLACEMENT LIGHTBULBS BULB REPLACEMENT Head LightLeft Front Turn SignalRight Front Turn SignalFront Side Marker
Front Fog Light (Front Fascia Mounted)Rear Tail, Stop, Turn Signal, and Back-Up LightsCenter High Mounted Stop Light (CHMSL)FLUID CAPACITIES FLUIDS, LUBRICANTS AND GENUINE PARTS EngineChassisMAINTENANCE SCHEDULES EMISSION CONTROL
SYSTEM MAINTENANCE MAINTENANCE SCHEDULE Required Maintenance IntervalsIF YOU NEED CONSUMER ASSISTANCE SUGGESTIONS FOR OBTAINING SERVICE FOR YOUR VEHICLE Prepare For The AppointmentPrepare A ListBe Reasonable With
RequestsIF YOU NEED ASSISTANCE WARRANTY INFORMATION (U.S. Vehicles Only) MOPAR PARTS REPORTING SAFETY DEFECTS In CanadaPUBLICATION ORDER FORMS DEPARTMENT OF TRANSPORTATION UNIFORM TIRE QUALITY GRADES Treadwear
Traction GradesTemperature GradesINDEX