service schedule DODGE NITRO 2008 1.G Owners Manual
[x] Cancel search | Manufacturer: DODGE, Model Year: 2008, Model line: NITRO, Model: DODGE NITRO 2008 1.GPages: 434, PDF Size: 6.2 MB
Page 177 of 434

26. Odometer/Trip Odometer
The odometer shows the total distance the vehicle has
been driven.
The trip odometer shows individual trip mileage. To
toggle between the odometer and the trip odometer,
press the Odometer/Trip Odometer Button. To reset the
Trip Odometer, press and hold the button while in trip
mode, until the Trip Odometer resets.
If the vehicle diagnostic system determines that the fuel
filler cap is loose, improperly installed, or damaged,
GASCAP will be displayed in the instrument cluster.
Tighten the fuel filler cap properly and press the odom-
eter reset button to turn the GASCAP message off. If the
problem continues, the message will appear the next time
the vehicle is started.
U.S. federal regulations require that upon transfer of
vehicle ownership, the seller certify to the purchaser thecorrect mileage that the vehicle has been driven. There-
fore, if the odometer reading is changed during repair or
replacement, be sure to keep a record of the reading
before and after the service so that the correct mileage can
be determined.
Change Oil Message
Your vehicle is equipped with an engine oil change
indicator system. The ªChange Oilº message will flash in
the instrument cluster odometer for approximately 12
seconds after a single chime has sounded to indicate the
next scheduled oil change interval. The engine oil change
indicator system is duty cycle based, which means the
engine oil change interval may fluctuate dependent upon
your personal driving style. Unless reset, this message
will continue to display each time you turn the ignition
switch to the ON/RUN position. To turn off the message
temporarily, press and release the Trip Odometer button
INSTRUMENT PANEL AND CONTROLS 177
4
Page 178 of 434

on the instrument cluster. To reset the oil change indica-
tor system (after performing the scheduled maintenance)
refer to the following procedure.
1. Turn the ignition switch to the ON position (Do not
start the engine).
2. Fully depress the accelerator pedal slowly three
times within 10 seconds.
3. Turn the ignition switch to the OFF/LOCK position.
NOTE:If the indicator message illuminates when you
start the vehicle, the oil change indicator system did not
reset. If necessary repeat this procedure.27. Malfunction Indicator Light
This light is part of an onboard diagnostic system
which monitors the emissions and engine control
system. If the vehicle is ready for emissions
testing the light will come on when the ignition is first
turned on and remain on, as a bulb check, until the
engine is started. If the vehicle is not ready for emissions
testing the light will come on when the ignition is first
turned on and remain on for 15 seconds, then blink for 10
seconds, and remain on until the vehicle is started. If the
bulb does not come on during starting, have the condi-
tion investigated promptly.
If this light comes on and remains on while driving, it
suggests a potential engine control problem and the need
for system service.
Although your vehicle will usually be drivable and not
need towing, see your dealer for service as soon as
possible.
178 INSTRUMENT PANEL AND CONTROLS
Page 353 of 434
Regardless of whether your vehicle's OBD system is
ready or not ready, if the MIL symbol is illuminated
during normal vehicle operation, you should have your
vehicle serviced before going to the I/M station. The I/M
station can fail your vehicle because the MIL symbol is on
with the engine running.
REPLACEMENT PARTS
Use of genuine Mopartparts for normal/scheduled
maintenance and repairs is highly recommended to in-
sure the designed performance. Damage or failures
caused by the use of non-Mopartparts for maintenance
and repairs will not be covered by the manufacturer's
warranty.
DEALER SERVICE
Your dealer has the qualified service personnel, special
tools, and equipment to perform all service operations in
an expert manner. Service Manuals are available which
include detailed service information for your vehicle.
Refer to these manuals before attempting any procedure
yourself.
NOTE:Intentional tampering with emissions control
systems can result in civil penalties being assessed
against you.
WARNING!
You can be badly injured working on or around a
motor vehicle. Only do service work for which you
have the knowledge and the proper equipment. If
you have any doubt about your ability to perform a
service job, take your vehicle to a competent
mechanic.
MAINTAINING YOUR VEHICLE 353
7
Page 355 of 434
CAUTION!
Overfilling or underfilling the crankcase will cause
aeration or loss of oil pressure. This could damage
your engine.
Change Engine Oil
Road conditions as well as your kind of driving affect the
interval at which your oil should be changed. Check the
following to determine if any apply to you:
²Day or night temperatures are below 32ÉF (0ÉC)
²Stop and go driving
²Extensive engine idling
²Driving in dusty conditions
²Short trip driving of less than 10 miles (16.2 km)
²More than 50% of your driving is at sustained high
speeds during hot weather, above 90ÉF (32ÉC)
²Taxi, Police, or delivery service (commercial service)
²Trailer towing
²If equipped for and operating with E±85 (ethanol) fuel
IfANYof these apply to you, then change your engine oil
at every interval shown in schedule ªBº of the ªMainte-
nance Schedulesº section of this manual.
If none of these apply to you, then change your engine oil
at every interval shown on schedule ªAº of the ªMain-
tenance Schedulesº section of this manual
NOTE:Under no circumstances should oil change in-
tervals exceed 6,000 miles (10 000 km) or 6 months
whichever comes first.
MAINTAINING YOUR VEHICLE 355
7
Page 358 of 434

Engine Oil Filter Selection
All of the manufacturer's engines have a full-flow type
disposable oil filter. Use a filter of this type for replace-
ment. The quality of replacement filters varies consider-
ably. Only high quality filters should be used to assure
most efficient service. Mopartengine oil filters are high
quality oil filters and are recommended.
Drive Belts Ð Check Condition and Tension
Belt tension is controlled by means of an automatic
tensioner. No belt tension adjustments are required.
However, belt and belt tensioner condition should be
inspected at the specified intervals, and replaced if re-
quired. See your authorized dealer for service
At the mileage indicated in the appropriate ªMainte-
nance Scheduleº, all belts and tensioner should be
checked for condition. Improper belt tension can cause
belt slippage and failure.Belts should be inspected for evidence of cuts, cracks,
glazing, or frayed cords and replaced if there is indication
of damage which could result in belt failure. Low gen-
erator belt tension can cause battery failure.
Also check belt routing to make sure there is no interfer-
ence between the belts and other engine components.
Spark Plugs
Spark plugs must fire properly to assure engine perfor-
mance and emission control. New plugs should be in-
stalled at the mileage specified in the appropriate main-
tenance chart. The entire set should be replaced if there is
any malfunction due to a faulty spark plug.
Refer to the ªVehicle Emission Control Informationº label
in the engine compartment for spark plug information.
358 MAINTAINING YOUR VEHICLE
Page 372 of 434
are present. Components should be replaced immedi-
ately if there is any evidence of degradation that could
cause failure.
Brake System
In order to assure brake system performance, all brake
system components should be inspected periodically.
Refer to the appropriate ªMaintenance Scheduleº in
Section 8 for suggested service intervals.
WARNING!
Riding the brakes can lead to brake failure and
possibly an accident. Driving with your foot resting
or riding on the brake pedal can result in abnormally
high brake temperatures, excessive lining wear, and
possible brake damage. You wouldn't have your full
braking capacity in an emergency.
Brake and Power Steering System Hoses
When servicing the vehicle for scheduled maintenance,
inspect surface of hoses for evidence of heat and me-
chanical damage. Hard and brittle rubber, cracking, tears,
cuts, abrasion, and excessive swelling suggest deteriora-
tion of the rubber. Particular attention should be made to
examining those hose surfaces nearest to high heat
sources, such as the exhaust manifold.
Inspect all hose clamps and couplings to make sure they
are secure and no leaks are present.
NOTE:Inspection of brake hoses should be done when-
ever the brake system is serviced and every engine oil
change.
372 MAINTAINING YOUR VEHICLE
Page 398 of 434
EMISSION CONTROL SYSTEM MAINTENANCE
The ªScheduledº maintenance services, listed inbold
typemust be done at the times or mileages specified to
assure the continued proper functioning of the emission
control system. These, and all other maintenance services
included in this manual, should be done to provide best
vehicle performance and reliability. More frequent main-
tenance may be needed for vehicles in severe operating
conditions such as dusty areas and very short trip
driving.
Inspection and service also should be done any time a
malfunction is suspected.
NOTE:Maintenance, replacement, or repair of the emis-
sion control devices and systems on your vehicle may be
performed by any automotive repair establishment or
individual using any automotive part, which has been
certified pursuant to U.S. EPA or, in the State of Califor-
nia, California Air Resources Board regulations.
MAINTENANCE SCHEDULE
The oil change indicator system will remind you that it is
time to take your vehicle in for scheduled maintenance.
On Electronic Vehicle Information Center (EVIC)
equipped vehicles ªOil Change Requiredº will be dis-
played in the EVIC and a single chime will sound,
indicating that an oil change is necessary.
On Non-EVIC equipped vehicles ªChange Oilº will flash
in the instrument cluster odometer and a single chime
will sound, indicating that an oil change is necessary.
Based on engine operation condition the oil change
indicator message will illuminate, this means that service
is required for your vehicle. Have your vehicle serviced
as soon as possible, within the next 500 miles (805 km).
398 MAINTENANCE SCHEDULES
8
M
A
I
N
T
E
N
A
N
C
E
S
C
H
E
D
U
L
E
S
Page 402 of 434
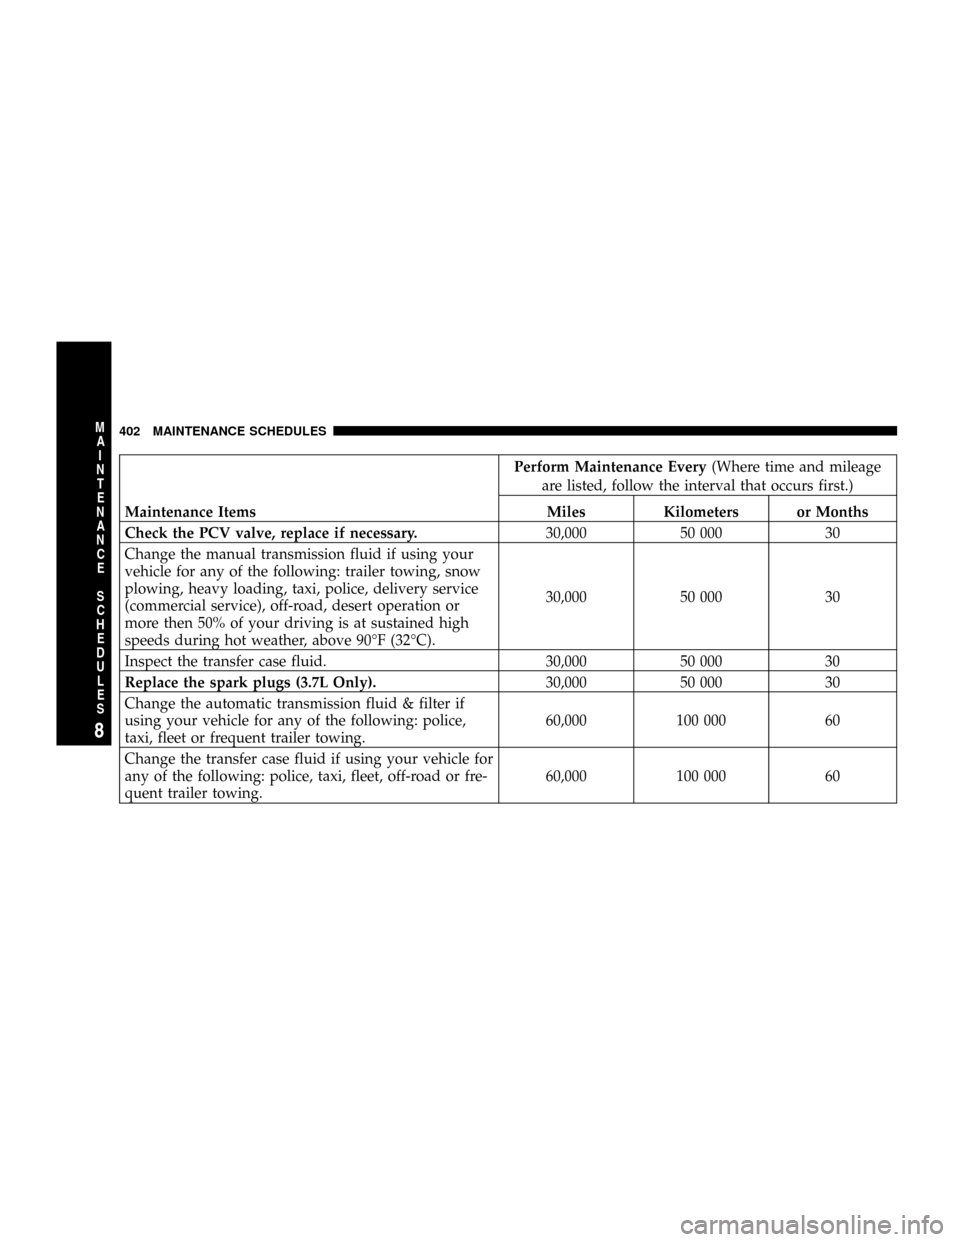
Perform Maintenance Every(Where time and mileage
are listed, follow the interval that occurs first.)
Maintenance Items Miles Kilometers or Months
Check the PCV valve, replace if necessary.30,000 50 000 30
Change the manual transmission fluid if using your
vehicle for any of the following: trailer towing, snow
plowing, heavy loading, taxi, police, delivery service
(commercial service), off-road, desert operation or
more then 50% of your driving is at sustained high
speeds during hot weather, above 90ÉF (32ÉC).30,000 50 000 30
Inspect the transfer case fluid. 30,000 50 000 30
Replace the spark plugs (3.7L Only).30,000 50 000 30
Change the automatic transmission fluid & filter if
using your vehicle for any of the following: police,
taxi, fleet or frequent trailer towing.60,000 100 000 60
Change the transfer case fluid if using your vehicle for
any of the following: police, taxi, fleet, off-road or fre-
quent trailer towing.60,000 100 000 60
402 MAINTENANCE SCHEDULES
8
M
A
I
N
T
E
N
A
N
C
E
S
C
H
E
D
U
L
E
S
Page 403 of 434
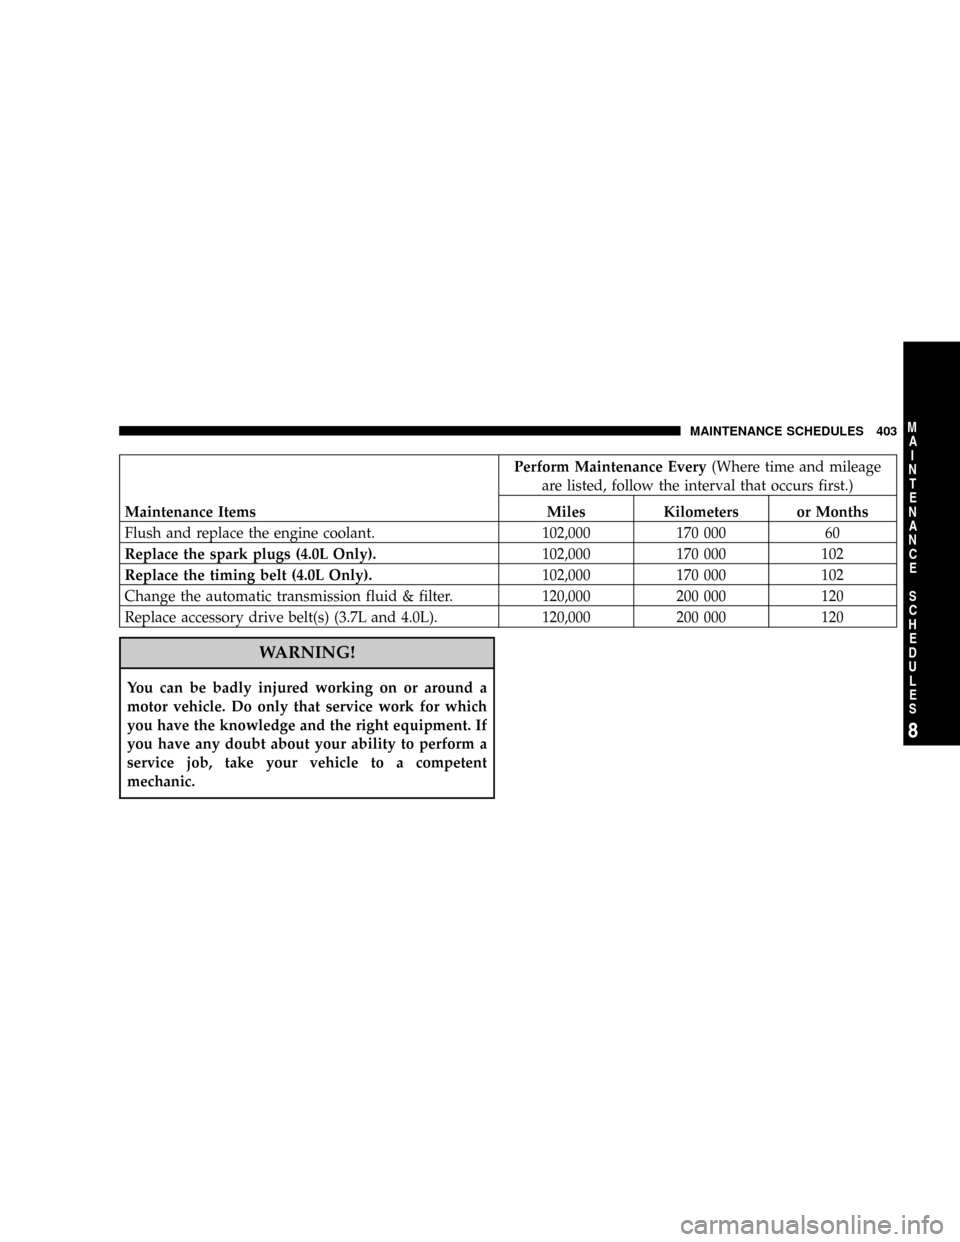
Perform Maintenance Every(Where time and mileage
are listed, follow the interval that occurs first.)
Maintenance Items Miles Kilometers or Months
Flush and replace the engine coolant. 102,000 170 000 60
Replace the spark plugs (4.0L Only).102,000 170 000 102
Replace the timing belt (4.0L Only).102,000 170 000 102
Change the automatic transmission fluid & filter. 120,000 200 000 120
Replace accessory drive belt(s) (3.7L and 4.0L). 120,000 200 000 120
WARNING!
You can be badly injured working on or around a
motor vehicle. Do only that service work for which
you have the knowledge and the right equipment. If
you have any doubt about your ability to perform a
service job, take your vehicle to a competent
mechanic.
MAINTENANCE SCHEDULES 403
8
M
A
I
N
T
E
N
A
N
C
E
S
C
H
E
D
U
L
E
S
Page 425 of 434

Side Marker.......................... 392
Tire Pressure Monitoring (TPMS)........... 296
Traction Control....................... 135
Turn Signal..................125,390,391,392
Warning (Instrument Cluster Description)..... 168
Load Floor, Cargo....................... 154
Load N Go
Sliding Cargo Floor..................... 156
Loading Vehicle......................... 313
Tires ............................... 283
Locks................................. 27
Child Protection........................ 32
Door................................ 27
Power Door........................... 29
Steering Wheel......................... 17
Low Tire Pressure System.................. 296
Lower Anchors and Tether for CHildren
(LATCH)............................70,71
Lubrication, Body....................... 364Luggage Carrier......................... 160
Maintenance Free Battery.................. 362
Maintenance Procedures................... 354
Maintenance Schedule.................... 398
Maintenance, Sunroof..................... 147
Malfunction Indicator Light (Check Engine) . . 178,351
Manual, Service......................... 410
Manual Transmission..................249,375
Fluid Level Check...................... 375
Lubricant Selection..................375,396
Shift Speeds.......................... 251
Master Cylinder (Brakes).................. 373
Mini-Trip Computer...................180,188
Mirrors................................ 83
Automatic Dimming..................... 84
Electric Powered....................... 85
Outside.............................. 84
Rearview............................. 83
INDEX 425
10