door lock DODGE NITRO 2010 1.G User Guide
[x] Cancel search | Manufacturer: DODGE, Model Year: 2010, Model line: NITRO, Model: DODGE NITRO 2010 1.GPages: 72, PDF Size: 11.5 MB
Page 3 of 72
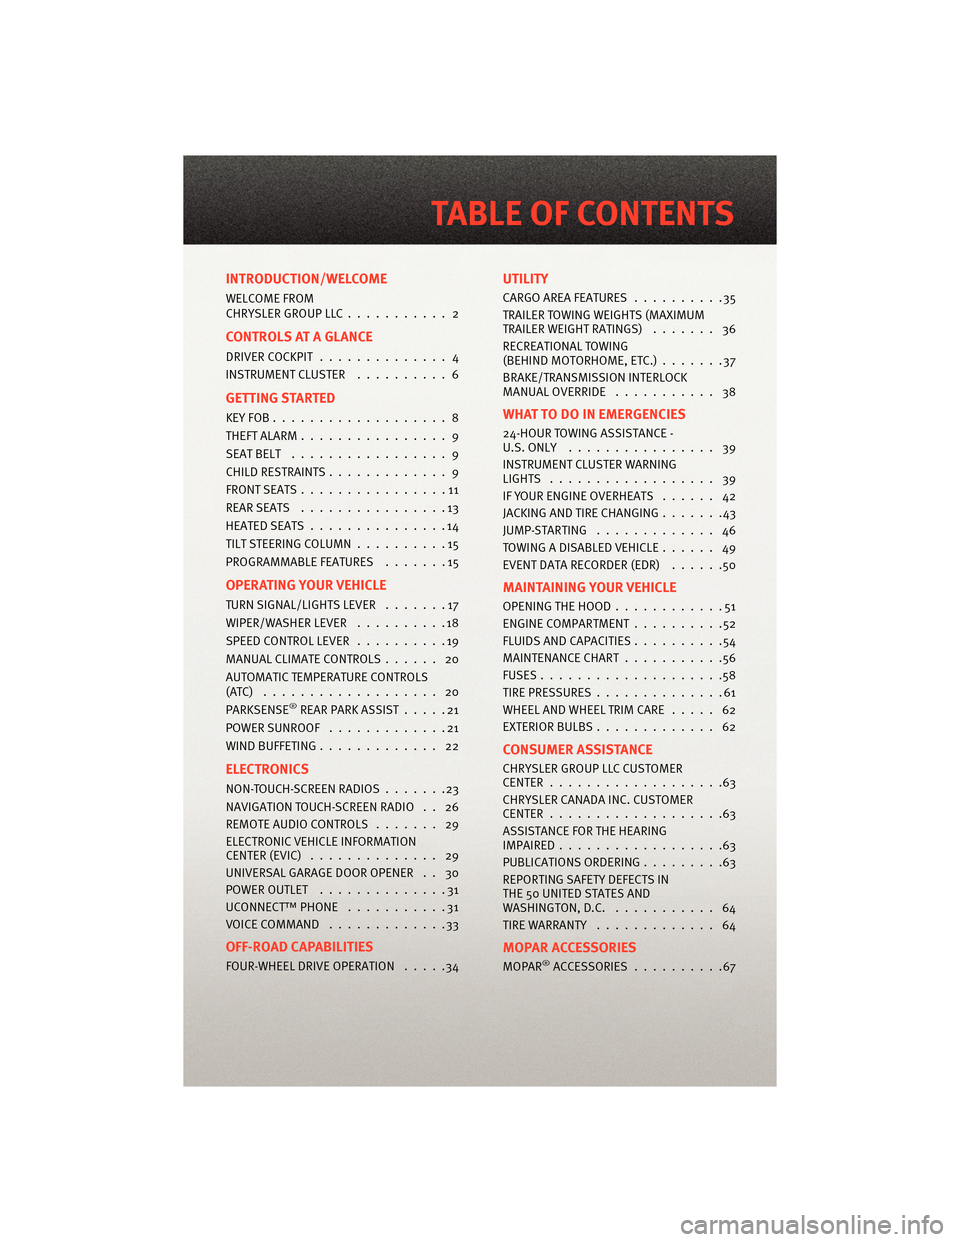
INTRODUCTION/WELCOME
WELCOME FROM
CHRYSLERGROUPLLC........... 2
CONTROLS AT A GLANCE
DRIVER COCKPIT.............. 4
INSTRUMENT CLUSTER ..........6
GETTING STARTED
KEYFOB...................8
THEFT ALARM................ 9
SEATBELT ................. 9
CHILD RESTRAINTS ............. 9
FRONTSEATS................11
REARSEATS ................13
HEATEDSEATS...............14
TILT STEERING COLUMN ..........15
PROGRAMMABLEFEATURES .......15
OPERATING YOUR VEHICLE
TURN SIGNAL/LIGHTS LEVER .......17
WIPER/WASHER LEVER ..........18
SPEED CONTROL LEVER ..........19
MANUAL CLIMATE CONTROLS ...... 20
AUTOMATIC TEMPERATURE CONTROLS
(ATC) ................... 20
PARKSENSE
®REAR PARK ASSIST .....21
POWERSUNROOF .............21
WIND BUFFETING ............. 22
ELECTRONICS
NON-TOUCH-SCREENRADIOS.......23
NAVIGATION TOUCH-SCREEN RADIO . . 26
REMOTE AUDIO CONTROLS ....... 29
ELECTRONIC VEHICLE INFORMATION
CENTER (EVIC) .............. 29
UNIVERSAL GARAGE DOOR OPENER . . 30
POWER OUTLET ..............31
UCONNECT™ PHONE ...........31
VOICECOMMAND .............33
OFF-ROAD CAPABILITIES
FOUR-WHEEL DRIVE OPERATION .....34
UTILITY
CARGOAREAFEATURES ..........35
TRAILER TOWING WEIGHTS (MAXIMUM
TRAILER WEIGHT RATINGS)....... 36
RECREATIONAL TOWING
(BEHIND MOTORHOME, ETC.) .......37
BRAKE/TRANSMISSION INTERLOCK
MANUAL OVERRIDE ........... 38
WHAT TO DO IN EMERGENCIES
24-HOUR TOWINGASSISTANCE -
U.S. ONLY ................ 39
INSTRUMENT CLUSTER WARNING
LIGHTS .................. 39
IF YOUR ENGINE OVERHEATS ...... 42
JACKINGANDTIRECHANGING.......43
JUMP-STARTING ............. 46
TOWINGADISABLEDVEHICLE...... 49
EVENT DATA RECORDER (EDR) ......50
MAINTAINING YOUR VEHICLE
OPENING THE HOOD............51
ENGINE COMPARTMENT ..........52
FLUIDS AND CAPACITIES ..........54
MAINTENANCE CHART ...........56
FUSES....................58
TIREPRESSURES..............61
WHEEL AND WHEEL TRIM CARE ..... 62
EXTERIOR BULBS ............. 62
CONSUMER ASSISTANCE
CHRYSLER GROUP LLC CUSTOMER
CENTER...................63
CHRYSLER CANADA INC. CUSTOMER
CENTER...................63
ASSISTANCE FOR THE HEARING
IMPAIRED..................63
PUBLICATIONS ORDERING .........63
REPORTING SAFETY DEFECTS IN
THE 50 UNITED STATES AND
WASHINGTON, D.C. ........... 64
TIRE WARRANTY ............. 64
MOPAR ACCESSORIES
MOPAR®ACCESSORIES..........67
TABLE OF CONTENTS
Page 10 of 72
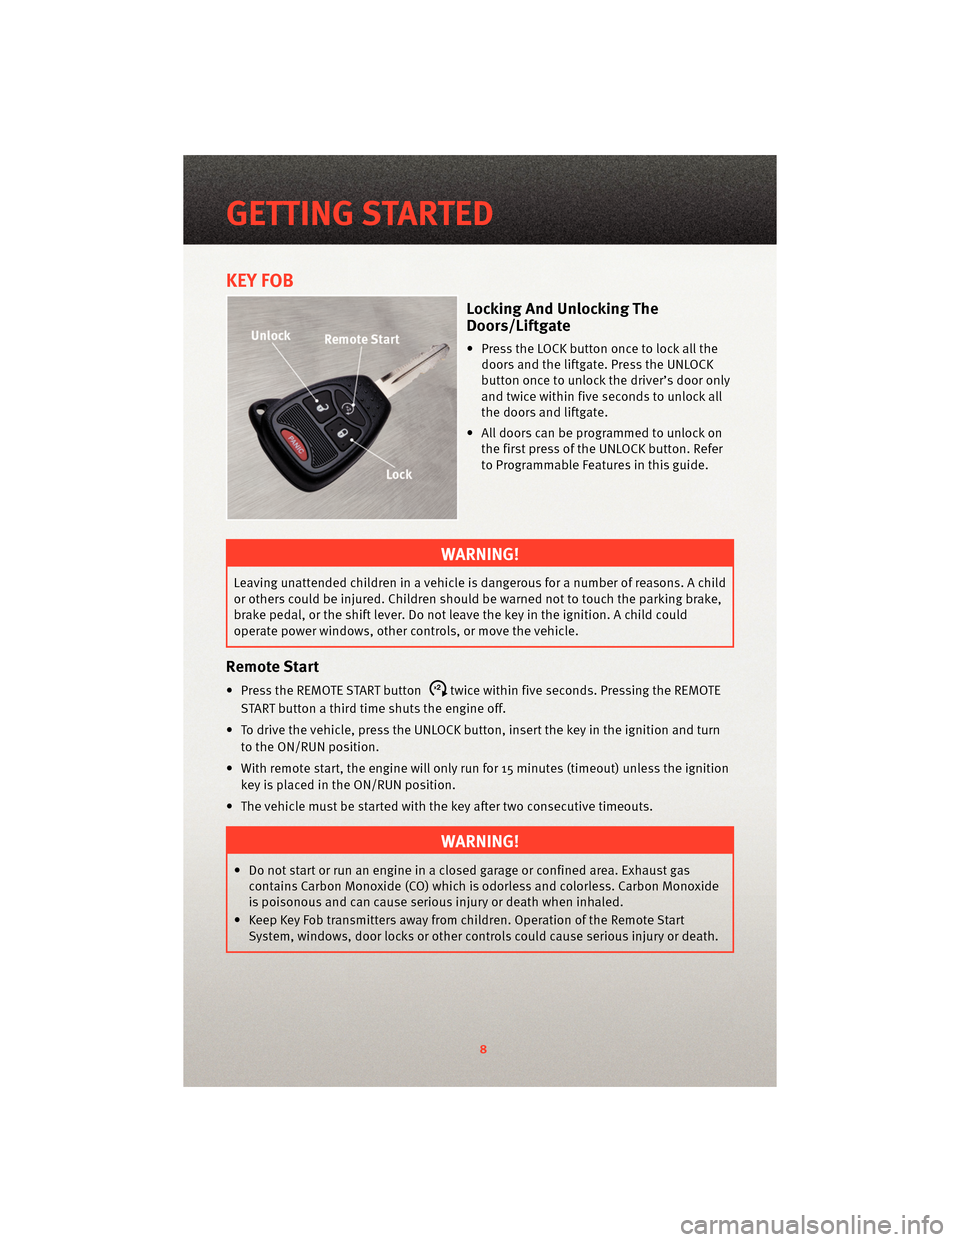
KEY FOB
Locking And Unlocking The
Doors/Liftgate
• Press the LOCK button once to lock all thedoors and the liftgate. Press the UNLOCK
button once to unlock the driver’s door only
and twice within five seconds to unlock all
the doors and liftgate.
• All doors can be programmed to unlock on the first press of the UNLOCK button. Refer
to Programmable Features in this guide.
WARNING!
Leaving unattended children in a vehicle is dangerous for a number of reasons. A child
or others could be injured. Children should be warned not to touch the parking brake,
brake pedal, or the shift lever. Do not leave the key in the ignition. A child could
operate power windows, other controls, or move the vehicle.
Remote Start
• Press the REMOTE START buttonx2twice within five seconds. Pressing the REMOTE
START button a third time shuts the engine off.
• To drive the vehicle, press the UNLOCK button, insert the key in the ignition and turn to the ON/RUN position.
• With remote start, the engine will only run for 15 minutes (timeout) unless the ignition key is placed in the ON/RUN position.
• The vehicle must be started with the key after two consecutive timeouts.
WARNING!
• Do not start or run an engine in a closed garage or confined area. Exhaust gas contains Carbon Monoxide (CO) which is odorless and colorless. Carbon Monoxide
is poisonous and can cause serious injury or death when inhaled.
• Keep Key Fob transmitters away from children. Operation of the Remote Start System, windows, door locks or other controls could cause serious injury or death.
GETTING STARTED
8
Page 11 of 72
Panic Alarm
• Press the PANIC button once to turn the panic alarm on.
• Wait approximately three seconds and press the button a second time to turn the
panic alarm off.
Express Window Feature
• To remotely lower both front door windows at the same time, press and release the UNLOCK button and then immediately press and hold the UNLOCK button until the
windows lower to the level desired or until they lower completely.
THEFT ALARM
To Arm
• Press the Key Fob LOCK button or the power door lock switch while the door is open.
To Disarm
• Press the Key Fob UNLOCK button and turn the ignition to the ON position.
SEAT BELT
• Be sure everyone in your vehicle is in a seat and using a seat belt properly.
WARNING!
In a collision, you and your passengers can suffer much greater injuries if you are not
properly buckled up. You can strike the interior of your vehicle or other passengers, or
you can be thrown out of the vehicle. Always be sure you and others in your vehicle
are buckled up properly.
CHILD RESTRAINTS
• Children 12 years and under should ride properly buckled up in a rear seat, if available. According to crash statistics, children are safer when properly restrained in
the rear seats rather than in the front.
• Every state in the United States and all Canadian provinces require that small children ride in proper restraint systems. This is the law, and you can be prosecuted for
ignoring it.
WARNING!
In a collision, an unrestrained child, even a tiny baby, can become a projectile inside
the vehicle. The force required to hold even an infant on your lap could become so
great that you could not hold the child, no matter how strong you are. The child and
others could be badly injured. Any child riding in your vehicle should be in a proper
restraint for the child's size.
9
GETTING STARTED
Page 17 of 72
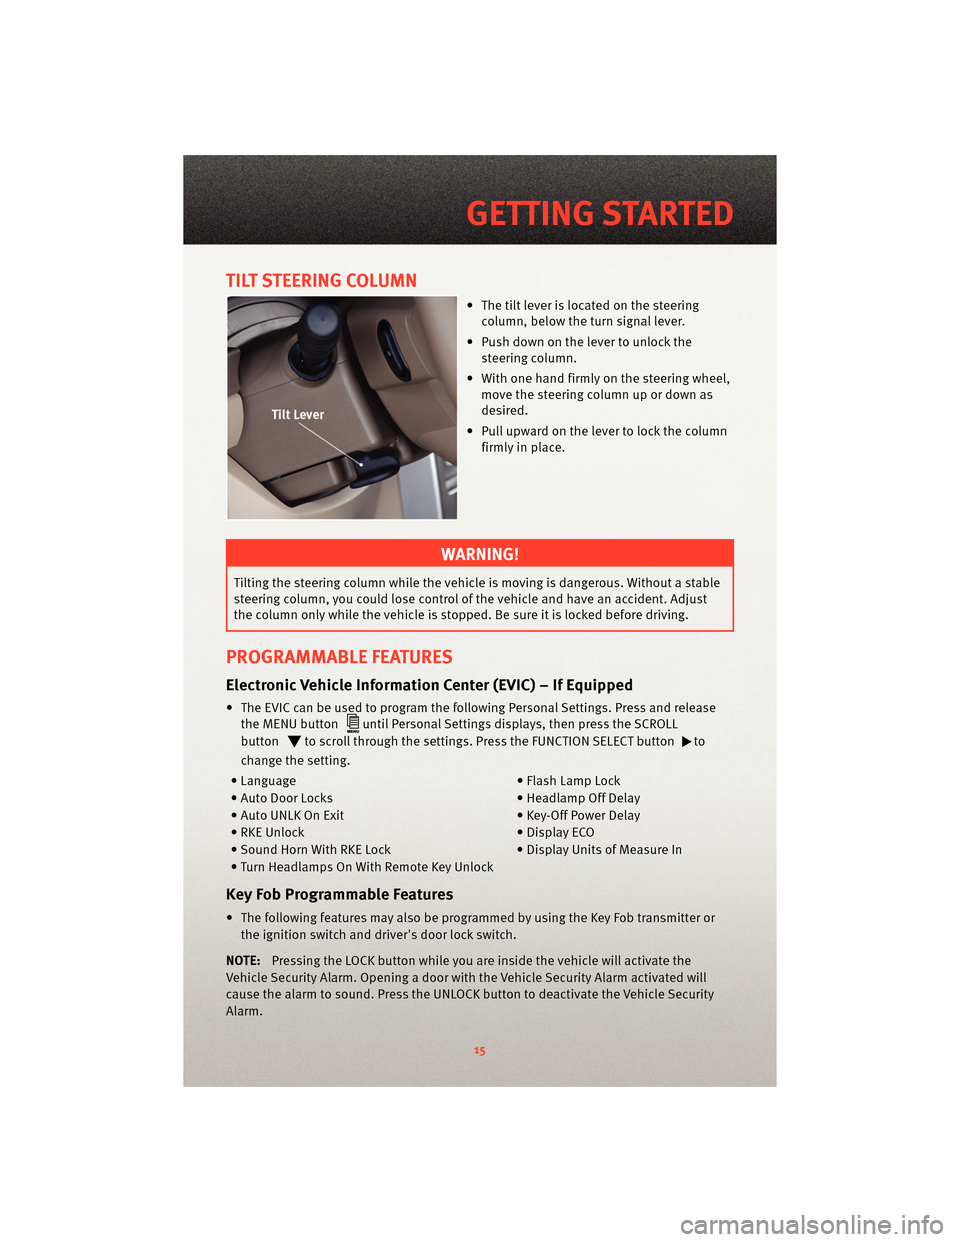
TILT STEERING COLUMN
• The tilt lever is located on the steeringcolumn, below the turn signal lever.
• Push down on the lever to unlock the steering column.
• With one hand firmly on the steering wheel, move the steering column up or down as
desired.
• Pull upward on the lever to lock the column firmly in place.
WARNING!
Tilting the steering column while the vehicle is moving is dangerous. Without a stable
steering column, you could lose control of the vehicle and have an accident. Adjust
the column only while the vehicle is stopped. Be sure it is locked before driving.
PROGRAMMABLE FEATURES
Electronic Vehicle Information Center (EVIC) – If Equipped
• The EVIC can be used to program the following Personal Settings. Press and releasethe MENU button
until Personal Settings displays, then press the SCROLL
button
to scroll through the settings. Press the FUNCTION SELECT buttonto
change the setting.
• Language • Flash Lamp Lock
• Auto Door Locks • Headlamp Off Delay
• Auto UNLK On Exit • Key-Off Power Delay
• RKE Unlock • Display ECO
• Sound Horn With RKE Lock • Display Units of Measure In
• Turn Headlamps On With Remote Key Unlock
Key Fob Programmable Features
• The following features may also be programmed by using the Key Fob transmitter or the ignition switch and driver's door lock switch.
NOTE: Pressing the LOCK button while you are inside the vehicle will activate the
Vehicle Security Alarm. Opening a door with the Vehicle Security Alarm activated will
cause the alarm to sound. Press the UNLOCK button to deactivate the Vehicle Security
Alarm.
15
GETTING STARTED
Page 18 of 72
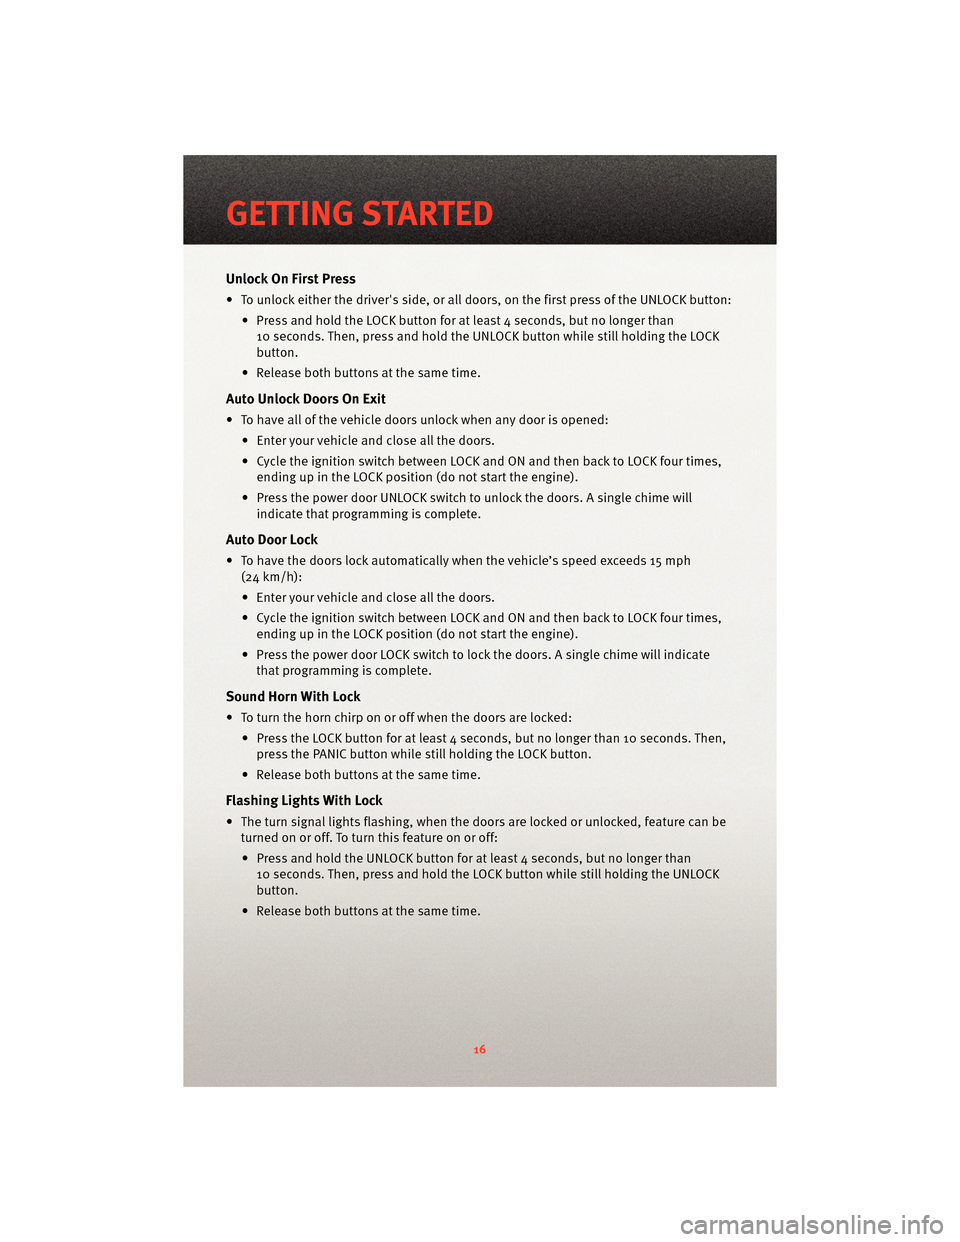
Unlock On First Press
• To unlock either the driver's side, or all doors, on the first press of the UNLOCK button:• Press and hold the LOCK button for at least 4 seconds, but no longer than10 seconds. Then, press and hold the UNLOCK button while still holding the LOCK
button.
• Release both buttons at the same time.
Auto Unlock Doors On Exit
• To have all of the vehicle doors unlock when any door is opened: • Enter your vehicle and close all the doors.
• Cycle the ignition switch between LOCK and ON and then back to LOCK four times,ending up in the LOCK position (do not start the engine).
• Press the power door UNLOCK switch to unlock the doors. A single chime will indicate that programming is complete.
Auto Door Lock
• To have the doors lock automatically when the vehicle’s speed exceeds 15 mph
(24 km/h):
• Enter your vehicle and close all the doors.
• Cycle the ignition switch between LOCK and ON and then back to LOCK four times, ending up in the LOCK position (do not start the engine).
• Press the power door LOCK switch to lock the doors. A single chime will indicate that programming is complete.
Sound Horn With Lock
• To turn the horn chirp on or off when the doors are locked:
• Press the LOCK button for at least 4 seconds, but no longer than 10 seconds. Then,press the PANIC button while still holding the LOCK button.
• Release both buttons at the same time.
Flashing Lights With Lock
• The turn signal lights flashing, when the doors are locked or unlocked, feature can be turned on or off. To turn this feature on or off:
• Press and hold the UNLOCK button for at least 4 seconds, but no longer than 10 seconds. Then, press and hold the LOCK button while still holding the UNLOCK
button.
• Release both buttons at the same time.
GETTING STARTED
16
Page 53 of 72
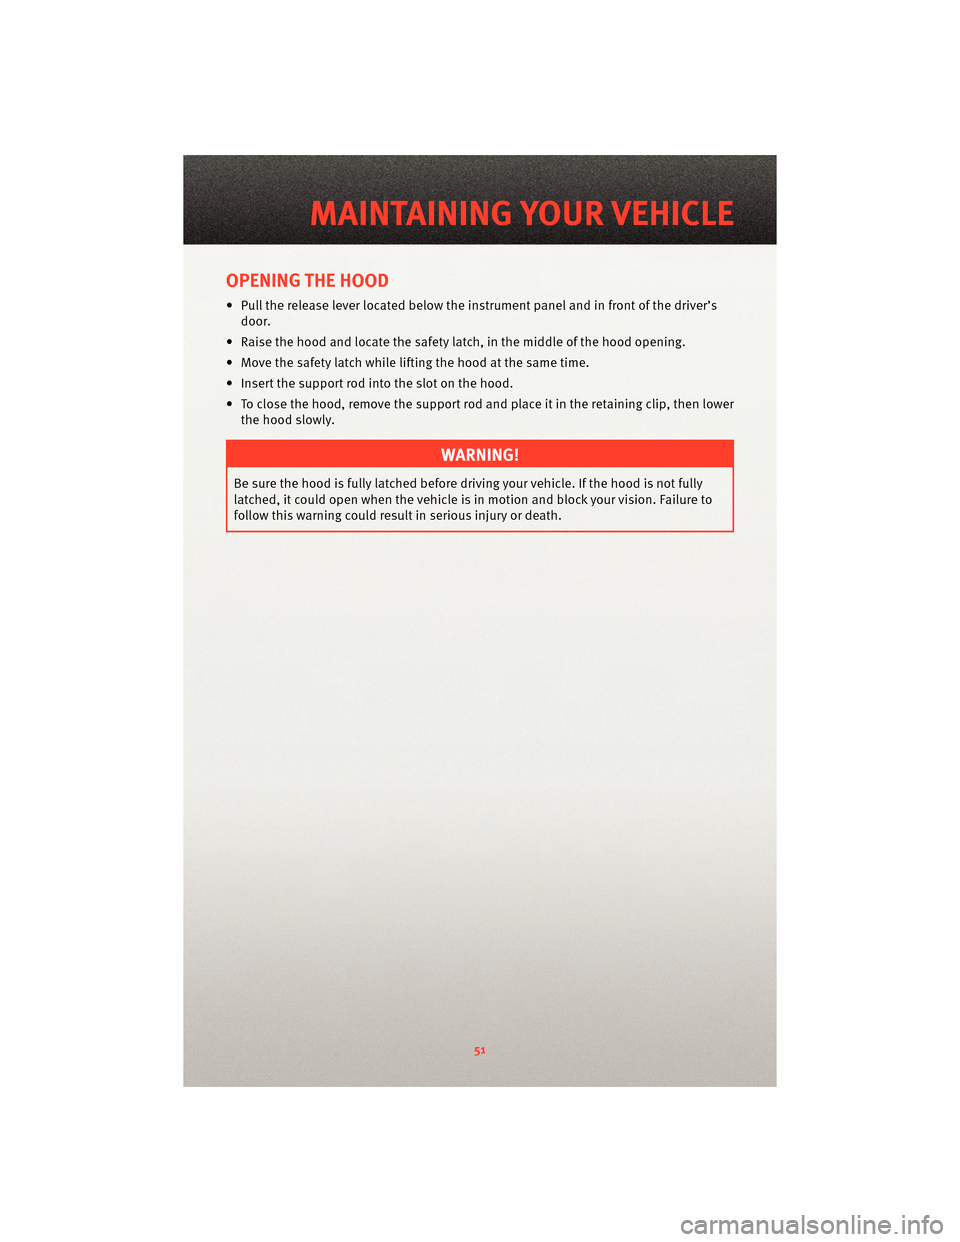
OPENING THE HOOD
• Pull the release lever located belowthe instrument panel and in front of the driver’s
door.
• Raise the hood and locate the safety latch, in the middle of the hood opening.
• Move the safety latch while lifting the hood at the same time.
• Insert the support rod into the slot on the hood.
• To close the hood, remove the support rod and place it in the retaining clip, then lower the hood slowly.
WARNING!
Be sure the hood is fully latched before driving your vehicle. If the hood is not fully
latched, it could open when the vehicle is in motion and block your vision. Failure to
follow this warning could result in serious injury or death.
51
MAINTAINING YOUR VEHICLE
Page 61 of 72
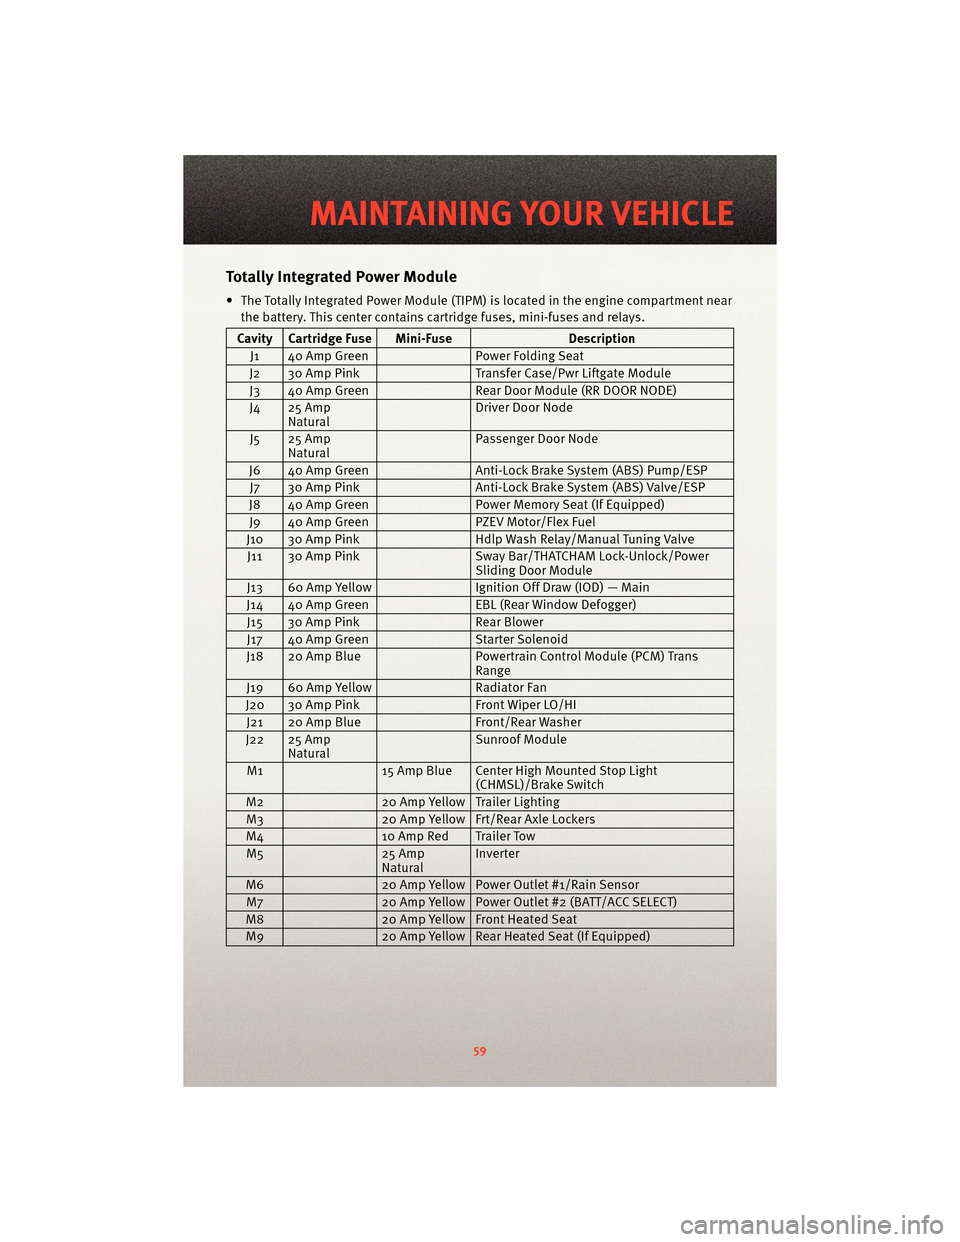
Totally Integrated Power Module
• The Totally Integrated Power Module (TIPM) is located in the engine compartment near
the battery. This center contains cartridge fuses, mini-fuses and relays.
Cavity Cartridge Fuse Mini-Fuse Description
J1 40 Amp Green Power Folding Seat
J2 30 Amp Pink Transfer Case/Pwr Liftgate Module
J3 40 Amp Green Rear Door Module (RR DOOR NODE)
J4 25 Amp Natural Driver Door Node
J5 25 Amp Natural Passenger Door Node
J6 40 Amp Green Anti-Lock Brake System (ABS) Pump/ESP
J7 30 Amp Pink Anti-Lock Brake System (ABS) Valve/ESP
J8 40 Amp Green Power Memory Seat (If Equipped)
J9 40 Amp Green PZEV Motor/Flex Fuel
J10 30 Amp Pink Hdlp Wash Relay/Manual Tuning Valve
J11 30 Amp Pink Sway Bar/THATCHAM Lock-Unlock/Power
Sliding Door Module
J13 60 Amp Yellow Ignition Off Draw (IOD) — Main
J14 40 Amp Green EBL (Rear Window Defogger)
J15 30 Amp Pink Rear Blower
J17 40 Amp Green Starter Solenoid
J18 20 Amp Blue Powertrain Control Module (PCM) Trans
Range
J19 60 Amp Yellow Radiator Fan
J20 30 Amp Pink Front Wiper LO/HI
J21 20 Amp Blue Front/Rear Washer
J22 25 Amp Natural Sunroof Module
M1 15 Amp Blue Center High Mounted Stop Light
(CHMSL)/Brake Switch
M2 20 Amp Yellow Trailer Lighting
M3 20 Amp Yellow Frt/Rear Axle Lockers
M4 10 Amp Red Trailer Tow
M5 25 Amp
NaturalInverter
M6 20 Amp Yellow Power Outlet #1/Rain Sensor
M7 20 Amp Yellow Power Outlet #2 (BATT/ACC SELECT)
M8 20 Amp Yellow Front Heated Seat
M9 20 Amp Yellow Rear Heated Seat (If Equipped)
59
MAINTAINING YOUR VEHICLE
Page 62 of 72
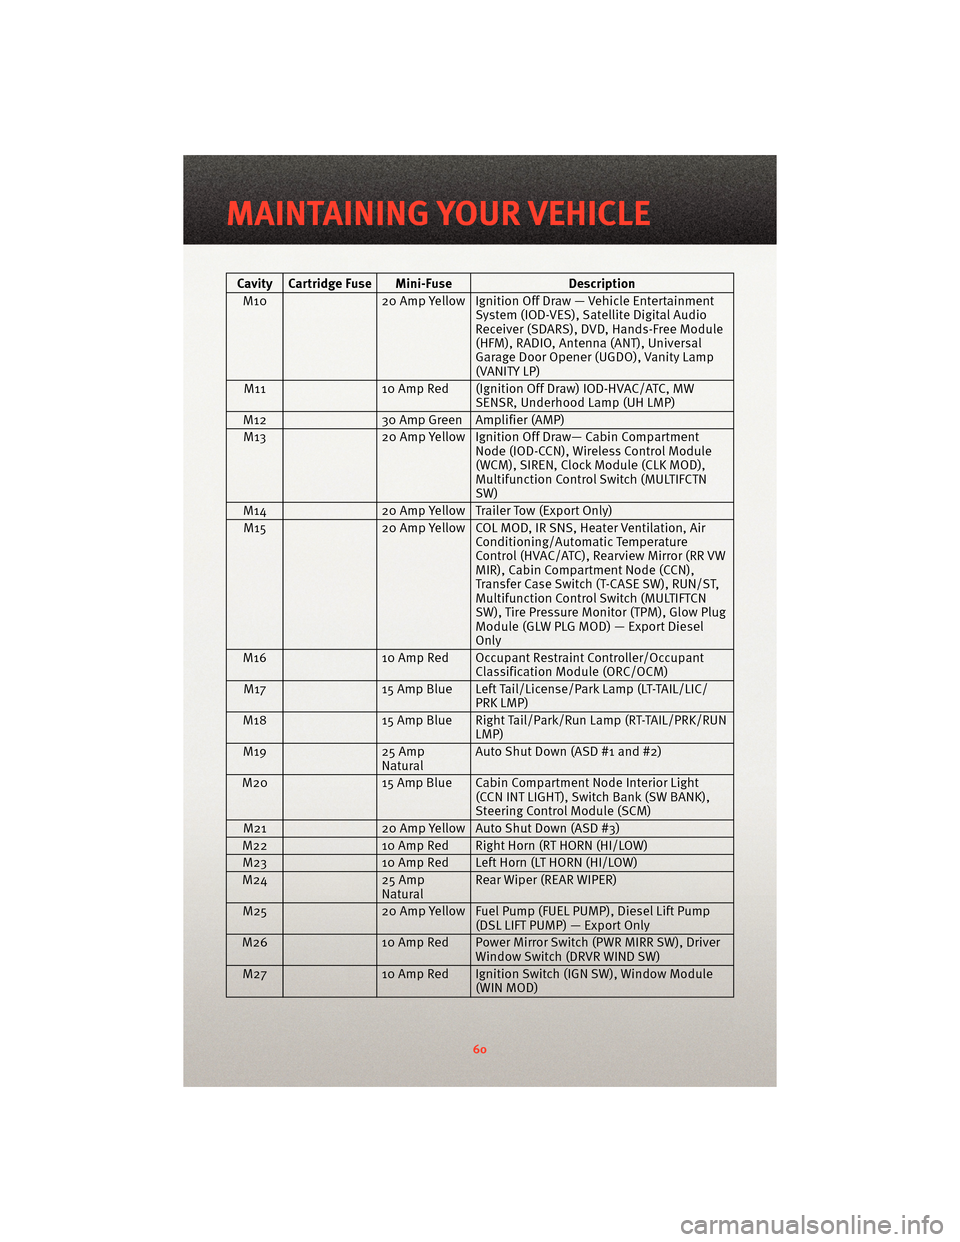
Cavity Cartridge Fuse Mini-FuseDescription
M10 20 Amp Yellow Ignition Off Draw — Vehicle Entertainment
System (IOD-VES), Satellite Digital Audio
Receiver (SDARS), DVD, Hands-Free Module
(HFM), RADIO, Antenna (ANT), Universal
Garage Door Opener (UGDO), Vanity Lamp
(VANITY LP)
M11 10 Amp Red (Ignition Off Draw) IOD-HVAC/ATC, MW
SENSR, Underhood Lamp (UH LMP)
M12 30 Amp Green Amplifier (AMP)
M13 20 Amp Yellow Ignition Off Draw— Cabin Compartment
Node (IOD-CCN), Wireless Control Module
(WCM), SIREN, Clock Module (CLK MOD),
Multifunction Control Switch (MULTIFCTN
SW)
M14 20 Amp Yellow Trailer Tow (Export Only)
M15 20 Amp Yellow COL MOD, IR SNS, Heater Ventilation, Air
Conditioning/Automatic Temperature
Control (HVAC/ATC), Rearview Mirror (RR VW
MIR), Cabin Compartment Node (CCN),
Transfer Case Switch (T-CASE SW), RUN/ST,
Multifunction Control Switch (MULTIFTCN
SW), Tire Pressure Monitor (TPM), Glow Plug
Module (GLW PLG MOD) — Export Diesel
Only
M16 10 Amp Red Occupant Restraint Controller/Occupant
Classification Module (ORC/OCM)
M17 15 Amp Blue Left Tail/License/Park Lamp (LT-TAIL/LIC/
PRK LMP)
M18 15 Amp Blue Right Tail/Park/Run Lamp (RT-TAIL/PRK/RUN
LMP)
M19 25 Amp
NaturalAuto Shut Down (ASD #1 and #2)
M20 15 Amp Blue Cabin Compartment Node Interior Light
(CCN INT LIGHT), Switch Bank (SW BANK),
Steering Control Module (SCM)
M21 20 Amp Yellow Auto Shut Down (ASD #3)
M22 10 Amp Red Right Horn (RT HORN (HI/LOW)
M23 10 Amp Red Left Horn (LT HORN (HI/LOW)
M24 25 Amp
Natural Rear Wiper (REAR WIPER)
M25 20 Amp Yellow Fuel Pump (FUEL PUMP), Diesel Lift Pump
(DSL LIFT PUMP) — Export Only
M26 10 Amp Red Power Mirror Switch (PWR MIRR SW), Driver
Window Switch (DRVR WIND SW)
M27 10 Amp Red Ignition Switch (IGN SW), Window Module
(WIN MOD)
MAINTAINING YOUR VEHICLE
60
Page 63 of 72
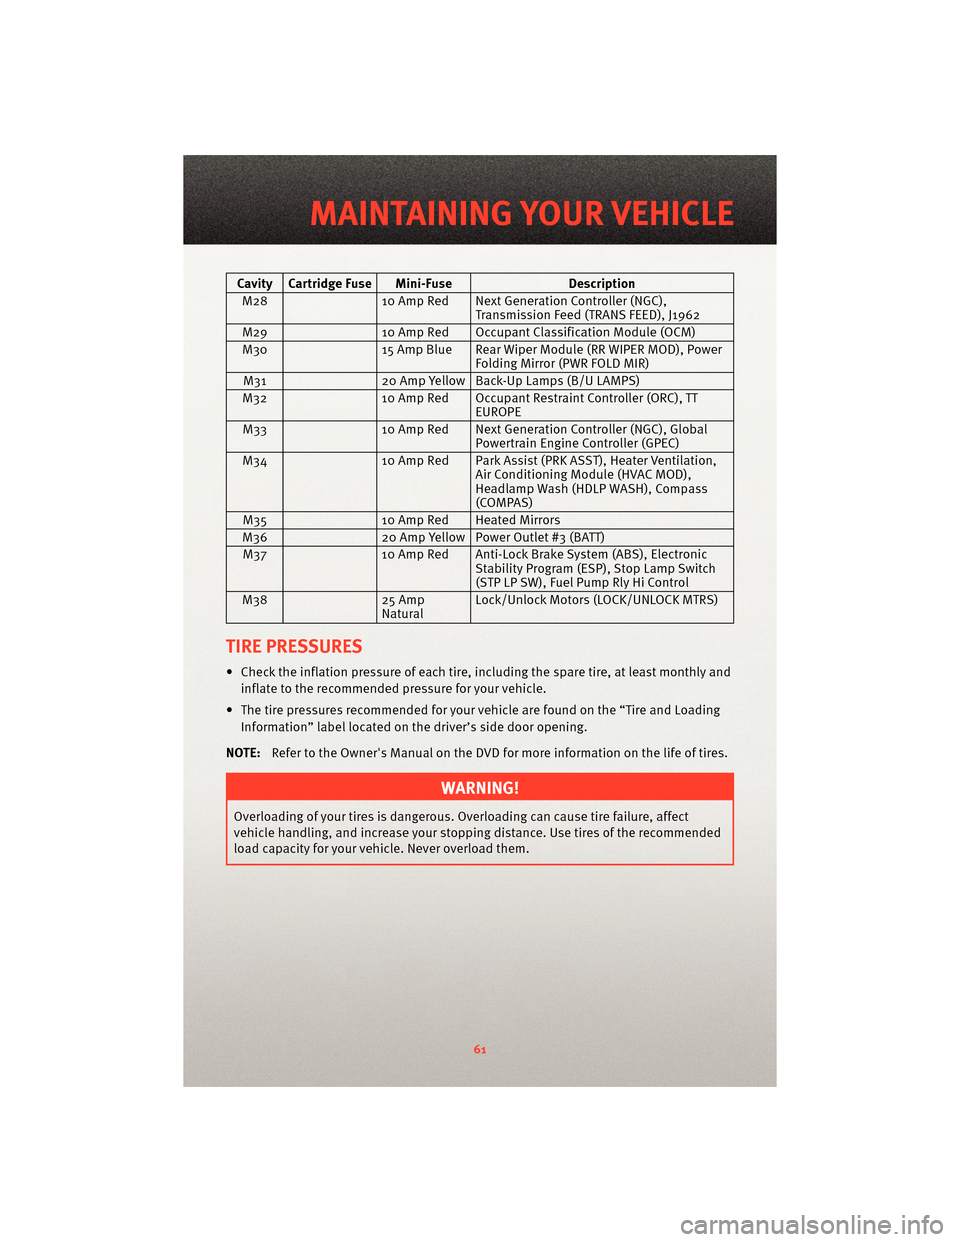
Cavity Cartridge Fuse Mini-FuseDescription
M28 10 Amp Red Next Generation Controller (NGC),
Transmission Feed (TRANS FEED), J1962
M29 10 Amp Red Occupant Classification Module (OCM)
M30 15 Amp Blue Rear Wiper Module (RR WIPER MOD), Power
Folding Mirror (PWR FOLD MIR)
M31 20 Amp Yellow Back-Up Lamps (B/U LAMPS)
M32 10 Amp Red Occupant Restraint Controller (ORC), TT
EUROPE
M33 10 Amp Red Next Generation Controller (NGC), Global
Powertrain Engine Controller (GPEC)
M34 10 Amp Red Park Assist(PRK ASST), Heat er Ventilation,
Air Conditioning Module (HVAC MOD),
Headlamp Wash (HDLP WASH), Compass
(COMPAS)
M35 10 Amp Red Heated Mirrors
M36 20 Amp Yellow Power Outlet #3 (BATT)
M37 10 Amp Red Anti-Lock Brake System (ABS), Electronic
Stability Program (ESP), Stop Lamp Switch
(STP LP SW), Fuel Pump Rly Hi Control
M38 25 Amp
NaturalLock/Unlock Motors (LOCK/UNLOCK MTRS)
TIRE PRESSURES
• Check the inflation pressure of each tire, including the spare tire, at least monthly and
inflate to the recommended pressure for your vehicle.
• The tire pressures recommended for your vehicle are found on the “Tire and Loading Information” label located on the driver’s side door opening.
NOTE: Refer to the Owner's Manual on the DVD for more information on the life of tires.
WARNING!
Overloading of your tires is dangerous. Ov erloading can causetire failure, affect
vehicle handling, and increase your stopping distance. Use tires of the recommended
load capacity for your vehicle. Never overload them.
61
MAINTAINING YOUR VEHICLE