warning DODGE NITRO 2011 1.G Owner's Manual
[x] Cancel search | Manufacturer: DODGE, Model Year: 2011, Model line: NITRO, Model: DODGE NITRO 2011 1.GPages: 84, PDF Size: 3.74 MB
Page 21 of 84
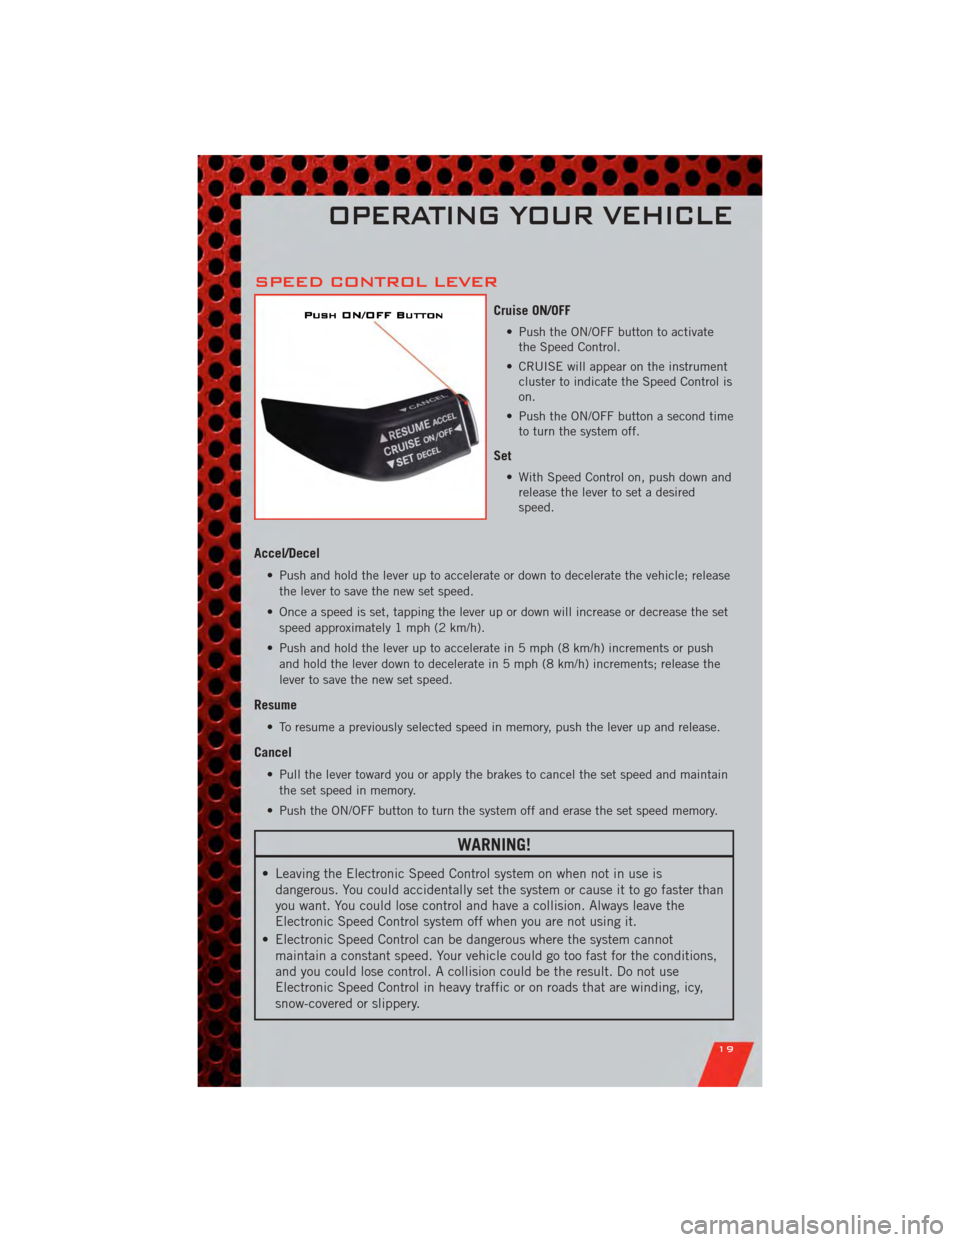
SPEED CONTROL LEVER
Cruise ON/OFF
• Push the ON/OFF button to activatethe Speed Control.
• CRUISE will appear on the instrument cluster to indicate the Speed Control is
on.
• Push the ON/OFF button a second time to turn the system off.
Set
• With Speed Control on, push down andrelease the lever to set a desired
speed.
Accel/Decel
• Push and hold the lever up to accelerate or down to decelerate the vehicle; release
the lever to save the new set speed.
• Once a speed is set, tapping the lever up or down will increase or decrease the set speed approximately 1 mph (2 km/h).
• Push and hold the lever up to accelerate in 5 mph (8 km/h) increments or push and hold the lever down to decelerate in 5 mph (8 km/h) increments; release the
lever to save the new set speed.
Resume
• To resume a previously selected speed in memory, push the lever up and release.
Cancel
• Pull the lever toward you or apply the brakes to cancel the set speed and maintainthe set speed in memory.
• Push the ON/OFF button to turn the system off and erase the set speed memory.
WARNING!
• Leaving the Electronic Speed Control system on when not in use is dangerous. You could accidentally set the system or cause it to go faster than
you want. You could lose control and have a collision. Always leave the
Electronic Speed Control system off when you are not using it.
• Electronic Speed Control can be dangerous where the system cannot maintain a constant speed. Your vehicle could go too fast for the conditions,
and you could lose control. A collision could be the result. Do not use
Electronic Speed Control in heavy traffic or on roads that are winding, icy,
snow-covered or slippery.
OPERATING YOUR VEHICLE
19
Page 23 of 84
Air Conditioning (A/C)
• If the air conditioning button is pressed while in the AUTO mode, the indicatorlight may flash three times to indicate the cabin air is being controlled
automatically.
Air Recirculation
• Use recirculation for maximum A/C operation.
• For window defogging, turn the air recirculation button off.
• If the recirculation button is pressed while in the AUTO mode, the indicator lightmay flash three times to indicate the cabin air is being controlled automatically.
PARKSENSE®REAR PARK ASSIST
• If an object is detected behind the rear bumper while the vehicle is in REVERSE, awarning will display in the EVIC.
• When the Instrument Cluster reads either “Clean Sensor” or “Blinded”, clean off the bumper sensors to see if the condition is corrected.
POWER SUNROOF
• The power sunroof switch is located on the overhead console.
Opening Sunroof
Express
• Press the switch rearward and release. The sunroof will fully open and stop automatically.
Closing Sunroof
Express
• Press the switch forward and release. The sunroof will close automatically from any position.
Manual Open/Close
• Press and hold the switch rearward to open or forward to close the sunroof. Anyrelease of the switch will stop the movement, and the sunroof will remain in a
partially open or closed position until the switch is pressed again.
Venting Sunroof
• Press and release the "VENT" button, and the sunroof will open to the ventposition. This is called “Express Vent” and will occur regardless of sunroof
position. During Express Vent operation, any movement of the switch will stop the
sunroof.
OPERATING YOUR VEHICLE
21
Page 24 of 84
Pinch Protection Feature
• This feature will detect an obstruction in the opening of the sunroof during ExpressClose operation. If an obstruction in the path of the sunroof is detected, the
sunroof will automatically return to the open position.
NOTE: Pinch protection is disabled while the switch is pressed and held during manual
opening and closing of the sunroof.
WARNING!
• Never leave children in a vehicle with the key in the ignition switch. Occupants, particularly unattended children, can become entrapped by the
power sunroof while operating the power sunroof switch. Such entrapment
may result in serious injury or death.
• In a collision, there is a greater risk of being thrown from a vehicle with an open sunroof. You could also be severely injured or killed. Always fasten your
seat belt properly and make sure all passengers are properly secured too.
• Do not allow small children to operate the sunroof. Never allow your fingers, other body parts, or any object to project through the sunroof opening. Injury
may result.
OPERATING YOUR VEHICLE
22
Page 40 of 84
• Use the radio ON/OFF VOLUME rotary knob to adjust the volume to a comfortablelevel while the Uconnect™ system is speaking. Please note the volume setting for
Uconnect™ is different than the audio system.
NOTE: To access the tutorial, press the Uconnect™ hard-key. After the BEEP, say
“tutorial”. Press any hard-key/button or touch the display (Touch-Screen radio) to
cancel the tutorial.
WARNING!
• Any voice commanded system should be used only in safe driving conditions following local laws and phone use. All attention should be kept on the
roadway ahead. Failure to do so may result in a collision causing you and
others to be severely injured or killed.
• In an emergency, to use Uconnect™ Phone, your mobile phone must be: • turned on,
• paired to Uconnect™ Phone,
• and have network coverage.
Uconnect™ VOICE COMMAND
• The Uconnect™ Voice Command system allows you to control your AM, FM radio,satellite radio, disc player, Uconnect™ Phone, a memo recorder, and supported
portable media devices.
• When you press the Voice Command button
located on the radio faceplate
or steering wheel, you will hear a beep. The beep is your signal to give a command.
If you do not say a command within a few seconds, the system will present you
with a list of options. If you ever wish to interrupt the system while it lists options,
press the Voice Command button
, listen for the BEEP, and say your
command.
Voice Command for Text Messaging
• If equipped with Uconnect™ Voice Command, your Media Center 430N radio may be able to play incoming SMS messages through the vehicle sound system.
• It also allows you to respond by selecting from various pre-defined phrases.
• Not all phones are compatible with this feature. Refer to the phone compatibility list at www.dodge.com/uconnect. Connected mobile phones must be
bluetooth-compatible, and paired with your radio.
Changing The Volume
• Start a dialogue by pressing the Voice Command button, then say a
command (for example, “tutorial”).
• Use the radio ON/OFF VOLUME rotary knob to adjust the volume to a comfortable level while the Voice Command system is speaking. The volume setting for Voice
Command is different than the audio system.
ELECTRONICS
38
Page 41 of 84
• For vehicles equipped with Video Entertainment System (VES)™, refer to theUconnect™ Voice Command section of the Uconnect™ User's Manual on the DVD
for further details.
• For vehicles not equipped with VES™, refer to your vehicle Owner's Manual on the DVD for Uconnect™ Voice Command information.
NOTE: To access the tutorial, press the Voice Command button
. After the
BEEP, say “tutorial”. Press any hard-key/button or touch the display (Touch-Screen
radio) to cancel the tutorial.
Bluetooth®Streaming Audio
• If equipped with Uconnect™ Voice Command, your bluetooth-equipped iPod®
devices, cellphones or other media players, may also be able to stream music to
your vehicle's speakers. Your connected device must be bluetooth-compatible, and
paired with your Media Center radio (see Uconnect™ Phone for pairing
instructions). Press the AUX button on the radio faceplate until "BT" is displayed
on the radio screen.
WARNING!
Any voice commanded system should be used only in safe driving conditions
following local laws and phone use. All attention should be kept on the roadway
ahead. Failure to do so may result in a collision causing you and others to be
severely injured or killed.
ELECTRONIC VEHICLE INFORMATION CENTER
(EVIC)
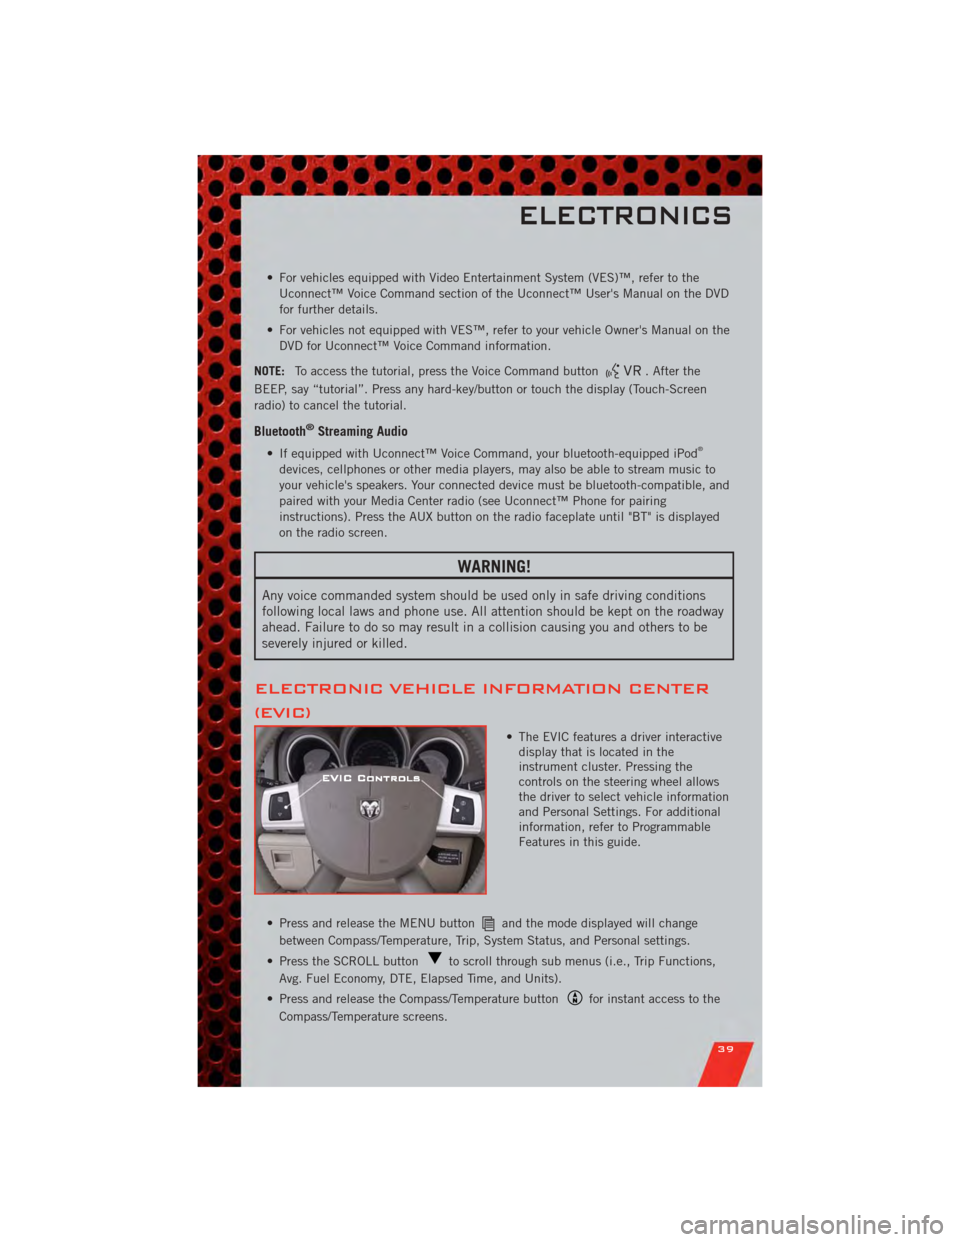
• The EVIC features a driver interactive display that is located in the
instrument cluster. Pressing the
controls on the steering wheel allows
the driver to select vehicle information
and Personal Settings. For additional
information, refer to Programmable
Features in this guide.
• Press and release the MENU button
and the mode displayed will change
between Compass/Temperature, Trip, System Status, and Personal settings.
• Press the SCROLL button
to scroll through sub menus (i.e., Trip Functions,
Avg. Fuel Economy, DTE, Elapsed Time, and Units).
• Press and release the Compass/Temperature button
for instant access to the
Compass/Temperature screens.
ELECTRONICS
39
Page 45 of 84
Programming A Rolling Code System• At the garage door opener motor (in the garage), locate the “learn” or “programming” button. This can usually be found where the hanging antenna wire
is attached to the garage door opener motor (it is NOT the button normally used to
open and close the door).
• Firmly press and release the “learn” or “programming” button. The name and color of the button may vary by manufacturer. Within 30 seconds, return to the vehicle
and press the programmed HomeLink
®button twice (holding the button for two
seconds each time). If the device is plugged in and activates, programming is
complete.
• If the device does not activate, press the button a third time (for two seconds) to complete the programming.
Using HomeLink
®
• To operate, simply press and release the programmed HomeLink®button and the
programmed device will operate.
• Refer to your Owner’s Manual on the DVD for further details. If you have any problems programming HomeLink
®, or require assistance, please call toll-free
1–800–355–3515 or, on the Internet, at www.HomeLink.com.
WARNING!
• Your motorized door or gate will open and close while you are programming the universal transceiver. Do not program the transceiver if people or pets are
in the path of the door or gate.
• Do not run your vehicle in a closed garage or confined area while programming the transceiver. Exhaust gas from your vehicle contains Carbon
Monoxide (CO) which is odorless and colorless. Carbon Monoxide is
poisonous when inhaled and can cause you and others to be severely injured
or killed.
ELECTRONICS
43
Page 48 of 84
CARGO AREA FEATURES
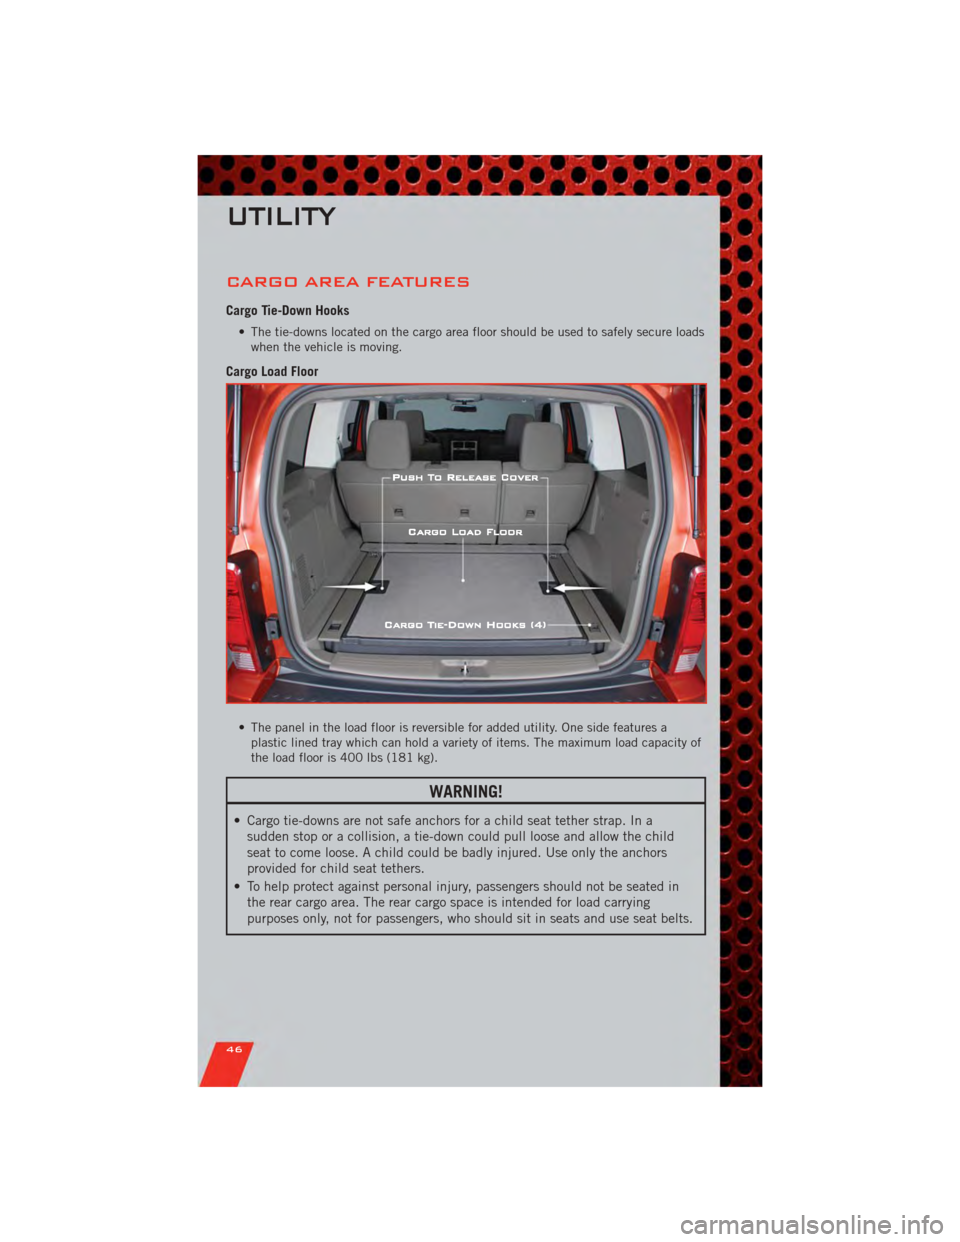
Cargo Tie-Down Hooks
• The tie-downs located on the cargo area floor should be used to safely secure loadswhen the vehicle is moving.
Cargo Load Floor
• The panel in the load floor is reversible for added utility. One side features aplastic lined tray which can hold a variety of items. The maximum load capacity of
the load floor is 400 lbs (181 kg).
WARNING!
• Cargo tie-downs are not safe anchors for a child seat tether strap. In asudden stop or a collision, a tie-down could pull loose and allow the child
seat to come loose. A child could be badly injured. Use only the anchors
provided for child seat tethers.
• To help protect against personal injury, passengers should not be seated in the rear cargo area. The rear cargo space is intended for load carrying
purposes only, not for passengers, who should sit in seats and use seat belts.
UTILITY
46
Page 50 of 84
RECREATIONAL
TOWING (BEHIND
MOTORHOME, ETC.)
Recreational Towing — Two-Wheel Drive
Models
• Recreational towing is allowed if therear wheels are OFFthe ground. This
may be accomplished using a tow
dolly or vehicle trailer. If using a tow
dolly, follow this procedure:
• Properly secure the dolly to the tow vehicle, following the dolly
manufacturer's instructions.
• Drive the rear wheels onto the tow dolly, firmly set the parking brake
and place the transmission in PARK.
• Turn the ignition switch to the unlocked OFF position.
• Install a suitable clamping device, designed for towing, to secure the
front wheels in the straight position.
• Disconnect the negative battery cable and secure it away from the
battery post.
• Flat towing (with all four wheels on the
ground) is allowed ONLY if the
driveshaft is removed. Towing with the
rear wheels on the ground while the
driveshaft is connected will result in
severe transmission damage.
• The parking brake mustbe firmly
engaged and the wheels chocked
during driveshaft removal and
installation. The parking brake must
remain engaged unless the vehicle is
securely and properly connected to
the tow vehicle, or the driveshaft is
completely reinstalled. See your
authorized dealer for proper
driveshaft removal and reinstallation
procedures, including flange
orientation/alignment, use of
thread-locking compound, proper
bolt torque specifications, etc.
Towing — Four-Wheel Drive Or All-Wheel
Drive Models
Recreational Towing (All Four Wheels On
The Ground)
• Recreational towing is NOT allowed. These models do not have a
NEUTRAL position in the transfer
case.
NOTE: This vehicle may be towed on a
flatbed or vehicle trailer provided all four
wheels are OFF the ground.
• Refer to your Owner's Manual on theDVD for further details.
CAUTION!
Front or rear wheel lifts should not
be used. Internal damage to the
transmission or transfer case will
occur if a front or rear wheel lift is
used when recreational towing.
WARNING!
If the driveshaft is removed, the
vehicle can roll even if the
transmission is in PARK, which
could cause serious injury or death.
UTILITY
48
Page 51 of 84
24-HOUR TOWING ASSISTANCE
• Dial toll-free 1-800-521-2779 or 1-800-363-4869 for Canadian residents.
• Provide your name, vehicle identification number and license plate number.
• Provide your location, including telephone number, from which you are calling.
• Briefly describe the nature of the problem and answer a few simple questions.
• You will be given the name of the service provider and an estimated time of arrival.If you feel you are in an “unsafe situation”, please let us know. With your consent,
we will contact local police or safety authorities.
INSTRUMENT CLUSTER WARNING LIGHTS
- Electronic Stability Control (ESC) Indicator Light
• If this indicator light flashes during acceleration, apply as little throttle aspossible. While driving, ease up on the accelerator. Adapt your speed and driving
to the prevailing road conditions. To improve the vehicle's traction when starting
off in deep snow, sand or gravel, it may be desirable to switch the ESC system off.
- Tire Pressure Monitoring System (TPMS) Light
• Each tire, including the spare (if provided), should be checked monthly, when coldand inflated to the inflation pressure recommended by the vehicle manufacturer on
the vehicle placard or tire inflation pressure label. (If your vehicle has tires of a
different size than the size indicated on the vehicle placard or tire inflation
pressure label, you should determine the proper tire inflation pressure for those
tires.)
• As an added safety feature, your vehicle has been equipped with a Tire Pressure Monitoring System (TPMS) that illuminates a low tire pressure telltale when one or
more of your tires is significantly under-inflated. Accordingly, when the low tire
pressure telltale illuminates, you should stop and check your tires as soon as
possible, and inflate them to the proper pressure. Driving on a significantly
under-inflated tire causes the tire to overheat and can lead to tire failure.
Under-inflation also reduces fuel efficiency and tire tread life, and may affect the
vehicle’s handling and stopping ability.
• IF THE LIGHT STARTS FLASHING INDICATING A LOW TIRE PRESSURE, ADJUST THE AIR
PRESSURE IN THE LOW TIRE TO THE AIR PRESSURE SHOWN ON THE VEHICLE PLACARD
OR TIRE INFLATION PRESSURE LABEL LOCATED ON THE DRIVER'S DOOR. NOTE: AFTER
INFLATION, THE VEHICLE MAY NEED TO BE DRIVEN FOR 20 MINUTES BEFORE THE
FLASHING LIGHT WILL TURN OFF.
• Please note that the TPMS is not a substitute for proper tire maintenance, and it is the driver’s responsibility to maintain correct tire pressure, even if under-inflation
has not reached the level to trigger illumination of the TPMS low tire pressure
telltale.
WHAT TO DO IN EMERGENCIES
49
Page 52 of 84
• Your vehicle has also been equipped with a TPMS malfunction indicator to indicatewhen the system is not operating properly. The TPMS malfunction indicator is
combined with the low tire pressure telltale. When the system detects a
malfunction, the telltale will flash for approximately one minute and then remain
continuously illuminated. This sequence will continue each time the vehicle is
restarted as long as the malfunction exists.
• When the malfunction indicator is illuminated, the system may not be able to detect or signal low tire pressure as intended. TPMS malfunctions may occur for a
variety of reasons, including the installation of replacement or alternate tires or
wheels on the vehicle that prevent the TPMS from functioning properly. Always
check the TPMS malfunction telltale after replacing one or more tires or wheels on
your vehicle, to ensure that the replacement or alternate tires and wheels allow the
TPMS to continue to function properly.
CAUTION!
The TPMS has been optimized for the original equipment tires and wheels.
TPMS pressures and warning have been established for the tire size equipped
on your vehicle. Undesirable system operation or sensor damage may result
when using replacement equipment that is not of the same size, type, and/or
style. Aftermarket wheels can cause sensor damage. Do not use tire sealant
from a can, or balance beads if your vehicle is equipped with a TPMS, as
damage to the sensors may result.
- Engine Temperature Warning Light
• This light warns of an overheated engine condition.
• If the light turns on and a warning chime sounds while driving, safely pull over andstop the vehicle. If the A/C system is on, turn it off. Also, shift the transmission
into NEUTRAL and idle the vehicle. If the temperature reading does not return to
normal, turn the engine off immediately.
• We recommend that you do not operate the vehicle or engine damage will occur. Have the vehicle serviced immediately.
WARNING!
A hot engine cooling system is dangerous. You or others could be badly burned
by steam or boiling coolant. You may want to call an authorized service center
for service if your vehicle overheats.
BRAKE- Brake Warning Light
• The Brake Warning light illuminates when there is either a system malfunction orthe parking brake is applied. If the light is on and the parking brake is not applied,
it indicates a possible brake hydraulic malfunction, booster problem or an
Anti-Lock Brake System problem.
• We recommend you drive to the nearest service center and have the vehicle serviced immediately.
WHAT TO DO IN EMERGENCIES
50