steering DODGE NITRO 2011 1.G User Guide
[x] Cancel search | Manufacturer: DODGE, Model Year: 2011, Model line: NITRO, Model: DODGE NITRO 2011 1.GPages: 84, PDF Size: 3.74 MB
Page 3 of 84
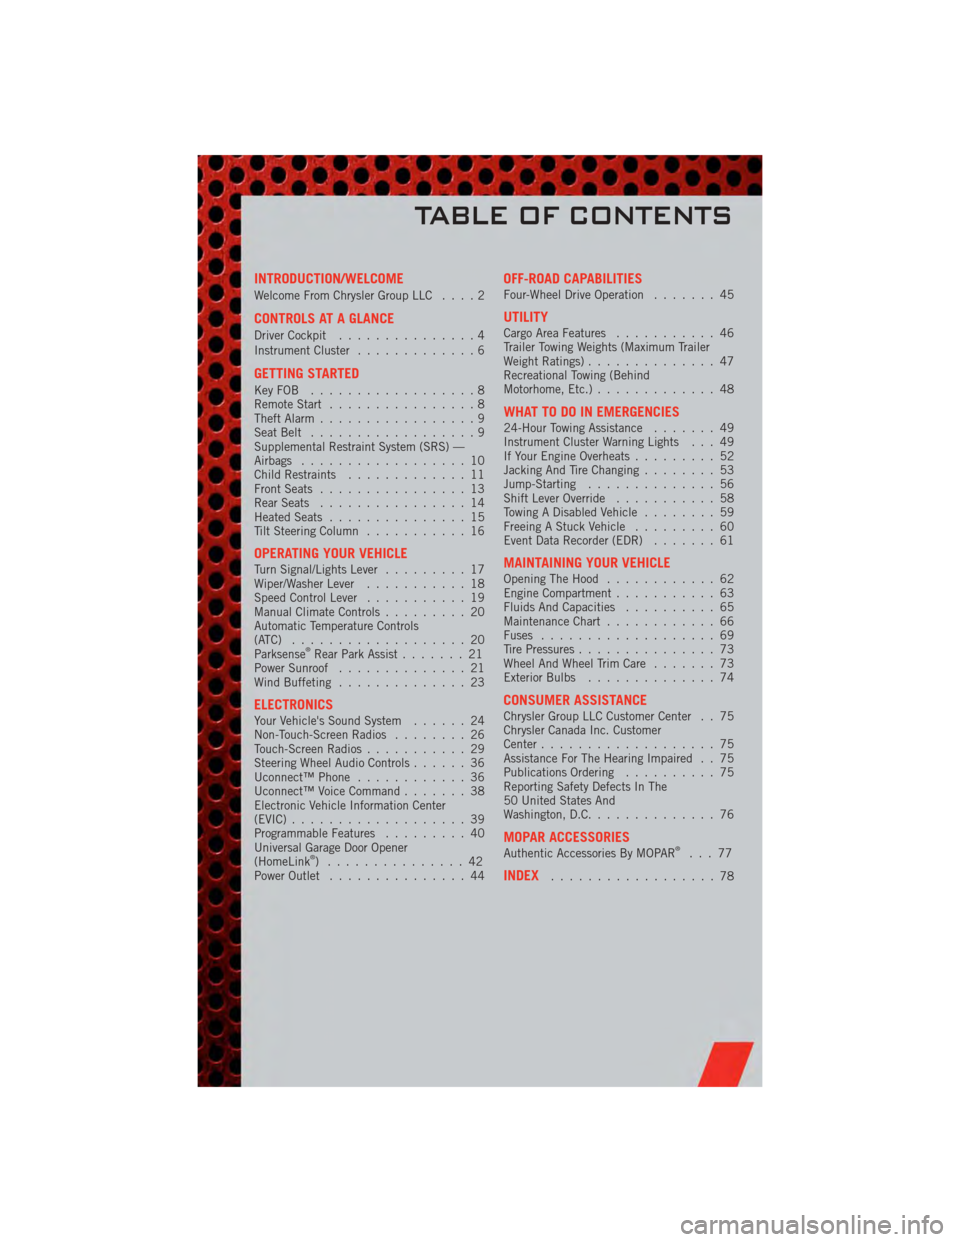
INTRODUCTION/WELCOME
Welcome From Chrysler Group LLC....2
CONTROLS AT A GLANCE
Driver Cockpit...............4
Instrument Cluster .............6
GETTING STARTED
KeyFOB ..................8
Remote Start................8
Theft Alarm .................9
Seat Belt ..................9
Supplemental Restraint System (SRS) —
Airbags ..................10
Child Restraints .............11
Front Seats ................13
Rear Seats ................14
Heated Seats ...............15
Tilt Steering Column ...........16
OPERATING YOUR VEHICLETurn Signal/Lights Lever .........17
Wiper/Washer Lever ...........18
Speed Control Lever ...........19
Manual Climate Controls .........20
Automatic Temperature Controls
(ATC) ...................20
Parksense
®Rear Park Assist .......21
Power Sunroof ..............21
Wind Buffeting ..............23
ELECTRONICSYour Vehicle's Sound System ......24
Non-Touch-Screen Radios ........26
Touch-Screen Radios ...........29
Steering Wheel Audio Controls ......36
Uconnect™ Phone ............36
Uconnect™ Voice Command .......38
Electronic Vehicle Information Center
(EVIC) ...................39
Programmable Features .........40
Universal Garage Door Opener
(HomeLink
®) ...............42
Power Outlet ...............44
OFF-ROAD CAPABILITIESFour-Wheel Drive Operation .......45
UTILITYCargo Area Features...........46
Trailer Towing Weights (Maximum Trailer
Weight Ratings) ..............47
Recreational Towing (Behind
Motorhome, Etc.) .............48
WHAT TO DO IN EMERGENCIES24-Hour Towing Assistance .......49
Instrument Cluster Warning Lights . . . 49
If Your Engine Overheats .........52
Jacking And Tire Changing ........53
Jump-Starting ..............56
Shift Lever Override ...........58
Towing A Disabled Vehicle ........59
Freeing A Stuck Vehicle .........60
Event Data Recorder (EDR) .......61
MAINTAINING YOUR VEHICLEOpening The Hood............62
Engine Compartment ...........63
Fluids And Capacities ..........65
Maintenance Chart ............66
Fuses ...................69
Tire Pressures ...............73
Wheel And Wheel Trim Care .......73
Exterior Bulbs ..............74
CONSUMER ASSISTANCEChrysler Group LLC Customer Center . . 75
Chrysler Canada Inc. Customer
Center...................75
Assistance For The Hearing Impaired . . 75
Publications Ordering ..........75
Reporting Safety Defects In The
50 United States And
Washington, D.C. .............76
MOPAR ACCESSORIESAuthentic Accessories By MOPAR®...77
INDEX..................78
TABLE OF CONTENTS
Page 12 of 84
WARNING!
In a collision, you and your passengers can suffer much greater injuries if you
are not buckled up properly. You can strike the interior of your vehicle or other
passengers, or you can be thrown out of the vehicle. Always be sure you and
others in your vehicle are buckled up properly.
SUPPLEMENTAL RESTRAINT SYSTEM (SRS) —
AIRBAGS
• This vehicle has Advanced Front Airbags for both the driver and right frontpassenger as a supplement to the seat belt restraint system. The Advanced Front
Airbags will not deploy in every type of collision.
• Advanced Front Airbags are designed to provide additional protection by supplementing the seat belts in certain frontal collisions depending on the severity
and type of collision. Advanced Front Airbags are not expected to reduce the risk
of injury in rear, side, or rollover collisions.
• This vehicle is equipped with Supplemental Side Airbag Inflatable Curtains to protect the driver, front and rear passengers sitting next to a window.
• If the Airbag Warning Light
is not on during starting, stays on, or turns on
while driving, have the vehicle serviced by an authorized service center
immediately.
• Refer to the Owner's Manual on the DVD for further details regarding the Supplemental Restraint System (SRS).
WARNING!
• Relying on the airbags alone could lead to more severe injuries in a collision.The airbags work with your seat belt to restrain you properly. In some
collisions, the airbags won't deploy at all. Always wear your seat belts even
though you have airbags.
• Being too close to the steering wheel or instrument panel during Advanced Front Airbag deployment could cause serious injury, including death. Airbags
need room to inflate. Sit back, comfortably extending your arms to reach the
steering wheel or instrument panel.
• Supplemental Side Airbag Inflatable Curtains need room to inflate. Do not lean against the door or window. Sit upright in the center of the seat.
• Being too close to the Supplemental Side Airbag Inflatable Curtain during deployment could cause you to be severely injured or killed.
• Do not drive your vehicle after the airbags have deployed. If you are involved in another collision, the airbags will not be in place to protect you.
• After any collision, the vehicle should be taken to an authorized dealer immediately.
GETTING STARTED
10
Page 18 of 84
TILT STEERING COLUMN
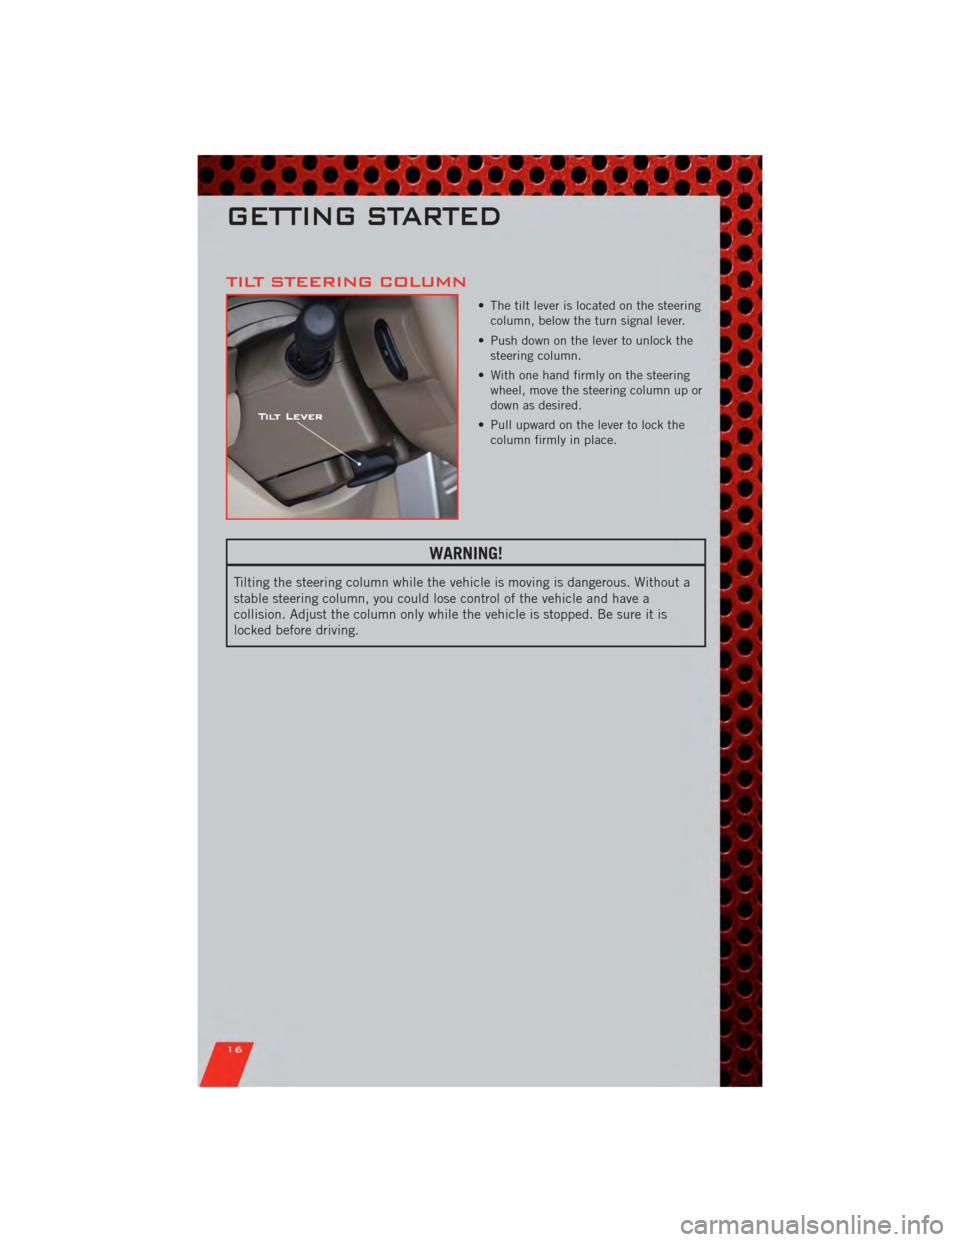
• The tilt lever is located on the steeringcolumn, below the turn signal lever.
• Push down on the lever to unlock the steering column.
• With one hand firmly on the steering wheel, move the steering column up or
down as desired.
• Pull upward on the lever to lock the column firmly in place.
WARNING!
Tilting the steering column while the vehicle is moving is dangerous. Without a
stable steering column, you could lose control of the vehicle and have a
collision. Adjust the column only while the vehicle is stopped. Be sure it is
locked before driving.
GETTING STARTED
16
Page 34 of 84
• Touch the MY FILES soft-key, then go to the MANAGE MY FILES screen.
• Touch the MY PICTURES soft-key to get an overview of the currently storedimages.
• Touch one of the ADD PICTURES soft-keys, then select the type of media inserted.
• Use the PAGE soft-keys to page through a list of pictures and press the picture you would like to import.
• Confirm your selection by touching the YES or SAVE soft-key. The imported picture is now available in the MANAGE MY PICTURES screen.
• In order to display the imported picture in the radio screen, touch the desired picture soft-key.
• Select this picture by pressing the PICTURE VIEW soft-key. A check mark indicates the currently used picture.
Cleaning Your Touch-Screen Radio
• Do not spray any liquid or caustic chemicals directly on the screen. Use a cleanand dry micro fiber lens cleaning cloth in order to clean the touch-screen.
• If necessary, use a lint-free cloth dampened with a cleaning solution such as isopropyl alcohol or an isopropyl alcohol and water solution ratio of 50:50. Be sure
to follow the solvent manufacturer's precautions and directions.
USB Port
• The USB Port on the radio allows you to copy songs from a connected USB drive orsupported media device onto your Media Center hard drive. You can also playback
music from your USB device through the USB Port on the radio. The USB Port on
a Media Center 730N (RHR) allows you to support iPod
®devices or USB drives for
music playback, charging, control through radio or steering wheel buttons, voice
commands and song selection by voice.
Navigation – Media Center 730N (Sales Code RER) & (Sales Code RHR) Only
• Navigation radios require digital data from a navigation database. The data in the navigation database is licensed from Navigation Technologies®. Not all roads are
digitized.
• For software updates, visit http://www.navteq.com website, or contact your authorized dealer for the latest available software.
NOTE: Many features of this radio are speed dependent. For your own safety, it is not
possible to use the touch-screen keyboard to enter a name (e.g., street name) while the
vehicle is in motion. Pull over at a safe location to complete your task or use Voice
Command.
• The Navigation system receives GPS signals from satellites to display the positionof your vehicle.
Map • Press the NAV hard-key to access the Navigation Main Menu.
• Touch the MAP soft-key to display a map of your current position.
ELECTRONICS
32
Page 38 of 84
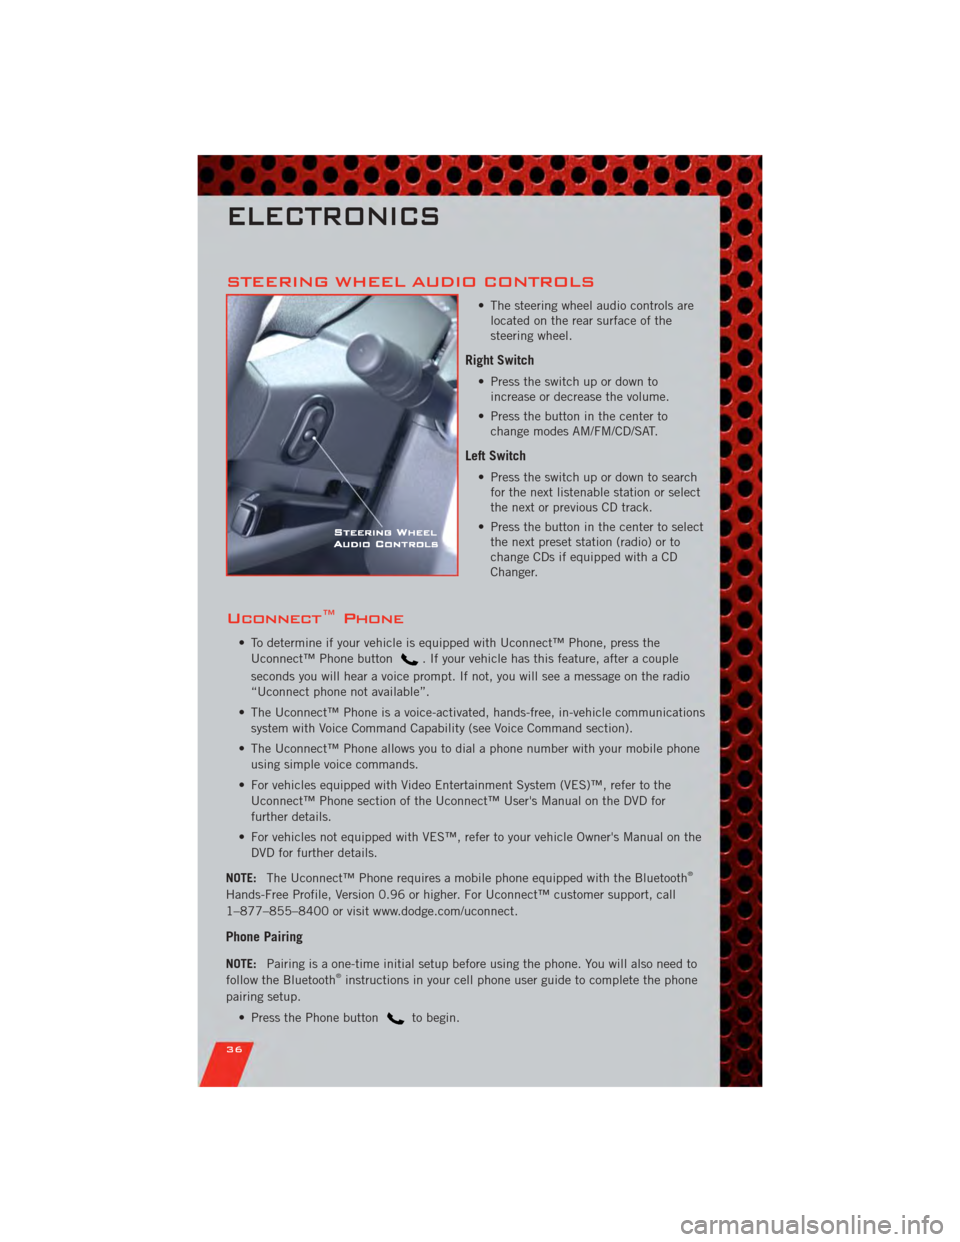
STEERING WHEEL AUDIO CONTROLS
• The steering wheel audio controls arelocated on the rear surface of the
steering wheel.
Right Switch
• Press the switch up or down toincrease or decrease the volume.
• Press the button in the center to change modes AM/FM/CD/SAT.
Left Switch
• Press the switch up or down to searchfor the next listenable station or select
the next or previous CD track.
• Press the button in the center to select the next preset station (radio) or to
change CDs if equipped with a CD
Changer.
Uconnect™ Phone
• To determine if your vehicle is equipped with Uconnect™ Phone, press the
Uconnect™ Phone button
. If your vehicle has this feature, after a couple
seconds you will hear a voice prompt. If not, you will see a message on the radio
“Uconnect phone not available”.
• The Uconnect™ Phone is a voice-activated, hands-free, in-vehicle communications system with Voice Command Capability (see Voice Command section).
• The Uconnect™ Phone allows you to dial a phone number with your mobile phone using simple voice commands.
• For vehicles equipped with Video Entertainment System (VES)™, refer to the Uconnect™ Phone section of the Uconnect™ User's Manual on the DVD for
further details.
• For vehicles not equipped with VES™, refer to your vehicle Owner's Manual on the DVD for further details.
NOTE: The Uconnect™ Phone requires a mobile phone equipped with the Bluetooth
®
Hands-Free Profile, Version 0.96 or higher. For Uconnect™ customer support, call
1–877–855–8400 or visit www.dodge.com/uconnect.
Phone Pairing
NOTE: Pairing is a one-time initial setup before using the phone. You will also need to
follow the Bluetooth®instructions in your cell phone user guide to complete the phone
pairing setup.
• Press the Phone button
to begin.
ELECTRONICS
36
Page 40 of 84
• Use the radio ON/OFF VOLUME rotary knob to adjust the volume to a comfortablelevel while the Uconnect™ system is speaking. Please note the volume setting for
Uconnect™ is different than the audio system.
NOTE: To access the tutorial, press the Uconnect™ hard-key. After the BEEP, say
“tutorial”. Press any hard-key/button or touch the display (Touch-Screen radio) to
cancel the tutorial.
WARNING!
• Any voice commanded system should be used only in safe driving conditions following local laws and phone use. All attention should be kept on the
roadway ahead. Failure to do so may result in a collision causing you and
others to be severely injured or killed.
• In an emergency, to use Uconnect™ Phone, your mobile phone must be: • turned on,
• paired to Uconnect™ Phone,
• and have network coverage.
Uconnect™ VOICE COMMAND
• The Uconnect™ Voice Command system allows you to control your AM, FM radio,satellite radio, disc player, Uconnect™ Phone, a memo recorder, and supported
portable media devices.
• When you press the Voice Command button
located on the radio faceplate
or steering wheel, you will hear a beep. The beep is your signal to give a command.
If you do not say a command within a few seconds, the system will present you
with a list of options. If you ever wish to interrupt the system while it lists options,
press the Voice Command button
, listen for the BEEP, and say your
command.
Voice Command for Text Messaging
• If equipped with Uconnect™ Voice Command, your Media Center 430N radio may be able to play incoming SMS messages through the vehicle sound system.
• It also allows you to respond by selecting from various pre-defined phrases.
• Not all phones are compatible with this feature. Refer to the phone compatibility list at www.dodge.com/uconnect. Connected mobile phones must be
bluetooth-compatible, and paired with your radio.
Changing The Volume
• Start a dialogue by pressing the Voice Command button, then say a
command (for example, “tutorial”).
• Use the radio ON/OFF VOLUME rotary knob to adjust the volume to a comfortable level while the Voice Command system is speaking. The volume setting for Voice
Command is different than the audio system.
ELECTRONICS
38
Page 41 of 84
• For vehicles equipped with Video Entertainment System (VES)™, refer to theUconnect™ Voice Command section of the Uconnect™ User's Manual on the DVD
for further details.
• For vehicles not equipped with VES™, refer to your vehicle Owner's Manual on the DVD for Uconnect™ Voice Command information.
NOTE: To access the tutorial, press the Voice Command button
. After the
BEEP, say “tutorial”. Press any hard-key/button or touch the display (Touch-Screen
radio) to cancel the tutorial.
Bluetooth®Streaming Audio
• If equipped with Uconnect™ Voice Command, your bluetooth-equipped iPod®
devices, cellphones or other media players, may also be able to stream music to
your vehicle's speakers. Your connected device must be bluetooth-compatible, and
paired with your Media Center radio (see Uconnect™ Phone for pairing
instructions). Press the AUX button on the radio faceplate until "BT" is displayed
on the radio screen.
WARNING!
Any voice commanded system should be used only in safe driving conditions
following local laws and phone use. All attention should be kept on the roadway
ahead. Failure to do so may result in a collision causing you and others to be
severely injured or killed.
ELECTRONIC VEHICLE INFORMATION CENTER
(EVIC)
• The EVIC features a driver interactive display that is located in the
instrument cluster. Pressing the
controls on the steering wheel allows
the driver to select vehicle information
and Personal Settings. For additional
information, refer to Programmable
Features in this guide.
• Press and release the MENU button
and the mode displayed will change
between Compass/Temperature, Trip, System Status, and Personal settings.
• Press the SCROLL button
to scroll through sub menus (i.e., Trip Functions,
Avg. Fuel Economy, DTE, Elapsed Time, and Units).
• Press and release the Compass/Temperature button
for instant access to the
Compass/Temperature screens.
ELECTRONICS
39
Page 62 of 84
FREEING A STUCK VEHICLE
• If your vehicle becomes stuck in mud, sand or snow, it can often be moved by arocking motion. Turn your steering wheel right and left to clear the area around the
front wheels. Then shift back and forth between REVERSE and DRIVE. Using
minimal accelerator pedal pressure to maintain the rocking motion, without
spinning the wheels, is most effective.
NOTE: If your vehicle is equipped with Traction Control or Electronic Stability Control
(ESC), turn the system OFF before attempting to “rock” the vehicle.
CAUTION!
• Racing the engine or spinning the wheels may lead to transmission overheating and failure. Allow the engine to idle with the shift lever in
NEUTRAL for at least one minute after every five rocking-motion cycles. This
will minimize overheating and reduce the risk of transmission failure during
prolonged efforts to free a stuck vehicle.
• When “rocking” a stuck vehicle by moving between REVERSE and DRIVE, do not spin the wheels faster than 15 mph (24 km/h), or drivetrain damage may
result.
• Revving the engine or spinning the wheels too fast may lead to transmission overheating and failure. It can also damage the tires. Do not spin the wheels
above 30 mph (48 km/h) while in gear (no transmission shifting occurring).
WARNING!
Fast spinning tires can be dangerous. Forces generated by excessive wheel
speeds may cause damage, or even failure, of the axle and tires. A tire could
explode and injure someone. Do not spin your vehicle's wheels faster than
30 mph (48 km/h) or for longer than 30 seconds continuously without stopping
when you are stuck and do not let anyone near a spinning wheel, no matter
what the speed.
WHAT TO DO IN EMERGENCIES
60
Page 67 of 84
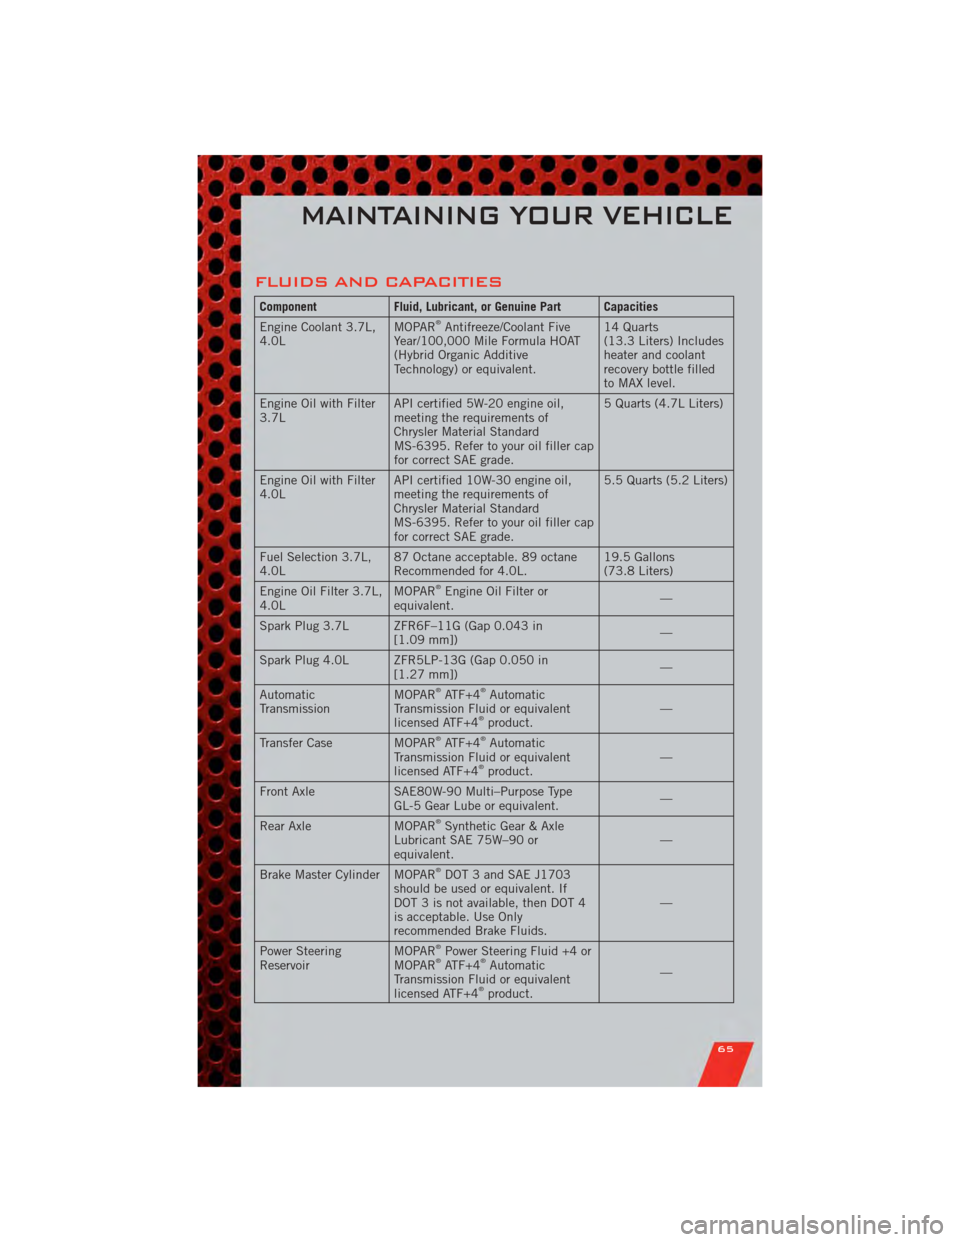
FLUIDS AND CAPACITIES
ComponentFluid, Lubricant, or Genuine Part Capacities
Engine Coolant 3.7L,
4.0L MOPAR®Antifreeze/Coolant Five
Year/100,000 Mile Formula HOAT
(Hybrid Organic Additive
Technology) or equivalent. 14 Quarts
(13.3 Liters) Includes
heater and coolant
recovery bottle filled
to MAX level.
Engine Oil with Filter
3.7L API certified 5W-20 engine oil,
meeting the requirements of
Chrysler Material Standard
MS-6395. Refer to your oil filler cap
for correct SAE grade. 5 Quarts (4.7L Liters)
Engine Oil with Filter
4.0L API certified 10W-30 engine oil,
meeting the requirements of
Chrysler Material Standard
MS-6395. Refer to your oil filler cap
for correct SAE grade. 5.5 Quarts (5.2 Liters)
Fuel Selection 3.7L,
4.0L 87 Octane acceptable. 89 octane
Recommended for 4.0L. 19.5 Gallons
(73.8 Liters)
Engine Oil Filter 3.7L,
4.0L MOPAR
®Engine Oil Filter or
equivalent. —
Spark Plug 3.7L ZFR6F–11G (Gap 0.043 in [1.09 mm]) —
Spark Plug 4.0L ZFR5LP-13G (Gap 0.050 in [1.27 mm]) —
Automatic
Transmission MOPAR
®ATF+4®Automatic
Transmission Fluid or equivalent
licensed ATF+4
®product. —
Transfer Case MOPAR®ATF+4®Automatic
Transmission Fluid or equivalent
licensed ATF+4
®product. —
Front Axle SAE80W-90 Multi–Purpose Type
GL-5 Gear Lube or equivalent. —
Rear Axle MOPAR
®Synthetic Gear & Axle
Lubricant SAE 75W–90 or
equivalent. —
Brake Master Cylinder MOPAR
®DOT 3 and SAE J1703
should be used or equivalent. If
DOT 3 is not available, then DOT 4
is acceptable. Use Only
recommended Brake Fluids. —
Power Steering
Reservoir MOPAR
®Power Steering Fluid +4 or
MOPAR®ATF+4®Automatic
Transmission Fluid or equivalent
licensed ATF+4
®product. —
MAINTAINING YOUR VEHICLE
65
Page 73 of 84
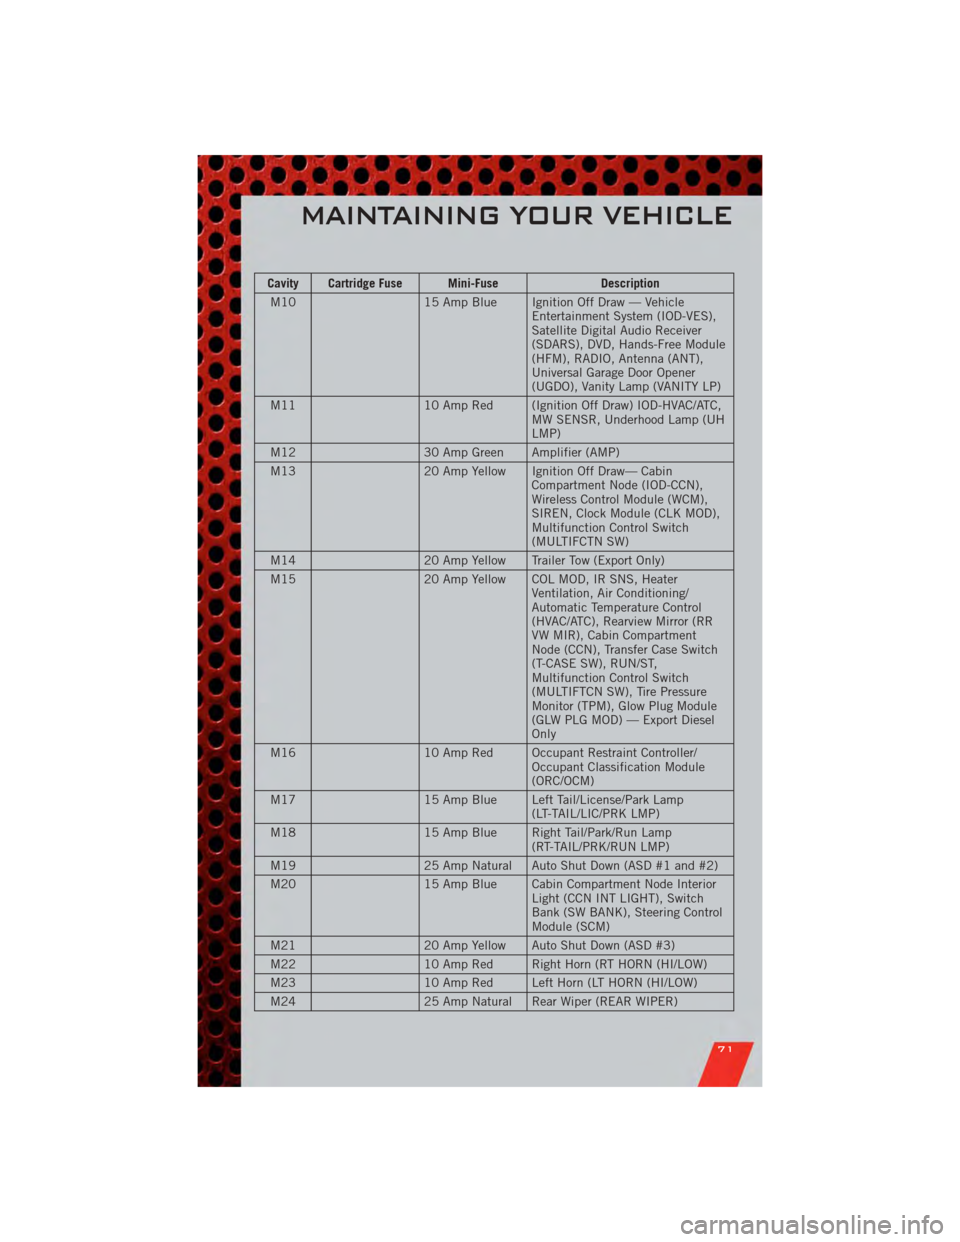
Cavity Cartridge Fuse Mini-FuseDescription
M10 15 Amp Blue Ignition Off Draw — Vehicle
Entertainment System (IOD-VES),
Satellite Digital Audio Receiver
(SDARS), DVD, Hands-Free Module
(HFM), RADIO, Antenna (ANT),
Universal Garage Door Opener
(UGDO), Vanity Lamp (VANITY LP)
M11 10 Amp Red (Ignition Off Draw) IOD-HVAC/ATC,
MW SENSR, Underhood Lamp (UH
LMP)
M12 30 Amp Green Amplifier (AMP)
M13 20 Amp Yellow Ignition Off Draw— Cabin
Compartment Node (IOD-CCN),
Wireless Control Module (WCM),
SIREN, Clock Module (CLK MOD),
Multifunction Control Switch
(MULTIFCTN SW)
M14 20 Amp Yellow Trailer Tow (Export Only)
M15 20 Amp Yellow COL MOD, IR SNS, Heater
Ventilation, Air Conditioning/
Automatic Temperature Control
(HVAC/ATC), Rearview Mirror (RR
VW MIR), Cabin Compartment
Node (CCN), Transfer Case Switch
(T-CASE SW), RUN/ST,
Multifunction Control Switch
(MULTIFTCN SW), Tire Pressure
Monitor (TPM), Glow Plug Module
(GLW PLG MOD) — Export Diesel
Only
M16 10 Amp Red Occupant Restraint Controller/
Occupant Classification Module
(ORC/OCM)
M17 15 Amp Blue Left Tail/License/Park Lamp
(LT-TAIL/LIC/PRK LMP)
M18 15 Amp Blue Right Tail/Park/Run Lamp
(RT-TAIL/PRK/RUN LMP)
M19 25 Amp Natural Auto Shut Down (ASD #1 and #2)
M20 15 Amp Blue Cabin Compartment Node Interior
Light (CCN INT LIGHT), Switch
Bank (SW BANK), Steering Control
Module (SCM)
M21 20 Amp Yellow Auto Shut Down (ASD #3)
M22 10 Amp Red Right Horn (RT HORN (HI/LOW)
M23 10 Amp Red Left Horn (LT HORN (HI/LOW)
M24 25 Amp Natural Rear Wiper (REAR WIPER)
MAINTAINING YOUR VEHICLE
71