flat tire DODGE RAM 2500 DIESEL 2004 3.G User Guide
[x] Cancel search | Manufacturer: DODGE, Model Year: 2004, Model line: RAM 2500 DIESEL, Model: DODGE RAM 2500 DIESEL 2004 3.GPages: 426, PDF Size: 7.22 MB
Page 261 of 426
SNOW TIRES
Snow tires should be of the same size and type construc-
tion as the front tires. Consult the manufacturer of the
snow tire to determine any maximum vehicle speed
requirement associated with the tire. These tires should
always be operated at the vehicle maximum capacity
inflation pressures under any load condition.
While studded tires improve performance on ice, skid
and traction capability on wet or dry surfaces may be
poorer than that of non-studded tires. Some states pro-
hibit studded tires; therefore, local laws should be
checked before using these tire types.
TIRE ROTATION RECOMMENDATIONS
Tires on the front and rear axles of vehicles operate at
different loads and perform different steering, driving,
and braking functions. For these reasons, they wear at
unequal rates, and develop irregular wear patterns.
These effects can be reduced by timely rotation of tires.
The benefits of rotation are especially worthwhile with
aggressive tread designs such as those on On/Off Road
type tires. Rotation will increase tread life, help to main-
tain mud, snow, and wet traction levels, and contribute to
a smooth, quiet ride.
STARTING AND OPERATING 261
5
Page 263 of 426
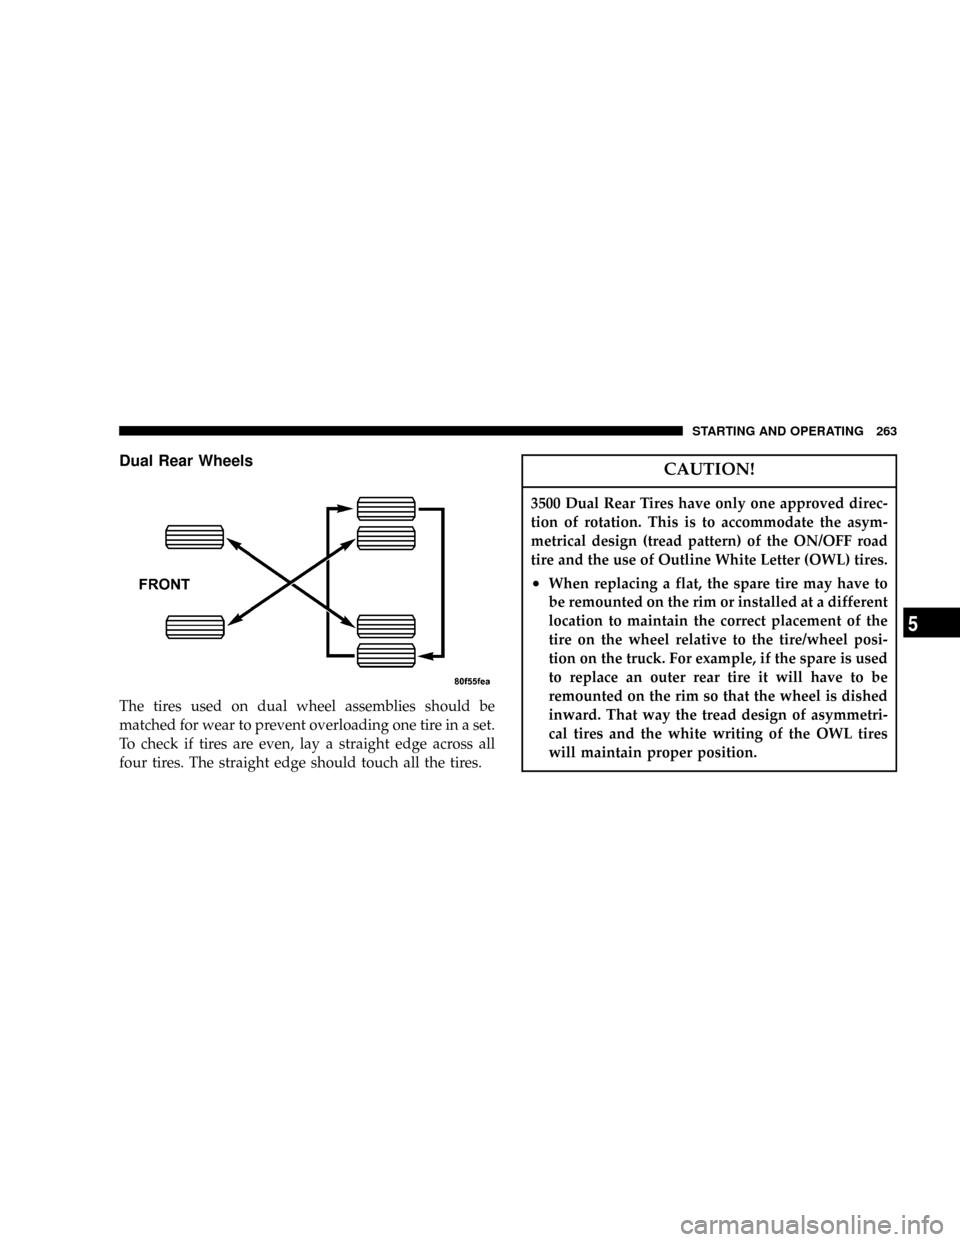
Dual Rear Wheels
The tires used on dual wheel assemblies should be
matched for wear to prevent overloading one tire in a set.
To check if tires are even, lay a straight edge across all
four tires. The straight edge should touch all the tires.
CAUTION!
3500 Dual Rear Tires have only one approved direc-
tion of rotation. This is to accommodate the asym-
metrical design (tread pattern) of the ON/OFF road
tire and the use of Outline White Letter (OWL) tires.
²When replacing a flat, the spare tire may have to
be remounted on the rim or installed at a different
location to maintain the correct placement of the
tire on the wheel relative to the tire/wheel posi-
tion on the truck. For example, if the spare is used
to replace an outer rear tire it will have to be
remounted on the rim so that the wheel is dished
inward. That way the tread design of asymmetri-
cal tires and the white writing of the OWL tires
will maintain proper position.
STARTING AND OPERATING 263
5
Page 270 of 426
Tire Size
This is the minimum allowable tire size for your vehicle.
Replacement tires must be equal to the load capacity of
this tire size.
Rim Size
This is the rim size that is appropriate for the tire size
listed.
Inflation Pressure
This is the cold tire inflation pressure for your vehicle for
all loading conditions up to full GAWR.
Curb Weight
The curb weight of a vehicle is defined as the total weight
of the vehicle with all fluids, including vehicle fuel, at full
capacity conditions, and with no occupants or cargo
loaded into the vehicle. The front and rear curb weight
values are determined by weighing your vehicle on a
commercial scale before any occupants or cargo are
added.
Loading
The actual total weight and the weight of the front and
rear of your vehicle at the ground can best be determined
by weighing it when it is loaded and ready for operation.
The entire vehicle should first be weighed on a commer-
cial scale to insure that the GVWR has not been exceeded.
The weight on the front and rear of the vehicle should
then be determined separately to be sure that the load is
properly distributed over front and rear axle. Weighing
the vehicle may show that the GAWR of either the front
or rear axles has been exceeded but the total load is
within the specified GVWR. If so, weight must be shifted
from front to rear or rear to front as appropriate until the
specified weight limitations are met. Store the heavier
items down low and be sure that the weight is distributed
equally. Stow all loose items securely before driving.
270 STARTING AND OPERATING
Page 294 of 426
3. Replace tires when tread wear indicators first become
visible.
4. Keep tires properly inflated.
5. Maintain sufficient distance between your vehicle and
the car in front to avoid a collision in a sudden stop.ENGINE DATA PLATE
Use the information from the engine data plate when
discussing service or sourcing parts for your engine. The
engine data plate is located on the intake side of the
breather cover.
294 STARTING AND OPERATING
Page 295 of 426
WHAT TO DO IN EMERGENCIES
CONTENTS
mHazard Warning Lights..................296
mAdding Fuel Ð 24±Valve Cummins Turbo
Diesel...............................297
mJack Location..........................298
NAll Models..........................298
mChanging A Flat Tire....................299
NRemoving The Spare Tire................299
NTire Changing Procedure................300
mHoisting.............................309mJump-Starting.........................310
NWith Portable Starting Unit..............313
mFreeing A Stuck Vehicle..................313
mEmergency Tow Hooks Ð If Equipped........314
mTowing A Disabled Vehicle................315
N4-Wheel- Drive Vehicles.................315
N2±Wheel- Drive Vehicles................315
6
Page 299 of 426
WARNING!
The jack is designed to use as a tool for changing
tires only. The jack should not be used to lift the
vehicle for service purposes, unless suitable sup-
ports are placed under the vehicle as a safety mea-
sure. The vehicle should be jacked on a firm level
surface only. Avoid ice or slippery areas.
WARNING!
After using the jack and tools, always reinstall them
in the original carrier and location. While driving
you may experience, abrupt stopping, rapid accelera-
tion, or sharp turns. A loose jack, tools, bracket or
other objects in the vehicle may move around with
force, resulting in serious injury.
CHANGING A FLAT TIRE
Removing The Spare Tire
Remove the spare tire before attempting to jack the truck.
Attach the wheel wrench to the jack extension tube. Insert
the tube through the access hole between the lower
tailgate and the top of the bumper and into the winch
mechanism tube. Rotate the wheel wrench handle coun-
terclockwise until the spare tire is on the ground with
enough cable slack to allow you to pull it out from under
the vehicle. When the spare is clear, tilt the retainer at the
end of the cable and pull it through the center of the
wheel.
WHAT TO DO IN EMERGENCIES 299
6
Page 300 of 426
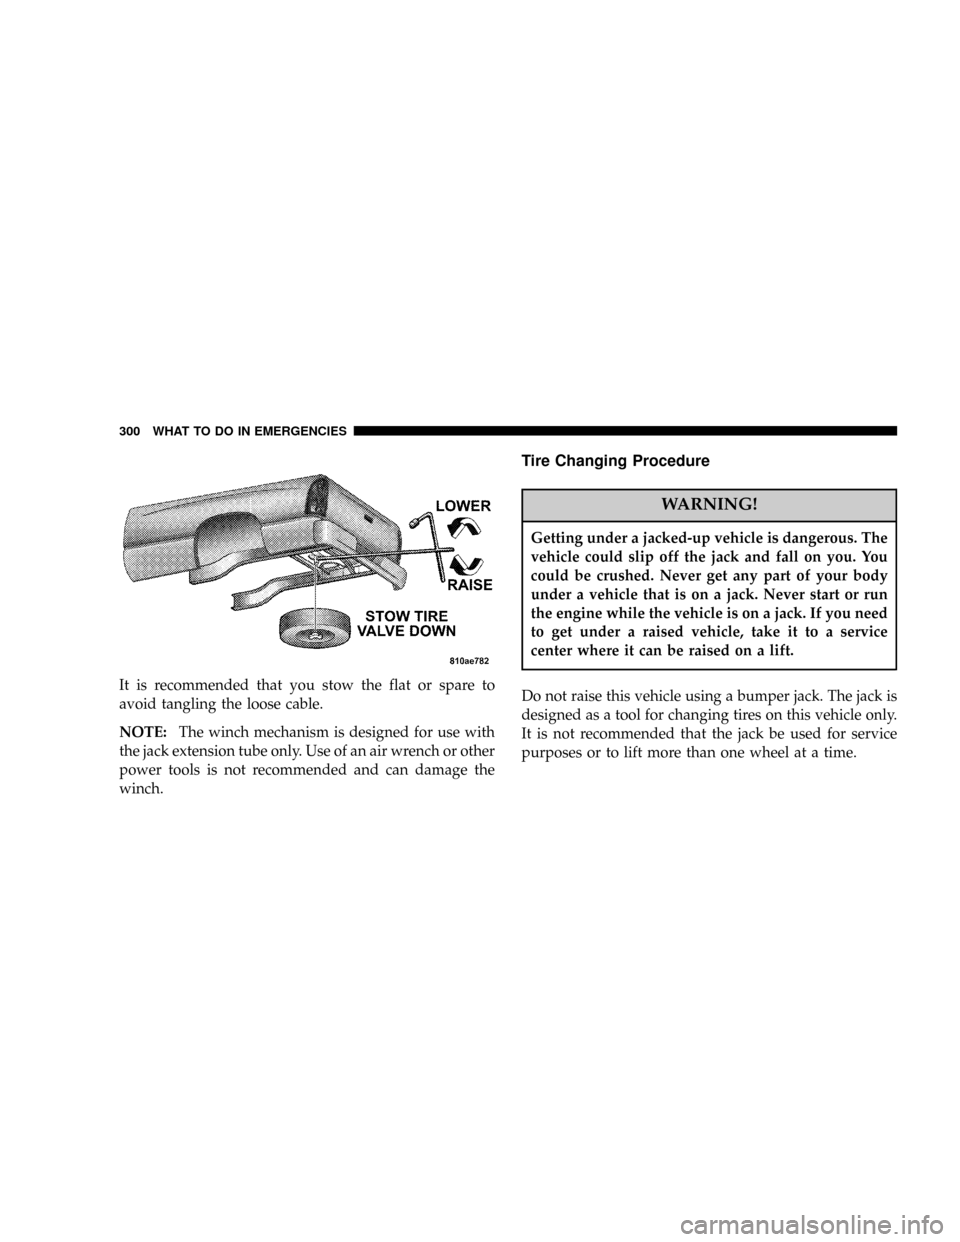
It is recommended that you stow the flat or spare to
avoid tangling the loose cable.
NOTE:The winch mechanism is designed for use with
the jack extension tube only. Use of an air wrench or other
power tools is not recommended and can damage the
winch.
Tire Changing Procedure
WARNING!
Getting under a jacked-up vehicle is dangerous. The
vehicle could slip off the jack and fall on you. You
could be crushed. Never get any part of your body
under a vehicle that is on a jack. Never start or run
the engine while the vehicle is on a jack. If you need
to get under a raised vehicle, take it to a service
center where it can be raised on a lift.
Do not raise this vehicle using a bumper jack. The jack is
designed as a tool for changing tires on this vehicle only.
It is not recommended that the jack be used for service
purposes or to lift more than one wheel at a time.
300 WHAT TO DO IN EMERGENCIES
Page 305 of 426
WARNING!
Raising the vehicle higher than necessary can make
the vehicle unstable and cause an accident. It could
slip off the jack and hurt someone near it. Raise the
vehicle only enough to remove the tire.
5. Remove the wheel nuts and pull the wheel off. Install
the spare wheel and wheel nuts with the cone shaped end
of the nuts toward the wheel on 2500/3500 single rear
wheel (SRW) models. On 3500 dual rear wheel models
(DRW) the lug nuts are a two piece assembly with a flat
face. Lightly tighten the nuts. To avoid risk of forcing the
vehicle off the jack, do not fully tighten the nuts until the
vehicle has been lowered.
6. Using the wheel wrench, finish tightening the nuts
using a crisscross pattern. Correct nut tightness is 135 ft.
lbs. (183 N´m) torque for 2500/3500 single rear wheel(SRW) models and 145 ft. lbs. (197 N´m) for 3500 dual rear
wheel models. If in doubt about the correct tightness,
have them checked with a torque wrench by your dealer
or at a service station.
WARNING!
A loose tire or jack thrown forward in a collision or
hard stop could injure someone in the vehicle.
Always stow the jack parts and the extra tire and
wheel in the places provided.
7. Install wheel center cap and remove wheel blocks. Do
not install chrome or aluminum wheel center caps on the
spare wheel. This may result in cap damage.
8. Lower the jack to its fully closed position. If the jack
will not lower by turning the dial (thumb wheel) by
WHAT TO DO IN EMERGENCIES 305
6
Page 306 of 426

hand, it may be necessary to use the jack drive tube in
order to lower the jack. Stow the replaced tire, jack, and
tools as previously described.
9. Adjust the tire pressure when possible.
NOTE:Do not oil wheel studs. For chrome wheels, do
not substitute with chrome plated wheel nuts.
Hub Caps
The hub caps must be removed before raising the vehicle
off the ground.
For 2500/3500 single rear wheel (SRW) models, use the
blade on the end of the lug wrench to pry the cap off.
On 3500 models with dual rear wheels (DRW), you must
first remove the hub caps. The jack handle driver has a
hook at one end that will fit in the pry off notch of the
rear hub caps. Position the hook and pull out on the
ratchet firmly. The cap should pop off. The wheel skins
can now be removed. For the front hub cap on 3500models use the blade on the end of the lug wrench to pry
the caps off. The wheel skin can now be removed.
You must use the flat end of the lug wrench to pry off the
wheel skins. Insert the flat tip completely and using a
back and forth motion, loosen the wheel skin. Repeat this
procedure around the tire until the skin pops off.
Replace the wheel skins first using a rubber mallet. When
replacing the hub caps, tilt the cap retainer over the
lugnut bolt circle and strike the high side down with a
rubber mallet. Be sure that the hub caps and wheel skins
are firmly seated around the wheel.
8-Stud Ð Dual Rear Wheels
Dual wheels are flat mounted, center piloted. The lug
nuts are a two piece assembly. When the tires are being
rotated or replaced, clean these lug nuts and add 2 drops
of oil at the interface between the hex and the washer.
306 WHAT TO DO IN EMERGENCIES
Page 309 of 426
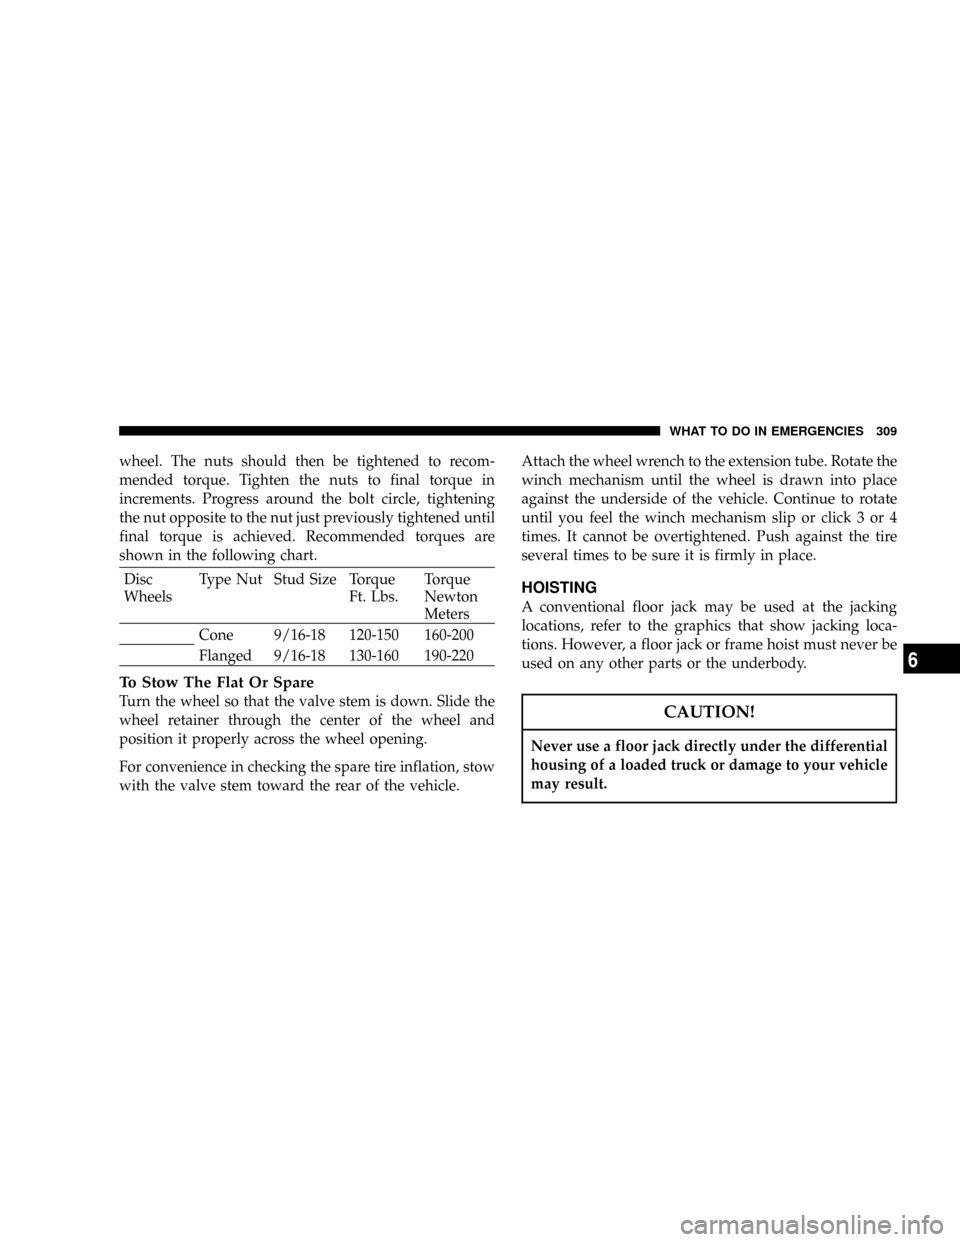
wheel. The nuts should then be tightened to recom-
mended torque. Tighten the nuts to final torque in
increments. Progress around the bolt circle, tightening
the nut opposite to the nut just previously tightened until
final torque is achieved. Recommended torques are
shown in the following chart.
Disc
WheelsType Nut Stud Size Torque
Ft. Lbs.Torque
Newton
Meters
Cone 9/16-18 120-150 160-200
Flanged 9/16-18 130-160 190-220
To Stow The Flat Or Spare
Turn the wheel so that the valve stem is down. Slide the
wheel retainer through the center of the wheel and
position it properly across the wheel opening.
For convenience in checking the spare tire inflation, stow
with the valve stem toward the rear of the vehicle.Attach the wheel wrench to the extension tube. Rotate the
winch mechanism until the wheel is drawn into place
against the underside of the vehicle. Continue to rotate
until you feel the winch mechanism slip or click 3 or 4
times. It cannot be overtightened. Push against the tire
several times to be sure it is firmly in place.
HOISTING
A conventional floor jack may be used at the jacking
locations, refer to the graphics that show jacking loca-
tions. However, a floor jack or frame hoist must never be
used on any other parts or the underbody.
CAUTION!
Never use a floor jack directly under the differential
housing of a loaded truck or damage to your vehicle
may result.
WHAT TO DO IN EMERGENCIES 309
6