check oil DODGE RAM 2500 POWER WAGON 2008 3.G Owners Manual
[x] Cancel search | Manufacturer: DODGE, Model Year: 2008, Model line: RAM 2500 POWER WAGON, Model: DODGE RAM 2500 POWER WAGON 2008 3.GPages: 504, PDF Size: 8.17 MB
Page 74 of 504

²Make sure that the child is upright in the seat.
²The lap portion should be low on the hips and as snug
as possible.
²Check belt fit periodically. A child's squirming or
slouching can move the belt out of position.
If the shoulder belt contacts the face or neck, move the
child closer to the center of the vehicle. Never allow a
child to put the shoulder belt under an arm or behind
their back.
Transporting Pets
Airbags deploying in the front seat could harm your pet.
An unrestrained pet will be thrown about and possibly
injured, or injure a passenger during panic braking or in
a collision. Pets should be restrained in the rear seat in
pet harnesses or pet carriers that are secured by seat belts.
ENGINE BREAK-IN RECOMMENDATIONS
A long break-in period is not required for the engine in
your new vehicle. Drive moderately during the first 300
miles (500 km). After the initial 60 miles (100 km), speeds
up to 50 or 55 mph (80 or 90 km/h) are desirable. While
cruising, brief full-throttle acceleration, within the limits
of local traffic laws, contributes to a good break-in.
Avoid wide open throttle acceleration in low gear.
The engine oil installed in the engine at the factory is a
high quality, energy conserving type lubricant. Oil
changes should be consistent with the anticipated cli-
matic conditions under which vehicle operation will
occur. The recommended viscosity and quality grades are
discussed in Section 7 under Maintenance Procedures,
Engine Oil.
NON-DETERGENT OR STRAIGHT MINERAL OILS
MUST NEVER BE USED.
74 THINGS TO KNOW BEFORE STARTING YOUR VEHICLE
Page 78 of 504

Safety Checks You Should Make Outside The
Vehicle
Tires
Examine tires for tread wear or uneven wear patterns.
Check for stones, nails, glass or other objects lodged in
the tread.
Inspect for tread cuts or sidewall cracks. Check wheel
nuts for tightness and tires for proper pressure.
Lights
Check the operation of all exterior lights. Check turn
signal and high beam indicator lights on the instrument
panel.
Door Latches
Check for positive closing, latching and locking.
Fluid Leaks
Check area under vehicle after overnight parking for fuel,
water, oil, or other fluid leaks. Also, if fuel fumes are
detected the cause should be located and corrected.
78 THINGS TO KNOW BEFORE STARTING YOUR VEHICLE
Page 179 of 504

INSTRUMENT CLUSTER DESCRIPTION
1. Check Gages
This light illuminates when the Voltmeter, Engine
Oil Pressure or Engine Coolant Temperature
gages indicate a reading either too high or too low.
Examine the gages carefully, and follow the instructions
above for each indicated problem.
NOTE:When the ignition switch is turned to OFF, the
Fuel Gage, Voltmeter, Oil Pressure and Engine Coolant
Temperature gages may not show accurate readings.
When the engine is not running, turn the ignition switch
to ON to obtain accurate readings.
2. Voltage Gauge
When the engine is running, the gauge indicates
the electrical system voltage. The pointer should
stay within the normal range if the battery ischarged. If the pointer moves to either extreme left or
right and remains there during normal driving, the
electrical system should be serviced.
NOTE:If the gauge pointer moves to either extreme of
the gauge, the ªCheck Gagesº indicator will illuminate
and a single chime will sound. The ªCheck Gagesº
indicator may also illuminate prior to the voltage gauge
moving out of normal range. In either case, see you local
authorized Dealer for system service.
3. Turn Signal Indicators
Lights in instrument cluster flash when outside turn
signals are operating.
4. Tachometer
The tachometer indicates engine speed in revolutions per
minute.
UNDERSTANDING YOUR INSTRUMENT PANEL 179
4
Page 180 of 504

CAUTION!
Do not operate the engine with the tachometer
pointer at high rpm for extended periods. Engine
damage may occur.
5. Airbag Indicator Light
The indicator lights and remains lit for 6 to 8 seconds
when the ignition is first turned on. If the light stays on,
flickers or comes on while driving, have the airbag
system checked by an authorized dealer.
6. High Beam Indicator
This indicator shows that headlights are on high
beam.
7. Seat Belt Reminder Light
When the ignition switch is first turned ON, this
light will turn on for 5 to 8 seconds as a bulb check.During the bulb check, if the driver's seat belt is unbuck-
led, a chime will sound. After the bulb check or when
driving, if the driver seat belt remains unbuckled, the
Seat Belt Warning Light will flash or remain on continu-
ously. Refer to9Enhanced Driver Seat Belt Reminder
System (BeltAlertŸ)9in the Occupant Restraints section
for more information.
8. Speedometer
The speedometer shows the vehicle speed in miles per
hour and/or kilometers per hour.
9. Oil Pressure Gauge
The pointer should always indicate some oil pres-
sure when the engine is running. A continuous
high or low reading, under normal driving conditions,
may indicate a lubrication system malfunction. Immedi-
ate service should be obtained.(See page 413 for more
information.)
180 UNDERSTANDING YOUR INSTRUMENT PANEL
Page 184 of 504

cluster. To reset the oil change indicator system (after
performing the scheduled maintenance) refer to the fol-
lowing procedure.
1. Turn the ignition switch to the ON position(Do not
start the engine).
2. Fully depress the accelerator pedal slowly three
times within 10 seconds.
3. Turn the ignition switch to the OFF/LOCK position.
NOTE:If the indicator message illuminates when you
start the vehicle, the oil change indicator system did not
reset. If necessary repeat this procedure.
17. Front Fog Light Indicator Ð If Equipped
This light shows when the front fog lights are ON.18. Check Gages Light
This light is part of an onboard diagnostic system
which monitors the emissions and engine control
system. If the vehicle is ready for emissions
testing the light will come on when the ignition is first
turned on and remain on, as a bulb check, until the
engine is started. If the vehicle is not ready for emissions
testing the light will come on when the ignition is first
turned on and remain on for 15 seconds, then blink for 5
seconds, and remain on until the vehicle is started. If the
bulb does not come on during starting, have the condi-
tion investigated promptly.
If this light comes on and remains on while driving, it
suggests a potential engine control problem and the need
for system service.
Although your vehicle will usually be drivable and not
need towing, see your dealer for service as soon as
possible.
184 UNDERSTANDING YOUR INSTRUMENT PANEL
Page 405 of 504

MAINTAINING YOUR VEHICLE
CONTENTS
mEngine CompartmentÐ 5.7L Gas Engine......408
mOnboard Diagnostic System (OBD II).........409
NLoose Fuel Filler Cap Message............409
mEmissions Inspection And Maintenance
Programs............................410
mReplacement Parts......................411
mDealer Service.........................412
mMaintenance Procedures..................412
NEngine Oil..........................413NEngine Oil Filter......................415
NDrive Belts Ð Check Condition And Tension . . 416
NSpark Plugs (Gas Engines)...............416
NEngine Air Cleaner Filter................416
NEngine Fuel Filter.....................417
NCatalytic Converter....................417
NEmission-Related Components............419
NMaintenance Free Battery................419
NAir Conditioner Maintenance.............420
7
Page 413 of 504

These items should be inspected if a malfunction is
observed or suspected.
Engine Oil
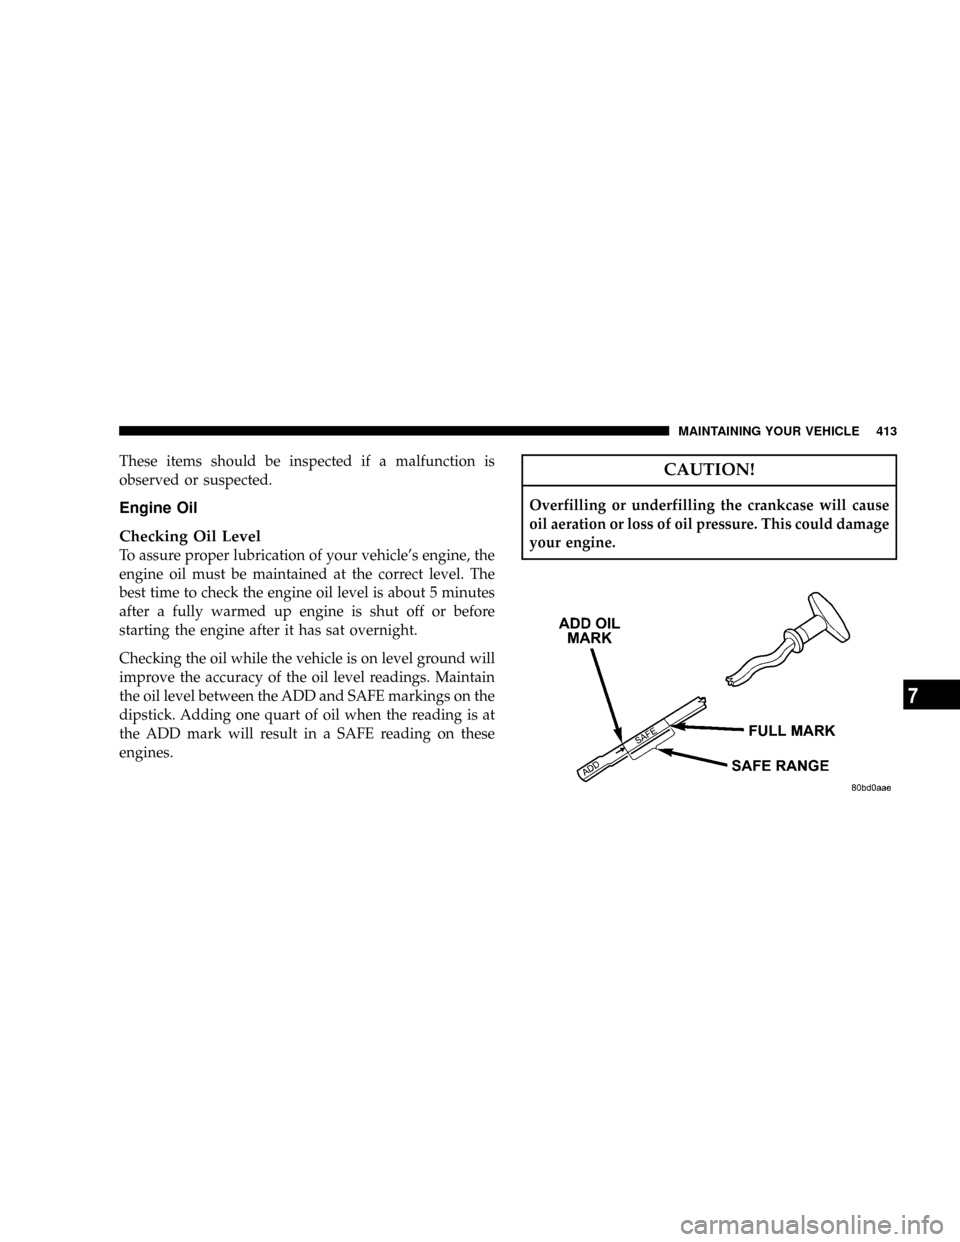
Checking Oil Level
To assure proper lubrication of your vehicle's engine, the
engine oil must be maintained at the correct level. The
best time to check the engine oil level is about 5 minutes
after a fully warmed up engine is shut off or before
starting the engine after it has sat overnight.
Checking the oil while the vehicle is on level ground will
improve the accuracy of the oil level readings. Maintain
the oil level between the ADD and SAFE markings on the
dipstick. Adding one quart of oil when the reading is at
the ADD mark will result in a SAFE reading on these
engines.
CAUTION!
Overfilling or underfilling the crankcase will cause
oil aeration or loss of oil pressure. This could damage
your engine.
MAINTAINING YOUR VEHICLE 413
7
Page 421 of 504

include cleaning of the condenser fins and a performance
test. Drive belt tension should also be checked at this
time.
WARNING!
²Use only refrigerants and compressor lubricants
approved by the manufacturer for your air condi-
tioning system. Some unapproved refrigerants are
flammable and can explode, injuring you. Other
unapproved refrigerants or lubricants can cause
the system to fail, requiring costly repairs.
²The air conditioning system contains refrigerant
under high pressure. To avoid risk of personal
injury or damage to the system, adding refrigerant
or any repair requiring lines to be disconnected
should be done by an experienced repairman.
Refrigerant Recovery and Recycling
R-134a Air Conditioning Refrigerant is a hydrofluorocar-
bon (HFC) that is endorsed by the Environmental Pro-
tection Agency and is an ozone-saving product. How-
ever, the manufacturer recommends that air conditioning
service be performed by dealers or other service facilities
using recovery and recycling equipment.
NOTE:Use only manufacturer approved A/C System
Sealers, Stop Leak Products, Seal Conditioners, Compres-
sor Oil, or Refrigerants.
Power Steering Ð Fluid Check
Checking the power steering fluid level at a defined
service interval is not required. The fluid should only be
checked if a leak is suspected, abnormal noises are
apparent, and/or the system is not functioning as antici-
pated. Coordinate inspection efforts through a certified
DaimlerChrysler Dealership.9
MAINTAINING YOUR VEHICLE 421
7
Page 424 of 504

Body Lubrication
Locks and all body pivot points, including such items as
seat tracks, doors, tailgate and hood hinges, should be
lubricated periodically to assure quiet, easy operation
and to protect against rust and wear. Prior to the appli-
cation of any lubricant, the parts concerned should be
wiped clean to remove dust and grit; after lubricating
excess oil and grease should be removed. Particular
attention should also be given to hood latching compo-
nents to insure proper function. When performing other
underhood services, the hood latch, release mechanism
and safety catch should be cleaned and lubricated.
The external lock cylinders should be lubricated twice a
year, preferably in the fall and spring. Apply a small
amount of a high quality lubricant such as MopartLock
Cylinder Lubricant directly into the lock cylinder.
Windshield Wiper Blades
The rubber edges of the wiper blades and the windshield
should be cleaned periodically with a sponge or soft cloth
and a mild nonabrasive cleaner. This will remove accu-
mulations of salt or road film.
Operation of the wipers on dry glass for long periods
may cause deterioration of the wiper blades. Always use
washer fluid when using the wipers to remove salt or dirt
from a dry windshield.
Avoid using the wiper blades to remove frost or ice from
the windshield. Keep the blade rubber out of contact with
petroleum products such as engine oil, gasoline, etc.
Windshield Washers
The fluid reservoir is located under the hood and should
be checked for fluid level at regular intervals. Fill the
reservoir with windshield washer solvent only (not ra-
diator antifreeze).
424 MAINTAINING YOUR VEHICLE
Page 432 of 504

Inspect all hose connections such as clamps and cou-
plings to make sure they are secure and no leaks are
present.
Components should be replaced immediately if there is
any evidence of wear or damage that could cause failure.
Brake System
Power Disc Brakes (front and rear)
Disc brakes do not require adjustment; however, several
hard stops during the break-in period are recommended
to seat the linings and wear off any foreign material.
Brake Master Cylinder
The fluid level of the master cylinder should be checked
when performing under the hood service, or immedi-
ately if the brake system warning lamp indicates system
failure.
The brake master cylinder has a translucent plastic
reservoir. On the outboard side of the reservoir, there is aªMAXº dot and an ªMINº dot. The fluid level must be
kept within these two dots. Do not add fluid above the
MAX mark, because leakage may occur at the cap.
With disc brakes the fluid level can be expected to fall as
the brake linings wear. However, an unexpected drop in
fluid level may be caused by a leak and a system check
should be conducted.
Refer to Fluids, Lubricants and Genuine Parts for the
correct Fluid type.
WARNING!
Use of a brake fluid that may have a lower initial
boiling point, or is unidentified as to specification,
may result in sudden brake failure during hard
prolonged braking. You could have an accident.
432 MAINTAINING YOUR VEHICLE