checking oil DODGE RAM 3500 DIESEL 2008 3.G Owners Manual
[x] Cancel search | Manufacturer: DODGE, Model Year: 2008, Model line: RAM 3500 DIESEL, Model: DODGE RAM 3500 DIESEL 2008 3.GPages: 527, PDF Size: 8.88 MB
Page 415 of 527
Engine Oil
Checking Oil Level
To assure proper lubrication of your vehicle's engine, the
engine oil must be maintained at the correct level. Check
the oil level at regular intervals. The best time to check
the oil level is before starting the engine after it has been
parked overnight. When checking oil after operating the
engine, first ensure the engine is at full operating tem-
perature, then wait at least 30 minutes after engine
shutdown to check the oil.
Checking the vehicle while it's on level ground will also
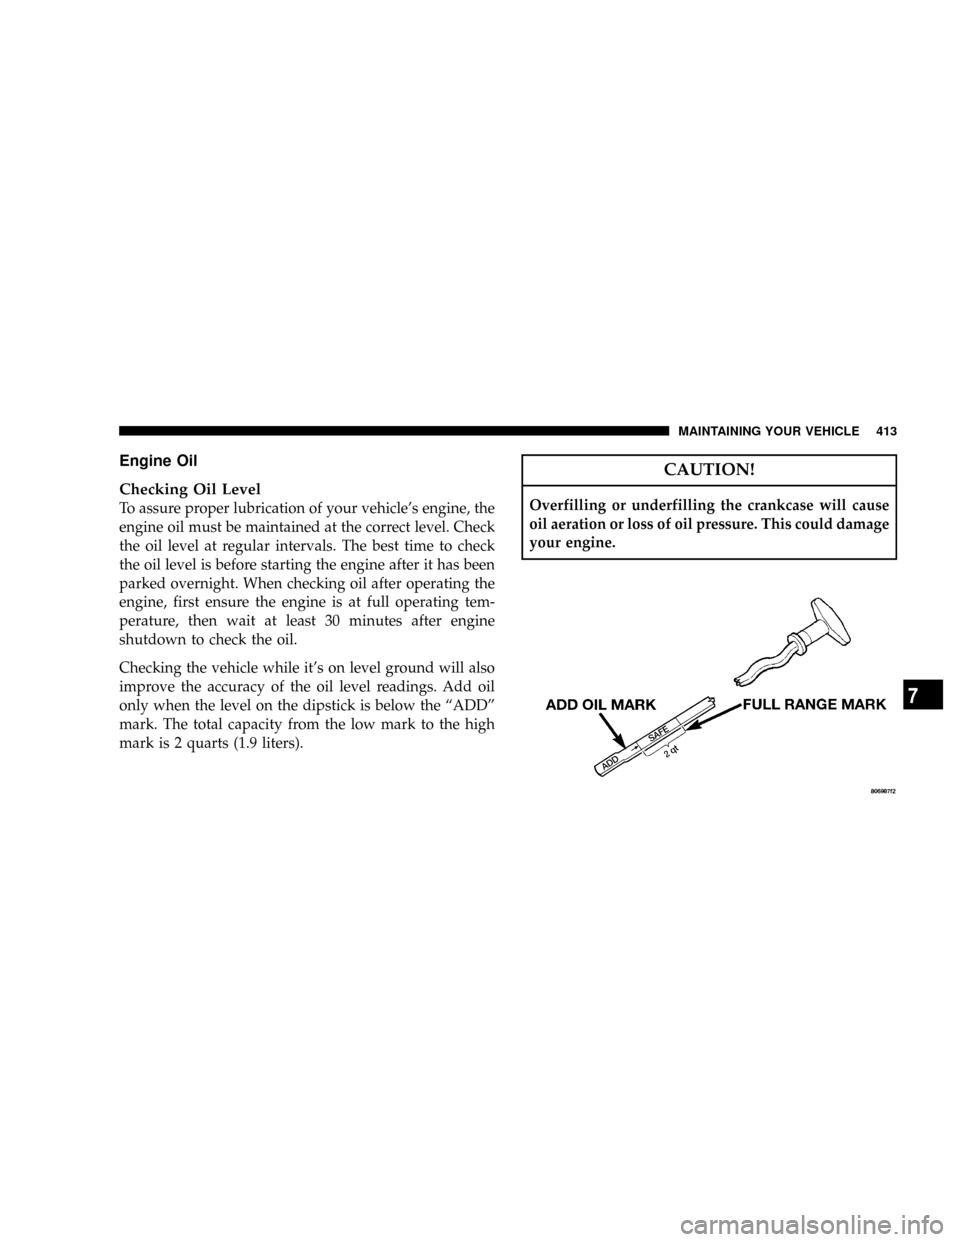
improve the accuracy of the oil level readings. Add oil
only when the level on the dipstick is below the ªADDº
mark. The total capacity from the low mark to the high
mark is 2 quarts (1.9 liters).
CAUTION!
Overfilling or underfilling the crankcase will cause
oil aeration or loss of oil pressure. This could damage
your engine.
MAINTAINING YOUR VEHICLE 413
7
Page 433 of 527
NOTE:Use only manufacturer approved A/C System
Sealers, Stop Leak Products, Seal Conditioners, Compres-
sor Oil, or Refrigerants.
Refrigerant Recovery and Recycling
R-134a Air Conditioning Refrigerant is a hydrofluorocar-
bon (HFC) that is endorsed by the Environmental Pro-
tection Agency and is an ozone-saving product. How-
ever, the manufacturer recommends that air conditioning
service be performed by dealers or other service facilities
using recovery and recycling equipment.
Power Steering Ð Fluid Check
Checking the power steering fluid level at a defined
service interval is not required. The fluid should only be
checked if a leak is suspected, abnormal noises are
apparent, and/or the system is not functioning as antici-
pated. Coordinate inspection efforts through a certified
DaimlerChrysler Dealership.
WARNING!
Fluid level should be checked on a level surface and
with the engine off to prevent injury from moving
parts and to ensure accurate fluid level reading. Do
not overfill. Use only manufacturer recommended
power steering fluid.
If necessary, add fluid to restore to the proper indicated
level. With a clean cloth, wipe any spilled fluid from all
surfaces. Refer to Fluids, Lubricants, and Genuine Parts
for correct fluid type.
Front Suspension Ball Joints
The ball joints originally supplied with the vehicle are
permanently lubricated at the factory and do not require
service. The ball joints and seals should be inspected
whenever the vehicle is serviced for other reasons.
MAINTAINING YOUR VEHICLE 431
7
Page 448 of 527
Rear Axle And 4x4 Front Driving Axle Fluid Level
For Model 9.25 Front Axles and 10.5º/11.5º Rear Axles
refer to Fluids, Lubricants and Genuine Parts for the
correct lubricant type. For normal service, periodic fluid
level checks are not required. When the vehicle is ser-
viced for other reasons, the exterior surfaces of the axle
assembly should be inspected.
When checking the fluid level, the vehicle should be in a
level position. The fluid level should be 1/4º 1/4º (6.4
mm 6.4 mm) below the fill hole on the 9.25º Front Axle.
The fluid level should be 3/4º 1/4º (19 mm 6.4 mm)
below the fill hole on all 10.5º and 1/4º 1/4º (6.4 mm
6.4 mm) on 11.5º Rear Axles.
Drain And Refill
Follow the Maintenance Schedule for recommended fron
and rear axle fluid change intervals.
Lubricant Selection
Refer to Fluids, Lubricants and Genuine Parts for the
correct lubricant type.
NOTE:The presence of water in the gear lubricant will
result in corrosion and possible failure of differential
components. Operation of the vehicle in water, as may be
encountered in some off-highway types of service, will
require draining and refilling the axle to avoid damage.
Limited-Slip Differentialsin vehicles equipped with
10.5º/11.5º AxlesDO NOT REQUIREany limited slip
oil additive (friction modifiers).
Transfer Case Ð If Equipped
Fluid Level Check
This fluid level can be checked by removing the filler
plug. The fluid level should be to the bottom edge of the
filler plug hole with the vehicle in a level position.
446 MAINTAINING YOUR VEHICLE
Page 451 of 527
5. Remove the dipstick, wipe it clean and reinsert it until
seated.
6. Remove the dipstick again and note the fluid level on
both sides. The fluid level should be between the ªHOTº
(upper) reference holes on the dipstick at normal operat-
ing temperature. Verify that a solid coating of oil is seen
on both sides of the dipstick. If the fluid is low, add as
required into the dipstick tube.Do not overfill.After
adding any quantity of oil through the oil fill tube, wait
a minimum of two minutes for the oil to fully drain into
the transmission before rechecking the fluid level.
NOTE:If it is necessary to check the transmissionbelow
the operating temperature, the fluid level should be
between the two ªCOLDº (lower) holes on the dipstick
with the fluid at approximately 70ÉF (21ÉC) (room tem-
perature). If the fluid level is correctly established at
room temperature, it should be between the ªHOTº(upper) reference holes when the transmission reaches
180ÉF (82ÉC). Remember it is best to check the level at the
normal operating temperature.
CAUTION!
Be aware that if the fluid temperature is below 50ÉF
(10ÉC) it may not register on the dipstick. Do not add
fluid until the temperature is elevated enough to
produce an accurate reading.
7. Check for leaks. Release parking brake.
To prevent dirt and water from entering the transmission
after checking or replenishing fluid, make certain that the
dipstick cap is properly reseated. It is normal for the
dipstick cap to spring back slightly from its fully seated
position, as long as its seal remains engaged in the
dipstick tube.
MAINTAINING YOUR VEHICLE 449
7
Page 486 of 527
EMISSION CONTROL SYSTEM MAINTENANCE
The Scheduled maintenance services, listed inbold type
in this section (Section 8) must be done at the times or
mileages specified to assure the continued proper func-
tioning of the emission control system. These, and all
other maintenance services included in this manual,
should be done to provide best vehicle performance and
reliability. More frequent maintenance may be needed for
vehicles in severe operating conditions, such as dusty
areas and very short trip driving.
Inspection and service also should be done anytime a
malfunction is suspected.
NOTE:Maintenance, replacement, or repair of the emis-
sion control devices and systems on your vehicle may be
performed by any automotive repair establishment or
individual using any automotive part which has been
certified pursuant to U.S. EPA or, in the State of Califor-
nia, California Air Resources Board regulations.
MAINTENANCE SCHEDULES Ð 6.7L TURBO
DIESEL
CAUTION!
Failure to perform the required maintenance items
may result in damage to the vehicle.
At Each Stop for Fuel
²Check the engine oil level about 30 minutes after a
fully warmed engine is shut off. Checking the oil level
while the vehicle is on level ground will improve the
accuracy of the oil level reading. Add oil only when
the level is at or below the ADD or MIN mark.
²Check the windshield washer solvent and add if
required. When refilling the washer fluid reservoir,
484 MAINTENANCE SCHEDULES
8
M
A
I
N
T
E
N
A
N
C
E
S
C
H
E
D
U
L
E
S