automatic DODGE RAM 5500 CHASSIS CAB 2008 3.G Repair Manual
[x] Cancel search | Manufacturer: DODGE, Model Year: 2008, Model line: RAM 5500 CHASSIS CAB, Model: DODGE RAM 5500 CHASSIS CAB 2008 3.GPages: 528, PDF Size: 7.84 MB
Page 282 of 528

ª2º Second
Use this position for driving on more severe conditions
and lower speeds than ª3º third. To prevent excessive
engine speed do not exceed 25 mph (40 km/h) in this
range.
ª1º First
Use this position for driving up very steep hills and for
engine braking at low speeds 12 mph (19 km/h) or less
when going downhill. To prevent excessive engine speed,
do not exceed 12 mph (19 km/h) in this range.
NOTE:Use caution when operating a heavily loaded
vehicle in ª2º Second or ª1º First gear selections in high
ambients as torque converter slip can impose significant
additional heat load on the cooling system.
Overdrive Operation
The overdrive automatic transmission contains an elec-
tronically controlled 5th and 6th (if equipped) speed(Overdrive). The transmission will automatically shift
from Drive to Overdrive if the following conditions are
present:
²the transmission selector is in Drive;
²the engine coolant has reached normal operating tem-
perature;
²vehicle speed is above approximately 38 mph (61
km/h) for 5th gear and 55 mph (89 km/h) for 6th gear;
²the ªTOW HAUL O/D OFFº switch has not been
activated;
²transmission has reached normal operating tempera-
ture.
NOTE:If the vehicle is started in extremely cold tem-
peratures, the transmission shift schedule initially re-
stricts transmission operation in forward gear ranges to
3rd gear until the transmission fluid temperature rises to
282 STARTING AND OPERATING
Page 283 of 528
a suitable level. During this condition, the ability of the
vehicle to accelerate under heavily loaded conditions
may be reduced. Refer also to the Note under torque
converter clutch, later in this section.
If the transmission temperature gets extremely hot, the
transmission will automatically select the most desirable
gear for operation at this temperature. If the transmission
temperature becomes hot enough the TRANS TEMP light
may illuminate and the transmission may downshift out
of Overdrive until the transmission cools down. After
cooldown, the transmission will resume normal opera-
tion.
The transmission will downshift from Overdrive to Drive
if the accelerator pedal is fully depressed at vehicle
speeds above approximately 37 mph (60 km/h) for 6th to
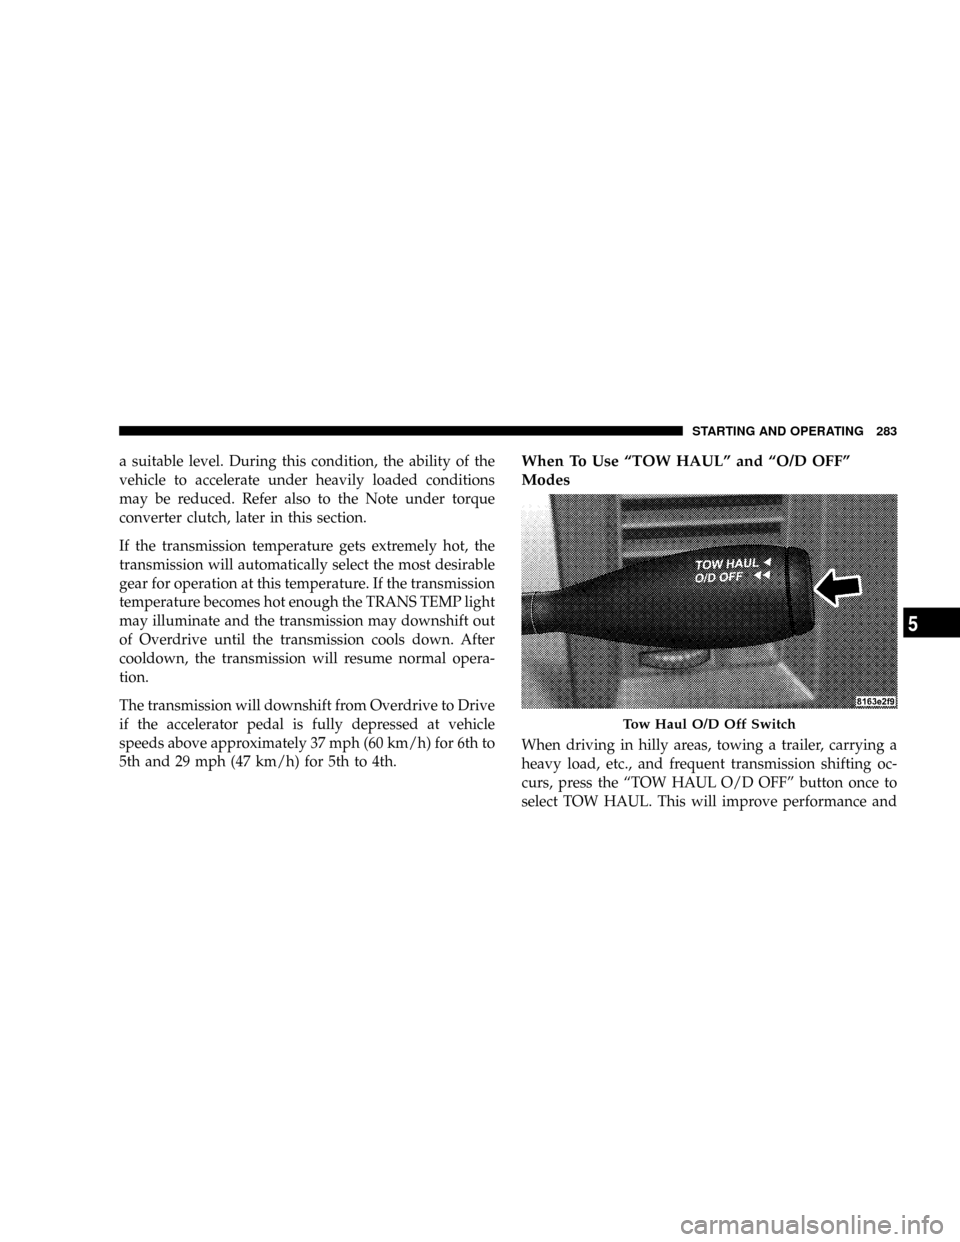
5th and 29 mph (47 km/h) for 5th to 4th.When To Use ªTOW HAULº and ªO/D OFFº
Modes
When driving in hilly areas, towing a trailer, carrying a
heavy load, etc., and frequent transmission shifting oc-
curs, press the ªTOW HAUL O/D OFFº button once to
select TOW HAUL. This will improve performance and
Tow Haul O/D Off Switch
STARTING AND OPERATING 283
5
Page 285 of 528
Torque Converter Clutch
A feature, designed to improve fuel economy, has been
included in the automatic transmission on your vehicle.
A clutch within the torque converter engages automati-
cally at calibrated speeds. This may result in a slightly
different feeling or response during normal operation in
high gear. When the vehicle speed drops or during
acceleration when the transmission downshifts to 1st
gear, the clutch automatically disengages.
NOTE:The torque converter clutch will not engage
until the transmission fluid and engine coolant are warm
[usually after 1-3 miles (1.6 - 4.8 km) of driving]. Because
the engine speed is higher when the torque converter
clutch is not engaged, it may seem as if the transmission
is not shifting into Overdrive when cold. This is normal.
Pressing the ªTOW/HAULº button, when the transmis-
sion is sufficiently warm, will demonstrate that the
transmission is able to shift into and out of overdrive.NOTE:If the vehicle has not been driven in several
days, the first few seconds of operation after shifting the
transmission into gear may seem sluggish. This is due to
the fluid partially draining from the torque converter into
the transmission. This condition is normal and will not
cause damage to the transmission. The torque converter
will refill within five seconds of shifting from Park into
any other gear position.
MANUAL TRANSMISSION
WARNING!
You or others could be injured if you leave the
vehicle unattended without having the parking
brake fully applied. The parking brake should al-
ways be applied when the driver is not in the vehicle,
especially on an incline.
STARTING AND OPERATING 285
5
Page 292 of 528

4L
4-Wheel-Drive Low Range - Low speed 4-wheel-drive.
Locks the front and rear driveshafts together. Forces the
front and rear wheels to rotate at the same speed.
Additional traction and maximum pulling power for
loose, slippery road surfaces only. Do not exceed 25 mph
(40 km/h).Vehicle's equipped with the AISIN
(AS68RC) Automatic Transmission, Overdrive gear (5th
and 6th) will be disabled when the transfer case is in
4L.
Shifting Procedure Ð Manually Shifted Transfer
Case
2H,4H
Shifting between 2H and 4H can be made with the
vehicle stopped or in motion. If the vehicle is in motion,
shifts can be made up to 55 mph (88 km/h). With the
Manual Transfer Case Shifter
292 STARTING AND OPERATING
Page 293 of 528

vehicle in motion, the transfer case will engage / disen-
gage faster if you momentarily release the accelerator
pedal after completing the shift. Apply a constant force
when shifting the transfer case lever.
2H or 4H,4L
With the vehicle rolling at 2 to 3 mph (3 to 5 km/h), shift
an automatic transmission to N (Neutral) or depress the
clutch on a manual transmission. While the vehicle is
coasting at 2 to 3 mph (3 to 5 km/h), shift the transfer
case lever firmly to the desired position. Do not pause in
transfer case N (Neutral).
NOTE:Pausing in transfer case N (Neutral) in vehicles
equipped with an automatic transmission may require
shutting the engine OFF to avoid gear clash while
completing the shift. If difficulty occurs, shift automatic
transmission to N (Neutral), hold foot on brake, and turn
engine OFF. Make shift to the desired mode.NOTE:Shifting into or out of 4L is possible with the
vehicle completely stopped, however difficulty may oc-
cur due to the mating clutch teeth not being properly
aligned. Several attempts may be required for clutch
teeth alignment and shift completion to occur. The pre-
ferred method is with the vehicle rolling 2 to 3 mph (3 to
5 km/h). Avoid attempting to engage or disengage 4L
with the vehicle moving faster than 2 to 3 mph (3 to 5
km/h).
NOTE:Do not attempt to shift to or from 4L while the
transmission is in gear or clutch is engaged.
Transfer Case Reminder Light
The four-wheel-drive operating light (4WD), located in
the instrument cluster, is used to alert the driver that the
front axle is fully engaged and all four wheels are
driving.
STARTING AND OPERATING 293
5
Page 302 of 528
POWER TAKE OFF OPERATION ± IF EQUIPPED
The Dodge Chassis Cab vehicle, when equipped with
either the automatic 6 speed or manual G-56 6 speed
transmissions, will allow for an aftermarket upfit with a
transmission driven PTO (power take off). The customer
will have the ability to operate the PTO in either a
ªstationaryº or ªmobileº mode. The vehicles will be
factory set to the ªstationaryº mode. In order to select the
ªmobileº mode a DaimlerChrysler Dealership is required
to modify the vehicles settings using their proprietary
Dealer service tool.
Stationary Mode
To operate the PTO in this mode the vehicle must meet
the following conditions:
²Be in ªparkº position (vehicles equipped with auto-
matic transmission)
²Upfitter provider (on/off) switch has been activated
²Parking brake applied (vehicles equipped with
manual transmission)
²Vehicle must be running
²No vehicle, brake or clutch switch faults present
²PTO must be correctly installed using the vehicle
provided circuits
The customer has the choice to operate the PTO by
utilizing the cruise control switches or by utilizing a
remote control (provided by the PTO supplier). To oper-
ate the feature using the cruise control switches the
customer must first activate the up fitter provided on/off
switch. Next, the cruise control ªonº switch is selected.
Following this step the ªsetº switch must be depressed.
The vehicle is now in the PTO mode and is ready for use.
In order to increase or decrease the engine idle speed, to
optimize the PTO function, the ªaccelº and ªdecelº cruise
switches can be used respectively. To disengage PTO
302 STARTING AND OPERATING
Page 303 of 528
operation and return to ªstandard vehicle operationº
simply turn the up fitter provided on/off switch to the off
position or press the ªcancelº cruise switch.
To operate the PTO via a remote switch the customer
must make sure the above conditions are met. It is vital
for proper operation that the PTO and remote have been
installed correctly paying special attention to ensure the
vehicle provided wiring has been connected properly.
This is the responsibility of the installer of the PTO and
switches/remote system. It is the responsibility of the
PTO manufacturer to ensure that their electrical (switches
and remote) system is compatible with the vehicle's
electrical architecture and software functionality.
Mobile Mode
To operate the PTO in this mode the vehicle must meet
the following conditions:
²Dealer selected ªmobileº mode activated via Dealer
proprietary service tool
²Upfitter provider (on/off) switch has been activated
²Vehicle must be in ªparkº or ªdriveº position (vehicles
equipped with automatic transmission)
²Parking brake must not be applied
²No vehicle, brake or clutch switch faults present
²Vehicle must be running
²PTO must be correctly installed using the vehicle
provided circuits
The customer may choose to use the PTO while the
vehicle is moving. To do so the PTO function must be
activated prior to taking the vehicle out of ªparkº. This is
accomplished by activating the up fitter provided PTO
on/off switch. At this point the customer may place the
vehicle in a forward or reverse gear and have PTO
STARTING AND OPERATING 303
5
Page 305 of 528
6. Do not use trailer tow mode on vehicle's with the
AISIN 6 speed automatic transmission (6.7L Diesel En-
gine only).
DRIVING THROUGH WATER
Driving through water more than a few inches deep will
require extra caution to ensure safety and prevent dam-
age to your vehicle.
Flowing/Rising Water
WARNING!
Do not drive on or cross a road or a path where water
is flowing and/or rising (as in storm run-off). Flow-
ing water can wear away the road or path's surface
and cause your vehicle to sink into deeper water.
Furthermore, flowing and/or rising water can carry
your vehicle away swiftly. Failure to follow this
warning may result in injuries that are serious or
fatal to you, your passengers, and others around you.
Shallow Standing Water
Although your vehicle is capable of driving through
shallow standing water, consider the following before
doing so:
STARTING AND OPERATING 305
5
Page 309 of 528
WARNING!
²Always fully apply the parking brake when leav-
ing your vehicle, or it may roll and cause damage
or injury. Also be certain to leave an automatic
transmission in Park, a manual transmission in
Reverse or First gear. Failure to do so may allow
the vehicle to roll and cause damage or injury.
²Never leave children alone in a vehicle. Leaving
children in a vehicle unattended is dangerous for a
number of reasons. A child or others could be
seriously or fatally injured. Don't leave the keys in
the ignition. A child could operate power win-
dows, other controls, or move the vehicle.
²Be sure the parking brake is fully disengaged
before driving, failure to do so can lead to brake
problems due to excessive heating of the rear
brakes.When parking on a hill, turn the front wheels toward the
curb on a downhill grade and away from the curb on an
uphill grade.
The parking brake should always be applied whenever
the driver is not in the vehicle.
BRAKE SYSTEM
If power assist is lost for any reason (for example,
repeated brake applications with the engine off), the
brakes will still function. However, you will experience a
substantial increase in braking effort to stop the vehicle.
If either the front or rear hydraulic systems lose normal
capability, the remaining system will still function with
some loss of overall braking effectiveness. This will be
evident by increased pedal travel during application,
greater pedal force required to slow or stop, and activa-
tion of the BRAKE warning lamp and the ABS lamp (if
equipped) during brake use.
STARTING AND OPERATING 309
5
Page 327 of 528
When adjusting inflation pressure to a tire and wheel
assembly mounted on a vehicle, use Remote Mount
Automatic Inflation Kit (similar to model number 27-
cc1021234, available from TEAM PSE ± PENTASTAR
Service Equipment Phone Number 1-800-734-4334.
NOTE:Never attempt to re-inflate a tire and wheel
assembly which has been run flat or extremely under
inflated without first removing the tire from the wheel
assembly for inspection.
Personnel trained, supervised, and equipped according
to Federal Occupational Safety and Health Administra-
tion (OSHA).Inflation Pressure Adjustment When Not Mounted to
Vehicle
When adjusting inflation pressure to a tire and wheel
assembly not mounted on a vehicle, use a Remote Mount
Automatic Inflation Kit and a Tire Inflation Cage similar
to model number #174-2240 available from TEAM PSE
(PENTASTAR Service Equipment ± 1-800-223-5623).
Tire Pressures for High Speed Operation
The manufacturer advocates driving at safe speeds
within posted speed limits. Where speed limits or condi-
tions are such that the vehicle can be driven at high
speeds, maintaining correct tire inflation pressure is very
important. Increased tire pressure and reduced vehicle
loading may be required for high-speed vehicle opera-
tion. Refer to original equipment or an authorized tire
dealer for recommended safe operating speeds, loading
and cold tire inflation pressures.
STARTING AND OPERATING 327
5