airbag DODGE RAM SRT-10 2006 Service User Guide
[x] Cancel search | Manufacturer: DODGE, Model Year: 2006, Model line: RAM SRT-10, Model: DODGE RAM SRT-10 2006Pages: 5267, PDF Size: 68.7 MB
Page 2417 of 5267
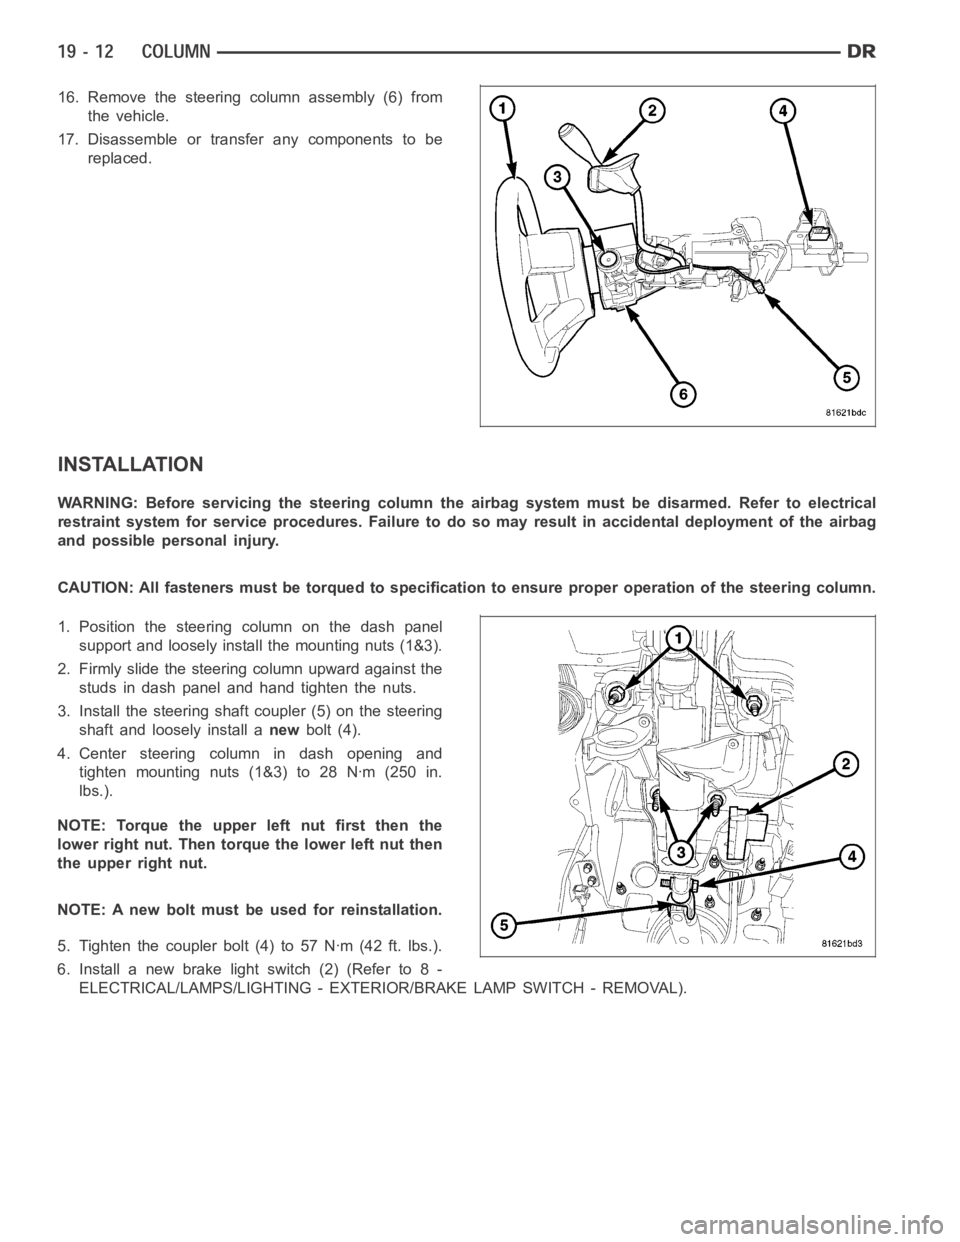
16. Remove the steering column assembly (6) from
the vehicle.
17. Disassemble or transfer any components to be
replaced.
INSTALLATION
WARNING: Before servicing the steering column the airbag system must be disarmed. Refer to electrical
restraint system for service procedures. Failure to do so may result in accidental deployment of the airbag
and possible personal injury.
CAUTION: All fasteners must be torqued to specification to ensure proper operation of the steering column.
1. Position the steering column on the dash panel
support and loosely install the mounting nuts (1&3).
2. Firmly slide the steering column upward against the
studs in dash panel and hand tighten the nuts.
3. Install the steering shaft coupler (5) on the steering
shaft and loosely install anewbolt (4).
4. Center steering column in dash opening and
tighten mounting nuts (1&3) to 28 Nꞏm (250 in.
lbs.).
NOTE: Torque the upper left nut first then the
lower right nut. Then torque the lower left nut then
the upper right nut.
NOTE: A new bolt must be used for reinstallation.
5. Tighten the coupler bolt (4) to 57 Nꞏm (42 ft. lbs.).
6. Install a new brake light switch (2) (Refer to 8 -
ELECTRICAL/LAMPS/LIGHTING - EXTERIOR/BRAKE LAMP SWITCH - REMOVAL).
Page 2418 of 5267
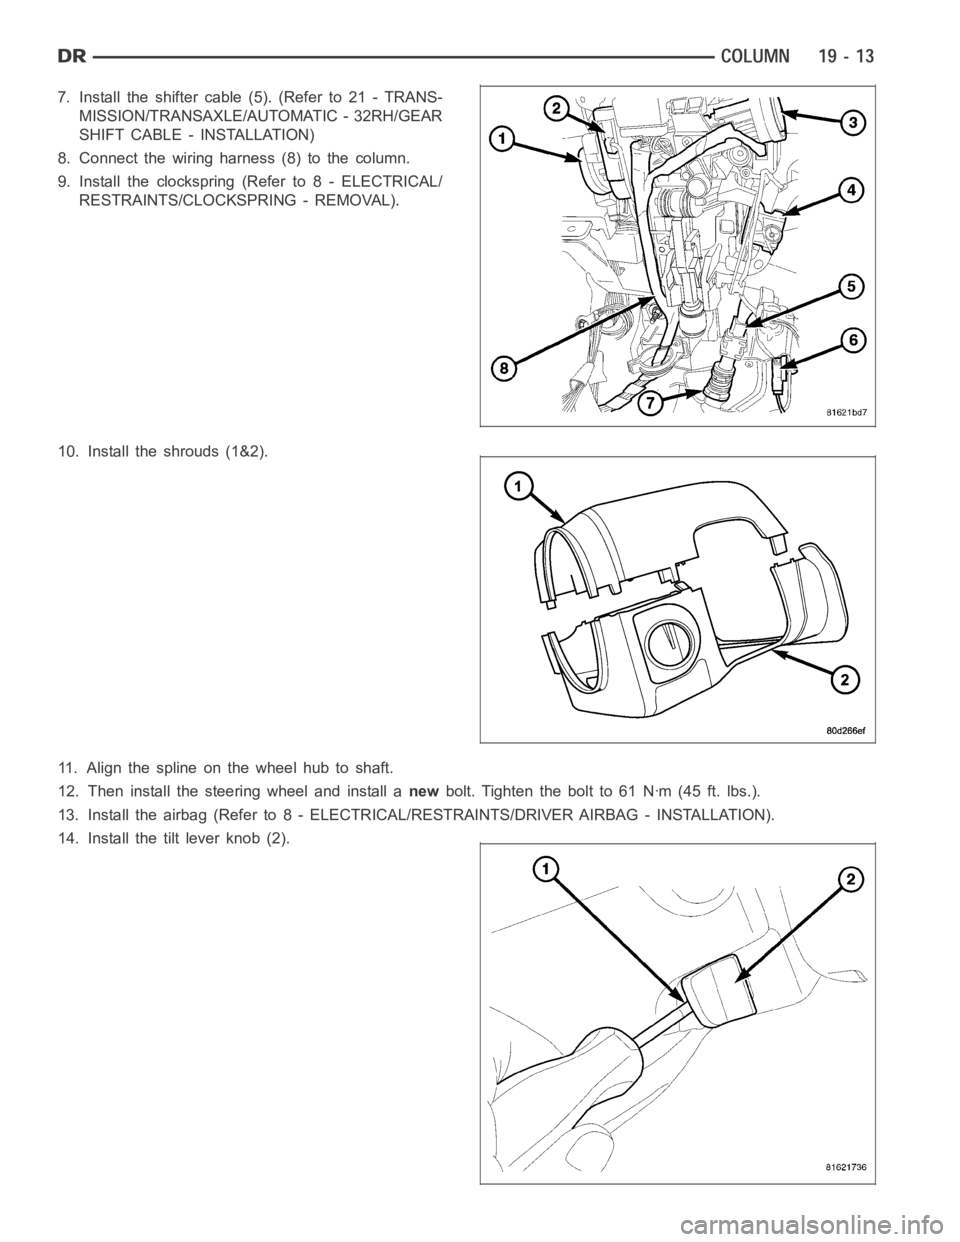
7. Install the shifter cable (5). (Refer to 21 - TRANS-
MISSION/TRANSAXLE/AUTOMATIC - 32RH/GEAR
SHIFT CABLE - INSTALLATION)
8. Connect the wiring harness (8) to the column.
9. Install the clockspring (Refer to 8 - ELECTRICAL/
RESTRAINTS/CLOCKSPRING - REMOVAL).
10. Install the shrouds (1&2).
11. Align the spline on the wheel hub to shaft.
12. Then install the steering wheel and install anewbolt. Tighten the bolt to 61 Nꞏm (45 ft. lbs.).
13. Install the airbag (Refer to 8 - ELECTRICAL/RESTRAINTS/DRIVER AIRBAG- INSTALLATION).
14. Install the tilt lever knob (2).
Page 2421 of 5267
REMOVAL
SERVICE PRECAUTIONS
NOTE: The steering column on vehicles equipped with an automatic transmission is not equipped with an
internal locking shaft with the ignition cylinder. Alternative methods of locking the steering wheel for ser-
vice will have to be used.
To service the steering wheel, switches or airbag, Refer to Electrical Restraints and follow all WARNINGS and CAU-
TIONS.
WARNING: The airbag system is a sensitive, complex electro-mechanical unit. Before attempting to diag-
nose, remove or install the airbag system components you must first disconnect and isolate the battery
negative (ground) cable. Then wait two minutes for the system capacitor todischarge. Failure to do so
could result in accidental deployment of the airbag and possible personalinjury. The fasteners, screws, and
bolts, originally used for the airbag components, have special coatings and are specifically designed for the
airbag system. They must never be replaced with any substitutes. Anytime anew fastener is needed,
replace with the correct fasteners provided in the service package or fasteners listed in the parts books.
CAUTION: Do not hammer on steering column shaft. This may cause damage to the shaft or bearing.
CAUTION: Do not attempt to remove the pivot bolts to disassemble the tilting mechanism.
The ignition key must be in the key cylinder for cylinder removal. The key cylinder must be removed first before
removing ignition switch.
1. Remove the negative (ground) cable from the battery.
2. Disable the airbag, (Refer to 8 - ELECTRICAL/RESTRAINTS/DRIVER AIRBAG- REMOVAL).
3. Remove the kneeblocker and steering column reinforcement panel.
4. Remove the lower and upper shrouds.
5. Remove key cylinder. (Refer to 19 - STEERING/COLUMN/LOCK CYLINDER HOUSING - REMOVAL).
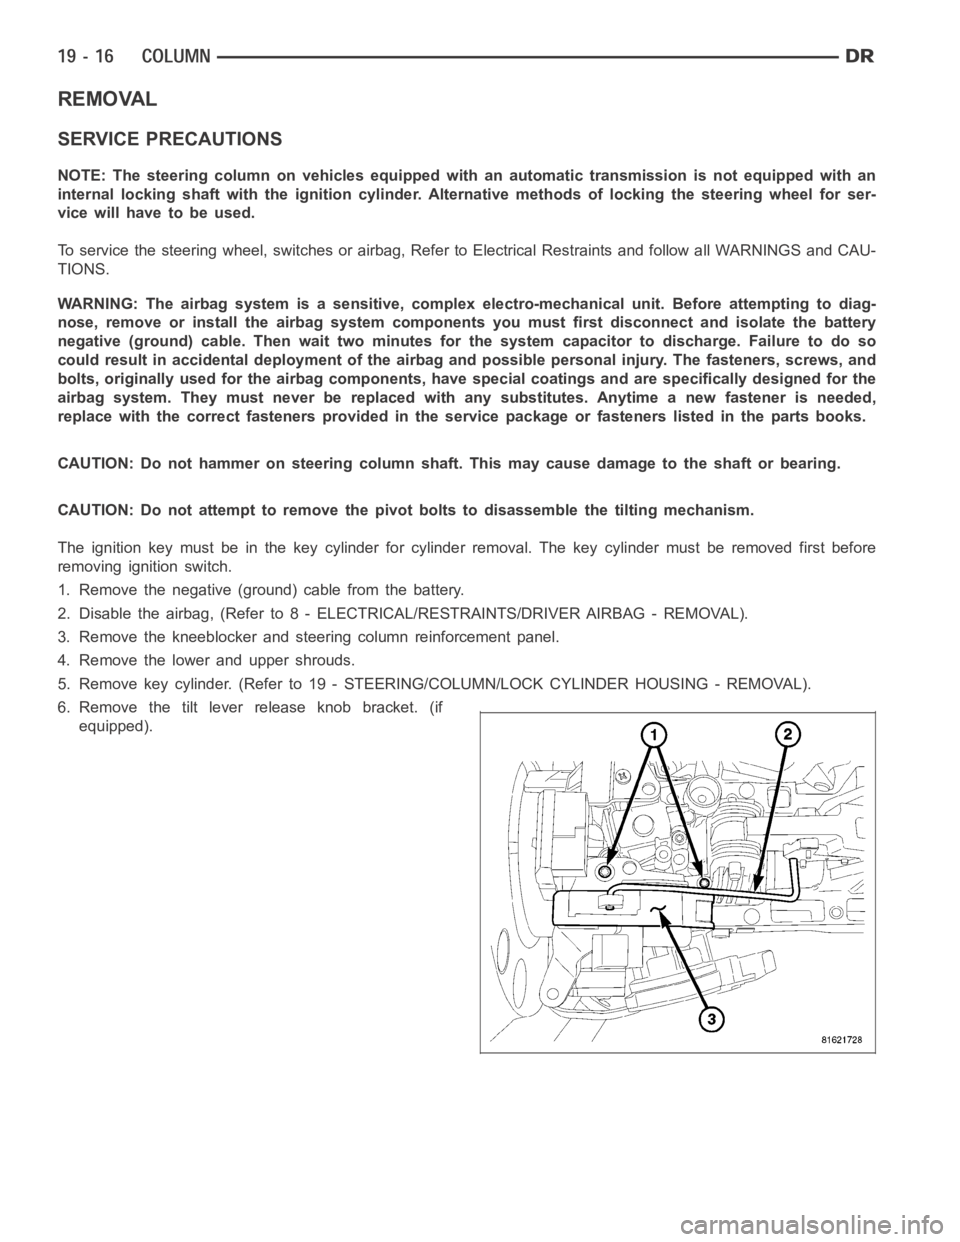
6. Remove the tilt lever release knob bracket. (if
equipped).
Page 2423 of 5267

4. Install the tilt lever release bracket mounting
screws. Tighten screws to 4.5 Nꞏm (40 in. lbs.).
5. Install the key cylinder.
6. Install steering column upper and lower shrouds.
7. Install the steering column reinforcement and knee-
blocker.
8. Enable the airbag system. (Refer to 8 - ELECTRI-
CAL/RESTRAINTS/DRIVER AIRBAG -
INSTALLATION).
Page 2429 of 5267
STEERING WHEEL
REMOVAL
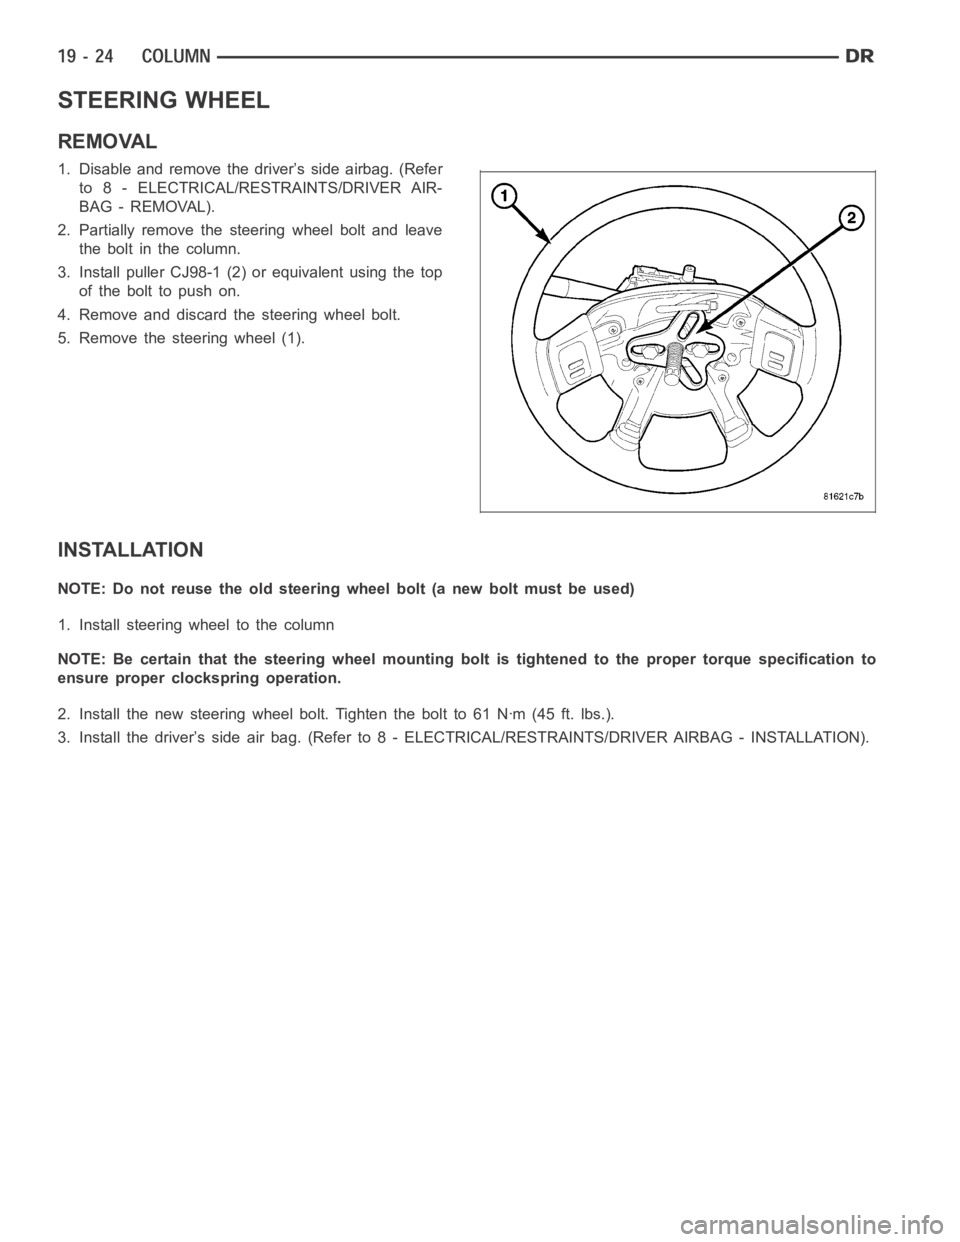
1. Disable and remove the driver’s side airbag. (Refer
to 8 - ELECTRICAL/RESTRAINTS/DRIVER AIR-
BAG - REMOVAL).
2. Partially remove the steering wheel bolt and leave
theboltinthecolumn.
3. Install puller CJ98-1 (2) or equivalent using the top
ofthebolttopushon.
4. Remove and discard the steering wheel bolt.
5. Remove the steering wheel (1).
INSTALLATION
NOTE: Do not reuse the old steering wheel bolt (a new bolt must be used)
1. Install steering wheel to the column
NOTE: Be certain that the steering wheel mounting bolt is tightened to the proper torque specification to
ensure proper clockspring operation.
2. Install the new steering wheel bolt. Tighten the bolt to 61 Nꞏm (45 ft. lbs.).
3. Install the driver’s side air bag. (Refer to 8 - ELECTRICAL/RESTRAINTS/DRIVER AIRBAG - INSTALLATION).
Page 4476 of 5267
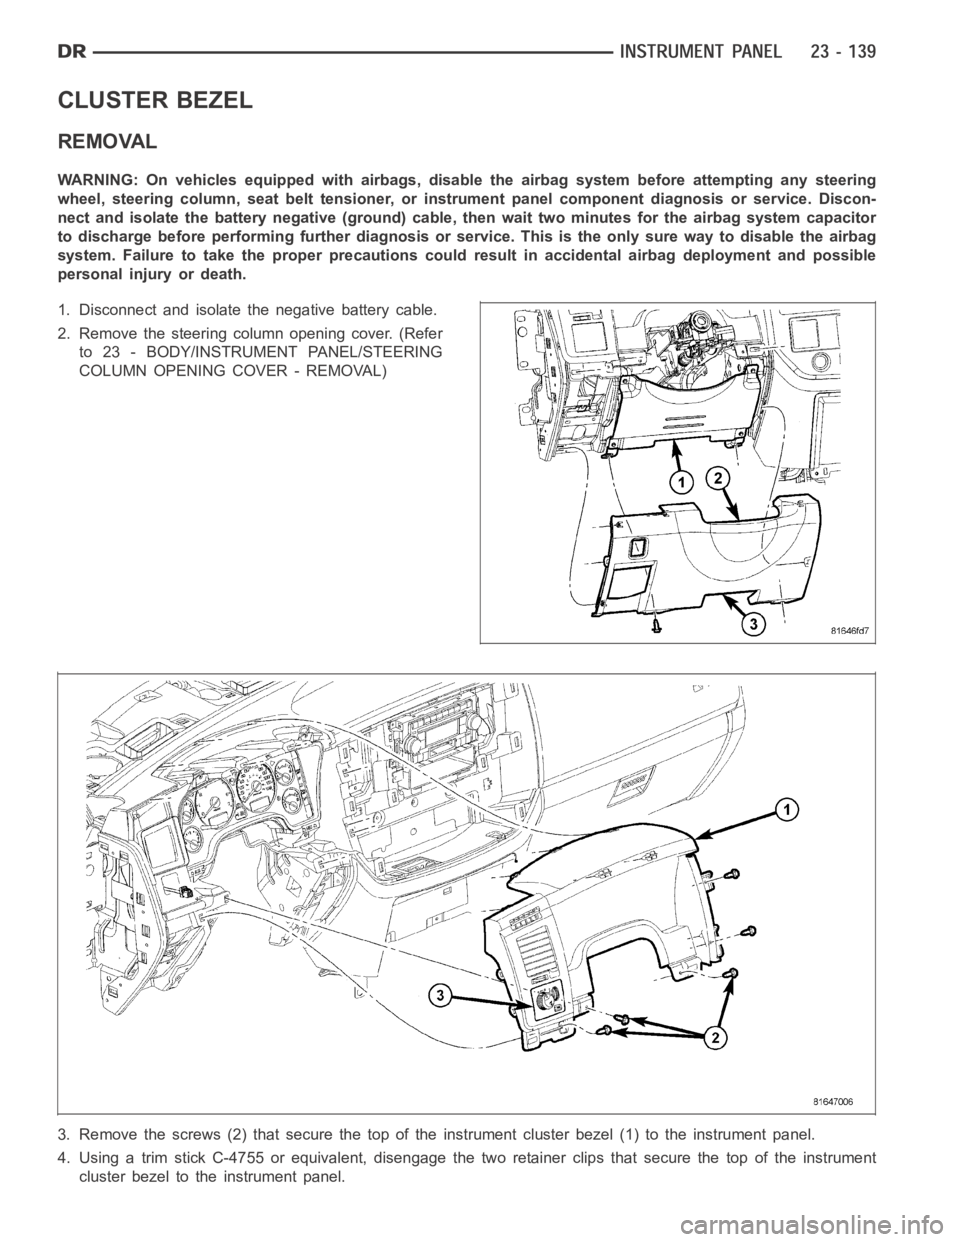
CLUSTER BEZEL
REMOVAL
WARNING: On vehicles equipped with airbags, disable the airbag system before attempting any steering
wheel, steering column, seat belt tensioner, or instrument panel component diagnosis or service. Discon-
nect and isolate the battery negative (ground) cable, then wait two minutes for the airbag system capacitor
to discharge before performing further diagnosis or service. This is the only sure way to disable the airbag
system. Failure to take the proper precautions could result in accidentalairbag deployment and possible
personal injury or death.
1. Disconnect and isolate the negative battery cable.
2. Remove the steering column opening cover. (Refer
to 23 - BODY/INSTRUMENT PANEL/STEERING
COLUMN OPENING COVER - REMOVAL)
3. Remove the screws (2) that secure the top of the instrument cluster bezel(1) to the instrument panel.
4. Using a trim stick C-4755 or equivalent, disengage the two retainer clips that secure the top of the instrument
cluster bezel to the instrument panel.
Page 4484 of 5267
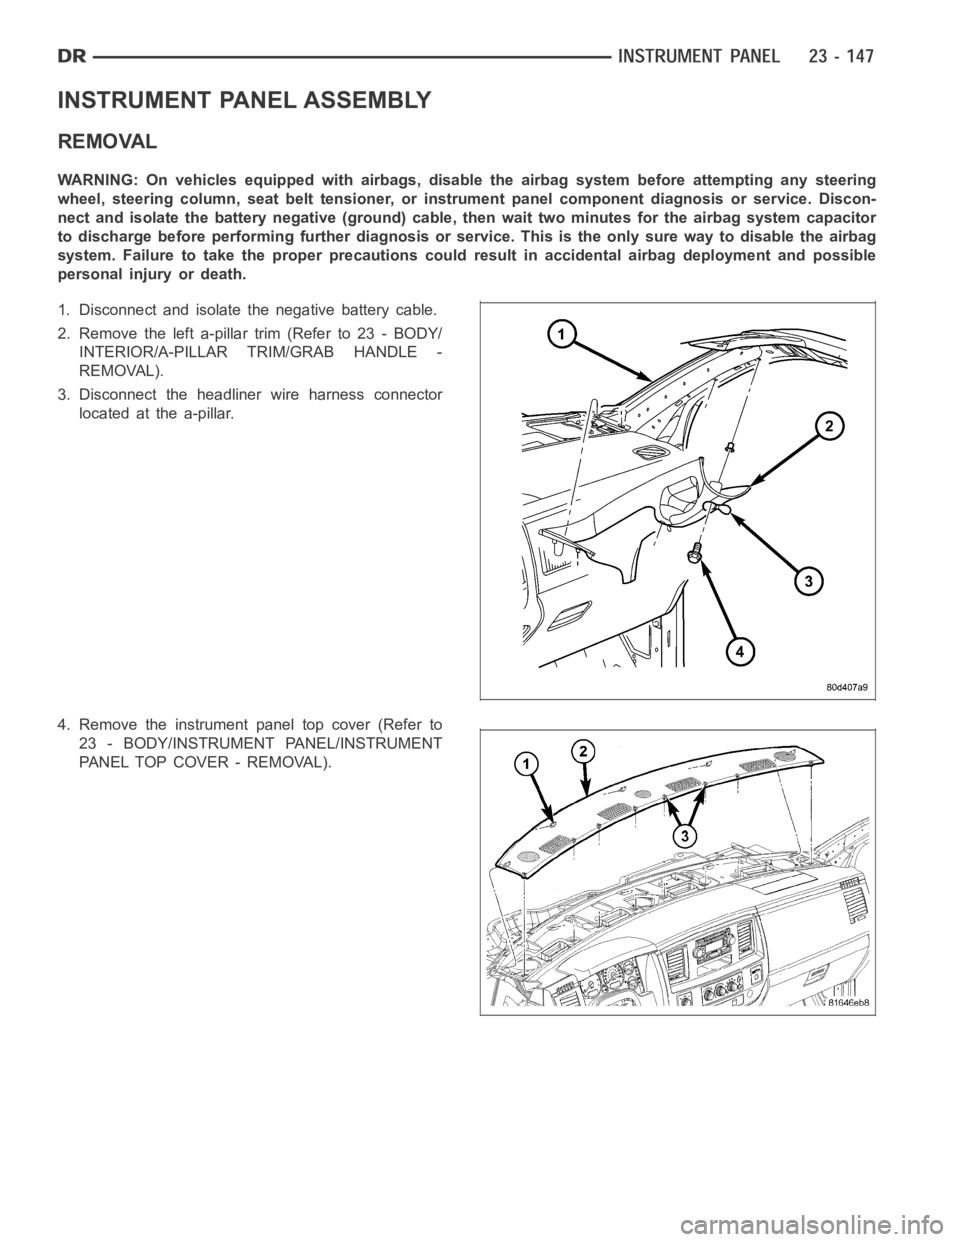
INSTRUMENT PANEL ASSEMBLY
REMOVAL
WARNING: On vehicles equipped with airbags, disable the airbag system before attempting any steering
wheel, steering column, seat belt tensioner, or instrument panel component diagnosis or service. Discon-
nect and isolate the battery negative (ground) cable, then wait two minutes for the airbag system capacitor
to discharge before performing further diagnosis or service. This is the only sure way to disable the airbag
system. Failure to take the proper precautions could result in accidentalairbag deployment and possible
personal injury or death.
1. Disconnect and isolate the negative battery cable.
2. Remove the left a-pillar trim (Refer to 23 - BODY/
INTERIOR/A-PILLAR TRIM/GRAB HANDLE -
REMOVAL).
3. Disconnect the headliner wire harness connector
located at the a-pillar.
4. Remove the instrument panel top cover (Refer to
23 - BODY/INSTRUMENT PANEL/INSTRUMENT
PANEL TOP COVER - REMOVAL).
Page 4488 of 5267
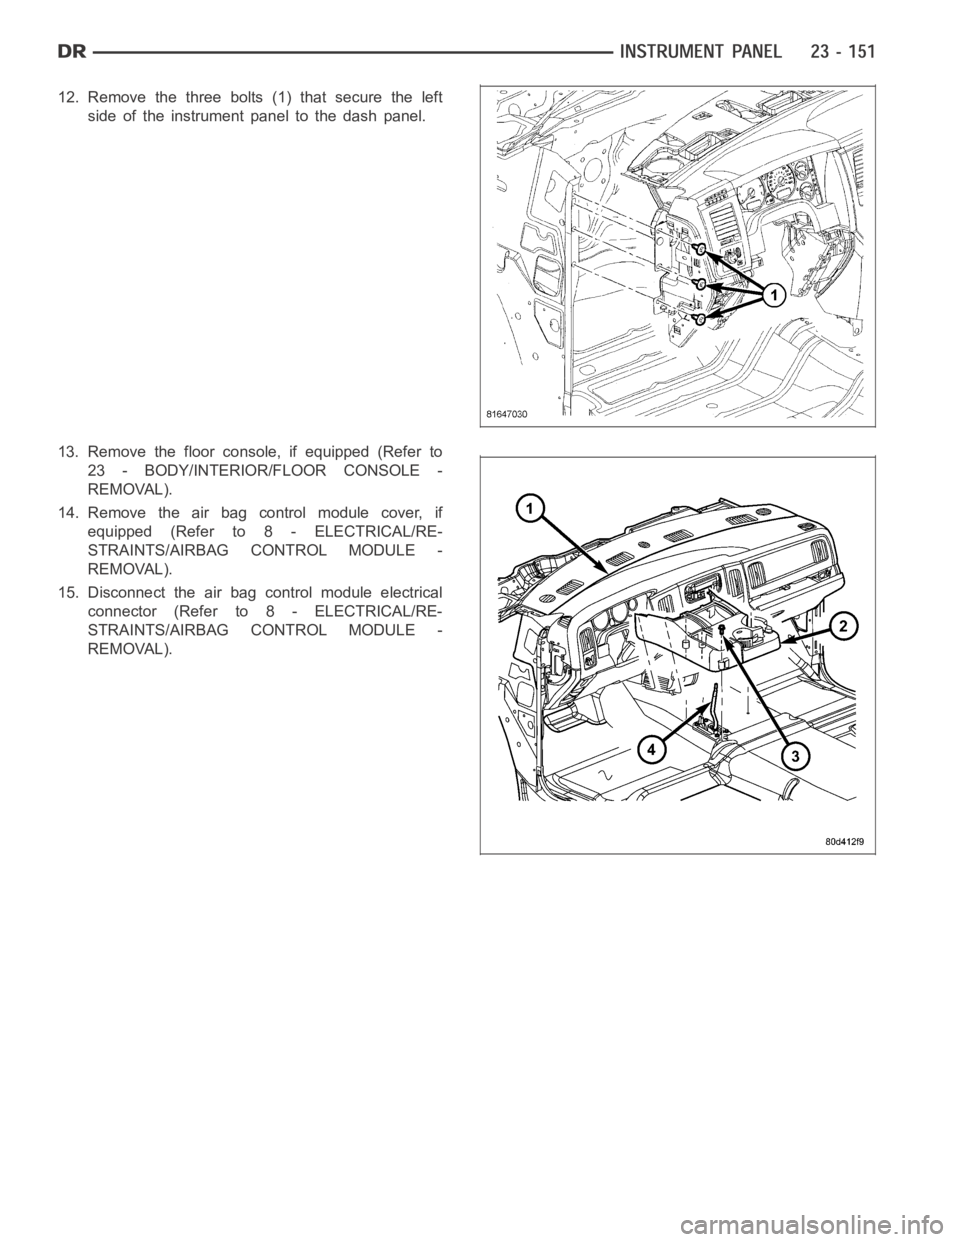
12. Remove the three bolts (1) that secure the left
side of the instrument panel to the dash panel.
13. Remove the floor console, if equipped (Refer to
23 - BODY/INTERIOR/FLOOR CONSOLE -
REMOVAL).
14. Remove the air bag control module cover, if
equipped (Refer to 8 - ELECTRICAL/RE-
STRAINTS/AIRBAG CONTROL MODULE -
REMOVAL).
15. Disconnect the air bag control module electrical
connector (Refer to 8 - ELECTRICAL/RE-
STRAINTS/AIRBAG CONTROL MODULE -
REMOVAL).
Page 4495 of 5267

14. Install the right cowl trim panel (Refer to 23 -
BODY/INTERIOR/COWL TRIM - INSTALLATION).
15. Install the two bolts (1) that secure the instrument
panel to the center of the floor panel.
16. Tighten the bolts to 12 Nꞏm (9 ft. lbs.).
17. Connect the air bag control module electrical con-
nector (Refer to 8 - ELECTRICAL/RESTRAINTS/
AIRBAG CONTROL MODULE - INSTALLATION).
18. Install the air bag control module cover, if
equipped (Refer to 8 - ELECTRICAL/RE-
STRAINTS/AIRBAG CONTROL MODULE -
INSTALLATION).
Page 4501 of 5267
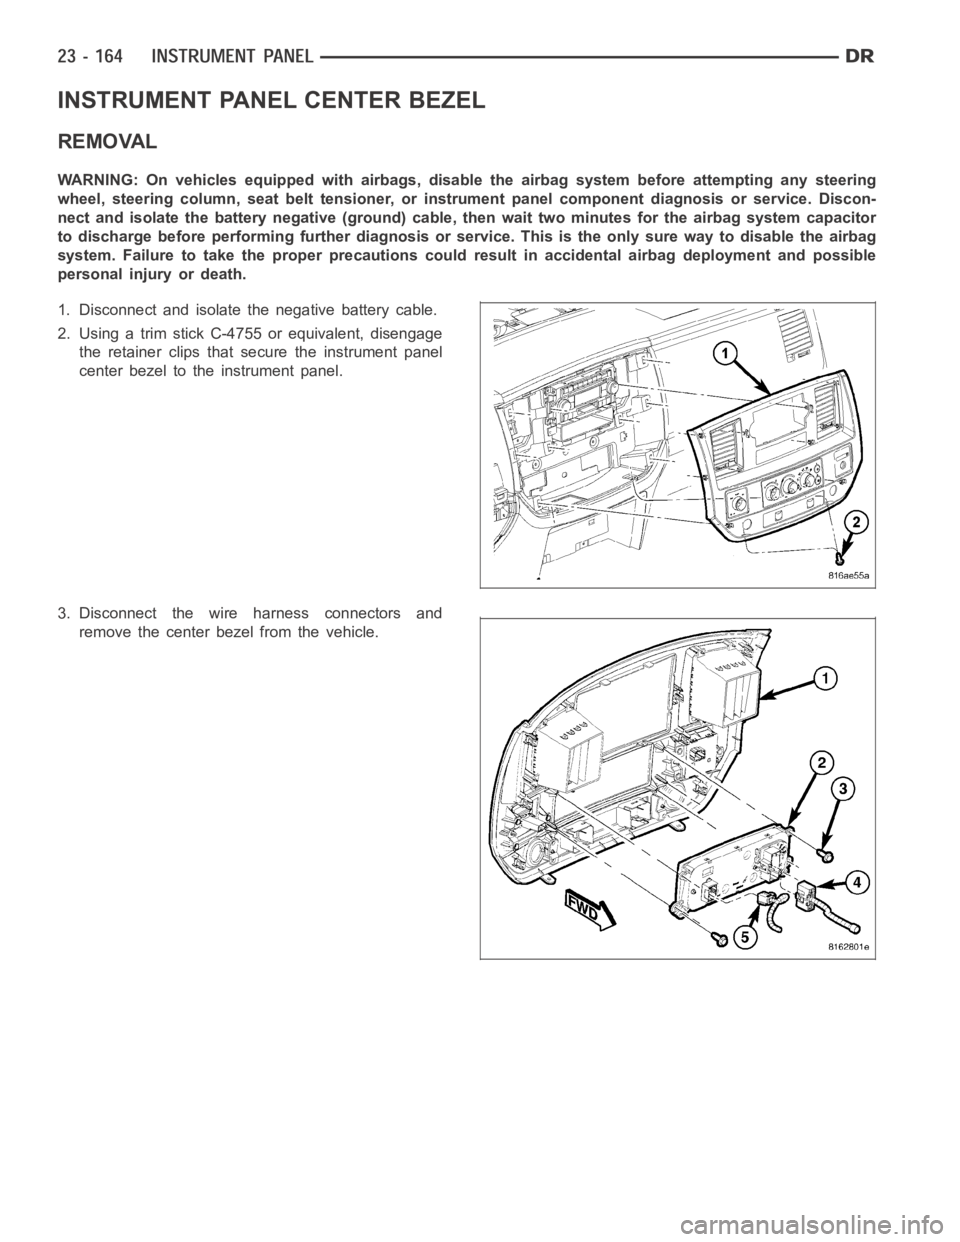
INSTRUMENT PANEL CENTER BEZEL
REMOVAL
WARNING: On vehicles equipped with airbags, disable the airbag system before attempting any steering
wheel, steering column, seat belt tensioner, or instrument panel component diagnosis or service. Discon-
nect and isolate the battery negative (ground) cable, then wait two minutes for the airbag system capacitor
to discharge before performing further diagnosis or service. This is the only sure way to disable the airbag
system. Failure to take the proper precautions could result in accidentalairbag deployment and possible
personal injury or death.
1. Disconnect and isolate the negative battery cable.
2. Using a trim stick C-4755 or equivalent, disengage
the retainer clips that secure the instrument panel
center bezel to the instrument panel.
3. Disconnect the wire harness connectors and
remove the center bezel from the vehicle.