DODGE RAM SRT-10 2006 Service Owner's Manual
RAM SRT-10 2006
DODGE
DODGE
https://www.carmanualsonline.info/img/12/56917/w960_56917-0.png
DODGE RAM SRT-10 2006 Service Owner's Manual
Page 4560 of 5267
CENTER SEAT
REMOVAL
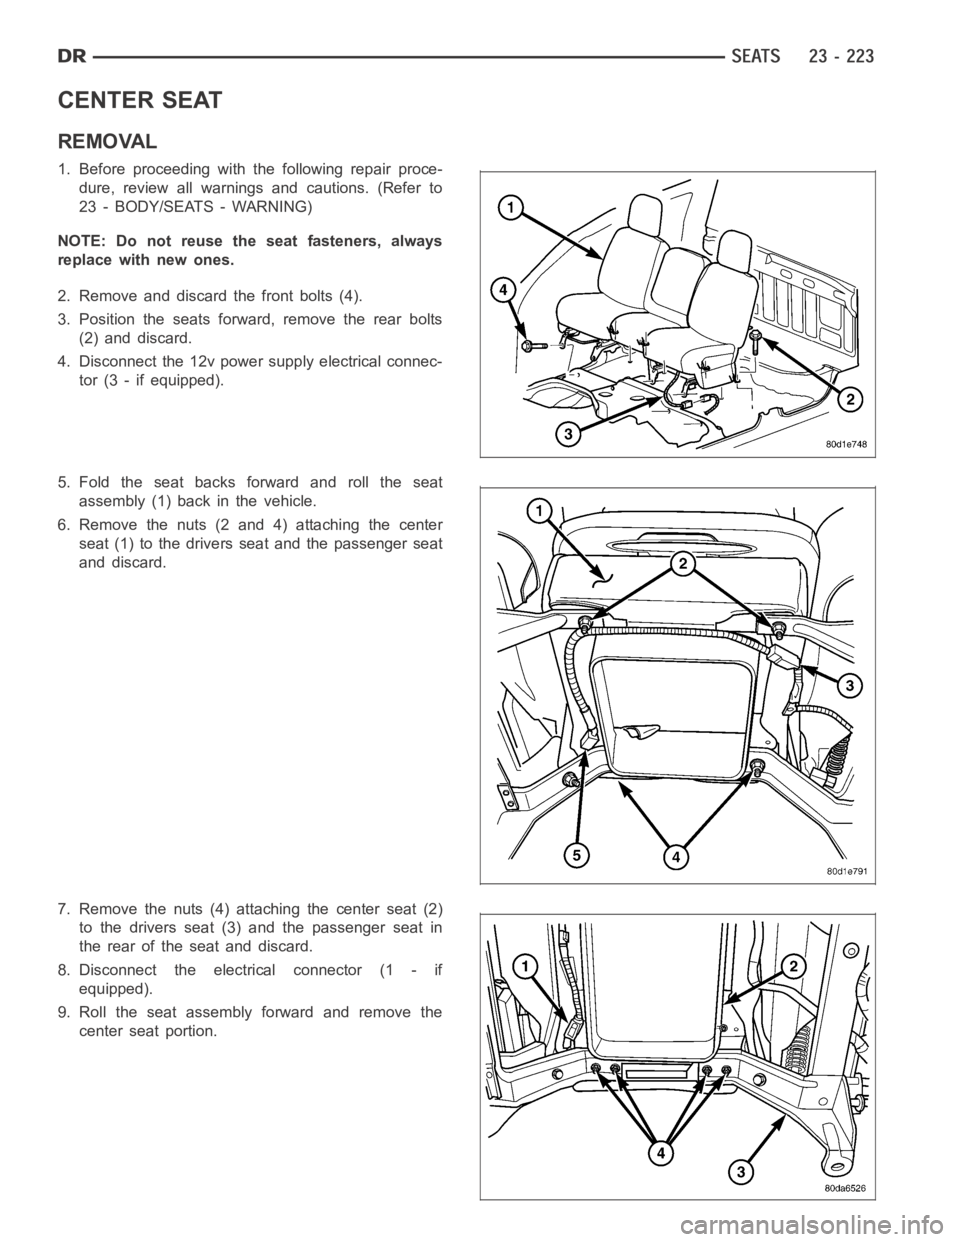
1. Before proceeding with the following repair proce-
dure, review all warnings and cautions. (Refer to
23 - BODY/SEATS - WARNING)
NOTE: Do not reuse the seat fasteners, always
replace with new ones.
2. Remove and discard the front bolts (4).
3. Position the seats forward, remove the rear bolts
(2) and discard.
4. Disconnect the 12v power supply electrical connec-
tor (3 - if equipped).
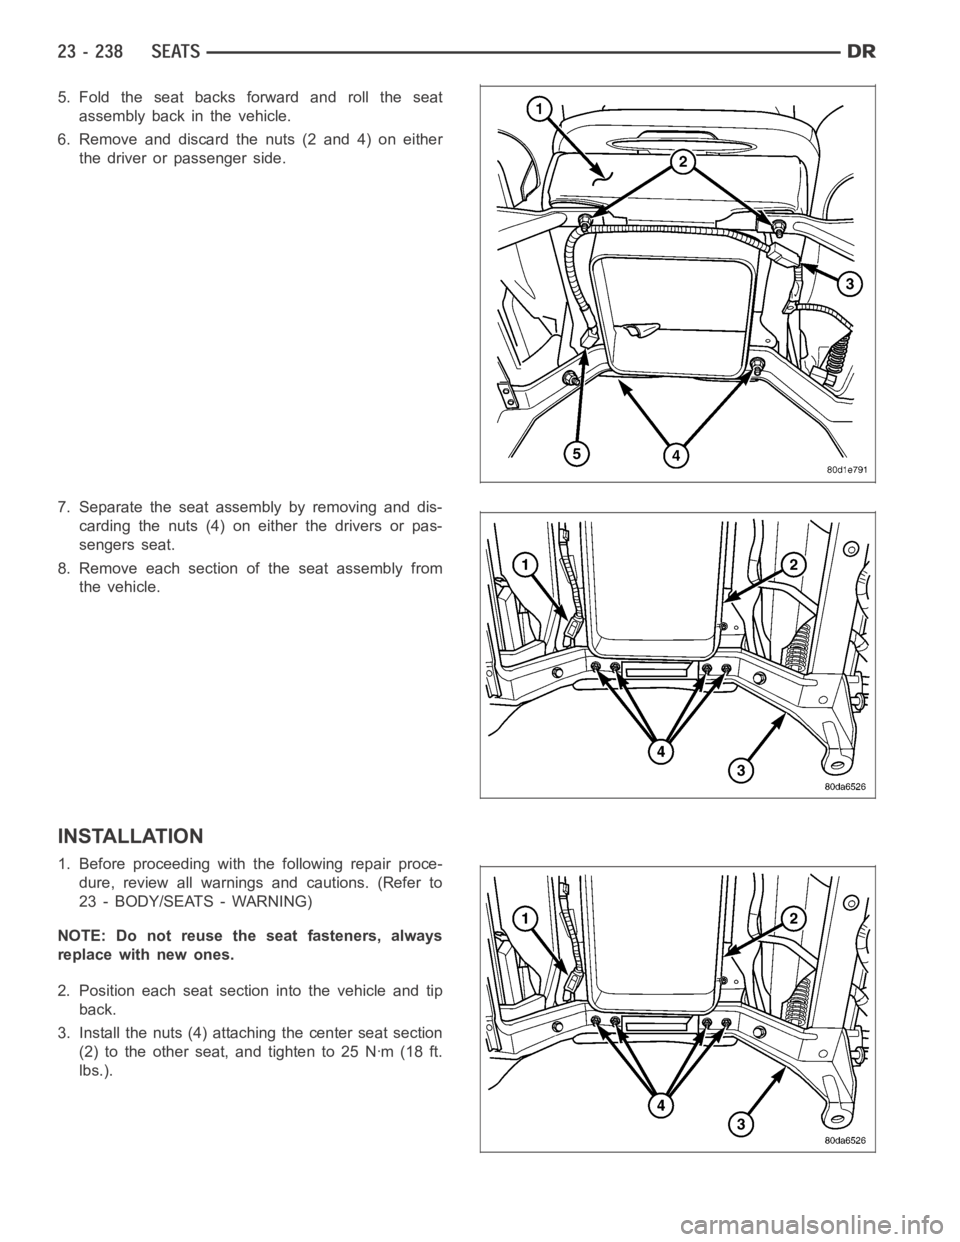
5. Fold the seat backs forward and roll the seat
assembly (1) back in the vehicle.
6. Remove the nuts (2 and 4) attaching the center
seat (1) to the drivers seat and the passenger seat
and discard.
7. Remove the nuts (4) attaching the center seat (2)
to the drivers seat (3) and the passenger seat in
the rear of the seat and discard.
8. Disconnect the electrical connector (1 - if
equipped).
9. Roll the seat assembly forward and remove the
center seat portion.
Page 4562 of 5267
CENTER ARMREST / SEAT BACK
REMOVAL
1. Before proceeding with the following repair proce-
dure, review all warnings and cautions. (Refer to
23 - BODY/SEATS - WARNING)
NOTE: Do not reuse the seat fasteners, always
replace with new ones.
2.Removethecenterseat(Referto23-BODY/
SEATS/SEAT - CENTER - REMOVAL).
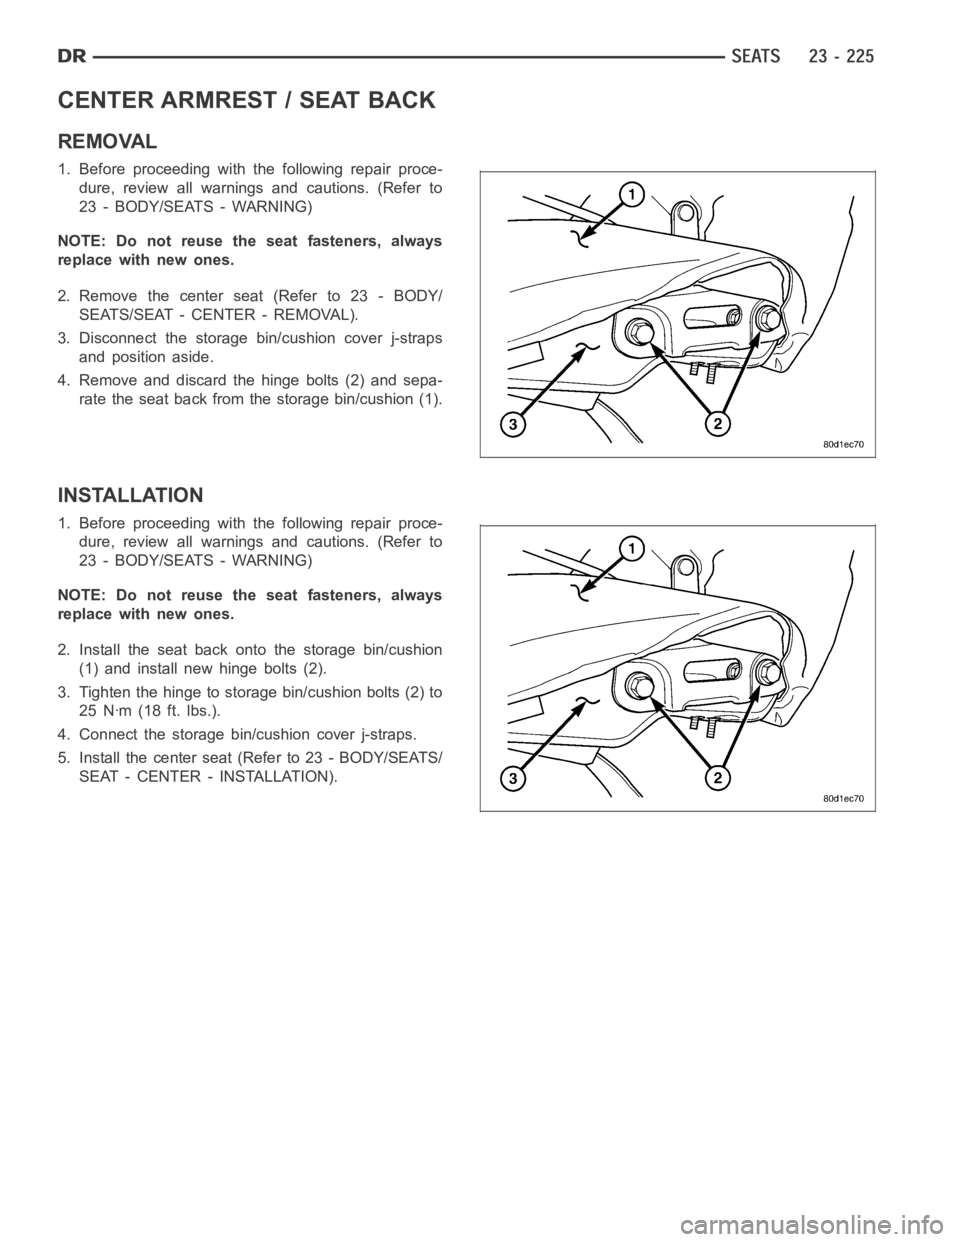
3. Disconnect the storage bin/cushion cover j-straps
and position aside.
4. Remove and discard the hinge bolts (2) and sepa-
rate the seat back from the storage bin/cushion (1).
INSTALLATION
1. Before proceeding with the following repair proce-
dure, review all warnings and cautions. (Refer to
23 - BODY/SEATS - WARNING)
NOTE: Do not reuse the seat fasteners, always
replace with new ones.
2. Install the seat back onto the storage bin/cushion
(1) and install new hinge bolts (2).
3. Tighten the hinge to storage bin/cushion bolts (2) to
25 Nꞏm (18 ft. lbs.).
4. Connect the storage bin/cushion cover j-straps.
5. Install the center seat (Refer to 23 - BODY/SEATS/
SEAT - CENTER - INSTALLATION).
Page 4563 of 5267
CENTER SEAT BACK INERTIA HINGE COVER
REMOVAL
NOTE: Free pivot hinge cover is removed with the
free pivot hinge (Refer to 23 - BODY/SEATS/CEN-
TER SEAT BACK HINGE - REMOVAL).
1. For the inertia hinge cover disconnect the zip strip
(1).
2. Position aside the storage bin/cushion cover (4).
3. Remove the pivot bolt (5).
4. Open the hinge cover at the bottom and remove
the hinge cover (1).
Page 4565 of 5267
CENTER SEAT BACK HINGE
REMOVAL
FREE PIVOT/HINGE COVER
NOTE: Do not reuse the seat fasteners, always
replace with new ones.
1. Remove the seat back (Refer to 23 - BODY/
SEATS/CENTER ARMREST/SEAT BACK -
REMOVAL).
2. Disconnect the storage bin/cushion cover j-strap
and position aside.
3. Remove and discard the pivot bolt (1).
4. Remove the hinge spacer (2).
Page 4566 of 5267
5. Open the hinge cover flap (1) and remove the wire
harness (5 - if equipped).
6. Remove the cover (3) from the hinge (4).
INERTIA HINGE
NOTE: Do not reuse the seat fasteners, always
replace with new ones.
1. Remove the seat back (Refer to 23 - BODY/
SEATS/CENTER ARMREST/SEAT BACK -
REMOVAL).
2. Remove the seat back inertia hinge cover (Refer to
23 - BODY/SEATS/CENTER SEAT BACK INERTIA
HINGE COVER - REMOVAL).
3. Remove and discard the inertia hinge bolts (1) and
remove the hinge (3).
Page 4570 of 5267
CENTER SEAT CUSHION
REMOVAL
1. Remove the center seat. (Refer to 23 - BODY/SEATS/CENTER SEAT - REMOVAL)
2. Remove the center armrest/seat back. (Refer to 23 - BODY/SEATS/CENTER ARMREST / SEAT BACK -
REMOVAL)
INSTALLATION
1. Install the center armrest/seat back. (Refer to 23 - BODY/SEATS/CENTERARMREST / SEAT BACK - INSTAL-
LATION)
2. Install the center seat. (Refer to 23 - BODY/SEATS/CENTER SEAT - INSTALLAT I O N )
Page 4571 of 5267
CENTER SEAT CUSHION COVER
REMOVAL
1. Remove the center seat cushion or underseat storage bin lid. (Refer to 23- BODY/SEATS/CENTER SEAT
CUSHION/UNDERSEAT STORAGE BIN LID - REMOVAL)
2. Disconnect the zip strips and remove the cover from the cushion.
INSTALLATION
1. Install the cover over the center seat cushion and connect the zip strips.
2. Install the center seat cushion or under seat storage bin lid. (Refer to 23 - BODY/SEATS/CENTER SEAT CUSH-
ION/UNDER SEAT STORAGE BIN LID - INSTALLATION)
Page 4573 of 5267
HEADREST SLEEVE
REMOVAL
1. Remove the headrest. (Refer to 23 - BODY/SEATS/HEADREST - REMOVAL)
2. Grasp the sleeves and pull up and out of the seat back to remove.
INSTALLATION
1. Position each headrest sleeve into correct seat back hole and press intoplace fully.
2. Install the headrest. (Refer to 23 - BODY/SEATS/HEADREST - INSTALLATION)
Page 4574 of 5267
SEAT - FRONT
REMOVAL
1. Before proceeding with the following repair proce-
dure, review all warnings and cautions. (Refer to
23 - BODY/SEATS - WARNING)
NOTE: Do not reuse the seat fasteners, always
replace with new ones.
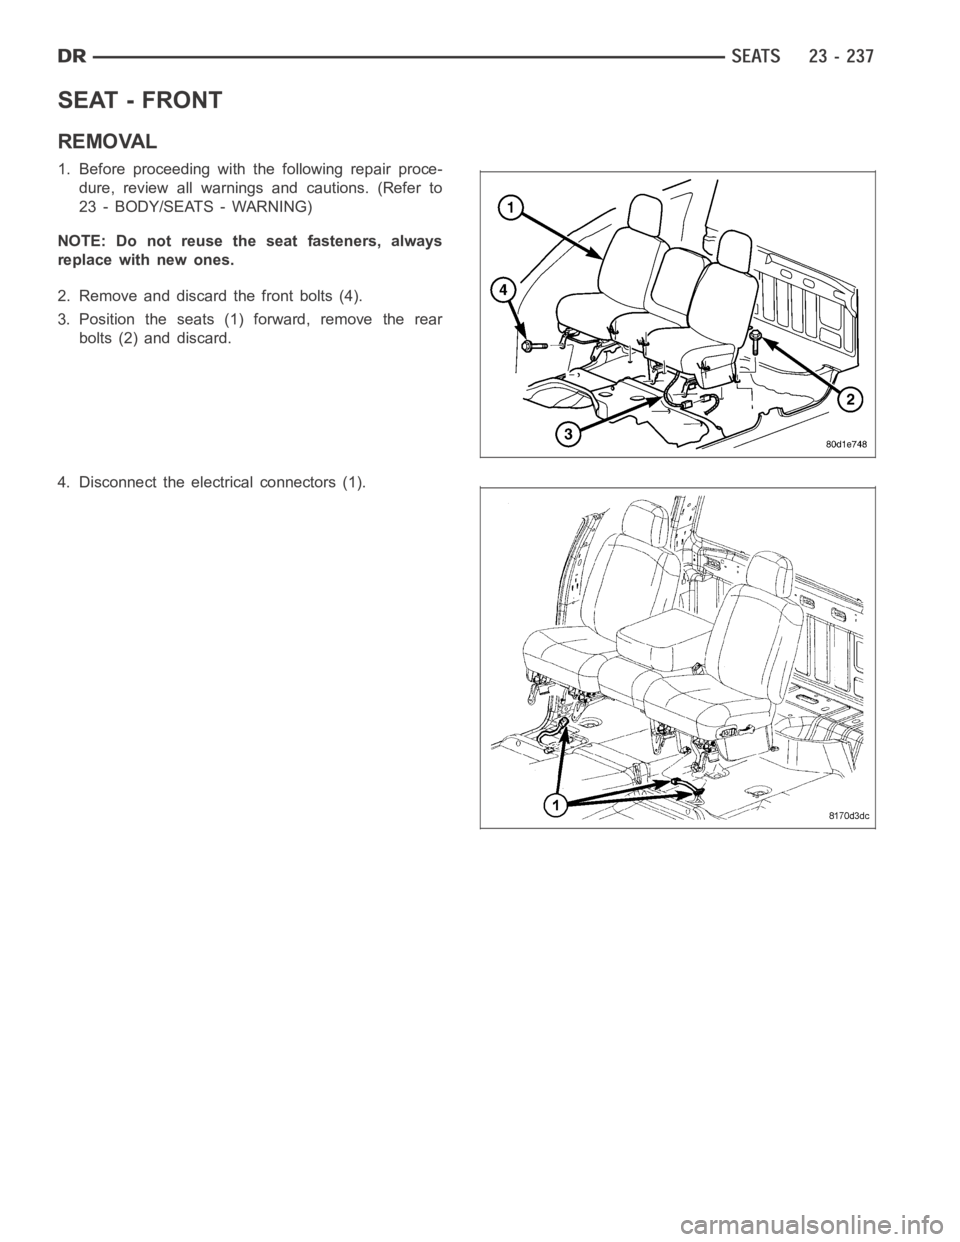
2. Remove and discard the front bolts (4).
3. Position the seats (1) forward, remove the rear
bolts (2) and discard.
4. Disconnect the electrical connectors (1).
Page 4575 of 5267
5. Fold the seat backs forward and roll the seat
assembly back in the vehicle.
6. Remove and discard the nuts (2 and 4) on either
the driver or passenger side.
7. Separate the seat assembly by removing and dis-
carding the nuts (4) on either the drivers or pas-
sengers seat.
8. Remove each section of the seat assembly from
the vehicle.
INSTALLATION
1. Before proceeding with the following repair proce-
dure, review all warnings and cautions. (Refer to
23 - BODY/SEATS - WARNING)
NOTE: Do not reuse the seat fasteners, always
replace with new ones.
2. Position each seat section into the vehicle and tip
back.
3. Install the nuts (4) attaching the center seat section
(2) to the other seat, and tighten to 25 Nꞏm (18 ft.
lbs.).