engine oil DODGE RAM SRT-10 2006 Service Repair Manual
[x] Cancel search | Manufacturer: DODGE, Model Year: 2006, Model line: RAM SRT-10, Model: DODGE RAM SRT-10 2006Pages: 5267, PDF Size: 68.7 MB
Page 3798 of 5267
pressure to the overdrive clutch during 3-4 upshifts, and when accelerating in fourth gear. The 3-4 accumulator
cushions overdrive clutch engagement to smooth 3-4 upshifts. The accumulator is charged at the same time as
apply pressure acts against the overdrive piston.
DIAGNOSIS AND TESTING
AUTOMATIC TRANSMISSION
Automatic transmission problems can be a result of poor engine performance, incorrect fluid level, incorrect linkage
or cable adjustment, band or hydraulic control pressure adjustments, hydraulic system malfunctions or electrical/
mechanical component malfunctions. Begin diagnosis by checking the easily accessible items such as: fluid level
and condition, linkage adjustments and electrical connections. A road test will determine if further diagnosis is nec-
essary.
PRELIMINARY
Two basic procedures are required. One procedure for vehicles that are drivable and an alternate procedure for
disabled vehicles (will not back up or move forward).
VEHICLE IS DRIVEABLE
1. Check for transmission fault codes using DRBscan tool.
2. Check fluid level and condition.
3. Adjust throttle and gearshift linkage if complaint was based on delayed, erratic, or harsh shifts.
4. Road test and note how transmission upshifts, downshifts, and engages.
5. Perform hydraulic pressure test if shift problems were noted during roadtest.
6. Perform air-pressure test to check clutch-band operation.
VEHICLE IS DISABLED
1. Check fluid level and condition.
2. Check for broken or disconnected gearshift or throttle linkage.
3. Check for cracked, leaking cooler lines, or loose or missing pressure-port plugs.
4. Raise and support vehicle on safety stands, start engine, shift transmission into gear, and note following:
a. If propeller shaft turns but wheels do not, problem is with differentialor axle shafts.
b. If propeller shaft does not turn and transmission is noisy, stop engine.Remove oil pan, and check for debris.
If pan is clear, remove transmission and check for damaged drive plate, converter, oil pump, or input shaft.
c. If propeller shaft does not turn and transmission is not noisy, perform hydraulic-pressure test to determine if
problem is hydraulic or mechanical.
ROAD TESTING
Before road testing, be sure the fluid level and control cable adjustmentshave been checked and adjusted if nec-
essary. Verify that diagnostic trouble codes have been resolved.
Observe engine performance during the road test. A poorly tuned engine will not allow accurate analysis of trans-
mission operation.
Operate the transmission in all gear ranges. Check for shift variations and engine flare which indicates slippage.
Note if shifts are harsh, spongy, delayed, early, or if part throttle downshifts are sensitive.
Slippage indicated by engine flare, usually means clutch, band or overrunning clutch problems. If the condition is
advanced, an overhaul will be necessary to restore normal operation.
A slipping clutch or band can often be determined by comparing which internal units are applied in the various gear
ranges. The Clutch and Band Application chart provides a basis for analyzing road test results.
Clutch and Band Application Chart
Page 3800 of 5267

Pressure Test Port Locations
Test ports are located at both sides of the transmis-
sion case.
Line pressure is checked at the accumulator port (3)
on the right side of the case. The front servo pressure
port (4) is at the right side of the case just behind the
filler tube opening.
The rear servo (1) and governor pressure (2) ports are
at the right rear of the transmission case. The over-
drive clutch pressure port (5) is at the left rear of the
case.
Test One - Transmission In Manual Low
This test checks pump output, pressure regulation, and condition of the rear clutch and servo circuit. Both test
gauges are required for this test.
1. Connect tachometer to engine. Position tachometer so it can be observedfrom driver seat if helper will be oper-
ating engine. Raise vehicle on hoist that will allow rear wheels to rotate freely.
2. Connect 100 psi Oil Pressure Gauge C-3292 to accumulator port. Then connect 300 psi Oil Pressure Gauge
C-3293-SP to rear servo port.
3. Disconnect throttle and gearshift cables from levers on transmission valve body manual shaft.
4. Have helper start and run engine at 1000 rpm.
5. Move transmission shift lever fully forward into 1 range.
6. Gradually move transmission throttle lever from full forward to full rearward position and note pressures on both
gauges:
Line pressure at accumulator port should be 54-60 psi (372-414 kPa) with throttle lever forward and gradually
increase to 90-96 psi (621-662 kPa) as throttle lever is moved rearward.
Rear servo pressure should be same asline pressure within 3 psi (20.68 kPa).
Test Two - Transmission In 2 Range
This test checks pump output, line pressure and pressure regulation. Use 100 psi Oil Pressure Gauge C-3292 for
this test.
1. Leave vehicle in place on hoist and leave Oil Pressure Gauge C-3292 connected to accumulator port.
2. Have helper start and run engine at 1000 rpm.
3. Move transmission shift lever one detent rearward from full forward position. This is 2 range.
4. Move transmission throttle lever from full forward to full rearward position and read pressure on gauge.
Page 3801 of 5267

5. Line pressure should be 54-60 psi (372-414 kPa) with throttle lever forward and gradually increase to 90-96 psi
(621-662 kPa) as lever is moved rearward.
Test Three - Transmission In D Range Third Gear
This test checks pressure regulation and condition of the clutch circuits. Both test gauges are required for this test.
1. Turn OD switch off.
2. Leave vehicle on hoist and leave Oil Pressure Gauge C-3292 in place at accumulator port.
3. Move Oil Pressure Gauge C-3293-SP over to front servo port for this test.
4. Have helper start and run engine at 1600 rpm for this test.
5. Move transmission shift lever two detents rearward from full forward position. This is D range.
6. Read pressures on both gauges as transmission throttle lever is gradually moved from full forward to full rear-
ward position:
Line pressure at accumulator in D range third gear, should be 54-60 psi (372-414 kPa) with throttle lever for-
ward and increase as lever is moved rearward.
Front servo pressure in D range third gear, should be within 3 psi (21 kPa) ofline pressure up to kickdown
point.
Test Four - Transmission In Reverse
This test checks pump output, pressure regulation and the front clutch andrear servo circuits. Use 300 psi Oil
Pressure Gauge C-3293-SP for this test.
1. Leave vehicle on hoist and leave Oil Pressure Gauge C-3292 in place at accumulator port.
2. Move 300 psi Oil Pressure Gauge C-3293-SP back to rear servo port.
3. Have helper start and run engine at 1600 rpm for test.
4. Move transmission shift lever four detents rearward from full forward position. This is Reverse range.
5. Move transmission throttle lever fully forward then fully rearward andnote reading at Gauge C-3293-SP.
6. Pressure should be 145 - 175 psi (1000-1207 kPa) with throttle lever forward and increase to 230 - 280 psi
(1586-1931 kPa) as lever is gradually moved rearward.
Test Five - Governor Pressure
This test checks governor operation by measuring governor pressure response to changes in vehicle speed. It is
usually not necessary to check governor operation unless shift speeds areincorrect or if the transmission will not
downshift. The test should be performed on the road or on a hoist that will allow the rear wheels to rotate freely.
1. Move 100 psi Oil Pressure Gauge C-3292 to governor pressure port.
2. Move transmission shift lever two detents rearward from full forward position. This is D range.
3. Have helper start and run engine at curb idle speed. Then firmly apply service brakes so wheels will not rotate.
4. Note governor pressure:
Governor pressure should be no more than 20.6 kPa (3 psi) at curb idle speed and wheels not rotating.
If pressure exceeds 20.6 kPa (3 psi), a fault exists in governor pressure control system.
5. Release brakes, slowly increase engine speed, and observe speedometerand pressure test gauge (do not
exceed 30 mph on speedometer). Governor pressure should increase in proportion to vehicle speed. Or approx-
imately 6.89 kPa (1 psi) for every 1 mph.
6. Governor pressure rise should be smooth and drop back to no more than 20.6kPa (3 psi), after engine returns
to curb idle and brakes are applied to prevent wheels from rotating.
7. Compare results of pressure test with analysis chart.
Test Six - Transmission In Overdrive Fourth Gear
This test checks line pressure at the overdrive clutch in fourth gear range. Use 300 psi Oil Pressure Gauge
C-3293-SP for this test. The test should be performed on the road or on a chassis dyno.
1. Remove tachometer; it is not needed for this test.
2. Move 300 psi Oil Pressure Gauge to overdrive clutch pressure test port. Then remove other gauge and reinstall
test port plug.
Page 3802 of 5267
3. Lower vehicle.
4. Turn OD switch on.
5. Secure test gauge so it can be viewed from drivers seat.
6. Start engine and shift into D range.
7. Increase vehicle speed gradually until 3-4 shift occurs and note gauge pressure.
8. Pressure should be 524-565 kPa (76-82 psi) with closed throttle and increase to 690-896 kPa (100-130 psi) at
1/2to3/4throttle.Notethatpressurecanincreasetoaround965kPa(140psi) at full throttle.
9. Return to shop or move vehicle off chassis dyno.
PRESSURE TEST ANALYSIS CHART
TEST CONDITION INDICATION
Line pressure OK during any one test Pump and regulator valve OK
Line pressure OK in R but low in D, 2, 1 Leakage in rear clutch area (seal rings, clutch seals)
Pressure low in D Fourth Gear Range Overdrive clutch piston seal, or check ball problem
Pressure OK in 1, 2 but low in D3 and R Leakage in front clutch area
Pressure OK in 2 but low in R and 1 Leakage in rear servo
Front servo pressure in 2 Leakage in servo; broken servo ring or cracked servo
piston
Pressure low in all positions Clogged filter, stuck regulator valve, wornor faulty
pump, low oil level
Governor pressure too high at idle speed Governor pressure solenoid valvesystem fault. Refer
to diagnostic book.
Governor pressure low at all mph figures Faulty governor pressure solenoid, transmission
control module, or governor pressure sensor
Lubrication pressure low at all throttle positions Clogged fluid cooler or lines, seal rings leaking, worn
pump bushings, pump, clutch retainer, or clogged filter.
Line pressure high Output shaft plugged, sticky regulator valve
Line pressure low Sticky regulator valve, clogged filter, worn pump
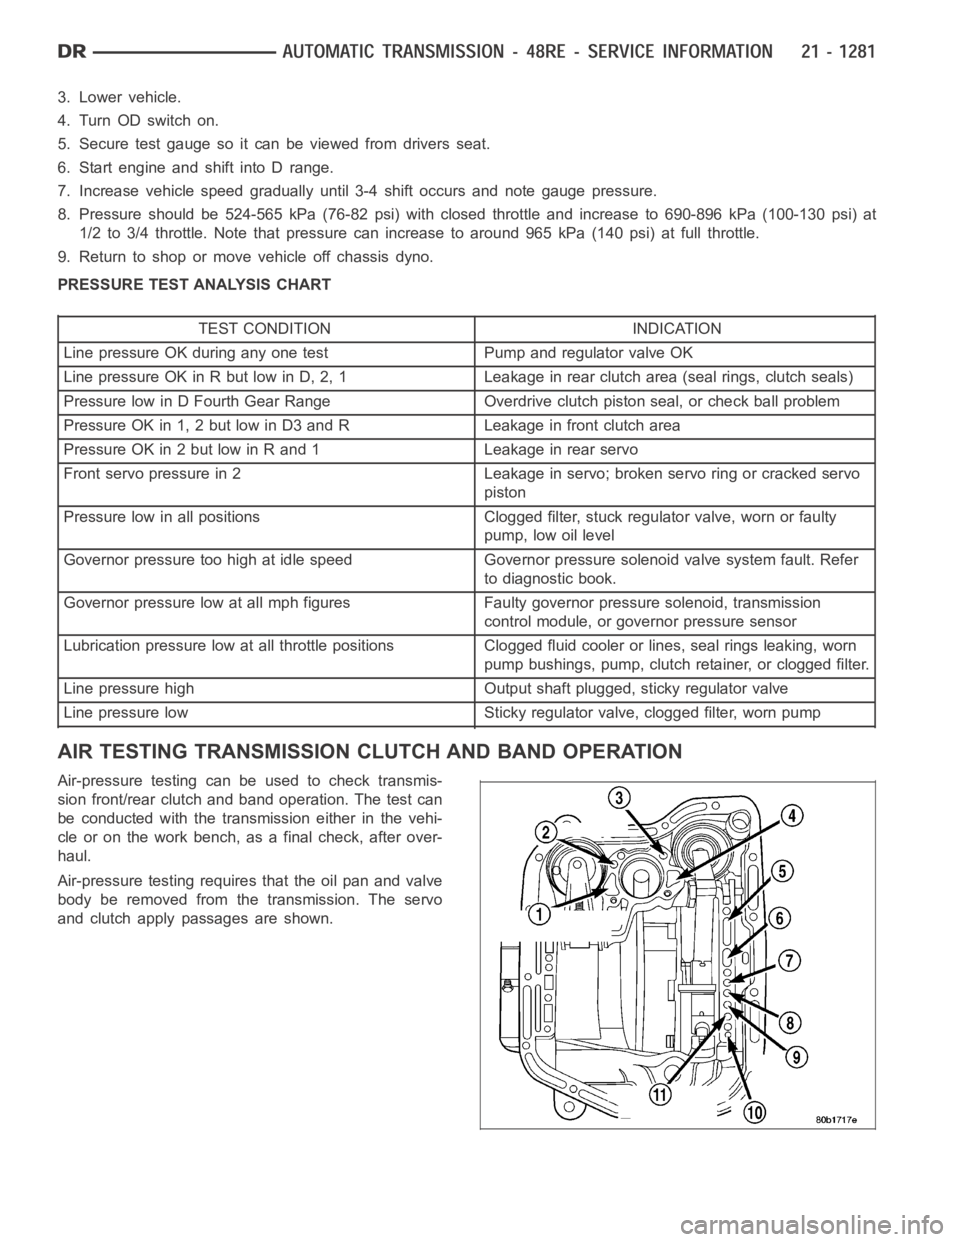
AIR TESTING TRANSMISSION CLUTCH AND BAND OPERATION
Air-pressure testing can be used to check transmis-
sion front/rear clutch and band operation. The test can
be conducted with the transmission either in the vehi-
cle or on the work bench, as a final check, after over-
haul.
Air-pressure testing requires that the oil pan and valve
body be removed from the transmission. The servo
and clutch apply passages are shown.
Page 3804 of 5267
5. Install new pump seal, O-ring, and gasket. Replace oil pump if cracked, porous or damaged in any way. Be sure
to loosen the front band before installing the oil pump, damage to the oil pump seal may occur if the band is still
tightened to the frontclutch retainer.
6. Loosen kickdown lever pin access plug three turns. Apply Loctite™ 592, orPermatex
No. 2 to plug threads and
tightenplugto17Nꞏm(150in.lbs.)torque.
7. Adjust front band.
8. Lubricate pump seal and converter hub with transmission fluid or petroleum jelly and install converter.
9. Install transmission and converter housing dust shield.
10. Lower vehicle.
DIAGNOSIS CHARTS
The diagnosis charts provide additional reference when diagnosing a transmission fault. The charts provide general
information on a variety of transmission, overdrive unit and converter clutch fault conditions.
The hydraulic flow charts in the Schematics and Diagrams section of this group, outline fluid flow and hydraulic
circuitry. Circuit operation is provided for PARK, NEUTRAL, FIRST, SECOND, THIRD, FOURTH, MANUAL FIRST,
MANUAL SECOND, and REVERSE gear ranges. Normal working pressures are alsosupplied for each of the gear
ranges.
Diagnosis Charts
CONDITION POSSIBLE CAUSES CORRECTION
HARSH ENGAGEMENT
(FROM NEUTRAL TO
DRIVE OR REVERSE)1. Fluid Level Low. 1. Add Fluid
2. Throttle Linkage Mis-adjusted.
V- 1 0 O n l y2. Adjust linkage - setting may be too long.
3. Mount and Driveline Bolts Loose. 3. Check engine mount, transmission
mount, propeller shaft, rear spring to body
bolts, rear control arms, crossmember and
axle bolt torque. Tighten loose bolts and
replace missing bolts.
4. U-Joint Worn/Broken. 4. Remove propeller shaft and replace
U-Joint.
5. Axle Backlash Incorrect. 5. Check per Service Manual. Correct as
needed.
6. Hydraulic Pressure Incorrect. 6. Check pressure. Remove, overhaul or
adjust valve body as needed.
7. Band Mis-adjusted. 7. Adjust rear band.
8. Valve Body Check Balls Missing. 8. Inspect valve body for proper check ball
installation.
9. Axle Pinion Flange Loose. 9. Replace nut and check pinion threads
before installing new nut. Replace pinion
gear if threads are damaged.
10. Clutch, band or planetary
component damaged.10. Remove, disassemble and repair
transmission as necessary.
11. Converter Clutch Faulty. 11. Replace converter and flush cooler and
line before installing new converter.
Page 3815 of 5267
REMOVAL
NOTE: The overdrive unit can be removed and serviced separately. It is not necessary to remove the entire
transmission assembly to perform overdrive unit repairs.
1. Disconnect battery negative cable.
2. Raise vehicle.
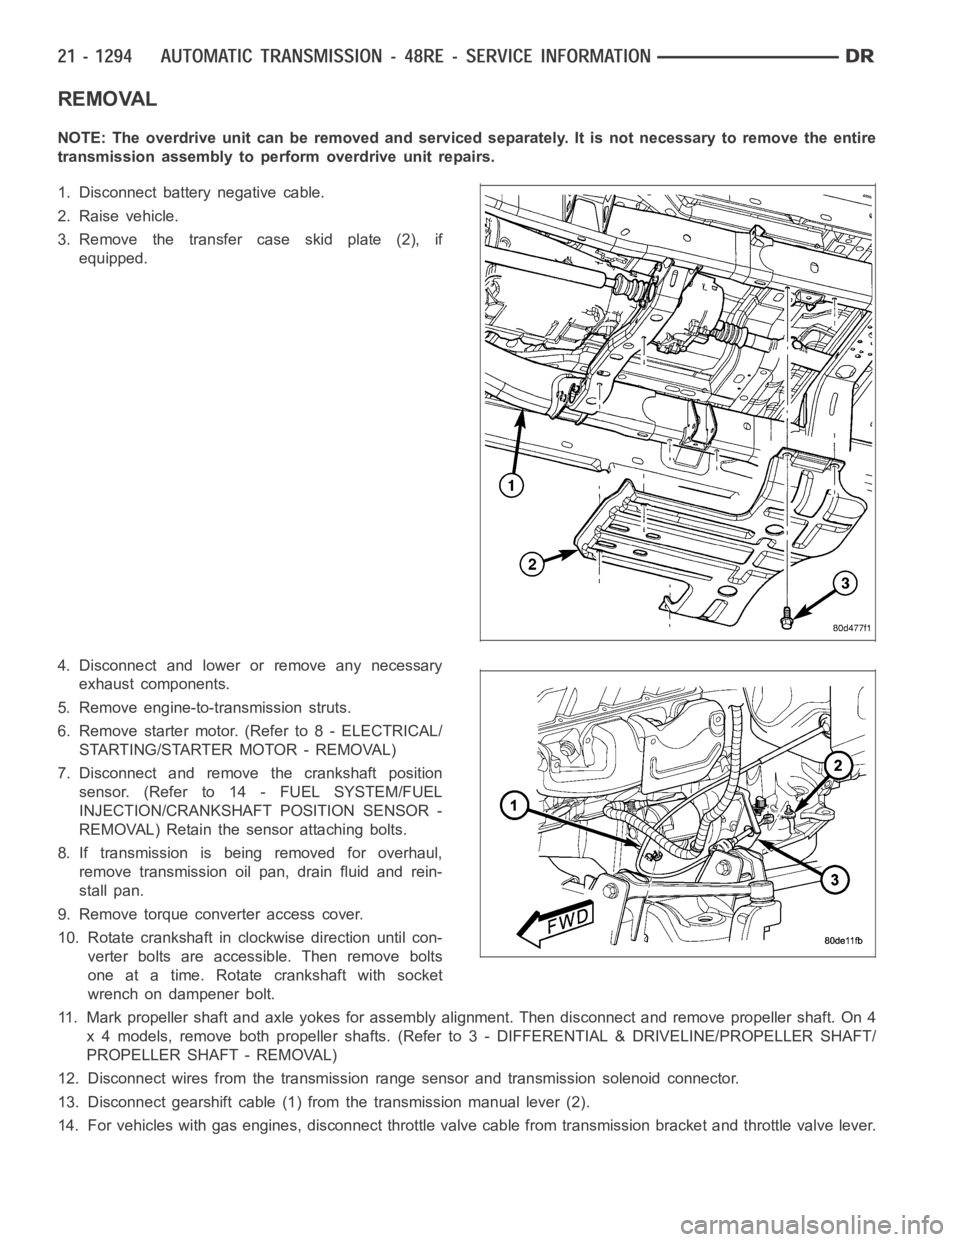
3. Remove the transfer case skid plate (2), if
equipped.
4. Disconnect and lower or remove any necessary
exhaust components.
5. Remove engine-to-transmission struts.
6. Remove starter motor. (Refer to 8 - ELECTRICAL/
STARTING/STARTER MOTOR - REMOVAL)
7. Disconnect and remove the crankshaft position
sensor. (Refer to 14 - FUEL SYSTEM/FUEL
INJECTION/CRANKSHAFT POSITION SENSOR -
REMOVAL) Retain the sensor attaching bolts.
8. If transmission is being removed for overhaul,
remove transmission oil pan, drain fluid and rein-
stall pan.
9. Remove torque converter access cover.
10. Rotate crankshaft in clockwise direction until con-
verter bolts are accessible. Then remove bolts
one at a time. Rotate crankshaft with socket
wrench on dampener bolt.
11. Mark propeller shaft and axle yokes for assembly alignment. Then disconnect and remove propeller shaft. On 4
x 4 models, remove both propeller shafts. (Refer to 3 - DIFFERENTIAL & DRIVELINE/PROPELLER SHAFT/
PROPELLER SHAFT - REMOVAL)
12. Disconnect wires from the transmission range sensor and transmissionsolenoid connector.
13. Disconnect gearshift cable (1) from the transmission manual lever (2).
14. For vehicles with gas engines, disconnect throttle valve cable from transmission bracket andthrottle valve lever.
Page 3819 of 5267
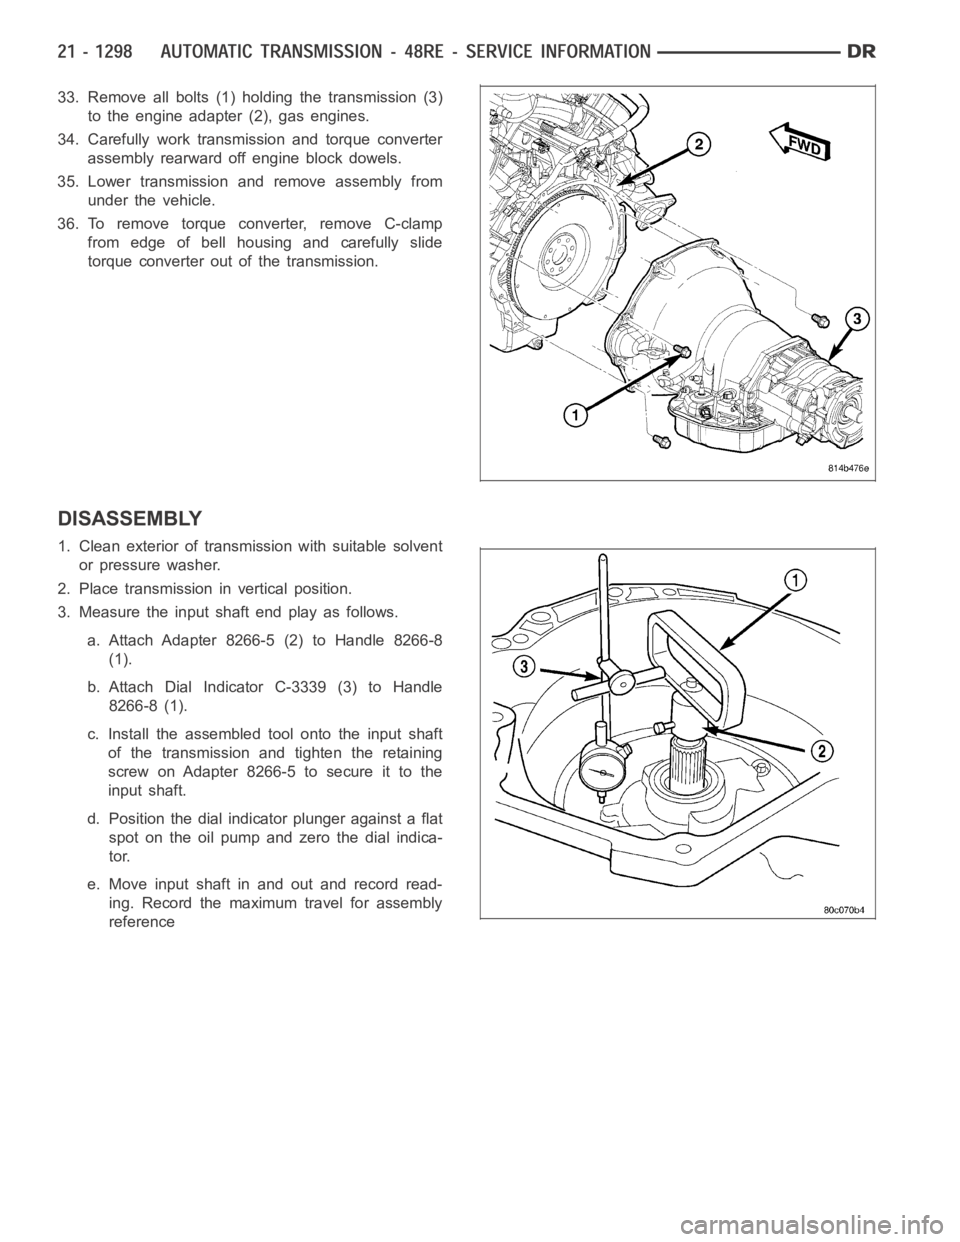
33. Remove all bolts (1) holding the transmission (3)
to the engine adapter (2), gas engines.
34. Carefully work transmission and torque converter
assembly rearward off engine block dowels.
35. Lower transmission and remove assembly from
under the vehicle.
36. To remove torque converter, remove C-clamp
from edge of bell housing and carefully slide
torque converter out of the transmission.
DISASSEMBLY
1. Clean exterior of transmission with suitable solvent
or pressure washer.
2. Place transmission in vertical position.
3. Measure the input shaft end play as follows.
a. Attach Adapter 8266-5 (2) to Handle 8266-8
(1).
b. Attach Dial Indicator C-3339 (3) to Handle
8266-8 (1).
c. Install the assembled tool onto the input shaft
of the transmission and tighten the retaining
screw on Adapter 8266-5 to secure it to the
input shaft.
d. Position the dial indicator plunger against a flat
spot on the oil pump and zero the dial indica-
tor.
e. Move input shaft in and out and record read-
ing. Record the maximum travel for assembly
reference
Page 3821 of 5267
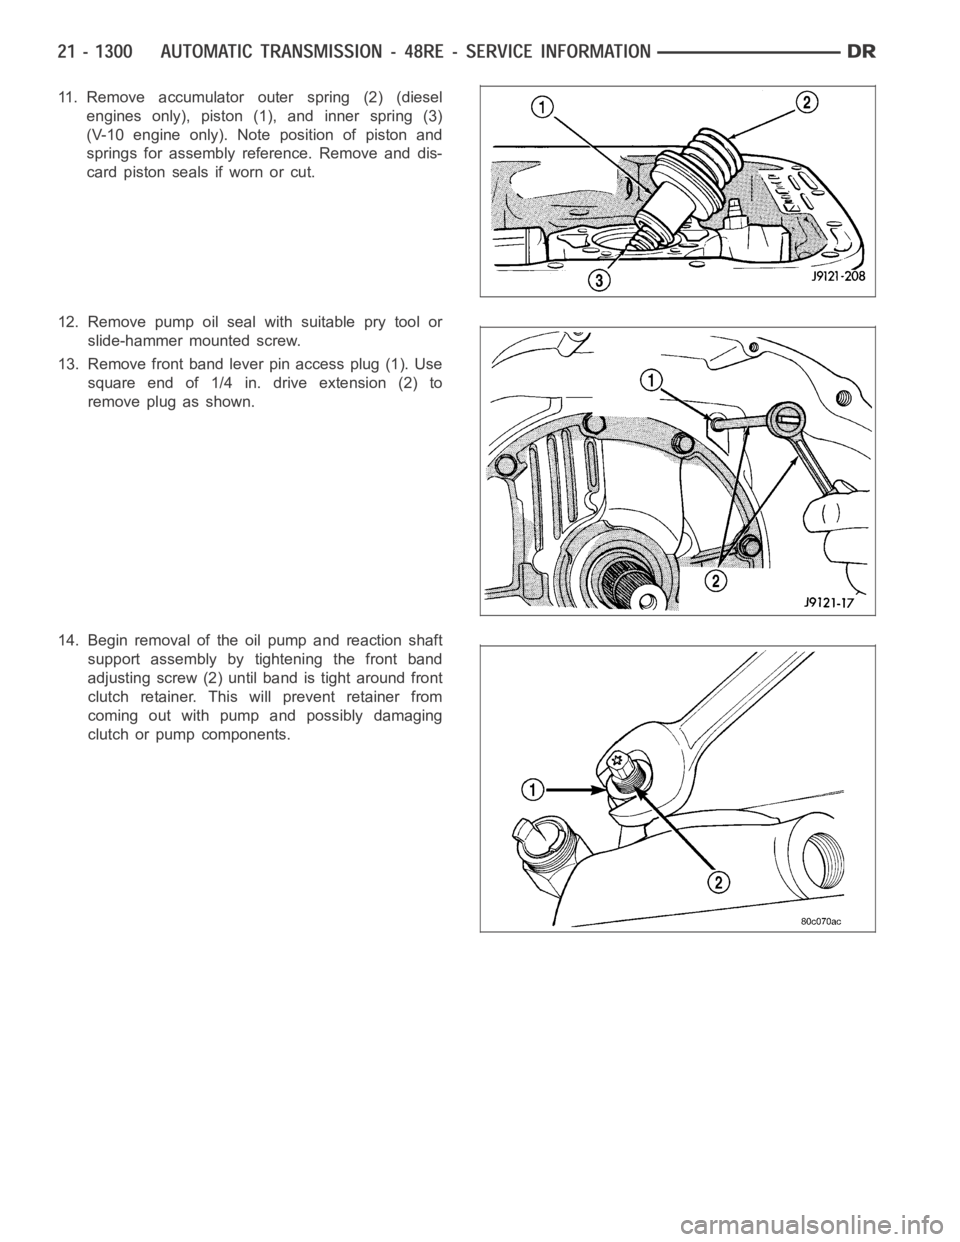
11. Remove accumulator outer spring (2) (diesel
engines only), piston (1), and inner spring (3)
(V-10 engine only). Note position of piston and
springs for assembly reference. Remove and dis-
card piston seals if worn or cut.
12. Remove pump oil seal with suitable pry tool or
slide-hammer mounted screw.
13. Remove front band lever pin access plug (1). Use
square end of 1/4 in. drive extension (2) to
remove plug as shown.
14. Begin removal of the oil pump and reaction shaft
support assembly by tightening the front band
adjusting screw (2) until band is tight around front
clutch retainer. This will prevent retainer from
coming out with pump and possibly damaging
clutch or pump components.
Page 3836 of 5267
ACCUMULATOR, VALVE BODY, OIL PAN, AND TORQUE CONVERTER
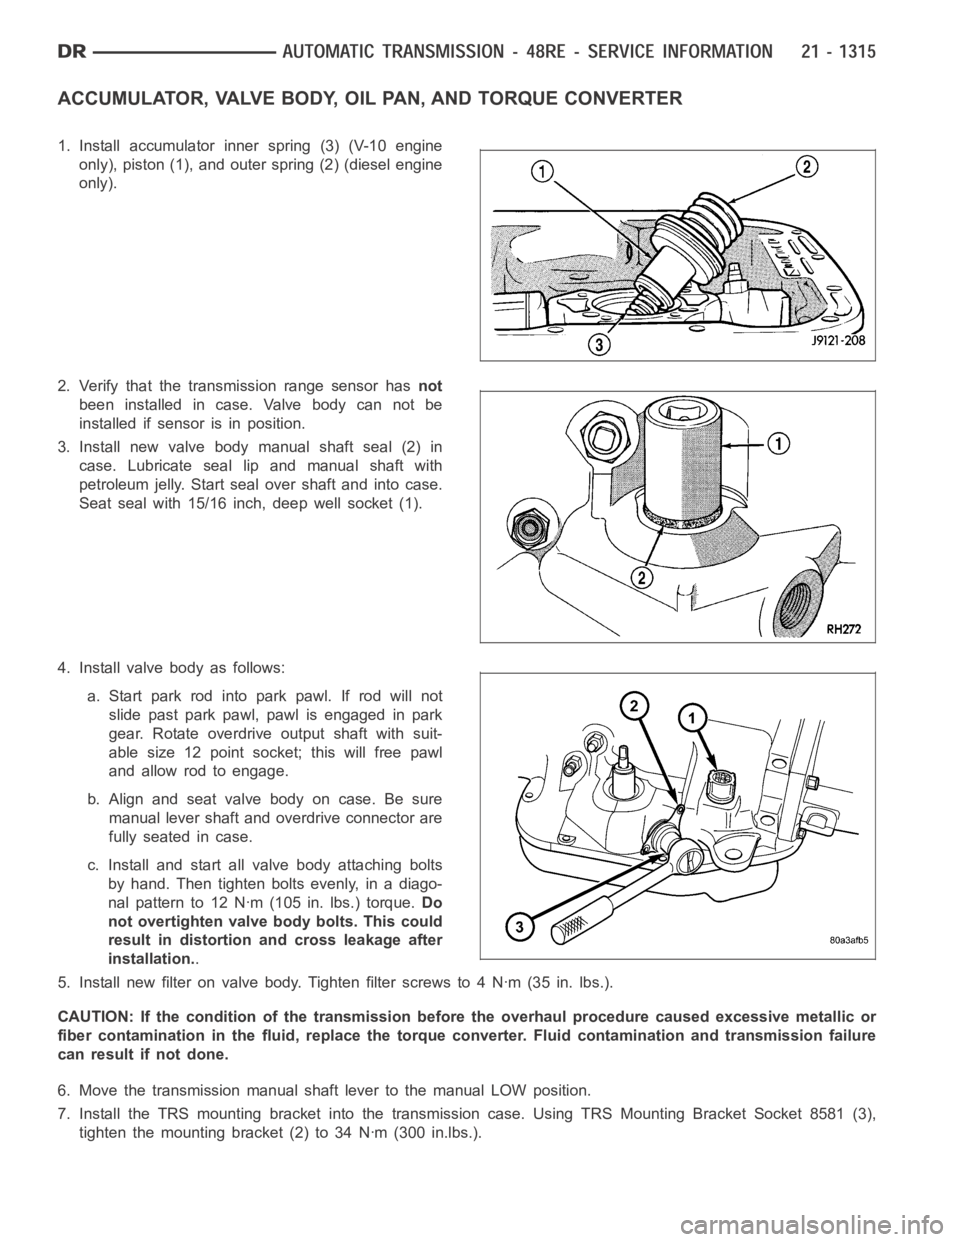
1. Install accumulator inner spring (3) (V-10 engine
only), piston (1), and outer spring (2) (diesel engine
only).
2. Verify that the transmission range sensor hasnot
been installed in case. Valve body can not be
installed if sensor is in position.
3. Install new valve body manual shaft seal (2) in
case. Lubricate seal lip and manual shaft with
petroleum jelly. Start seal over shaft and into case.
Seat seal with 15/16 inch, deep well socket (1).
4. Install valve body as follows:
a. Start park rod into park pawl. If rod will not
slide past park pawl, pawl is engaged in park
gear. Rotate overdrive output shaft with suit-
able size 12 point socket; this will free pawl
and allow rod to engage.
b.Alignandseatvalvebodyoncase.Besure
manual lever shaft and overdrive connector are
fully seated in case.
c. Install and start all valve body attaching bolts
by hand. Then tighten bolts evenly, in a diago-
nal pattern to 12 Nꞏm (105 in. lbs.) torque.Do
not overtighten valve body bolts. This could
result in distortion and cross leakage after
installation..
5. Install new filter on valve body. Tighten filter screws to 4 Nꞏm (35 in. lbs.).
CAUTION: If the condition of the transmission before the overhaul procedure caused excessive metallic or
fiber contamination in the fluid, replace the torque converter. Fluid contamination and transmission failure
can result if not done.
6. Move the transmission manual shaft lever to the manual LOW position.
7. Install the TRS mounting bracket into the transmission case. Using TRS Mounting Bracket Socket 8581 (3),
tighten the mounting bracket (2) to 34 Nꞏm (300 in.lbs.).
Page 3838 of 5267
INSTALLATION
1. Check torque converter hub inner and outer diam-
eters and hub drive notches for sharp edges burrs,
scratches, or nicks. Polish the hub and notches
with 320/400 grit paper and crocus cloth if neces-
sary. The hub must be smooth to avoid damaging
pump seal at installation.
2. Lubricate pocket in the rear oil pump seal lip with
transmission fluid.
3. Lubricate converter pilot hub of the crankshaft with
a light coating of Mopar
High Temp Grease.
4. Align and install converter in oil pump.
5. Carefully insert converter in oil pump. Then rotate
converter back and forth until fully seated in pump
gears.
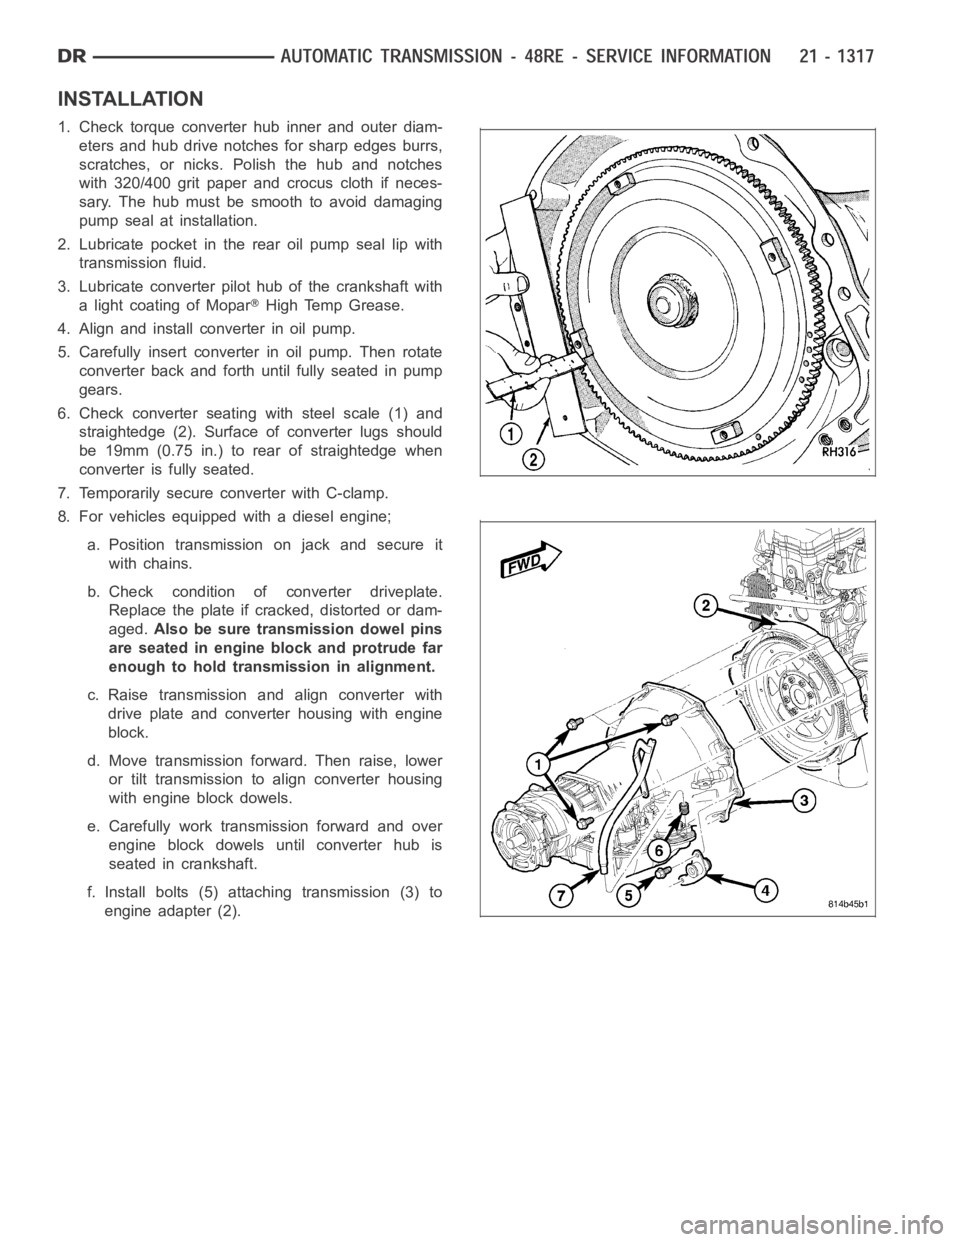
6. Check converter seating with steel scale (1) and
straightedge (2). Surface of converter lugs should
be 19mm (0.75 in.) to rear of straightedge when
converter is fully seated.
7. Temporarily secure converter with C-clamp.
8. For vehicles equipped with a diesel engine;
a. Position transmission on jack and secure it
with chains.
b. Check condition of converter driveplate.
Replace the plate if cracked, distorted or dam-
aged.Also be sure transmission dowel pins
are seated in engine block and protrude far
enough to hold transmission in alignment.
c. Raise transmission and align converter with
drive plate and converter housing with engine
block.
d. Move transmission forward. Then raise, lower
or tilt transmission to align converter housing
with engine block dowels.
e. Carefully work transmission forward and over
engine block dowels until converter hub is
seated in crankshaft.
f. Install bolts (5) attaching transmission (3) to
engine adapter (2).