ECO mode DODGE STRATUS COUPE 2005 2.G Owners Manual
[x] Cancel search | Manufacturer: DODGE, Model Year: 2005, Model line: STRATUS COUPE, Model: DODGE STRATUS COUPE 2005 2.GPages: 396
Page 19 of 396

If this problem occurs¼
Problem Do this Ref. page
The automatic transaxle does not shift
when accelerating and/or the vehicle
does not easily begin to move.There may be a problem in the automatic transaxle.
Have the vehicle inspected by an authorized dealer.
1.Vehicles with automatic transaxle
Shift the lever into ª2º (SECOND) position when
starting the vehicle. If the vehicle is on a level road, shift
the lever back to ªDº (DRIVE) position.
2.Vehicles with Autostick automatic transaxle
Shift the lever into 2nd gear of the Autostick mode
when starting the vehicle. If the vehicle is on a level
road, shift the lever back to ªDº (DRIVE) position.
(These methods may or may not work depending on the
contents of malfunction.)P. 160, 168
A tire is punctured.
1.Park the vehicle in a safe place where the surface is flat
and level.
2.Replace the flat tire with the spare tire.P. 270
INTRODUCTION 19
1
Page 30 of 396

Horn deactivation/reactivation
The confirmation function can be set in the following
three ways.
Each time the confirmation function is set, a buzzer will
sound to tell you the condition of the confirmation
function.
One buzzer: The horn will sound if the doors are locked
with the keyless entry system. The horn will sound
regardless of whether the doors are locked or unlocked.
Two buzzers: The horn will not sound, even if the doors
are locked with the keyless entry system.
Three buzzers: The horn will sound if the doors are
already locked and the keyless entry system is used
again.
In this mode, the horn will only sound when the keyless
entry LOCK button is pressed again to reconfirm that the
doors are locked.
1. Press the LOCK button for 4 to 10 seconds and press
the UNLOCK button during this period.2. Release the LOCK and UNLOCK buttons at the same
time.
Turn signal light feature±ON/OFF
The confirmation function provided by the turn signal
lights when the doors are locked and the confirmation
function provided when they are unlocked can be
deactivated/reactivated separately.
At the end of each procedure, a buzzer sounds once if the
function has been reactivated or twice if the function has
been deactivated.
1. Press the UNLOCK button for 4 to 10 seconds and
press the LOCK button within this period.
2. To turn ON/OFF the function provided when the
doors are locked, release the LOCK button and then
release the UNLOCK button.
3. To turn ON/OFF the function provided when the
doors are unlocked, release the UNLOCK button and
then release the LOCK button.
30 LOCKING AND UNLOCKING
Page 45 of 396

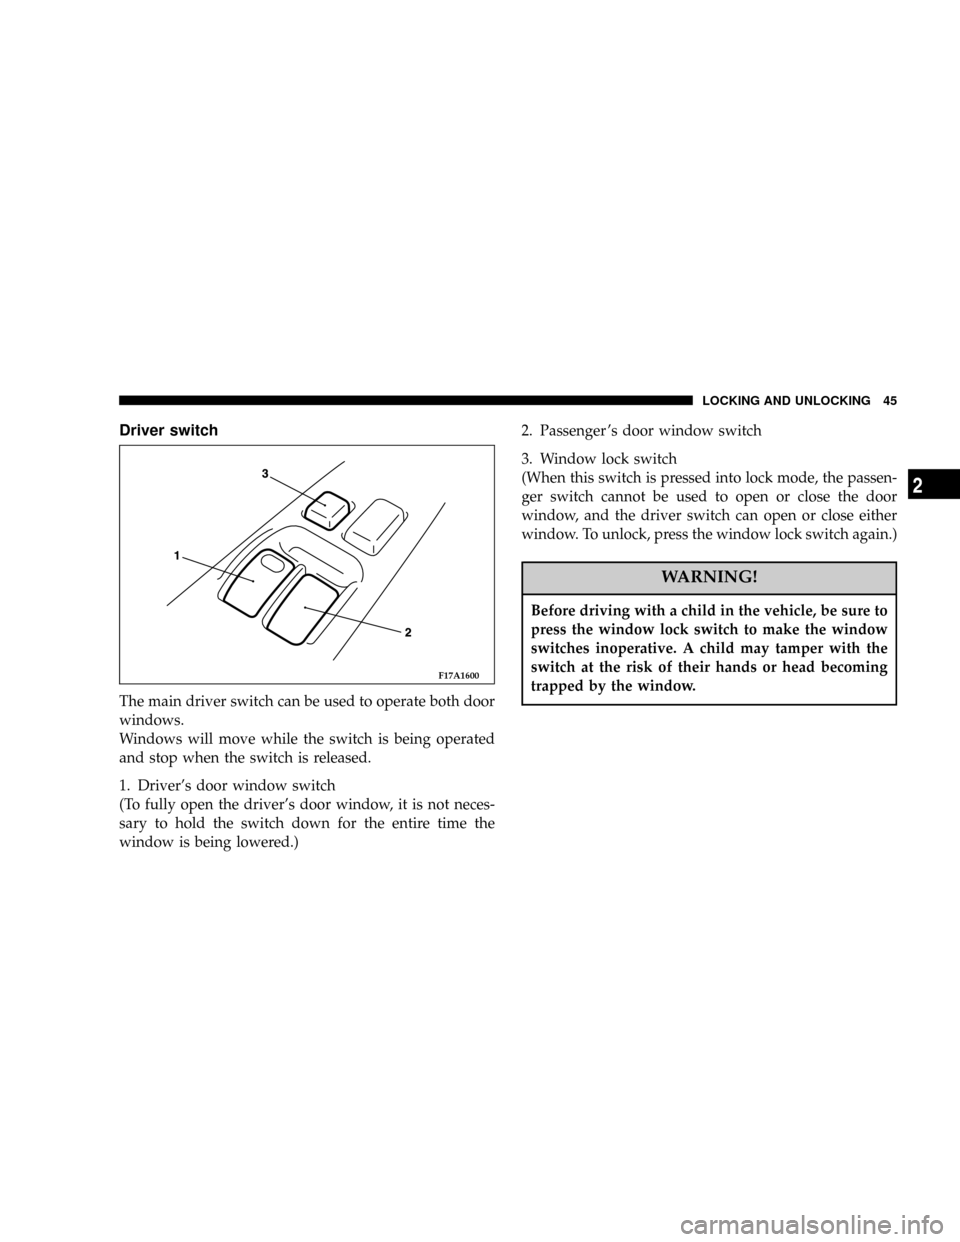
Driver switch
The main driver switch can be used to operate both door
windows.
Windows will move while the switch is being operated
and stop when the switch is released.
1. Driver's door window switch
(To fully open the driver's door window, it is not neces-
sary to hold the switch down for the entire time the
window is being lowered.)2. Passenger 's door window switch
3. Window lock switch
(When this switch is pressed into lock mode, the passen-
ger switch cannot be used to open or close the door
window, and the driver switch can open or close either
window. To unlock, press the window lock switch again.)
WARNING!
Before driving with a child in the vehicle, be sure to
press the window lock switch to make the window
switches inoperative. A child may tamper with the
switch at the risk of their hands or head becoming
trapped by the window.
F17A1600
LOCKING AND UNLOCKING 45
2
Page 71 of 396

2. Grasp the metal tongue and slide it up the webbing so
that it becomes easy to pull across your body.
After a couple of tries this will become an automatic
one-handed motion.3. Pull the seat belt out slowly while holding the metal
tongue. This system will not lock up if you stop or
hesitate, so relax and continue to ªbuckle-upº.
Push the metal tongue into the buckle until a ªclickº is
heard. Pull up on the belt to confirm the metal tongue is
locked securely in the buckle.
NOTE:If the seat belt is pulled to its full extension, it can
enter the ALR mode and lock in position. If this occurs,
allow the belt to fully retract and then repeat step 3.
G28A0220G28A0230
SEATS, SEAT BELTS, CHILD RESTRAINTS AND AIR BAGS 71
3
Page 89 of 396

WARNING!
All seat belt assemblies, including retractors and
attaching hardware, should be inspected by an au-
thorized dealer after any collision. We recommend
that all seat belt assemblies in use during a collision
be replaced unless the collision was very minor and
the belts show no damage and continue to operate
properly.
Do not attempt to repair or replace any part of the
seat belt assemblies; that work should be done by an
authorized dealer. Failure to have an authorized
dealer perform the work could reduce the effective-
ness of the belts and could result in serious or fatal
injury in a collision.
Supplemental Restraint System (SRS) - air bag
This vehicle is equipped with a Supplemental Restraint
System (SRS), which includes air bags for the driver and
front passenger. The SRS air bag is designed to supple-
ment the primary protection of the driver and front
passenger side seat belt systems by providing those
occupants with protection against head and chest injuries
in certain moderate to severe frontal collisions. The SRS
side air bag (if so equipped) is also designed to supple-
ment the seat belts and provide the driver and front
passenger with protection against chest injuries in certain
moderate to severe side impact collisions.
The SRS is NOT a substitute for the seat belts. For
maximum protection in all types of crashes and acci-
dents, seat belts must ALWAYS be worn by everyone
who drives or rides in this vehicle (with infants and small
children in an appropriate child restraint in the rear seat,
and older children buckled in the rear seat). Refer to
``Child Restraints'' on page 76.
SEATS, SEAT BELTS, CHILD RESTRAINTS AND AIR BAGS 89
3
Page 144 of 396

NGear positions........................158
NDriving speed
(Vehicles with automatic transaxle).........159
NHolding on an upgrade.................159
NTransaxle reset mode...................160
mAutomatic transaxle Autostick
(if so equipped)
........................160
NSelector lever operation.................161
NIndicator lights.......................163
NSelector positions (Main gate).............164
NSelector positions Manual gate Autostick.....165
NHolding on an upgrade.................167
NTransaxle reset mode...................168
mManual transaxle (if so equipped)..........168
NTo start.............................169
NProper shift points.....................169NRecommended downshifting speed.........171
NDriving precautions....................171
mParking brake.........................171
mBrake pedal...........................173
mPower brakes.........................174
mBrake pad wear alarm...................174
mAnti-lock braking (ABS) system
(if so equipped)
........................175
NGeneral driving hints
(standard/anti-lock brakes)...............175
mSteering wheel tilt lock lever..............177
mPower steering........................178
mInside Day/Night rearview mirrors.........179
NElectrochromic inside rearview mirror
(if so equipped.......................180
NElectrochromic mirror operation
(if so equipped).......................181
144 STARTING AND DRIVING
Page 147 of 396

CAUTION!
Using leaded gasoline in your vehicle will damage
the engine, catalytic converter, and the oxygen sen-
sors. Further, using leaded gasoline is illegal, and
will void warranty coverage of the engine, catalytic
converter, and oxygen sensors.
Gasoline additives
Many fuel suppliers add detergents to their gasoline to
minimize fuel injector fouling and to control intake valve
deposits. These detergent gasolines are highly recom-
mended for use in your vehicle. They help keep your
engine in tune and your emission control system working
properly.
Octane requirement
2.4 liter engine model
Your vehicle is designed to operate on unleaded gasoline
having a minimum octane rating of 87 [(MON+RON)/2],
or 91 RON.
3.0 liter engine model
Your vehicle is designed to operate on regular grade
unleaded gasoline having a minimum octane rating of 87
[(MON+RON)/2], or 91 RON. If optimum performance
is wanted, it is recommended to use premium grade
unleaded gasoline having an octane rating of 91
[(MON+RON)/2], or 95 RON.
MON: Motor Octane Number
RON: Research Octane Number
Reformulated Gasoline
Many areas of the country require the use of cleaner
burning fuel referred to as ªReformulated Gasolineº.
Reformulated gasolines contain oxygenates, and are spe-
cially blended to reduce vehicle emissions and improve
air quality.
The manufacturer supports the use of reformulated gaso-
lines. Properly blended reformulated gasolines will pro-
vide excellent performance and durability of engine and
fuel system components.
STARTING AND DRIVING 147
5
Page 156 of 396

CAUTION!
The electronically controlled transaxle system is
strictly intended to provide supplementary func-
tions. When driving downhill under certain condi-
tions, or immediately after starting when the auto-
matic transaxle is cold, no automatic shift-down may
be made. The driver should shift down to a low gear
(3rd gear or 2nd gear), which will permit the engine
to exert a braking effect.
NOTE: During the brake-in period or immediately after
re-connection of the battery cable, the vehicle may not
shift as smoothly. This does not indicate a faulty trans-
mission. The transaxle system must have a short period
to learn parameters for proper shifting. Shifting will
become smooth after the transaxle has been shifted
several times by the electronic control system.
Selector lever operation
As an additional safety precaution, models equipped
with an automatic transaxle have a shift-lock device that
holds the selector lever in the ªPº (PARK) position. To
move the selector lever from the ªPº (PARK) position to
another position, follow the steps below.
1. Depress and hold down the brake pedal.
2. Move the selector lever to the desired position.
NOTE: The selector lever cannot be moved from ªPº
(PARK) to another position if the ignition key is at the
ªLOCKº position, removed, or if the brake pedal is not
depressed and held down.
156 STARTING AND DRIVING
Page 159 of 396

ª3º THIRD / ª2º SECOND
For driving slowly in heavy city traffic or on mountain
roads where more precise speed control is desired.
Also use it when climbing long grades, and for engine
braking when descending moderately steep grades.
Engine braking is automatically applied when necessary,
depending on road conditions.
ªLº LOW
This position is for driving up very steep hills and for
engine braking at low speeds when descending steep
gradients.
WARNING!
Be very careful not to shift into ªLº suddenly. Doing
so may cause the tires to slip.
Driving speed (Vehicles with automatic transaxle)
In order to avoid damage to the engine from excessively
high rpm, do not exceed the listed driving speed when
the selector lever is set to the ª3º (THIRD) position, the
ª2º (SECOND) position or the ªLº (LOW) position.
ConditionDriving speed mph (km/h)
2.4 liter engine 3.0 liter engine
ª3º (THIRD) 114 (180) 118 (190)
ª2º (SECOND) 74 (115) 80 (130)
ªLº (LOW) 28 (45) 31 (45)
WARNING!
Always obey posted speed limits. Use common
sense and drive safely, regardless of posted speed
limits. Drive at speeds that are safe for the traffic,
weather, or road conditions.
Holding on an upgrade
To avoid transaxle overheating, never hold the vehicle
stationary on an incline by using the accelerator pedal.
Instead, use the brake pedal.
STARTING AND DRIVING 159
5
Page 160 of 396

Transaxle Reset Mode
The transaxle is monitored for abnormal conditions. If a
condition is detected that could cause damage, the trans-
axle automatically shifts into second gear. The transaxle
remains in second gear despite the forward gear selected.
Park (P), Reverse (R), and Neutral (N) will continue to
operate. This Reset feature allows the vehicle to be driven
to a dealer for service without damaging the transaxle.
If the problem has been momentary, the transaxle can be
reset to regain all forward gears.
²Stop the vehicle and shift into PARK (P).
²Turn the key to OFF then start the engine.
²Shift into ªDº and resume driving.
NOTE:Even if the transaxle can be reset, we recom-
mend that you visit a dealer at your earliest possible
convenience. Your dealer has diagnostic equipment to
determine if the problem could recur.
If the transaxle cannot be reset, dealer service is required.
AUTOMATIC TRANSAXLE AUTOSTICK
(IF SO EQUIPPED)
Designed for optimum control and equipped with adap-
tive control capabilities, the electronically controlled
transaxle optimally matches gear shifts to almost all
driving and road conditions.
DRIVING UPHILL
The transaxle may not upshift to a higher gear if the
computer determines the current speed cannot be main-
tained once a higher gear is engaged.
For smoother vehicle performance, if you release the
throttle while climbing a steep grade, the transaxle may
not upshift. This is normal, as the computer is controlling
the shifting. After reaching the top of the hill, normal gear
shift function will resume.
DRIVING DOWNHILL
When traveling down steep grades and depressing the
brake pedal, the computer may automatically select a
lower gear. This function assists engine braking efforts,
reducing the need to use the brakes.
160 STARTING AND DRIVING