flat tire DODGE STRATUS COUPE 2005 2.G Owners Manual
[x] Cancel search | Manufacturer: DODGE, Model Year: 2005, Model line: STRATUS COUPE, Model: DODGE STRATUS COUPE 2005 2.GPages: 396
Page 8 of 396

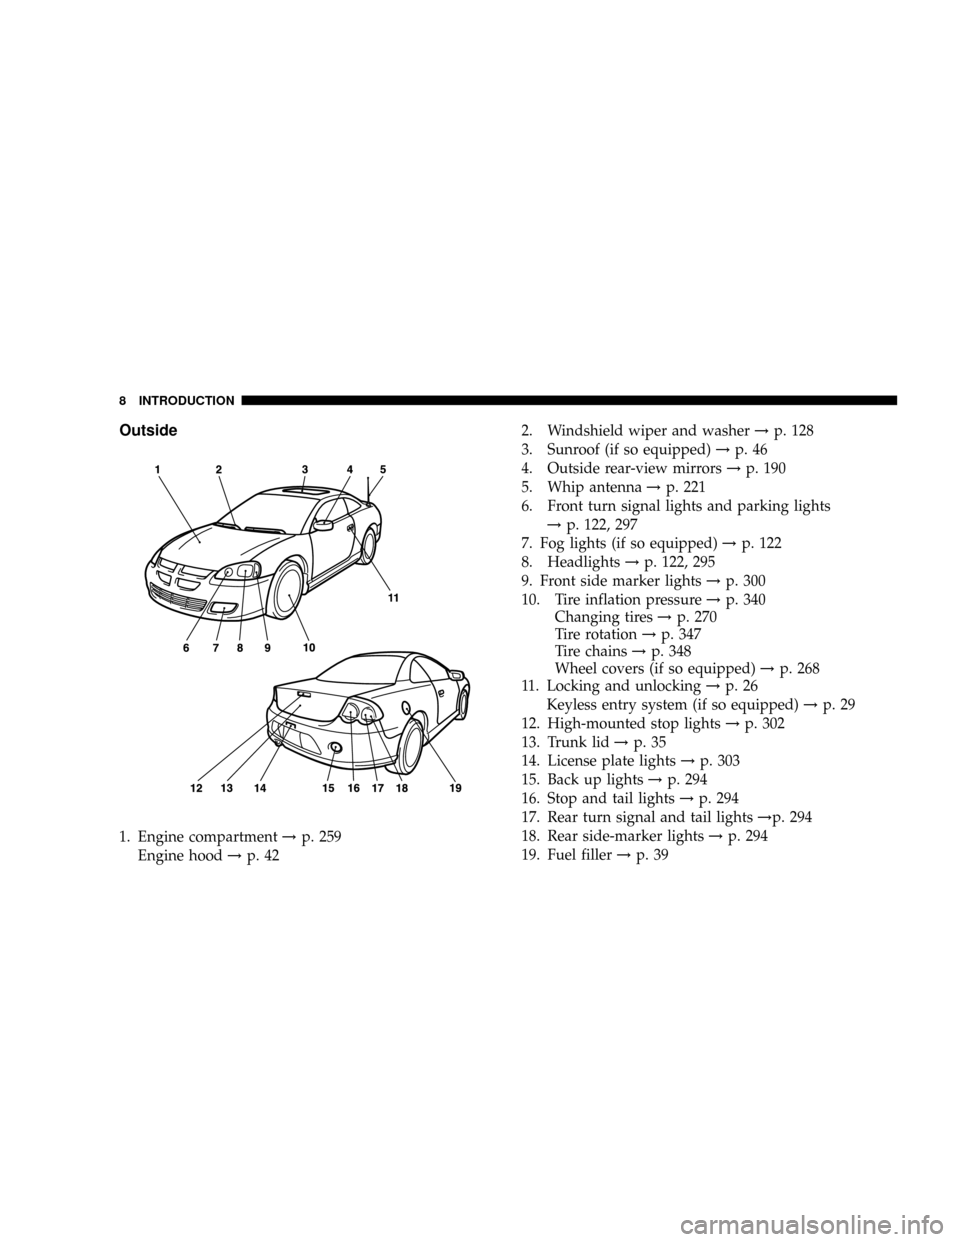
Outside
1. Engine compartment!p. 259
Engine hood!p. 422. Windshield wiper and washer!p. 128
3. Sunroof (if so equipped)!p. 46
4. Outside rear-view mirrors!p. 190
5. Whip antenna!p. 221
6. Front turn signal lights and parking lights
!p. 122, 297
7. Fog lights (if so equipped)!p. 122
8. Headlights!p. 122, 295
9. Front side marker lights!p. 300
10. Tire inflation pressure!p. 340
Changing tires!p. 270
Tire rotation!p. 347
Tire chains!p. 348
Wheel covers (if so equipped)!p. 268
11. Locking and unlocking!p. 26
Keyless entry system (if so equipped)!p. 29
12. High-mounted stop lights!p. 302
13. Trunk lid!p. 35
14. License plate lights!p. 303
15. Back up lights!p. 294
16. Stop and tail lights!p. 294
17. Rear turn signal and tail lights!p. 294
18. Rear side-marker lights!p. 294
19. Fuel filler!p. 39
8 INTRODUCTION
Page 19 of 396

If this problem occurs¼
Problem Do this Ref. page
The automatic transaxle does not shift
when accelerating and/or the vehicle
does not easily begin to move.There may be a problem in the automatic transaxle.
Have the vehicle inspected by an authorized dealer.
1.Vehicles with automatic transaxle
Shift the lever into ª2º (SECOND) position when
starting the vehicle. If the vehicle is on a level road, shift
the lever back to ªDº (DRIVE) position.
2.Vehicles with Autostick automatic transaxle
Shift the lever into 2nd gear of the Autostick mode
when starting the vehicle. If the vehicle is on a level
road, shift the lever back to ªDº (DRIVE) position.
(These methods may or may not work depending on the
contents of malfunction.)P. 160, 168
A tire is punctured.
1.Park the vehicle in a safe place where the surface is flat
and level.
2.Replace the flat tire with the spare tire.P. 270
INTRODUCTION 19
1
Page 97 of 396

WARNING!
²Do not set anything on, or attach anything to, the
instrument panel above the glove compartment. Such
items could strike and injure an occupant if the air
bag inflates.
²Do not mount or locate any aftermarket equipment
on or behind the knee bolsters.
²Do not attach accessories to, or put them in front of,
the windshield. They could restrict the air bag infla-
tion, or strike and injure an occupant, when the air
bag inflates.
²Do not put packages, pets or other objects between the
air bags and either the driver or the front passenger.
This could affect air bag performance, or could cause
severe or even fatal injury when the air bag inflates.
²Right after air bag inflation, several parts of the air
bag system will be hot. Do not touch them. You could
be burned.
²The air bag system is designed to work only once.
After the air bags deploy, they will not work again.
They must promptly be replaced and the entire air
bag system inspected by an authorized dealer.
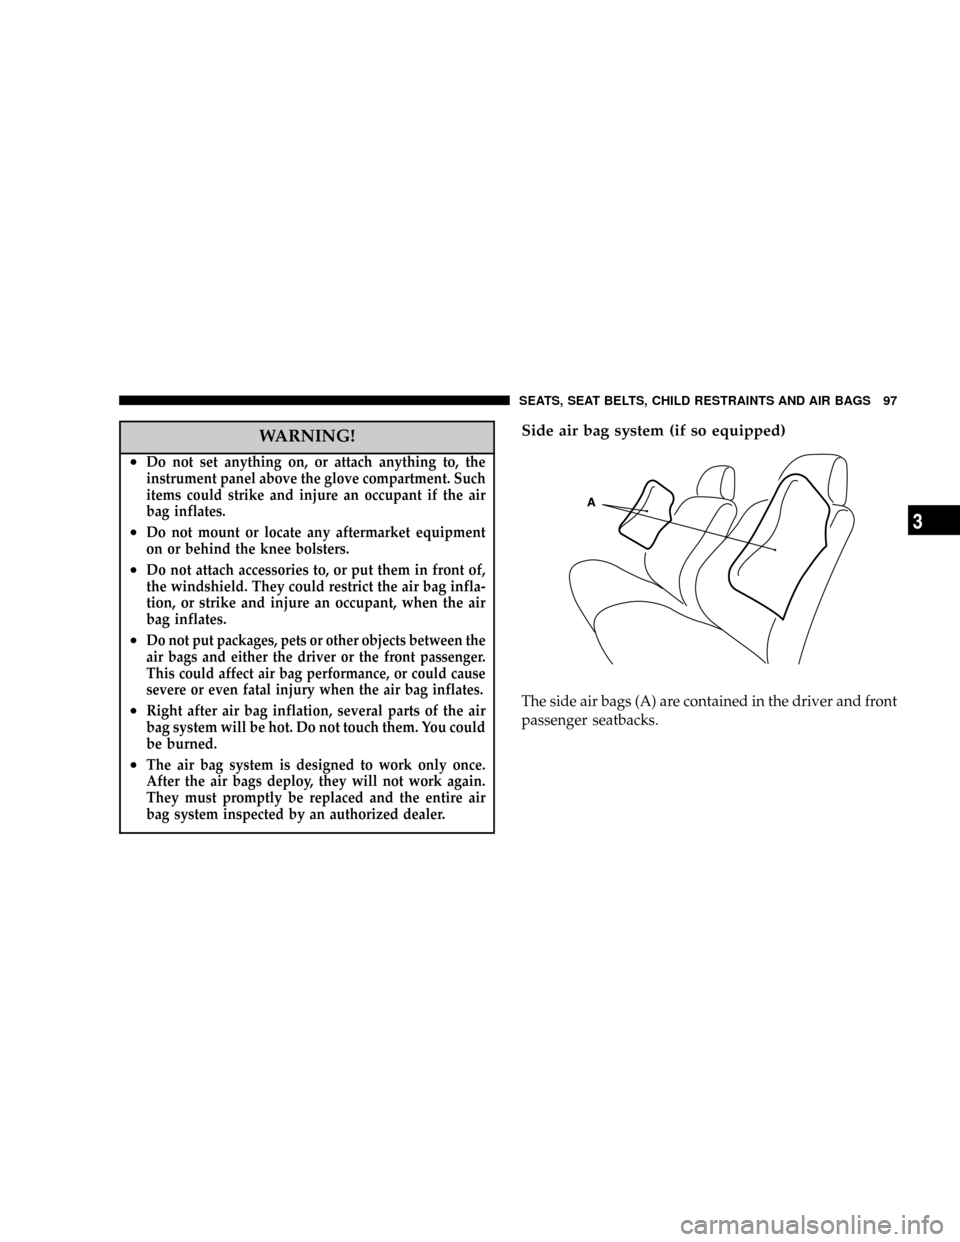
Side air bag system (if so equipped)
The side air bags (A) are contained in the driver and front
passenger seatbacks.
SEATS, SEAT BELTS, CHILD RESTRAINTS AND AIR BAGS 97
3
Page 151 of 396

FUEL ECONOMY
Fuel economy is dependent on many factors. Your per-
sonal driving habits can have a significant effect on your
fuel economy. Several recommendations for achieving
maximum fuel economy are listed below.
1. When pulling away from traffic lights or stop signs,
accelerate slowly and smoothly.
2. When parked for even a short period, do not idle the
engine. Shut it off.
3. Plan your trips to avoid unnecessary stops.
4. Keep your tires inflated to the recommended pres-
sures.
5. For freeway driving, maintain a constant speed within
the posted limits when traffic, roadway and weather
conditions safely permit, for the best fuel economy.
6. Keep your air filter clean and your vehicle lubricated
according to the recommendations in this manual.
7. Keep your vehicle ªtuned-upº.
An out-of-tune engine wastes fuel and costs money.
8. Reduce excess vehicle load.
IGNITION SWITCH
LOCK
For vehicles with a manual transaxle, when removing the
key, push the key in at the ªACCº position and keep it
depressed until it is turned to the ªLOCKº position, and
remove the key.
For vehicles with an automatic transaxle: When remov-
ing the key, first set the gear selector lever to the ªPº
(PARK) position, and then turn the key to ªLOCKº and
remove it.
I21A0230
STARTING AND DRIVING 151
5
Page 175 of 396

WARNING!
Driving on worn brake pads can reduce your ability
to stop, and can result in an accident.
ANTI-LOCK BRAKING (ABS) SYSTEM (IF SO
EQUIPPED)
The ABS gives increased vehicle stability and brake
performance under most braking conditions. The system
automatically ªpumpsº the brakes during severe braking
conditions to prevent wheel lock up.
All vehicle wheels and tires must be the same size and
tires must be properly inflated to produce optimal signals
for the computer. However, the system will compensate
when the compact spare is in use.
During stops where ABS is activated, a vibration of the
brake pedal may be felt and associated system noises
may be heard.
NOTE:Pumping of the brake pedal will diminish the
effectiveness of Anti-lock brakes and may lead to anaccident. Pumping makes the stopping distance longer.
Just press firmly on your brake pedal when you need to
slow down or stop.
General driving hints (standard/anti-lock brakes)
1. During anti-lock braking, steering differs slightly from
normal driving conditions. Be sure to operate steering
wheel carefully.
2. The anti-lock braking system is not restricted to situ-
ations where brakes are applied suddenly. This system
may also operate to prevent wheel lock when driving
over manholes, steel roadwork plates, road markings, or
any uneven road surface.
3. Always maintain a safe distance from vehicles in front
of you. If your vehicle is equipped with Anti-lock braking
system, allow for a greater braking distance when:
·Driving on gravel or snow-covered roads.
·Driving with tire chains installed.
·Driving on uneven road surfaces.
STARTING AND DRIVING 175
5
Page 202 of 396

Check wheel nuts for tightness and tires (including spare
tire) for proper pressure. Maintain specified tire inflation
pressures. Replace tires before they are excessively worn.
Lights
Have someone observe the operation of all exterior lights
while you activate the controls. Check the turn signals
and highbeam indicators on the instrument panel.
Fluid leaks
Check the area under the vehicle after overnight parking
for fuel, water, oil, or other fluid leaks. Make sure all fluid
levels are at the proper levels. Also, if fuel leaks are
detected, the cause should be located and corrected
immediately.
Driver
Do not drive if you are tired or sleepy. Do not drive if you
have been drinking or taking drugs. Unless you are alert
and able to concentrate on your driving, you could have
an accident, resulting in serious or fatal injury to yourself
and others.
SAFE DRIVING TECHNIQUES
Even this vehicle's safety equipment, and your safest
driving, cannot guarantee that you can avoid accident or
injury. However, we recommend that you give extra
attention to the following, to help maximize the safety of
you and your passengers:
1. Drive defensively. Be aware of traffic, road and
weather conditions. Leave adequate stopping distance
for your vehicle.
2. Before changing lanes, check your mirrors and flash
the proper turn-signal light.
3. While driving, watch the behavior of other drivers,
bicyclists and pedestrians.
4. During an emergency stop, switch on the hazard
warning flasher.
5. When leaving the vehicle, set the parking brake and
place the gearshift lever into low gear.
In vehicles with an automatic transaxle, place the selector
lever in the ªPº (PARK) position. Remove the key.
202 STARTING AND DRIVING
Page 204 of 396

over curbs or parking stop blocks. Always use caution
when traveling up or down sharp inclines as your
bumper may contact the road surface.
2. Maintain specified tire inflation pressures. Replace
tires before they are excessively worn.
3. If you plan to drive in another country, comply with
the vehicle registration laws and confirm the availability
of the correct fuel.
OPERATION DURING COLD WEATHER
1. Check the battery, including terminals and cables.
During extremely cold weather, the battery capacity will
decrease. Also, the battery power level may drop because
more power is needed for cold starting and operation.
Before driving the vehicle, check to see if the engine runs
at the proper speed and if the headlights are at their usual
intensity. Charge or replace the battery if necessary.
During cold weather, it is possible that a discharged
battery could freeze.
WARNING!
The battery gives off explosive hydrogen gas. Any
spark or flame can cause the battery to explode,
which could seriously injury or kill you.
Always wear protective clothes and a face shield
when doing battery maintenance, or let a skilled
technician do it.
2. Manual transaxles may be more difficult to shift
during cold weather operation. This is normal and shift
effort will become easier as the transaxle reaches a
normal operating temperature.
Maintain low-speed operation at first to allow the trans-
axle oil to be distributed to all lubrication points.
3. Check the engine antifreeze.
If there is a shortage of coolant due to leakage or engine
overheating, add high-quality ethylene glycol antifreeze
and water. The recommended ratio is about 50% water
and 50% anti-freeze. This ratio provides adequate corro-
sion, boiling, and freeze protection.
204 STARTING AND DRIVING
Page 265 of 396

CAUTION!
²When driving in rain, a layer of water may form
between the tires and the road surface (hydroplan-
ing).
This reduces a tire's frictional resistance on the
road, resulting in loss of steering stability and
braking capability. When driving on a wet road,
observe the following:
(a) Drive your vehicle at a safe speed.
(b) Do not drive on worn tires.
(c) Always maintain the specified tire inflation
pressures.
On snowy or icy roads
1. When driving on a road covered by snow or ice, it is
recommended that you use snow tires.
CAUTION!
Tire chains are not recommended for your vehicle.
The clearance between the chains and the body is
small, and body damage may occur.
2. Drive slowly. Avoid any sudden starts or stops, abrupt
brake application or sharp cornering.
3. Depressing the brake pedal during travel on snowy or
icy roads may cause tire slippage and skidding. When a
skid occurs, take your foot off the accelerator. Steer gently
into the skid. Braking will differ, depending upon
whether you have anti-lock brakes (ABS). If you do have
ABS, brake by pressing the brake pedal firmly, and
keeping it pressed. If you do not have ABS (vehicles
without anti-lock braking system) pump the brake pedal
with short rapid jabs, each time fully applying and fully
releasing for greatest effect.
4. Allow extra distance between your vehicle and the
vehicle in front of you, and avoid sudden braking.
EMERGENCIES 265
8
Page 267 of 396

Jack
To remove
Turn the shaft end so that the jack contracts and detach it
from the storage bracket.
To store
Turn the shaft end by hand to expand the jack until it is
secured firmly in position.
COMPACT SPARE TIRE
The compact spare tire is designed to save space in the
trunk and its lighter weight makes it easier to use if a flat
tire occurs.
CAUTION!
²The tire pressure should be periodically checked
and maintained at the specified pressure while
the tire is stowed.
²Driving with an insufficient tire pressure can lead
to an accident. If you have no choice but to drive
with an insufficient tire pressure, keep your speed
down and adjust to the specified pressure [60 psi
(420 kPa)] as soon as possible.
²The compact spare should only be used temporarily
and should be returned to the trunk and the
original
tire repaired or replaced as soon as possible. If your
vehicle is equipped with aluminum type wheels, the
wheel nuts for aluminum type wheels can be used
temporarily on the compact spare tire wheel.
²Do not exceed 50 mph (80 km/h) while the com-
pact spare tire is installed on the vehicle.
N21C0010To removeTo storeStorage
bracket
EMERGENCIES 267
8
Page 270 of 396

Before installing the wheel cover to the wheel, make sure
that the opening with the symbol mark is correctly
aligned with the air valve.
JACKING AND TIRE CHANGING
If a tire must be changed, do so only after making sure
the vehicle is stopped in a safe, flat location.
Jacking up the vehicle
1. Park the vehicle on level and stable ground.
2. Switch on the hazard warning flashers, set up a
warning triangle, flashing signal light, etc., at an ad-
equate distance from the vehicle, and have all passengers
leave the vehicle. Turn the ignition key to the ªLOCKº
position.
3. Set the parking brake firmly, and move the gearshift
lever (manual transaxle) to the ªNº (Neutral) position or
move the selector lever (automatic transaxle) to the ªPº
(PARK) position.4. Apply a chock or block (A) at the tire diagonally
opposite the tire (B) to be changed.
NOTE: The chock shown is not supplied with the ve-
hicle. It is recommended that you keep one in the vehicle
for use if required.
N24A0100
A
B
270 EMERGENCIES