ABS DODGE STRATUS SEDAN 2004 Owners Manual
[x] Cancel search | Manufacturer: DODGE, Model Year: 2004, Model line: STRATUS SEDAN, Model: DODGE STRATUS SEDAN 2004Pages: 273, PDF Size: 4.79 MB
Page 88 of 273
An optionalAutoStick Gear Indicatordisplays the current
transaxle gear when in AutoStick mode.
16. Odometer/Trip Odometer
The odometer shows the total distance the vehicle has
been driven.
U.S. federal regulations require that upon transfer of
vehicle ownership, the seller certify to the purchaser the
correct mileage that the vehicle has been driven. There-
fore, if the odometer reading is changed, during repair or
replacement, be sure to keep a record of the reading
before and after the service so that the correct mileage can
be determined.
The trip odometer shows individual trip mileage. To
switch from odometer to trip odometer, press and release
the Trip Odometer button. Press and release the Trip
button a second time to return to the odometer. While in
trip mode, press and hold the button for at least
1¤2second
to reset the trip odometer.
Door, Deck or Trunk Ajar WarningsIf you move the vehicle and a door is not completely
closed, the word DOOR will replace the odometer dis-
play and a chime will sound once. The odometer display
will reappear when the door is closed. If the trunk is not
completely closed, the work DECK will replace the
odometer display. The odometer display will reappear
when the trunk is closed.
17. Anti-Lock Warning Light Ð If Equipped
This light monitors the Anti-Lock Brake System
described elsewhere in this manual. This light
will come on when the ignition key is turned to the
RUN position and may stay on for several seconds. If
the light does not come on, have the system checked
by an authorized dealer. The warning light should be
checked frequently to assure that it is operating prop-
erly.
If the ABS light remains on or comes on during driving,
it indicates that the Anti-Lock portion of the brake system
is not functioning and that service is required, however,
the conventional brake system will continue to operate
normally provided that the BRAKE warning light is not
on.
88 UNDERSTANDING YOUR INSTRUMENT PANEL
Page 89 of 273
18. Oil Pressure Light
Shows low engine oil pressure. The light will
come on and remain on briefly when the igni-
tion is turned on as a bulb check. If the bulb does not
come on during starting, have the bulb repaired
promptly.
If the light comes on and remains on while driving, stop
the vehicle and shut off the engine. Do not operate the
vehicle until the cause is corrected.
The light does not show the quantity of oil in the engine.
This can be determined using the procedure shown in
Section 7.
19. Brake System Warning Light
This light monitors both the brake fluid level
and the parking brake. If the light comes on,
it indicates either that the parking brake is
on or there is a low fluid level in the brake
master cylinder. On vehicles equipped with Anti-lock
brakes (ABS), the brake light may also indicate re-
duced braking performance.
If the parking brake is off and the light remains on, have
the brake system inspected as soon as possible.
WARNING!
Driving a vehicle with the brake light on is danger-
ous. A significant decrease in braking performance
may occur. It will take you longer to stop the vehicle.
You could have an accident. Have the vehicle
checked immediately.
The warning light should be checked frequently to assure
that it is operating properly. Turn the ignition key to the
RUN position. (Refer to ªA Word About Your Keys,
Ignition Key Removalº in this manual for an illustration
of the ignition positions.) The light should come on. If the
light does not come on, have the system checked by an
authorized dealer.
The light will also come on when the parking brake is
applied with the ignition in the RUN position.
NOTE:This light shows only that the parking brake is
on. It does not show the degree of brake application.
UNDERSTANDING YOUR INSTRUMENT PANEL 89
4
Page 90 of 273
In an ABS equipped vehicle, the Brake System Warning
light will come on if the ABS light is not functioning or if
the ABS system is not communicating.
20. Seat Belt Reminder Light
When the ignition switch is first turned ON, this
light will turn on for 5 to 8 seconds as a bulb
check. During the bulb check, if the driver's seat
belt is unbuckled, a chime will sound. After the bulb
check or when driving, if the driver seat belt remains
unbuckled, the Seat Belt Warning Light will flash or
remain on continuously. Refer to9Enhanced Driver
Seat Belt Reminder System (BeltAlertŸ)9in the Occu-
pant Restraints section for more information.
21. Theft Alarm Light Ð If Equipped
The light in the instrument cluster will flash rapidly for
15 seconds. This shows that the system is arming. If the
light comes on but does not flash, the system is still
armed, but there is a problem in the trunk circuit. After 15
seconds the light will continue to flash slowly. This
shows that the system is fully armed.
22. Low Fuel Light
When the fuel level drops to about 21¤2gallons (91¤2liters), the fuel symbol will light and remain lit
until fuel is added.
COMPASS, TEMPERATURE, AND TRIP
COMPUTER DISPLAY Ð IF EQUIPPED
This feature allows you to choose between a compass /
temperature display and one of five trip conditions being
monitored.
90 UNDERSTANDING YOUR INSTRUMENT PANEL
Page 128 of 273
NAnti-Lock Brake System (ABS) Ð If
Equipped...........................141
mPower Steering........................142
mTraction Control Ð If Equipped...........142
mTire Safety Information..................143
NTire Markings........................143
NTire Identification Number (TIN)..........146
NTire Loading And Tire Pressure...........147
mTiresÐGeneral Information...............150
NTire Pressure.........................150
NTire Inflation Pressures.................151
NRadial-Ply Tires......................153
NCompact Spare Tire Ð If Equipped.........153
NTire Spinning........................154
NTread Wear Indicators..................155
NReplacement Tires.....................155NAlignment And Balance.................156
mTire Chains...........................157
mSnow Tires...........................157
mTire Rotation Recommendations...........157
mAutoStick Ð If Equipped................158
NAutoStick Operation...................158
NAutoStick General Information............159
mFuel Requirements.....................160
NReformulated Gasoline.................160
NGasoline/Oxygenate Blends..............160
NMMT In Gasoline.....................161
NSulfur In Gasoline.....................161
NMaterials Added To Fuel................162
mAdding Fuel..........................162
NFuel Filler Cap (Gas Cap)...............162
mVehicle Loading.......................164
128 STARTING AND OPERATING
Page 141 of 273
Anti-Lock Brake System (ABS) Ð If Equipped
The ABS gives increased vehicle stability and brake
performance under most braking conditions. The system
automatically ªpumpsº the brakes during severe braking
conditions to prevent wheel lock-up.
All vehicle wheels and tires must be the same size and
tires must be properly inflated to produce accurate
signals for the ABS computer. However, the system will
compensate when the compact spare is in use.
During stops where ABS is activated, a vibration of the
brake pedal may be felt and associated system noises
may be heard.
WARNING!
Pumping of the brake pedal will diminish the effec-
tiveness of Anti-lock brakes and may lead to an
accident. Pumping makes the stopping distance
longer. Just press firmly on your brake pedal when
you need to slow down or stop.
WARNING!
²Anti-lock system (ABS) cannot prevent the natu-
ral laws of physics from acting on the vehicle, nor
can it increase braking or steering efficiency be-
yond that afforded by the condition of the vehicle
brakes and tires or the traction afforded.
²The ABS cannot prevent accidents, including
those resulting from excessive speed in turns,
following another vehicle too closely, or hydro-
planing. Only a safe, attentive, and skillful driver
can prevent accidents.
²The capabilities of an ABS equipped vehicle must
never be exploited in a reckless or dangerous
manner which could jeopardize the user's safety
or the safety of others.
STARTING AND OPERATING 141
5
Page 143 of 273
TIRE SAFETY INFORMATION
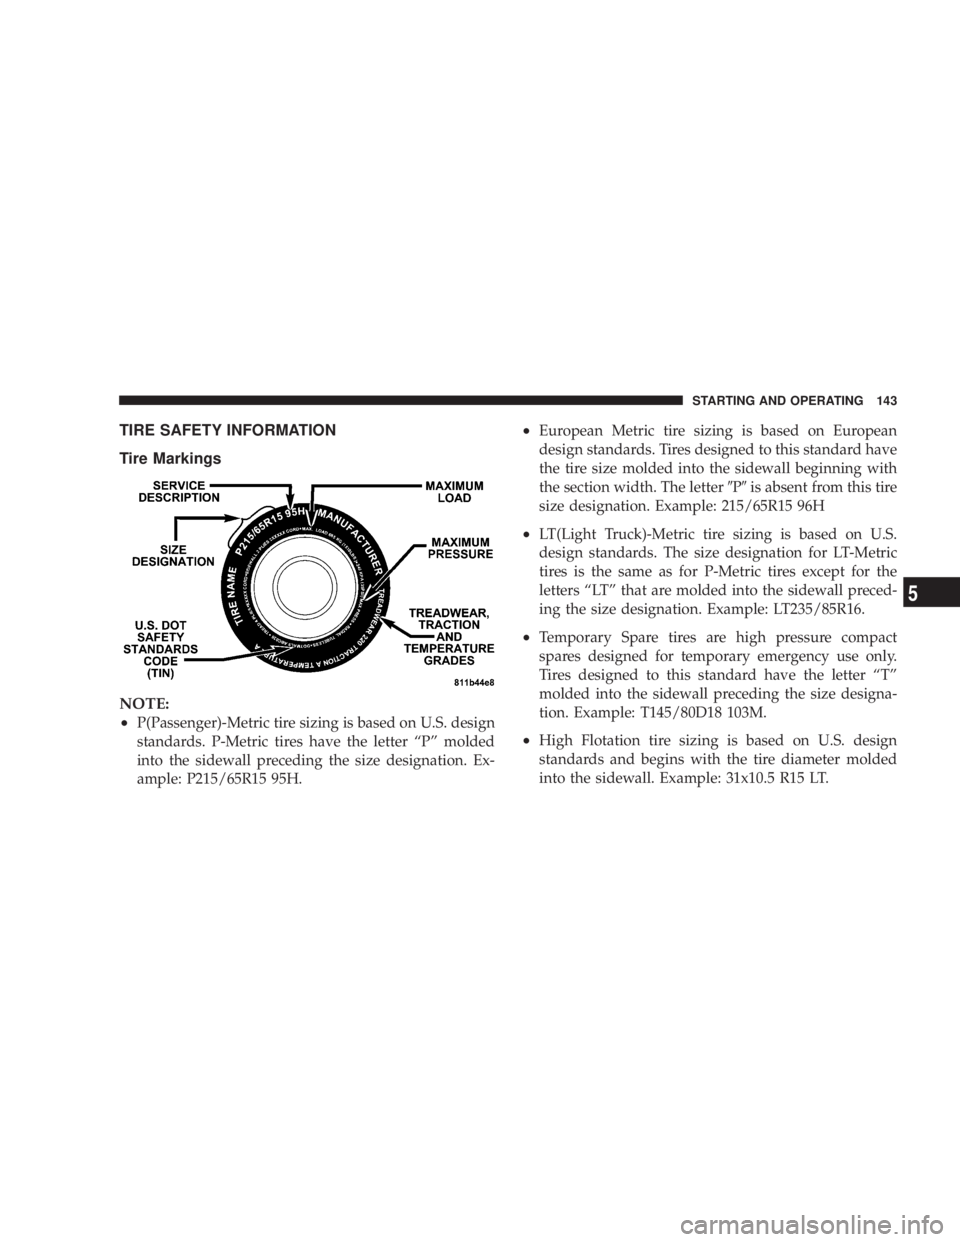
Tire Markings
NOTE:
²
P(Passenger)-Metric tire sizing is based on U.S. design
standards. P-Metric tires have the letter ªPº molded
into the sidewall preceding the size designation. Ex-
ample: P215/65R15 95H.
²European Metric tire sizing is based on European
design standards. Tires designed to this standard have
the tire size molded into the sidewall beginning with
the section width. The letter9P9is absent from this tire
size designation. Example: 215/65R15 96H
²LT(Light Truck)-Metric tire sizing is based on U.S.
design standards. The size designation for LT-Metric
tires is the same as for P-Metric tires except for the
letters ªLTº that are molded into the sidewall preced-
ing the size designation. Example: LT235/85R16.
²Temporary Spare tires are high pressure compact
spares designed for temporary emergency use only.
Tires designed to this standard have the letter ªTº
molded into the sidewall preceding the size designa-
tion. Example: T145/80D18 103M.
²High Flotation tire sizing is based on U.S. design
standards and begins with the tire diameter molded
into the sidewall. Example: 31x10.5 R15 LT.
STARTING AND OPERATING 143
5
Page 145 of 273
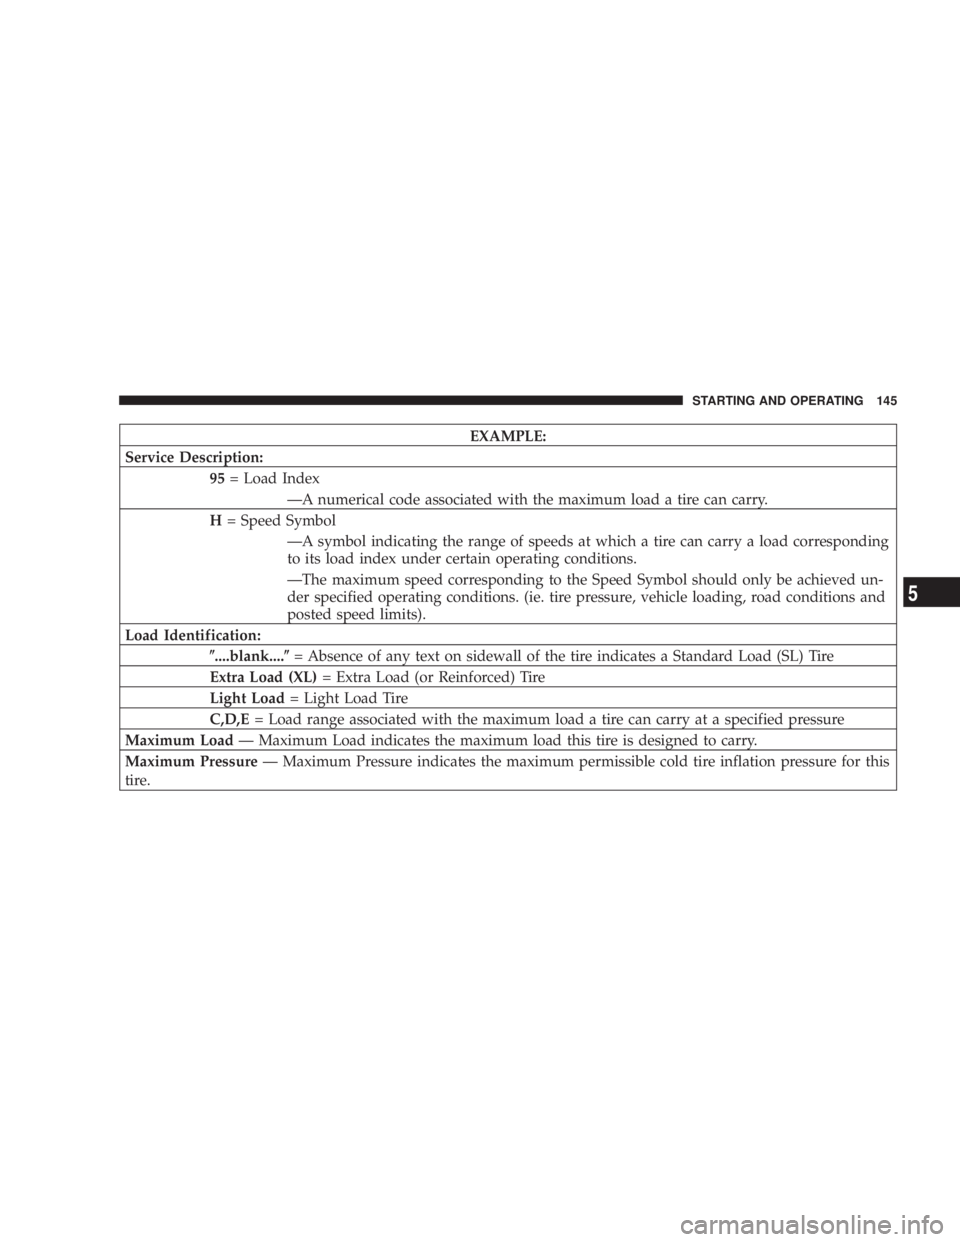
EXAMPLE:
Service Description:
95= Load Index
ÐA numerical code associated with the maximum load a tire can carry.
H= Speed Symbol
ÐA symbol indicating the range of speeds at which a tire can carry a load corresponding
to its load index under certain operating conditions.
ÐThe maximum speed corresponding to the Speed Symbol should only be achieved un-
der specified operating conditions. (ie. tire pressure, vehicle loading, road conditions and
posted speed limits).
Load Identification:
(....blank....(= Absence of any text on sidewall of the tire indicates a Standard Load (SL) Tire
Extra Load (XL)= Extra Load (or Reinforced) Tire
Light Load= Light Load Tire
C,D,E= Load range associated with the maximum load a tire can carry at a specified pressure
Maximum LoadÐ Maximum Load indicates the maximum load this tire is designed to carry.
Maximum PressureÐ Maximum Pressure indicates the maximum permissible cold tire inflation pressure for this
tire.
STARTING AND OPERATING 145
5
Page 221 of 273
CAUTION!
When replacing a blown fuse, it is important to use
only a fuse having the correct amperage rating. The
use of a fuse with a rating other than indicated may
result in a dangerous electrical system overload. If a
properly rated fuse continues to blow, it shows a
problem in the circuit that must be corrected.
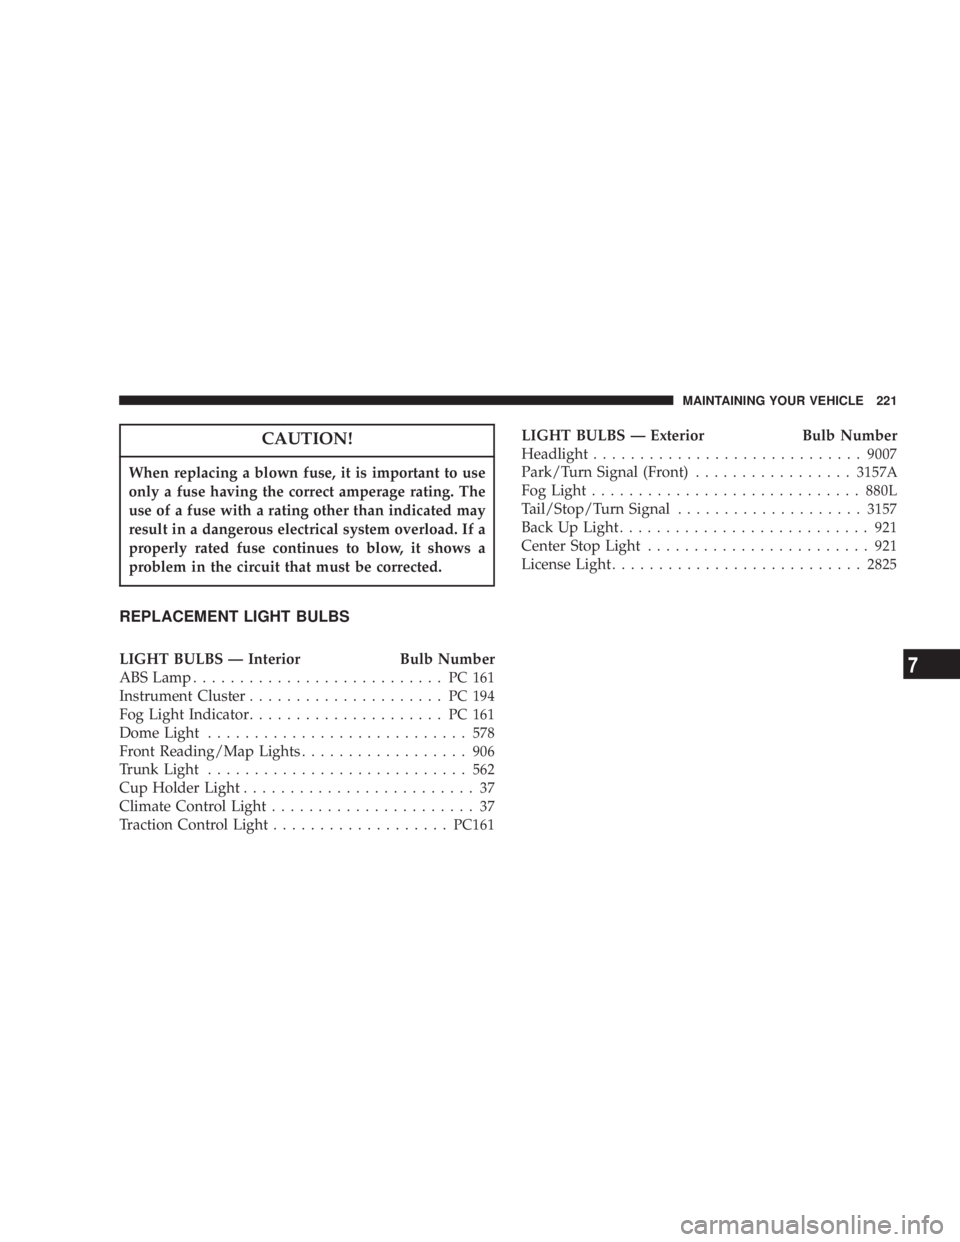
REPLACEMENT LIGHT BULBS
LIGHT BULBS Ð Interior Bulb Number
ABS Lamp........................... PC161
Instrument Cluster..................... PC194
Fog Light Indicator..................... PC161
Dome Light............................ 578
Front Reading/Map Lights.................. 906
Trunk Light............................ 562
Cup Holder Light......................... 37
Climate Control Light...................... 37
Traction Control Light...................PC161LIGHT BULBS Ð Exterior Bulb Number
Headlight.............................9007
Park/Turn Signal (Front).................3157A
Fog Light.............................880L
Tail/Stop/Turn Signal....................3157
Back Up Light........................... 921
Center Stop Light........................ 921
License Light...........................2825
MAINTAINING YOUR VEHICLE 221
7
Page 254 of 273
Service Contract
You may have purchased a service contract for your
vehicle to help protect you from the high cost of unex-
pected repairs after your manufacturer's new vehicle
limited warranty expires. The manufacturer stands be-
hind only the manufacturer's Service Contracts. If you
purchased a manufacturer's Service Contract, you will
receive Plan Provisions and an Owner Identification Card
in the mail within three weeks of your vehicle delivery
date. If you have any questions about your service
contract, call the manufacturer's Service Contract Na-
tional Customer Hotline at 1-800-521-9922.
The manufacturer will not stand behind any service
contract that is not the manufacturer's Service Contract. It
is not responsible for any service contract other than the
manufacturer's Service Contract. If you purchased a
service contract that is not a manufacturer's Service
Contract, and you require service after your manufactur-
er's new vehicle limited warranty expires, please refer to
your contract documents, and contact the person listed in
those documents.We appreciate that you have made a major investment
when you purchased your new vehicle. Your dealer has
also made a major investment in facilities, tools, and
training to assure that you are absolutely delighted with
your ownership experience. You'll be pleased with their
sincere efforts to resolve any warranty issues or related
concerns.
WARRANTY INFORMATION
See your manufacturer's Warranty Information Booklet
for information on warranty coverage and transfer of
warranty.
254 IF YOU NEED CONSUMER ASSISTANCE