radio DODGE STRATUS SEDAN 2004 Owners Manual
[x] Cancel search | Manufacturer: DODGE, Model Year: 2004, Model line: STRATUS SEDAN, Model: DODGE STRATUS SEDAN 2004Pages: 273, PDF Size: 4.79 MB
Page 22 of 273
If your Remote Lock Control fails to operate from a
normal distance, check for these two conditions:
1. Weak batteries in transmitter. The expected life of
batteries is from one to two years
2. Closeness to a radio transmitter such as a radio station
tower, airport transmitter, and some mobile or CB radios.
Transmitter Battery Service
The recommended replacement batteries are CR2016.
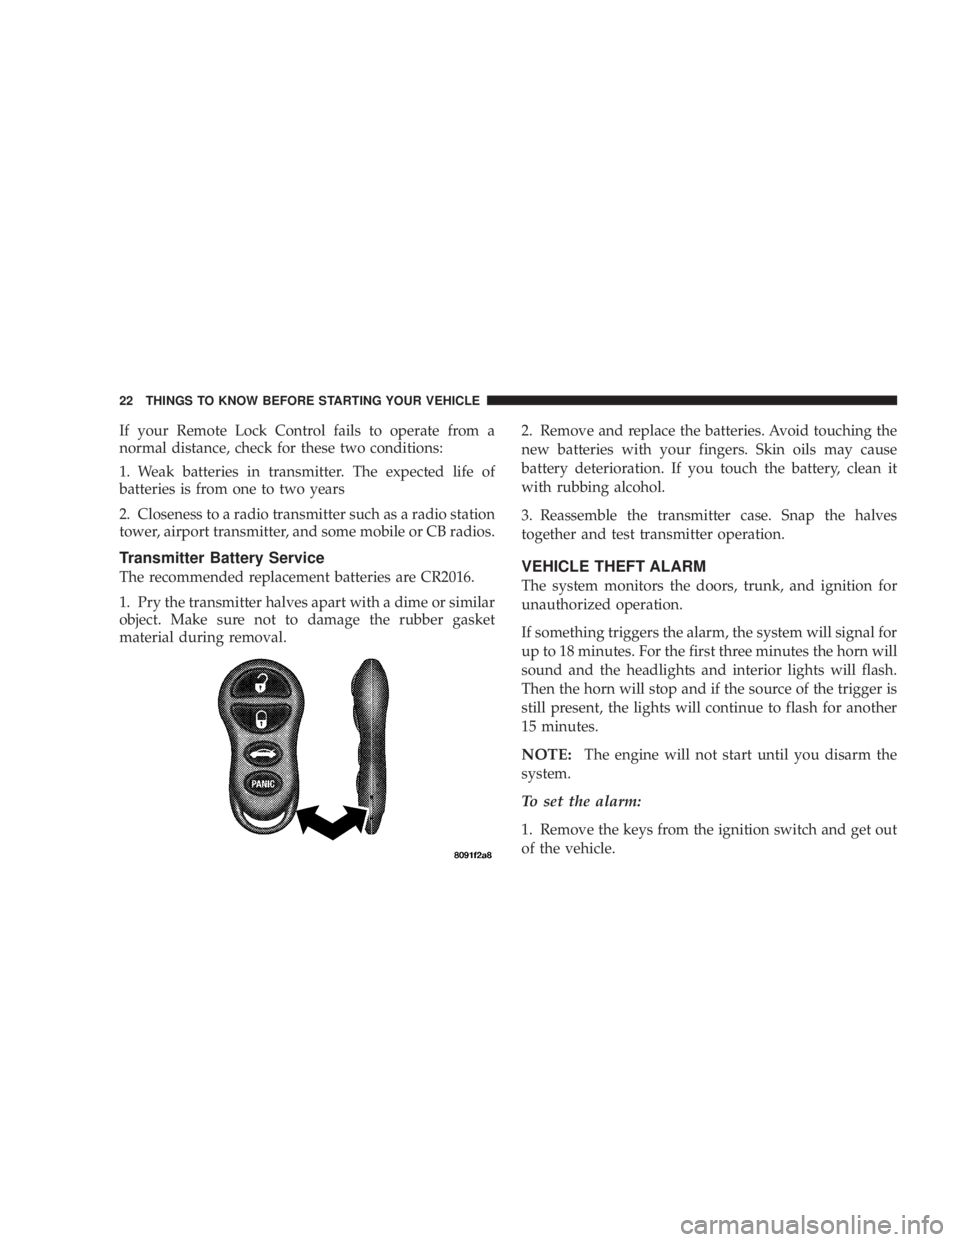
1. Pry the transmitter halves apart with a dime or similar
object. Make sure not to damage the rubber gasket
material during removal.2. Remove and replace the batteries. Avoid touching the
new batteries with your fingers. Skin oils may cause
battery deterioration. If you touch the battery, clean it
with rubbing alcohol.
3. Reassemble the transmitter case. Snap the halves
together and test transmitter operation.VEHICLE THEFT ALARM
The system monitors the doors, trunk, and ignition for
unauthorized operation.
If something triggers the alarm, the system will signal for
up to 18 minutes. For the first three minutes the horn will
sound and the headlights and interior lights will flash.
Then the horn will stop and if the source of the trigger is
still present, the lights will continue to flash for another
15 minutes.
NOTE:The engine will not start until you disarm the
system.
To set the alarm:
1. Remove the keys from the ignition switch and get out
of the vehicle.
22 THINGS TO KNOW BEFORE STARTING YOUR VEHICLE
Page 34 of 273
WARNING!
²Do not put anything on or around the front airbag
covers or attempt to manually open them. You may
damage the airbags and you could be injured be-
cause the airbags are not there to protect you. These
protective covers for the airbag cushions are de-
signed to open only when the airbags are inflating.
²If your vehicle is equipped with left and right
window bags, do not stack luggage or other cargo
up high enough to block the location of the
window bag. The area where the window bag is
located should remain free from any obstructions.
²If your vehicle is equipped with left and right
window bags, do not have any accessory items
installed which will alter the roof, including add-
ing a sunroof to your vehicle. Do not add roof
racks that require permanent attachments (bolts
or screws) for installation on the vehicle roof. Do
not drill into the roof of the vehicle for any reason.
²Do not drill, cut or tamper with the knee bolster in
any way.
²Do not mount any accessories to the knee bolster
such as alarm lights, stereos, citizens band radios
etc.
Airbags inflate in moderate to high speed impacts. Along
with the seat belts, front airbags work with the instru-
ment panel knee bolsters to provide improved protection
for the driver and front passenger. Left and right window
airbags also work with seat belts to improve occupant
protection.
The seat belts are designed to protect you in many types
of collisions. The front airbags deploy only in moderate
to severe frontal collisions. If your vehicle is so equipped,
the window bag on the crash side of the vehicle is
triggered in moderate to severe side collisions. In certain
types of collisions where the airbags deploy, you need the
seat belts to keep you in the right position for the airbags
to protect you properly.
Here are some simple steps you can take to minimize
the risk of harm from a deploying airbag.
1. Children 12 years old and under should ride buckled
up in the rear seat. Infants in rear-facing child restraints
shouldNEVERride in the front seat of a vehicle with a
passenger front airbag. An airbag deployment could
cause severe injury or death to infants in that position.
34 THINGS TO KNOW BEFORE STARTING YOUR VEHICLE
Page 62 of 273
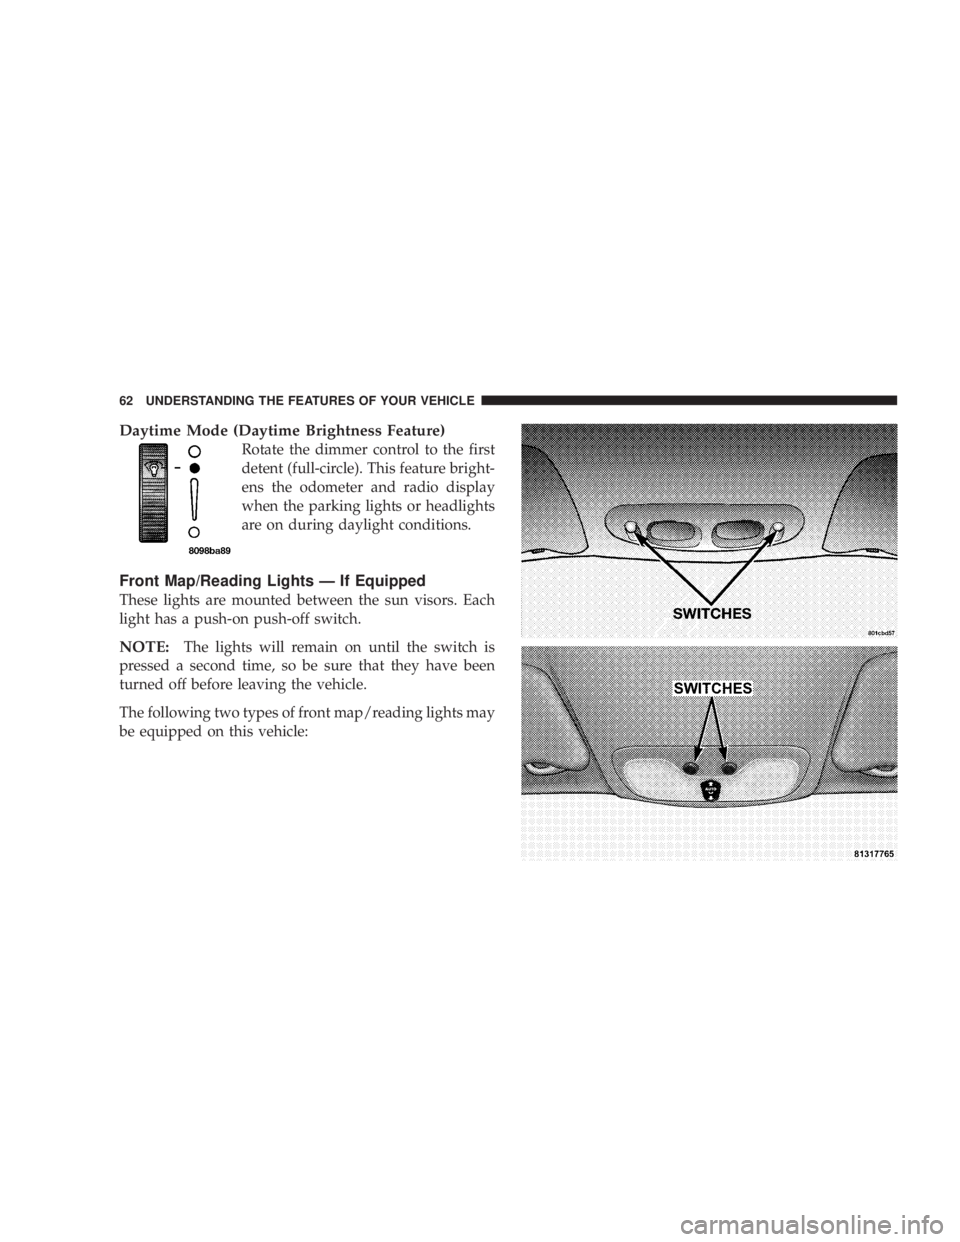
Daytime Mode (Daytime Brightness Feature)
Rotate the dimmer control to the first
detent (full-circle). This feature bright-
ens the odometer and radio display
when the parking lights or headlights
are on during daylight conditions.
Front Map/Reading Lights Ð If Equipped
These lights are mounted between the sun visors. Each
light has a push-on push-off switch.
NOTE:The lights will remain on until the switch is
pressed a second time, so be sure that they have been
turned off before leaving the vehicle.
The following two types of front map/reading lights may
be equipped on this vehicle:
62 UNDERSTANDING THE FEATURES OF YOUR VEHICLE
Page 79 of 273
UNDERSTANDING YOUR INSTRUMENT PANEL
CONTENTS
mInstruments And Controls.................83
mInstrument Cluster......................84
mInstrument Cluster Description.............85
mCompass, Temperature, And Trip Computer
Display Ð If Equipped
...................90
NControl Buttons.......................91
NTrip Conditions........................91
NCompass Temperature Display.............92
mCigar Lighter/Ashtray...................94
mElectronic Digital Clock..................94
NTo Set The Clock.......................94
mRadio General Information................94NRadio Broadcast Signals..................94
NTwo Types Of Signals...................95
NElectrical Disturbances...................95
NAM Reception........................95
NFM Reception.........................95
mSales Code RAZÐAM/ FM Stereo Radio With
Cassette Tape Player, CD Player And CD
Changer Controls Ð If Equipped
...........95
NOperating Instructions Ð Radio............95
NPower Switch, Volume Control.............95
NSeek Button (Radio Mode)................96
NTuning..............................96
4
Page 80 of 273
NPTY (Program Type) Button...............96
NBalance.............................97
NFade...............................97
NTone Control.........................97
NAM/FM Selection......................98
NScan Button..........................98
NTo Set The Radio Push-Button Memory.......98
NTo Change From Clock To Radio Mode.......98
NOperating Instructions Ð Tape Player........98
NSeek Button..........................99
NFast Forward (FF)......................99
NRewind (RW).........................99
NTape Eject............................99
NScan Button..........................99
NChanging Tape Direction.................99NMetal Tape Selection....................99
NPinch Roller Release....................99
NNoise Reduction......................100
NOperating Instructions Ð CD Player........100
NInserting The Compact Disc..............100
NSeek Button.........................101
NEJT CD (Eject) Button..................101
NFF/Tune/RW........................101
NProgram Button 4 (Random Play)..........101
NMode..............................102
NTape CD Button......................102
NTime Button.........................102
NScan Button.........................102
NCD Changer Control Capability Ð If
Equipped...........................102
80 UNDERSTANDING YOUR INSTRUMENT PANEL
Page 81 of 273
mSales Code RBBÐAM/FM Stereo Radio With
Cassette Tape Player And CD Changer
Capability
...........................104
NOperating Instructions..................104
NPower Button........................104
NElectronic Volume Control...............104
NSeek..............................104
NTune ..............................105
NTo Set The Push-Button Memory..........105
NBalance............................105
NFade..............................105
NBass And Treble Tone Control............105
NAM/FM Selection.....................106
NMode Button........................106
NCassette Player Features................106
NCD Changer Control Capability Ð If
Equipped...........................107NRadio Display Messages................108mSales Code RBKÐAM/ FM Stereo Radio With
CD Player And CD Changer Controls
.......109
NRadio Operation......................109
NCD Player Operation...................111
NCD Changer Control Capability Ð If
Equipped...........................112
NRadio Display Messages................114
m6 Disc CD Changer Ð If Equipped.........114
NLoading The CD Changer...............114
NPlaying Discs........................115
NSeek Button.........................115
NFF/Tune/RW........................115
NMode Button........................115
NProgram Button 1.....................115
NProgram Button 4 (Random Play)..........115
UNDERSTANDING YOUR INSTRUMENT PANEL 81
4
Page 82 of 273
NProgram Button 5.....................116
NTime Button.........................116
NChanging Modes......................116
NRemoving Discs From The CD Changer.....116
NCD Changer Operation With The Changer
Off ...............................116
mRemote Sound System Controls Ð If
Equipped
............................117
NRadio Operation......................117NTape Player.........................117
NCD Player Ð Single Disc In Radio.........118
NCD Player Ð 6 Disc CD Changer..........118
mCassette Tape And Player Maintenance......118
mCompact Disc Maintenance...............119
mRadio Operation And Cellular Phones.......120
mClimate Controls......................120
NManual Air Conditioning/Heater Control....120
82 UNDERSTANDING YOUR INSTRUMENT PANEL
Page 94 of 273
Outside Temperature
If the outside temperature is more than 131ÉF (55ÉC), the
display will show 131ÉF. When the outside temperature is
less than240ÉF (240ÉC), the display will show240ÉF/C.
CIGAR LIGHTER/ASHTRAY
For a nominal charge your dealer can provide a ªsmok-
er'sº package. This package consists of a cigar lighter and
an ashtray that utilizes one of the cup holders.
ELECTRONIC DIGITAL CLOCK
The clock and radio each use the display panel built into
the radio. A digital readout indicates the time in hours
and minutes whenever the ignition switch is in the ON or
ACC position. Whenever the radio is turned on, it first
comes up on either tape, cd or radio, whichever was
previously on, and will revert back to Time/Clock after a
few seconds. If Time/Clock was not previously selected,
the display will revert back to whichever was previously
on after a few seconds, whether it was tape, cd or radio.
When the ignition switch is in the OFF position, pressing
the Time button will cause the radio to display time for
several seconds, then turn off.
To Set The Clock:
1. Use a ballpoint pen or similar object to press the hour
(H) or minute (M) buttons on the radio, The time setting
will increase each time you press the button.
2. Press any other button to exit from the clock setting
mode. Or, it will exit the mode automatically if left alone
for 5 or 6 seconds.
RADIO GENERAL INFORMATION
Radio Broadcast Signals
Your new radio will provide excellent reception under
most operating conditions. Like any system, however, car
radios have performance limitations, due to mobile op-
eration and natural phenomena, which might lead you to
believe your sound system is malfunctioning. To help
you understand and save you concern about these ªap-
parentº malfunctions, you must understand a point or
two about the transmission and reception of radio sig-
nals.
94 UNDERSTANDING YOUR INSTRUMENT PANEL
Page 95 of 273
Two Types of Signals
There are two basic types of radio signals... AM or
Amplitude Modulation, in which the transmitted sound
causes the amplitude, or height, of the radio waves to
vary... and FM or Frequency Modulation, in which the
frequency of the wave is varied to carry the sound.
Electrical Disturbances
Radio waves may pick up electrical disturbances during
transmission. They mainly affect the wave amplitude,
and thus remain a part of the AM reception. They
interfere very little with the frequency variations that
carry the FM signal.
AM Reception
AM sound is based on wave amplitude, so AM reception
can be disrupted by such things as lightning, power lines
and neon signs.
FM Reception
Because FM transmission is based on frequency varia-
tions, interference that consists of amplitude variations
can be filtered out, leaving the reception relatively clear,
which is the major feature of FM radio.
SALES CODE RAZÐAM/ FM STEREO RADIO
WITH CASSETTE TAPE PLAYER, CD PLAYER
AND CD CHANGER CONTROLS Ð IF EQUIPPED
Operating Instructions Ð Radio
NOTE:
Power to operate the radio is controlled by the
ignition switch. It must be in the ON or ACC position to
operate the radio.
Power Switch, Volume Control
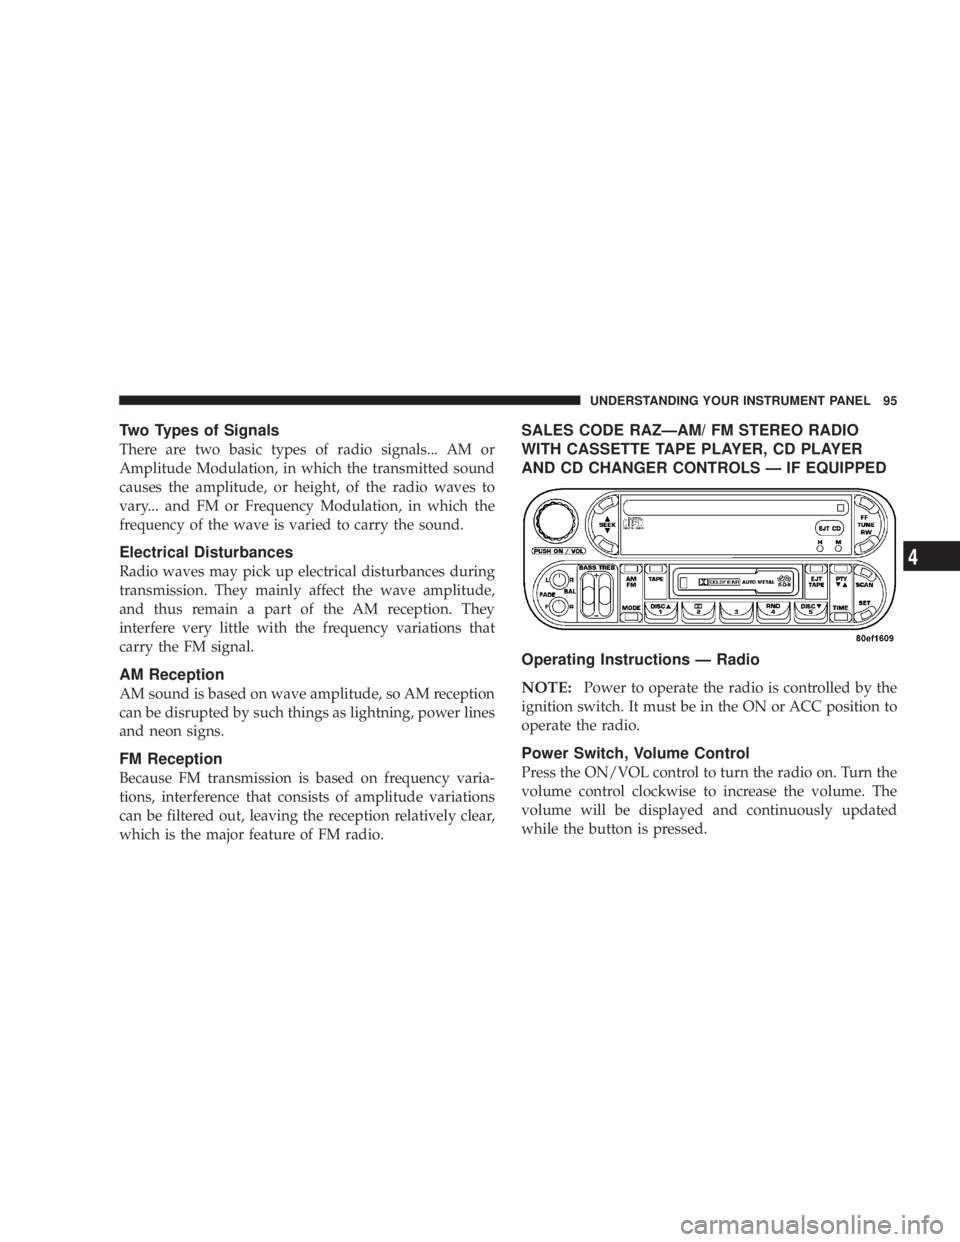
Press the ON/VOL control to turn the radio on. Turn the
volume control clockwise to increase the volume. The
volume will be displayed and continuously updated
while the button is pressed.
UNDERSTANDING YOUR INSTRUMENT PANEL 95
4
Page 96 of 273
Seek Button (Radio Mode)
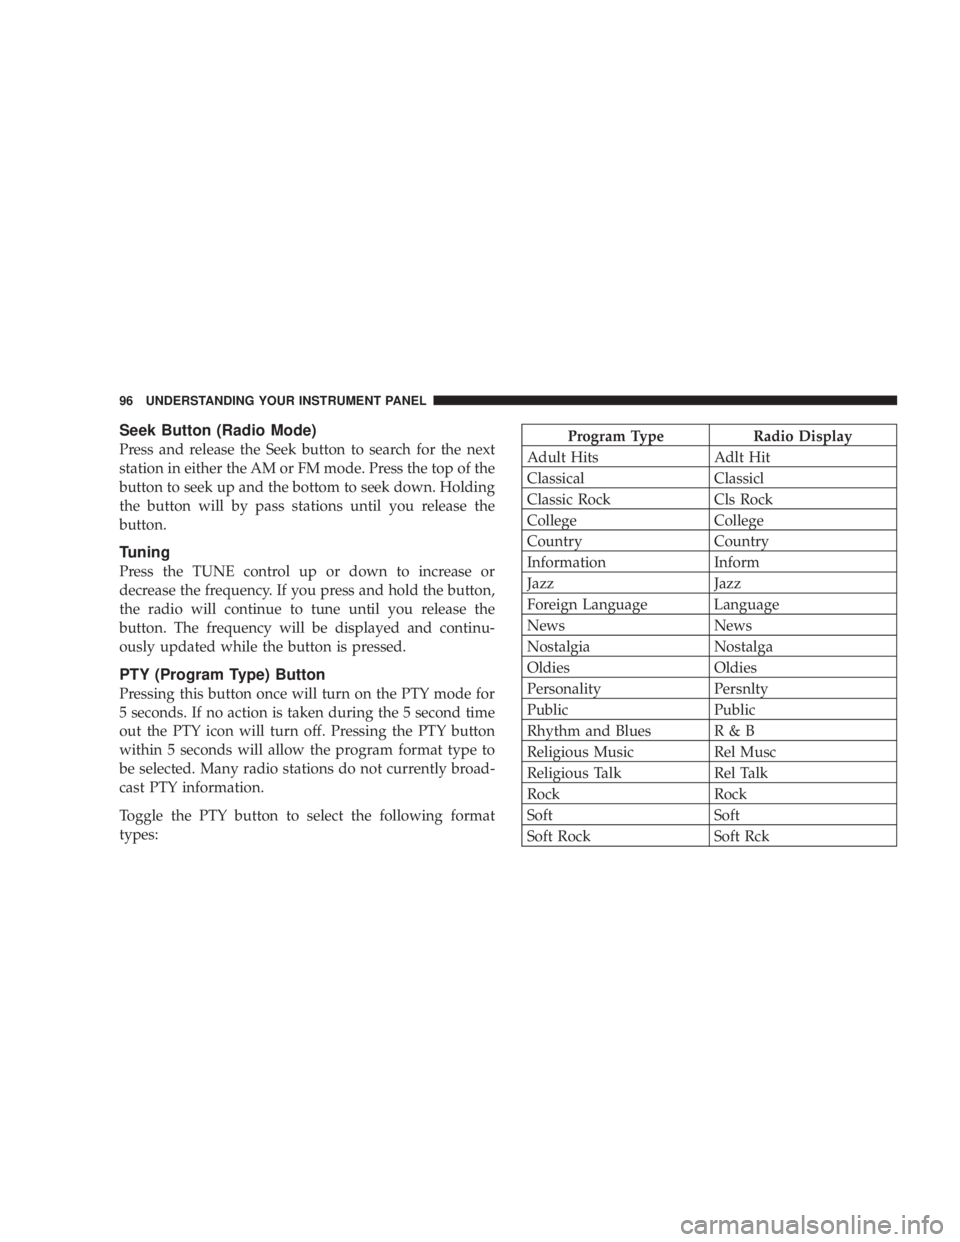
Press and release the Seek button to search for the next
station in either the AM or FM mode. Press the top of the
button to seek up and the bottom to seek down. Holding
the button will by pass stations until you release the
button.
Tuning
Press the TUNE control up or down to increase or
decrease the frequency. If you press and hold the button,
the radio will continue to tune until you release the
button. The frequency will be displayed and continu-
ously updated while the button is pressed.
PTY (Program Type) Button
Pressing this button once will turn on the PTY mode for
5 seconds. If no action is taken during the 5 second time
out the PTY icon will turn off. Pressing the PTY button
within 5 seconds will allow the program format type to
be selected. Many radio stations do not currently broad-
cast PTY information.
Toggle the PTY button to select the following format
types:
Program Type Radio Display
Adult Hits Adlt Hit
Classical Classicl
Classic Rock Cls Rock
College College
Country Country
Information Inform
Jazz Jazz
Foreign Language Language
News News
Nostalgia Nostalga
Oldies Oldies
Personality Persnlty
Public Public
Rhythm and Blues R & B
Religious Music Rel Musc
Religious Talk Rel Talk
Rock Rock
Soft Soft
Soft Rock Soft Rck
96 UNDERSTANDING YOUR INSTRUMENT PANEL