DODGE TOWN AND COUNTRY 2003 Service Manual
Manufacturer: DODGE, Model Year: 2003, Model line: TOWN AND COUNTRY, Model: DODGE TOWN AND COUNTRY 2003Pages: 2177, PDF Size: 59.81 MB
Page 1541 of 2177
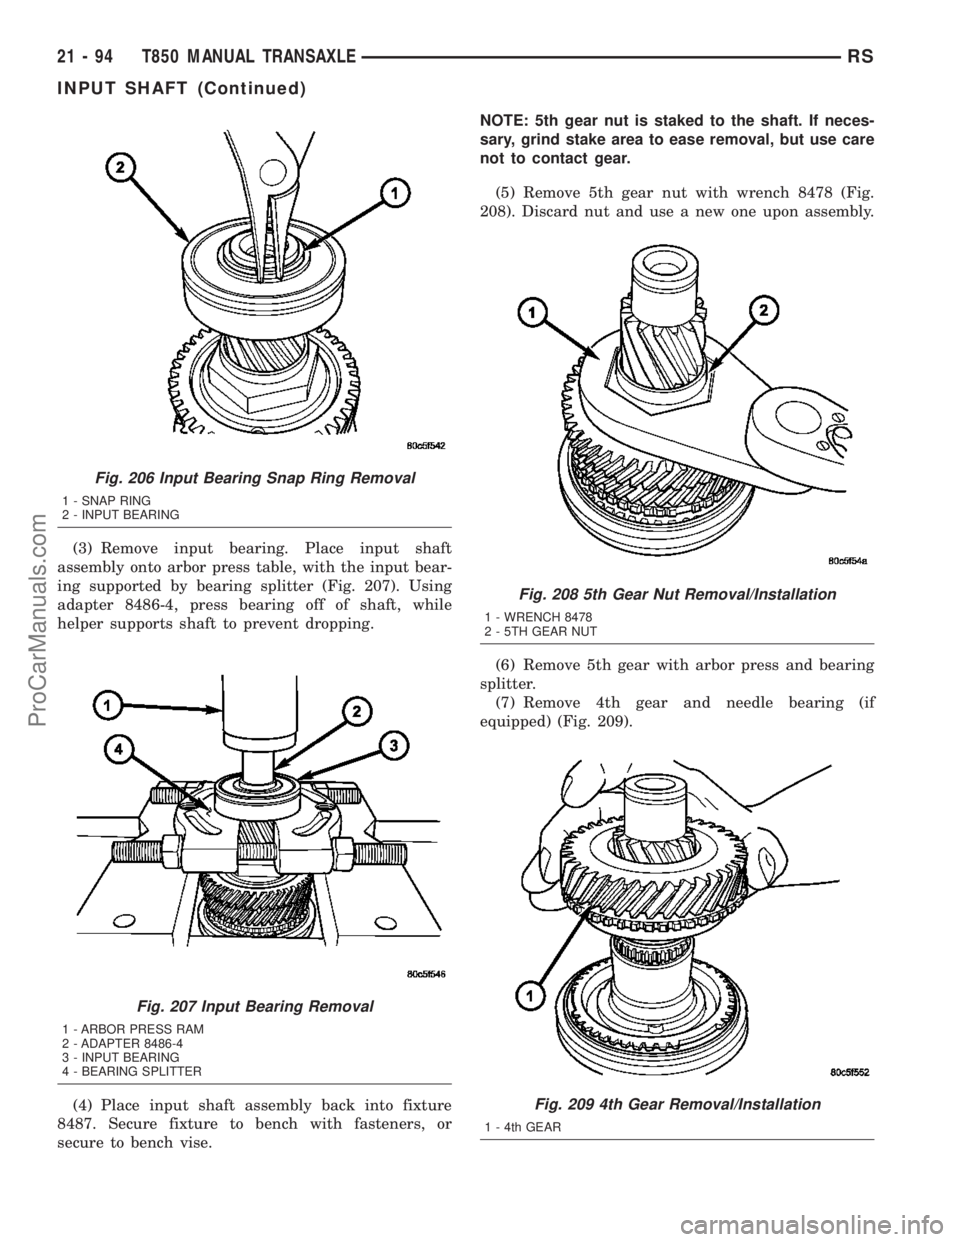
(3) Remove input bearing. Place input shaft
assembly onto arbor press table, with the input bear-
ing supported by bearing splitter (Fig. 207). Using
adapter 8486-4, press bearing off of shaft, while
helper supports shaft to prevent dropping.
(4) Place input shaft assembly back into fixture
8487. Secure fixture to bench with fasteners, or
secure to bench vise.NOTE: 5th gear nut is staked to the shaft. If neces-
sary, grind stake area to ease removal, but use care
not to contact gear.
(5) Remove 5th gear nut with wrench 8478 (Fig.
208). Discard nut and use a new one upon assembly.
(6) Remove 5th gear with arbor press and bearing
splitter.
(7) Remove 4th gear and needle bearing (if
equipped) (Fig. 209).
Fig. 206 Input Bearing Snap Ring Removal
1 - SNAP RING
2 - INPUT BEARING
Fig. 207 Input Bearing Removal
1 - ARBOR PRESS RAM
2 - ADAPTER 8486-4
3 - INPUT BEARING
4 - BEARING SPLITTER
Fig. 208 5th Gear Nut Removal/Installation
1 - WRENCH 8478
2 - 5TH GEAR NUT
Fig. 209 4th Gear Removal/Installation
1 - 4th GEAR
21 - 94 T850 MANUAL TRANSAXLERS
INPUT SHAFT (Continued)
ProCarManuals.com
Page 1542 of 2177

(8) Remove 4th gear blocker ring (Fig. 210).
(9) Remove 3/4 synchronizer snap ring (Fig. 211).
Discard and replace with new snap ring upon assem-
bly.(10) Remove 3/4 synchronizer (Fig. 212).
(11) Remove 3rd gear blocker ring (Fig. 213).
(12) Remove 3rd gear and needle bearing (if
equipped) (Fig. 214).
(13) Inspect third gear thrust washer for signs of
excessive wear. To replace, drive off of input shaft
with suitable drift and hammer.
Fig. 210 4th Gear Blocker Ring
1 - 4th GEAR BLOCKER RING
Fig. 211 3/4 Synchro Snap Ring
1 - SNAP RING
2 - 3/4 SYNCHRONIZER
Fig. 212 3/4 Synchro Assembly
1 - 3/4 SYNCHRONIZER
Fig. 213 3rd Gear Blocker Ring
1 - 3RD GEAR BLOCKER RING
RST850 MANUAL TRANSAXLE21-95
INPUT SHAFT (Continued)
ProCarManuals.com
Page 1543 of 2177
ASSEMBLY
NOTE: Depending on date of manufacture, some
input shafts will utilize a needle bearing under the
3rd and 4th Speed Gears.
NOTE: When servicing the input shaft assembly, all
snap rings MUST be replaced with new ones upon
assembly. 5th gear nut must also be replaced.
NOTE: When installing 3/4 synchronizer hub to
shaft, make sure to align oil slots on synchronizer
hub face with oil hole in the shaft splined hub jour-
nal.
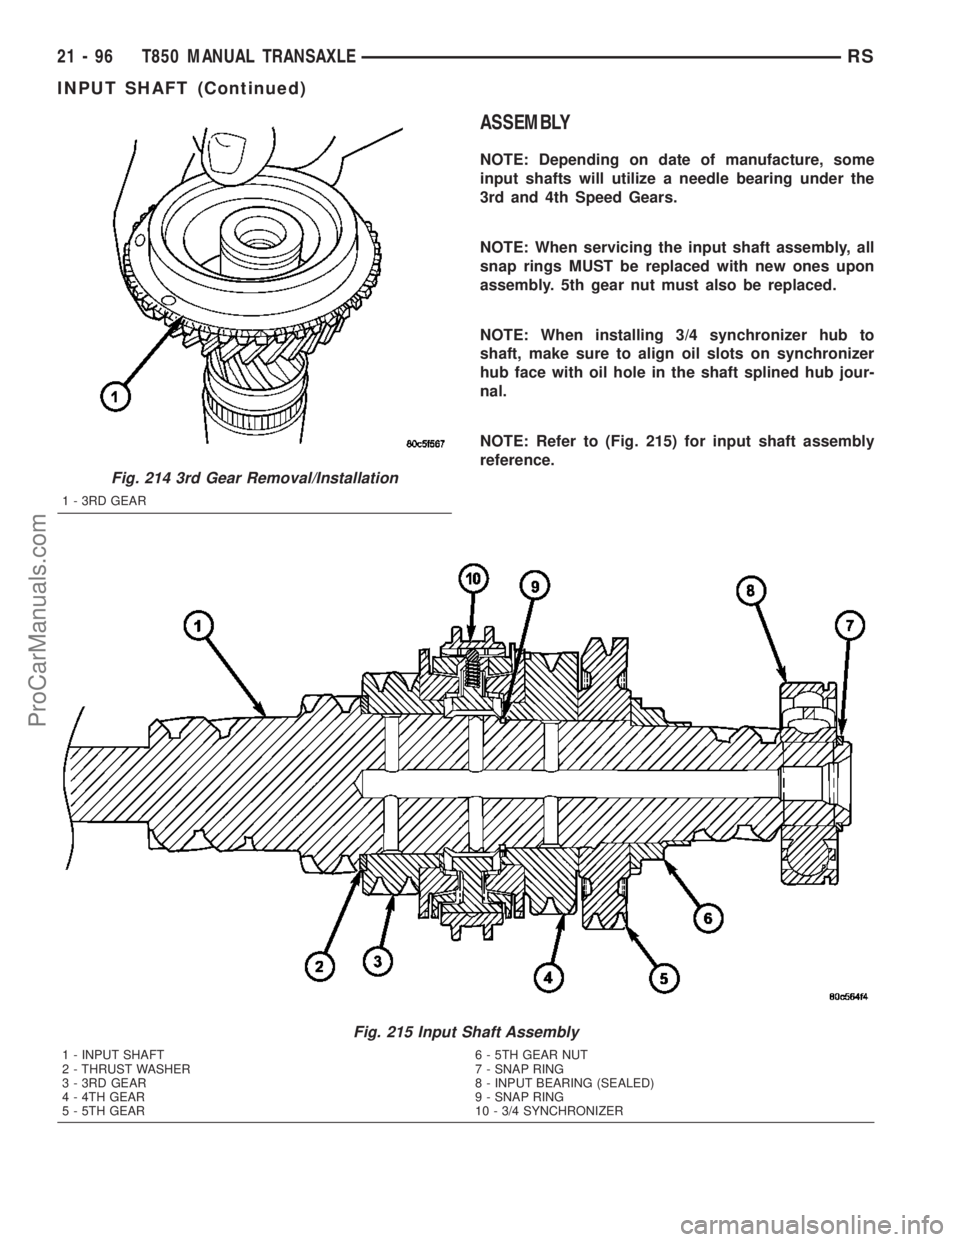
NOTE: Refer to (Fig. 215) for input shaft assembly
reference.
Fig. 215 Input Shaft Assembly
1 - INPUT SHAFT 6 - 5TH GEAR NUT
2 - THRUST WASHER 7 - SNAP RING
3 - 3RD GEAR 8 - INPUT BEARING (SEALED)
4 - 4TH GEAR 9 - SNAP RING
5 - 5TH GEAR 10 - 3/4 SYNCHRONIZER
Fig. 214 3rd Gear Removal/Installation
1 - 3RD GEAR
21 - 96 T850 MANUAL TRANSAXLERS
INPUT SHAFT (Continued)
ProCarManuals.com
Page 1544 of 2177
(1) Install input shaft into fixture 8487.
(2) Install thrust washer if removed upon disas-
sembly.
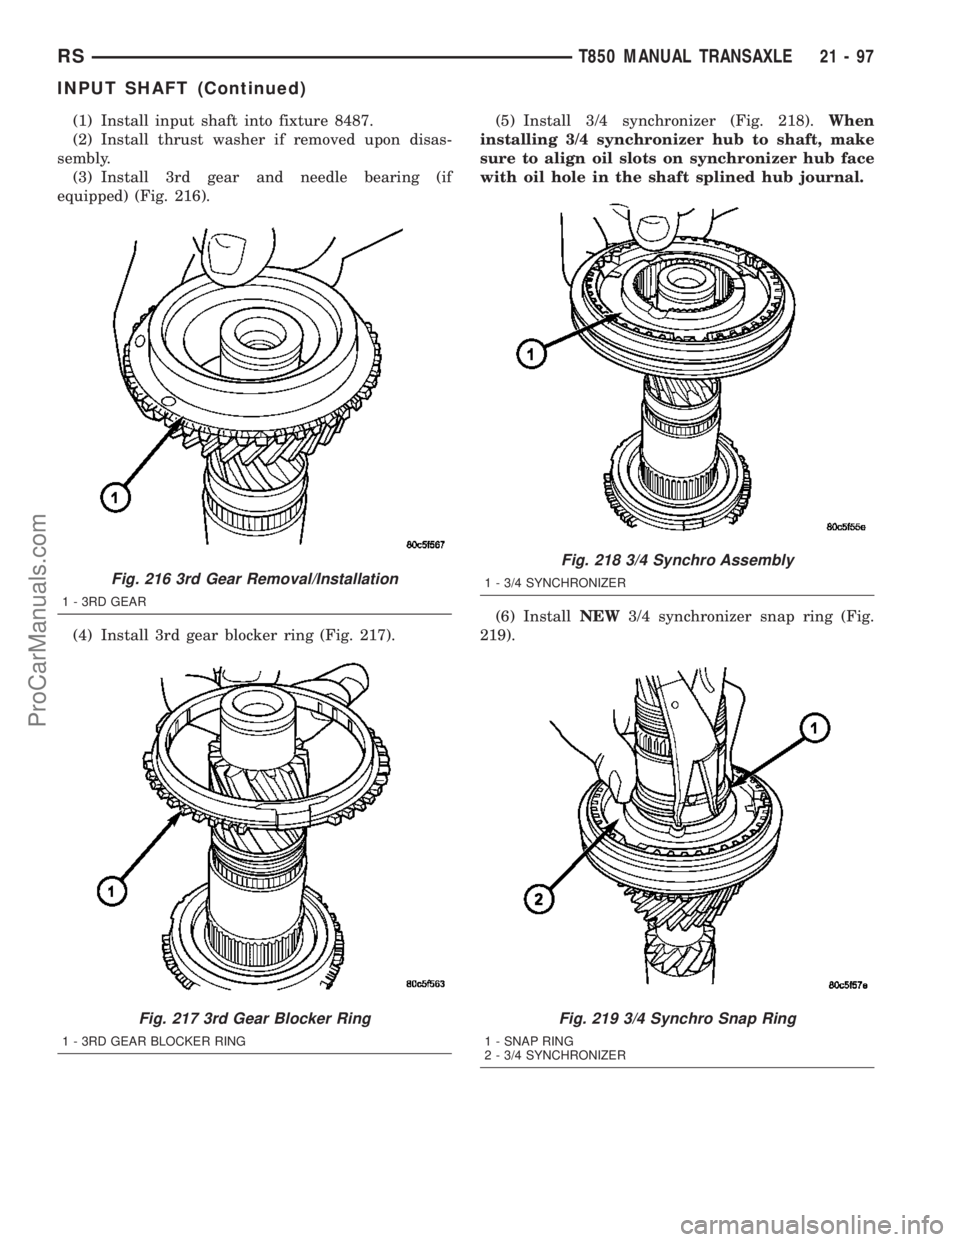
(3) Install 3rd gear and needle bearing (if
equipped) (Fig. 216).
(4) Install 3rd gear blocker ring (Fig. 217).(5) Install 3/4 synchronizer (Fig. 218).When
installing 3/4 synchronizer hub to shaft, make
sure to align oil slots on synchronizer hub face
with oil hole in the shaft splined hub journal.
(6) InstallNEW3/4 synchronizer snap ring (Fig.
219).
Fig. 216 3rd Gear Removal/Installation
1 - 3RD GEAR
Fig. 217 3rd Gear Blocker Ring
1 - 3RD GEAR BLOCKER RING
Fig. 218 3/4 Synchro Assembly
1 - 3/4 SYNCHRONIZER
Fig. 219 3/4 Synchro Snap Ring
1 - SNAP RING
2 - 3/4 SYNCHRONIZER
RST850 MANUAL TRANSAXLE21-97
INPUT SHAFT (Continued)
ProCarManuals.com
Page 1545 of 2177

(7) Install 4th gear blocker ring (Fig. 220).
(8) Install 4th gear and needle bearing (if
equipped) (Fig. 221).
(9) Install 5th gear and press into position using
installer 8481 (Fig. 222).(10) InstallNEW5th gear nut and torque to 262
N´m (193 ft. lbs.) using wrench 8478 (Fig. 223).
Fig. 220 4th Gear Blocker Ring
1 - 4th GEAR BLOCKER RING
Fig. 221 4th Gear Removal/Installation
1 - 4th GEAR
Fig. 222 5th Gear Installation
1 - ARBOR PRESS RAM
2 - INSTALLER 8481
3 - 5TH GEAR
Fig. 223 5th Gear Nut Removal/Installation
1 - WRENCH 8478
2 - 5TH GEAR NUT
21 - 98 T850 MANUAL TRANSAXLERS
INPUT SHAFT (Continued)
ProCarManuals.com
Page 1546 of 2177

(11) Stake 5th Gear nut in four (4) places as fol-
lows:
(a) Install staking tool 8479 to 5th gear nut.
(b) Tighten upper thumb screw by hand (Fig.
224).
(c) Tighten two (2) side thumb screws by hand.
(d) Tighten both staking screws until they bot-
tom on tool body (Fig. 225).
(e) Loosen staking screws and thumb screws.
Remove tool and visually inspect stake (Fig. 226).
(f) Remove tool, rotate 90É, and repeat process to
stake in four (4) places.
NOTE: The input shaft sealed roller bearing and
snap ring do not get installed until transaxle assem-
bly to facilitate installation of the reverse idler gear
mechanism.
Fig. 224 Staking Tool Set-Up
1 - STAKING TOOL 8479
2 - THUMB SCREWS (3)
Fig. 225 Tighten Stake Screws
1 - STAKING TOOL 8479
Fig. 226 5th Gear Nut Stake (Four Places)
1-STAKE
RST850 MANUAL TRANSAXLE21-99
INPUT SHAFT (Continued)
ProCarManuals.com
Page 1547 of 2177
INTERMEDIATE SHAFT
DESCRIPTION
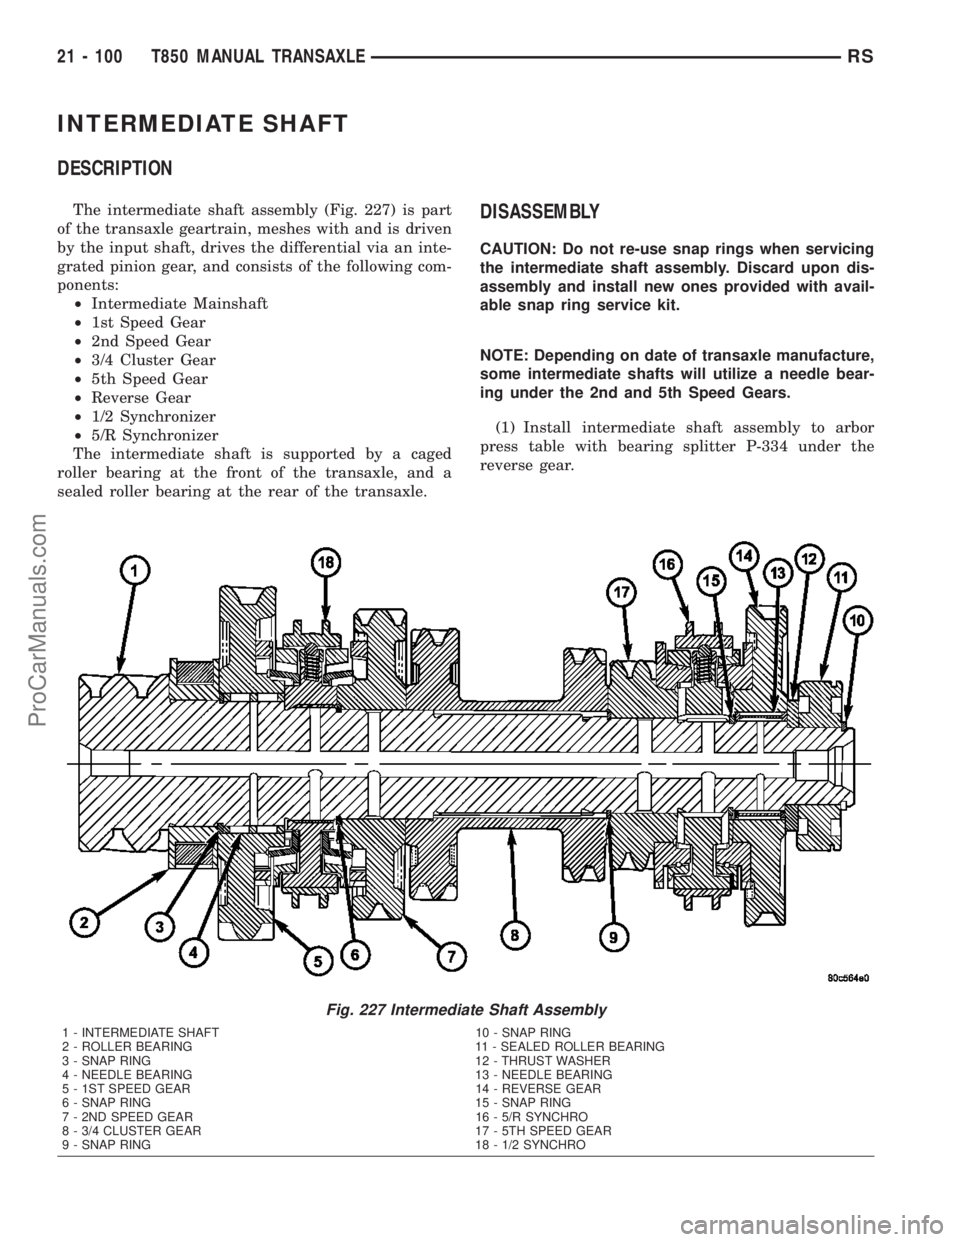
The intermediate shaft assembly (Fig. 227) is part
of the transaxle geartrain, meshes with and is driven
by the input shaft, drives the differential via an inte-
grated pinion gear, and consists of the following com-
ponents:
²Intermediate Mainshaft
²1st Speed Gear
²2nd Speed Gear
²3/4 Cluster Gear
²5th Speed Gear
²Reverse Gear
²1/2 Synchronizer
²5/R Synchronizer
The intermediate shaft is supported by a caged
roller bearing at the front of the transaxle, and a
sealed roller bearing at the rear of the transaxle.DISASSEMBLY
CAUTION: Do not re-use snap rings when servicing
the intermediate shaft assembly. Discard upon dis-
assembly and install new ones provided with avail-
able snap ring service kit.
NOTE: Depending on date of transaxle manufacture,
some intermediate shafts will utilize a needle bear-
ing under the 2nd and 5th Speed Gears.
(1) Install intermediate shaft assembly to arbor
press table with bearing splitter P-334 under the
reverse gear.
Fig. 227 Intermediate Shaft Assembly
1 - INTERMEDIATE SHAFT 10 - SNAP RING
2 - ROLLER BEARING 11 - SEALED ROLLER BEARING
3 - SNAP RING 12 - THRUST WASHER
4 - NEEDLE BEARING 13 - NEEDLE BEARING
5 - 1ST SPEED GEAR 14 - REVERSE GEAR
6 - SNAP RING 15 - SNAP RING
7 - 2ND SPEED GEAR 16 - 5/R SYNCHRO
8 - 3/4 CLUSTER GEAR 17 - 5TH SPEED GEAR
9 - SNAP RING 18 - 1/2 SYNCHRO
21 - 100 T850 MANUAL TRANSAXLERS
ProCarManuals.com
Page 1548 of 2177
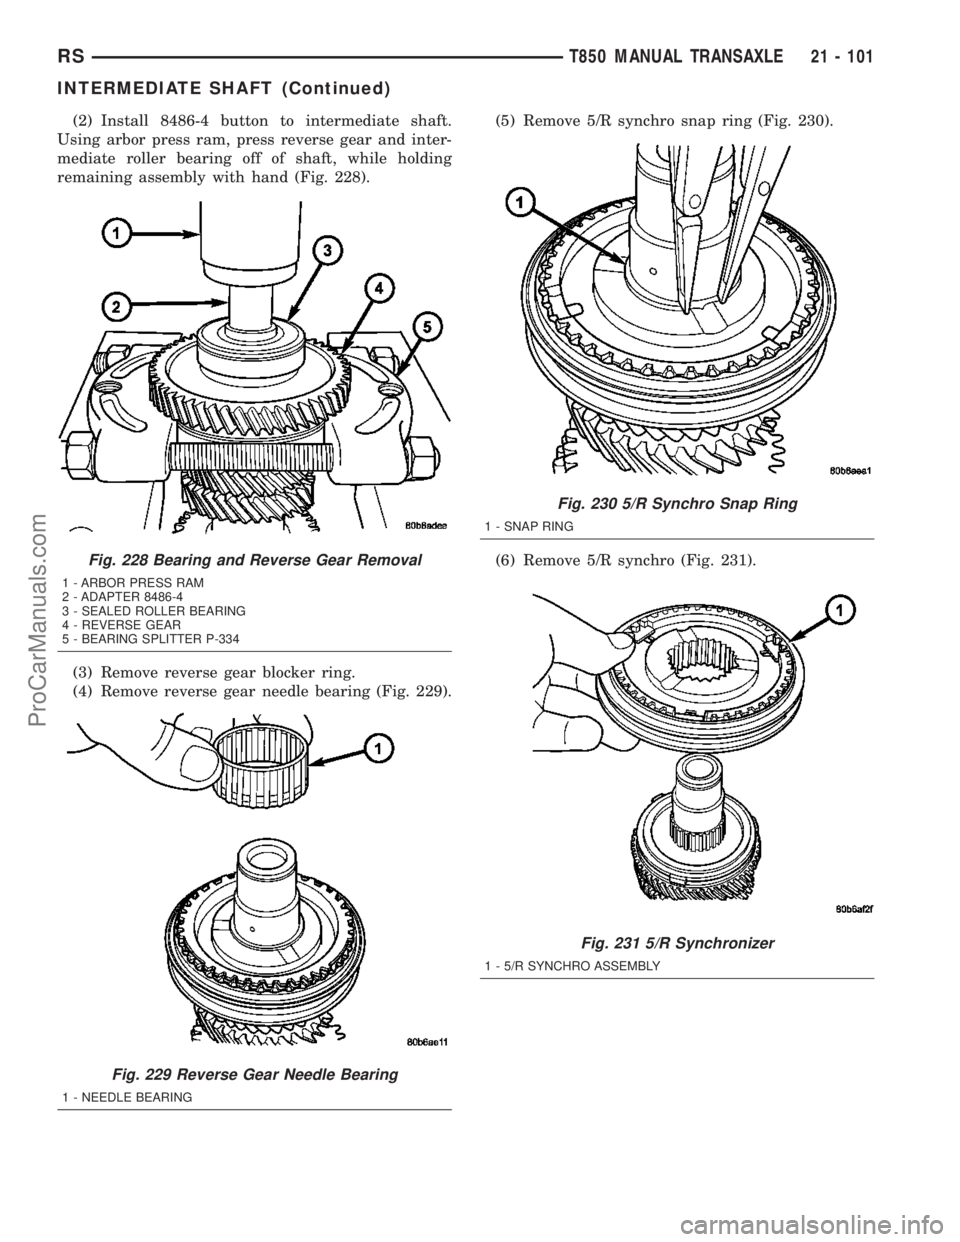
(2) Install 8486-4 button to intermediate shaft.
Using arbor press ram, press reverse gear and inter-
mediate roller bearing off of shaft, while holding
remaining assembly with hand (Fig. 228).
(3) Remove reverse gear blocker ring.
(4) Remove reverse gear needle bearing (Fig. 229).(5) Remove 5/R synchro snap ring (Fig. 230).
(6) Remove 5/R synchro (Fig. 231).
Fig. 228 Bearing and Reverse Gear Removal
1 - ARBOR PRESS RAM
2 - ADAPTER 8486-4
3 - SEALED ROLLER BEARING
4 - REVERSE GEAR
5 - BEARING SPLITTER P-334
Fig. 229 Reverse Gear Needle Bearing
1 - NEEDLE BEARING
Fig. 230 5/R Synchro Snap Ring
1 - SNAP RING
Fig. 231 5/R Synchronizer
1 - 5/R SYNCHRO ASSEMBLY
RST850 MANUAL TRANSAXLE21 - 101
INTERMEDIATE SHAFT (Continued)
ProCarManuals.com
Page 1549 of 2177
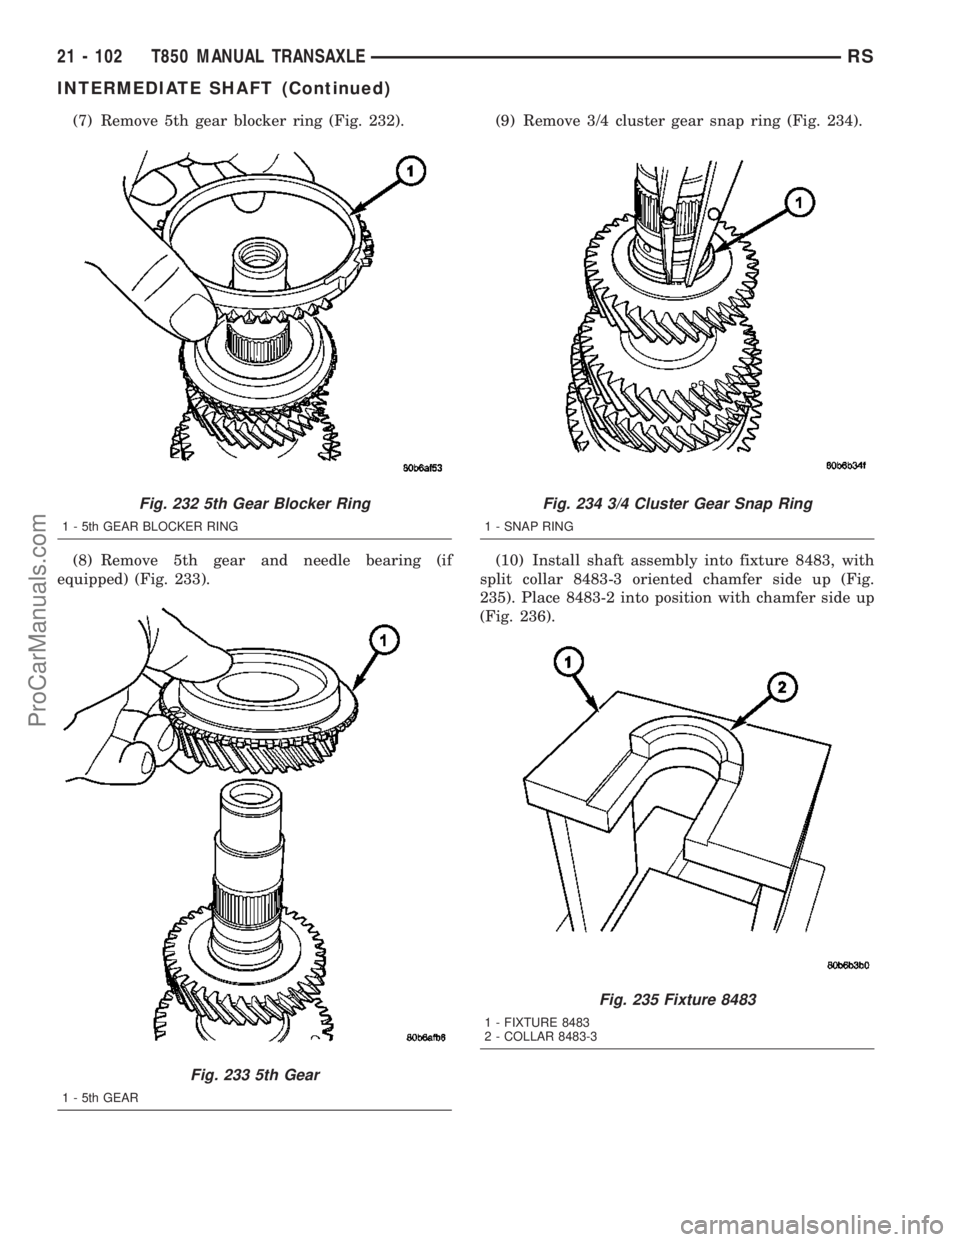
(7) Remove 5th gear blocker ring (Fig. 232).
(8) Remove 5th gear and needle bearing (if
equipped) (Fig. 233).(9) Remove 3/4 cluster gear snap ring (Fig. 234).
(10) Install shaft assembly into fixture 8483, with
split collar 8483-3 oriented chamfer side up (Fig.
235). Place 8483-2 into position with chamfer side up
(Fig. 236).
Fig. 232 5th Gear Blocker Ring
1 - 5th GEAR BLOCKER RING
Fig. 233 5th Gear
1 - 5th GEAR
Fig. 234 3/4 Cluster Gear Snap Ring
1 - SNAP RING
Fig. 235 Fixture 8483
1 - FIXTURE 8483
2 - COLLAR 8483-3
21 - 102 T850 MANUAL TRANSAXLERS
INTERMEDIATE SHAFT (Continued)
ProCarManuals.com
Page 1550 of 2177

(11) Using an arbor press, press intermediate shaft
out of 3/4 cluster gear (Fig. 237).
(12) Remove intermediate shaft from fixture and
remove 3/4 cluster gear from shaft (Fig. 238).
(13) Remove 2nd gear and needle bearing (if
equipped) (Fig. 239).
Fig. 236 Loading Intermediate Shaft
1 - FIXTURE 8483
2 - 3/4 CLUSTER GEAR
3 - COLLAR 8483-2
Fig. 237 Press Intermediate Shaft Out of 3/4 Cluster
Gear
1 - ARBOR PRESS RAM
2 - INTERMEDIATE SHAFT
3 - 3/4 CLUSTER GEAR
4 - FIXTURE 8483
Fig. 238 3/4 Cluster Gear
1 - 3/4 CLUSTER GEAR
2 - INTERMEDIATE SHAFT
Fig. 239 2nd Gear Removal
1 - 2ND GEAR
2 - INTERMEDIATE SHAFT
RST850 MANUAL TRANSAXLE21 - 103
INTERMEDIATE SHAFT (Continued)
ProCarManuals.com