DODGE TOWN AND COUNTRY 2004 Service Manual
Manufacturer: DODGE, Model Year: 2004, Model line: TOWN AND COUNTRY, Model: DODGE TOWN AND COUNTRY 2004Pages: 2585, PDF Size: 62.54 MB
Page 141 of 2585
torque to the rear wheels in accordance with the
amount of slippage at the front wheels. The variable
torque distribution is automatic with no driver
inputs required.
OPERATION
The viscous coupler (Fig. 46) is a housing nearly
filled with a high viscosity silicone liquid and thin
metal plates alternately splined to an inner and
outer drum. The viscous coupler provides torque in
the following modes:²Shear mode (normal operation)
²Hump mode (locked mode)
The inner plates are slotted around the radius and
the outer plates have holes in them. In the shear
mode (normal operation), the plates are evenly
spaced and the torque is created by the shearing of
the plates through the fluid and 90-100% of the
torque is applied to the rear axle. During the shear
mode, a fluid flow pattern is created from this design
(holes and slots). This fluid flow causes high pressure
on each side of each pair of plates and low pressure
between each pair of plates.
When a high speed difference (shear) occurs
because of loss of traction (one axle spinning faster
than the other), the silicone fluid expands as it heats
from this shearing. When the silicone expands to fill
the viscous coupler completely, this pressure differ-
ence is high enough to squeeze each pair of plates
together. The resulting hump torque is up to 8 times
higher than the shear torque. When the viscous cou-
pler is in the hump mode, it does not lock the axles
(undifferentiated 4-Wheel Drive). It controls the
amount of slippage while delivering maximum power
to the axle having greatest traction. Once the speed
difference equalizes the fluid and plates cool down
and the viscous coupler goes back to the shear mode.
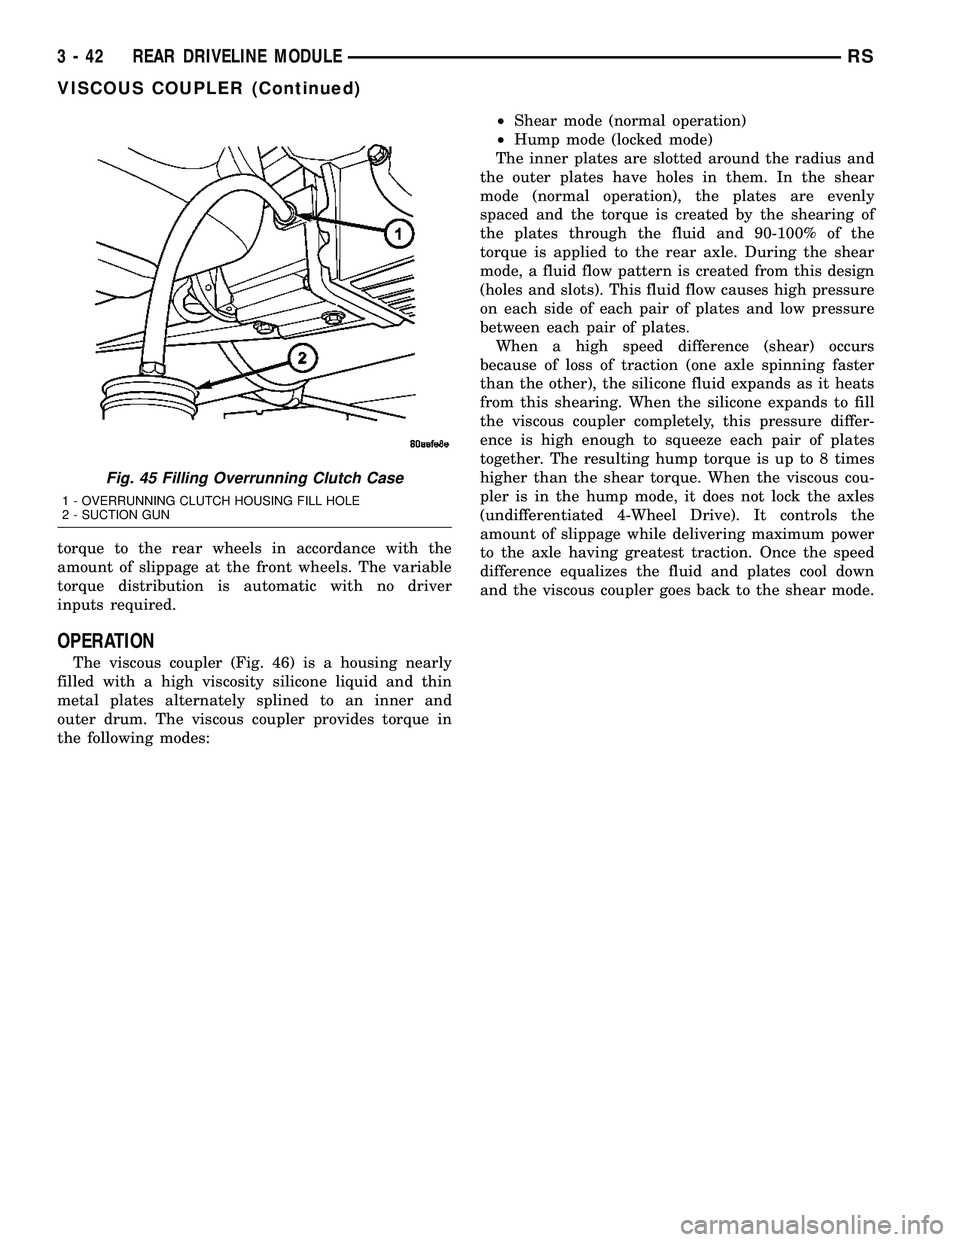
Fig. 45 Filling Overrunning Clutch Case
1 - OVERRUNNING CLUTCH HOUSING FILL HOLE
2 - SUCTION GUN
3 - 42 REAR DRIVELINE MODULERS
VISCOUS COUPLER (Continued)
Page 142 of 2585
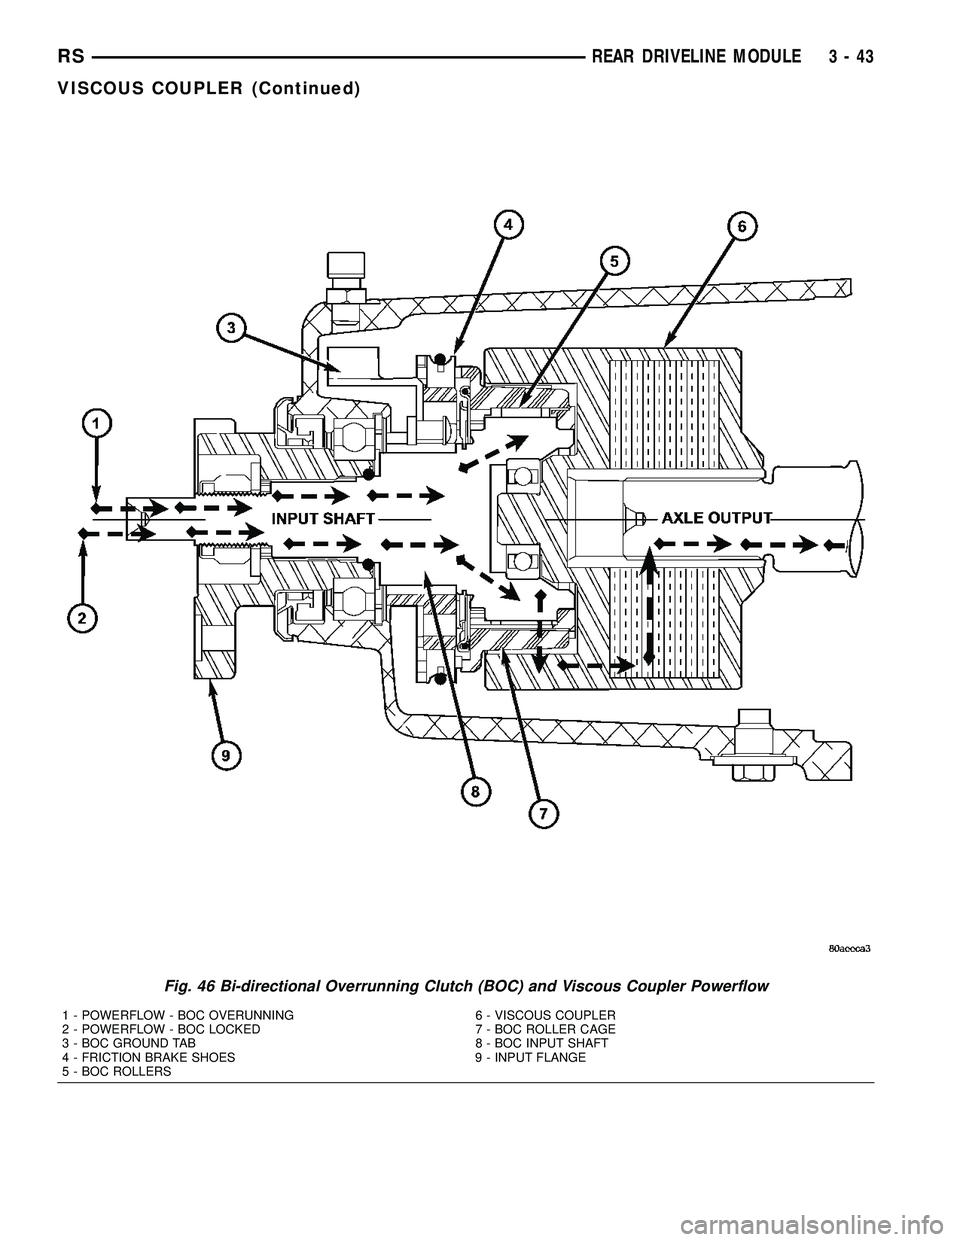
Fig. 46 Bi-directional Overrunning Clutch (BOC) and Viscous Coupler Powerflow
1 - POWERFLOW - BOC OVERUNNING 6 - VISCOUS COUPLER
2 - POWERFLOW - BOC LOCKED 7 - BOC ROLLER CAGE
3 - BOC GROUND TAB 8 - BOC INPUT SHAFT
4 - FRICTION BRAKE SHOES 9 - INPUT FLANGE
5 - BOC ROLLERS
RSREAR DRIVELINE MODULE3-43
VISCOUS COUPLER (Continued)
Page 143 of 2585
TORQUE ARM
REMOVAL
(1) Raise vehicle on hoist.
(2) Remove rear driveline module assembly. (Refer
to 3 - DIFFERENTIAL & DRIVELINE/REAR DRIV-
ELINE MODULE - REMOVAL)
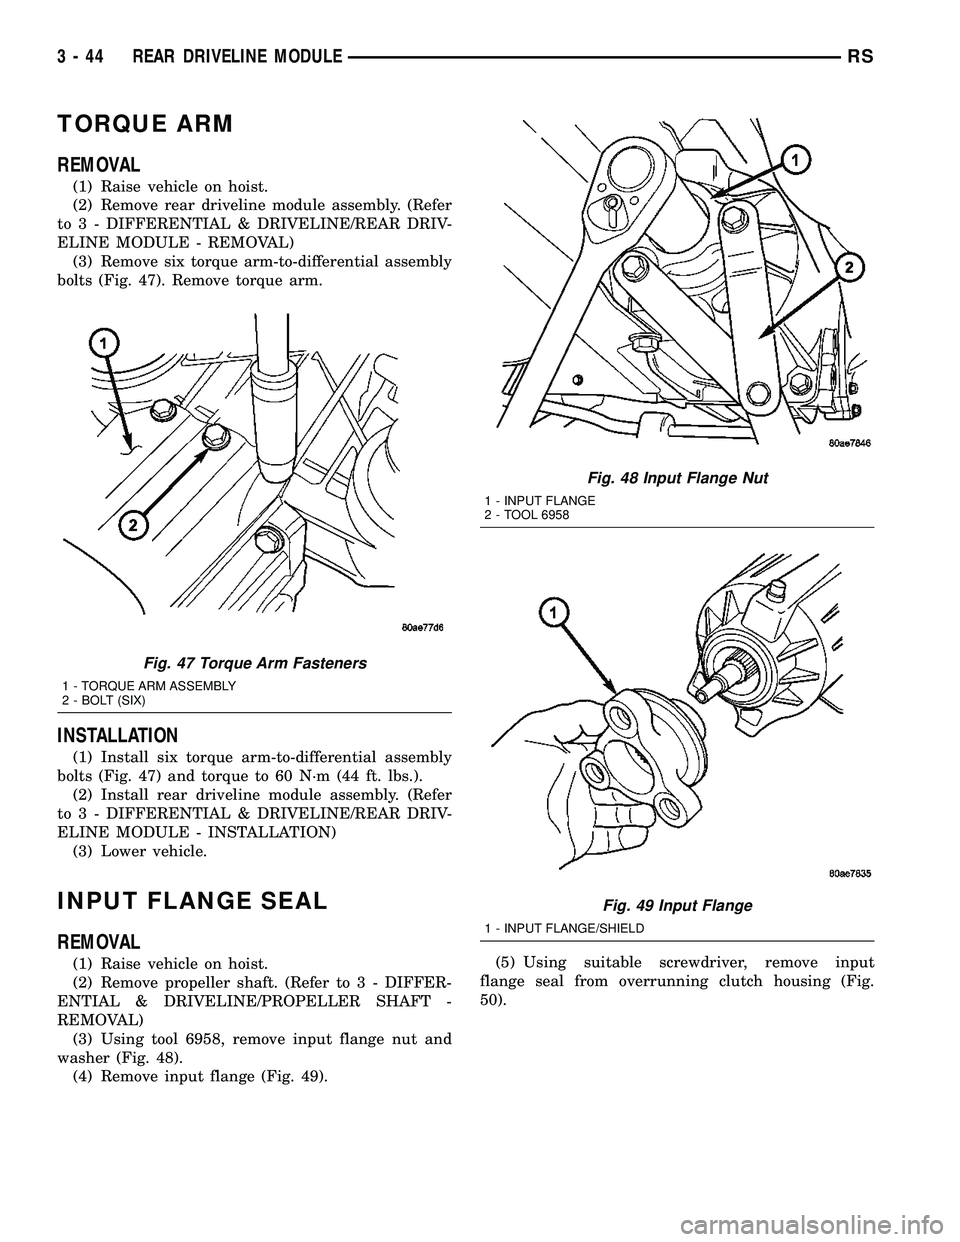
(3) Remove six torque arm-to-differential assembly
bolts (Fig. 47). Remove torque arm.
INSTALLATION
(1) Install six torque arm-to-differential assembly
bolts (Fig. 47) and torque to 60 N´m (44 ft. lbs.).
(2) Install rear driveline module assembly. (Refer
to 3 - DIFFERENTIAL & DRIVELINE/REAR DRIV-
ELINE MODULE - INSTALLATION)
(3) Lower vehicle.
INPUT FLANGE SEAL
REMOVAL
(1) Raise vehicle on hoist.
(2) Remove propeller shaft. (Refer to 3 - DIFFER-
ENTIAL & DRIVELINE/PROPELLER SHAFT -
REMOVAL)
(3) Using tool 6958, remove input flange nut and
washer (Fig. 48).
(4) Remove input flange (Fig. 49).(5) Using suitable screwdriver, remove input
flange seal from overrunning clutch housing (Fig.
50).
Fig. 47 Torque Arm Fasteners
1 - TORQUE ARM ASSEMBLY
2 - BOLT (SIX)
Fig. 48 Input Flange Nut
1 - INPUT FLANGE
2 - TOOL 6958
Fig. 49 Input Flange
1 - INPUT FLANGE/SHIELD
3 - 44 REAR DRIVELINE MODULERS
Page 144 of 2585
INSTALLATION
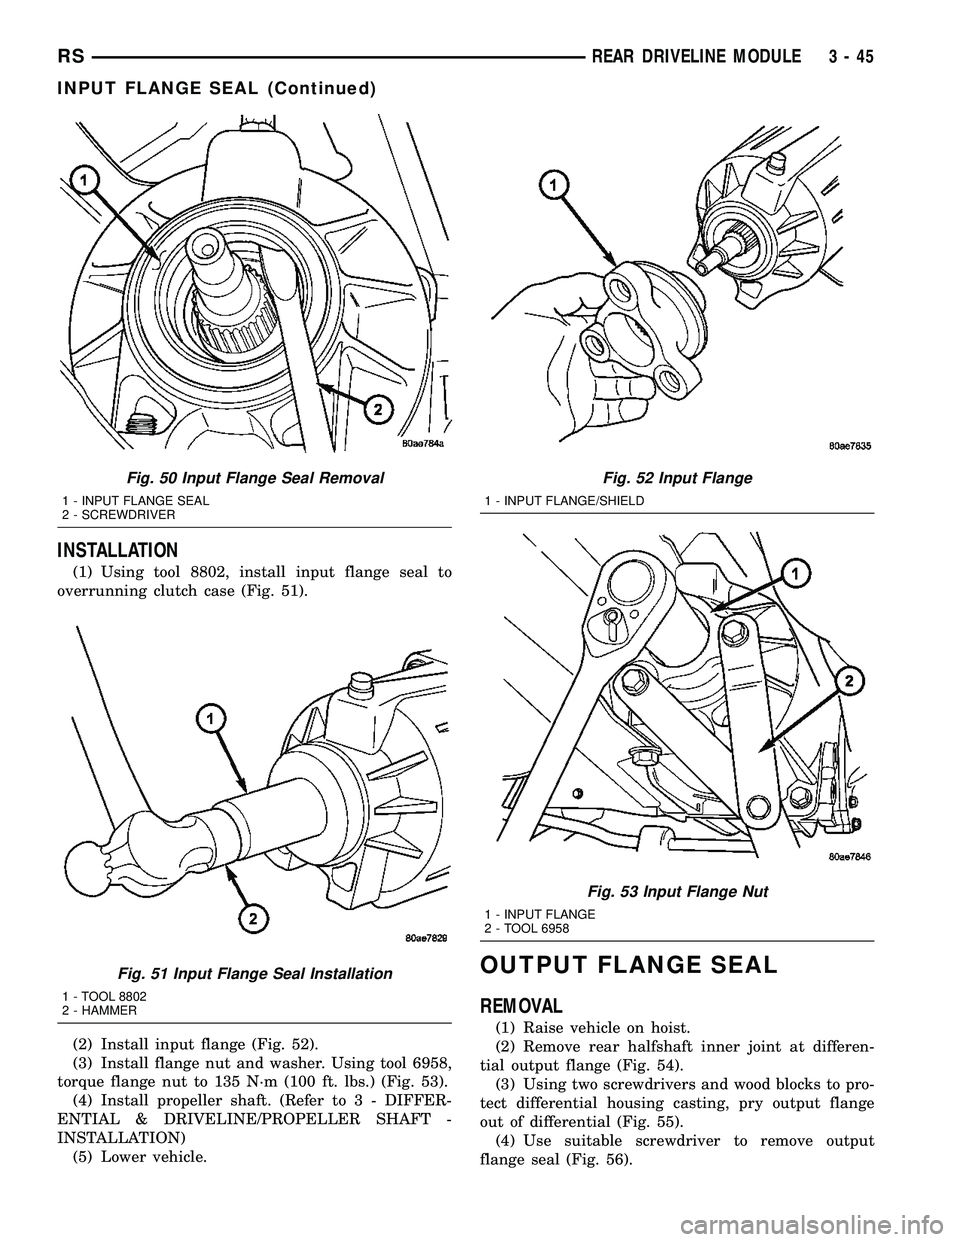
(1) Using tool 8802, install input flange seal to
overrunning clutch case (Fig. 51).
(2) Install input flange (Fig. 52).
(3) Install flange nut and washer. Using tool 6958,
torque flange nut to 135 N´m (100 ft. lbs.) (Fig. 53).
(4) Install propeller shaft. (Refer to 3 - DIFFER-
ENTIAL & DRIVELINE/PROPELLER SHAFT -
INSTALLATION)
(5) Lower vehicle.
OUTPUT FLANGE SEAL
REMOVAL
(1) Raise vehicle on hoist.
(2) Remove rear halfshaft inner joint at differen-
tial output flange (Fig. 54).
(3) Using two screwdrivers and wood blocks to pro-
tect differential housing casting, pry output flange
out of differential (Fig. 55).
(4) Use suitable screwdriver to remove output
flange seal (Fig. 56).
Fig. 50 Input Flange Seal Removal
1 - INPUT FLANGE SEAL
2 - SCREWDRIVER
Fig. 51 Input Flange Seal Installation
1 - TOOL 8802
2 - HAMMER
Fig. 52 Input Flange
1 - INPUT FLANGE/SHIELD
Fig. 53 Input Flange Nut
1 - INPUT FLANGE
2 - TOOL 6958
RSREAR DRIVELINE MODULE3-45
INPUT FLANGE SEAL (Continued)
Page 145 of 2585
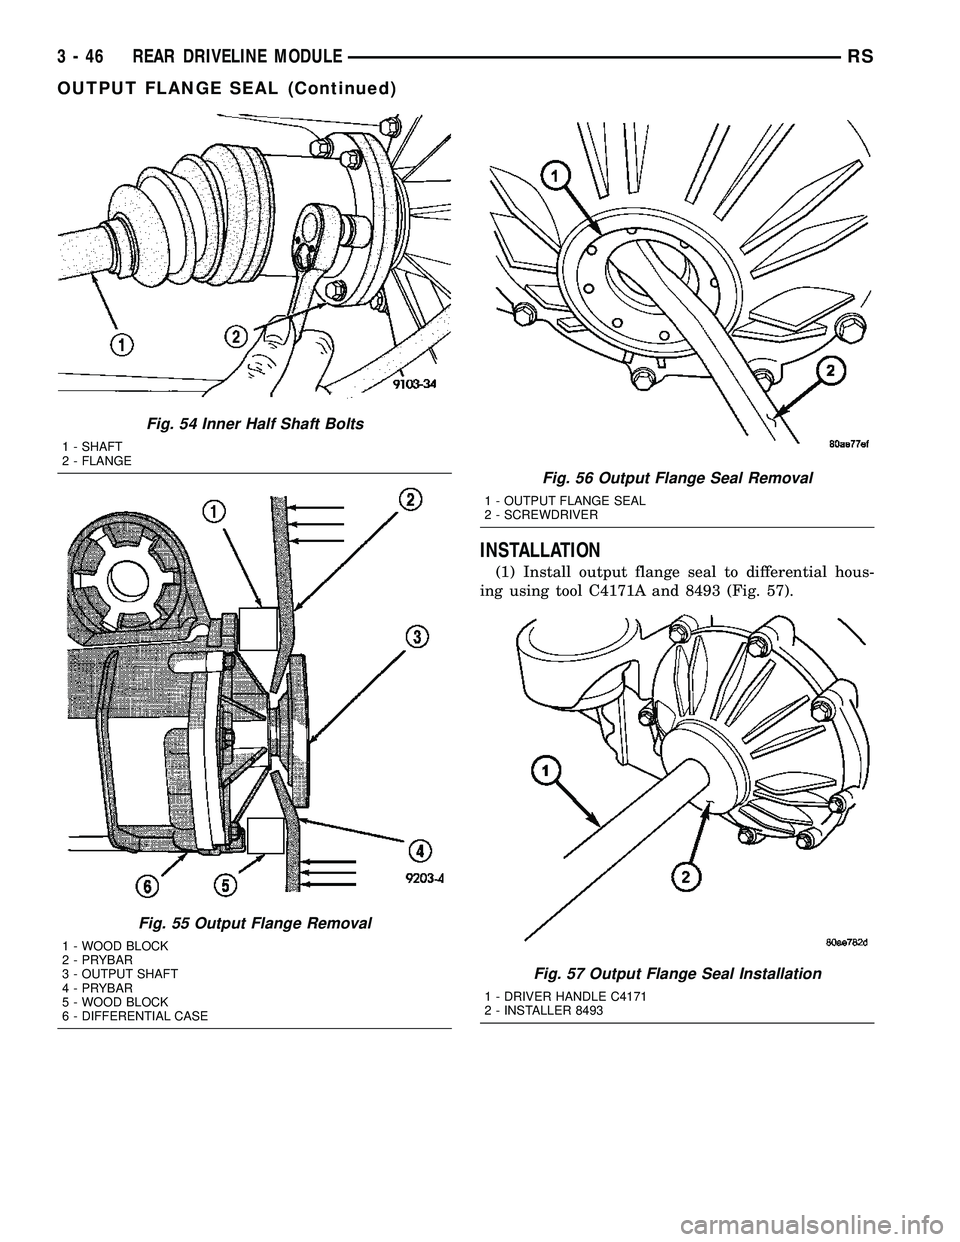
INSTALLATION
(1) Install output flange seal to differential hous-
ing using tool C4171A and 8493 (Fig. 57).
Fig. 54 Inner Half Shaft Bolts
1 - SHAFT
2 - FLANGE
Fig. 55 Output Flange Removal
1 - WOOD BLOCK
2 - PRYBAR
3 - OUTPUT SHAFT
4 - PRYBAR
5 - WOOD BLOCK
6 - DIFFERENTIAL CASE
Fig. 56 Output Flange Seal Removal
1 - OUTPUT FLANGE SEAL
2 - SCREWDRIVER
Fig. 57 Output Flange Seal Installation
1 - DRIVER HANDLE C4171
2 - INSTALLER 8493
3 - 46 REAR DRIVELINE MODULERS
OUTPUT FLANGE SEAL (Continued)
Page 146 of 2585
(2) Install ouput flange to differential assembly.
Verify that it is seated all the way into position by
attempting to pull out by hand.
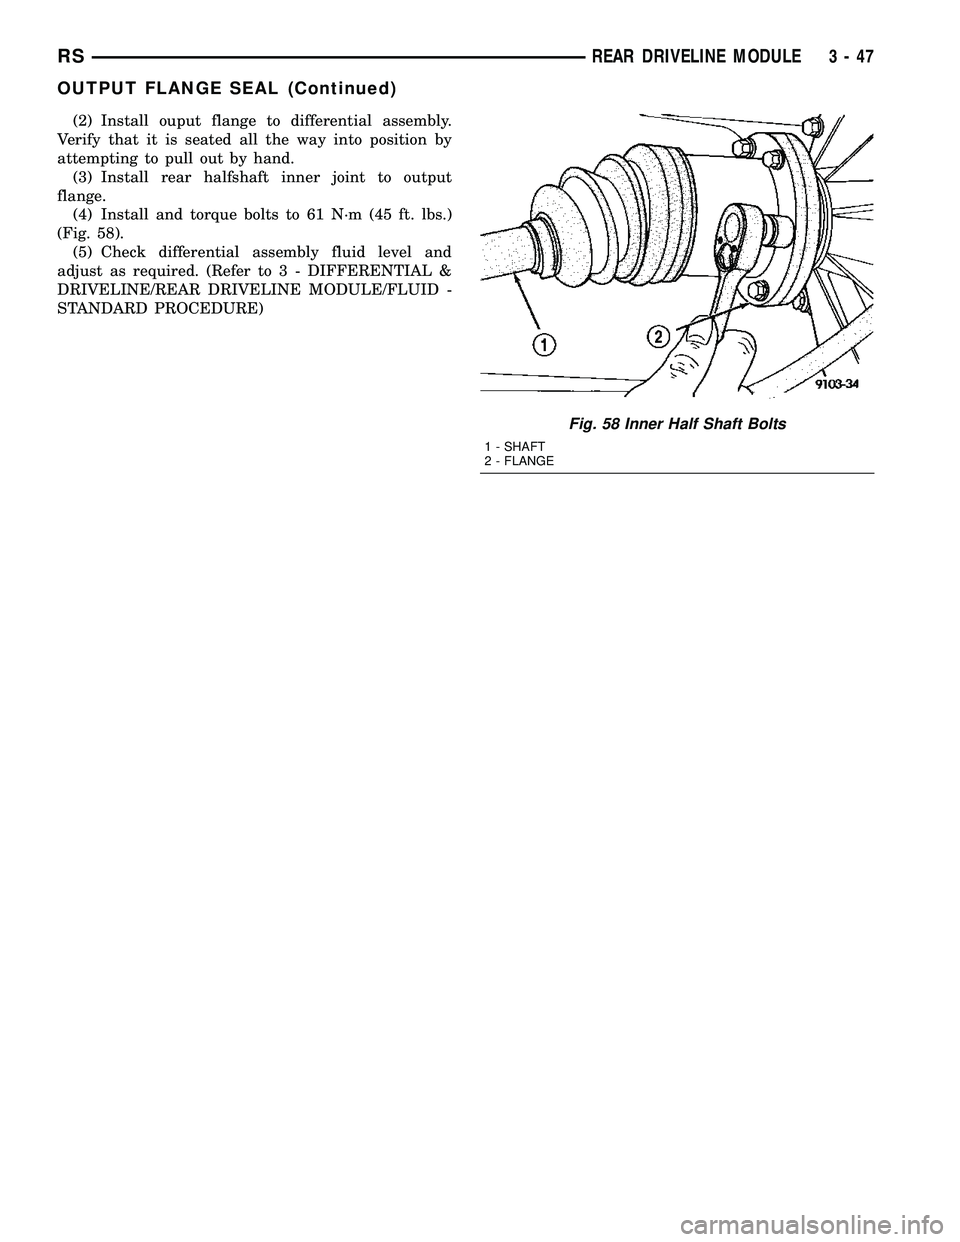
(3) Install rear halfshaft inner joint to output
flange.
(4) Install and torque bolts to 61 N´m (45 ft. lbs.)
(Fig. 58).
(5) Check differential assembly fluid level and
adjust as required. (Refer to 3 - DIFFERENTIAL &
DRIVELINE/REAR DRIVELINE MODULE/FLUID -
STANDARD PROCEDURE)
Fig. 58 Inner Half Shaft Bolts
1 - SHAFT
2 - FLANGE
RSREAR DRIVELINE MODULE3-47
OUTPUT FLANGE SEAL (Continued)
Page 147 of 2585

Page 148 of 2585
BRAKES
TABLE OF CONTENTS
page page
BRAKES - BASE........................... 1BRAKES - ABS........................... 75
BRAKES - BASE
TABLE OF CONTENTS
page page
BRAKES - BASE
DESCRIPTION
DESCRIPTION - BASE BRAKES...........3
DESCRIPTION - BASE BRAKES (EXPORT) . . . 3
OPERATION - BASE BRAKES..............3
WARNING.............................4
CAUTION..............................4
DIAGNOSIS AND TESTING - BASE BRAKE
SYSTEM.............................4
STANDARD PROCEDURE - BASE BRAKE
BLEEDING............................7
SPECIFICATIONS
BRAKE FASTENER TORQUE.............9
SPECIAL TOOLS
BASE BRAKE SYSTEM.................10
BRAKE FLUID LEVEL SWITCH
DESCRIPTION.........................10
OPERATION...........................10
REMOVAL.............................11
INSTALLATION.........................11
HYDRAULIC/MECHANICAL
DESCRIPTION
DESCRIPTION - DISC BRAKES (FRONT) . . . 11
DESCRIPTION - DISC BRAKES (REAR)....12
DESCRIPTION - DISC BRAKES (EXPORT) . . 13
DESCRIPTION - DRUM BRAKES (REAR) . . . 13
OPERATION
OPERATION - DISC BRAKES (FRONT).....13
OPERATION - DISC BRAKES (REAR)......13
DIAGNOSIS AND TESTING - DRUM BRAKE
AUTOMATIC ADJUSTER................13
BRAKE LINES
DESCRIPTION - BRAKE TUBES AND HOSES . 14
OPERATION - BRAKE TUBES AND HOSES . . . 14
INSPECTION - BRAKE TUBES AND HOSES . . . 14BRAKE PADS/SHOES - FRONT
REMOVAL
REMOVAL - FRONT DISC BRAKE SHOES
(DISC/DISC BRAKES)..................14
REMOVAL - FRONT DISC BRAKE SHOES
(DISC/DRUM BRAKES).................15
CLEANING - DISC BRAKE SHOES..........16
INSPECTION - DISC BRAKE SHOES........16
INSTALLATION
INSTALLATION - FRONT DISC BRAKE
SHOES (DISC/DISC BRAKES)............16
INSTALLATION - FRONT DISC BRAKE
SHOES (DISC/DRUM BRAKES)...........17
BRAKE PADS/SHOES - REAR DISC
REMOVAL - REAR DISC BRAKE SHOES.....17
CLEANING - DISC BRAKE SHOES..........18
INSPECTION - DISC BRAKE SHOES........18
INSTALLATION - REAR DISC BRAKE SHOES . . 19
BRAKE PADS/SHOES - REAR DRUM
REMOVAL - REAR DRUM BRAKE SHOES....19
INSPECTION - REAR DRUM BRAKE SHOE
LINING..............................22
INSTALLATION - REAR DRUM BRAKE SHOES . 22
ADJUSTMENTS
ADJUSTMENT - REAR DRUM BRAKE
SHOES.............................23
DISC BRAKE CALIPER - FRONT
REMOVAL
REMOVAL - FRONT DISC BRAKE CALIPER
(DISC/DISC BRAKES)..................24
REMOVAL - FRONT DISC BRAKE CALIPER
(DISC/DRUM BRAKES).................24
DISASSEMBLY
DISASSEMBLY - CALIPER GUIDE PIN
BUSHINGS (DISC/DISC BRAKES).........24
DISASSEMBLY - CALIPER PISTON AND
SEAL...............................24
RSBRAKES5-1
Page 149 of 2585
CLEANING - CALIPER...................25
INSPECTION - CALIPER..................25
ASSEMBLY
ASSEMBLY - CALIPER GUIDE PIN
BUSHINGS (DISC/DISC BRAKES).........25
ASSEMBLY - CALIPER PISTON AND SEAL . . 26
INSTALLATION
INSTALLATION - FRONT DISC BRAKE
CALIPER (DISC/DISC BRAKES)...........27
INSTALLATION - FRONT DISC BRAKE
CALIPER (DISC/DRUM BRAKES)..........27
DISC BRAKE CALIPER - REAR
REMOVAL - REAR DISC BRAKE CALIPER....27
DISASSEMBLY - CALIPER PISTON AND SEAL . 28
CLEANING - CALIPER...................29
INSPECTION - CALIPER..................29
ASSEMBLY - CALIPER PISTON AND SEAL . . . 29
INSTALLATION - REAR DISC BRAKE CALIPER . 30
DISC BRAKE CALIPER ADAPTER
REMOVAL - FRONT DISC BRAKE CALIPER
ADAPTER...........................31
INSTALLATION - FRONT DISC BRAKE
CALIPER ADAPTER....................31
DISC BRAKE CALIPER GUIDE PINS
REMOVAL - DISC BRAKE CALIPER GUIDE
PINS (DISC/DRUM BRAKES).............31
INSTALLATION - DISC BRAKE CALIPER
GUIDE PINS (DISC/DRUM BRAKES).......31
DRUM
REMOVAL.............................32
INSTALLATION.........................32
FLUID
DIAGNOSIS AND TESTING - BRAKE FLUID
CONTAMINATION.....................32
STANDARD PROCEDURE - BRAKE FLUID
LEVEL CHECKING.....................32
SPECIFICATIONS
BRAKE FLUID........................33
JUNCTION BLOCK
DESCRIPTION - NON-ABS JUNCTION BLOCK . 33
OPERATION - NON-ABS JUNCTION BLOCK . . 33
REMOVAL - NON-ABS JUNCTION BLOCK....33
INSTALLATION - NON-ABS JUNCTION BLOCK . 33
MASTER CYLINDER
DESCRIPTION
DESCRIPTION........................34
DESCRIPTION - RHD..................35
OPERATION...........................35
STANDARD PROCEDURE - MASTER
CYLINDER BLEEDING..................35
REMOVAL
REMOVAL - LHD......................36
REMOVAL - RHD......................37
DISASSEMBLY - MASTER CYLINDER (FLUID
RESERVOIR).........................37
ASSEMBLY - MASTER CYLINDER (FLUID
RESERVOIR).........................38INSTALLATION
INSTALLATION - LHD..................38
INSTALLATION - RHD..................39
PEDAL TORQUE SHAFT - RHD
REMOVAL.............................39
INSTALLATION.........................39
POWER BRAKE BOOSTER
DESCRIPTION.........................40
OPERATION...........................41
DIAGNOSIS AND TESTING - POWER BRAKE
BOOSTER...........................41
REMOVAL
REMOVAL - LHD......................42
REMOVAL - RHD......................43
INSTALLATION
INSTALLATION - LHD..................46
INSTALLATION - RHD..................47
PROPORTIONING VALVE
DESCRIPTION - PROPORTIONING VALVE
(HEIGHT SENSING)....................48
OPERATION - PROPORTIONING VALVE
(HEIGHT SENSING)....................48
DIAGNOSIS AND TESTING -
PROPORTIONING VALVE (HEIGHT
SENSING)...........................49
REMOVAL - PROPORTIONING VALVE
(HEIGHT SENSING)....................50
INSTALLATION - PROPORTIONING VALVE
(HEIGHT SENSING)....................51
ROTOR
DIAGNOSIS AND TESTING - BRAKE ROTOR . . 51
STANDARD PROCEDURE - BRAKE ROTOR
MACHINING..........................53
REMOVAL - FRONT BRAKE ROTOR........54
INSTALLATION - FRONT BRAKE ROTOR.....54
SPECIFICATIONS
BRAKE ROTOR.......................55
BRAKE ROTOR - EXPORT..............55
SUPPORT PLATE - DRUM BRAKE
REMOVAL.............................56
INSTALLATION.........................56
WHEEL CYLINDERS
REMOVAL.............................57
INSPECTION..........................57
INSTALLATION.........................57
PARKING BRAKE
DESCRIPTION
DESCRIPTION........................57
DESCRIPTION - EXPORT...............58
OPERATION...........................58
STANDARD PROCEDURE
STANDARD PROCEDURE - PARKING
BRAKE AUTOMATIC ADJUSTER TENSION
RELEASE...........................58
STANDARD PROCEDURE - PARKING
BRAKE AUTOMATIC ADJUSTER TENSION
RESET.............................59
5 - 2 BRAKES - BASERS
Page 150 of 2585
CABLES - PARKING BRAKE
REMOVAL
REMOVAL - PARKING BRAKE CABLE
(FRONT)............................59
REMOVAL - PARKING BRAKE CABLE
(INTERMEDIATE)......................60
REMOVAL - PARKING BRAKE CABLE
(RIGHT REAR)........................60
REMOVAL - PARKING BRAKE CABLE (LEFT
REAR)..............................62
INSTALLATION
INSTALLATION - PARKING BRAKE CABLE
(FRONT)............................63
INSTALLATION - PARKING BRAKE CABLE
(INTERMEDIATE)......................63
INSTALLATION - PARKING BRAKE CABLE
(RIGHT REAR)........................63
INSTALLATION - PARKING BRAKE CABLE
(LEFT REAR).........................64ADJUSTMENTS
ADJUSTMENT - PARKING BRAKE CABLES . 64
CABLES - PARKING BRAKE (EXPORT)
REMOVAL - FRONT CABLE...............64
INSTALLATION - FRONT CABLE............64
LEVER - PARKING BRAKE
REMOVAL.............................64
INSTALLATION.........................65
LEVER - PARKING BRAKE (EXPORT)
REMOVAL - PARKING BRAKE LEVER AND
FRONT CABLE.......................65
INSTALLATION - PARKING BRAKE LEVER
AND FRONT CABLE...................66
SHOES - PARKING BRAKE
REMOVAL.............................67
INSTALLATION.........................72
ADJUSTMENTS
ADJUSTMENT - PARKING BRAKE SHOES . . 73
BRAKES - BASE
DESCRIPTION
DESCRIPTION - BASE BRAKES
The base brake system consists of the following
components:
²Brake pedal
²Power brake booster
²Master cylinder
²Brake tubes and hoses
²Proportioning valve (non-ABS vehicles only)
²Disc brakes
²Drum brakes
²Brake lamp switch
²Brake fluid level switch
²Parking brakes
Front disc brakes control the braking of the front
wheels; rear braking is controlled by rear drum
brakes or rear disc brakes depending on options.
The hydraulic brake system is diagonally split on
both the non-antilock braking systems and antilock
braking systems. That means the left front and right
rear brakes are on one hydraulic circuit and the right
front and left rear are on the other.
For information on the brake lamp switch, (Refer
to 8 - ELECTRICAL/LAMPS/LIGHTING - EXTERI-
OR/BRAKE LAMP SWITCH - DESCRIPTION)Vehicles equipped with the optional antilock brake
system (ABS) use a system designated Mark 20e. It
is available with or without traction control. This
system shares most base brake hardware used on
vehicles without ABS. ABS components are described
in detail in ANTILOCK BRAKE SYSTEM.DESCRIPTION - BASE BRAKES (EXPORT)
Four-Wheel Disc Antilock Brakes are standard on
all models.
OPERATION - BASE BRAKES
When a vehicle needs to be stopped, the driver
applies the brake pedal. The brake pedal pushes the
input rod of the power brake booster into the booster.
The booster uses vacuum to ease pedal effort as force
is transferred through the booster to the master cyl-
inder. The booster's output rod pushes in the master
cylinder's primary and secondary pistons applying
hydraulic pressure through the chassis brake tubes
to the brakes at each tire and wheel assembly.
The parking brakes are foot-operated. When
applied, the parking brake lever pulls on cables that
actuate brake shoes at each rear wheel. These shoes
come in contact with a hub mounted drum (drum for
disc/drum brakes or drum-in-hat for disc/disc brakes)
and hold it in place.
RSBRAKES - BASE5-3