Valve DODGE VIPER 2008 ZB II / 2.G Owners Manual
[x] Cancel search | Manufacturer: DODGE, Model Year: 2008, Model line: VIPER, Model: DODGE VIPER 2008 ZB II / 2.GPages: 303, PDF Size: 2.65 MB
Page 160 of 303
check tire pressure. Do not make a visual judgement
when determining proper inflation. Radial tires may look
properly inflated even when they are under inflated.
CAUTION!
After inspecting or adjusting the tire pressure, al-
ways reinstall the valve stem cap (if equipped). This
will prevent moisture and dirt from entering the
valve stem, which could damage the valve stem.
Inflation pressures specified on the placard are always
ªcold tire inflation pressure.º Cold tire inflation pressure
is defined as the tire pressure after the vehicle has not
been driven for at least 3 hours, or driven less than 1 mile
(1 km) after a 3 hour period. The cold tire inflation
pressure must not exceed the maximum inflation pres-
sure molded into the tire sidewall.Check tire pressures more often if subject to a wide range
of outdoor temperatures, as tire pressures vary with
temperature changes.
Tire pressures change by approximately 1 psi (7 kPa) per
12É F (7É C) of air temperature change. Keep this in mind
when checking tire pressure inside a garage, especially in
the winter.
Example: If garage temperature = 68É F (20É C) and the
outside temperature = 32É F (0É C) then the cold tire
inflation pressure should be increased by 3 psi (21 kPa),
which equals 1 psi (7 kPa) for every 12É F (7É C) for this
outside temperature condition.
Tire pressure may increase from 2 to 6 psi (13 to 40 kPa)
during operation. DO NOT reduce this normal pressure
build up or your tire pressure will be too low.
STARTING AND OPERATING 159
5
Page 179 of 303
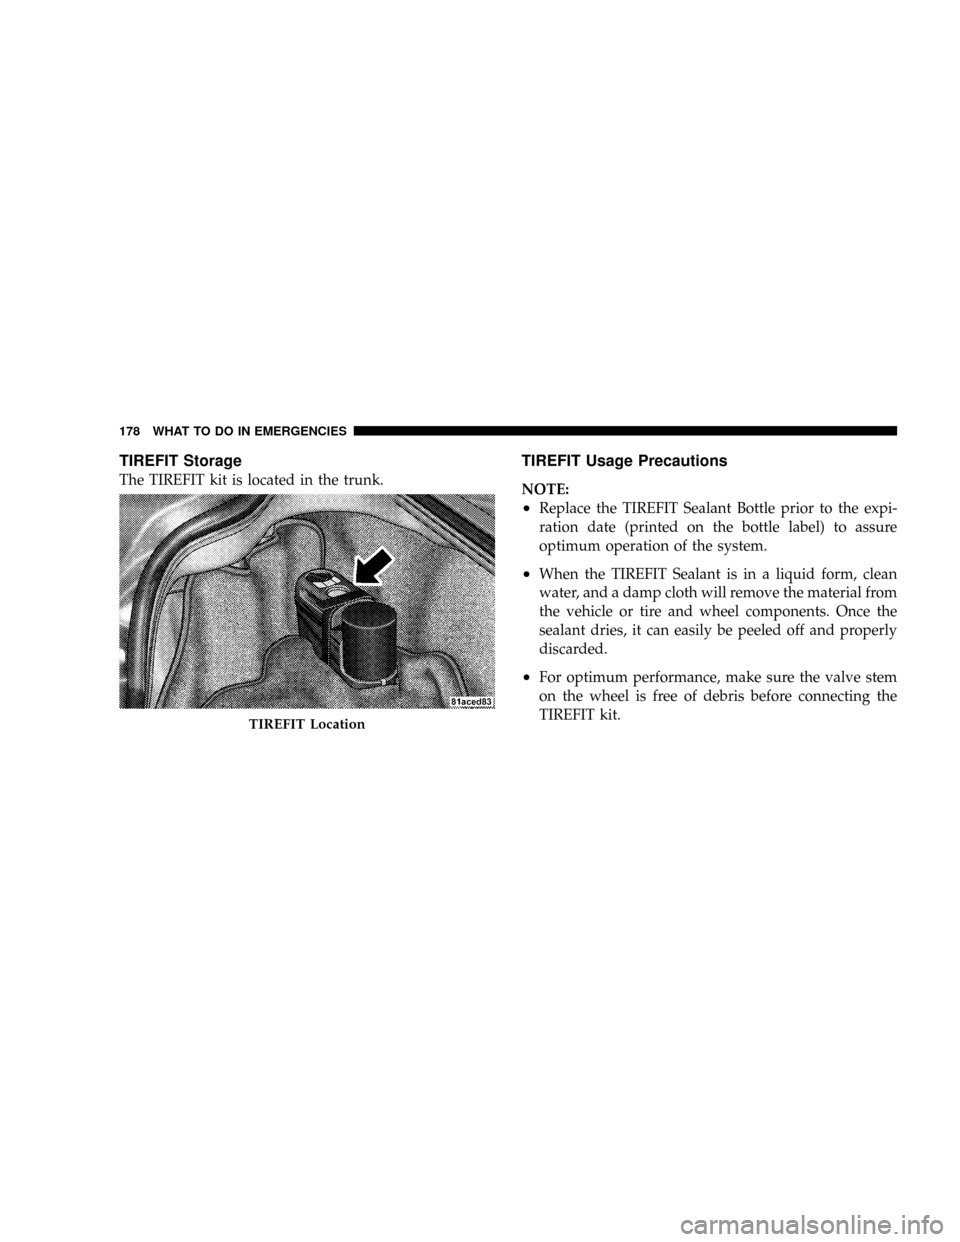
TIREFIT Storage
The TIREFIT kit is located in the trunk.
TIREFIT Usage Precautions
NOTE:
²Replace the TIREFIT Sealant Bottle prior to the expi-
ration date (printed on the bottle label) to assure
optimum operation of the system.
²When the TIREFIT Sealant is in a liquid form, clean
water, and a damp cloth will remove the material from
the vehicle or tire and wheel components. Once the
sealant dries, it can easily be peeled off and properly
discarded.
²For optimum performance, make sure the valve stem
on the wheel is free of debris before connecting the
TIREFIT kit.
TIREFIT Location
178 WHAT TO DO IN EMERGENCIES
Page 182 of 303
6. Air Pump Hose (Black)
7. Sealant Hose (Clear with Yellow Cap)
Using the Mode Select Knob & Hoses
Selecting Air Mode
Turn the Mode Select knob (4) to this position
for air pump operation only. Use the Black Air
Pump Hose (6) when selecting this mode.
Selecting Sealant/Air Mode
Turn the Mode Select knob (4) to this position
to inject the TIREFIT Sealant and to inflate the
tire. Use the Sealant Hose (Clear hose with the
Yellow Cap) (7) when selecting this mode.
Using the Air Pump Power Button
Push and release the button (3) once to turn On
the TIREFIT kit. Push and release the button (3)
again to turn Off the TIREFIT kit.Sealing a Tire with TIREFIT
(A) Whenever You Stop to Use TIREFIT:
Turn on the vehicle's hazard warning flashers.
1. Verify that the valve stem (on the wheel with the
deflated tire) is in a position that is near to the ground.
This will allow the TIREFIT Hoses (6) and (7) to reach the
valve stem and keep the TIREFIT kit flat on the ground.
This will provide the best positioning of the kit when
injecting the sealant into the deflated tire and running the
air pump. Move the vehicle as necessary to place the
valve stem in this position before proceeding.
2. Place the transmission in Park (auto transmission) or
in Gear (manual transmission) and turn off the ignition.
3. Set the parking brake.
WHAT TO DO IN EMERGENCIES 181
6
Page 183 of 303
(B) Setting Up to Use TIREFIT:
Turn the Mode Select knob (4) to the Sealant/
Air Mode position.
1. Uncoil the Clear Sealant Hose (7) and then remove the
Yellow Cap from the fitting at the end of the hose.
2. Place the TIREFIT kit flat on the ground next to the
deflated tire.
3. Remove the cap from the valve stem and then screw
the fitting at the end of the Sealant Hose (7) onto the
valve stem.
4. Uncoil the Power Plug and Cable (5) and then insert
the plug into the vehicle's power outlet.
NOTE:Do not remove foreign objects (e.g., screws or
nails) from the tire.
(C)Injecting TIREFIT Sealant into the deflated tire:
1. Always start the engine before turning on the TIREFIT
kit.
2. After pressing the Air Pump Power Button
(3), the air pump should start to inflate the tire
and the sealant (white fluid) will flow from the
Sealant Bottle (1) through the Sealant Hose (7)
and into the tire.NOTE:Some sealant may leak out
through the puncture in the tire.
3.If the sealant Does Not Flow Through the Clear
Sealant Hose (7):
²Press the Air Pump Power Button (3) to turn off the
TIREFIT kit. Disconnect the Clear Sealant Hose (7)
from the valve stem. Make sure the valve stem is
free of debris. Reconnect the Clear Sealant Hose (7)
to the valve stem. Press the Air Pump Power Button
(3) to turn on the TIREFIT kit.
182 WHAT TO DO IN EMERGENCIES
Page 184 of 303
²Turn the Mode Select knob to the Sealant/Air Mode.
²Connect the Power Plug (5) to a different power
outlet in your vehicle or another vehicle, if available.
Make sure the engine is running before turning on
the TIREFIT kit.
²The Sealant Bottle (1) may be empty due to previous
use. Call for assistance.
(D) After Injecting TIREFIT Sealant:
1. Allow the air pump to inflate the tire to the pressure
indicated on the tire pressure label on the driver-side
latch pillar. Check the pressure in the tire by looking at
the Pressure Gauge (2).
²If the tire inflates to at least 26 psi (1.8 bar) within 15
minutes, proceed to Step 2 of this procedure.
²If tire fails to inflate to 26 psi (1.8 bar) within 15
minutes, perform the procedure steps described
under ª(G) Distributing TIREFIT Sealant to Better
Enable Tire Inflation.º
²Press the Air Pump Power Button (3) to
turn off the TIREFIT kit.
2. Remove the Speed Limit sticker from the top of the
Sealant Bottle (1) and place the sticker on the steering
wheel.
3. Disconnect the TIREFIT kit from the valve stem and
place it in the vehicle.
(E) Securing TIREFIT Sealant in the Tire
Drive the vehicle for approximately 5 miles (8 km) to
ensure distribution of the TIREFIT Sealant within the tire.
WHAT TO DO IN EMERGENCIES 183
6
Page 185 of 303
WARNING!
TIREFIT is not a permanent flat tire repair. Have the
tire inspected and repaired or replaced after using
TIREFIT. Do not exceed 55 mph (90 km/h) until
having the tire repaired or replaced. Failure to follow
this warning can result in injuries that are serious or
fatal to you, your passengers, and others around you.
(F) After Securing TIREFIT Sealant in the Tire:
Turn the Mode Select knob (4) to the Air Mode
position.
1. Uncoil the Black Air Pump Hose (6) and connect it to
the valve stem.2. Check the pressure in the tire by reading the Pressure
Gauge (2).
²If the pressure is less than 19 psi (1.3 bar), the tire is
too badly damaged. Do not attempt to drive the
vehicle further. Call for assistance.
²If the pressure is equal to or greater than 19 psi (1.3
bar), but less than the level indicated on the tire
pressure label, proceed to Step 4 of this procedure.
²If the pressure is at the level indicated on the tire
pressure label on the driver-side latch pillar, proceed
to Step 5 of this procedure.
3. Inflate the tire to the pressure indicated on the tire
pressure label on the driver-side latch pillar.
4. Disconnect the TIREFIT kit from the valve stem and
then reinstall the cap on the valve stem.
184 WHAT TO DO IN EMERGENCIES
Page 186 of 303
5. Place the TIREFIT kit in its proper storage area in the
vehicle.
6. Have the tire inspected and repaired or replaced at the
earliest opportunity at an authorized dealer or tire ser-
vice center.
7. Replace the Sealant Bottle (1) at your nearest autho-
rized Mopartparts dealership as soon as possible.
(G) Distributing TIREFIT Sealant to Better Enable
Tire Inflation
NOTE:Use this procedure only if directed here from
Step 1 of ª(D) After Injecting TIREFIT Sealant.º
Press the Air Pump Power Button (3) to turn off
the TIREFIT kit. Then, disconnect the kit from
the valve stem and place it in the vehicle.1. Drive the vehicle forward approximately 30 to 50 feet
(9 to 15 m) to distribute the sealant more evenly within
the tire.
2. Return to Step 1 of ª(D) After Injecting TIREFIT
Sealantº and attempt to inflate the tire. However, this
time, if the tire fails to inflate to 26 psi (1.8 bar) within 15
minutes, the tire is too badly damaged. Do not attempt to
drive the vehicle further. Call for assistance.
WHAT TO DO IN EMERGENCIES 185
6
Page 207 of 303
NOTE:
²Because of the plastic body shell on your vehicle,
ignition cables should be replaced with the specially
designed RFI cables available at your dealer.
²The ignition timing cannot be set on this engine.
Crankcase Emission Control System
Proper operation of this system depends on freedom
from plugging due to deposits. As vehicle mileage builds
up, the Crankcase Ventilation Valve orifice may accumu-
late deposits. If a valve is not working properly, it should
be replaced with a new orifice. DO NOT ATTEMPT TO
CLEAN THE OLD ORIFICE!
Check the ventilation hose for indication of damage or
plugging deposits and replace if necessary. See your
authorized dealer for service.
Maintenance-Free Battery
The top of the MAINTENANCE-FREE battery is perma-
nently sealed. You will never have to add water, nor is
periodic maintenance required.
The battery is located underneath an access panel inside
the rear compartment on the left side of the vehicle. A
remote battery terminal is located in the engine compart-
ment for jump-starting.
To gain access to the battery, remove the floor portion of
the rear compartment carpet.
206 MAINTAINING YOUR VEHICLE
Page 262 of 303
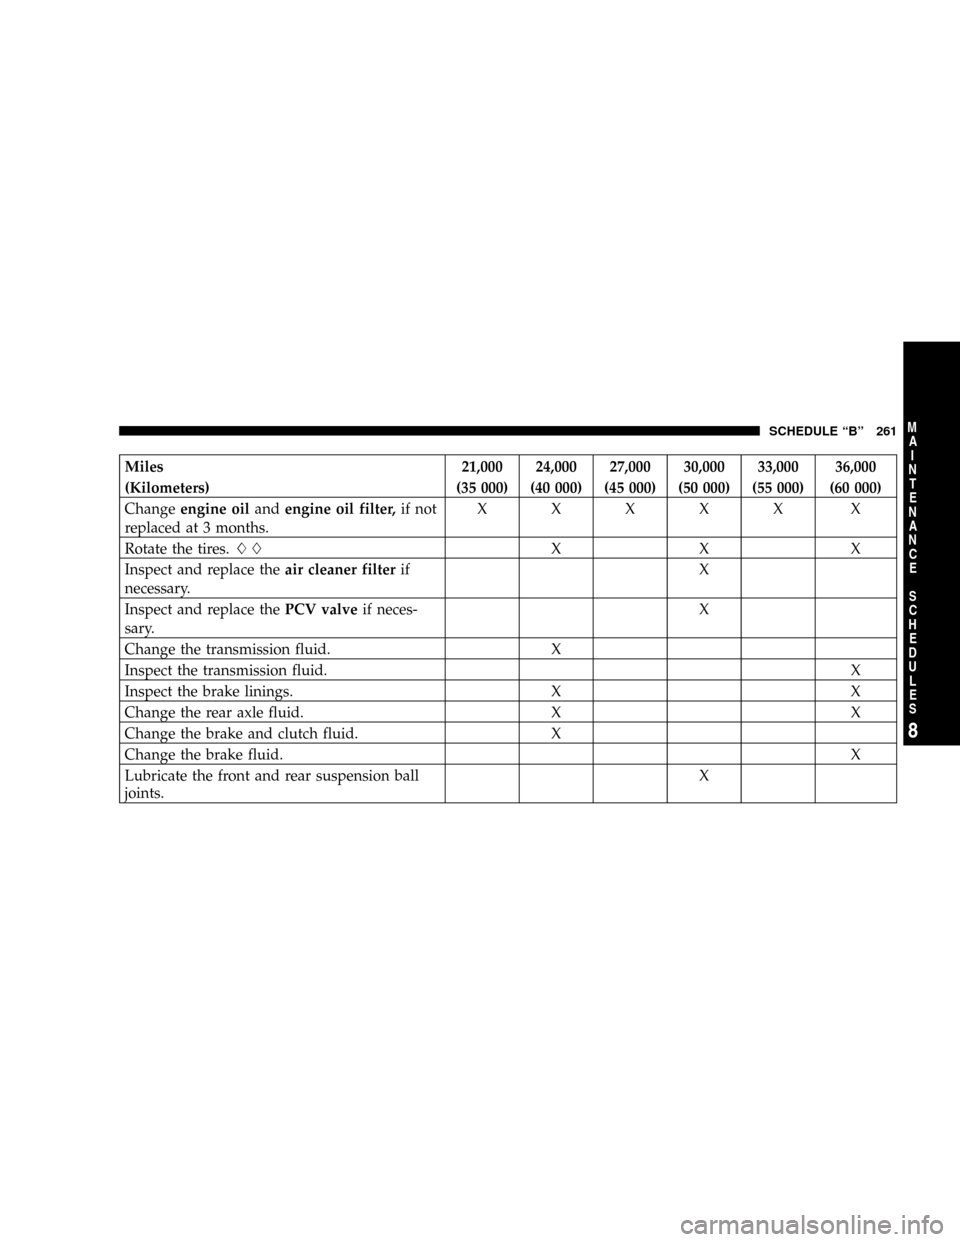
Miles 21,000 24,000 27,000 30,000 33,000 36,000
(Kilometers) (35 000) (40 000) (45 000) (50 000) (55 000) (60 000)
Changeengine oilandengine oil filter,if not
replaced at 3 months.XXXXX X
Rotate the tires.LLXX X
Inspect and replace theair cleaner filterif
necessary.X
Inspect and replace thePCV valveif neces-
sary.X
Change the transmission fluid. X
Inspect the transmission fluid.X
Inspect the brake linings. X X
Change the rear axle fluid. X X
Change the brake and clutch fluid. X
Change the brake fluid.X
Lubricate the front and rear suspension ball
joints.X
SCHEDULE ªBº 261
8
M
A
I
N
T
E
N
A
N
C
E
S
C
H
E
D
U
L
E
S
Page 264 of 303
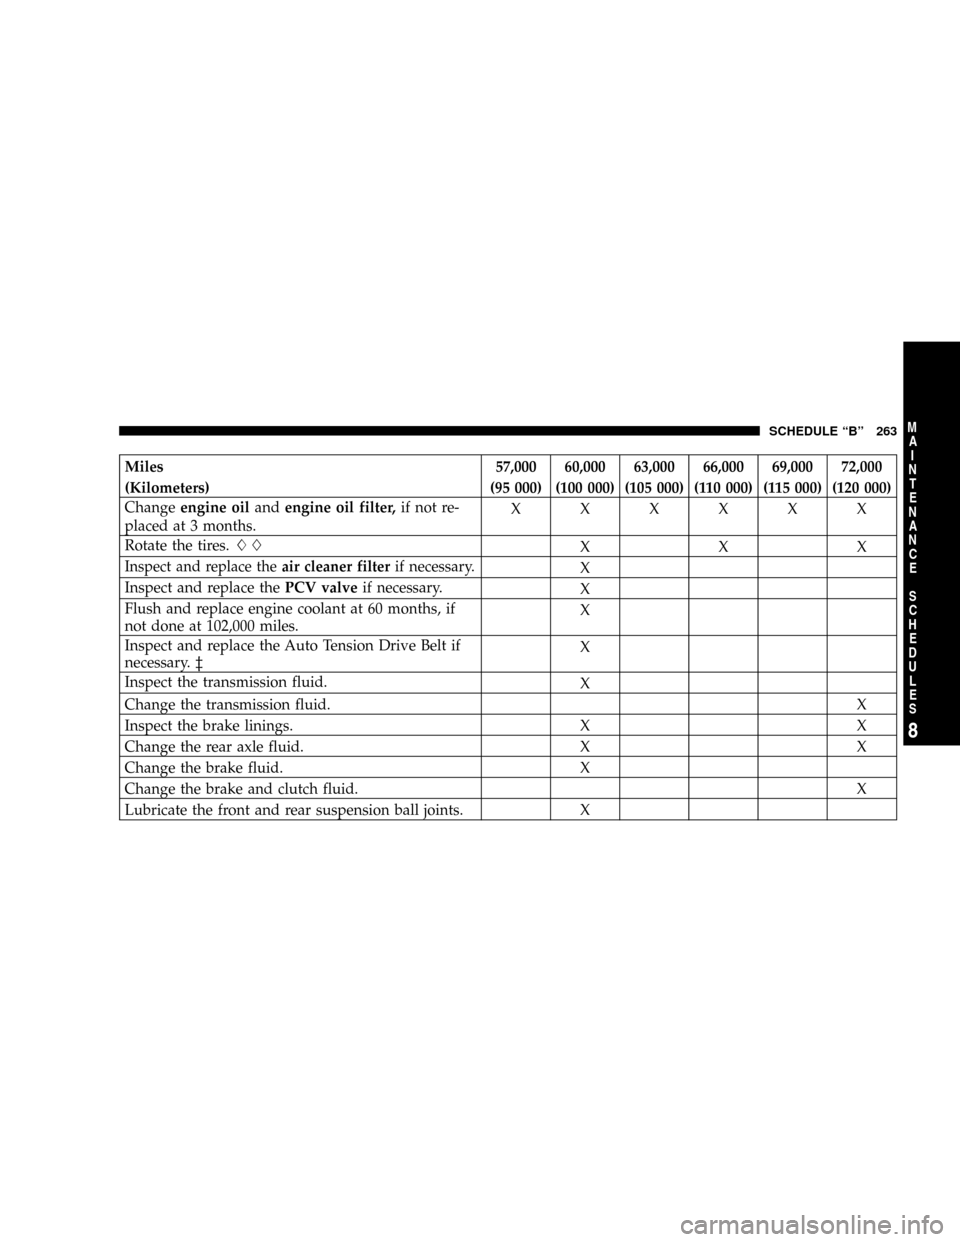
Miles 57,000 60,000 63,000 66,000 69,000 72,000
(Kilometers) (95 000) (100 000) (105 000) (110 000) (115 000) (120 000)
Changeengine oilandengine oil filter,if not re-
placed at 3 months.XXXXXX
Rotate the tires.LL
XXX
Inspect and replace theair cleaner filterif necessary.
X
Inspect and replace thePCV valveif necessary.
X
Flush and replace engine coolant at 60 months, if
not done at 102,000 miles.X
Inspect and replace the Auto Tension Drive Belt if
necessary. ³X
Inspect the transmission fluid.
X
Change the transmission fluid.X
Inspect the brake linings. X X
Change the rear axle fluid. X X
Change the brake fluid. X
Change the brake and clutch fluid.X
Lubricate the front and rear suspension ball joints. X
SCHEDULE ªBº 263
8
M
A
I
N
T
E
N
A
N
C
E
S
C
H
E
D
U
L
E
S