fuel DODGE VIPER 2008 ZB II / 2.G Owners Manual
[x] Cancel search | Manufacturer: DODGE, Model Year: 2008, Model line: VIPER, Model: DODGE VIPER 2008 ZB II / 2.GPages: 303, PDF Size: 2.65 MB
Page 58 of 303
²Avoid excessive idling.
²Check the engine oil level at every fuel fill.
NOTE:A new engine will consume some oil during the
first few thousand miles of operation. This should be
considered as a normal part of the break-in and not
interpreted as a sign of difficulty.
SAFETY TIPS
Exhaust Gas
Do not run the engine in a closed garage or in confined
areas any longer than needed to move your vehicle in or
out of the area.
If it is necessary to sit in a parked vehicle with the engine
running, adjust your heating or cooling controls to force
outside air into the vehicle. Set the blower at high speed.The best protection against carbon monoxide entry into
the vehicle body is a properly maintained engine exhaust
system.
Whenever a change is noticed in the sound of the exhaust
system, when exhaust fumes can be detected inside the
vehicle, or when the underside or rear of the vehicle is
damaged, have a competent technician inspect the com-
plete exhaust system and adjacent body areas for broken,
damaged, deteriorated, or mispositioned parts. Open
seams or loose connections could permit exhaust fumes
to seep into the passenger compartment. In addition,
inspect the exhaust system each time the vehicle is raised
for lubrication or oil change. Replace as required.
THINGS TO KNOW BEFORE STARTING YOUR VEHICLE 57
2
Page 60 of 303
Periodic Safety Checks You Should Make Outside
The Vehicle
Tires
Examine tires for excessive tread wear or uneven wear
patterns. Check for stones, nails, glass, or other objects
lodged in the tread. Inspect the tread and side wall for
cuts and cracks. Check the wheel nuts for tightness.
Check the tires for proper pressure.
Lights
Have someone observe the operation of exterior lights
while you work the controls. Check turn signal and high
beam indicator lights on the instrument panel.
Door Latches
Check for positive closing, latching, and locking.
Fluid Leaks
Check the area under the vehicle after overnight parking
for fuel, water, oil, or other fluid leaks. Also, if gasoline
fumes are present, the cause should be corrected imme-
diately.
THINGS TO KNOW BEFORE STARTING YOUR VEHICLE 59
2
Page 96 of 303
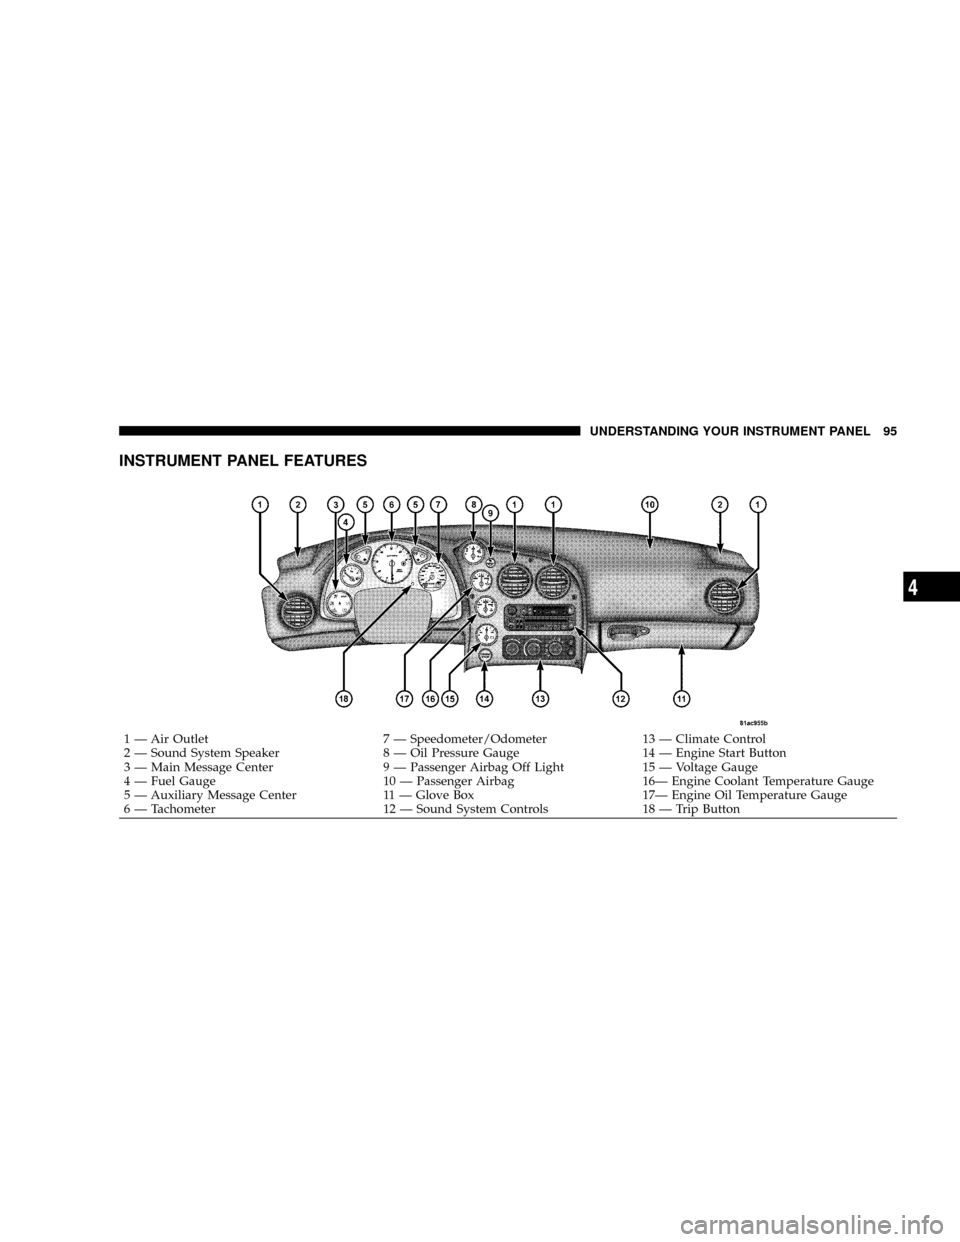
INSTRUMENT PANEL FEATURES
1 Ð Air Outlet 7 Ð Speedometer/Odometer 13 Ð Climate Control
2 Ð Sound System Speaker 8 Ð Oil Pressure Gauge 14 Ð Engine Start Button
3 Ð Main Message Center 9 Ð Passenger Airbag Off Light 15 Ð Voltage Gauge
4 Ð Fuel Gauge 10 Ð Passenger Airbag 16Ð Engine Coolant Temperature Gauge
5 Ð Auxiliary Message Center 11 Ð Glove Box 17Ð Engine Oil Temperature Gauge
6 Ð Tachometer 12 Ð Sound System Controls 18 Ð Trip ButtonUNDERSTANDING YOUR INSTRUMENT PANEL 95
4
Page 99 of 303
standard non-anti-lock brakes. If this occurs, safely bring
the vehicle to a complete stop as soon as possible and
cycle the ignition key to attempt to reset the ABS. If the
light remains on, see your authorized dealer immediately
to have the system serviced. Furthermore, if the red
BRAKE warning light and the amber ABS warning light
are on, and the parking brake is fully released, see your
authorized dealer immediately. (See page 147 for more
information.)
WARNING!
If the ABS and/or Brake Warning lights illuminate,
please seek service immediately! Your vehicle will
have diminished braking capability and control if ABS
and/or service brake systems are not working properly.
Have your brake system serviced immediately.
Malfunction Indicator Light
This light is part of an onboard diagnostic
system called OBD. The OBD system monitors
engine control systems. The light will turn on
when the key is in the ON/RUN position
before engine start. If the light does not come on when
turning the key from OFF/LOCK to ON/RUN, have the
condition checked promptly.
Certain conditions such as a loose or missing gas cap,
poor fuel quality, etc. may illuminate the light after
engine start. The vehicle should be serviced if the light
remains on through several of your typical driving
cycles. In most situations, the vehicle will drive normally
and will not require towing.
The Malfunction Indicator Light flashes to alert you to
serious conditions that could lead to immediate loss of
power or severe catalytic converter damage. The vehicle
should be serviced as soon as possible if this occurs. (See
page 195 for more information.)
98 UNDERSTANDING YOUR INSTRUMENT PANEL
Page 100 of 303
CAUTION!
Prolonged driving with the light on could cause
further damage to the emission control system. It
could also affect fuel economy and driveability. The
vehicle must be serviced before any state emissions
tests can be performed.
Turn Signal Indicators
The left or right arrow will flash in unison with the
corresponding front and rear turn signals when the
turn signal switch is operated. (See page 82 for more
information.)
Hazard Indicators
Both turn signal arrows will flash in unison with the
front and rear turn signals when the hazard warning
switch is operated. (See page 176 for more information.)
NOTE:Leaving the hazard flashers on for extended
periods will wear down the battery.
Airbag Warning Light
This light will turn on for 6 to 8 seconds as a
bulb check when the ignition switch is first
turned on. If the light does not turn on during
starting, remains on after starting, or turns on
while driving, have the system checked immediately by
an authorized dealer. (See page 40 for more information.)
Brake System Warning Light
The red Brake System Warning Light turns on
when the ignition is first turned on. It should
stay on briefly as a bulb check. If the light does not turn
on during starting, have it repaired promptly. If the light
remains on following the bulb check, it may be an
indication that the parking brake is not released. If the
light remains on when the parking brake is released, it
indicates a possible hydraulic brake system malfunction.
In this case, immediate repair is necessary and continued
operation of the vehicle in this condition is dangerous.
UNDERSTANDING YOUR INSTRUMENT PANEL 99
4
Page 102 of 303
Low Tire Pressure Telltale / TPMS Malfunction
Indicator
Each tire, including the spare (if provided),
should be checked monthly when cold and
inflated to the inflation pressure recommended
by the vehicle manufacturer on the vehicle
placard or tire inflation pressure label. (If your vehicle
has tires of a different size than the size indicated on the
vehicle placard or tire inflation pressure label, you should
determine the proper tire inflation pressure for those
tires.)
As an added safety feature, your vehicle has been
equipped with a tire pressure monitoring system (TPMS)
that illuminates a low tire pressure telltale when one or
more of your tires is significantly under-inflated. Accord-
ingly, when the low tire pressure telltale illuminates, you
should stop and check your tires as soon as possible and
inflate them to the proper pressure. Driving on a signifi-
cantly under-inflated tire causes the tire to overheat andcan lead to tire failure. Under-inflation also reduces fuel
efficiency and tire tread life and may affect the vehicle's
handling and stopping ability.
Please note that the TPMS is not a substitute for proper
tire maintenance, and it is the driver 's responsibility to
maintain correct tire pressure, even if under-inflation has
not reached the level to trigger illumination of the TPMS
low tire pressure telltale.
Your vehicle has also been equipped with a TPMS
malfunction indicator to indicate when the system is not
operating properly. The TPMS malfunction indicator is
combined with the low tire pressure telltale.
When the system detects a malfunction, the telltale will
flash for approximately one minute and then remain
continuously illuminated. This sequence will continue
UNDERSTANDING YOUR INSTRUMENT PANEL 101
4
Page 106 of 303
between 20 and 80 psi (pounds per square inch). If the
pointer remains in the red range, safely bring the vehicle
to a complete stop and turn off the engine. DO NOT
operate the vehicle until the cause is corrected.
This gauge does not indicate the amount of oil in the
engine. The engine oil level must be checked under the
hood. Check the level often during severe usage.
Oil Pressure Warning Light
The red Oil Pressure Warning Light is located in
the Oil Pressure Gauge. It will turn on to indicate
low engine oil pressure. The light should turn on briefly
as a bulb check when the engine is first started. If the
light remains on or turns on while driving, safely bring
the vehicle to a complete stop and turn off the engine. DO
NOT operate the vehicle until the cause is corrected.NOTE:This light does not indicate how much oil is in
the engine. The engine oil level must be checked using
the procedure shown in section 7. (See page 198 for more
information.)
Fuel Gauge
This gauge shows the amount of fuel in the gas
tank. The reaction time of the gauge has been
slowed to avoid needle fluctuation during pe-
riods of high G force cornering.
Voltage Gauge
This gauge shows the electrical system voltage.
The normal operating voltage is from 12 to 14
volts with the engine running. If the pointer
remains at either the high or low ends of the
scale, the electrical system should be serviced.
UNDERSTANDING YOUR INSTRUMENT PANEL 105
4
Page 126 of 303
²Defrost/Floor
Air is directed through the windshield defrost
and the floor outlets. This setting works best in
cold or snowy conditions that require extra heat
at the windshield. This setting is good for maintaining
comfort while reducing moisture on the windshield.
²Defrost
Air is directed through the windshield defrost
outlet. Use this mode with maximum fan and
temperature settings for best windshield defrosting.
NOTE:The air conditioning compressor operates in this
mode. This dehumidifies the air to help dry the wind-
shield. To improve fuel economy, leave in the Defrost
mode only when necessary.
Air Conditioning Control
With the fan control in the ON position, push the
A/C button to turn on the air conditioning com-
pressor. An indicator light above the button shows
that the Air Conditioning compressor is on. Conditioned
air is now directed through the outlets selected. Pushing
the button a second time turns the compressor OFF.
Slight changes in engine speed or power may be noticed
when the compressor is on. This is a normal occurrence
since the compressor will cycle on and off to maintain
comfort and increase fuel economy.
NOTE:If your air conditioning performance seems
lower than expected, check the front of the A/C con-
denser for an accumulation of dirt or insects.
UNDERSTANDING YOUR INSTRUMENT PANEL 125
4
Page 131 of 303
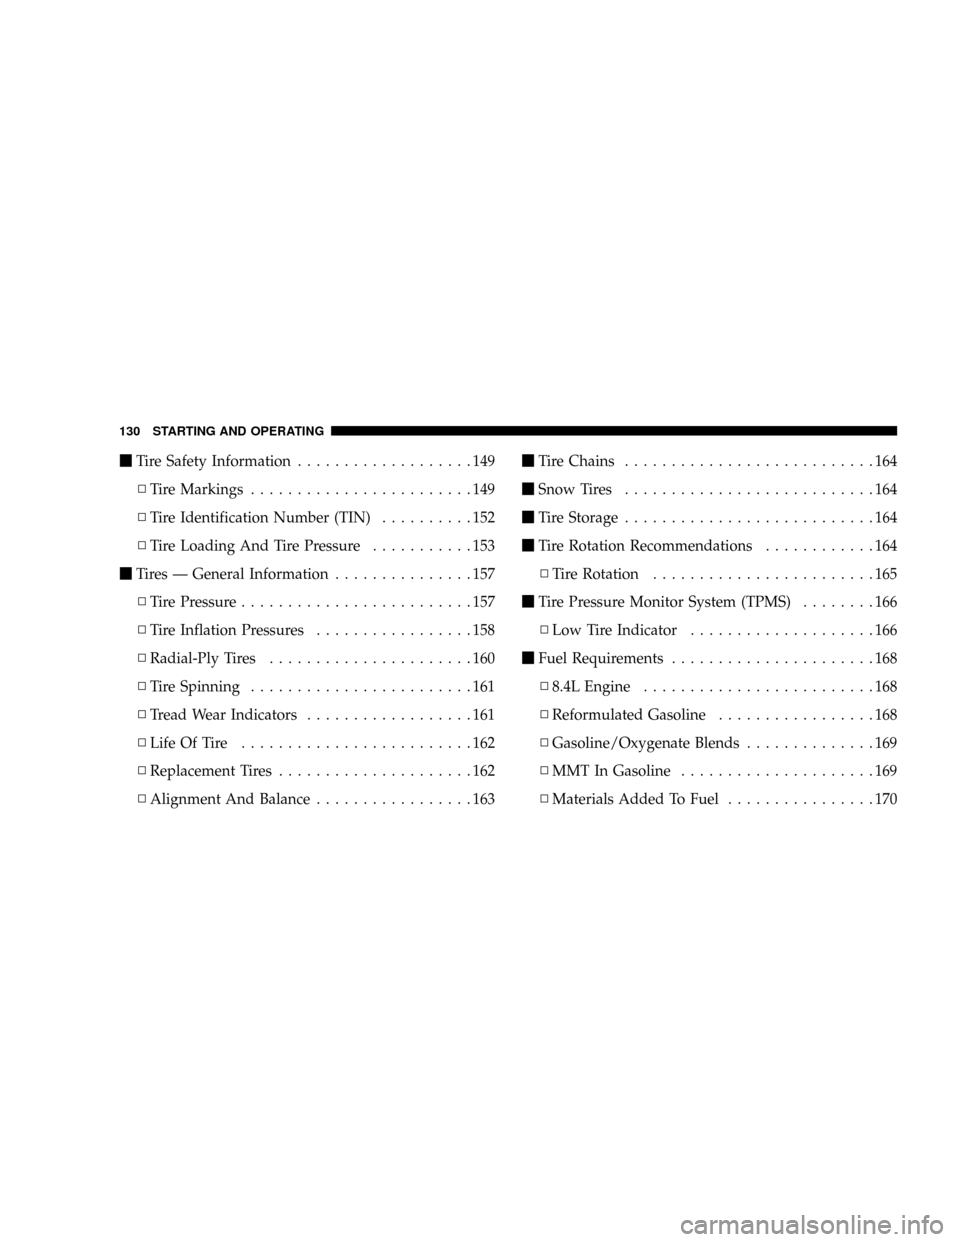
mTire Safety Information...................149
NTire Markings........................149
NTire Identification Number (TIN)..........152
NTire Loading And Tire Pressure...........153
mTires Ð General Information...............157
NTire Pressure.........................157
NTire Inflation Pressures.................158
NRadial-Ply Tires......................160
NTire Spinning........................161
NTread Wear Indicators..................161
NLife Of Tire.........................162
NReplacement Tires.....................162
NAlignment And Balance.................163mTire Chains...........................164
mSnow Tires...........................164
mTire Storage...........................164
mTire Rotation Recommendations............164
NTire Rotation........................165
mTire Pressure Monitor System (TPMS)........166
NLow Tire Indicator....................166
mFuel Requirements......................168
N8.4L Engine.........................168
NReformulated Gasoline.................168
NGasoline/Oxygenate Blends..............169
NMMT In Gasoline.....................169
NMaterials Added To Fuel................170
130 STARTING AND OPERATING
Page 132 of 303
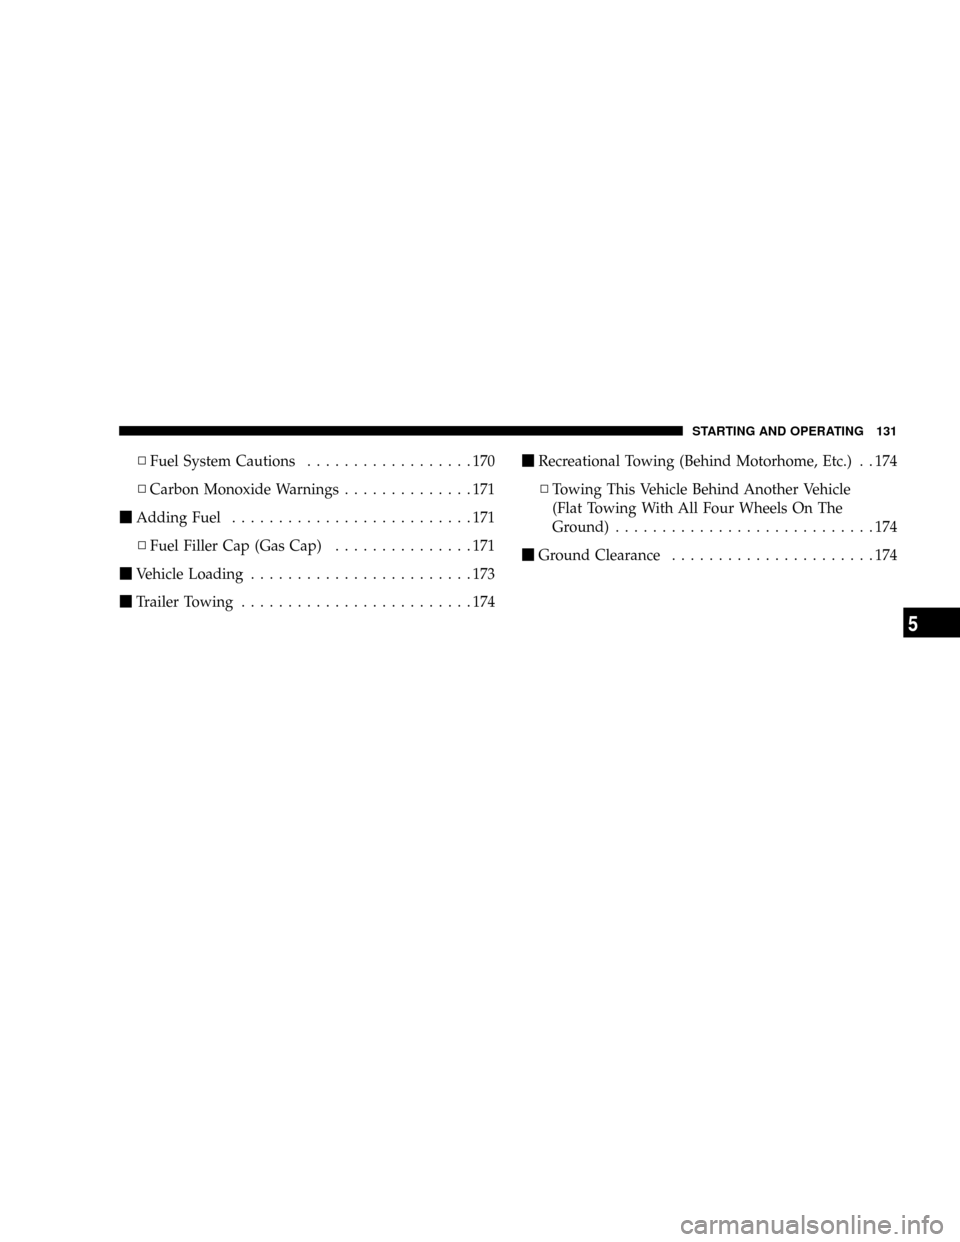
NFuel System Cautions..................170
NCarbon Monoxide Warnings..............171
mAdding Fuel..........................171
NFuel Filler Cap (Gas Cap)...............171
mVehicle Loading........................173
mTrailer Towing.........................174mRecreational Towing (Behind Motorhome, Etc.) . . 174
NTowing This Vehicle Behind Another Vehicle
(Flat Towing With All Four Wheels On The
Ground)............................174
mGround Clearance......................174
STARTING AND OPERATING 131
5