tow DODGE VIPER 2010 ZB II / 2.G User Guide
[x] Cancel search | Manufacturer: DODGE, Model Year: 2010, Model line: VIPER, Model: DODGE VIPER 2010 ZB II / 2.GPages: 80, PDF Size: 8.08 MB
Page 2 of 80
IMPORTANT: This User Guide is i\fte\fded to f\bmili\brize you with
the import\b\ft fe\btures of your vehicle. The DVD e\fclosed co\ft\bi\fs
your Ow\fer’s M\b\fu\bl, N\bvig\btio\f/Medi\b Ce\fter M\b\fu\bls,
W\brr\b\fty Booklets, Tire W\brr\b\fty \b\fd 24-Hour Towi\fg Assist\b\fce
(\few vehicles purch\bsed i\f the U.S.) or Ro\bdside Assist\b\fce
(\few vehicles purch\bsed i\f C\b\f\bd\b) i\f electro\fic form\bt. We hope
you fi\fd it useful. If you \bre the first registered ow\fer of your
vehicle, you m\by obt\bi\f \b pri\fted copy of the Ow\fer’s M\b\fu\bl,
N\bvig\btio\f/Medi\b Ce\fter M\b\fu\bls or W\brr\b\fty Booklet by c\blli\fg
1-800-423-6343 (U.S.) or 1-800-387-1143 (C\b\f\bd\b) or by co\ft\bcti\fg
your de\bler. Repl\bceme\ft DVD kits m\by be purch\bsed by visiti\fg
www.tech\buthority.com. Copyright © 2010 Chrysler Group LLC.
Page 3 of 80
INTRODUCTION/WELCOME
WELCOME FROM CHRYSLER GROUP
LLC ..................... 2
CONTROLS AT A GLANCE
DRIVER COCKPIT.............. 4
INSTRUMENT CLUSTER ..........6
GETTING STARTED
KEYFOB...................8
MANUAL DOOR LOCK........... 9
THEFT ALARM ................ 9
ENGINE START BUTTON ..........10
SEATBELT .................11
CHILD RESTRAINTS .............11
FRONTSEATS................13
TILT STEERING COLUMN ..........14
ADJUSTABLEPEDALS ...........15
PROGRAMMABLEFEATURES .......16
OPERATING YOUR VEHICLE
TURN SIGNAL/LIGHTS LEVER .......17
WIPER/WASHER LEVER ..........18
MANUAL TRANSMISS ION 1 TO 4 SKIP
SHIFT ....................18
MANUAL CLIMATE CONTROLS .......19
CONVERTIBLE TOP OPERATION ..... 20
WIND BUFFETING ..............21
ELECTRONICS
NON-TOUCH-SCREENRADIO....... 22
NON-TOUCH-SCREENRADIO....... 24
POWER OUTLET..............27
PERFORMANCE/ACR
OVERVIEW ................ 28
AERODYNAMICS............. 29
TWO PIECE BRAKE ROTORS ........34
PILOTSPORTCUPTIRES......... 36
ADJUSTABLE DAMPERS ..........37
HARDCOREPACKAGE ...........43 TUNINGRECORD ..............44
LIMITED WARRANTY
............45
ACKNOWLEDGEMENT .......... 46
WHAT TO DO IN EMERGENCIES
24-HOUR TOWINGASSISTANCE -
U.S. ONLY .................47
INSTRUMENT CLUSTER WARNING
LIGHTS ...................47
IF YOUR ENGINE OVERHEATS .......50
TIREFIT TIRE REPAIR ............51
JUMP-STARTING ..............54
TOWINGADISABLEDVEHICLE.......56
FREEING A STUCK VEHICLE ........57
EVENT DATA RECORDER (EDR) ......58
MAINTAINING YOUR VEHICLE
OPENING THE HOOD............59
ENGINE COMPARTMENT ......... 60
FLUIDS AND CAPACITIES ..........61
MAINTENANCE CHART B ......... 62
FUSES................... 64
TIREPRESSURES..............65
WHEEL AND WHEEL TRIM CARE ..... 66
EXTERIOR BULBS ............. 66
VEHICLESTORAGE .............67
CONSUMER ASSISTANCE
CHRYSLER GROUP LLC CUSTOMER
CENTER.................. 69
CHRYSLER CANADA INC. CUSTOMER
CENTER.................. 69
ASSISTANCE F OR THE HEARING
IMPAIRED................. 69
PUBLICATIONS ORDERING ........ 69
REPORTING SAFETY DEFECTS IN
THE 50 UNITED STATES AND
WASHINGTON, D.C. ............70
TIRE WARRANTY ..............70
MOPAR ACCESSORIES
MOPAR®ACCESSORIES..........73
TABLE OF CONTENTS
Page 19 of 80
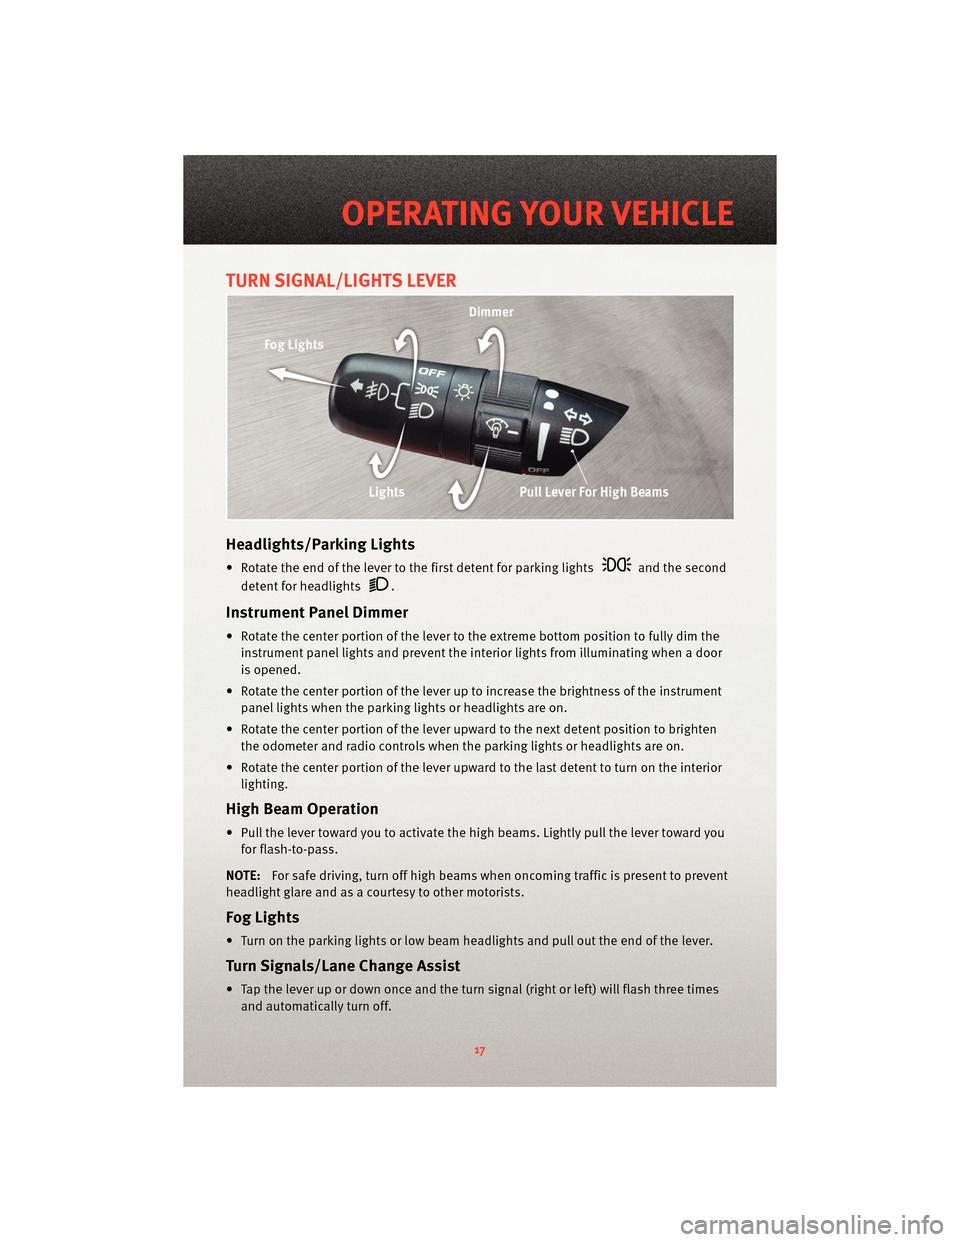
TURN SIGNAL/LIGHTS LEVER
Headlights/Parking Lights
• Rotate the end of the lever to the first detent for parking lightsand the second
detent for headlights
.
Instrument Panel Dimmer
• Rotate the center portion of the lever t o the extreme bottom position to fully dim the
instrument panel lights and prevent the int erior lights from illuminating when a door
is opened.
• Rotate the center portion of the lever up to increase the brightness of the instrument panel lights when the parking lights or headlights are on.
• Rotate the center portion of the lever u pward to the next detent position to brighten
the odometer and radio controls when the parking lights or headlights are on.
• Rotate the center portion of the lever upward to the last detent to turn on the interior lighting.
High Beam Operation
• Pull the lever toward you to activate the high beams. Lightly pull the lever toward youfor flash-to-pass.
NOTE: For safe driving, turn off high beams when oncoming traffic is present to prevent
headlight glare and as a courtesy to other motorists.
Fog Lights
• Turn on the parking lights or low beam headlights and pull out the end of the lever.
Turn Signal s/Lane Change Assist
• Tap the lever up or down once and the turn signal (right or left) will flash three times
and automatically turn off.
17
OPERATING YOUR VEHICLE
Page 20 of 80
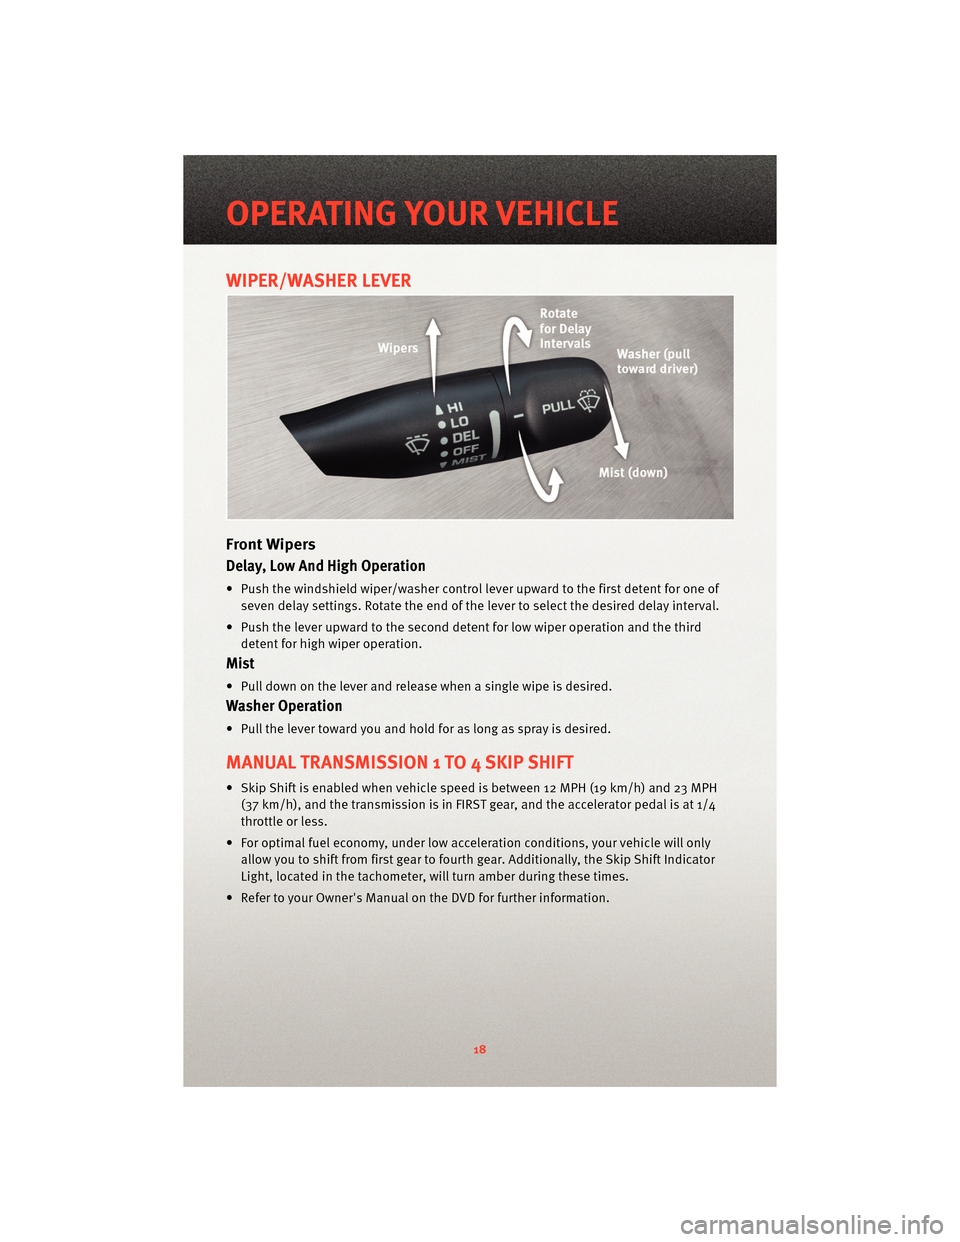
WIPER/WASHER LEVER
Front Wipers
Delay, Low And High Operation
• Push the windshield wiper/washer control lever upward to the first detent for one ofseven delay settings. Rotate the end of the lever to select the desired delay interval.
• Push the lever upward to the second detent for low wiper operation and the third detent for high wiper operation.
Mist
• Pull down on the lever and release when a single wipe is desired.
Washer Operation
• Pull the lever toward you and hold for as long as spray is desired.
MANUAL TRANSMISSION 1 TO 4 SKIP SHIFT
• Skip Shift is enabled when vehicle speed is between 12 MPH (19 km/h) and 23 MPH(37 km/h), and the transm ission is in FIRST gear, and the a ccelerator pedal is at 1/4
throttle or less.
• For optimal fuel economy, under low acceleration conditions, your vehicle will only allow you to shift from first gear to fourth gear. Additionally, the Skip Shift Indicator
Light, located in the tachometer, w ill turn amber during these times.
• Refer to your Owner's Manual on the DVD for further information.
OPERATING YOUR VEHICLE
18
Page 38 of 80
CAUTION!
Do not come to a complete stop when the system is hot and leave your foot on the
pedal. Pad material will immediately transfer to the rotor causing a vibration during
future use.
• After the final stop, drive as much as possible without using the brakes to cool off the system. Ideally, the brakes should be allowed to cool to ambient temperature
before using them again.
• After the first break in cycle, the brakes will still not be operating at optimum capacity. A second or third heat cycle is typically necessary before the brakes start
to work optimally. This will occur during everyday use.
Care and Maintenance
• Your brake calipers have a painted finish. Immedi ately clean off any spilled brake
fluid, wiping it off with a soft, clean terry-cloth towel.
• Do not use any harsh chemicals when cleaning your calipers. Wash your calipers with soap and rinse with water.
• Do not use any harsh chemicals when cleaning your rotor hats (the anodized center part of the rotor assembly). Wash your rotor hats with soap and rinse with water.
• Breaking-in rotors and pads is critical to the optimum performance of your new brakes. When breaking-in new parts, you are not only heat-cycling the pads, you are
also depositing a layer of pad material onto the rotor face. If not broken-in properly, an
uneven layer of pad material will be deposited onto the rotor, causing vibration.
• If you experience brake pedal pulsation, steering vibration, or repeatable brake noise, perform the break-in procedure again as soon as possible. This will re-condition the
rotor surface and remove irregular brake pad deposits. If concerns continue, please
visit y our local dealer fo r further diagnosis.
PILOT SPORT CUP TIRES
• Your Viper ACR comes equipped with Michelin Pilot Sport Cup competition oriented
tires that are DOT approved for street use. The Pilot Sport Cup tire uses a special tread
and compound which provides considerably more dry grip than normal street tires.
• Due to the special tread and compound of your Pilot Sport Cup Tires, the minimum tread depth can be reached earlier dependin g on your driving style, resulting in
reduced tire life. The special Pilot S port Cup tread and compound may lead to
performance degradation in cold climates, heavy rain or in conditions with standing
water.
WARNING!
Use extreme caution and drive slowly in wet situations to reduce the risk of
hydroplaning. Avoid driving in any conditions of heavy rain or standing water. These
conditions can cause loss of control or accident.
PERFORMANCE/ACR
36
Page 49 of 80
24-HOUR TOWING ASSISTANCE - U.S. ONLY
• Dial toll-free 1-800-521-2779 or 1-800-363-4869 for Canadian residents.
• Provide your name, vehicle identification number and license plate number.
• Provide your location, including telephone number, from which you are calling.
• Briefly describe the nature of the problem and answer a few simple questions.
• You will be given the name of the service provider and an estimated time of arrival. Ifyou feel you are in an “unsafe situation”, please let us know. With your consent, we
will contact local police or safety authorities.
INSTRUMENT CLUSTER WARNING LIGHTS
- Tire Pressure Monitoring System (TPMS) Light
• Each tire, including the spare (if provided), should be checked monthly, when coldand inflated to the inflation pressure recommended by the vehicle manufacturer on
the vehicle placard or tire inflation pressure label. (If your vehicle has tires of a
different size than the size indicated on the v ehicle placard or tire inflation pressure
label, you should determine the proper tire inflation pressure for those tires.)
• As an added safety feature, your vehicle has been equipped with a Tire Pressure Monitoring System (TPMS) that illuminates a low tire pressure telltale when one or
more of your tires is significantly under-inflat ed. Accordingly, when the low tire
pressure telltale illuminates, you should stop and check your tires as soon as
possible, and inflate them to the proper pressure. Driving on a significantly
under-inflated tire causes the tire to overheat and can lead to tire failure.
Under-inflation also reduces fuel efficiency and tire tread life, and may affect the
vehicle’s handling and stopping ability.
• Please note that the TPMS is not a subs titute for proper tire maintenance, and it is the
driver’s responsibility to maintain correct tire pressure, even if under-inflation has not
reached the level to trigger illumination of the TPMS low tire pressure telltale.
• Your vehicle has also been equipped with a TPMS malfunction indicator to indicate
when the system is not operating properly. The TPMS malfunction indicator is
combined with the low tire pressure telltale. When the system detects a malfunction,
the telltale will flash for approximately one minute and then remain continuously
illuminated. This sequence will continue upon subsequent vehicle start-ups as long as
the malfunction exists.
• When the malfunction indicator is illuminated, the system may not be able to detect or signal low tire pressure as intended. TPMS malfunctions may occur for a variety of
reasons, including the installation of replacement or alternate tires or wheels on the
vehicle that prevent the TPMS from functioning properly. Always check the TPMS
malfunction telltale after replacing one or more tires or wheels on your vehicle, to
ensure that the replacement or alternate tires and wheels allow the TPMS to continue
to function properly.
47
WHAT TO DO IN EMERGENCIES
Page 51 of 80
- Malfunction Indicator Light (MIL)
• Certain conditions, such as a loose or missing gas cap,poor fuel quality, etc., may
illuminate the MIL after engine start. The vehicle should be serviced if the light stays
on through several typical driving cycles. In most situations, the vehicle will drive
normally and not require towing.
• If the MIL flashes when the engine is running, serious conditions may exist that could lead to immediate loss of power or severe catalytic converter damage. We recommend
you do not operate the vehicle. Hav e the vehicle serviced immediately.
- Charging System Light
• This light shows the status of the electrical ch arging system. If the charging system
light remains on, it means that the vehicle is experiencing a problem with the charging
system.
• We recommend you do not continue driving if the charging system light is on. Have the vehicle serviced immediately.
- Oil Pressure Warning Light
• This light indicates low engine oil pressure. If the light turns on while driving, stop thevehicle and shut off the engine as soon as possible. A chime will sound for four
minutes when this light turns on.
• We recommend you do not operate the vehicle or engine damage will occur. Have the vehicle serviced immediately.
- Anti-Lock Brake (ABS) Light
• This light monitors the Anti-Lock Brake System (ABS).
• If the light is not on during starting, stays on, or turns on while driving, we recommendyou drive to the nearest service center and have the vehicle serviced immediately.
- Electronic Throttle Control (ETC) Light
• This light informs you of a problem with the Electronic Throttle Control (ETC) system.
• If a problem is detected, the light will come on while the engine is running. Cycle theignition when the vehicle has completely stopped and the shift lever is placed in the
PARK position; the light should turn off.
• If the light remains lit with the engine running, your vehicle will usually be drivable; however, see an authorized service center immediately. If the light is flashing when
the engine is running, immediate service is required and you may experience reduced
performance, an elevated/rough idle or en gine stall and your vehicle may require
towing.
- Airbag Warning Light
• If the light is not on during starting, stays on, or turns on while driving, have the vehicle serviced by an authorized service center immediately.
49
WHAT TO DO IN EMERGENCIES
Page 53 of 80
TIREFIT TIRE REPAIR
WARNING!
• Do not attempt to seal a tire on the side of the vehicle close to moving traffic. Pullfar enough off the road to avoid the danger of being hit while using the TIREFIT kit.
• Replace (or repair) the original tire at the first opportunity and reinstall it on your vehicle. Failure to do so could result in loss of vehicle control.
• A loose TIREFIT kit thrown forward in an accident or hard stop, could endanger the occupants of the vehicle. Always stow the TIREFIT kit in the place provided.
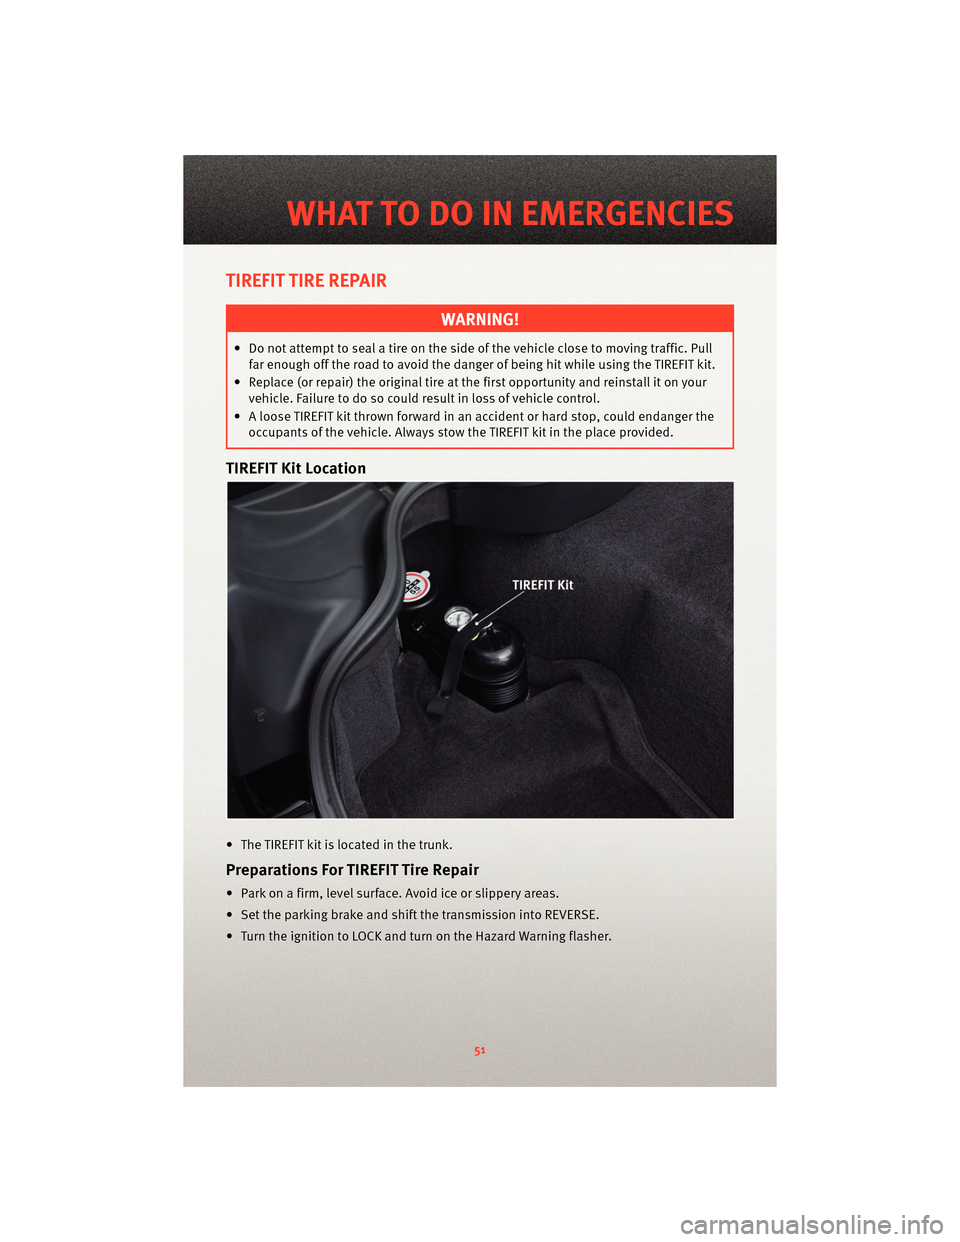
TIREFIT Kit Location
• The TIREFIT kit is located in the trunk.
Preparations For TIREFIT Tire Repair
• Park on a firm, level surface. Avoid ice or slippery areas.
• Set the parking brake and shif t the transmission into REVERSE.
• Turn the ignition to LOCK and turn on the Hazard Warning flasher.
51
WHAT TO DO IN EMERGENCIES
Page 58 of 80
If You Are Jump-Starting Another Vehicle:
• Connect one end of a jumper cable to the remote jump-start positive post (+).Connect the other end of the same cable to the positive (+) terminal of the
discharged battery.
• Connect the other cable to the ear of the thermostat housing on the engine in your vehicle. Connect the other end of the same cable to a good ground on the engine in
the other vehicle. Make sure that you have a good contact.
• Start the engine in the vehicle which has the booster battery; let the engine idle a few minutes.
NOTE: The Vehicle Security Alarm System will prevent the engine from starting.
• Turn off the Vehicle Security Alarm System.
• Start the engine in the vehicle with the discha rged battery. If engine does not start in
15 seconds, stop cranking engine and allow s tarter to cool down before cranking
again.
• When removing the jumper cables, reverse the above sequence exactly. Be careful of the moving belts and fan.
WARNING!
During cold weather when temperatures are below the freezingpoint, electrolyte in a
discharged battery may freeze. Do not attempt jump-starting because the battery
could rupture or explode. The battery t emperature must be brought up above the
freezing point before attempting a jump-start.
TOWING A DISABLED VEHICLE
• Do not tow with sling type equipment. Only use flat bed equipment. Always comply
with applicable state or local towing ordinances.
CAUTION!
Towing with equipment other than flat bed types may damage your vehicle.
WHAT TO DO IN EMERGENCIES
56